Update: We have a much newer cabinet-painting post with more photos, details, and even a video for you here.
If you can paint a wall (and even if you can’t) you can paint your kitchen cabinets. There are just a few tried and true rules when attempting this project, so if you follow the simple steps outlined below it’ll be pretty hard to screw things up. And although you’ve all seen our newly renovated kitchen, we actually painted our previous 50-year-old knotty pine cabinets right after we moved in (to tide us over until we had the funds to replace them altogether). Check out the dark and dingy kitchen that we inherited with the house:
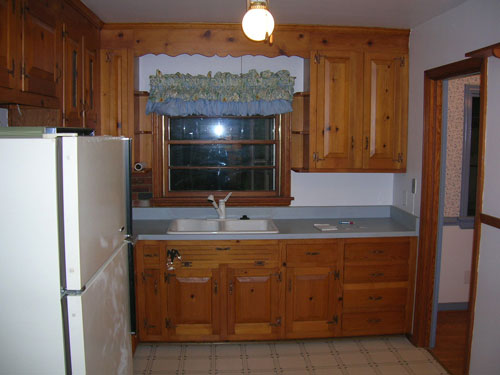
And the refreshing “after” thanks to only a few hours of prepping and painting:
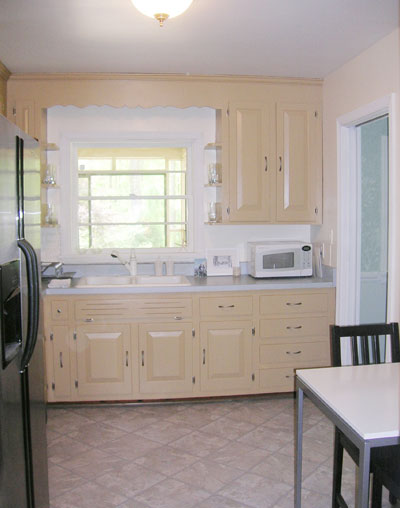
So how did we do it? Easy peasy.
Step 1: Figure out what you want. Bring home paint swatches and select the perfect palette, and if you’re planning to replace your hardware, purchase some before you move on to the next step. Because most old hardware is a different size than newer hardware (the holes are further apart or closer together), it’s important to know if your new door and drawer bling is spaced differently than your current hardware before you begin. Then it’s nice to wash everything down with a little soap and water to cut the grease and the spills that have built up on the doors and drawers over the years. Nothin’ like a little sponge bath to get you in the mood to makeover your kitchen…
Step 2: Take it off, baby. Now it’s time to remove all of your hardware and your hinges (regardless of whether you’ll be reusing it or replacing it- and it helps to store everything in a big ziplock bag so you’re never short a screw). Of course by removing the hinges you’ll be removing all the doors, so finding a place that you can lay out a big fabric or plastic drop cloth (which are about $2 from Home Depot or Lowe’s) is a good idea. Once you have your drop cloth in place, lay out all your cabinet doors and drawers so you can paint them all together in one convenient spot (and have full access to the frames of the cabinets in the kitchen).
Step 3: Fill ‘er up. Then if you’re replacing your hardware with something that won’t fit the existing holes in your doors and drawers, you’ll want to pick up some wood filler (it’s around $6 a tube, which is all ya need) and fill those existing hardware holes in all of the doors and drawers. There are many different colors of wood fill, but since you’re painting your cabinets, matching the tone isn’t really a big deal (although it can’t hurt to grab the one that most closely resembles the color of your current cabinets).
Step 4: Get sandy. The sanding process isn’t always necessary (for example, our cabinets weren’t glossy so we skipped it and went straight to priming) but for some people with super shiny cabinets (aka: lots of polyurethane) it can’t hurt to run an electric sander over everything- or take a bit more time to hand sand things- with fine grit paper to rough everything up for maximum paint stickage. Not sure if yours need to be sanded? If they feel matte like a cutting board (a little absorbent) then they shouldn’t need it, but if they feel shiny like a laminated piece of paper or a glossy credit card then sanding is your best bet. Note: lead paint is a serious health risk when sanding, so if you have an older home with already-painted cabinets that look decades old it’s worth testing for lead with a $6 lead test kit from Home Depot. Safety first!
Step 5: It’s prime time. Due to all the grease and even just the wood stain that often coats kitchen cabinets, it’s über important to get down and dirty with oil-based primer (even if the water-based equivalent claims that it works just as well on cabinet surfaces, we’ve seen stains seep right through that stuff, so oil-based is the better-safe-than-sorry alternative). One coat of primer applied with a decent quality roller should do the trick (then just use a brush to get into those tigher spaces and the grooves in the doors). We prefer wool or polyester rollers (Purdy’s a great brand) over foam ones as we’ve found that they rile up the paint and cause bubbles. Oh and it doesn’t matter if you can still see the wood tone underneath after one coat, the primer’s main job is to make your cabinets sticky and the paint will do the rest. You’ll probably want to snag an extra brush just for priming since they’re usually pretty messed up afterwords (it’s best to toss it or save it for other priming projects and use a pristine new one for painting). And ditto with the roller. We usually don’t even try washing the oil-based paint out of it- and prefer to replace it with a fresh new one before painting for a seamless result (reused rollers and brushes can often compromise the smooth finish that you’re going for when it comes to your cabinets).
Step 6: Get your paint on. You’re in the home stretch, so just two coats of latex paint (in a semi gloss finish for easy wipe-ability) are next on the agenda. You’ll definitely want to wait a few hours after applying primer, but I actually primed and painted my cabinets (two coats!) all in the same day. When it comes to applying the paint, a high quality wool or polyester roller makes for the sleekest application. A mini foam roller can also help since it’s smaller and easy to control. You’ll also probably need to use a brush sparingly, just to get into those little cracks and crevices that your roller can’t reach. Do yourself a favor by buying an angle-tipped brush as opposed to a flat-tipped one- they make staying in the lines a lot easier.
Note: We didn’t prime or paint the inside of the doors, but our approach would be to prime/paint them first and then wait five days and turn them over and prime/paint the outside (that way if anything got a bit imperfect after being flipped face down, it would be on the inside- an therefore less noticeable).
Step 7: Wait for it. After two coats of latex paint you now have to practice patience. Most experts advise waiting at least three days to rehang or begin using your doors and drawers (especially since the rehanging process involves lots of holding and pressing and drilling which can muck up anything that’s not 100% dry). We actually advise waiting five days if ya can (it beats doing the whole thing all over again and guarantees a totally seamless finish even in high humidity).
Step 8: Hang in there. Then all you have to do is rehang your doors (either using your existing hinges or new ones), slip in your drawers, and add your hardware. If the hardware is new, take time to measure twice before you drill to avoid any annoying mistakes that will make you want to putty and repaint, which never looks as good as the flawless finish that you get the first time around. John actually took his sweet time drilling all of our holes for the new hardware (to the tune of about two hours) but it was well worth the assurance that everything was perfectly centered and right where it should be. In this case slow and steady wins the race.
*Oh and it bears noting that if your cabinets are anything but solid wood (laminate, veneered, etc) you should definitely take off a door or a drawer and bring it with you to your local hardware store and ask the paint pro there what they recommend. There are some great oil-based primers and enamel paints out there so it might be possible to get a semi-durable finish (although none as long-lasting as solid wood paint jobs). The key is really roughing up the surface so it’s less glossy and then priming and painting with the best stuff they have (usually oil or enamel based). Oh and don’t forget to let everything dry for a while so things can cure up and get super durable for the long haul.
So that about does it for our cabinet painting and refinishing tutorial. Of course Step 9 is to invite all of your friends over for celebratory margaritas or to do the happy dance every time you walk into your amazing new space. We hope this will help you completely transform your kitch on a dime and in a flash. And just in case you need a few more before & after pictures to convince you, here are two clients of ours that we helped transform their rooms with painted cabinets:
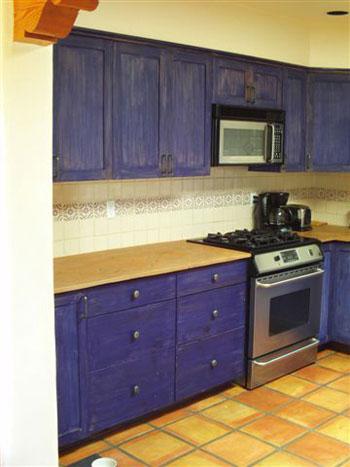
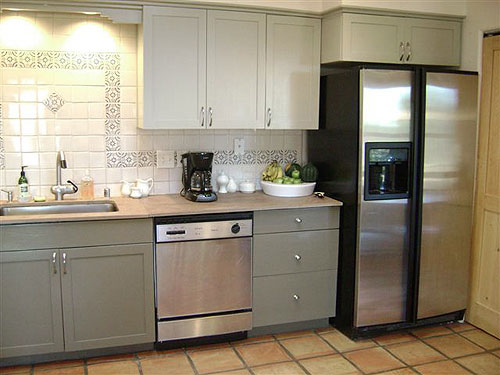
Here’s Kim’s crazy blue kitchen that she inherited with her home:
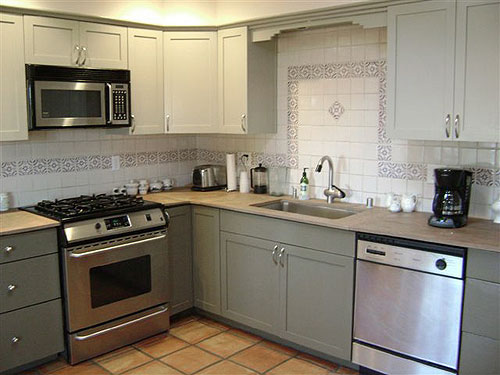
And here’s her two-tone masterpiece after a quick paint makeover (we suggested slightly different colors for her upper and lower cabinets):
And here’s Carla’s kitchen before she came to us for help:

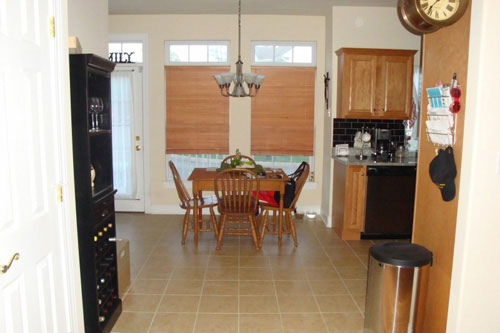
And here it is after we encouraged her to paint her cabinets a crisp glossy white tone (along with her dining room chairs) while the dining table went black to mimic the backsplash:
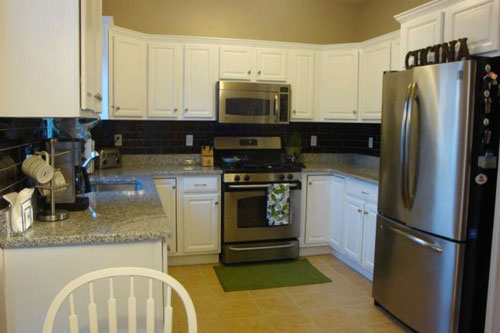
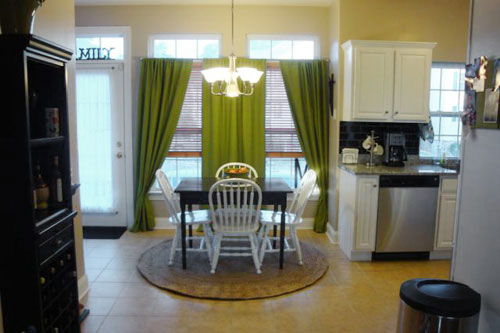
Amazing what a little paint can do, eh? And if they can do it you can to! So if you have a spare weekend or even a few week nights you’ll be well on your way to a totally new room. Happy painting…
In need of a furniture painting tutorial? Fret not, we’ve gotcha covered.
Update: We have a much newer cabinet-painting post with more photos, details, and even a video for you here.

Katie says
great tutorial! i’m currently on step 5 in my kitchen, glad to see that i’ve been doing things correctly. i can’t wait to finish this project up, i think it will make a huge difference. and seeing your before and after (well, before and temp. after) pictures above has made me even more confident that painting our dark wood cabinets a light color will help to make the space seem brighter and more open.
rj says
Great job! I have a question. Did you use the two tone grey colors? I wondering if you used the same colors, what are they? Thank you!
Erin Kathleen says
Thanks for the advice. I wish we knew this when we did ours. Oil based primer is a must. We didn’t know that and eventually we are going to have to redo ours.
kelly kettrick says
Thanks for the tutorial – perfect timing. One question – we have glass-fronted cabinets on top…do we paint all of the interiors of the cabinets?
RA says
Our kitchen cabinets are some mysterious composite with fake-o wood veneer on the front. We have heard through the grapevine that they can’t be painted, but is there anything that can’t be primed and painted?
Susan says
I had the same problem and was told something similar but luckily I found a do it yourself website and bought new painted cabinet doors with hidden hinges and new drawer fronts from taylorcabinetdoor. I hired a painter who painted my cabinet boxes and was able to match the color of my cabinet doors. Once they dried my husband and I installed the doors we ordered and it was so easy just to do that ourselves. All of this was so much easier than buying new cabinets and my cabinets look brand new. Love the end result of my kitchen!
YoungHouseLove says
So glad!
xo
s
Amy says
You make it sound so easy!
I would like to paint the cabinets in a rental, I have permission to if I like. They are not even real solid wood. They’re a mess really. I think they are an mdf or pressboard with what looks like the precursor to laminate on top. Any tips on painting those?
One good tip not mentioned is to number your doors and drawers so it’s easier to put them back where they belong.
Thanks,
Amy
Heather says
is there a special size or type of roller that you recommend? thanks for all the info…I think I see a weekend project in my future!
bschwanke says
Ditto on RA’s question. These crappy fake-wood cabinets….can they be painted? Thanks for all the info!!!
Stephanie says
I want to know about the fake wood ones, too. Also, do we need to paint the insides of the cabinets or cabinet doors?
Karen says
did you paint the inside of the doors too? just curious.
YoungHouseLove says
Hey guys,
As for the “can you paint fake wood” questions, they’re pretty hard to answer blindly and we’re by no means experts when it comes to faux wood, so our suggestion would be to visit Home Depot or Lowe’s and talk to one of the painting specialists (you can even bring in a door to show them). They’ll hopefully be able to make a recommendation for ya, and if that fails you can always test the priming and painting method above on the back of one of your doors and see how it goes. Good luck!
And when it comes to painting the interiors of the cabinets, it’s definitely a great idea with glass fronted ones (in fact we painted the back of our white glass fronted cabinet in the same pale blue wall color as the rest of the kitchen for a nice subtle pop behind the glass). As for whether you have to paint inside the doors when they’re not glass, it’s totally up to you (we only did the fronts of our doors and drawers but if we weren’t planning to replace them down the line we probably would have done the insides and the backs of the doors for resale). Hope that helps!
Oh and as for picking the perfect roller, any good roller (ie: not the cheapest one, we like Purdy rollers) meant for “smooth surfaces” (which means they’ll have a short nap for a glossy and clean finish) will get ‘er done. Happy painting!
xoxo,
Sherry
Gina says
Thanks SO much for the tutorial.. It seems doable, however, I have one question. Is it better to replace the counter first before painting the whole cabinets?
I am thinking about replacing my faux wood counter to a nice granite. (oh, not thinking, i’m definitely going to replace it!!!) :o)
Thanks again!!! You rock!
YoungHouseLove says
Hey Gina,
Wahoo! So excited about your counter upgrade along with the cabinet paint job. Don’t forget to send pics! When it comes to painting before or after the installation, it’s really a chicken or the egg situation. But from our experience, when the installers slide in the slabs of granite, they can actually scrape against the cabinets in the process (the granite slabs are cut extremely snug to fit perfectly in the space, so they really get wedged in there with some force). With that in mind, we’d encourage you to go ahead and paint after the cabinet installation (since you can easily cover the granite with a drop cloth and tape off the edges for a clean and seamless look). Good luck!
xoxo,
Sherry
All Things Lovely says
The before and after looks brilliant! Thanks for that great information. I’m not sure if the terminology is different in the US to Australia, but I have laminated cupboards. In your experience, do you think the light sanding and priming would work on them? They’re currently a feral grey colour which I’d love to paint off white.
Gràcia says
“If the hardware is new, take time to measure twice before you drill to avoid any annoying mistakes ”
So true… This is what you get after three hours of re-doing things: http://www.flickr.com/photos/xieta/2777808391/in/set-72157603804509588/
Casamacho says
Great tutorial! I’m definitely going to pass this on to some friends who have been talking about this. It’s amazing what paint can do.
Sarah says
I’m painting over knotty pine this winter, but everyone keeps telling me the knots in it are still going to secrete the dark brown color even through the paint… did you have that happen in the long run? (We specifically went to Sherwin Williams and asked for a primer that would work on knotty pine, but everyone’s getting me worried)
Home ReNewal Painting says
We have had excellent results using the tinted white shellac primer from Sherwin Williams but make sure you do not have a can that has been sitting on the shelf forever. It brushed on and dries flat in about 30 minutes but we often use an hvlp toploading cupgun and a compressor. We have found that home owners screw up their cabinets a lot when try try to “roll latex” or primer on — it is best to spray cabinets.
YoungHouseLove says
Hey Sarah,
Fear not! We lived with our cabinets for over a year and a half after painting them and they showed not one ounce of seepage. The oil based primer plus two coats of latex paint (in semi-gloss) was the winning combination for us, and we bet it’ll work out seamlessly for you! Good luck!
xoxo,
Sherry
heather says
I’ve been putting this project off for 3 years now but my navy blue cabinets keep staring at me everyday hoping I paint them a bright shiny white so that my kitchen is less dungeny and I’m more motivated after your easy directions. Cant wait to show you my bright after pictures!!
sarah says
For those of you interested in painting laminate cabinets (I was too–our laundry room “falsies” are hideous!) I found a pretty helpful article:
http://www.washingtonpost.com/wp-dyn/content/article/2005/09/21/AR2005092100593.html
(But there were a bunch of results just from searching Google for “paint laminate cabinets.”
I’m so glad this can be done without too much trouble!
Jennie Gift says
This is great – makes me want to run home and start a diy project right now :) Have you found anything or heard anyone talk about painting their laminate countertops. I were in the process of saving to do a kitchen redo but in the mean time I can’t stand my countertops. Any suggestions?
sarah says
Sorry, one more comment. :) Maybe you could also offer tips on how to decide whether to paint your cabinets or sand and restain them a more “contemporary” tone.
I’m currently struggling with this decision for our new house (well, new to us). The kitchen cabinets are currently a dark oak–not quite light enough to look nice, yet not quite dark enough to be contemporary-ish. So I’m really trying to figure out which would be best… light paint or a mod cherryish or espresso stain (we will still have black appliances until we can upgrade to stainless).
Just thought maybe you or readers might have comments on what finally pushed you one way or another (paint or stain).
Thanks!
YoungHouseLove says
Hey Sarah- Thanks so much for those links about painting laminate cabinets (3 posts above this one). It’s amazing how much info is available thanks to google and we’d love to hear from people who attempt to repaint their laminate to see how it goes (remember you can always test prime & paint the back of the door first).
As for Sarah’s second comment about paint vs. stain, that’ll make a great burning question so stay tuned for an audience poll in the coming weeks. Oh and when it comes to countertops we’ve heard time and time again that you can’t paint them due to the heavy usage they get, so maybe replacing them with a cheap butcher block counter from Ikea is the best bet (they’re super affordable and look even better the more you use them). Hope that helps!
xoxo,
Sherry
Kim says
I am in the process of redoing my kitchen and found a special painting kit for making laminate countertops look like granite. It is available through some stores (not in Maine though) but also on line and and it was only $80. It is called Giani. http://www.giani.com. I haven’t gotten to that point yet, but I can’t wait. The website may tell you if it can be done to other types of counters.
Kim
YoungHouseLove says
Thanks for sharing! Has anyone used it?! We’d love to hear how it looks!
xo,
s
YoungHouseLove says
Good suggestions, Joan. This was just an “interim” version of the kitchen. We did end up taking out that trim above the sink…and a whole lot more. You can check out what our totally new kitchen looks on our house tour page.
Mmmmm…and we do love us some glass tile. Always good to know there are some good deals out there too. Thanks!
-John
Joan says
What would make this kitchen re-do fantastic is to cut that trim out that is above the sink and do a backsplash in glass tile all the way to the ceiling. You can get glass tile for as little as $6 a sq ft from the internet, and it is very easy to install—I think. You don’t even need a tile saw if you can score the tile and break it and smooth the edges.
shanon says
i have just one question how do you apply two coats of paint? do you apply one and then wait a certain amount of time then apply another coat are you just paint the cabinets one time then right after paint again.
YoungHouseLove says
Hey Shanon,
By the time we coated all of our cabinet fronts, drawer fronts, cabinet frames, sides and then carefully painted out the molding at the top by hand with an angled brush, most of the first coat was already dry. Just to be sure we gave everything about 30 minutes to firm up and then started in on our second coat (being sure to paint things in the same order so they all had the same amount of time to dry instead of skipping ahead and worrying that something might still be wet). Hope it helps! Happy painting…
xo,
Sherry
Judy says
Hi Sherry,
I’m having some new cabinet doors made, to replace the old laminate ones. They are maple, and will be unfinished, so I can paint them. Three questions: 1) do they need sanding before priming? 2) what oil-based primer (brand) do you recommend? 3) the cabinet people were offering to have their painting subcontractors paint them for me, but for an exorbitant amount. But his process called for all latex–prime, 2 coats, and then 2 or 3 coats of “lacquer”–to make it impervious (or semi-impervious) to dings, etc., and to make it more wipeable. Do you think the lacquer (varnish, perhaps?) is a useful addition, when you do the cabinets, as you suggest with an oil-based primer to start?
Thanks so much.
Judy
YoungHouseLove says
Hey Judy,
As for our oil-based primer recommendation, we’ve had great luck with Kilz (from Home Depot) but just be sure to grab the oil based version (I remember there were water based cans of primer also by Kilz). And when it comes to replicating the shine of the varnish without paying a professional, you could follow that coat of Kilz with two coats of gloss latex paint (as opposed to semi gloss) for even more shine and wipe-ability.
In our kitchen we went with semi gloss since our cabinets weren’t perfect (and the shinier the finish, the more noticeable the existing flaws), but since you’ll have flawless new cabinet doors they’ll look great all glossy and sleek. No sanding will be necessary in your case as the doors are unfinished, so all ya need is one coat of oil-based Kilz followed by two coats of latex gloss paint. Adding any varnish or trying to lacquer the cabinets yourself might result in a much less professional and smooth finish, so hopefully the glossy paint is the perfect compromise for a sleek and smooth (and simple!) result.
Happy painting…
xo,
Sherry
Jennifer says
My husband and me just got a house and we what to upgrade alot of the stuff in the house. But the first room I want to started was the kitchen and it looks like it has not been update in a very long time. So I saw the color you paint your cabinets and I like it. I want to know what color you paint them. Thank you so very much and also I love your website too.
Jennifer
Amanda says
My BF likes the color of your cabinets. He’s thinking of options- whether to re-stain or paint his current cabinets. So, do you remember what color you painted them above?
YoungHouseLove says
Hey Amanda,
The color is called Brown Bag from Glidden. It actually looked a lot more “chocolate” on the swatch, but we were happily surprised by the lighter, more mocha shade that it ended up as on the cabinets. This little swatch cards can be so deceiving! Good luck. And send us before and after pictures whether you decide to go with stain or paint!
xo,
Sherry
Margot says
Hi there! You guys are great. I have a very open ~30 yr old kitchen that needs to be spruced up – especially the dark brown wood cabinets that I want to paint and I LOVE this tutorial (thank you!). My problem is that the laminate counter tops and backsplash are this yellow/cream pock marked design and the floor is a similar yellowish cream. I don’t want the color to be too washed out as the accent wall is a very light peachy brown. The kitchen leads to the family room (a burgundy color) and also out to the living room ( a creamy beige color). We have new satin chrome handles to complement the stainless steel dishwasher we recently installed. What color or shade would you recommend I paint the cabinets or should I just stick with the tried and true glossy white?
YoungHouseLove says
Hey Margot,
You usually can’t go wrong with glossy white, but your cabinets would look particularly lovely in a light cream or ivory color (a warmer color than stark white). I wouldn’t go for anything with too much yellow in it (you don’t want to step back after painting to see a totally yellow kitchen (since the backsplash and laminate counter are already yellow), but a creamy white or a warm ivory tone will work seamlessly with the other colors in the space for a softer look than the jarring bright white that might be the kitchen cabinet default in most cases. Hope it helps! Happy painting…
xoxo,
Sherry
Sara says
Hi! I have painted cabinets in my older home which I really like, but the paint is starting to peel and I suspect that they weren’t primed because nothing else in my house was! That being said, to touch up the paint could I just prime over the paint? Or should I strip, sand, prime, then paint? I have been putting it off because I suspect the latter would be best.
By the way, my cabinets are a nice light/bluish gray color that looks great in a ktchen if anyone is looking for ideas.
Thanks,
Sara
YoungHouseLove says
Hey Sara,
Yup, you guessed right. It’s definitely best to sand down any peeling paint because priming and painting over it will still show the difference in thickness where the paint peeled off- ack! Ideally you’ll get your cabinets down to one even plane again with sandpaper and then you can prime and paint ’em. It’ll be worth it I promise!
xoxo,
Sherry
Sue says
Hi – Just stumbled upon your blog a few weeks ago and have been following ever since! :) My fiance and I are considering repainting our kitchen cabinets and hoping to get some insight. How do your kitchen cabinets look up close after they were painted? Do the cabinets look like it’s been repainted or do they look like they were purchased that color? The reason why I ask is because we have painted some drawers before and they were looked strange (had a weird texture and super shiny and items I placed on top of the drawer sometimes got stuck to the paint).
Thanks so much!
YoungHouseLove says
Hey Sue,
Our cabinets looked smooth and consistent up close- no brush strokes or dents from things getting stuck to the paint. They certainly didn’t look like a shiny new car (which is obviously paint that has been applied by a sprayer) but it looked even and consistent, just a bit less slick and hard if that makes sense (it looks warmer and a bit more casual since it’s not super sleek and new-car shiny).
Your description of your experience with the drawers makes me wonder if you used one thin coat of oil-based primer followed by two thin coats of latex primer. That really is a key combination. And ensuring that each coat is dry (waiting ample time between applications to be sure that there’s nothing that’s still wet- which creates instant brush strokes and makes things stick to them since they weren’t allowed to thoroughly dry between coats- is the answer)! And of course waiting at least five days after the project to start hanging and using the cabinets again really does the trick (no loading stuff in right away or you’ll definitely get fingerprints and smudges). Hope it helps. Happy painting…
xoxo,
Sherry
Audra says
Hi! I’ve been a closet blog stalker for a long time. I love all you have done to your home and it’s so motivating to see the fun changes you have made. Plus I love all of your great ideas. I want to paint my kitchen cabinets… they have already been painted but they are an off-white color and they don’t really match my new decor. I was thinking either a pure white or Atmosphere blue by Restoration Hardware but do you think light blue for cabinets is a little too much? The walls are brown and the back splash is Shore by restoration hardware. Also, because they are already painted and not wood, do you think I still need to prime? Thanks again for all of your advice. I’m saving some money for some more serious renovations then I will be coming to you for some design dilemma advice! Love you guys!
Audra
YoungHouseLove says
Hey Audra,
I am a huuuge fan of blue but I actually think you’ll be happier if you go with the pure white cabinet color for the long haul (it’s better for resale and it’s definitely a color you’ll be able to live with for a looong looong time). Plus it works with practically any accent color known to man, so you can change things up more easily than in a kitchen with blue cabinets. As for your second question, I would definitely definitely still suggest priming your kitchen cabinets, even if they’re already painted. Grease can build up in a kitchen like you wouldn’t believe, and just one coat of oil-based primer will create a much more durable and polished looking end product. Hope it helps! Happy painting…
xoxo,
Sherry
Becca says
Great job!! The kitchen looks great and your article gives me the courage to try and paint my kitchen cabinets. Thanks so much.
Shawna says
I recently discovered your blog through The Nest and absolutely love it. You’ve inspired me to tackle so many projects around my house, especially painting my kitchen cabinets. I do have a few questions for you:
1) Our cabinets are currently painted red, and to me they appear to have been coated with a high gloss finish vs. a semi-gloss. My husband disagrees. Irrespective of the glossiness, would you recommend sanding prior to applying primer coats?
2) We are terrified of white kitchen cabinets, due to what upkeep they may require to keep them pristine(we have black countertops that will stay for now). We’ve thought of a blue-grey color, but google provides only a few images. Is this something you’ve seen in your design career and would you recommend it?
I apologize for being so lengthy.
Shawna
YoungHouseLove says
Hey Shawna,
1. Sanding is always extra credit, so if you’re willing to put in the time it’s a great way to ensure than any surface is ready to go. Primer (especially oil-based) is really great these days, though- so even if you skipped right to priming you’d probably end up with a flawless finish.
2. White cabinets are super easy to maintain (semi-gloss paint makes them very wipe-able and a little Magic Eraser can save the day for any horrendous stains). That being said, we love love love the idea of blue-gray cabinets and would totally recommend that you give it a whirl! You could even do darker blue-gray cabinets on the bottom and a lighter tone from the same paint swatch on the upper cabinets. We’d love to see your before and after pics! Good luck and happy painting…
xoxo,
Sherry
richardb says
What a great job! Just a quick suggestion on the hardware part. A template for the drill holes, either handmade or store-bought will really speed up that process. Just decide on one cabinet door the precise hardware placement, and cut a piece of cardboard that you can line up with the lower corner of the door, and put a hole in it where you put it on the first door. Then you can just line it up with the subsequent doors and make perfect marks without all the measuring. Be sure to flip your template over for doors where the hardware goes in the opposite direction (ie, doors that meet in the middle). Make another for your drawers, and get to enjoying your new kitchen that much faster!
Jay says
My wife and I are getting ready to paint our kitchen cabinets. They are old cabinets that have a nice layer of paint. I am definitely planning on sanding, priming and then painting them. Two questions, first should I strip the paint before sanding? Secondly, I was planning on using a small foam roller to appply the paint. What do you recommend, brush or foam roller? I truly appreciate the help. Have a good one and take it easy…Jay
YoungHouseLove says
Hey Jay,
You’ll probably be ok if you thoroughly sand without stripping the paint first. It should rough things up and even them out for some great adhesion (while stripping could leave things less even and create divots and imperfections). As for the roller we would suggest a high quality wool or polyester roller (we like Prudy) over foam as foam can rile up the paint and cause little bubbles and prickles in the finish. As you apply paint with any type or roller it will look a bit imperfect but once it dries (assuming you take your time and apply thin, even coats and wait for them to thoroughly dry between coats) it’ll look a lot more smooth and lovely. Oh and you can use a paint brush to cut in and get into the small angles and details on the doors that a roller might gloss over. Hope it helps! Happy painting…
xo,
Sherry
Melisa says
I am hoping to paint our “Builder Oak” kitchen cabinets. They are a nice orangy shade…. I have printed out your tutorial I have a couple questions…..How important is it to sand the existing doors? They are about 8 years old. Also what about spraying the doors? Rather then rolling. Any advice is appreciated.
YoungHouseLove says
Hey Melisa,
Good questions! Sanding can usually be described as extra credit. It’s usually not necessary since oil-based primer does a great job of making sure the paint will stick, but if you have super glossy cabinets or some splintered or rough edges, sanding before priming is definitely recommended. As for spraying, if you know what you’re doing with a sprayer than by all means go that route. It definitely goes on faster and can potentially turn our smooth as a baby’s bum if you’re an expert sprayer (if you’re not it can be a drippy, uneven nightmare). For most people using a roller (and a brush to get into any nooks and crannies) is usually a more controlled method and the outcome is still smooth and fabulous if you take your time and apply thin even coats (two or even three thin coats are waaay better than one goopy thick one, and it’s always important to wait for each coat to thoroughly dry before moving onto the next coat). Hope it helps! Happy painting…
xoxo,
Sherry
Dezaree says
Hi,
Your website is awsome…me and my husband just got our first “real” place…and we can decorate how ever we please which makes me soooo happy! Our house too is very small (the kitchen mostly) I mean you can’t even open the fridge and the oven at the same time! I have been trying so hard to find the right colors to paint…and our kitchen cabinets keep throwing me off. There ugly old wood that i hate! I asked my husband about painting them and he looked at me like i was crazy…guess he thinks you cant paint them. But now I know I can and I’m soo excited! Thanks so much for the help…picking a color for the walls is going to be much easier and fun!
sarah says
Hi again! We are on the verge of doing this project ourselves, but I’m just curious: do you get a better finished product by rolling the paint or using one of those paint sprayers (outside/in the garage, of course!)? If roller, what type so you get a nice sleek finish?
Also, our island has what looks like wood paneling around the bottom; it’s not real wood like the cabinets. Do we sand that and paint it like we will the cabinets? Or do we need to pull it off and buy white paneling?
Thanks!
YoungHouseLove says
Hey Sarah,
First for the not-real-wood paneling, that was all over our den and we just primed (oil-based of course) and painted it with gorgeous results so you might not even have to sand it but don’t forget to prime! As for the roller vs. sprayer question, this is an age old debate and it really depends on whoever’s doing the project. If you’re good at spraying and know how to keep the nozzle far enough away and moving fast enough to avoid drips (applying thin even coats and letting them dry fully before going back for a second coat) you’ll get a fabulous result but if you’re a novice it’s a lot harder to control so we would wholeheartedly suggest a good quality wool or polyester roller instead (not foam as it causes bubbles!) . We like the brand Purdy when it comes to rollers, but you can ask you paint professional at Lowe’s or Home Depot which one they recommend and go with that if you’re standing there scratching your head. Then of course stick to the thin and even coats and wait for them to fully dry before going in for the next one and you should have a lovely finished product. Hope it helps!
xo,
Sherry
Joy says
Hi, I just stumbled on your website and I am hooked! We’re about to close on our first house (fingers crossed!) but I have many design projects I’d like to work on. I would love to renovate my kitchen, but don’t have the funds right now. But now that I’ve seen your painting tutorial, I may try painting my cabinets for now until I am able to get my dream kitchen. Any thoughts on what colors might go well with white tile countertops and laminate floors? http://www.flickr.com/photos/joyski311/3596370899/
Would love any suggestions. THANKS!
YoungHouseLove says
Hey Joy,
So glad you found us! We think a soft creamy sand tone would look lovely with your rich laminate flooring and your white cabinets. Of course you could also go pure white for a white on white kitchen (always classic and soothing) but a bit of tone on the cabinets might make the counters look brighter and more “new” by comparison. Benjamin Moore’s Ashen Tan is a great starting point, and if you want something a bit lighter/creamier you can try Benjamin Moore’s Moccasin. Hope it helps! Happy painting…
xoxo,
Sherry
Melissa says
Hi there,
I love what you’ve done with your cabinets! I was wondering if you could suggest a paint color for my oak cabs. My kitchen walls are a pale yellow and my laminate countertops are a speckled blue/beige/grey pattern. Thank you! http://i299.photobucket.com/albums/mm314/gemgirl514/IMG_4260.jpg?t=1245034164
YoungHouseLove says
Hey Melissa,
I would take home a bunch of light beige & grey tones and hold them up to your walls and your counters to see which ones really work with both colors. The idea is that you cabinets won’t be the same grey-beige as the counters, but a shade or two lighter or darker so they complement but don’t exactly match them (and also work with the existing wall color). Hope it helps! Happy hunting…
xo,
Sherry
Julie says
Is i recommended to paint the whole interior of the cabinets too? shelves, walls, etc? that’s tons of work so I need to mentally prepare!
YoungHouseLove says
Hey Julie,
When it comes to painting the interiors of the cabinets, it’s definitely a great idea with glass fronted ones (in fact we painted the back of our white glass fronted cabinet in the same pale blue wall color as the rest of the kitchen for a nice subtle pop behind the glass). As for whether you have to paint inside the doors when they’re not glass, it’s totally up to you (we only did the fronts of our doors and drawers but if we weren’t planning to replace them down the line we probably would have done the insides and the backs of the doors for resale). Hope that helps!
xo,
Sherry
Nancy says
I stumbled across your web page, too, and I am totally inspired by the “Blue Kitchen” makeover. I was pouring over paint samples and didn’t know what color to go with. After seeing that kitchen,”La Chateau” is the exact color I want to paint my cabinets.
Your house looks amazing, you guys really have a talent for redecorating! We just moved into a new house that needs a little paint and TLC, and I’m so excited to have found you guys!
Angela says
Hi Sherry,
I love your website! It is so inspirational! I wanted to get your advice on whether or not we could paint our kitchen cabinets. Our kitchen is straight out of the 80’s. We have laminate cabinets and countertops. I would love to give it a fresh update with a coat of paint, but I have been told that paint will not stick to laminate. Is this true? What do you recommend? We really do not want to replace them or even reface them. Any suggestions?
Thanks!
YoungHouseLove says
Hey Angela,
We’ve heard that painting laminate cabinets is definitely possible with the right oil-based primer and good quality paint so I would take off a door and bring it into Home Depot or Benjamin Moore and discuss the best approach with the paint professional there. Hope it helps!
xoxo,
s
Turran says
I’m hooked on this site now.
What’s the best way to go about painting cabinets that look like they’ve been painted a few times already? We’re buying a house, and the cabinets will have to stay for now, but could use some paint. They look kind of “cake-y” from what I assume is too much paint in the past. Any ideas, or just stick to sanding?
Thanks,
Turran
YoungHouseLove says
Hey Turran,
I would use an electric sander to get the bulk of that paint off and start fresh again. Just remember that paint accentuates any lumps or flakes or differences in thickness (people assume paint will hide things but it actually magnifies them) so you’ll want to get the cabinets feeling even and smooth before you reach for the primer and the paint. A good foundation is key so the prep really is important. Hope it helps!
xo,
s
laura says
Wonderful work!!! Thanks for sharing. I was wondering if you can tell me the color that you used and also what kind of brushes, I was looking exactly what you do.
Julie says
Hi Sherry,
I noticed that the original cabinets in your kitchen look like they were real wood. We are moving into an older home that has wood paneling in the den similar to your kitchen cabinets, complete with the darkened knots, etc. We were thinking about painting over the paneling, but my father-in-law thinks that the paint will accentuate the knots in the wood. Any tips on how to prevent that from happening? We eventually plan on taking down the wood paneling, but it’s not a project we can tackle right away.
Thanks,
Julie
YoungHouseLove says
Hey Julie,
Just use oil-based primer before you paint, everything will be all the same color and the knots will disappear. Of course if there are holes in the knots that will still be obvious once you paint the paneling, using wood putty to fill them in before priming and painting is the answer. Hope it helps!
xo,
s
Alicia M says
Hi Sherry!
After reading this post and browsing through your site, I really, reealllly want to repaint my kitchen cabinets! They are currently a bricky red and are a bit cakey like Turran’s. I’m just stuck on what color to pick. My counter tops are cream and my floor is cream ceramic tile with dark grout (hopefully replacing someday!). The wall color is close to the tan color on the background of your site and wraps into an equally tan living room and dining room.
Any suggestions you have would be helpful!
Thanks so much!
Alicia
Ps: I’m obsessed with your blog! It’s so inspiring, great work!
YoungHouseLove says
Hey Alicia,
I think you could definitely go white for a crisp new look (just bring home a number of white paint swatches and pick ones with warm yellow undertones so they work with the cream counter and aren’t too cool and stark looking). You could also go with a lighter tan than the walls (a soft sand color) which will also look good with the creamy cabinets. Just bring home a bunch of swatches and play around until you find something that complements all the other tones in the room. Have fun!
xo,
s