You may have seen the before & after bench pictures in our latest column for R. Home magazine. And we’re back to break down the process of completely transforming a cheap rickety ol’ bench with paint, fabric and a bit of elbow grease. Here’s the shoddy excuse for a bench that came home with us for $7 from Love of Jesus Thrift (yes, that’s really the name of one of our favorite local thrift stores):
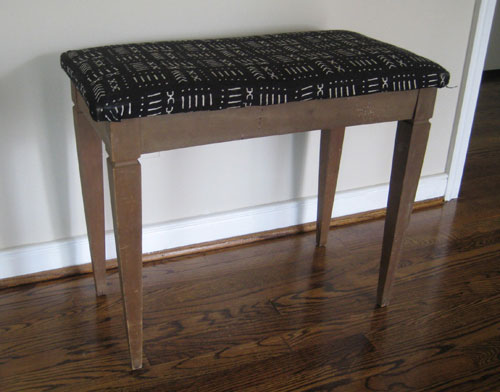
We looked beyond the dingy wood finish and the dated fabric to see something with true potential. The clean lines and easy-to-upholster seat cushion meant this baby was primed for a major makeover. We removed the seat cushion and tightened the interior bolts which immediately remedied the bench’s rickety nature. And we gently sanded the wood with 100 grit sandpaper and quickly got down to the bare wood (older pieces make this especially easy).
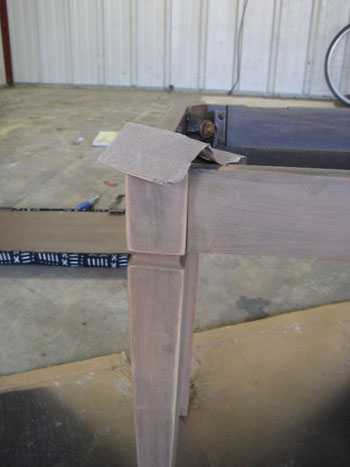
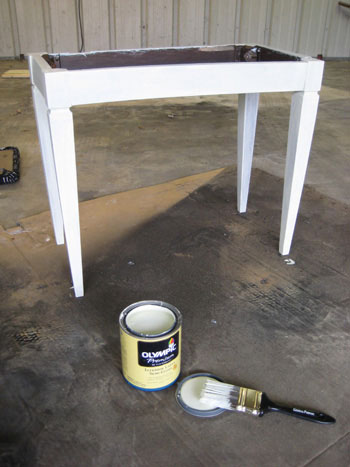
Sanding is a great way to help prepare a surface for paint, but we also followed this step with a thin coat of white oil-based primer since we were planning to paint the bench a light celery color and we didn’t want any old stains or sap marks bleeding through our brand new finish.
Then we followed our coat of primer with two coats of semi-gloss latex paint in a soft celery green (Lunar Tide by Valspar) applied with a brush for a smooth and bubble-free application. Many people think rollers are the way to a smooth finish… but only for walls. When painting furniture items, especially those with spindles or thin legs, even Benjamin Moore paint specialists agree that paint brushes offer a smoother finish (along with paint sprayers of course, but paint brushes are less messy, more accessible, easily affordable, and they offer you more control). Just remember that two thin coats are much better than one globby one- which will definitely show brush stokes and drip marks- ewww.
Then we let the bench dry for at least 24 hours while we tackled reupholstering the cushion. We purchased just half a yard of green and cream lattice William’s & Sherrill fabric for a mere $12 and couldn’t wait to give our sad little bench a fresh luxe look. It’s important to take the time to carefully place fabric with a pattern before you start stapling so it doesn’t seem off-center or crooked. We cut our piece of fabric with a few extra inches on each side so we could shift it and check it out from the front to be sure that the lines were straight and centered looking before we whipped out the $12 Home Depot staple gun.
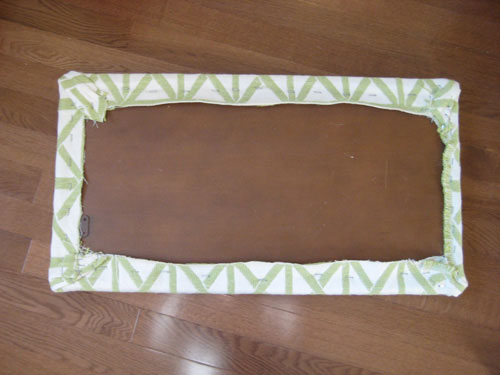
We secured the fabric to the bench by pulling it tight and stapling it at the 12 o-clock, three o-clock, six o-clock and nine o-clock position. This keeps everything centered and in place (instead of stapling in a clockwise motion, which tends to allow fabric to rotate as you rotate, resulting in a bit of a twisted and unbalanced final product). We layered the new fabric right over the old fabric since the cushion underneath was in great shape and we didn’t want to tear out the old fabric and risk ruining the plush little form of batting underneath.
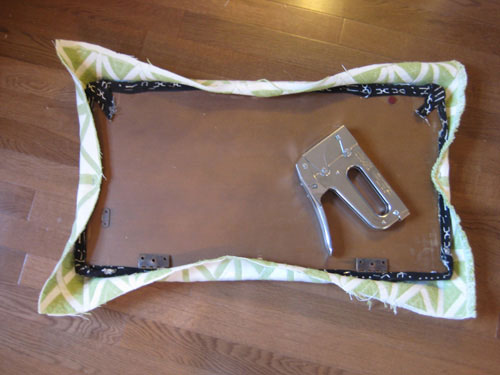
After securing your fabric in the middle of each side with one staple, going around the perimeter of the piece and adding more staples all the way around takes about five seconds. And you’re left with something that looks pretty darn good- and that’s just the back.
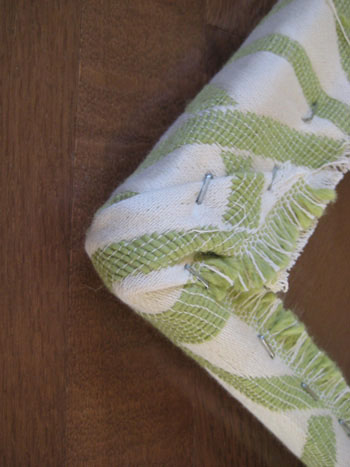
When it comes to the corners, folding them like you’re wrapping a present (and checking that it looks seamless from the front) is the way to go. It usually takes at least two darts and two staples, so don’t try to do it all at once. Slow and steady wins the corner-upholstery race. And the great thing about this process is that you can always pop a staple or two out with a flat head screwdriver if you want a do-over. Which practically guarantees a flawless finished product.
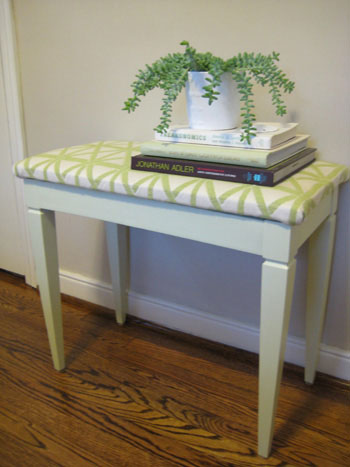
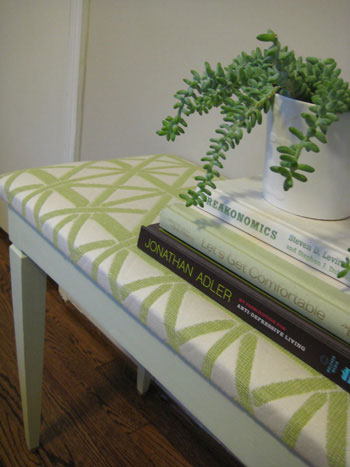
Here’s our bench all put back together. Isn’t she a beaut? I wonder how many people laughed at that pathetic little $7 thrift store bench before we rescued her!
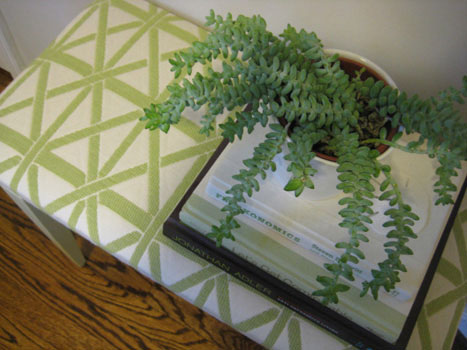
Here’s a top view to show how we did our best to center the fabric both left to right and top to bottom before stapling it in place. See the center line that runs down the center of the bench? And the stripes on each side that hit about a half inch away from each edge? It’s those little details that make it look clean and profession. Not at all like an afternoon project done on a serious budget.
If you can paint a wall and wrap a present you have all the skills you need to completely refinish a bench. And even if you can’t, you can now that we’ve given you the play by play. It’s easy and oh so rewarding. And every time a visitor stops to compliment your new addition you can offhandedly mention “oh this old thing, I picked it up for $7 at a thrift store”- priceless. Speaking of price, the entire cost of the whole bench project was $30 for the bench, the fabric and the paint. Not too shabby…
So go get benched! And tell us all about it.
Looking for another tutorial? Check out our How-To page for everything from cabinet-painting instructions to headboard-making advice.

Amy says
Great idea guys, it turned out great!
I also have a quick question: I finally found my own little burro tail this weekend at home depot (!) but, it didnt come with any care tips/instructions. do you have any tips to keep my cute litte burro healthy and strong? thanks!
NancyV908 says
I have admired that bench before–thanks! But I have two questions. First, with thrift-store finds, do you do anything to guard against the possibility of bugs if you’re keeping the old upholstery? I don’t like to use chemicals, but I would worry about that. (There has been a lot of stuff about bedbugs in the NY metro area lately, & I know John had an awful experience; one of the things I always hear is to be wary of cast-off furniture.)
Second–& forgive me if this is posted elsewhere–is there a rule of thumb about when to sand & when to prime? Just wondering when it’s safe to skip the sanding, which is a task I loathe above all others. Thanks!
YoungHouseLove says
Amy- Burro tails are so super easy to care for. Stick them in a place where they get a bit of sun and just water them (about a shot glass or two) once we week. They’re succulents so they don’t like to be damp or overwatered, so keep ’em dry and sunny and they’ll be happy!
Nancy- John has taught me all about carefully looking over a piece before we even buy it for signs of bedbugs. They’re not invisible to the naked eye since they’re the size of a pencil eraser, so turning things over and checking the cracks along with the upholstery for any signs of droppings or bug activity (holes) is always something that we do. We also leave everything that we purchase with upholstery in the garage for a few days (this is especially helpful fall through spring) because bed bugs like warm temps so when it gets colder overnight it would kill them or drive them away). The way to do the big chill in the city without a garage space would be to remove the seat cushion and stick it in a garbage bag in the fridge or freezer. Might sound strange but it’ll do the trick!
As for when to sand or stain, they’re both good ways to prep a piece and it’s really your call whether to do one, the other, or both. Sanding is always super easy on smaller older pieces, but if you’re refinishing a huge armoire you might just want to sand any rough or splintered areas and rely on the primer to get the entire piece prepped so you won’t be sanding all day. We always suggest sanding anything that’s super glossy though, because even with primer and paint it can still get chipped or scraped easily if the base of the piece is too shiny (since paint will have a hard time sticking to that surface). Hope it helps!
xo,
Sherry
bungalow_bliss says
So easy and such a dramatic change! Yay for thrift store finds!
heather s. says
At first I was surprised you didn’t replace the foam since in the first pic it looks like the cushion is saggy in the middle but maybe it just looks that way because of the fabric. The final result is great! I’m always looking for inexpensive furniture to revamp but the pickings around here are slim. I can’t wait for yardsales to start up since spring cleaning is just around the corner!
Natalie says
That bench is fabulous!! You guys did such a great job!
And thanks for the step-by-step tutorial; your tips will definitely come in handy :)
Brandi H. says
John/Sherry:
I was wondering if you would go over your routine of cleaning out your paint brushes and rollers. I am in the process of painting my kitchen and find it difficult to get the brushes clean. It usally results in leftover paint still on the brush, making the application not as smooth as the first use. Rollers, I usually just pitch. I looked on your how to page, but don’t think this has been addressed before.
Thanks.
YoungHouseLove says
Hey Brandi,
Good question! We actually love to use plastic wrap when we’re in the middle of painting something that may need multiple coats with a bit of time between the applications. We don’t suggest this method if you’re not going to get to that last coat of paint for days, but if you know that your brushes may dry out in the time that you’ll be leaving them between coats, wrapping them in plastic wrap keeps them moist so no paint cakes onto those bristles.
Secondly, we always rinse our brushes as soon as possible once we finish a project. Interior latex paints come out relatively easily, but it does take a while to squeeze them and get the water to run clear, so stick with it until that happens for a much better brush when you return to reuse it.
And when we do have a brush that just isn’t as pristine as it once was, we save it for projects that don’t need as seamless of an application (like primer, for example, which is followed by so many layers of paint that a less-than-perfect application isn’t visible once the paint goes over it). Then we head out for a new brush, because when you’re doing a multi-step painting process like refinishing furniture or edging a room, you never want a sub-par brush to be the reason your finish doesn’t look flawless. Hope it helps!
xo,
Sherry
cindy says
Bench looks great! I love that fabric. I’m confused about something though, I was always under the impression that you can’t paint latex based paints over oil based paints? did I misunderstand?
YoungHouseLove says
Hey Cindy,
Nope you’re exactly right. Latex paint over old-based PAINT is a bubbly nightmare. But latex paint over oil-based PRIMER is one of the best ways to prep a piece for maximum certainty that it will look flawless after all those layers! Even the Benjamin Moore experts agree that although oil-based primer is a lot stickier and messier, it’s totally worth the added adhesion and will always result in a more durable and dependable finish. We’ll never use water-based primer again (we actually only did once and some stain in the wood beneath it bled right through it like it was water). Hope it helps!
xo,
Sherry
Christine says
I absolutely love it! The bench turned out so pretty, great job!
sarah says
is this bench taking up permanent residence in your house and if so, where? it’s so cute!
YoungHouseLove says
Hey Sarah,
The bench currently lives in the guest bedroom (it looks great with the brown patterned bedding and the green headboard). Who knows where else it will move in the future, though. We’re always shifting things around!
xo,
s
Keri says
Great bench! I hope to find one like that soon. I love to find things that are manageable size. Love the fabric too! I did a pair of chairs recently in a similar pattern. Love it!!
Meredith says
Looks great you two! I need to convince my other half that painting wood is NOT a mortal sin!
Candied Fabrics says
Fabulous redo! Great minds think alike ;-) I just recovered an old office chair! Check it out if you have time:
http://candiedfabrics.wordpress.com/2009/03/11/tutorial-recovering-an-office-chair/
YoungHouseLove says
Hey Candied Fabrics,
Grrreeaaat office chair makeover!!! Everyone go check it out. Amazing!
xo,
Sherry
Tam says
Sherry…thank God the first picture was not the after because I swear I was saying…OMG…Why did they do that..thats nothing they would do, and the fabric is UGLY…then I saw the after and was able to breathe..
YoungHouseLove says
Haha Tam, you made me snort with laughter. Glad you’re breathing again!
xo,
s
Ilana says
Great makeover… it’s night and day. I have been looking for a lattice fabric in that same shade of green but have had no luck. Do you know the name and or designer of what you used? I love it. Thanks!
YoungHouseLove says
Hey Ilana,
The fabric is actually made by William’s & Sherrill, a local fabric store in Richmond with many of their own designs. They also of course carry the designer stuff, and it’s all rather expensive (ours was $24 a yard but we got it half price since we only got half a yard). Perhaps checking out the swanky, expensive local fabric stores (as opposed to chains like Joanne) might yield some lattice designs? They might be spendy, but if you only need a little bit it’s not too bad. Hope it helps! Happy hunting…
xo,
s
Ami Rae says
Hey Sherry, I just picked up a rattan coffee table with no top from the side of the road (yep, I’m a trash picker) and your bench gives me the idea to turn the table into a bench for the “mudroom” area of the new house. Since it’s just the rattan with no top or bottom I’ll build a “box” out of mdf to slide into the middle then put a foam and fabric top on with hinges.I think the rattan will give it great visual interest and while it will be a little lower than a normal bench (only 24″) I’ve been known to sit on a coffee table a time or two. So thanks for the great post today and when I get it done I’ll shoot you some pics.
Ami Rae
Carmil says
I LOOOOOVVEE that fabric — I loved it when you had the bench in other posts. I bummed that Williams and Sherril do not have fabric available for purchase on line. Have you seen a similar on line resource???
YoungHouseLove says
Hey Carmil,
We haven’t seen anything similar online off the top of our heads, but maybe googling “green lattice fabric” or even checking out ebay or fabric.com will help you find something comparable. And there’s always this great Waverly fabric. Happy hunting…
xo,
Sherry
ashley morgan says
Love, love, love the fabric!
Markslady says
Wow!! I found your site through a friend’s blog and I am so0o addicted. Sherry, you and your husband are so creative and the most darling couple. You have inspired/helped me to make many alterations in our home and budgets. Just wanted to say thank you and keep up the good work!
YoungHouseLove says
Aw thanks everyone! So glad you’re enjoying our little bench makeover! Of course we’d love to see any and all DIY projects that you guys take on. Send the pics our way!
xo,
s
Audrey says
I posted about cleaning paint brushes on my blog if anyone is interested. I’m really anal about cleaning my brushes, but it’s worth it – one house and many furniture pieces later, and still the same 2 brushes!
http://theartfulabode.wordpress.com/2009/02/16/spick-and-span/
YoungHouseLove says
Wow Audrey, that’s definitely something to brag about!
xo,
s
Rachel says
Hi Youngsters! Thanks for the inspiration! I managed you use your schnazzy re-do to convince my husband we should repaint all our dark cherry furniture fun & fresh colors.
One question, do you take apart your furniture before painting and then reassemble or just paint as-is? Thanks!
YoungHouseLove says
Hey Rachel,
Other than removing upholstered seat cushions, we usually paint everything as is. Hope it helps!
xo,
s
Jessica J. says
Love the bench!
I’ve been reading vis Google Reader lately. Just came over to the site to comment on the giveaway today and was wondering, did you change the house photo up at the top? It looks much sunnier and vibrant than it used to. Tell me that a week away at Google Reader hasn’t just messed with my mind?
YoungHouseLove says
Good eye Jessica,
We actually changed the header a few days ago (switching it out for a picture taken a while back with a bit more shade and sun- the mottled roof makes me happy). Can’t wait til spring when everything’s green like that again!
xo,
Sherry
Layersofmeaning says
I love it Sherry! the fabric is great!
Kristy says
I can totally see that bench looking very very glam if you simply installed a mirror top on it and made it a table.
Rachel says
Wow, great job you guys! I love how you kept it airy and light. Now I’ll be hunting for my own bench! I’ll be linking as well.
chacha says
So great – I really need to scope out local thrift stores. Who can’t use a cute little bench like that?
megan says
Amen! I love your $7 find! I will definitely have to look for something similar for an area in our kitchen.
Katy Wilson says
Dear Sherry & John ~ WOW. That’s quite a transformation. From sad little thrift store bench to va va va voom!
And I love the fabric you chose for the cushion…with the celery colored paint. It looks so fab.
Thank you for the step-by-step-by-step instructions for the DIY challenged [me]. I require a thorough play-by-play in order to have the confidence to try this stuff. And even if you think, oh it’s just a $7 bench plus paint…no biggie if it doesn’t turn out well….well, for me, it’s the time investment too.
So ~
I appreciate your willingness to go into great detail for the DIY newbies out there!
Happy St. Patty’s Day to ya both <3
~ Katy O’Keefe Wilson
May the road rise to meet you,
May the wind be always at your back.
May the sun shine warm upon your face,
The rains fall soft upon your fields.
wide open spaces says
you guys are immensely inspiring.
and i love your taste. really, great work you’re doing!
Allie says
This is beautiful! My mom takes old coffee tables and turns them into big benches for the kids at the school she works at. It’s amazing what you can make/remake with a little work.
Shannon says
Loved the bench makeover and the site that we did a post on it! Thanks for a great project.
Erin K. says
I think I might make over an old bench seat that we inherited with some antique furniture last year. It will be a good spring break or summer vaca project. Thanks for the advice and ideas!
Diva Style says
You guys are so awesome!!…I am always afraid to paint anything, for fear that I’ll mess it up. :-/ Blah.
Heather - one love photo says
Oh man, Lots of inspiration to be had here!!!! I am adding you to my blogroll. I have a bathroom that I must tackle!
Lauren says
I really love this revamped bench. I am going to have to try a project like that (except find a chair for my desk). Any other great places to find amazing fabric that I can possibly use for my project – I’m in Southside (if that helps)? Thanks!
YoungHouseLove says
Hey Lauren,
We really love William’s & Sherrill (it’s always our first stop) but you’d be surprised what you can find at Joanne Fabrics if you really look. Happy hunting!
xo,
Sherry
Rachel says
Looks great! I have a question though. I wanted to give an old chair new life that I found at goodwill, but there were no bolts in it. It had a cushion, but it wasn’t actually attached to the chair. Being that I have NEVER attempted something like this, I didn’t know what to do. Thoughts?
YoungHouseLove says
Hey Rachel,
Seeing as the cushion isn’t attached to the chair I’d suggest spray painting or painting the chair and then replacing the cushion with an inexpensive one from Lowe’s or Home Depot (which is infinitely easier than trying to create a custom slipcover around the existing cushion). Hope it helps!
xo,
Sherry
WilderMiss says
Simple and Lovely! I have a similar transformation planned for a cool little table/magazine rack I picked up at a thrift shop. It has really neat and unusual lines mixed with a really dated wood finish. I’d been thinking white but now you’ve got me wondering if there is a colour that would look neat…
Mandi says
Any suggestions on places to look for fabric in Charlottesville? And do you have any recommendations for fabric types to use on a piece that will be used often?
YoungHouseLove says
Hey Mandi,
I don’t know of any fabric stores in Cville, but maybe you can get a recommendation from a friend or even rely on google? As for the type of fabric you want if you plan to use the seat often, go for something thick (you can always ask “is this upholstery grade?”) so it’s durable and long-lasting. Generally we would suggest staying away from anything satiny or silky and selecting something thicker and woven without too much stretch (which can make the seat baggy after continued use). Hope it helps!
xo,
Sherry
Stacey says
Love it! You guys did a great job! This reminds me of my stool project–except mine cost a total of $6!!! See here:
http://fablifeonafarm.blogspot.com/2008/10/weekend-productivity.html
Marelis says
Wonderful! I’m always looking for ways to save $$ during decorating projects and love the fact that you can purchase something drab for $5 and make it look like a $50 unique piece!!
tiffany says
Hey, love the bench, love the site. Question for you and the bench is the closest I’ve found to the answer. Any ideas on how to turn a regular ottoman into a storage ottoman? Thanks
YoungHouseLove says
Hey Tiffany,
Hmm, that’s a toughie. The issue with converting a non-storage ottoman into one that can store things is that it might end up being structurally compromised due to the conversion (ex: storage ottomans are built to have a hinged top and still support a good deal of weight on top so if you made your own I’d be afraid it wouldn’t be able to hold any weight up top). Maybe it’s something you can google or ask the wood guy at Home Depot/Lowe’s? They might have some reinforcing ideas to save your bench!
xo,
Sherry
Air says
LOVE THIS! Just found your blog and I’m obsessed! Keep it up! I too purchased my first home with my fiance – a year and a half ago – and it’s old. It was built in ’49, and we’re 24…old house, young people!
Just noticed a silly thing…but I think you’re confusing your usage of “compliment” and “complement.” Sorry, it just popped out at me a couple of times.
PS – I work in advertising too! Makes me love this even more.
megan says
Hey there,this was so informative thank you.I was wondering why you chose to prime it first and also why you chose an oil based primer. I’m getting ready to redo an antique bench. Thank you so much. -Megan
YoungHouseLove says
Hey Megan,
Good question. We once made the terrible heartbreaking mistake of using a water-based primer and the oils in the wood bled right through our paint job and ruined our white finish with gross brown stains. It was THE WORST because we had to sand everything back down and redo the entire proect with an oil-based primer to correct the bleed-through. Everything looked lovely the second time around, but now we ALWAYS use oil-based primer because we’d rather be safe than sorry! It’s really the only guarantee that the paint will stick for a durable long-lasting finish (painting without primer can be a lot less durable and prone to chipping and peeling). Hope it helps! Good luck with your bench!
xo,
Sherry
Julianne Hendrickson says
Sherry,
Does the top just sit on the wood base? How did you secure the covered seat to the wood bottom?
Julianne
YoungHouseLove says
Hey Julianne,
Since it was formerly a piano bench there were two hinges on the underside of the seat that attach it to the bench (which we removed to upholster and paint it but then re-attached so it’s hinged as one piece again). Hope it helps!
xo,
Sherry
Devon @ Green House, Good Life says
I’ve been planning to do something like this forever — I bought a piano bench at the estate sale of the house we tore down, and I’d love to give it a padded seat. Between time constraints and not having figured out how to do the top, I just haven’t gotten to it yet, but I was looking back at this post and the comments to try to glean some ideas. I was excited to see that yours started out as a piano bench, too — does it still have the original bench top? (I was imagining replacing it with something thinner, but I wasn’t sure how to attach that without screws poking through, so upholstering the current top is definitely easier.) And you said it’s attached with the original hinges — so it still opens? Thanks for the info.
P.S. Typo in “little details that make it look clean and profession.”
Kristen says
Wow… so loving your site. I just read your wedding story and I was brought to tears — equally as much for all the fantastic ideas I wish I’d thought of when I got married as the love that so obviously exists between the two of you. We had always planned to renew our vows in Vegas, complete with Elvis impersonator, powder blue tux, and gambling in my wedding dress, but now you’re making want to just throw a real wedding in my backyard!!
Just a quick suggestion for Tiffany, if she hasn’t figured a way to convert an existing ottoman — check out homereserve.com. They sell ‘assembly required’ upholstered furniture that comes in a HUGE array of fabric choices and the offer storage ottomans. If she can’t find a fabric that works, she could always get the plainest one they have and recover it herself.
All the best!
mai-ling says
what a deal on a piano/organ bench!
you know how hard it is to find one
along with out its companion!?!?
Catherine says
Hi Youngsters,
What are your favorite thrift stores in Richmond? I’m fairly new to the area and want to go thrift diving over the weekend (after IKEA trip!). Any suggestions?
YoungHouseLove says
Hey Catherine,
If you click the “Topics” tab above the search box on the top right of our sight, you can then click the “Feeling Thrifty” tab which will show you a few of our favorite thrift stores and even take you inside for a quick tour!
xo,
s
Betty Holland says
You are both amazing! Thanks for listing the paint color, brand, and photo of said paints so I can just go grab a can of paint for myself. Everything looks fab on your blog. I think Olympic owes you some $$$! I love the Lunar Tide shade….just what I need for a bookshelf I intend on painting. I am glad things worked out for you with your new URL. Please keep up the good work.
Kayleen @ This Old Chair says
This is so great! I have an old bench that needs a makeover desperately. I left an award for you on my blog!
Rhea says
Hi guys: I love your site and thank you for the step-by-step process. I have a quick question, though:
When you painted your bookcase green last year, you did not re-sand the piece. However, you sanded this bench instead of just priming it. Why?
I’m trying to figure out whether I need to sand a varnished dark wood bookcase/shelf or just prime it before re-painting … Thank you for your help!
YoungHouseLove says
Good question! Sanding is like extra credit. If you have it in you it never hurts. In the case of the bench it was so old and dusty that a quick sanding evened things out and removed any loose varnish while the bookcase was newer and had a more seamless and even surface to begin with. Hope it helps!
xo,
s
Rhea says
Thanks, guys! I went ahead and lightly sanded the the bookcase, and I primed it. I’m getting ready to paint tomorrow … when I saw Bev’s comment from Sept. 15 in another post about her using a water-based primer (that the paint shop guys pushed) instead of oil-based like you recommended and now her tabletop is still tacky after 2 weeks.
Uh oh. Because when I went to the store today to get an oil-based primer – the clerk also thought I was crazy to get that and gave me a quart of water-based instead.
Should I go ahead and paint my bookcases, or should I cut my losses and sand everything down and re-prime with an oil-based primer? Sorry for this stupid question.
YoungHouseLove says
I would return the water-based stuff and pick up oil-based primer instead. It really is an important step and you should have no problem exchanging it or returning it if you haven’t used it yet (just explain that you went back to look at the directions for your project and it listed oi-based and you felt pressured to buy water-based and realize now that it won’t work). Hope it helps! I don’t know why those paint people keep pushing the water based stuff, it’s baffling!
xo,
s