We’re back to share the “backstage” details of our recent photo shoot with the crew from BHG for Do It Yourself magazine and Kitchen + Bath Makeovers (with our newly transformed nursery and our recently renovated bathroom playing the stars of the show). Let’s just say it was a day full of prepping, propping, shooting, eating, secretly high fiving when no one was looking (ok, that was just me and John), and standing around staring as the masters worked their magic (again, that was just me and John).
And we had a lot to stare at. There were large panels of fabric to soften any outside light, big worth-more-than-our-house camera lenses, and computers hooked up to the camera so each picture could be analyzed and every detail could be tweaked to “get the shot.” It really reminded us of how much goes into those seemingly effortless photos of people’s homes that fill every shelter magazine on the shelves of Barnes & Noble. Below you’ll see the high-tech-camera-hooked-up-to-the-computer setup, along with our nursery chair full of baby toys and a shot list (which is a printed booklet from the magazine’s art director or editor which directs the photographer and stylist when it comes to which photos to snag for the story).
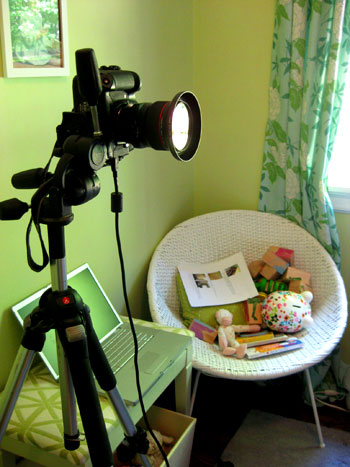
We’ve learned that as glamorous as at-home photo shoots sound, you really have to be completely ok with people rolling in and rearranging all of your stuff (sometimes moving it into a pile in your nursery chair for example) so they can reset the space and style it in a unique way to capture every angle that they need with ease. So our first behind the scenes tidbit would be that as flawless as each room looks in a glossy magazine, picture it with piles of props just out of frame, since it’s likely that there are tons of eyesores hiding just beyond the bounds of the shot – like thick extension cords for cameras and computers as well as stacks of unused decor items. The good thing is that everyone’s super respectful when it comes to putting things back and leaving the house exactly as it was when they arrived (if not a bit cleaner- bonus!).
Oh and amid the chaos we somehow managed to work in a quickie interview to sleuth out a few photo shoot tricks of the trade with both the stylist, Cat (who happens to be my best friend- we actually met in NYC and worked at Country Home magazine together back in the day) and Erik Johnson, the photographer (we worked with him a while back when he shot our house for a three part series for Do It Yourself which ran last year- you can check those out here, here, and here). So without further ado, a few glossy magazine secrets and tips, straight from the pros themselves…
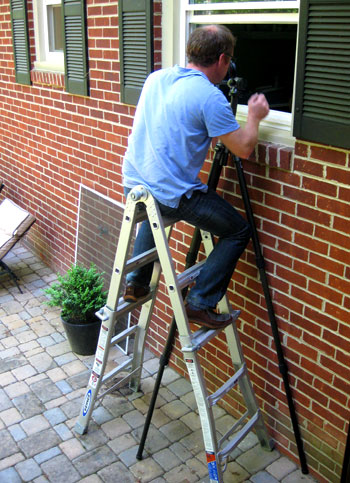
Of course these tips aren’t necessarily things that you’d try when shooting your own home for your blog or your personal photo album (some are a bit intense) but it’s definitely interesting to learn what it takes to get the shot for glossy national publications. And it’s not all glitz and glamour. In fact, Erik’s first tip is to check your pride at the door and do what it takes to get the shot. That might mean lying down on the floor or squishing yourself into a corner and holding your breath, just to get a photo from the right angle. Heck, in our nursery’s case it actually meant sitting on top of a ladder and shooting into the room from an exterior window (after removing the screen) – all in the name of getting the widest angle possible.
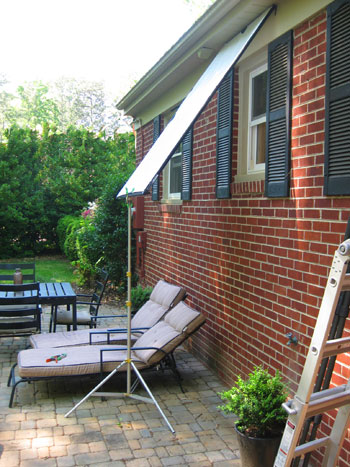
But that wasn’t the only exterior action that our house saw that fateful Friday. They also used a strip of fabric (referred to as a scrim) to diffuse the light coming into the window from outside so it was less harsh and a lot more ethereal. It might not look like much, but the difference in the photos was amazing. Oh the tricks of the trade…
Erik’s second tip is to always use a tripod. It helps to keep things steady and adds to the crispness that you can capture. So that’s actually a pretty easy trick that anyone can implement (even without getting on a ladder outside or purchasing a huge fabric scrim for filtering light). And again you’ll see him doing what it takes to get the shot he needs (which happens to mean standing on one of our dining room chairs). Whatever works, right? It’s just funny to see this side of things because we’re sure when the shot he was actually taking runs in the magazine no one would ever guess that capturing that photo involved a man with a giant tripod standing on a chair.
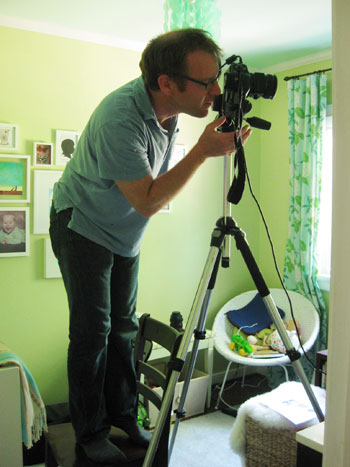
And just for fun, here’s an over the shoulder shot so you can see why he was up on a chair in the first place. Yup, he was just getting a boost to be closer to our hanging mobiles. We can’t wait to see how all of his photos turned out. But on to Erik’s next tip: after your camera is mounted to a tripod, experiment with angling the camera up, down, or to the side. People tend to only think about shooting straight on when their camera is on a tripod, but Erik was all about working those angles and swinging his camera 45 degrees up or 25 degrees down, just to get an interesting viewpoint and a less stagnant looking shot in the end. He suggests trying a few different angles since you never really know what will work best until you give a few of them a try.
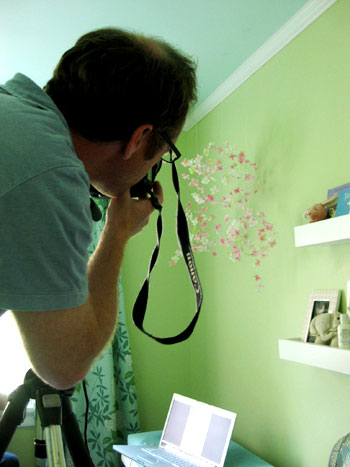
The last two photography tips actually come from Erik’s photo assistant, Abby Greenawalt. She was also a real pro when it came to making sure they got every shot they came for (and then some) and she was the one to toss out photo tip number four: natural light is best. Every single photo that they took of our home was taken without any of our interior lights on. Which was totally crazy for us since we’re used to turning on every single light that we can just to avoid our camera’s garish flash (which always blows out the foreground and makes the background fade into the shadows). But Abby pointed out that when you use a tripod, the camera is more steady and you can capture things more crisply and get lighter shots than you could if you tried to hold it still and shoot in such low light situations (which results in a blurry mess). Good point.
Abby’s last photo tip of the day was: less is more. She recommends resisting the urge to snap a million pictures of a space, and instead suggested taking one and uploading it on a computer (just like the pros) so you can study the composition and ensure that you like everything (from the way the curtains are hanging to the flowers you placed on that side table). It’s easy to see if something is out of wack when you’re looking at the large photo on the computer (as opposed to the tiny view finder on your camera). Then you can tweak things and take one “final shot” instead of having to sift through 500 pictures in search of the best version after an unbridled snap-fest.
Now we’ll share Cat’s five styling secrets. Here she is standing next to our bathroom door (yup, doors usually have to come off in order to get certain shots) showing off the robes that she painstakingly ironed…
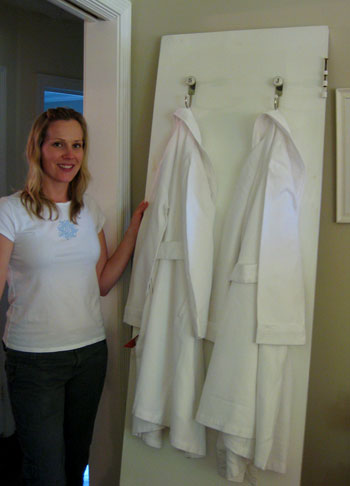
Which leads us to her first styling tip: be a perfectionist. In real life you’d probably never iron your robes, but that’s the job of a stylist. To make everything look flawless. She’s also been known to wipe down mirrors for that perfect shine, and remove screens from windows so they look crystal clear. So that’s another thing to remember when you look at a room in a magazine. Don’t beat yourself up too much if your windows “never look that clean” or your robes “aren’t nearly as luxurious.” Chances are they had a little help from a stylist and don’t really look like that on a daily basis.
Cat’s second styling tip is to cheat things and fake it. Sort of like how Erik will do whatever it takes to get the shot, Cat will do whatever it takes to make every single accent in a room look plush, luxe, and nothing short of gorgeous. Here’s how she created the look of super fluffy towels (she stuffed them with striped dishcloths to create a thicker look)…
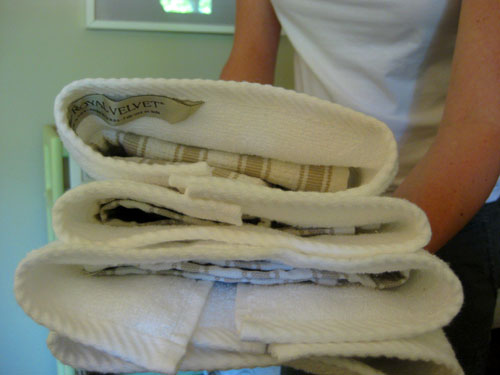
She also cheated things like ottomans and accents a bit to the left or right to create separation that works for the angle of the shot (but looks all wonky and crazy if you stared at it straight on). Because it doesn’t matter what the room really looks like- it matters what it looks like through the lens of the camera. Another way that she routinely cheats things is to pull everything that’s on an open shelf (like the ones in our bathroom closet) almost unnatrually forward so they catch the most light. Through the lens they look great, but in person you’d be tempted to push everything back a bit since it’s so close to the edge.
Cat’s other three styling tips are simple: repurpose items from other rooms (she raided our kitchen for a glass cup to use as a bud vase), accessorize in groups of three (this is a common decorating trick, three objects on a side table or mantel just look better than two or four) and just play around (there’s no right answer when it comes to styling, so having fun with texture and working with different combinations of objects until you land on something you love is par for the course).
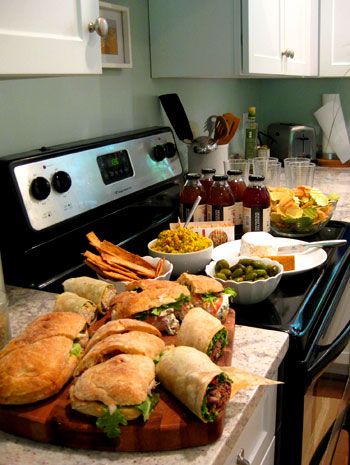
So that’s what we learned from our whirlwind photo shoot with the kind folks from BHG. Oh and did we mention that they fed us like kings and queens? They even set out the spread they picked up at Whole Foods in a glossy-magazine-worthy way. Doesn’t it look delectable? Yup, we had a fantastic time with Erik, Abby and Cat. And they even left a few extra sandwiches behind for us. Can’t really ask for more than that.
So we’re throwing out a big thank you to the whole crew and to Do It Yourself magazine and Kitchen + Bath Makeovers for setting up such a fun day for us (and for thinking that our house is photo shoot worthy- we’re honored). We hope you guys enjoyed our little behind the scenes details and we can’t wait to see how all those shots actually turn out. We’ll definitely keep you posted…
Psst- Wanna check out other behind the scenes photo shoot tales of yore? Here’s one from a while back with some of the same crew, another shoot for a totally different mag, and the backstage play by play from our fleeting appearance on HGTV’s Rate My Space.

shanna says
Wow! This is so cool. Thanks for sharing! And I love DIY Magazine – I just subscribed and my only complaint is that it isn’t a monthly publication. So many great ideas. Can’t wait to see your home featured!
Katie Cortes says
Wow, thanks so much for sharing this! I always love seeing how those glossy, perfect photographs are created. Your home looks picture-perfect already – but to see what these magazines do with your space is amazing! Thanks for sharing!
Stephanie says
Thanks for the behind the scenes! It does make me feel better when you describe the background chaos that goes on right around a beautiful photo. Like supermodels who are touched up every 5 seconds. Hopefully they won’t start airbrushing accessories to make them look thinner :) Wait…they probably already do!
Liz @ Bon Temps Beignet says
“and standing around staring as the masters worked their magic”…. Uh, hello, if y’all weren’t the masters of DIY then all these magazines wouldn’t be shooting your rooms!!! Congratulations AGAIN!
PS: My Husband and I high five all the time, too. Made some awesome meatballs for dinner? High five! Remembered to replace the empty TP roll? High tens!
Jessica @ How Sweet says
So cool! Thanks for the behind the scenes shots. :)
Kathy :) says
Read you all the time don’t comment too much…Congrats to you love BHG, I get the magazine but not the DIY…will definitely look for your article though !!!!
All the best,
Kathy :)
Mrs. Jones' Soapbox says
Great tips! Thanks so much for sharing, Sherry.
Krissy says
Your house seems to be featured in a number of magazines and it sometimes seems to cath you by surprise… Can magazines use your images without permission? Do you get compensated for these shoots, or is the publicity worth it? This may be an inappropriate question – but I’m just so curious about how it all works.
YoungHouseLove says
Hey Krissy,
It’s true, we’re always surprised when a magazine contacts us to feature our home. Who wouldn’t be?! It’s super exciting to us that they think our tiny ranch is worthy of sharing and of course the press helps us gain more readers which keeps the ol’ blog going so it’s really a win-win thing (we don’t get compensated when they use our images). And as for using images without permission, magazines and other printed publications always ask first (in fact, they can’t really use photos of our house without our help since the web versions of our pictures on the blog are too low-res to be printed in magazines, so they email us to request larger files). The biggest surprises are when we hear from a magazine editor and then they disappear for any number of months and out of nowhere we get a random call from a distant relative or an email from a reader to let us know that a picture of our house has popped up somewhere.
And of course if we participate in a photo shoot, we sign a photo release so they own full rights to the images (in this case we signed a photo release with Meredith Corp, who owns a slew of magazines from Do It Yourself to BHG and beyond) so sometimes our photos will pop up in magazines (or websites) that we weren’t expecting since they own the rights and can use them anywhere they’d like. But it’s always a happy surprise!
xo,
s
Marilyn says
Congrats! I know it is more work than it looks. My son works for a company in Nashville that directs and produces music videos, commercials, etc. He tells me they put in some long hours and they always feed the workers and musicians well.
k & b adventures in renovating says
That looks like so much fun! Even the sandwiches look amazing. Nice work guys!
patti says
i’m so glad i read this write up this morning. i have to go take photos of a restaurant for a client today and i’m a little nervous – some of these photo tips are going to come in handy.
thanks! :)
Krissy says
That’s so interesting. Thanks for sharing!
{The Classy Woman} says
Very cool look at the behind the scenes. One of my other blogger friends will have her kitchen featured in BHG Kitchen & Bath and she did a behind the scenes look too. So fun to see how they ‘get the shot’. They were sweet enough to leave her some artichokes behind and some flowers. The BHG team seems very sweet. :)
As a Home Stager/Designer I have a lot of little tricks that I use for the actual projects and also have a few for photos too. I typically take my own and try to adjust the lighting afterwards to save cost. However, when the pics are for a new marketing campaign, etc., I call in the pros. My photos simply cannot compare. I really need to take a photography course and get a better camera. LOL
How much fun is that!? Glad you had such a great time and I’m sure it gave you ideas for your own photo shoots. Can’t wait to see your pics in the upcoming mag!!
~Karla
jbhat says
Neato! I’m looking forward to seeing the final photos. And thanks for all the styling tips. Not that I’ll necessarily be ironing my robes, but you never know.
jbhat
Amanda says
May I just say THANK YOU and bless your hearts for showing us all the tricks that make the magazine and book photos look so perfect? Because heaven knows that’s always the look I’m aiming for in my house but it’s never quite “just so”, and now I feel like I can be a little more self-forgiving.
Penny says
How exciting! Congrats! I’m looking forward to reading the article when it’s published. I’ve been a BG&G subscriber for years, and am a recent subscriber to Do It Yourself. Thank you for the styling photography tips since it’s a passion of mine – so interesting!
Jennifer says
Thanks for the sneak peek — so interesting! Can’t wait to see what they did when the issue finally comes out.
Catherine says
Great insights! The details about the robes and “fluffed” towels were especially interesting. I totally would have just assumed that someone whose house is nice enough to get featured is pretty well off and would simply have much nicer things than us. It’s fun to know they have to be cheat a bit too. :)
The Virginia House says
Thanks for sharing all of those tips! It’s great to know that for the most part no ones house looks as great as they do in the magazines! Now I need to go buy a tripod…
Elisa says
YAY!! Thank you for sharing! Now I want to snap pictures of my own house. By the way, I stole your baskets-in-the-bathroom-closet trick! Now all my stuff looks luxe & stylish in there… instead of having clutter of headbands and extra toothpaste tubes haha.
Rachel says
My parents took down their screens to clean their windows when they were getting ready to sell their house. It looked so much brighter and cleaner inside that they decided to leave them off while the house was for sale. It sold in less than two months in the spring 2009 market, so maybe that helped.
I wouldn’t want to live without screens, of course, but I think I might do it if I were selling a place.
Amanda says
I love your pictures. I am friends with the photographer’s wife and it is always funny to see him cross over into things I see. I will have to forward this post to them.
Karen J says
Great info and tips! I knew you were supposed to take shots without your flash, but, hmmm, I’m not sure I agree about turning all the lights off too. I like seeing a warm pool of light from lamps and beautiful light fixtures; in fact, I think most lamps and fixtures look a lot better lit than unlit.
YoungHouseLove says
Karen J,
We felt the same way! But check out any decor magazine like House Beautiful or BHG. You’ll notice that 9 times out of 10 all the lights are off in a shot, and the sunlight is just streaming softly through the window. We were so surprised!
xo,
s
Jill Stigs says
Cool behind the scenes! So that’s why my pictures suck………I need to shoot from the porch with the screen off! LOL.
robyn says
i have recently discovered and fell in love with your site! your home is lovely and your personalities which shine through the interiors are so fun!
i loved this post – it totally confirmed why i want to work for magazines!
all the best with baby p. on the way!
xoxo.
Amanda V says
This is so cool! I’ve started to use a lot of natural sunlight and no overhead lighting for my photos and they turn out so splendid! Did you catch what type of camera the photographer used for your shoot?
And I was drooling over that spread of food too! I thought I caught a glimpse of my favorite tea, Honest Tea! I love the Black Forest Berry, which has just a hint of sweetness and is caffiene free, pregnant lady friendly. :O)
YoungHouseLove says
Yup, that was Honest Tea (so good!) and the camera that Erik used was a super high tech Nikon (didn’t catch the make and model but it had an insanely awesome lens on it). Hope it helps!
xo,
s
sara says
WOW thanks for the behind the scenes, that’s so cool! Great tips. I’m so interested in everything photography/design, so this was great!
Melanie Beth says
Thanks for this, these posts are so cool! I love learning tips and tricks, I’ve never been that good at taking photos of rooms. I can’t wait to try some of this out!
sarah says
thanks for this post! i am a semi-pro photographer so learning the tricks of the trade from the big kids is very cool!
oh, and the camera he used is a canon (probably canon 5d mark II). in the mobile photo you can see the camera strap that says “canon”. i guess he might have been shooting w/ a nikon, and using a canon strap, but photogs are usually pretty territorial when it comes to the camera brand they choose. :)
Billie says
I’m not trying to be snarky but I have always wondered how you got into so many magazines. I guess being best friends with someone that works at DIY Magazine can’t hurt …
YoungHouseLove says
Hey Billie,
My best friend is actually a freelance stylist, so she was hired by Do It Yourself magazine after they decided to feature our nursery. The thing that helped get us in there was the fact that we already have a regular column with them, so you’re right that knowing the right people definitely can’t hurt! When it comes to being in The Nest magazine or being on CNN or HGTV’s Rate My Space, those were totally random happenings. We didn’t know a soul at those places and we’re still thanking our lucky stars for all the unexpected opportunities that have been tossed our way!
xo,
s
Kim @ Yellow Brick Home says
Ahh, love, love, LOVE this post!
Straight out of art school, I freelanced as a photo assistant for the glossies, and I loved each and every second of it. As much as I’m a neat freak in my own home, I loved all the tangles of camera cords, triggers, laptops, and tripods. And just like you said, we took doors off hinges, worked with the stylists to “fake” things beautifully, and we put it all back exactly as we found it (and cleaner, too).
Not to mention, the lunches were always delicious – just as you’ve shown us here!
Oh, memories! Thanks for this.
Lori says
Incredibly fascinating! Thanks for taking the time to share the behind the scenes; a side most of us have never seen.
Thanks!
Kalee says
This is an amazing behind the scenes look! Love all the tips which will come in handy as we begin photographing what we’ve done decorating wise in our home. Oh, and can I ask what kind of robes you have? We’ve been looking for some nice white ones for a while, and these looks super comfy!
YoungHouseLove says
Hey Kalee,
We actually don’t own robes (those hooks on the back of the door are where we usually hang our towels) but the editor requested them so the prop stylist picked them up and got them all nice and ironed for the shoot. It’s always fun to see the little tweaks and accessories they bring in. Oh and the robes are from Bed Bath & Beyond if that helps!
xo,
s
Alicia (Atypical Type A) says
I have come across some of them before, but removing doors was a new one!
Definitely agreed on the natural light. I have taken to saving up all the shots I need to take until the weekend when I am home during daylight hours.
I have recently started my own business (invitation design) and blog. It has been a steep learning curve trying to get the photos up to a professional standard when I am not a professional photographer or stylist and don’t have a professional camera.
ourlifeinaclick says
Thanks so much for sharing all the behind the scenes photos, tips and tricks (I’ve been using overhead light based on your suggestion and it was helping a lot–now I’ll have to try it without!) This is so great to be able to see something I’d never get to otherwise! Can’t wait to see the actual issue when it comes out. Congrats!!
-heather
Amanda says
This was a fascinating post! And I do feel a bit less bad about my own house considering all the props they use and tweaking they do for the magazines. Very interesting about the fluffy towels! Thanks for the glimpse.
Beylah says
You must be so proud of your home and your great success every time a new magazine contacts you, so congrats! I think I’ll have to subscribe to DIY Magazine one of these days. Hey… a subscription to their magazine would make for a great giveaway, don’t you think? ;)
But onto the real reason I am commenting… when they do these photo shoots do they tell you when it will be published? Does it work that they usually have a specific issue in mind, or are you *always* surprised when your house pops up in one of these good reads?
YoungHouseLove says
Hey Beylah,
Well for the Do It Yourself magazine feature (of our nursery) we’re 99% certain that it’ll be in the next issue (which comes out in the late summer but will be called the “fall issue”) and as for the Kitchen + Bath makeovers write-up, we’re thinking it’ll be out about the same time (a delay of two or three months is pretty common). So we’ll start looking for the story in late summer/early fall. The best thing is that so many of our readers see our house and email or comment to tell us about it- so we don’t worry as much about missing ’em (plus the magazines themselves are usually really nice about sending some extra issues our way once the story is out).
xo,
s
kristiina says
Another great behind the scenes recap. Thanks for all the detailed tips :) I love DIY magazine–that’s how I first found you guys a few years back…
I love coming here because of all the positive energy and great information. Keep up the great work :)
Lila says
Wow. I have just spent a whole hour reading one post, that lead to another post (nursery) which MADE me read like 4 more posts. I heart this blog. And I loved the look behind the scenes. Good luck with your delivery- maybe we’ll have our babies on the same day!