When Real Simple asked us to whip up a DIY holiday gift idea for their site, Sherry did her Elaine from Seinfeld dance (which is only slightly better than her ugly cry) and we excitedly put together a quick tutorial for creating a seasonal welcome mat to slide under someone’s Christmas tree… which they can then slide under their front door.
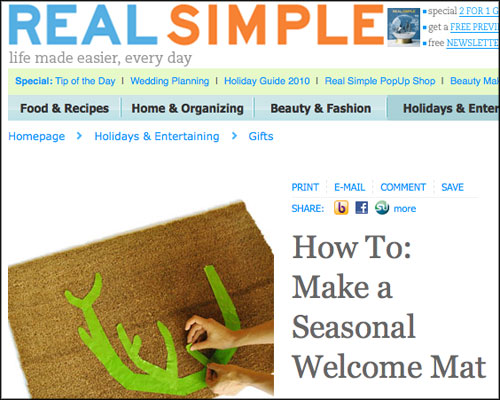
You can check out the full how-to details for making this buck-ish beauty over on RealSimple.com (here’s the first page and here’s the second page). It’s basically an easy project involving a cheap Ikea doormat, some painters tape, some outdoor-approved (or enamel) spray paint, and about ten minutes of your time.
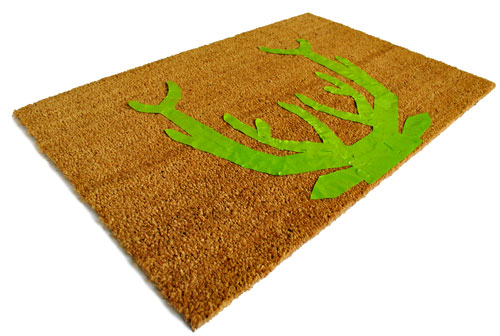
And when the dust spray paint haze clears, you’re left with a little something like this:
As long as you use good quality indoor/outdoor approved spray paint it should be 100% fixed in place once it’s dry (since it’s made to get rained and snowed on outside, there should be no worries about painted footprints in the house). A lot of “professional” welcome mats are actually spray painted, so these will wear out over time like most mats do – but it’s a fairly standard treatment when it comes to buying any mats with designs on them from the store. Using something that specifically says “enamel spray paint” will give you one of the most durable and long-lasting results since that’s the good stuff, but the spray paint that we used was outdoor approved (although it didn’t specifically say “enamel” on the label) and it has held up really well so far (we actually made ours a few months ago because the Real Simple “due date” was November 1st).
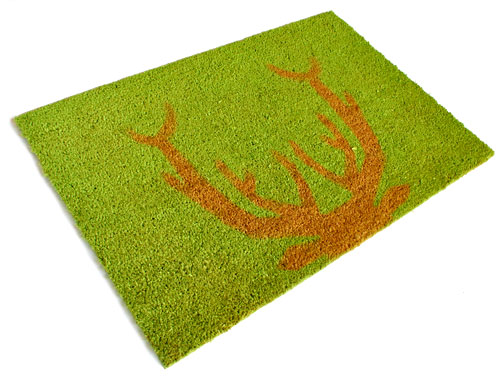
Anyway, our big secret is that we actually made a second DIY welcome mat- you know, in case the first one was a bust. So we thought we’d share the alternate one here (which we also liked, but didn’t love quite as much as our deer friend). It uses the same basic technique as the reindeer antler version, but it requires less taping time and a bit more spray painting time. Oh, and we used a big round mat for this attempt, also from Ikea.
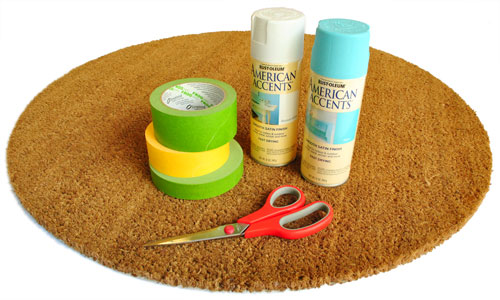
We were going for a snowglobe effect on this one, which meant creating white snowflakes on an icy blue background. So after spraying the entire mat with a couple of coats of white paint (and letting it dry, obviously) we cut our painters tape to create various-sized asterisk shapes all over the mat. They’re not the most intricate snowflakes in the world, but we wanted to keep it simple (since that seems to be a key term over at Real Simple).
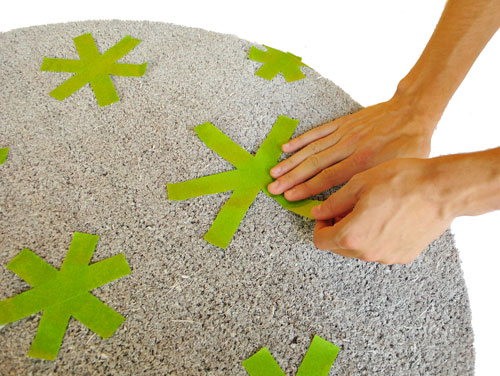
With the tape firmly pressed down, we applied another couple of coats of blue spray paint all over the entire mat, let that dry, and then peeled up our tape to reveal this little ditty:
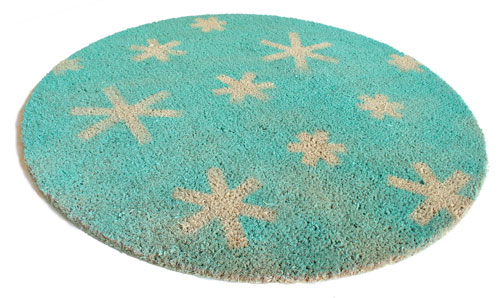
I’ll admit that we didn’t get the blue coat to go on as evenly as we wanted. We had to stop about a coat early because some of our painters tape was starting to peel up a little (which we feared would result in less-than-crisp snowflake edges). The good news is that the tape-lifting side effect isn’t normal, it’s something that we caused by unsticking and re-sticking our asterisks too many times while taking process shots and changing their configurations (we didn’t have that issue with the antler one). So you can easily avoid that problem by leaving your tape asterisks right where you stick them the first time (or removing them, tossing that less-sticky tape, and starting over with fresh tape). You can also always start all over again if you don’t like the initial results (just spray the whole thing with white paint again, wait for that to dry, and asterisk it again for an easy do-over).
So that was our little DIY doormat adventure. When we were brainstorming handmade gift ideas, we figured a doormat is a pretty universal present. It might sound strange at first, but most of your friends and family members have some kind of a door, right? Plus we think it would be a fun gift idea to go put it on someone’s porch for them (and leave a note so they know who it’s from). Has anyone else taken on a doormat project? Sherry loves this homemade house number version by that crafty countess Martha Stewart.
Update: You can check out all of our favorite holiday decor finds here – many of which are under $15!

Jessica F. says
You’re a dear, thanks for sharing!
Beth@Just{Heart}It says
I like the snowflakes better. Sorry to say, but I didn’t know that was a deer until you said something. I thought it was a desert cactus or something. Oh well.
So, Sherry, we going to see a video of that dance sometime (you, not Elaine)? :-)
YoungHouseLove says
Never!
xo,
s
Karen R says
Loving these! Does the paint stay put once someone wipes their feet?? Would love to have one, but afraid of green footprints throughout the house! Awesome idea though!!!
YoungHouseLove says
Hey Karen,
As long as you use good quality spray paint (not that $2 stuff) that says it’s for use outdoors it should be 100% fixed in place once it’s dry (so no worries about painted footprints in the house since it’s made to hold up to rain and snow). Hope it helps!
xo,
s
JMB says
TOO CUTE!!I like both designs, but especially the reindeer :o)
Bethany says
Love it! So cute….
But I also have to shout out to your mad photoshop skills to remove your background so crisply…your drop shadows…everything! Can you tell us how you did that?
YoungHouseLove says
Hey Bethany,
Real Simple required that our photos be on a white background, so we got a few sheets of white posterboard and took pics on that as we went. Then we just used Photoshop to clean up some of the posterboard edges for a crisp white background that looked more seamless- and John even dropped a shadow (using the “drop shadow” tool that pops up when you double click the layer). Hope it helps!
xo,
s
april's craft nest says
how awesome is that deer head!?? all that mess of tape turned into one beautiful looking mat!!! congrats!
Jessica @ How Sweet says
That is so cute! Love it!
Em says
Looks cute!! However, when you wipe wet shoes (from rain or snow) on the mat, won’t the paint come off on your shoes? Or smear all of the mat?
YoungHouseLove says
Hey Em,
As long as you use good quality spray paint (not that $2 stuff) that says it’s for outdoor use it should be 100% fixed in place once it’s dry (so no worries about painted footprints in the house since it’s made to hold up to rain and snow). Hope it helps!
xo,
s
Shreya says
LOVE the Reindeer head!
Leslie says
Brilliant! And when I think of all the personalization possibilities…..!!
Erin R says
I also dance a little jig when I get excited. My husband calls it “the happy dance”. He always laughs because he knows that I only do it when I’m genuinely tickled about something ;) and because I look like a goof ;)
Lori says
Ha, nice. We used this same technique back in August when we went to a rock concert for one of our favorite bands. We got a couple of black tees and found some clipart online of bunnies (the band’s logo is a bunny). Cut out the bunnies and stuck the stencil to the shirt and sprayed on some purple! We then outlined the image with a silver sharpie. They really turned out awesome! :) here’s mine, while we were painting: [http://i489.photobucket.com/albums/rr260/lokiroki/tbmt.jpg]
Rachel @ The Avid Appetite says
I absolutely love this idea! I can’t wait to try it!
Irene says
I like the snowflake idea a lot and you can get a better quality mat b/c the holiday ones aren’t that great.
Rebecca @ the lil house that could says
Awesome idea! I would have never thought you could use just regular old spray paint.
I was actually in search of a blue/silver winter doormat and everything out there is red and green! I decided to throw in some green and now I can reuse my spring mat for Christmas. If I hadn’t done that, I would totally make one of these!
JME says
Awesome. I was just googling DIY holiday gift ideas.
CBH says
What a brilliant idea! I love it. Never thought of that: a can, a rug, a stencil…Voila! Thanks for sharing.
Karrie says
Great idea! This past summer, I spray painted an ugly door mat (it came with our house) gray after striking out trying to find one. I can say from experience that it holds up well and it does have some fading but overall still looks nice!
April L. says
Okay, I have to admit that when I saw the first two pictures, I thought they were of the finished product, and I was a little scared. “Really? Their projects are usually much more sleek and pretty. What’s going on here?”
And then I scrolled down and thought, “Ah, that’s better!”
Erin says
You two are so inspiring! I’m so proud of you (even though I don’t know you) for the way you embrace so many new and exciting opportunities. I’ve been reading your blog for years and it’s so fun to see all the fun things you get to do. You truly inspire me to dream a little bigger.
Hayley says
Hi J & S,
I followed the link to the Martha site, and it specifically said to use enamel spray paint. Any idea why and whether this is necessary? Thanks.
YoungHouseLove says
Hey Hayley,
Martha’s “enamel” spray paint detail is nice because it’s the most durable spray paint (which will hold up better and last longer). So we definitely recommend that over the $2 cheap water-based stuff that might have trouble in the rain! The good news is that most spray paint is made for indoor and outdoor use these days (you definitely want to look to see if it’s outdoor-approved on the label), so it’s meant to hold up to rain, ice, snow, changes in temperature, etc.
xo,
s
Patti says
Real Simple called you to do this?!? That IS amazing!! You should be dancing!! {{like the BeeGees say}} I had to laugh at myself, I thought the pic of the mat with the frog tape was the finished product at first … I thought to myself, oh dear how unfortunate, this doesn’t look like yhl quality at all! But as I read on I saw my error and how cute it turned out … now that’s more like it!
J says
Ya’ know, this has LOTS of possibilities! I can just see several of these on a wall with stenciled florals or geometrics.
J'Anns Boutique says
Wow great ideas!
http://jannsboutique.blogspot.com/
Britt says
Love love love it! I am having a turquoise Christmas ( http://ababyadogandablog.blogspot.com/2010/12/im-dreaming-of-turquoise-christmas.html )and wanted a welcome mat to match so now I am off to the store for the supplies!
Celestia says
I understand why you went with the deer one but the snowflakes are awesome! I’m totally going to steal this idea. Do you think the snowflakes would look okay on a rectangle as well? I know it’s not as “snowglobe-y” but I don’t think I can handle a round doormat.
YoungHouseLove says
Oh yeah, they’d look just as cute on a rectangular mat I think!
xo,
s
J says
You guys are just amazing. I so love this!!!!!
kristen f davis says
cute idea! reminds me of my DIY rug that you guys posted about looong looong ago!!
Kali says
Real Simple is by far THE best magazine in my humble opinion so I wanted to say a HUGE congrats for being asked to contribute to it. I would be dancing for days!
Jen says
How cute!! I wasn’t seeing the deer until I scrolled down to the finished version…then it jumped right out at me! Love it!
carolinaheartstrings says
What a neat idea. If my Ikea store was anywhere close by, I would be in the car right now.
Melissa @ HOUSEography says
That is super cute! So many possibilities – santa hat, trees, initials, etc. Great ideas.
LittleMissEclectic says
These are so cute and do-able! Thanks for the little tutorial.
Lisa V says
Wow – you could do so many different patterns with this technique. Thanks for sharing.
Robin says
how cute!! I would never think to use a circle door mat but I love it!!
sarah @ handbagsnpigtails says
GENIOUS! I love it!
Elizabeth says
Hey you guys…your paint pen glasses are on Apartment Therapy today!
http://www.apartmenttherapy.com/chicago/diy/diy-decorated-drinking-glasses-young-house-love-133852
YoungHouseLove says
Wahooo! So exciting. Thanks for the heads up!
xo,
s
Sheila says
This isn’t your very first Real Simple project is it?…seems I remember something from a while back.
This is so cute and easy… easy gift for someone who has everything, and easy craft for these busy busy days ahead. Thanks!
YoungHouseLove says
Hey Sheila,
A waaaaay long time ago Holly Becker of Decor8 wrote about us on the Simply Stated blog, but otherwise this is the first time we’ve teamed up with Real Simple. Very exciting indeed.
-John
Kate S. says
Thank you for giving me the best DIY christmas present idea ever!!! :-)
Rose says
Hmm. I actually like the snowflake one the best. I am going to have to try this next spring. For the moment, every outdoor surface where I live is covered in snow!
Melly says
These are both incredibly cute.
Congratulations on the Real Simple feature!
Rachel H. says
Very cute! I think a PDF pattern of the reindeer might have helped though for those of us who are less artsy than Sherry :) I think I would have a really hard time trying to emulate the reindeer just based on the picture on your website.
YoungHouseLove says
Actually John taped off the reindeer just using a picture from google images on the computer as a reference point! It’s only tape, so you can always redo things until they look just like you want them to!
xo,
s
Clare says
SO cute! I think you just gave me the idea for a present for my Dad and his wife!
Joy says
I LOVE them both but especially the reindeer. I think I’m going to make mine with just one more detail, a half-round red nose at the bottom. That will add a little shot of contrasting color. Love everything you guys do. Thanks for sharing!
Courtney says
This is awesome! Unfortunately I don’t have an Ikea anywhere near me, so do you think this would work on a cheap door mat that already has a print on it? Could I spray paint over the other design or do you think it would bleed through? I like the idea of using colors, but I would think black would have to be the only color to cover up another print. Thanks!
YoungHouseLove says
Yeah, it should work. Maybe use Kilz spray primer first to block anything from coming through? Hope it helps!
xo,
s
Rebecca says
Love it! The first one is super cute, but I feel like if *I* tried to make antlers out of painter’s tape, it would come out looking like a “special” deer. The second one I could totally do, though, and it’s just as snazzy!
P.S. Thanks for posting the reminders about your BabyCenter posts….I always go look at them, and there’s not really a way to subscribe just to your posts on their site. Your baby insights are great!
Lonely Wife Project says
I would never have thought to do this. Another cute idea from the famous DIYers!
Rosa @ flutterflutter says
LOVE IT!!
Carrie says
This is sooooo simple and I’ll definitely be making a few this Christmas.
You could even move the reindeer head up a bit to get more of its face on the mat and spray a little red nose (a little more complicated but it could be cute too)…this has inspired so many ideas to zip through my head.
You guys are great!
Rachel says
Did you guys consider making a stencil out of contact paper? I wonder how that would work compared to the painters tape.
I’m so making this for my new-home-owning brother and his wife. Gee, I hope the garage is still warm enough to spray paint in!
YoungHouseLove says
That’s actually a great alternate idea! We worried that contact paper might be harder to redo if we didn’t like the design (since tape can easily be peeled up and redone, but once contact paper is cut you’d need a whole new piece to start over). I guess we thought it was easier to build up tape in steps to create the design, but if contact paper is more your speed it could totally work!
xo,
s