Alternate post title: “In A Minute, I Have To Hairdry The Chair”
Guys, I did something crazy. Since we’d like to take our $25 hotel-ish dining chairs to a crisp not-patterned apple green (the curtains I want to make will be patterned, so I just want chairs in a fun color but without a pattern that I’ll tire of) I decided to paint them.
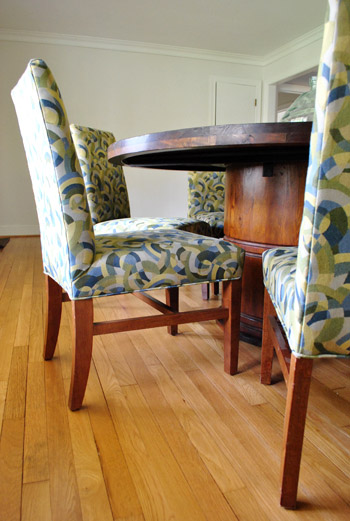
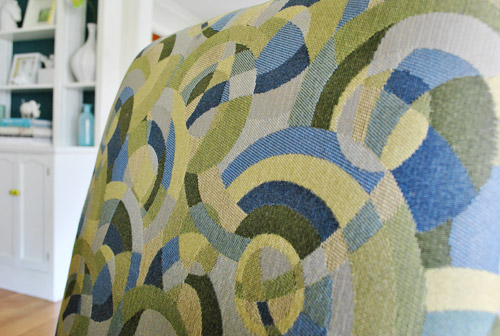
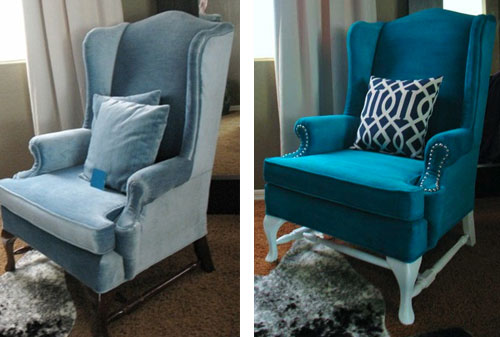
I know. Insane. But I didn’t think I had much to lose since the backup plan is to reupholster or slipcover them (both of which would still be entirely possible if I didn’t like how the whole painting thing turned out). I went into it as a hmm-this-experiment-should-be-interesting thing. Nothing was guaranteed and I felt like a crazy person the whole time. Yup, I was skeeeeered. I mean who paints a chair? Well besides a few amazing bloggers who have posted about how well it went for them. For example, this tutorial was up on my iPhone the entire time for reference and encouragement. Just look at Kristy’s amazing chair transformation. She did that with paint!
So here’s how it all went down. I pretty much just based my method on Kristy’s breakdown with a bit of flexibility since the directions on some of my supplies conflicted with a few steps. And speaking of supplies, here they are (that’s the Top Chef finale in the background BTW):
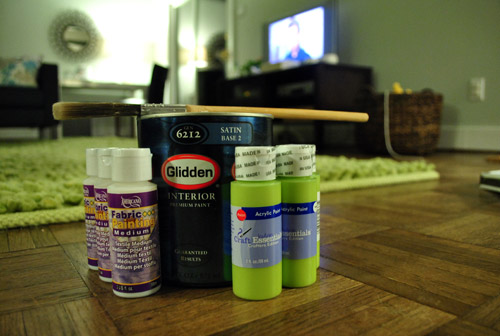
I got three tubes of “Fabric Painting Medium” and three tubes of acrylic paint in cheerful apple green from JoAnn Fabrics for under $10 total. I also picked up a quart of satin interior paint by Glidden in Granny Smith Apple (I thought it was meant to be since I’ve always talked about “apple green” chairs).
Then I just followed Kristy’s directions for the most part (admittedly not to the letter because I was also trying to adhere to the instructions on the back of my specific fabric medium, so I tried to walk the line between those and Kristy’s) and mixed one part latex paint and one part textile medium in a bowl. In order to get an even ratio I even got all type-A and dumped out the fabric painting medium into a measuring cup so I would know how much paint to add to keep the amounts equal. Here you can see that it was about a third of a cup:
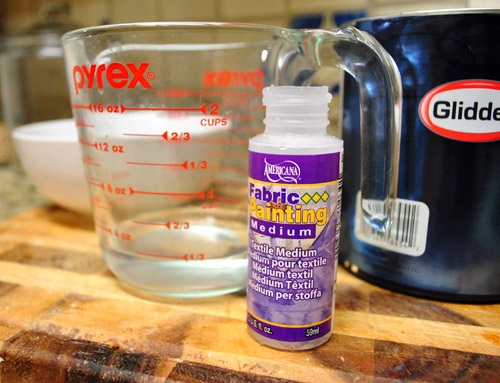
Of course I accidentally dumped way too much paint into the measuring cup so I had to pour a good amount back into the can, but I was definitely happy that I wasn’t just trying to eye things (would’ve had way too much paint in the mix).
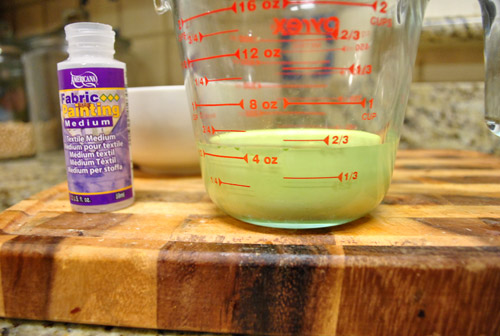
Eventually I got down to a third of a cup of latex paint and poured that into the third of a cup of fabric painting medium that I already had in the bowl.
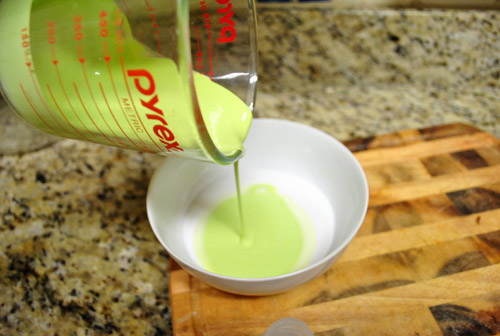
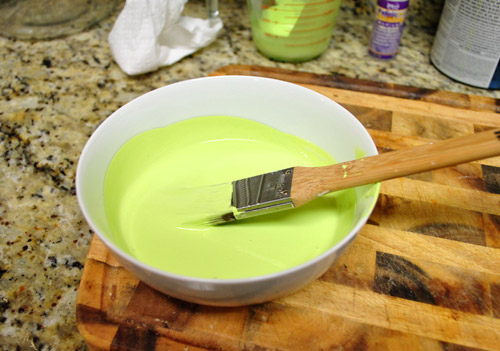
And mixed that up with a brush that I had on hand. I was a little worried because the whole thing was looking pretty yellow but paint is always kind of an odd color until it dries and gets darker.
Then I added about a quarter of a cup of water to the bowl to thin things out a bit per Kristy’s suggestion. Next up was spraying down the chair with water (I reused an old cleaning bottle) so it was moist and ready for paint to glide over it evenly (instead of soaking up too much and getting all clumpy).
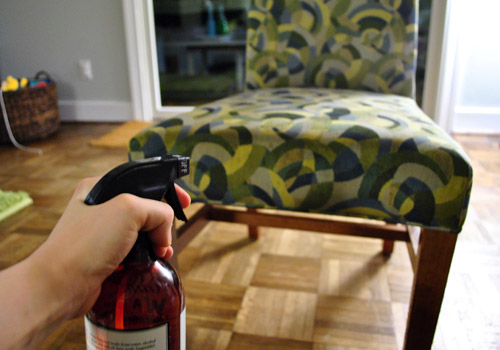
Here’s an in-progress painting shot that John grabbed over my shoulder as I went (I was too afraid of getting it wrong to stop and pose for a clear pic).
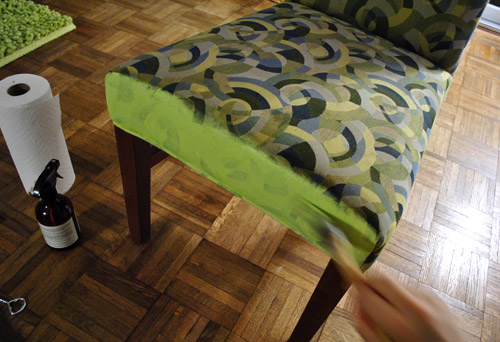
And here’s the after. Well actually I still had a few more steps left, hence the “wait a minute I have to hairdry the chair” title. John asked if I wanted to watch The Soup and I said, yup you guessed it: “wait a minute I have to hairdry the chair.” Which struck John as hilarious for some reason (I can’t imagine why) and he proclaimed that it had to be the title of this post.
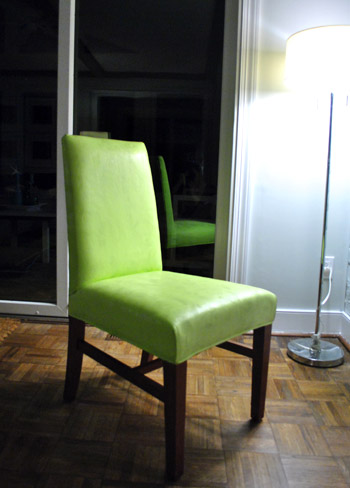
The reason I was supposed to hairdry the chair was to set the textile medium (it needs heat, and when you can’t toss whatever you’re painting in the dryer, like a chair, you can apply heat with a hairdryer. But I reread the instructions on the textile medium tube and it said that I had to wait a day for the heat-setting step. So we watched The Soup and my crazy painted chair sat in the corner of the living room drying.
Here are a few first impressions:
- It’s way too neon and not as apple green as I’d like (my fault since I chose the color, but that could be fixed with different paint).
- Man, that took forever! Over an hour and a half to paint one chair (I applied a few even coats for better coverage). That factors out to 12 solid hours to do all eight chairs.
- It looks kinda cheap and those annoying swirls in the fabric still show through. See?
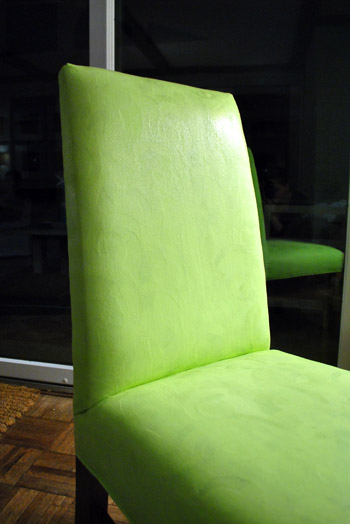
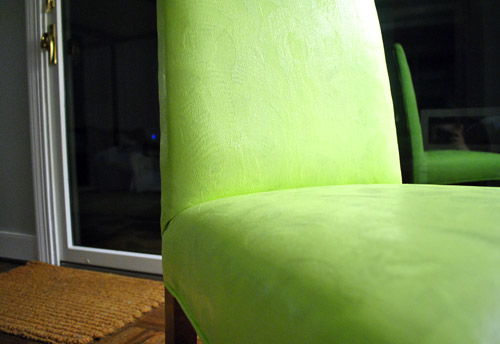
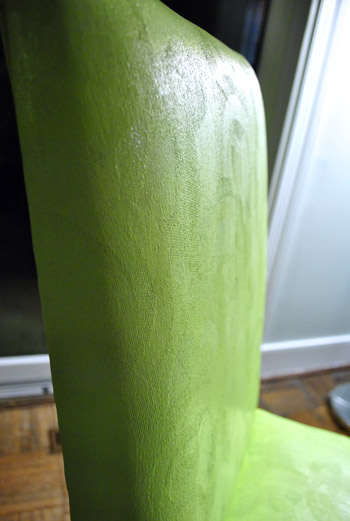
And here’s where we ended up after sleeping on it:
Slipcovering or reupholstering is a better solution for us since we’re not happy with the swirly texture that still shows through, the semi crunchy feeling (they’re not as smooth as vinyl, more like a rough burlap), and the odd look of painted seams (the flat parts of the chair don’t look as crazy, but the seams/folds in the corners just look gunky and unconvincing – as if they’ve very clearly been painted – since they have).
This method is obviously one of those it-depends-what-you’re-painting experiences. Because seriously, how amazing is that turquoise painted chair at the top of this post? I’ll save you the scrolling trouble. Here it is again (with a full tutorial here). So inspiring, right?

And although we didn’t have the same success, we’re glad that we tried this whole crazy process just to have it under our belts and share it with you guys (well, we didn’t end up applying the last coat of acrylic paint to finish things off because we decided to abort the mission, but I did later hairdry it to set it). And it’s definitely set for good, so for anyone wondering if a painted chair will rub off on the person who sits on it, nope. It’s just like how you can wear and even machine wash your painting clothes over and over again without worrying if they’ll smear. Once that paint is set into your shirt it’s hard and permanent (and the fabric medium is meant to help soften the paint so it’s less crunchy, in case you’re wondering about that additive).
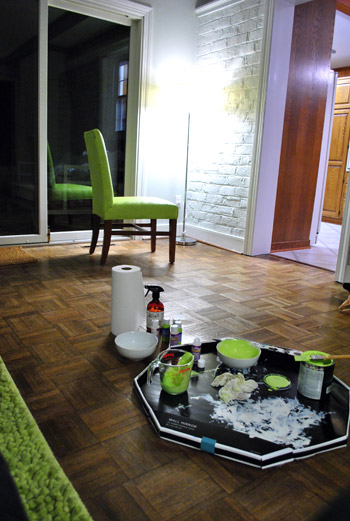
So as of right now the green painted chair is living in the crazy cluttered playroom while the other seven unpainted chairs are still hanging out in the dining room waiting for reupholstering or cheerful apple green slipcovers.
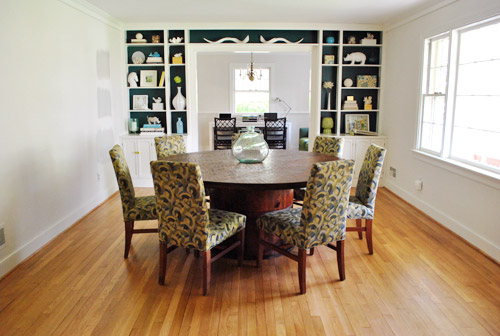
We’ll keep you guys posted as this crazy chair adventure continues. Who knows where we’ll end up (our guess is slipcovers but you never know)…
Psst- We’re talking about how kids never fail to want the only non-toy items within their reach (the remote, your cell phone, the keys, your sunglasses) and we’re divulging Clara’s very favorite (and admittedly very weird) not-a-toy toys over on BabyCenter.

ALittleBite says
Too bad it didn’t work! I’m sure slipcovers will be much better though… you can always through them in the washing machine that way!
julie says
interesting, it almost looks like coated canvas, like the material of a louis vuitton bag
mike @ the lil house that could says
I thought the same thing!
Adam says
I have been weary about the painted fabric since you or another commenter mentioned it a few posts ago. I just imagine the paint cracking each time you sit down… Since parson chairs are pretty straightforward without too many frills and curves, it seems like it would be easy to sew quick slipcovers?
YoungHouseLove says
Just might attempt that. Only problem: I can’t sew to save my life. But I’m trying desperately to learn! More on that soon.
xo,
s
Julie Grogan says
My suggestions either would be to find some slipcovers, even if they are too big, and nip-tuck them to fit or find one slip cover that fits and cut it apart to use as a pattern. Better yet, what my neighbors and I have done is to barter jobs based on our talents, ie ” I’ll sew if you paint”.
Amanda @ Our Humble A{Bowe}d says
Well, at least you tried. It looked like the chairs had texture, so I was curious about the results. I think you can make a slipcover easily enough for the back and I think you can upholster the seat, too. I’ve considered making fun patterned slipcovers for our Dolce chairs, and that was my plan of attack.
reFresh reStyle says
Well at least you gave it your best effort! Hope you find a slipcover source soon, I know it’s driving you crazy! Good luck!
Debbie
karen @ our slo house says
Well, at least you gave it the good ‘ol college try. I agree with Mike (above), and I think that Parson’s chairs will be fairly easy to slipcover or reupholster.
Have you checked out any adult education classes in your area? (That’s where I was able to take a reupholstering class.)
YoungHouseLove says
I was just mentioning sewing classes to John last night before bed. I think I might have to get in on one of those.
xo,
s
karen @ our slo house says
“Mike”? I meant Adam. Duh….
Kristy Swain says
I’m the one with the painted chair. I love this post. It highlights that it won’t work for every case. If I can change or add anything to my instructions let me know. I was actually using a textil medium that didn’t require heat setting (I ended up with a different one after the second and third coats) so I didn’t set it. But, still no rubbing off or anything. That is one thing that is for sure – patterns and textures show through the paint. And, yep, seams were hard – I really watered that part down so it didn’t accumulate there. Please make any suggestions you want for the tutorial – feel free to email me. It’s awesome that you tried it! I guess what do you have to lose if you are going to possibly slip cover anyway. I’m sorry it didn’t work out, but I do appreciate you sharing!
YoungHouseLove says
I wouldn’t change a thing about your tutorial Kristy! It was perfect!
xo,
s
Katie Kerr says
Does your chair have a crusty texture to it or is it soft like regular material?
Molly McMahan says
Velvet paints wonderfully, I did it a few years ago and changed a champagne set of chairs to black and they ended up looking like old cracked leather…they were so cool.
and I love the royal wing chair, super cool.
Anneke says
Oh my goodness….I just finished trying this and I LOVE it! I definitely learned some things along the way and would love to share. The chair still needs some final sanding, but I posted a sneak peak on my blog (that I finally set up like two hours ago!) I knew blogging would be fun once I figured it out. :-) I’ll have to get some better pictures when it’s done-done, but I was so excited I just had to share. Hope you like it! I love your blue chair, and thank you, thank you, THANK YOU for your tutorial!
YoungHouseLove says
Wow- that looks awesome!
xo,
s
Elisa says
Definitely didn’t know you could paint fabric like that… oh well! Good effort :D And as far as sewing goes, have faith! The only thing you really need to learn to do is sew in a straight line, hah. And places like Craigslist have a ton of old but good sewing machines!
Jessica Z. says
I’m glad you gave it the good ole college try, but am more glad you are going the slip-covered route. I think it will look more professional and put together.
And gotta say, sounds as if we have similar TV taste. We’ve watched all seasons of Top Chef, and All-Stars is tied with Las Vegas for our favorite season. Since you like The Soup, have you watched Community? It’s pretty good, and Joel McHale is his usual self . . .
YoungHouseLove says
Yes! That’s pretty funny too. We’re huge Abed and Troy fans. Haha.
xo,
s
Sara says
A valiant attempt. I would have been too nervous to paint and while I like the color I agree about those stubborn swirls. AND, I adore JoAnn :)
tarynkay says
That chair is such a simple shape, I don’t think it would be that hard to just reupholster them. I just reupholstered a storage ottoman- just needed some appropriate fabric and a heavy duty stapler. It took about an hour, and was surprisingly easy. I am sure that more complicated shapes would be much trickier- but for this, you can probably just screw the legs off and go to town. Anyhow, that seems simpler and ultimately more what you’re going for than sewing slipcovers. And you could always give it a shot with one chair before making a final decision. If you hate it, it’s easy to pull the staples out and start over.
SouthsideShellyP says
I would reupholster.
Lindsey says
I have heard of this technique, but never seen it done before – so at least you gave it a try! I am interested in where you guys find (or how you will make) the slip covers. I have never been lucky when it comes to sofa or chair covers.
Rachel says
I can’t wait to see how the chairs end up! I have two kittens that used their claws to murder my dinning room chairs that look so similar in size and shape to yours. I’ll definitely be looking to you for the inspiration on that project!
miriam says
Honestly, I don’t think the fabric is that bad…doesn’t it kind of look nice with the bookcases? And once you have some art on the walls, a rug, and more stuff in there, might you not like it better?
I would be very wary about lightish-colored solid upholstered chairs in the dining room–stains are much more apparent on solids, and you might end up really regretting it. Have you considered apple green leather (if there even is such a thing?)
YoungHouseLove says
Nope, we’ll never like the original it on seven chairs. It just screams 90’s hotel to us (maybe it’s a you-have-to-be-here-in-person thing). As for slipcovers, we’ve had white slipcovered sofas with a dog and a baby and those have actually worked really well for us, so apple green washable cotton slipcovers should be a-ok. Originally we wanted green leather parson’s chairs but then we found these for $25 a pop (as opposed to around $100 a pop for green leather ones) so we decided to figure out how to Tim Gunn them (make them work).
xo,
s
Sarah K says
Haha. “How to Tim Gunn them”. Love it! Adopting it into my vocabulary today.
Ted says
Because of the simple lines of the chair, it looks like it would be easy to reupholster the chairs with your fabric of choice and a staple gun.
heather @ at home with h says
So what did you do with the acrylic paint? You mentioned mixing one part latex paint and one part textile medium but I didn’t see the acrylic paint mentioned other than the fact that you bought it. Did I miss something or was it in Kristy’s tutorial?
I had a feeling it would feel stiff like painted carpets tend to feel. Good luck with the slipcovers!
YoungHouseLove says
Yup, it was over in Kristy’s tutorial and I mentioned in the bottom of our post that we didn’t go that extra step (it’s applied after heat setting but we just stopped after heat setting). Hope it helps!
xo,
s
heather @ at home with h says
Thanks. I just reread and saw that sentence – I missed it the first time!
YoungHouseLove says
No worries! We know we get all sorts of wordy. Haha.
xo,
s
susan says
I actually like the chairs as they were but you are committed now:) Can’t wait to see the fabric you pick out. susna
Beth says
I love that you post about things that don’t work along with things that do. It was worth a shot!
Megan says
When I’m exhausted and flaking out tomorrow I’m torally blaming you. It’s 11.44pm here in Australia and I have 4 kids under 4 (almost 4, 2.5 and 5mo twins) so I should totally be sleeping built I couldn’t go past that title!!! What a bummer that it didn’t work out but it has me totally excited to see what future final look of the chairs will be.
Liz @ It's Great To Be Home says
Love that you guys tried this! I’ve seen Kristy’s chair and it is mighty inspiring. It’s funny that you posted this today, I just stenciled the Ikea parsons chairs in my breakfast nook and they worked out really well (it wasn’t a whole-chair paint job, which I think is the difference): http://itsgreattobehome.net/2011/04/11/tutorial-customizing-your-ikea-slipcovers/. Sorry your painting project didn’t work out, but I can’t wait to see your reupholstering process!
YoungHouseLove says
Oh yes, I’M OBSESSED WITH YOUR CHAIR STENCILING PROJECT. They turned out amazing!
xo,
s
Jill Stigs says
OH, Liz……………….FANTABULOUS chairs.
Seriously, to. die. for.
Carrie says
A. MAZ. ING!
Liz @ It's Great To Be Home says
Sherry, that just totally made my day, thanks!! :)
YoungHouseLove says
Aw you’re a rockstar! We love your blog and those amazing chairs you whipped up! You’re the talk of the interweb!
xo,
s
Jen @ The Decor Scene says
Def. rockstar. I found her blog through Centsational Girl. Love your blog and love what you did with the Ikea chair. I have one of them at home in my office….might have to try this for myself.
Darleen Wright says
I noticed you wood floor “squares”. Have you ever put a stain on them and how do you clean them. I have the same floor and of course the cleaner I use to get is no longer available.. but then I am wondering about putting a stain on them to liven them up a bit.
YoungHouseLove says
We just moved in a few months ago so we haven’t stained them yet (we eventually want to refinish them along with the rest of the old wood flooring in our house). As for cleaning them, we water down Ms Meyer’s soap and just gently wipe them down and then “rinse” them with a damp cloth with just water on it (not too much water of course- that’s bad for wood). Good luck!
xo,
s
betty in munich says
Someone early in your life must have freaked you out about sewing. It is not difficult and actually kinda fun. If you can paint, put up tile, make a headboard, handle a drill, well sewing is just as easy. Especially things like curtains, pillows and slip-covers which mostly require only straight seams. I mean you aren’t going to make John’s suits or a wedding dress….well actually once you learn…watch out! You seem to be quite the unstoppable force. But I predict if you learn how to sew – and you could teach yourself with some good books from the library – you will wonder why you ever used glue and an iron to make curtains.
YoungHouseLove says
I have actually invested in a sewing machine (a cheap one with good ratings from Amazon, just to get started) and I’m telling you it must just be a gene that’s missing. I cannot sew for my life. Things get jammed. The needle breaks. I have tension issues. It’s a mess.
I have faith that I can learn, but let’s just say it doesn’t come naturally at all. More details on my terrifying sewing adventures soon…
xo,
s
annabelvita says
Which sewing machine did you get and would you recommend it? I’m looking for a cheap but reliable one myself.
YoungHouseLove says
I wouldn’t recommend it yet because I’m a nightmare on it so I don’t know if it’s the machine or me. Haha. It’s a Brother XL 2600i (it had 5 stars as a beginner’s sewing machine on amazon and was really affordable). It’s probably a great machine but I keep destroying things with it. Haha.
xo,
s
Tia says
Sherry, I’m totally with you. I’m missing the sewing gene. Despite taking several sewing classes and having a mom and sister that are really talented, I still can’t sew a straight line for curtains! We can’t all be good at everything :)
Beth@Just{Heart}It says
SO glad you guys tried this, tho!
I’ve been thinking about trying this on a cheap quilt I have – there’s one part that’s red that I would really like to be orange. What do you think – can you paint just a portion of something like that? Does the paint run at all?
And thanks for the “visual” of clothes with paint on them – that clarified a lot for me!
YoungHouseLove says
Nope, the paint didn’t seem to have any runniness issues (although you might want to pull the quilt tightly over something so you have a nice taut surface to paint (so it doesn’t get all wiggly and bunched). Good luck!
xo,
s
Laura says
Just out of curiosity, what is the black octagon you’ve got all your paint supplies on? I’ve got hardwood floors, too, and I’m always looking for something besides the 4-5 layers of tarp I put down to protect them from errant paint drips.
YoungHouseLove says
It’s an old box that a mirror from Target came in. I use it all the time to paint on!
xo,
s
Snickrsnack Katie says
I don’t think it came out all that bad, but I agree that the swirls still show through. I figured that would happen – but it is great you guys gave it a good try! I say slip-covering is the best bet – just take a sewing class and get movin’! :) I think it will look really amazing!
Kristy Swain says
I agree, slip cover or reupholstering shouldn’t be too tough for these. There are some good slip cover tutorials out there. Again, though, what bravery! Kudos! I just happened to post today on a project that didn’t work out for me. And, on Sunday, I posted about others who have tried painting fabric, one of which didn’t go so well. We all have our projects that don’t work out. That’s when you just have to laugh, post about it and try somethings else! Best of luck to you!! I applaud you for giving it a try!! It made for a great post.
Kim says
I’ve wondered about painting furniture. I’m a fan of re-habilitating furniture but that just seems a little more out there than I’m comfortable with… but like you, I’ve been really impressed with what OTHERS have done :) You should submit this project to Better After since she’s getting ready to do the flip side for fun every once in a while with projects that didn’t go quite as expected.
BTW, I bought 20 yards of upholstery canvas in APPLE GREEN recently for $5/per yard (along with 25 yards of denim at $4/yard) and am excited to do some reupholstery and slip covering. But I’m a nervous nelly because I’ve never done either before. Soooooo, while we’re in the U.S. I’m planning to get some upholstery lessons. Then when we come back in 6 months I’ll be ready to tackle my couch and chairs. I’m doing some in the gorgeous apple green and some in denim with apple green piping.
Felicity @ Our Little Beehive says
I think I had neon zinc oxide sunscreen stuff for my nose in that color when I was on vacation in elementary school. It was all the rage ;)
YoungHouseLove says
Haha, seriously! I went from a 90’s pattern to a 90’s color. Haha.
xo,
s
LauraC says
That’s the color of my kitchen walls that I painted only two years ago. But we don’t have much wall space, and I knew we’d redo the kitchen in a few years so I wanted to do something a little wild and crazy. Actually, I’ve gotten several complements on it. I have cobalt dishes that it looks really good with. Fun!
YoungHouseLove says
So pretty!
xo,
s
Robin @ Our Semi Organic Life says
I can’t sew either… can’t wait to see how you start to get into it. Can you borrow a sewing machine from anyone?
YoungHouseLove says
I actually just bought one on amazon. Just a cheap one with good ratings to get me started. Details when I actually, uh, get started. Haha.
xo,
s
Erin says
Good luck with your sewing adventures Sherry. I actually took sewing lessons from a reputable fabric/sewing company here in Northern VA a couple of summers ago (because at that point I couldn’t even sew a button. Pathetic.). While I had fun at the lessons, and made a shirt and a tote bag, I didn’t learn a thing that I could sustain alone without the instructor standing right over my shoulder. So needless to say, 6 classes later, I still can’t sew a stitch on a machine, but at least can sew on a button by hand!
Amanda H says
Found this super easy PDF pattern on etsy. A “non-sewer/can’t sew to save my life” gal myself, I have had some luck with simple step by step projects with instructions like this one. Am thinking the simplicity of a parson chair’s lines would lend itself well to giving this a spin at home!
http://www.etsy.com/listing/70261588/parsons-chair-slipcover-pdf-format?ref=v1_other_2
YoungHouseLove says
Very intriguing. If only I could sew in a straight line and keep the machine from jamming and the needle from breaking. I’m a disaster I tell ya!
xo,
s
Natalie says
A for Effort!!!!
Have you checked out the slipcovers from Pier 1? http://www.pier1.com/Catalog/Dining/tabid/493/List/0/CategoryID/113/level/a/ProductID/29182/ProductName/Green-Geometric-Dana-Slipcoveruu/Default.aspx
These were on sale at my local Pier1 for $39 each and I recently got a 10% off coupon that you could hunt down for more savings. I am not completely crazy about the ruffle at the bottom, but with the piping, you could easily trim this piece off and still have a finished look. Just an idea!
YoungHouseLove says
Great suggestion! Sadly they have a pattern, and we’re 100% sure we don’t want patterned one since the curtain fabric is patterned and we don’t want it to get too crazy. Haha.
xo,
s
Sami says
First of all – I’m not going to tell you that sewing is easy. I borrowed my sister’s machine to do some curtains.
Had it for 5 minutes – thought I broke it – starting crying. Read the manual cover to cover (fun!) – fixed it – started crying (with joy).
Then I gave it back – bought seam tape – and hemmed my curtains the no-sew way.
However my suggestion would be – buy a pattern or one actual slipcover (and a seam ripper – deconstruct it to make a pattern). Then buy the fabric and cut out ALL the pieces to make your 8 slipcovers.
Then find a friend and/or family member that can sew. Trade them lunch/dinner, possibly free babysitting, or maybe just beg for them to sew the 8×4-ish straight lines for you to assemble the slipcovers.
I owe my sis a few dinners. ;)
YoungHouseLove says
Haha, that just might be doable.
xo,
s
Lindsey Turner says
Wow! What a crazy adventure!
Dawn says
Well,…I like it. I think the pattern texture coming thru adds some fun texture without it being a print in the room. I think it could definately be a darker color though…but I like the result…just my two cents…;)
DanielleR says
I might be in the minority here but I kind of like it lol. Maybe a color a bit more apple-y like you said, but I am kind of liking the look of it anyway. Although I do have to agree with the guy where said he pictures the chair crackling every time you sit … does painted fabric feel crunchy? That’s kind of how I picture it. I actually kind of liked that you can see the swirls through the paint … it adds texture. Maybe I’m a weirdo but I am liking it :)
YoungHouseLove says
It feels rough like burlap. Not totally unsittable, but not smooth like the leather or cotton equivalent. At least in our experience!
xo,
s
Kim says
So were you happy with the outcome of Top Chef All Stars? I was Team Richard for sure!
YoungHouseLove says
We were team Antonio! So after she went home it was kind of a toss up. It seemed like Richard worked really hard for the win (and was expected to win his season too) so we were happy for him!
xo,
s
My Beautiful Life says
I wondered about that crunchy texture when I saw her blue chair. That would drive me nuts.
I would have done the same thing with the hairdryer. Must be a trait of those who prefer not to wait.
;)
Sara @ House Bella says
Well, now you know! A fun experiment though, with little risk for the long run because you could always just slipcover. But I understand how scary the risk must have seemed while you did it! Maybe it depends on fabric – your inspiration tutorial looks like a more fibrous fabric – velvet or similar.
P/S: I l-o-v-e Top Chef. And Richard Blais. Who else can get their smirk and hairdo to line up in the same direction?
YoungHouseLove says
Bwahaha, best ps ever.
xo,
s
Paige says
I was actually hoping you’d try to paint one of the chairs…I didn’t even realize you COULD paint stuff like that…but I guess people paint shirt and other textiles. Sorry it didn’t work out, but can’t wait to see all those chairs in an apple green :-)
Rosalyn says
At least you tried… I give a “A” for effort! :-)
As a seamstress, I would suggest getting a pattern. (I found this one on eBay: http://cgi.ebay.com/Straight-Parsons-Folding-Chair-Slipcover-PATTERN-Cover-/380214621829?pt=LH_DefaultDomain_0&hash=item58868eb685) They help when you are novice (or experienced) seamstress.
Excited to see the end result!
YoungHouseLove says
Very intriguing. If only I could sew in a straight line and keep the machine from jamming and the needle from breaking. I’m a disaster I tell ya!
xo,
s
Liz says
I never knew you could paint chairs! Too bad it didn’t work out better, but I think I like the idea of reupholstering them a bit more. Do you think the fabric paint would crack and peel over time?
YoungHouseLove says
From what we hear the fabric textile medium and thin even applications prevent that from happening.
xo,
s
Angie @ The Country Chic Cottage says
Do y’all know pink and polka dot?? Check her out for fab slipcover tutorials! :)
http://www.pinkandpolkadot.net/
YoungHouseLove says
Off to check them out!
xo,
s
Sarah says
What a scary endeavor! I would’ve been biting my nails the whole time. :-P But, hey, like you said, it was a dud, but it was worth a shot since you don’t plan on keeping them the way they are. I wonder if maybe the success she had with the blue chair has to do with the type of material too. Hers looks almost velvety. I wonder if it went on easier and less cheap looking because of that too. Well, I can’t wait to see where your chairs end up though! :)
Melissa says
I can’t wait to see all the chairs done up in all their apple green glory. It’s my favorite color! :)
I have to ask though – when the heck are you going to paint the dining room?! Is there a reason why you didn’t knock that out while you were already painting the family room and hallway?
YoungHouseLove says
We were just spent after painting the trim and the beams in the living room along with the adjoining hallway. We like to take breaks so we don’t want to do crazy things like punch each other and stop blogging. Haha.
xo,
s
Melissa says
Haha! I hear ya on that one. I lost my blogging mojo in January. I have guilt.
L says
I actually kinda like the finished color/gloss — but you’re the one who has to live with it!
Would fabric paint (rather than medium + latex paint) give you a better finish? I get fabric paint from Dharma Trading Company (online) — I’m a theatrical costumer — and it has done some AMAZING transformations. That said, for the amount of time & $$$s, you will probably be better off with slipcovers.
And, honestly, they are NOT very hard to sew! Good luck and thanks for sharing.
YoungHouseLove says
We read a lot on painting fabric right on the chair and people seemed to recommend the latex paint plus textile medium more than fabric paint for long lasting durability. No idea why. Maybe fabric paint needs more heat to set (like a run through a hot dryer) which isn’t possible when it’s on a chair?
xo,
s
Jayme & Mendi says
Sherry, you totally get an “A++” for effort!! Can’t wait to watch & see what direction you decide to go in with these chairs. Good luck!
And by the way, gotta love some Joel McHale & The Soup!!
We’re fellow Richmonders who just started up a new blog called Her Late Night Cravings. We cover fashion trends, beauty products & shopping finds, but we’ll also get into home decor…which I’m obsessed with! We’d love your support from Richmonder to another. We’ve been YHL fans since January 2010! Check us out at http://www.herlatenightcravings.blogspot.com!!
Jayme & Mendi
YoungHouseLove says
Off to check you guys out…
xo,
s
Barb says
So you gave it a good try. I personally would do the slipcovers if it were my choice. They can be easily removed for dry cleaning or washer and that is a perk.
How hard can it be to sew them? I am not a sewer either but that is just a bunch of straight seams. SHERRY…..You can do it!!! You can do much harder DIY stuff than slipcovers. Just DO IT!!!
Get that pattern on EBAY and do a trial run with muslin. Presto….You will do great. I have faith in you!!!
B.
YoungHouseLove says
You guys are all overestimating me on the sewing thing. I cannot sew a straight seam. The needle breaks. The tension messes up and my string gets tangled. I cry. It’s not a good scene. I do plan to learn, but let’s just say that everyone acting like it should be so easy for me (when it so isn’t) isn’t building up my confidence! I’m feeling more and more doomed. Like I’m just not sewing machine compatible or something. Haha.
xo,
s
KathyG says
It’s not easy, I agree. I’m a barely-can-sew-straight sewer too, but I’ve done some things that shocked even me.
Lesson I learned, it’s v.i.t.a.l. to have the needle in perfectly, and have it threaded exactly right. (my husband usually has to do that part for me for some reason HA – and I cant wind a bobbin to save my own life).
Brigid says
Sherry – I’m with you on the sewing curse. I’ve had my mother try to teach me for years…decades even…anytime I’m at my parents’ house. Its all fine and dandy until she leaves me by myself and somehow I manage to jam EVERYTHING and make a mess. It stresses me out so much that I just handsew anything I need to!
tarynkay says
Has John tried to use the sewing machine? Maybe he’ll have better luck, and then he can teach you and then you can teach Clara and Clara can teach Burger and then you can all sit around reviewing patterns together.
YoungHouseLove says
Haha, I would love that.
xo,
s
Elise says
I’m just wondering why nobody has suggested that John learn how to sew. Maybe he will end up being the seamster in the family!
YoungHouseLove says
Haha, you’re actually the third to suggest it. And what can I say, I like the sound of it!
xo,
s
Kayakgirl73 says
Sherry,
It sounds like you issues are that the machine is somehow threaded wrong. It may be your top threads or your bobbin threads. Also is the bobbin inserted right? That causes lots of issues. There is a website called patternreview.com that offers online classes.
Try having John or someone else follow the threading instructions, they may pick up a small but vital step that you may have missed. Good Luck.
YoungHouseLove says
I’ve triple checked it (and even had John look over my shoulder to check me). Seems like user error. Haha.
xo,
s
Carrie says
I not only cannot sew a straight line- I can’t CUT a straight line and I cannot DRAW a straight line. Both of my grandmothers were excellent seamstresses and my mother is pretty good too, at least with curtains and upholstery and hemming my pants to the proper length for my short squat legs but the gene just missed me. So I feel your pain. It is not that easy. Tiling is easy. Cutting wood is easy. Ripping out sheet rock is easy. Sewing is HARD.
YoungHouseLove says
Haha, it’s like you’re reading my mind. Give me a staining project any day, just don’t make me get near the sewing machine. I’m cursed!
xo,
s
Maky says
I actually like the swirly bits showing through! But then again, maybe it looks different in reality than it does on the pictures.
Glad you had the guts to do it though! Lesson learned, shared… moving on ;)
Can’t wait to see what you end up doing with them! It is bound to be supercool!
Elizabeth says
Thought you might enjoy this post from “It’s Great To Be Home” on a painted slipcovered chair success story. I thought the results were fabulous. http://itsgreattobehome.net/
YoungHouseLove says
Yes I love that project!!! So amazingly fabulous.
xo,
s