And now, for the dang paneling update. Hold on to your hats ladies and gents. This post = wild ride.
As you probably know, we’re no strangers to priming and painting paneling. Sure we could remove the paneling, but it would mean removing and rehanging all the cabinets since they’re hung in front of it – and revealing goodness knows how many scary issues behind it (they’re old plaster walls so that just felt like a big ol’ can o’ worms). And we could attempt to drywall over it (but it would mean drywalling around the existing cabinets and a lot more expense/trouble than just painting it). So we decided early on that we’d once again say yes to painted paneling – just like we did in our former den (which ended up being our favorite room in the house) when it (slowly over the course of 4.5 years) went from this…
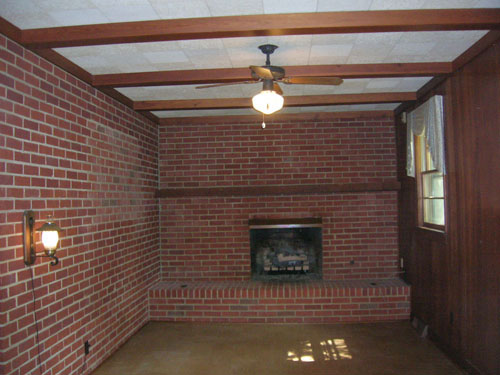
… to this:
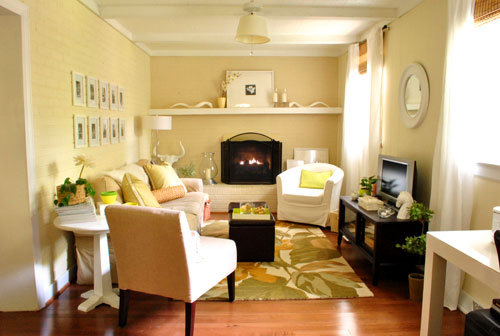
We never regretted the whole painted paneling choice – I guess it’s just like painted brick to us (we don’t mind the grooves that remain after it’s painted since they just add charming and subtle texture). But folks have caulked or puttied those grooves to hide ’em, so you can always do that (or rip it the heck out) if it’s not your thing.
But this time there was a slight variation to the painted paneling process since the last time we tackled it. That variation: the time that it took to get ‘er done. Last time it took us an afternoon (more on that here). So we went into this whole priming and painting thing with high hopes that it would be a quick little project. Yessiree, an afternoon spent completing the paneling would have been awesome (as would seeing a unicorn on our front lawn or finding out that Burger laid golden eggs). Spoiler alert: that didn’t happen.
The time difference was all because we decided to attempt to prime and paint our paneling the no slash low VOC way this time. Just because we like the idea of avoiding as many harmful fumes as we can since we work so regularly with paint and caulk and primer (especially now that we have a baby around). We knew this choice wasn’t a short cut. Heck, it would crack our margin for error right open (since oil-based stainblocking primer is the only professionally recommended way to guard against nasty yellow-orange wood-bleed, which can ooze through as you prime and paint). But we thought it was a risk worth taking in the name of family health. And it was in the end… it just took a while to get there. So here’s how it all went down.
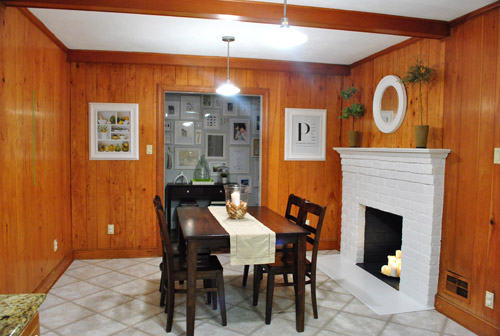
First, here’s what our kitchen looked like before we embarked on our little priming adventure:
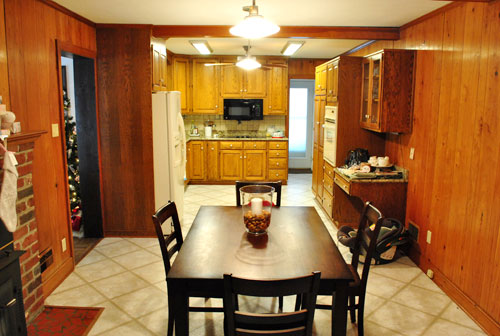
And here’s an old shot of the kitchen from the other direction just for reference (it was actually taken a while back, before we removed the wood stove and painted the fireplace):
Step 1: We wiped down the paneling, beams, and trim with a moist cloth. Some people use TSP for their wipe-down, but we didn’t (didn’t use it last time we painted the den paneling either – but it’s not a bad idea, especially if your paneling feels especially greasy). We also didn’t sand at all (didn’t last time either) but you can if your paneling is especially tough, splintery, or super glossy & shellacked.
Step 2: We removed the vent covers and outlet covers since we decided that we’d be replacing them all (they were bisque and we wanted fresh white).
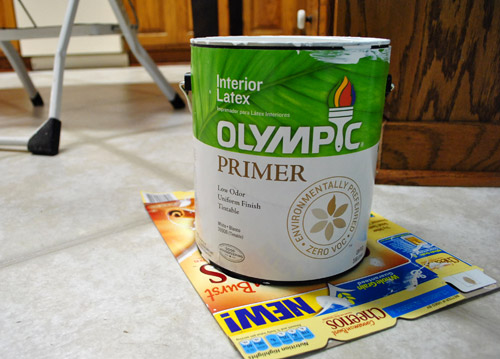
Step 3: We spent about three hours applying a coat of primer to the trim, beams, and paneled walls with Olympic No-VOC primer.
After our first coat it looked like this (about fifteen minutes in we knew we were in trouble):
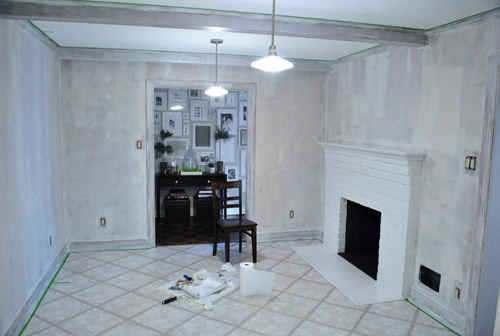
Primer never needs to be super consistent and perfect looking (it often looks uneven and rough but still totally does the job) but we experienced almost immediate bleed-through in a number of spots (when the orangey-brown stain of the wood seeps through the primer and threatens to ruin your paint job). Not good.
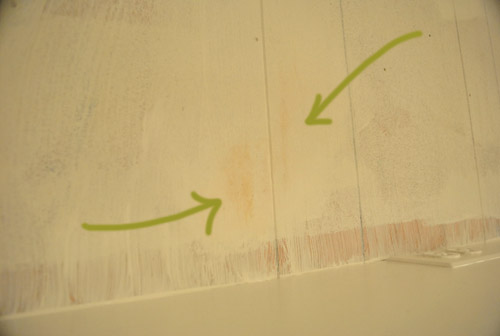
Step 4: We waited for that to dry a bit and tried a second coat of the same primer in certain obviously-bleeding spots, hoping it would block more nasty orange seepage. Nope. It did not.
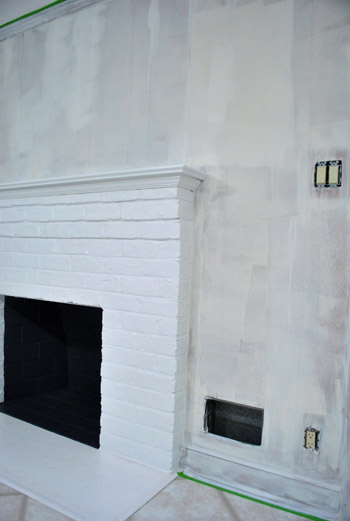
Step 5: We noticed that we had a can of Behr Primer + Paint (in white semi-gloss) in the basement from a previous project (which is low-VOC and nice and thick) so everything got a coat of that (yup, the trim, beams, and paneling got another full coat).
We still had bleed through. Not much, but in certain places it was definitely still there. And it was maddening.
Step 6: We went to Home Depot and found Kilz Clean Start No-VOC primer. It said “stainblocker” right on the label so we gave it a shot on everything (yup, another full coat of a third type of primer went up on the trim, beams, and walls).
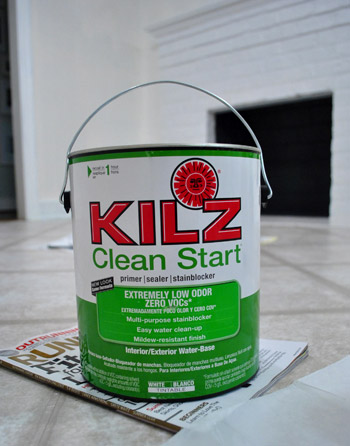
It worked. Angels sang and two white-haired Petersiks rejoiced in the privacy of their freshly primed (finally) kitchen.
Step 7: We painted just the trim and beams with our Behr Primer + Paint (in white semi-gloss) since leaving things primed but not painted for the long term can lead to a nasty and grungy hard-to-wipe-down mess (it’s a dust and dirt magnet since primer is intentionally sticky for paint adhesion). Happily the Behr stuff had great coverage over that last coat of Kilz and looked glossy and amazing. A sight for sore eyes (and arms).
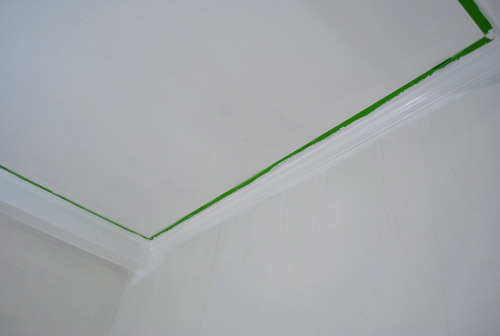
Step 8: We removed all the painter’s tape while the last coat of paint was still fresh for the cleanest lines possible (waiting for everything to dry can cause the paint to peel when you remove the tape). In cases when it was stuck to the primer/paint, we used an exacto knife to carefully slice it along the line of the tape so the primer/paint wouldn’t get pulled off with it.
We’re usually happy to avoid painters tape when we can (I rely a lot on this little miracle short handled brush instead) but since I’m short and I’m the resident cutter-inner/edger, I don’t have as much control up on a stool. So taping around the ceiling trim (and in this case tossing down a quick frame of tape around the baseboards) helped me go faster while I was happy to freehand around the door frames and fireplace.
About 48 hours after the beginning of our priming adventure, it finally looked like this. The trim looks whiter because it’s topped with that semi-gloss Behr paint and not just a flat finish white primer (which was more creamy and less snow-white-ish in color). Now we just have to paint those walls.
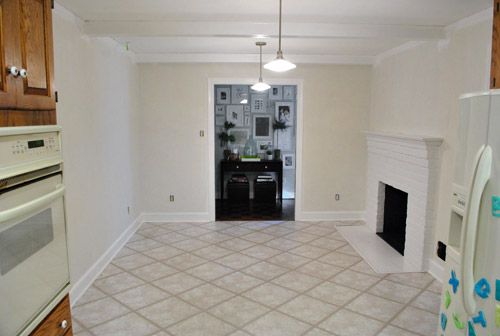
We’re not sure if the Kilz No-VOC primer worked because it was the best choice for the job or because it was layered with the other methods beneath it (perhaps on its own you’d need two or even three coats of it to get full bleed-blockage) but we definitely would recommend 2-3 coats of Kilz Clean Start No-VOC primer followed by two thin and even coats of latex paint if you’re planning to paint your paneling without messing with fumey VOCs. Fingers crossed that’ll work for ya. Otherwise one coat of oil-based stainblocking primer followed by two thin and even coats of latex paint should do the trick (find more step by step instructions on that method here).
It probably won’t take you an afternoon if you go low/no VOC (it took us two days with some babysitting help from John’s parents just to complete the priming stage). And we’re not gonna lie. It was not fun. But it was worth it as soon as we got through to the other side. You know, when we finally crossed that rainbow bridge from bleed-ville to clean-white-walls… hallelujah. It should be mentioned that in very rare cases bleed can come through weeks or even months later (which would make us want to stick paintbrushes in our eyes). Thankfully we painted the wood trim in the living room using the same no-VOC method (four coats of Olympic Premium Paint instead of with an oil-based stainblocking primer) five months ago and nothing has since seeped through. And because the baseboard and trim in the kitchen is the same exact wood, all signs point to: this should work. Of course we’ll tell you if something supremely annoying happens though.
So if somebody would be so kind as to do a nap-time dance for Clara, we’d really appreciate it. So far swinging her stuffed giraffe back and forth and saying “you are getting sleeeepy” isn’t quite doing the trick. Well it’s making us sleepy, but we’re not the target. Has anyone else tried to paint paneling without VOCs? Or been forced to apply four coats of paint or primer for any reason at all? Sucks right? Let’s commiserate.
Psst- Read more about the whole Phase 1 kitchen plan here.

Megan Brewer says
Wow! That paneling is sure testing your endurance! I LOVE your inspiration kitchen! I love everything from the paint color to the glass cabinets to the warm wood floors to the stainless steel pulls on the drawers! Gorgeous!
Happy decorating & living-
Thanks for continuing to inspire me!
http://cottagebluedesigns.blogspot.com/
Megan
Lindsey says
Beautiful!!
Future Mama says
Agreed! Can’t wait to see the next update!!!!
Much love,
Future Mama
http://expectingablessing.blogspot.com/
Becky says
I have paneling in my house that was already painted when I bought it. I made the mistake of painting that section of the wall a deep moody blue — after living with it for about 6 months I have decided I don’t like it. I have a can of Olympic no-VOC out and ready … but maybe I will have to rethink my choice!
sarah (sarah learns) says
oh wow, i’m sorry it was such a pain, but it already looks so so so much better! :) it’s amazing what a (ok i guess 3 or 4?) coats of primer/paint can do!
ALittleBite says
I love the color you’ve chosen for the walls! Can’t wait to see it finished.
Kirsten says
The guys at our local paint store recommend an oil-based primer for use on paneling. (Something about “I don’t care what they say, latex primers bleed through…”) That worked for us – in one coat! :) But of course, it ain’t low VOC so not the best choice if there’s a little one in the house.
YoungHouseLove says
Yup, that’s what we did in our den at our first house, but we decided to go rogue this time. So far so good- but we’ll let you know if it all comes crashing down at some point. Haha.
xo,
s
Alisa says
We painted our 20×25 living room paneling and it was a freaking nightmare. It took probably six coats of paint and there are still some areas that it bled thru but I gave up and just put furniture against those spots..
Kate says
Wow! That already made a HUGE difference. I guess with three coats of primer you would hope it would, right? ;) Hopefully the real paint will go on a lot faster!
Nichole says
Lookin’ good. I love Pinterest for inspiration…just as much as I love your blog for inspiration!
Ashleigh says
I LOVE the new color! I can’t wait to see it finished. Looks so clean and crisp.
Adrienne says
Our house is where the 70’s came to die, so i feel your paneling pain! I broke my wrist this week trying to paint out the wood trim that is 75% of our bathroom!! I used Zinsser 1-2-3 primer as recommended and was told that sanding was NOT required. We had a teeny bit of bleed through…which I opted to ignore. One coat of primer, a coat and a half of white paint down and it’s looking good. Did have some peeling when i removed some tape though so i’m a little worried that skipping the sanding was a mistake. (fingers on good hand crossed ;))
YoungHouseLove says
Oh man, I hope your wrist is ok. That stinks! But I bet those walls look amazing!
xo,
s
Chels says
The 70s died here, too! You can touch up the bleed-through spots with the Zinnser and then paint with your color. Sometimes the peeling is just from using a too-harsh tape…I like the blue “delicate surface” myself.
Kate says
I always use Kilz, I definitely think it’s thes best. And I’ve never had any problem with bleeding through, even with the Eco version. Good luck, it looks great!
YoungHouseLove says
That’s so good to hear! It definitely felt like the best of the three primers we tried! Hooray for no bleed-through!
xo,
s
Meghan, UK says
WOWEE. Your hard work certainly paid off! This does remind me of your first house though (in a completely positive fashion) – will you be going off-piste?
YoungHouseLove says
We’ll just have to see how the room evolves. The color on the walls of the kitchen will be like the inspiration room (which is a lot brighter than anything we’ve used on the walls of our last house) and we’d love to add some more happy vibrancy with a window treatment and some fun accessories. But the cabinets will most likely be glossy white again. Can’t wait to see where we end up!
xo,
s
Meghan, UK says
I think I’m much like a lot of your readers – this makeover is very exciting to read about. I hope you have fun along the way!
Rebecca @ the lil house that could says
Oh great, I’ve had Olympic primer on the lower half of the walls in my entryway for over a month now! It doesn’t look dusty and dirty though. I hope it stays that way until I can finally paint it! School has been kicking my arse.
The kitchen looks great already and I can’t wait to see it all painted! It’s definitely going to be one of those game changers for you guys!
Line says
Nice job! I can almost feel the pain in my arms…
Alyssa says
The kitchen is already looking 10X better with the trim painted and the walls primed!! I can’t wait to see the finished product. Also, thanks for the paneling primer suggestion. I have a feeling I will be painting some paneling in my future….
zinna says
I have to say, I like the no-VOC primer and paint but I find that the coverage is not as good as the old-fashioned stuff and I did have to do several coats more than I anticipated as well.
It wasn’t a big deal since I was doing a half-bath but I can imagine how frustrating it would be to paint a kitchen as big as yours. I probably would have sanded the paneling lightly with a hand-sander, but that’s just me. :)
BTW, it looks AWESOME! Can’t wait to read the post on the final color!!!!!
Page says
So sorry you had to go through all of that, but golly it will be worth it when the grellow goes up!
Tanya from Dans le Townhouse says
Those walls lool great with just primer! Lol. Anything is better than the wood panelling. Too bad you had such trouble, but so worth it!
Emily says
Ha ha those chairs in the last pic look sooo familiar! Apparently “grellow” was meant to be! Glad the priming is done :) Are you going to take it easy this holiday wknd with the family or try to get ‘er done?
YoungHouseLove says
We’re definitely gung ho about painting those primed walls, but we’re not going to finish Phase 1 or anything. Haha. One step at a time is our mantra!
xo,
s
Dianne says
I have had the same problem..I wondered if maybe had smoked in there before..Nothing is worse than trying to cover that.
At least your hard work payed off..it looks great.
Kristen @ Popcorn on the Stove says
I love Kilz. It’s good to know they make a No-VOC primer now! Does the no-VOC version still have that smell (I know it says odor free, but sometimes it’s still there).
The kitchen looks so big right now! I can’t wait to see it with those grellow walls!
YoungHouseLove says
It didn’t really smell at all. The Behr primer + paint had a slight odor but the no-VOC Olympic and Kilz primers really didn’t at all (we did have the fan going and a window cracked for ventilation thought).
xo,
s
Kristen @ Popcorn on the Stove says
BTW, did you see the post today on the Kitchn? It was a kitchen makeover and it had white cabinets with a green color on the walls. So random that shows up after you posted this!
http://www.thekitchn.com/thekitchn/kitchen-design/a-1449-kitchen-makeover-150204?utm_source=feedburner&utm_medium=feed&utm_campaign=Feed%3A+apartmenttherapy%2Fthekitchn+%28The+Kitchn%29
YoungHouseLove says
Love it!!
xo,
s
Cindy Wait says
I’ve had several latex primer failures (forever hopeful or maybe I just never learn?!) and have come to rely on BIN. It smells toxic, but always seals my job. It is truly frustrating when you’ve worked so hard to prep and prime (and even once or twice paint) and then get the bleed-through. I feel your pain but hopefully you’re safe now!
Can’t wait to see your room with fresh green paint and watch the rest of the kitchen progress!
Ever - The red house by the lake says
We went for oilbased when we painted our panneling, mostly because it was newer than yours and the risk of stains bleeding through is still high.
I do not mean to rain on your parade, but every painter have told me that the danger is not over until a few years later – the wood can bleed for a long time, depending on temperature, moist and other things. However, older wood is less likely to bleed, which means that you are probably safe, but that the method might not be as reliable on brand new wood.
It looks amazing, by the way. Can’t wait to see the finished results.
YoungHouseLove says
In our last house we had the same wood trim and we painted it without oil-based primer and after 4.5 years nothing bled through, so we’re crossing our fingers for the same result here. Of course if something annoying happens we’ll chronicle that too!
xo,
s
Lissy says
It always amazes me how just white make such a HUGE difference! You guys are definitely inspiring me to do some home renovation…my husband is getting tired of me quoting you or showing him pictures of your stuff :)
Short, Sweet Season says
Yay! Even unpainted, the kitchen is so much brighter and cheerful looking. So excited to see the continuing transformation.
Sarah B. says
Wow, that makes a huge difference! Looks so good.
I have the exact same picture as inspiration for our kitchen, and I want to paint that color so bad… but my husband hates it! Maybe someday…
Sarah B. says
I forgot to add that he pretty much likes everything you’ve done in both of your homes, and yes, I do make him sit and look at the pictures with me… So here’s hoping he’ll like it when you guys do it :)
Laura says
So far it looks great! It’s funny, I didn’t notice the crisp, modern pendant lights in your kitchen until you primed the paneling. Painting really does make a difference!
hjc says
I had the same thought – I had to scroll up to see if they had changed the lights!
Tiffany says
I have been following your blog a long time but have never posted. Your inspiration photo was the same as mine when we built our house a few months ago! Needless to say, I love your choice! Good luck and I hope the next phase goes quickly! :)
Betsy says
We just renovated our whole house and Kilz was our go-to for both sealing drywall and covering 100 year old stains and other good times. Love the green kitchen and can’t wait to see you transform yours!
Rebecca @This Nest is Best says
Every time I see the before and after shots of your old den, I’m in awe. You REALLY transformed that room! This kitchen is already looking a lot different; you guys are amazing!
Amy P says
I used that SAME picture as inspiration for our kitchen. It’s so fresh and crisp, yet cozy and inviting. You’ll be very happy with the green!
Diana says
It is not exactly the same scenario as yours, but we had quite a time painting our nursery walls. We live in a mobile home, and while it looks like a ranch house in many ways, the materials frequently remind us that it isn’t. Rather than drywall, the walls are made of some sort of panels that feel like they have wallpaper slapped over them (textured and everything), but it is part of the wall so it cannot be taken down. We had to sand the walls (like with blocks of sandpaper) before we began painting, and then it took 3-4 coats to cover the walls with our butter yellow nursery color.
Needless to say, my husband has not wanted to brave another room of the house since then, so I am stuck with my sort of ugly fake wallpaper walls. Would love any tips if anyone has delt with a similar situation!!
Amy says
Phenominal! looks so much better already!
Even though it was the bane of your existance.
Any victory dances in the works since you got this marathon project done?
YoungHouseLove says
We’re saving the dancing until after we’re done painting those walls!
xo,
s
Dixie Redmond says
The power of paint, baby! It looks great with the clean slate. :-)
Dixie
Katie Carroll says
Looks awesome so far!!
We were forced to do six coats (total) on our dining room the last time. When we bought our older home it had a tiny dining room and small-ish kitchen. We painted the dining room a lovely red. Fast forward two years and we knock down the wall separating those two rooms. Now to remove the red! While we didn’t do it VOC-free it took…
– SANDING! We could only get the red color we wanted in gloss. MISTAKE!
– Two coats of flat grey paint. A painter friend of ours told us this trick. Worked great!
– Two coats of Kilz primer
– Two coats of our creamy colored (Malted Milk from Valspar) paint
Melissa says
At least you have that behind you now and only good stuff to look forward to :) We had a similar color in our pre-renovation kitchen – called limeade by Martin-Senour. It was the only thing I really liked about that kitchen! You can see it if you scroll to the bottom of this
http://houseography.blogspot.com/p/house-photos.html
YoungHouseLove says
Pretty! Your whole home makeover still amazes me.
xo,
s
kathy says
Melissa, I love the color of your laundry room. Do you remember the brand/color? (Your remodeling/redecorating is beautiful throughout the house!)
Kim says
It looks great so far! Diid you guys research what kind of paint to use? In our first house we just painted over the paneling in white latex paint, maybe sanding it a little. We had no idea what we were doing (and it showed). We also painted latex over the wood cabinets, which of course peeled off and had to be repainted later! How do you know what kind of paint to use?
YoungHouseLove says
Latex paint is usually recommended over oil-based (or in this case no-VOC primer) since oil-based paint can take a lot longer to dry and show more brushstrokes when novices attempt to use it (it’s also a high VOC product). I think skipping the primer was what did you in (it’s like the foundation, so it has to be sturdy). Good luck!
xo,
s
Keri Beth says
SO much better! You guys are inspiring, as usual.
dominique teall says
Our office is all paneling. One day while my husband was at work I thought I would tackle it in one afternoon with low VOC – as you know not a easy task. Forty million hours and layers of paint later(ok not really but it felt like it)covered in paint and primer and tears it was done…I love it though, it was well worth the horrifying process. I love the texture the paneling adds to the room!
YoungHouseLove says
Wahoo! You go girl. To anyone who did this job alone: I salute you. And I agree- it feels awesome when you’re finally finished.
xo,
s
MissPinkKate says
Looks GORGEOUS! Hurray!
Samantha says
We painted my parent’s dining room, living room and den in one good coat of Kilz then painted the dining room a very similar grellow color, the living room went to tan and a deep maroon. This was done about 4 years ago and there is no stain problems at all. I think you are safe :)
Laura says
It looks great! I can’t wait to see the finished product.
I agree with some other posters. I have used the same Olympic no-VOC paint on 2 projects now, and I’ve been very unhappy with the coverage.
myhonestanswer says
Oh wow, it looks SO MUCH BETTER.
Jamie M says
Wow you guys are troopers!! I would have been swearing by the third coat. (and i really am not the swearing type). But I’m excited to see the finished product! Good Luck with Clara’s naps! I know whenever I want a specifically long nap from my 13month old he seems to know it and doesn’t want to miss anything- so he ends up barely napping at all! How do they do that? How do they know?
YoungHouseLove says
I know right? She’s not acting very tired today. Better wear her out in the backyard or something. Haha.
xo,
s
Misty says
I literally just gasped out loud! I can’t believe the difference already! It looks so good!!!
So, did you get up this morning and run into the kitchen doing the giddy dance and smiling uncontrollably?
YoungHouseLove says
You know I did! Haha.
xo,
s
Danielle @ The Sunshine Girl says
4 coats = 0 fun. I’ve been working on painting my kitchen cabinets for about two months. I did the first set using Rustoleum’s Cabinet Transformation Kit that says you will only need two coats. Yep, not the case. Try 5. Someday I’ll paint the remaining cabinet doors. Probably once I forget how frustrating the first set were. Can’t wait to see more once you paint!
Irene says
In our apartment, we covered our dark paneling by applying 1 coat of regular Glidden paint in a coral color that went on very well. Unfortunately for us the color appeared too pink and we wound up repainting with 2 coats of a yellow color. There was no bleed with the original color, but since it wasn’t a light hue like white or some other pale color, I’m not sure the ease of coverage was because of the color or the paint itself.
Michelle says
ummm yeah. . . I totally understand. I recently painted a dresser and had the bleed through problem that resulted in 5, yes I said 5, coats of paint. I wanted to throw the dresser in the trash instead of finishing (no worries, I hung in there). So when it came time to paint our paneling last month after the dresser disaster I did a ton more prep work (mostly sanding, bleh) and miraculously only had to use one coat of low voc primer and then 2 coats of paint. No bleed through yet. I know sanding sucks the big one. . . but I am gearing up to paint our kitchen cabinets white soon and I will go the sanding route again.
Caity says
Looks so much better already! We’re painting our family room which is completely paneling and brick…hoping it ends up looking fresh and vibrant like your old den and now your kitchen!(And crossing my fingers for no bleed-through…oy vay).