Can’t we just paint some darn cabinets already?! If your patience to see some painted cabinets is wearing thin – just imagine how we feel! When we were planning this kitchen project our big-picture brains said “We retrofit those few doors to match the rest of the room and then we paint. Hooray!” But now that we’re in the weeds (amid holiday madness, no less) we realize that a lot of stuff actually has to happen between those two steps.” There are gaps to be filled, rough spots to be sanded, trim to be added, hinges to be dealt with, hardware to be chosen, primer to be selected, a final paint color to be decided, etc, etc, etc.
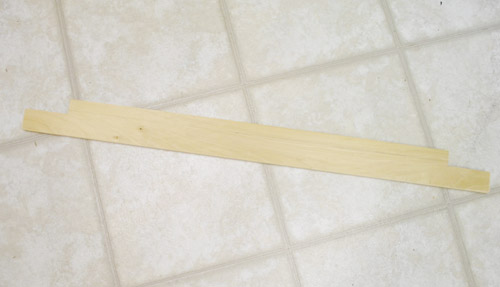
First up, this goes under the category of trim: I wanted to rebuild the window sill and molding so that we could caulk / prime / paint it while we had everything out for the cabinets. And since our old sill was a piece of granite that matched our old counters (but we were very happy with a wood sill in our first house), I snagged a piece of pine board at Home Depot that would fit in the space and cut a couple of notches out of it.
Then I just slid and nailed it into place.
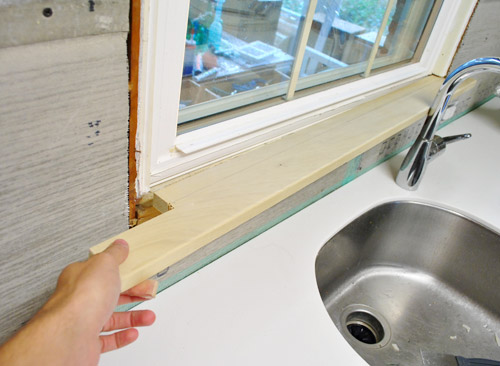
From there, it was the usual song and dance of cutting and nailing the trim casings around the edges. I even added a smaller piece underneath the sill to mimic what we had done on the half wall ledge.
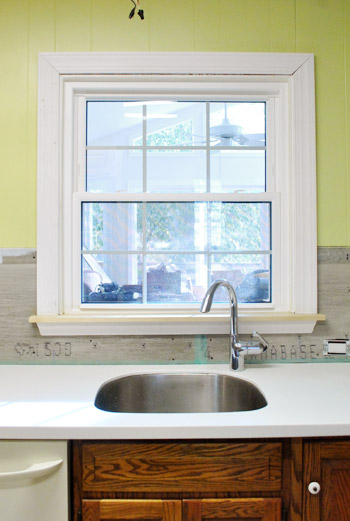
Now that the window’s ready for caulk (to fill the small gaps at the corners), primer (for the raw sill) and white semi-gloss paint (to protect the wood and keep it all durable and wipe-abe) – it’s onto some other trim. Specifically, the toe-kick that goes around the bottom of the base cabinets. A lot of it got removed when we shuffled cabinets around. So in some places I was able to cut down/reinstall the leftover pieces.
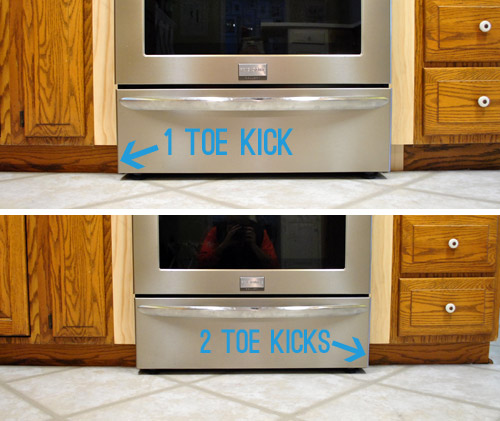
But around the peninsula I needed to buy new stuff (since we added that to the layout). I actually couldn’t find any off-the-shelf toe kick trim (perhaps it was sold out due to last minute holiday DIYers like us?) and although I knew I could special order it through the Home Depot’s kitchen department, I didn’t have that patience. So I just bought some standard pre-primed baseboard that would fit under my peninsula cabinets and installed that. Since everything’s getting painted the same cabinet color, no one should be the wiser. Whew.
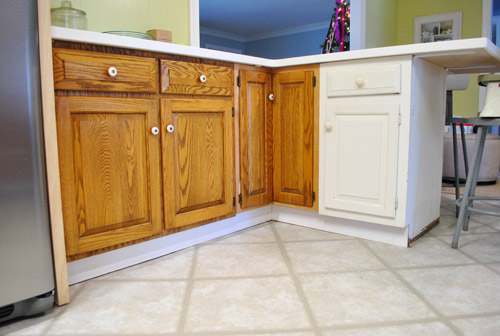
Oh, and since we’re still undecided on what treatment to give the back of the peninsula (worn wood? raised panels? we’ll keep you posted!), that’s why the toe-kick stops suddenly there on the right. I’ll cover up that raw end with whatever trim/wood we apply to the side and back. And although I did buy all of my shoe molding, I’m not installing that until after the new floors are done (we’ll prime and paint it before it goes in to avoid getting paint on the new cork floors).
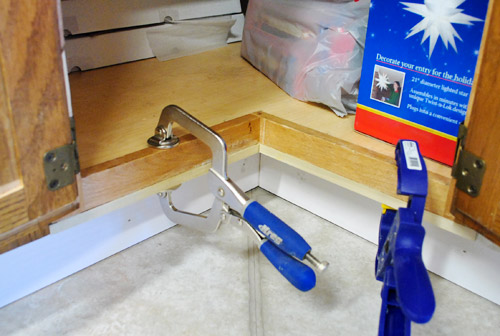
But that wasn’t the end of my trim-venture. Check out the subtle unevenness when it comes to the bottom edge of that corner cabinet’s frame. See how it’s a tiny bit higher than the two cabinets surrounding it? Annoying, but not the end of the world. Fortunately it was exactly 1/2″ too high on each side, so I just bought 1/2″ pieces of pine craft wood and securely wood-glued them into place with clamps and glue boasting an especially heavy duty hold (there was no way I could fit a hammer or screwdriver under there). Once we putty, sand, prime, and paint it should be completely undetectable.
The only other trim we had planned to install at this point was some crown around the upper cabinets. But, believe it or not, we’ve kinda been digging the clean and modern look of just the sharp squared-off edges (we held some crown up against it and cringed, really- it just seems sleeker and cleaner without it and a bit too adorned with that stuff going on up there). So we’re gonna leave things alone for now and proceed without crown. But if we decide later that it’s missing something we’ll just add it after the fact (pre-primed and painted like the shoe molding so we won’t worry about ruining our cabinet paint job).
Oh and as for hinges, we considered hidden ones, but our doors are half-sunk (more on that here) so they have a very thin stepped down edge all around them (and since hidden hinges need to be routed in, our doors would be too thin around the edge so it wouldn’t work for us). No worries, there are plenty of awesome kitchens on Pinterest (according to my obsessed wife) with exposed hinges and great hardware – so we’re cool with them. So after moving on from hidden hinge research we thought we might be able to spray prime/paint the hinges that we had (since they’re pretty rare/hard to find and it would save us money) but we gave it a try with two different satin nickel finishes (we picked hardware- it just hasn’t come in yet- but it was nice to make that decision so we knew what exact finish our hinges should be)… and… it didn’t work.
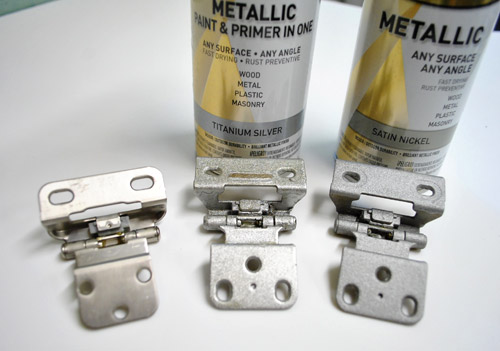
See the hinge on the left? That’s a new hinge (one of the rare ones that actually work with our door- which we tracked down at a local hardware store called Pleasant’s with tons of extra options). And it’s in the exact finish we need to work with our hardware (which they also had in their store, just not enough of it to take home on the spot). Those other two hinges to the middle and right are the original ones from our kitchen after being sprayed with the two types of spray paint in the cans above them. See how they don’t look as smooth and satin-nickel-y… and look a bit stippled and – well, fake? And even worse, when you moved the hinge back and forth (which would happen a million times a day for the next few decades) the paint actually got worn off on the middle of the hinge:
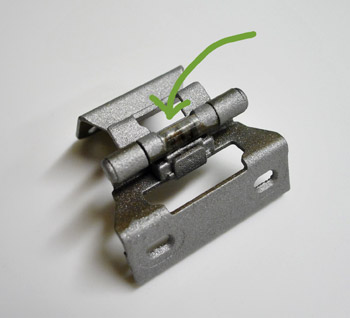
So it didn’t work. But we’re happy we gave it the ol’ college try. Thankfully shelling out $90 for new hinges isn’t really much in the scheme of a full-on kitchen reno, and definitely worth a clean/fresh/new/functional look.
Oh and speaking of other decisions we’ve made, we’ve finally picked a cabinet color. As in, there’s no going back (we got it mixed and brought it home and everything). We were switching back and forth between pure clean white (we loved our white cabinets in our first house) and a soft warm gray or gray-beige color – but ultimately decided against anything too gray or gray-beige because:
- there’s so much gray on the walls of the dining room, the living room, and the hallway that a room in the middle of all of those spaces full of gray cabinets (especially when seen from the gray dining room since they’re so open to each other) might be too much
- our backsplash is a soft gray penny tile, so that’s a less severe way of adding that color to the room than putting it on every cabinet – plus the penny tile will really pop if the cabinets are lighter instead of too blendy
- painted cabinets in a tone of white feel the most classic to us – so we won’t worry that they’re trendy or “out” in a decade
But we didn’t actually go with a bright white color – so we sort of landed in the middle of the two camps. Here was our process:
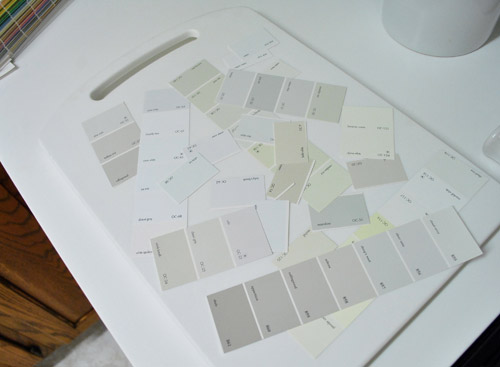
#1. Pull a ton of swatches out to look at them with the counters and the backsplash tile and the rich dark cork floors (which will definitely keep the room from feeling too sterile and white-washed):
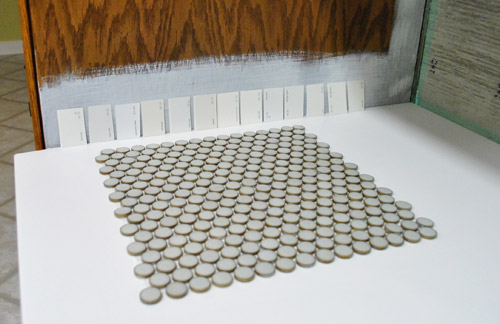
#2. Pick our favorites of the bunch and place them on the plane that they’ll live on (ex: sit them vertically against the cabinets to see how they read vertically since that’s how the color will be seen). Oh and the backsplash tile is there too for our reference.
# 3. Study those colors in the morning, noon, and night (and on a sunny and cloudy day – just to be thorough) and slowly eliminate swatches until we were left with our four finalists:
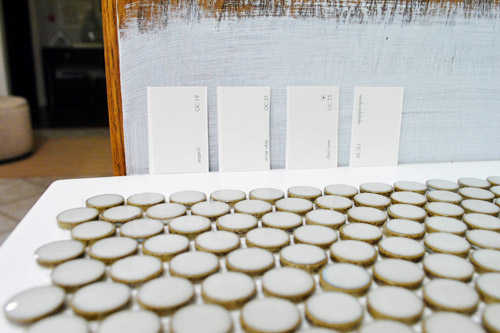
#4. Realize that we probably can’t go wrong with any of them so just go with our gut (our favorite swatch all along- yes, from the very beginning, was the one second from the right). It’s called Cloud Cover and although the picture above hardly does any of them justice, it’s basically not a bright white (which you can see represented by the bright white counter under it) but it’s sort of a very very very light gray- but it’s a warm gray. Sort of the lightest greige in the world that would look like a soft white from afar but as you get closer and see the bright white counter it’ll be clear that it’s not completely white and a bit moody and tonal. So yeah, it’s safe to say we’re so excited and can’t wait to see how bright and glossy and clean our new kitchen is going to look once those cabinets slip into their new “wardrobe” and our floors get the rich cork treatment to keep it from light/white/bright overload.
And speaking of getting to the cabinet painting finish line, here’s a quick breakdown of our steps:
- Remove doors, drawer fronts, and hardware
- Remove everything from our cabinets
- Use wood putty to fill any lingering gaps, seams, and holes (like where the old knobs were since our new hardware won’t be placed the same way)
- Sand dried putty as well as any ridges, scrapes, chips, or other dings that our cabinets have collected over the years to get them as smooth as possible.
- Sand all cabinet doors (front and back) as well as all cabinet frames to rough them up before priming (some folks skip sanding, we want these babies to last forever so we’re not taking any chances)
- Clean up all the sanding mess to ensure that we don’t get dust in our primer
- Use a liquid deglosser on all cabinet doors and frames to be extra sure they’re ready for primer
Buy hardware and finalize hinge plan- Prime (hopefully one coat, depending on what kind of primer we end up getting – still have to talk to a paint pro and decide)
- Paint (we’re hoping that two coats on each side of the doors and the frames give us enough coverage, knock on wood)
- Let everything dry and cure for 3-5 full days (at least that’s what the paint can said the last time we did this- and we followed that to the letter)
- Drill holes for and install new hinges and hardware
- Reinstall all doors and drawers
- Restock the kitchen with all the stuff we took out of our cabinets/drawers
- Take a long nap (preferably for 2-3 days, Clara permitting)
- Take after photos (preferably 500, from every last angle)
Man, just typing that out made me tired. But we’re trying to be thorough because we want our paint job to be clean, even, and durable. As in a-couple-of-decades durable. So even though it will take us extra days going through all of the prep, we think it will be well worth it in the end. It’s actually looking like we’ll be priming and painting during the week between Christmas and New Year’s. Which means we should have 500 after pictures for you in early January. Woot. We can’t begin to tell you how excited we are to have “new” cabinets for the new year!
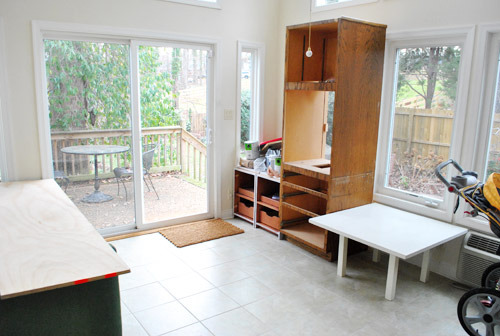
Oh but if you’re dying for a before & after rightthissecond, here’s an equally thrilling much less exciting one for ya. This is what our sunroom (aka our kitchen reno storage room) looked like recently.
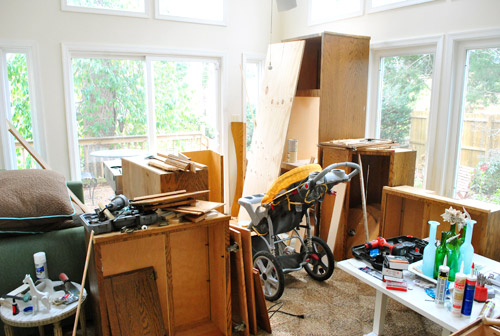
We were basically hoarding every scrap from the demo process “just in case” we needed it to rebuild cabinets or complete the peninsula. But now that it’s clear what cabinet, doors, and trim we needed – and, more importantly, what can go – we did a big clean up. And now it looks like this:
We brought all of the usable cabinet scraps out into the carport to be donated to a local thrift store (one of our local favorites, Diversity Thrift, came right to our door to pick them up on Monday). Then all of the smaller pieces of wood got tossed into my scrap pile in the basement. There might have been some general tidying too… like putting my tools away properly.
Oh, and notice those big planks of spare plywood resting on the couch and the daybed?
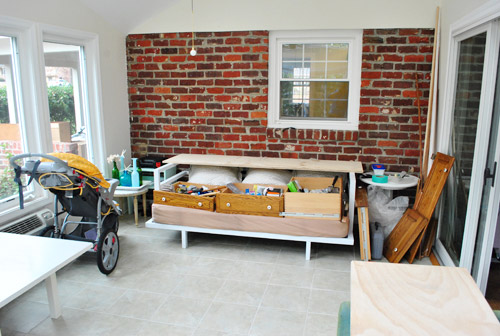
Welcome to our makeshift cabinet door wood puttying / sanding / priming / painting zone (we’ll just lay some drop cloths under the plywood to protect the couch and the daybed first). We figure the sunroom is a good place to spread out and get work done (while keeping things off limits to Clara, and keeping the fumes out of the house – even though we’ll be using low and no-VOC stuff). So expect a lot of pictures taken in here in the coming days.
Maybe I should’ve added “prep sunroom work area” to our list so I could have another thing crossed off. Well, make that two other things…
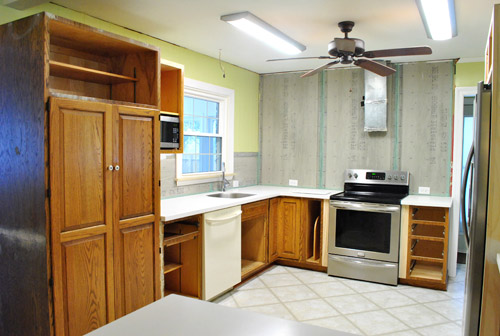
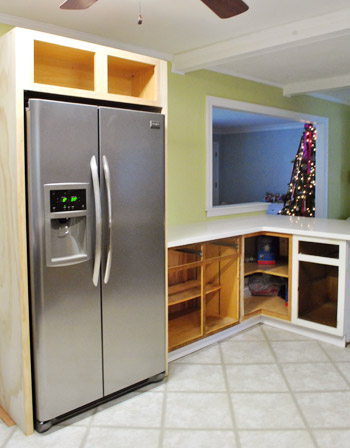
Yup, the cabinet doors, drawer fronts, and hardware have been officially removed. Oh, and since we emptied the cabinets (mostly) I guess that makes another things off our list. Looks like we’re on a roll.
Prep sunroom work areaRemove doors, drawer fronts and hardwareRemove everything from our cabinets
Only fifteen more to go. Let’s just say it’s a good thing my parents are hosting the official Christmas dinner…
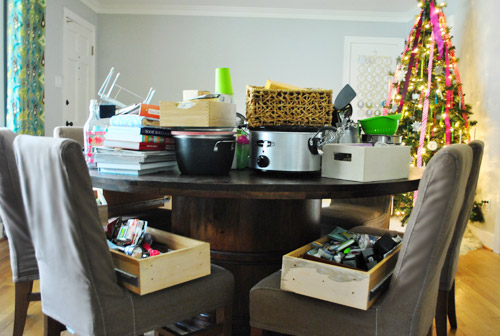
… although we do have four relatives staying with us for the holiday weekend. Thankfully they’ve come to expect nothing less than chaos whenever they come over. They even claim to look forward to seeing what we’re up to. Now that’s unconditional love. Update: although the chair covers look different in the pic above (not sure why) we haven’t dyed or changed them out, so they’re still the same mocha color – for now…
What are you guys doing this week and next? Any big projects? Big meals? Big presents? Big lists?
Psst- We’re over on BabyCenter talking about Clara’s favorite books/toys/songs/activities for anyone looking for last minute toddler gift ideas of something to do with their little ones over the holidays. You can find it all here.

Emily says
Anyone else think of the scene from The Cutting Edge when she skates around going, “Toooeee Piiiiick!”, when they say the 1 Toe Kick, 2 Toe Kick pics??
No? Just me? Oh….
YoungHouseLove says
Haha- I love that movie.
xo,
s
Heather says
Omigosh, I love that movie! And yes, I think of TOE PICK every time someone mentions toe kick! =)
Julie B says
I was thinking the SAME thing! Toe pick!
Stephanie says
I was just about to write that. Too funny. Guess I wasn’t the only one who loved that movie :)
Lisa says
Ha I thought the exact same thing and said to myself ‘now if Sherry wrote this there would definitely be toe-pick references’ haha!!!
Brittany says
yep!
Tonya says
I did too!
Tiffany says
So funny, I was just about to say the same thing. LOVE that movie!!
Laurel M. says
AAAAH! I can’t wait! It’almost like I’M the one getting new cabinets I’m so excited.
Lindsey @ arkadian belle woods says
AWW you guys are so cute! You’re making progress! That’s all that matters and not only that but you guys blow our minds on a regular basis! You’ll have the kitchen finished in no time!
CandiL says
What Lindsey said!! I love that penny tile!! Can’t wait to see that on the walls!!
Kelly says
How cool that they picked up your stuff right from the house! We often put out anything that we don’t need for ‘trash’ the day before pickup, and it always gets taken! There are a couple of older trucks that scout our neighborhood every trash day so I never feel bad about putting scraps out by the curb.
I’m thankful we don’t have family visiting this year so we can work on some patching and touchups that need to be done in our family room, and possibly painting some other areas that desperately need it. Of course with 4 kids home from school that could just be wishful thinking. ;)
Hope you have a very happy holiday!
Stephanie Phillips says
Um…. How about those dining room chairs?? Have they been dyed again?
I’m so excited for you guys! I know the work is less than glamorous, but you’re totally inspiring and I feel like I’m living it with you (minus the achy muscles and money-spending part). Keep on keepin’ on!
YoungHouseLove says
Not yet! Do they look dyed in the pic? Too funny. We haven’t had any dyeing time but hopefully we’ll have some time in the next few months when we get over the hard-part of the kitchen reno (painting cabs and backsplash/hood stuff)!
xo,
s
Alister says
They do look dyed, I was wondering the same thing.
YoungHouseLove says
That’s so funny! Maybe being in the foreground while we focused on other stuff in the background blew them out/made them less saturated.
xo,
s
Alison says
I was going to ask the same thing!!! They look a grey-ish color! Keep up the great work- the kitchen is going to look beautiful!!!!
Sarah says
Yes, they look gray!
Nina says
Excellent work and so inspiring. I love the Diversity Thrift shout out, they’re my favorite Richmond thrift store as well.
Julianne says
You are on a roll! Can’t wait to see the painted cabs!
Caitie says
I cannot wait to see your finished kitchen! It’s seriously going to be amazing!!!
Tricia says
Great to read this update and refresher on how to paint kitchen cabinets. Would love your opinion on my cabinet conundrum. I have old kitchen cabinets–not old like original to my 1930s house, but old like they were installed probably in the 1980s and appear to be made out of cheap pressed wood. They function ok and their shape/style is fine. But they’re dark. I don’t have the money for new cabinets. Is it worth painting them? does paint work on the cheaper materials like pressed wood/ particle board? hmmmm. . .
YoungHouseLove says
I would think primer & paint would work – and would definitely lighten them up! It’s extremely hard to get goo coverage/longlasting durability on laminate cabinets (shiny like Ikea furniture) but pressed wood should take paint pretty well since it’s actually wood and not too shiny. For a big upgrade you could even spring for new solid wood doors eventually, since the frame is hardly seen as much as the doors. But even just some paint should gussy them right up!
xo,
s
Erin says
We had the same thing – 1980s cabinets (the sticker said so!) and dark, and ours turned out pretty well! It made the cabinets sooo much more bearable until we can afford a whole room makeover in a couple (or 5) years.
The room is far from done, but you can check out how it looks here:
http://creekbedthreads.com/2011/07/28/a-67-kitchen-reveal/
YoungHouseLove says
Aw, it looks great!
xo,
s
Melanie @ Mailbox Journey says
The suspense is killing me! :P
YoungHouseLove says
Haha- it’s killing us too! Why do things like this take ten seconds on HGTV? Haha.
xo,
s
Kate @ Twenty-Six to Life says
Great progress! I can’t wait to see how the not-quite-white cabinets looks with the counters!
Ang says
I HEART the tile you’ve selected for the backsplash, but I have to agree, I am getting impatient!!! Hurry it up already! P.S. When are you gonna do the cork floors and don’t you want to put those down before you install toe-kicks and trim?
I can’t wait to see what you guys do! My kitchen is hideous and I will have that 30 year old kitchen done THIS year…right after my master bath.
Hurry, hurry! BTW, do you make your relatives paint while they are staying? :D
YoungHouseLove says
Since there’s an asbestos liner under our vinyl floor we can’t rip them up. So we’ll be floating the new floor as one of our last steps (so we don’t drip paint on it, for example) since it won’t go under any cabinets (but will go under the fridge/dishwasher). So just adding shoe molding after it’s down should make it look seamless (no need to wait to do toe kicks and trim as long as there’s shoe to bridge the tiny gap and make things look seamless). Hope it helps! And yes, we’re going to require that anyone staying with us paints something – even the babies!
xo,
s
Julie says
I didn’t think of it until now but can I ask why you didn’t do the floor before cabinets and moulding? We’ve taken vinyl flooring out of two kitchens while leaving cabinets and it’s a PAIN! Or are you just laying it over the existing floor?
YoungHouseLove says
Yup, there’s an asbestos liner under our vinyl floor so we can’t rip them up. We want to float the new floor as one of our last steps (so we don’t drip paint on it, for example) since it won’t go under any cabinets (but will go under the fridge/dishwasher). Hope it helps!
xo,
s
Emily says
Will you be painting the insides of your cabinets so the interiors all match? I will be DIYing our kitchen soon and love watching your progress!
YoungHouseLove says
We’ll be doing the front and the backs of the doors and the front and side of the cabinet frames while the inside of the cabinets remain oak. That’s how we did it when we painted the cabs in our first kitchen, and it has a nice long-lasting durability (since things can be jammed and scraped in and out of the cabinets without worrying about any chipping or peeling). We also went that route for the cabinets in the office built-ins and love the result – it’s actually a pretty cool two-toned look. Hope it helps!
xo,
s
Tracey says
New slipcovers for your dining chairs? I can hardly wait to see those penny tiles on the wall!!
YoungHouseLove says
So funny- you’re the second person to say that. They’re not new or dyed- must just be the pic! Off to add a note about that in the post to clarify!
xo,
s
Monika says
Can you tell us the type of paint you purchased for the cabinets? Did you go with BM Advance again?
YoungHouseLove says
Yup, love that stuff!
xo,
s
Kristen @ Popcorn on the Stove says
You guys are keeping very busy! The window sil looks great and it seems like everything is moving along well. Be sure to enjoy the holidays between adding coats of paint to the cabinets!
Katie says
Typo alert: “Thankfully they’ve come to expect nothing less than chaos whenever hey come over.” I think hey is missing a “t” :)
YoungHouseLove says
Thanks, off to fix that!
xo,
s
bridget b. says
i love the look of white cabinets. can’t wait to see them finished!
is installing a windowsill always that easy? a tutorial that i read recently seemed to show that changing out a windowsill involved cutting into the surrounding sheetrock and it sounded so complicated that i just decided to putty the damaged part of our sill instead. loved seeing your take on it and will keep it in mind for the future.
YoungHouseLove says
We have always tackled windows this way (we take an undo-what-was-previously-done-and-redo-it-approach, so all of the windows that we have tackled have had this method of trim applied, which we have removed and then re-added). Hope it helps!
xo,
s
Amanda @ Our Humble A{Bowe}d says
Oh man, I hear you on the ‘Can’t we just paint?!?’ situation. I felt like that forever and we just installed our painted drawer fronts. http://ourhumbleabowed.wordpress.com/2011/12/20/i-like-big-drawers-and-i-cannot-lie-2/ It took forever to paint, but so worth it!
YoungHouseLove says
Wow- those look amazing! Isn’t it funny how things like painting cabinets take ten minutes on tv?
xo,
s
Alanna says
i can’t wait to see how the cabinets turn out! i’ve never been brave enough to try painting old cabinets.
we’re planning on potty training our daughter the week between christmas and new years. i must admit… i think i’d rather be in your shoes!
YoungHouseLove says
Oooh good luck!
xo,
s
Ashley Reid says
Progress – yay! Hey I noticed your new SS dishwasher isn’t installed yet. When do you plan to put that in?
YoungHouseLove says
We’ll install that after we add the cork floors (so we can run them under the dishwasher- and we’ll pull out the fridge to get them under there too).
xo,
s
Alyssa says
Great progress guys!!! It’s really coming along and quickly! Although it probably doesn’t feel that way to you, it does to this reader;) keep it up!
Kristen says
Looks like you are making great progress!!! I say put the paint brushes aside and take a week off!! Enjoy the holidays with your family!! I’m sure every reader would be happy to wait while you enjoy some down time!!! Happy Holidays from my home to yours! Xo
YoungHouseLove says
Aw thanks Kristen! I think we’re hoping to have some awesome family time and some great project time too – we might be crazy, but new cabinets for the New Year seem worth working for! We’re also the crazy people who tackle something major every single Christmas for the last five years (our first kitchen reno, a bathroom gut job, a floor refinishing project, moving to a new house, and now this kitchen stuff!)
xo,
s
Kristen says
Oh my goodness!! LOL … Plan to take next year off! haha! :-) Good Luck!! xo
Regan @ RenovatingRothenbergers says
I’m so excited for you two! I’m living vicariously through you because we’re pinching our pennies & hoping to redo our kitchen next summer :)
Can’t wait to see the painted cabinets!!
Kelly says
I sure wish I could get up the courage to paint our kitchen cabinets. I have been saying that I was going to do it for over a year now. My husband doesn’t really want me to do it. So, if I ever do it, it has to be totally perfect and the “OMG, it looks great” perfect kind. That is what I am freaking out about. I am basically afraid!!! LOL!
KathyG says
I couldn’t pass this by, I’ve been exactly where you are.
IF YOU are not an experienced painter, starting with some smaller things first, to build your confidence as well as your husbands.
Get several pieces of thrift store furniture, or even off the street, and make them look new again. Get things with doors and drawers. Practice. (and you’ll get some nice pieces to use, give away, or even sell.).
Once you have the skills to make them look good, you can SHOW him and yourself that you are confident and experienced enough. THEN tackle the kitchen. JMO. Hope it helps, and you get the kitchen you want!
Shannon @ Bungalow960 says
Just read the comment about the asbestos liner, ugh the perks and drawbacks of an old home. We live in a house built in 1924 and we have to be SO careful with any changes we make. Asbestos, lead paint, etc. It’s worth it though!
YoungHouseLove says
Amen! It’s so worth it for the character and the adventure of it- but we’re crazy careful when it comes to the scary stuff like lead and asbestos, especially with our two little ones (Burger counts too!).
xo,
s
Beau says
I’ve always wondered (especially now as I plan my own kitchen project)…what happens to the inside of the cabinets? Do they get painted at all? Im assuming the outside of the door frames do, right?
YoungHouseLove says
Yup, the outside of the frames and the front and back of the doors will get painted while we’ll leave the inside of the cabinets oak. This way we can toss things in there and pull them out without worrying about scratching or peeling paint. We also like the two-toned effect of clean paint with wood interiors (we did that in our old kitchen and in our office built-in cabinets and really love the surprise of natural wood when you open the door).
xo,
s
Brittnee says
I am excited to see your new cabinets, but I still think the grellow might look weird with the cabinet color and tile.
YoungHouseLove says
We’re definitely not afraid to repaint if we end up hating the grellow, but in person we’ve held up all the swatches and tile samples to the walls and we love the pop of color in an otherwise classic/safe room! Once we hang the floating cabinets and add some colorful accents on them (and on the counters/walls with art/etc) we think it’ll all tie in!
xo,
s
Heather W says
I think you will lurve it! I have that same color on my walls with white cabinets also plan to some day get new wood floors in a dark stain and it looks so clean and classic with a modern touch. Eveyone that comes over ALWAYS compliments the color of my kitchen with the white and stainless appliances. I can’t wait to see it but I have no doubts you will love your choices!
Emily says
How thick is the coork flooring? Are you nervous at all that you’ll have enough room under the countertops to slide your dishwasher back in after you’ve installed another layer of flooring?
YoungHouseLove says
We’re a little nervous but we looked at the measurements and it should work (it has little feet that can be raised and lowered so that will hopefully save us).
xo,
s
Debbie says
after such a huge thanksgiving where we flew a gaggle of my relatives in our plane to our AZ home, we decided to go a little lower key (or at least that’s what I thought) for Christmas & new years. after we leave my family’s gathering on Sunday, we are headed to our airport to jump in a plane to go on one of our famous ‘put your finger down on the map & that’s where we’re going’ trips . although, I may have been peeking when my finger landed on NYC. I haven’t been ice skating at rockafeller center in a couple years. we’re spending the week there & coming back the first of the year. it was going to be a low key trip until I found out my sister will be in the city w/ some of her Hollywood friends (think fashionable mainstream actress & her indie actor boyfriend…or are they married now…) for a big industry bash. I wanted to pass, but I haven’t seen my sister in awhile so our low key new York trip has turned into something else…
Marla says
I love how you’re going with a clean modern look and ditching the crown. Have you ever considered ditching the shoe mold too and running the cork under the baseboards?
YoungHouseLove says
We figure since the rest of our house has shoe molding it’s a nice thing to carry throughout the house, and it makes laying the floor so easy so we’ll probably stick with it. Interesting suggestion though!
xo,
s
sophie says
progress! looks good (and probably already feels better, even if it’s upside down)
not so much on the reno front here. it’s snowy and cold and we can’t get enough ventilation at this time of year. But once April’s here, the upstairs carpet is coming out and I’m painting the floor (which we’ve done with other floors, too). Dark forest green.
DIYing, this season, has been reserved for the family boardgame I created.
Hannah says
I love the progress and photo-heavy post! I didn’t realize how grey the penny tile is until you laid it on the counter!
One thing I’ve been wondering (and have seen in the comments a few times) is what’s happening with the pantry cabinet and the door moulding? When the pantry first got moved into that corner it covered up the moulding around the door, and that it would get fixed when the tile and upper cabinet got demoed. To me, it still looks the same, so I’m curious to know how you solved this.
YoungHouseLove says
We’ll be detailing that for you soon! Basically to work with the cabinetry that we had and keep that pantry (which has awesome swing out doors) and achieve the layout we wanted we had to place the cabinet there – but with primer and paint and caulk and some trim we think it’ll look perfectly balanced and deliberate – someday! Haha. Hopefully we’ll have those details for you soon!
xo,
s
Katie says
I still maintain that the link I am MOST looking forward to in your kitchen reno is your new door pulls for the cabinets. In the third pic from the bottom that poor tall cabinet that still has doors on it looks terrified!! ;) Keep up the good work!
YoungHouseLove says
Haha, they’re skeeeered outta their mind!
xo,
s
Laura D. says
Everything looks so awesome! I read your blog often, and my husband and I are actually on schedule to paint our kitchen cabinets about the same time you are! Which means we can’t learn from you ahead of time… bummer. We have bought new cabinet doors since our current ones have terribly 70-s trim on them, and as of now we plan to use a paint sprayer for the cabinet doors, and a brush/foam rollers for the cabinet boxes themselves. What are your plans as far as what type of paint applier/brushes, etc?
YoungHouseLove says
We like to use a high quality angled brush for the crevices and divots in the doors and frame and then roll everything with a small foam roller. That’s the method we used with the office built-ins and it looks great (no brush strokes) and has held up really well! We’re planning to share tons of those details (and even a video) as we go, so stay tuned!
xo,
s
Amanda says
Gorgeous as the kitchen is becoming, I was most impressed with your sunroom organization! I swear, the hardest part about any project is keeping everything tidy enough to live in. Out of curiosity, why did you empty your cabinets? I’ve reno-ed two kitchens, and always just emptied the drawers, and that was hard enough to find a place for everything outside its normal spot. Never had problem with splatter into the cabinets, but I guess you could toss an old towel/dropcloth/paper over the contents if that’s a worry.
YoungHouseLove says
We had to empty the cabinets because of the curious toddler running around! Haha. Keeping everything out of her reach was the way to go (because once the doors came down Clara was a lot more interested in the stuff that she could suddenly see!).
xo,
s
Amanda says
Of course! That makes sense. My first kitchen was pre-kids, and the second I had one immobile baby and one three-year-old. I terrified him of all things paint at the time by dressing him in his favorite shirt then showing him my smeared paint clothes – “Mommy has washed and washed them, and they just won’t get clean! He ran for his bedroom every time he saw the roller for a few years, so open cabinets weren’t a temptation. Now, at 7, he’s right there helping with paint clothes of his own!
YoungHouseLove says
How amazing to have a little helper like that!
xo,
s
Rachel Tatem says
I’m excited to see… you guys do such good work!
Melissa says
Cant wait to see this all come together!!!! Ill have lots of time to follow the progress since…on our agenda for next week is having baby #2 (due 12/29), so I wont have work to get in the way of reading blogs…..I can totally change diapers and read blogs.
YoungHouseLove says
Wahoo! Good luck with baby #2! How exciting!
xo,
s
Jo says
We’re laying hardwood floors in our room and our 2-1/2 year old’s room – painting ceilings, walls, trim as part of the process. And poor husband had to go up in the attic last weekend and repair ductwork, too! It’s hard work doing it ourselves, but oh-so-fun, and our toddler keeps saying “Me help!” – we’re raising another generation of DIY-er. :)
YoungHouseLove says
Haha, I love it!
xo,
s
Allyn says
The chaos at your house reminds me of the chaos at my parents house. My mom is always working on something, and it never bothers us when we visit. No worries.
I seriously love the worn wood idea for the peninsula. Love love love.
Vonda says
I’m exhausted just reading what all you have left, but it’s going to be so worth it.
Tomorrow I’m off to the tile shop to return the tile we borrowed to test drive in our kitchen and to buy what we fell in love with (with mixed emotions). We loved it after trying out all HD and Lowes had to offer and just getting that ‘it’s the 1’ feeling, but the price tag is awful. But they’re giving us a combined discount of 25% and it will be something we see everyday, that will be there forever and that’s how we’re rationalizing it.
http://www.tileshop.com/product/productdetail.aspx?familyID=2129&recordID=5061902
YoungHouseLove says
Ooh – so pretty! I’m sure it’ll make you smile every second you stare at it!
xo,
s
Jessica @ The Desert Abode says
You’re so close to the finish line! I hope you’re successful in ringing in 2012 with painted cabinets–what a great way to kick off the New Year.
I love that you can see the Christmas tree from the kitchen. We had no idea where to put ours in our new abode and ended up finding the perfect spot where we can see it from the kitchen, family room and dining room. It makes us smile. :)
Centsational Girl says
Hey y’all. I’m soooo excited for this! I’ve been enjoying this kitchen remodel so much and now you’re almost ready to paint, hooray! Hey, if you’re looking for tips on primer, I just gotta say, I loooove the Zinsser Cover Stain, sticks like glue baby! It’s stinkier, but way more durable, I used it on my own kitchen island and two years later, nary a scratch. The brush on formula could use a little Penetrol conditioner, only a couple of bucks, and it gives you a nice open time to minimize brush strokes. Of course there’s always the option to spray the doors, it comes in those handy cans and might be worth a try but it requires a certain temperature, and not sure what that is in January in your neck of the woods. Anyhoo, can’t wait to see what you go with as far as paint color, I’m sure it will be gorgeous but I just had to say, that Zinsser is awesome,and you can use any paint on top, including the water based ones. Yay!
xo
Kate
YoungHouseLove says
Thanks so much for the tip Kate! We have a paint guy that we’re enamored with at our local paint shop so we’re planning to pow-wow with him to see what he recommends. We definitely want something super durable, so it’ll be interesting to see if he points to the same stuff! Thanks again for the tip!
xo,
s
tina says
paint…. how exciting!! maybe Santa will bring some elves to help finish the job :)
YoungHouseLove says
That. Would. Be. Amazing.
xo,
s
Sara says
Just imagine – this time next year you’ll barely even remember what the old kitchen looked like! Or maybe not, haha, but still! You’re so close! Good luck with guests over for the holidays! :)
YoungHouseLove says
It’s so true! While we’re working away we keep saying how it’s impossible to remember living in our first house with the old kitchen and soon enough it’ll feel the same way here!
xo,
s
Megan says
No big projects planned this weekend, New Years Eve weekend is another story however!
Just general tidyness and organizing this weekend. Maybe some small projects like putting air vents back in place, light switches, receptacle covers etc.
Ashley@AttemptsAtDomestication says
Ahhh!!! I can’t wait!! I’m beyond ready to see the paint on those cabinets!
bex says
Glad to see we’re not the only DIY-ers that week! We’ll be building in the custom, home-made storage system in our master closet that week. Can. Not. WAIT.
YoungHouseLove says
Wahoo- that sounds so exciting!
xo,
s
Olivia says
Looking good! We just started painting our cabinets this week- yay! We started with the island- it looks great so far http://theprokops.blogspot.com/2011/12/island.html. I started painting the cabinets on the wall last night…crazy what a little fresh paint can do for some old cabinets.
YoungHouseLove says
Wow- those look great!
xo,
s