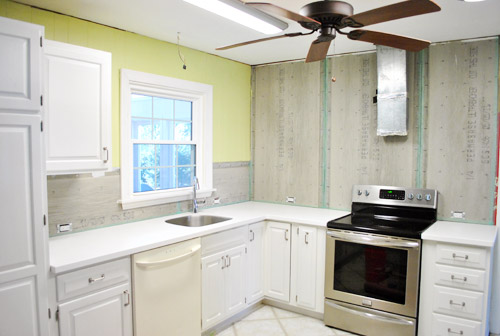
Monday’s backsplash post kinda dove straight into the middle of the project, so we thought while we were back to share our progress we should rewind a smidge to explain a bit more about the process for anyone else out there who wants to tackle something similar. First we had to prep the room. So everything came off the counters.
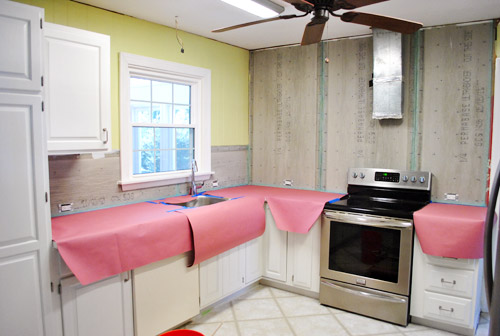
Then down went the rosin paper (from Home Depot). It was recommended by our counter installation guy when we mentioned we were doing a backsplash. It’s basically like brown construction paper, but with an added moisture barrier that keeps any thinset drips from seeping through. We covered each of the counters with cardboard (for extra protection against sharp trowel corners) then taped rosin paper over it, with the painter’s tape going right up to the wall.
Finally we got to start planning our tile placement. We decided to start in the corner under the microwave because it felt like a nice fairly inconspicuous spot to learn the ropes. And it was basically three sheets wide in that area, so we took it as sign that it’d be an easy way to get our feet wet.
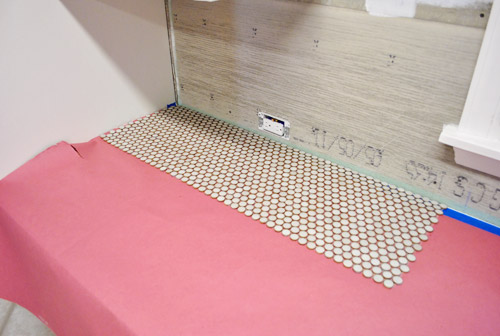
Not knowing how long it would take to make cuts, we didn’t want our whole batch of thinset to dry out while we fumbled with the nippers for an hour (which happened, as you know from Monday’s post). I’m glad we took it slow to start, but we later learned it’s MUCH faster to put up as many full sheets as you can and then just backfill with cut pieces along your edge (even if you have to use some freshly mixed thinset to place those).
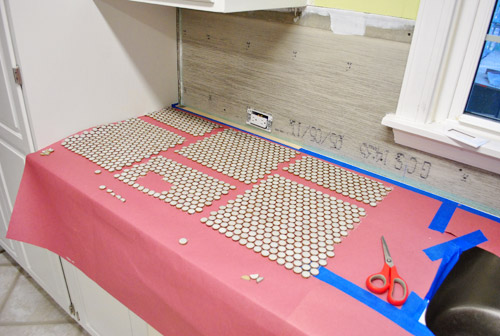
The staggered pattern is to help disguise the seams by alternating where they lie. So instead of your eye catching one long horizontal seam, things are mixed up a little so there’s hopefully a more seamless effect once it all gets grouted.
Anyways, now that we were FINALLY ready to put some tile on the wall, I had to mix up the thinset (we got this kind from The Tile Shop). Not gonn lie. This step made us nervous because we ruined a whole bag of grout during our first house’s bathroom project by misreading the label and pouring in too much water. Oops. So we read the bag about ten times and then found this Ask The Builder video on YouTube. And we’re happy to report that we had no trouble getting our thinset to the right consistency.
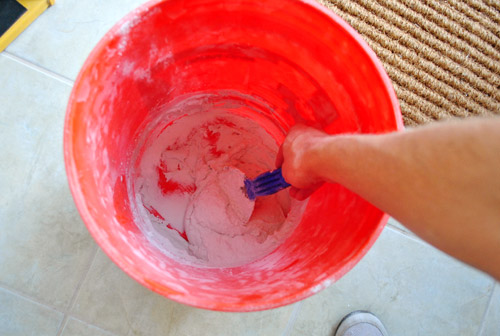
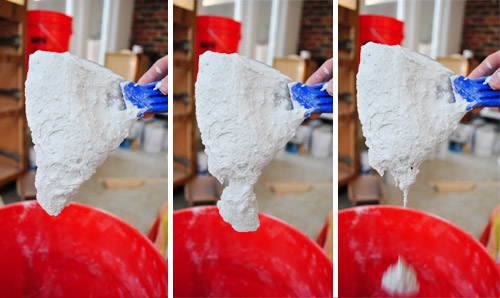
As we’ve heard, the thickness is supposed to be somewhere in the neighborhood of toothpaste or pancake batter. It should hold together, but still be loose enough to spread – and fall slowly off your putty knife like so:
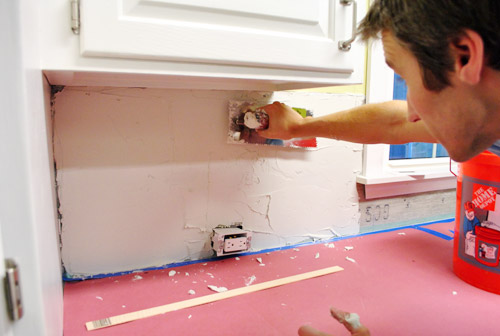
With the thinset mixed, we spread it on the wall using the flat side of the 3/16″ notched trowel (from The Tile Shop). I also used the putty knife sometimes since it fit better in the tight space.
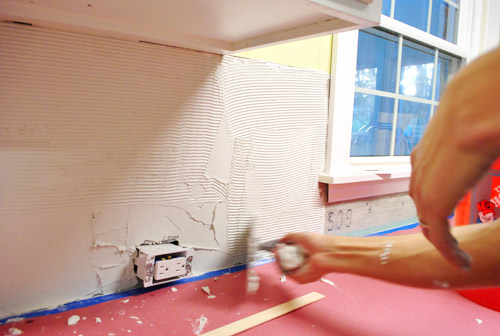
Once it was on and fairly even, we held the notched edge of the trowel at a 45-degree-ish angle and scraped along the thinset, creating little grooves to grab the tiles (we used a small 3/16″ trowel notch since we’ve got small tiles).
And at last, the first tile sheet was pressed into the wall. It was scary and awesome all at the same time.
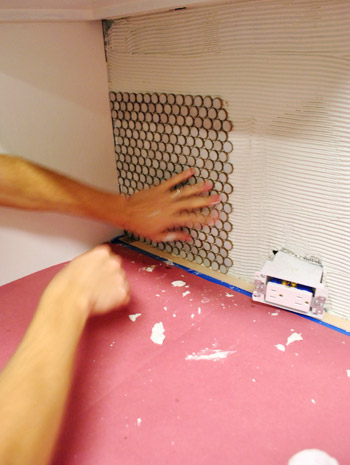
Oh, and we used a veryveryvery thin piece of scrap wood as a spacer against the bottom so that we’d be sure to leave some room between the tile and the counter for caulk (you don’t want tile resting right on your counter, so a tiny smidge of space akin to the spacing between each tile is ideal). So our wood spacer was about as thick as a paint stick if that helps you picture it. Maybe even a little thinner.
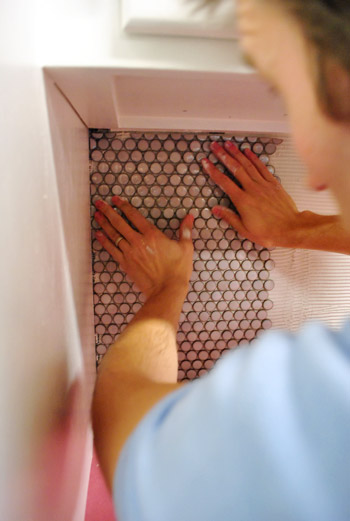
These pieces were fairly easy to lay because there was a lot of stuff (counter & cabinets) to help keep things straight. So once we actually started tiling, it didn’t take us too long to get to the point that you saw on Monday (maybe an hour and a half?). We had just spent so much time prepping that we were too spent to continue on into the night…
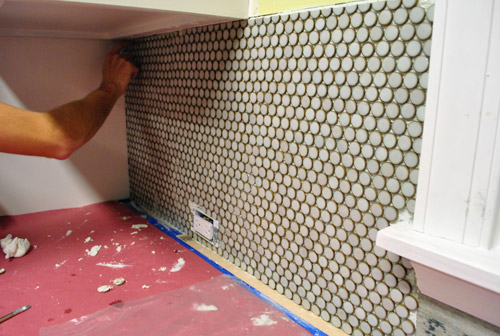
… but the next day we had our mojo back and made our way along the sink wall with renewed energy. We even removed the piece of molding under the window so we wouldn’t have to do any tile cuts around it (we’d just place the molding on top of the finished tile for a seamless look).
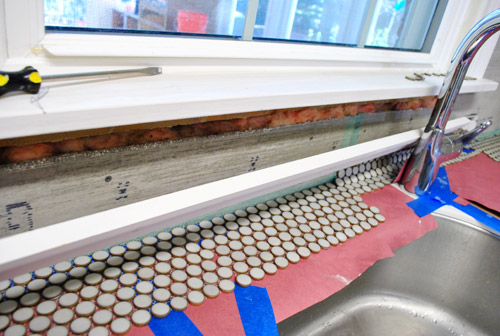
This time we were a bit less type A and didn’t plan out all of our cuts ahead of time… we just removed the full tiles that would interfere with the disposal switch before mixing up thinset and back-filled the rest as we went (popping off half and full tiles and sticking them wherever we needed to fill those in).
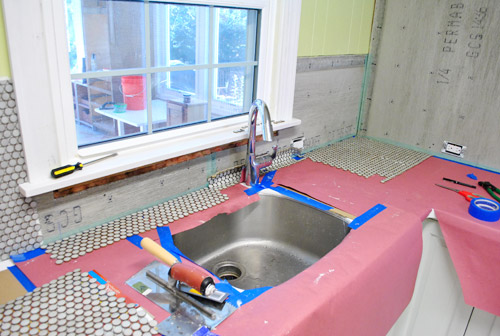
So this whole part went pretty quickly, especially in comparison to the day before.
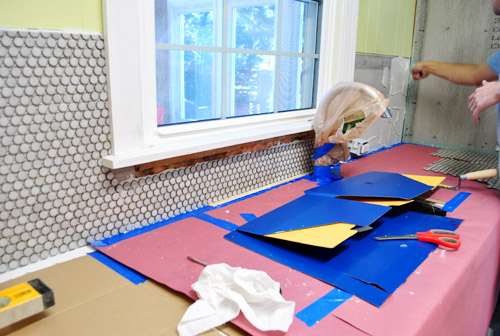
But Clara didn’t give us much of a nap, so we had to call it quits and clean up before we could move our tiling party onto the big back wall. Sigh. At least we got one side done! It’s the easy side, but still. Oh and see how the widow looks off center? Once we add the open shelving to the stove wall there will be 14″ of space on either side of the window so it’ll look nice and balanced again. Note: we’ll share how we’ll be “capping” those 14 inches of tile on either side of the window that won’t be under a cabinet or shelf as soon as we can snap pics to explain things better.
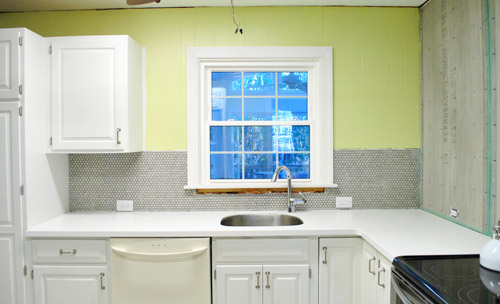
We’re hoping the back wall goes relatively quickly. On the one hand, it’s a huge space to tile. On the other, we’re sort of getting the hang of it now AND the wall is pretty much all full tiles (aka: fewer cuts).
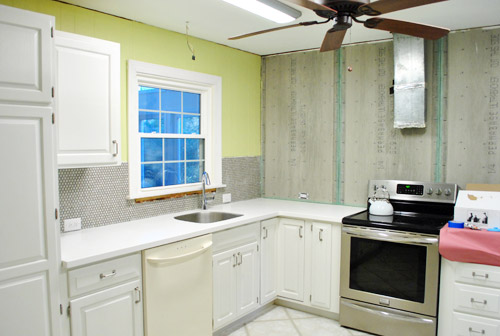
Until then, we’re just enjoying the work we’ve already done. We’re pretty much obsessed with it actually. The weirdest thing is that our favorite thing to do is look at it in the dark. I can’t explain it, but it sort of gleams at night. Like it’s wet. We love that fancy shine. It definitely elevates things like our white Corian counter and our painted cabinets. Can’t wait to grout it and see the finished result. And replace that dishwasher with our stainless guy (just waiting to get the floor down so it runs under it).
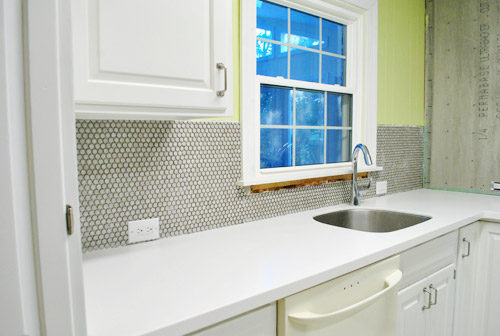
What penny tile lacks in quick application points, it makes up for in looks-good ones. We read so many things online about folks having issues lining them up and hiding seams but ours seem to be pretty easy to slide around in the thinset until we like how it’s all lining up.
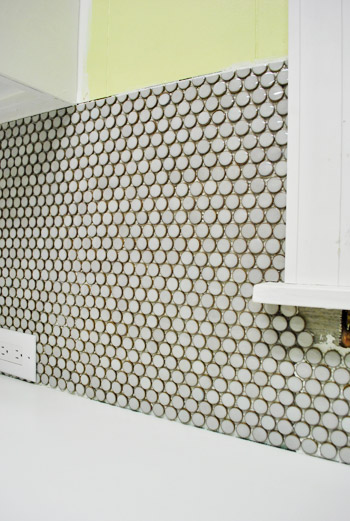
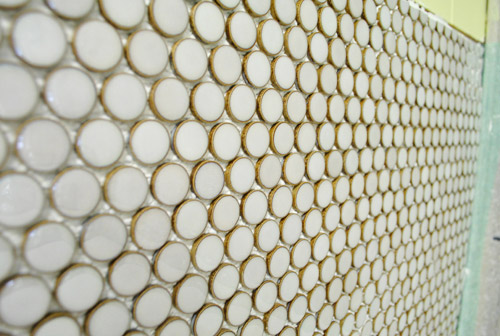
So we just stand there and keep noodling until we get nice even rows. So as tedious as it can be, the result is 100% worth the finished result in our humble opinion.
In writing this post I also realize we mentioned that we’d make another video and completely spaced on that. Next post for sure! We wanted to show you how we spread and scrape the thinset and set (and scooch around) the tile. Good thing we still have an entire wall to do. Haha.
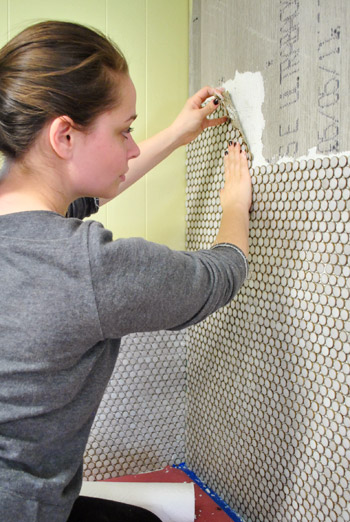
But wait, you don’t think we stopped there, do ya? Late last night we got a chance to start some of the back wall. Slowly but surely is the name of the game here (we wish we could snap our fingers and be done, but… we tried and there was still a whole wall to tile). Our goal is to be completely finished by the end of this weekend. We’ll just inch along through the weekend and hopefully be back with some wide shots of a fully-tiled-monty post on Monday! Look how serious Sherry is about it. Hah.
Anyone else doing tile stuff? We went into this project not knowing if it would take us three weeks or three days, so I’d say that we’re pretty excited if we get to share a completed tile job around a week after starting it. Not too bad for just stealing evenings and the occasional nap time to chip away at it. So if you’re wondering if you can do it, penny tile can be slow going, but it’s definitely not the hardest thing we’ve tackled. It’s probably not even in the top ten actually. So… you can do it.

Maria says
I have been debating doing my own back splash and thanks to you guys and your riskiness I am definitely going to DIY it. Plus, if I get stuck and can’t figure it out, my dad is a contractor, so I do have something to fall back on.
I will admit, I had a really hard time imagining your penny tile in your kitchen. I was afraid it wouldn’t turn out the way you were wanting it to, but I can DEFINITELY see it now that some of it is on the wall. It’s going to look awesome!
laura says
Love it! I can’t say it’s a tile I would have gravitated towards naturally, but it’s really beautiful….I can’t wait to see it grouted.
A question I’ve wondered: When you get the kitchen done, do you ever worry about running out of projects to keep your blog going? Do you think you’ll ever be “finished” with your current house and wonder what to do next?
Laura
YoungHouseLove says
Haha, we have about ten million things that are still on our to-do list here (we haven’t touched any of our three bathrooms, we want to build a deck, we want to enclose the carport, we have a sunroom and a playroom that we haven’t touched yet, our yard needs tons of work, we want to add wainscoting in the hallway, etc) so we assume we still have a few years until things dwindle down here (our last house took us 4.5 years to complete). We figure by then we hopefully will have saved enough money up to go in with some family members on a rental or a beach property so we can start the whole crazy adventure all over again! Haha. We’re nuts.
xo,
s
Jessica says
OMG!!! A beach house??? I would DIE to see what you guys would do with a beach house…..mmmmmmm!!!
YoungHouseLove says
Wouldn’t that be fun!
xo,
s
Heidi P. says
That’s so funny – I wondered the same thing recently. I guess the kitchen was/is such a huge project that it seems like now that you’re nearing the end, that you’ll be done with everything! Ha! If only, right?
I also wondered about the shelves, but I guess I’ll just have to wait and see how you do the drilling. And so smart to have marked the studs on the ceiling. You guys think of EVERYTHING!!
My only wish is that the previous owners could see the kitchen now!!! OH how I WISH they could see it!! There jaws would drop. And then they’d drool. And then they’d pet. ;)
Looks beautiful. It’s the stuff dreams are made of :)
YoungHouseLove says
Haha, I completely agree! They would drool and then they’d pet. It’s impossible not to. Haha.
xo,
s
Rachel says
Looks awesome, but scary! Love it though.
Meghan, UK says
Far too exciting. Can’t wait to see the finished job!
Shaye says
Will the tile give you any problems when you have to hang your open shelves? Do you have to install that hardware before you grout? (I’ve always wondered that about shelves over tile.)
Looks great so far!
YoungHouseLove says
We’re going to drill right through the tile that we need to in order to hang our shelves. The great thing about the tile being so small is that even if it cracks (it shouldn’t because we’ll make a pilot hole first) it’ll be hidden beneath the shelves once they go up!
xo,
s
rashmi says
Wow. Its looking great! Cant wait for all of it to come together.
Jonica Whitmore says
It looks amazing – cant wait until I am able to do this stuff in my house.
Aislynn says
The penny tiles look awesome!! Can’t wait to see the finished product :)
Lindsey says
Look at you, all fancy with your money tile! bahaha
I love it!!!!
YoungHouseLove says
Haha, if only it were quarter tile instead of penny tile. We’d be rich!
xo,
s
becca says
looks good! what color grout are you going to use though? (it does get grouted, right?)
YoungHouseLove says
Yup, it gets grouted! We’re using the same grout they had in the sample we photographed in our “Lucky Penny” post, so it’s sort of a creamy white. It looks like the tones of marble when it’s grouted (soft gray and white) which is nice because we hope it’ll go with everything like marble does!
xo,
s
Elisa @ The Self Life says
Looks great! We’re still pondering our backsplash choices since the kitchen is looking a little crazy: http://theselflife.com/2012/01/i-talk-more-about-the-kitchen-and-also-other-things/
But I’m definitely digging the penny tile! I’ll have to show the ol’ hubs, especially since I dreamed about tiling last night. Except it was in a hotel room so I didn’t even get to enjoy the fruits of my labor. Weird.
YoungHouseLove says
It looks amazing in there! And as for that dream, I totally have ones like that! You’re doing all this work to paint a fence or something and you wake up and you’re like “that wasn’t even our fence – or anyone that we know’s fence – it was in the woods” or something equally weird.
xo,
s
Kristen @ Popcorn on the Stove says
The tiles look amazing! I really like the choice you made and can’t wait to see when it’s all up. Is it just me or does the kitchen seem fancier now??
YoungHouseLove says
Haha- they totally have fancification powers! It’s so much more posh now! I can’t even tell you. In person, it’s a ridiculously amazing difference. We should invite everyone over when we’re done. Haha. Come on down!
xo,
s
Amanda @ Our Humble A{Bowe}d says
So exciting! It’s going to make such a huge difference.
We did some tiling over the weekend and just shared our marble tile back splash: http://ourhumbleabowed.wordpress.com/2012/01/11/the-big-splash/
I worried the marble would take forever to get the cuts right, but I think it was easier than ceramic tile!
YoungHouseLove says
So pretty!
xo,
s
Stephanie Phillips says
You two are making. my. week. I love living vicariously through you both!
Amanda, I’ll be commenting on your post shortly, so be on the edge of your seat.. ;)
Sherry, it truly looks amazing. So much more sophisticated and finished, but still completely homey. Love it!
Oh, and random compliment- I LOVE how intuitive your blog is. I wanted to see the grout so I scrolled right up to the top and typed “Lucky Penny” and ta-da! There I was. I like how you have the search bar at the top of your side bar. /OCD geekiness.
YoungHouseLove says
Aw thanks Stephanie!
xo,
s
Terry says
I absolutely love how the penny tile is transforming the kitchen already. I must admit I am a little obsessed with every little step of your kitchen redo, it’s amazing to see how everything is coming together. Keep up the fantastic work, and I can’t wait to see the finished project!
TheChangingHouse says
Ummmm…. wow…. they make it look so easy on tv… We need to do our backsplash soon too. I never thought about keeping it straight and level…. yikes!
Carrie says
I much prefer individual tiles to sheet tile! It required me to be much more meticulous and felt like it took forever! Granted I was doing a floor and my back was killing me so that may have played a teensy part. :)
I am loving the tile with the countertops! And I didn’t realize you had so much counter space on the left of your sink. I guess the busy granite made it hard to tell. Can’t wait to see the finished product!
YoungHouseLove says
Oh yes, that used to be our only real prep space in the whole kitchen since the cabinets sort of encroached and made the other wall feel cramped. Now we have so much room over on the peninsula but also find ourselves using the space on the stove wall- and gravitating towards our original prep space sometimes… for old time’s sake! Haha.
xo,
s
Devlin says
Stunning!! I can’t wait to see the final product.
Brenda says
Oh really great job, looks fantastic, wait until you grout. brave to do the ‘big’ wall. We have been ‘redoing’ our kitchen for about 8 mos…my daughter works with warm glass and made glass tiles for the back splash,random colors and sizes each had to be placed one at a time. We drew the footprint out on paper because the tiles could not be cut easily and made them to fit before they were fired. Very eclectic, colorful and I KNOW exactly what you mean by seeing them at night with light. Many evening we sat and marveled at the coolness of the whole thing.
YoungHouseLove says
Haha, it’s like a tile secret no one tells you- it’s even prettier at night!
xo,
s
Seriously Sassy Mama says
How are you going to hang the shelves with the tile up?
YoungHouseLove says
We’ll share those deets as we go! The recommendation is to tile first and hang things up afterwards (with a small drill bit meant to go through tile) sort of like how people hang towel hooks on wall of tile in a bathroom! Will keep ya posted!
xo,
s
my honest answer says
I was so excited for this post!! It looks great! But wow, it was quite the undertaking. Your patience always pays off.
Ashley says
Wow! It’s mesmerizing! I can picture you guys(Burger and Clara included) just standing there staring at it for hours. I really want to pet it.
YoungHouseLove says
Haha, I would say the hardest thing about penny tile is… resisting the urge to pet it. So I don’t. I downright refuse to not pet it.
xo,
s
Melissa says
Looking fantastic there, guys!!
I have a question about your counters – how did you know that concrete counters would be too heavy? How much heavier would the cement have been versus the heavy granite that was there before?
YoungHouseLove says
We learned in order to have the peninsula that we wanted (with a 12″ overhang on two sides) it would need to be double thick, so it would have been at least twice as heavy as the granite we had!
xo,
s
Ilana says
How did you learn that? When you were scheming about the peninsula construction/counters, were the corian people the ones to tell you that?
YoungHouseLove says
I called a few local concrete pros and asked how thick our counters would have to be to have a 12″ overhang and they all said standard was fine. But when I said “well, it’ll have a 12″ overhang on two sides” they both said “um, you need to go double thick for that, which usually means you need to reinforce your floors.” Hope it helps!
xo,
s
Melissa says
Ah ha. That makes sense.
We have the same peninsula arrangement in our kitchen. We’ve had a cement guy come out to measure and he didn’t say anything about weight being an issue…but I don’t think our cabs are especially great quality and our current counters are not that heavy (laminate) (ugh). Hmmm.
YoungHouseLove says
Maybe they’ll be reinforcing it with rebar or something so it doesn’t have to be double thick? I’d imaging they’d tell you if it was going to be super thick!
xo,
s
Melanie @ Mailbox Journey.com says
It’s looking great! I need a house, this looks like fun actually :p
Alex - Old Town Home says
Have you guys considered epoxy grout for this backsplash to help with easy cleanup? It is more expensive, but wipes down much easier and doesn’t stain. Unfortunately, it is about 10x the cost of regular sanded grout and nearly made me have a nervous breakdown when we were installing it.
We can’t wait to be at a tile ordering (and putting up) point on our project. When we do, we’ll once again proudly walk into the Tile Shop that is near us and say “Young House Love sent us!”
Lookin’ Good!
YoungHouseLove says
We talked to the guy at The Tile Store about what grout they recommended and he actually sent us home with something that we can seal just like our first bathroom (we had so much luck with that grouting and sealing process that over a year of use = zero scrubbing). Seriously, when we were having open houses my instinct was to scrub the tub after a year of use but there wasn’t a thing to scrub! Here’s hoping we have the same luck here! We’ll report back to you for sure.
xo,
s
nat says
how exiting. tile looks great. wouldnt you want to take it all the way up the wall around the window though?
YoungHouseLove says
We just decided to have one accent wall of tile to the ceiling, and because you see the stove wall from so many POVs (and only face the sink when you enter from the office) we decided to make that our accent wall!
xo,
s
Jennifer says
What have you done to prepare for hanging your shelving on a wall of tile? Have you made any notes/marks where the wall studs are behind the backer board? Just curious.
YoungHouseLove says
Yup, we have measured where our studs are and made tiny marks on the ceiling (where they’ll be covered by crown) so we know where they are! We’ll share all the shelf hanging details when we get there for sure!
xo,
s
[email protected] says
This looks so tedious and rewarding at the same time! Can’t wait to see the way that looks with some open shelving! I hope you guys are planning a huge kitchen reno dinner party when you are done all of this work! :)
YoungHouseLove says
Oh yeah- we’re going to party for days when we’re done with this baby! Haha.
xo,
s
Kristin says
On the window wall, to the right, where the tile stops, do you just apply a thicker line of grout so that it looks intentional to stop there? Most kitchens don’t have that open space, because all the back splash usually runs right up to the cabinets on all walls. I was just wondering how you make it look seamless?
YoungHouseLove says
We’re going to use something to “cap” those fourteen inches of tile on either side of the window! More details when we can snap pics (they’ll explain better than words can)!
xo,
s
Jessica says
I was going to ask the same question! Our short sale apartment came with an updated kitchen but they did sloppy work on the backsplash, so its unfinished in a few areas where it just stops without anything on the edge. Can’t wait to see what you guys do, I need inspiration!
Tina says
This looks even neater than I expected it to. Srsly can’t wait to see the finished project. One question for you – and maybe you’ve already covered it else where and my ADD brain missed it- How are you going to finish the edge on the partial tile wall?
YoungHouseLove says
We’ll share those details in Monday’s post for ya!
xo,
s
Allyn says
Eeek! It’s looking sooooo good!
The process seriously makes my stomach hurt though. For real. Sweaty palms. You guys are brave. One day I’m going to own a house and have to (and want to) do stuff like this, but til then, I just think of how much I’d be stressing out!
I’ll stick to paint. Yay paint!
YoungHouseLove says
Haha, not to worry! It took us years to work up to this! We were yay paint folks for a while too! Slowly but surely we got braver… very slowly actually. Haha.
xo,
s
Allyn says
It does make me feel better. Maybe this year I’ll branch out to gardening and sewing then slowly but surely make my way into being a real live grown up!
Reenie says
Lookin’ good :)
leslie says
We lived in our brand spankin’ new house for 9 days before my hubby was ripped up the carpet for a tile hearth/faux fireplace. He cut every black and white tile and created a chevron pattern. I couldn’t be happier with it now, but it sure was scary. L-O-V-E how your kitchen is coming together and I totally understand your need to just stare at it. I find myself doing that all the time in our new abode.
YoungHouseLove says
That sounds amaaaaazing! Would love to see pics!
xo,
s
Brandi @ His Shabby Her Chic says
Looks great!
Make with the big wall already, I’m getting antsy!! :)
John@Our Home From Scratch says
It looks beautiful! I can’t wait to see how it turns out.
It really suits you. Just looking at it, you can tell it’s a Sherry and John project!
We still have to add a solid surface countertop and do a backsplash and on and on. Thanks for the daily inspiration!
Lindsey @ arkadian belle woods says
This penny tile makes my mouth water and not just because it’s in the kitchen :-)
shannon says
looks gorgeous so far! good luck finishing the project!!!
Allison says
Ohhhh, beautiful!! I’m also jealous of all your COUNTER SPACE! My rental has a tiny kitchen… picture that bit of counter to the right of your stove, then the corner to the sink. That’s it. Luckily there’s only me here, lol.
YoungHouseLove says
I remember those rental days! My apartment in NY had a counter that was smaller than a placemat! It was crazy. I ate a lot of peanut butter from the jar.
xo,
s
Brigid from www.naturallyattached.com says
Looking great so far! It’s getting me motivated to put our backsplash up!!
Julie says
I sort of wonder why you didn’t start at the place where the two tiled walls meet. But other than that, it’s great!
YoungHouseLove says
We just wanted to start in the most hidden corner to get our sea legs. Haha. So we figured no one would notice anything in the microwave corner, but the main corner next to the sink would be seen from so many angles when you enter the room! We have started on the back wall so we’ve done the area where the tiles meet and it’s going great!
xo,
s
jess says
Looks great guys! Question- are you going to need a border tile on the wall w/ the sink? If so, what will you use?
YoungHouseLove says
We’ll share those details in Monday’s post!
xo,
s
Sarah says
We just finished tiling our mudroom! It was my first time tiling, and my hubby’s second. We did a decent job, I think, but here’s an (obvious!!) word to the wise: mix tiles from various boxes! Holy buckets! We knew this, but for some reason forgot to do it, and we now have a rather obvious line between where we’d been forgetting and where we remembered. Ha! Luckily, we’ll be building and installing cabinets right in that area, and I’m definitely going to put down a rug, so it will be camouflaged somewhat. Boo! :)
Great job, you two! It’s so fun watching your kitchen get prettier and prettier!
YoungHouseLove says
Oh yes, such a great tip!!
xo,
s
Teresa @ wherelovemeetslife says
I sat there and looked at the pic again and again tryingt o find joint lines… none to be seen! Looks good so far! I am ready to see the grouted, finished look. I was a little skeptical of the grey grout, but after seeing your cabinets so white, you need that grey to add some contrast.
Sara @The Fat Hydrangea says
I LOVVVVE IT! So much work, but definitely worth it. Is it weird that I want to hug your wall?
YoungHouseLove says
I hope it’s not weird! I’ve hugged it at least ten times. It’s hard to do but very comforting.
xo
s
erika m says
This thought made me laugh and kinda reminded me of this commercial, like you would “cling” to the wall…
http://www.youtube.com/watch?v=nKokoCTp1WM
looks awesome…can’t tell you how much I love the tile AND that grellow color…beautiful…keep it up!
YoungHouseLove says
Oh yeah I’m totally that girl.
xo,
s
Whitney Dupuis says
This looks amazing so far! I can’t wait to see the finished product. I know you are way more excited about it than I am too!
candace says
That tile is looking so delicious already!!! I love how it sparkles!!! It’s beautiful – great job, you two!
Alex says
I’m loving the tile! Even though I’ve never been one to really embrace the neutrals, I think the color looks amazing and just right for your purposes.
susan says
You even look glamorous putting up penny tile. I can’t wait to see the finished kitchen.
YoungHouseLove says
Haha, that’s very kind of you. I think I look pissed off. Hah.
xo,
s
Tanda says
Looking good guys! This is totally random, but the company I work for actually produces that rosin paper you used (which is 100% recycled as well-yay for being green!). What a small world. :-)
YoungHouseLove says
Wahoo! Love our magenta (and green!) rosin paper!
xo,
s
Lilly says
the tile looks gorgeous, and the cabinets I cant get over how good those look. Funny thing, I had a dream with u guys. Yup weird, we were at a volley ball game that Clara was playing with her cousin. And I was video taping for John because he was having a lazy day. And for some weird reason I talked to John, Clara n her cousin like normal but I was so nerveous to talk to you (Sherry) I kept trying to but then we talked n it was cool u where very nice n I know there was more to the dream but thats all I can remember. The weird thing is that its not the first time I dream with u guys. I dreamed that we were all on vacation one day with my hubby and daughters this time (they werent at the game). I think I gotta stop coming to ur blog for a while (yeah right, like never, my computer basically does it itself,lol). Any who good job people :)
YoungHouseLove says
Haha- so funny how we wormed our way into your dream!
xo,
s
leslie says
Don’t know if you can see these? Made the album public so hopefully it will work. I MUST get new photos blogged. Like this weekend.
http://www.facebook.com/photo.php?fbid=2808905468594&set=a.2773617026405.154601.1437434854&type=3&theater
YoungHouseLove says
That. Is. Phenomenal.
We’re in awe!!!
xo,
s