Ok, so we completed the door-painting process a few days ago (picture us doing the droopiest super-tired happy dance that you’ve ever seen) and we’re now into the “waiting game” portion of the cabinet painting process. But we couldn’t wait to share all the photos of everything both during the painting-process and now that they’re all glossy and finished, so here ya go:
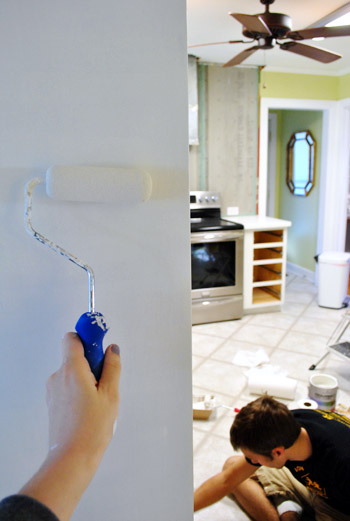
We used Benjamin Moore’s Advance paint in Cloud Cover in a satin finish (it’s a soft tonal taupey-gray color, so it’s not quite as bright as our glacier white counters for a subtle layered look). Benjamin Moore Advance paint (in the satin finish) actually came recommended by a few pro cabinet painters that we know. We used it on our office cabinets a few months back (which still look mint after Clara has beat on them relentlessly with wooden toys) so it’s safe to say that we’ve been extremely happy with it. The fact that it’s low-VOC, self-leveling, and amazingly durable is pretty much the cabinet paint trifecta.
Just like we did for the office cabinets, we applied it with a high quality 2″ angled brush to get into all the cracks and a small foam roller to smooth everything out and ensure that we were applying super thin and even coats. As for applying any sealer or topcoat, the general pro recommendation for cabinet painting is to use high quality stain blocking primer and 2-3 thin and even coats of super high quality paint with ample drying time between coats (Benjamin Moore’s Advance paint is meant for cabinets without any top coat, since sealers can drip, yellow, and even cause things to stick/crack since they thicken the application). We’ll be back with a video on Wednesday to share more actual application details/tips along with the big full monty reveal (we thought it would be helpful to share one exhaustive how-to-paint-cabinets-post with a detailed tutorial, application video, and the after pics all in one spot).
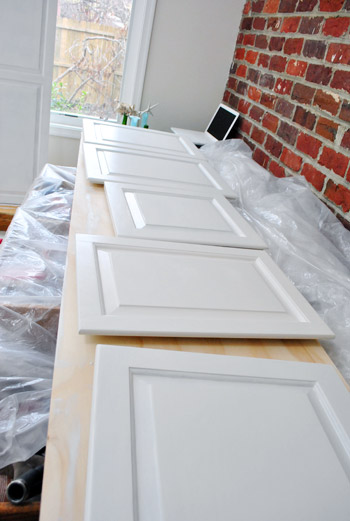
Using high quality primer and good self-leveling paint helps hide a lot although it doesn’t guarantee 100% invisible grain (we don’t see any evidence of grain on the oak cabinets in the office but do see a hint of it on the kitchen cabinets, so it probably just depends how much grain your cabinets have to begin with). We don’t mind painted wood that looks like painted wood though, so a little grain is ok with us, as long as the paint is nice and even and glossy.
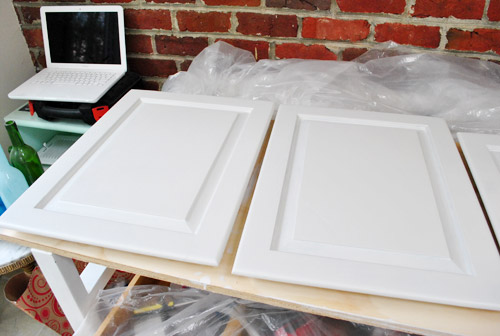
For those wondering how those few retrofitted doors that we whipped up are doing with primer and paint (more on that process here), some of them are completely seamless (the two corner cabinet doors might even stump a detective) while a few others are a tad less than perfect. By this I mean if you look at them from an inch away for five minutes (bobbing your head back and forth to catch the light bouncing off of them) two out of ten people might notice a tiny seam. See the über light horizontal seam on the door with the arrow in this pic below?
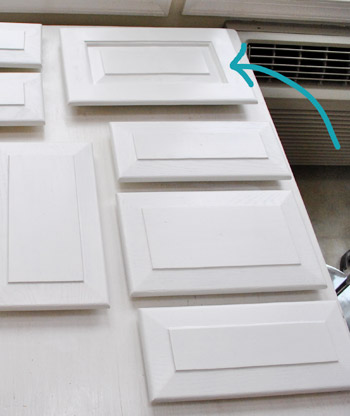
Yeah, me either. Haha. It’s nearly invisible and impossible to photograph. But once we hang them all we’ll take some close up pics for ya. Even in person it’s so subtle that we can’t decide if it’s worth doing anything about (thankfully at least two of the five doors are seamless, so we’re leaving those for sure). We’ll keep you posted if we decide to sand the other three one more time and use some sort of buildable primer and a few more coats of paint to hopefully make them as perfect as the two corner cabinet ones).
We’re psyched to have two perfect ones among the group because it gives us faith that if we want to be super type-A about things, we can probably get all of them to look that good with a little more work (if none of them worked out we’d bag it and go with Plan B). All in all I’d say we’re really happy about being able to work with our existing cabinets to save some major loot (thereby making other upgrades like new appliances, cork floors, new counters, new backsplash tile, and a big opening into the dining room possible).
So for $40 in paint (ya know we used a $10 off coupon, haha) and $22 in primer, we’re beyond overjoyed at the new layout and the lighter look! Painting cabinets is right up there with painting wood paneling or dark brick – we think it’s one of the biggest bangs for your buck. It’s amazing what 60 bucks can get ya. Well, 60 bucks and a week of puttying, sanding, deglossing, priming, painting, and waiting not-so-patiently to put everything back together.
Oh and we primed and painted the outside of the frames and the front and back of the doors while leaving the inside of the cabinets oak. This way we can toss things in there and pull them out without worrying about scratching or peeling paint. We also like the two-toned effect of clean paint with wood interiors (we did that in our old kitchen and in our office built-in cabinets and really love the surprise of natural wood when you open the door).
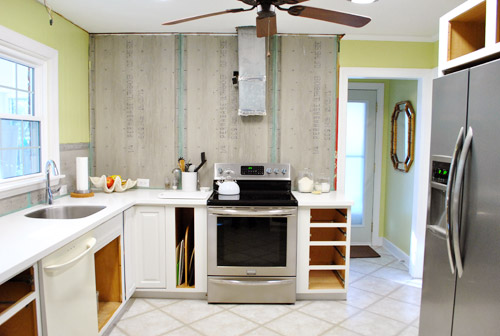
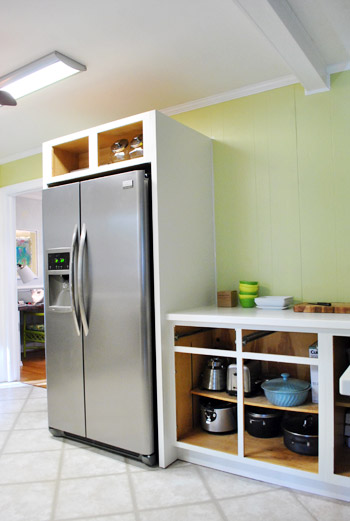
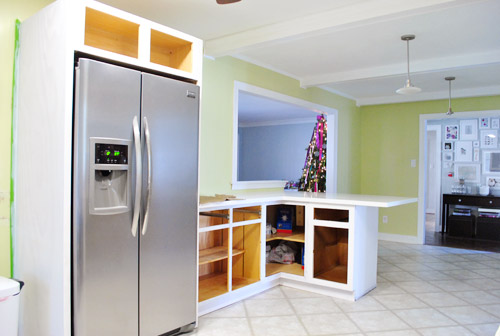
Of course the room’s still pretty white-washed since the rich cork floors aren’t in yet, but we’ll get there eventually. And now for a bunch more random doorless pics. This is fun because you can spy on all of our kitchen items like my pretty blue cassarole dish:
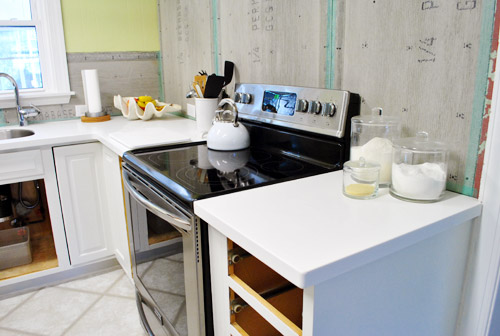
This shot makes me long for our backsplash tile to go up (after we hang our cabinet doors and add hardware it’s next on the agenda!).
Yes, our tree is still up. I always hate taking down my glowy happy friend.
It’s so light and airy in here now… except for that terrible bisque dishwasher. Egads. Can’t wait to install the new one (after we lay the new flooring so it can run under it).
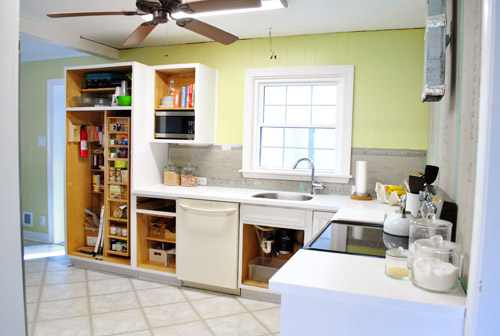
These two views (the one above and below) are a lesser seen angle (taken from the office doorway). I still do that “ahh!” thing when I walk in that way because I keep picturing the dark old kitchen that used to be there.
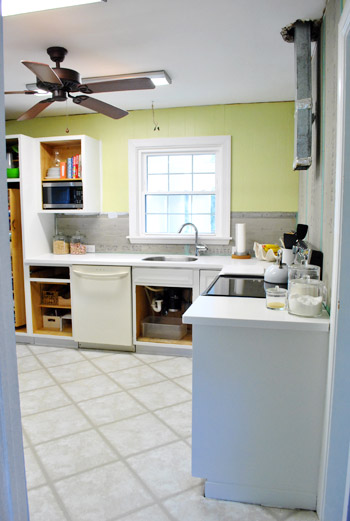
You know, the one that looked like this (although John didn’t always stand on the counter like that).
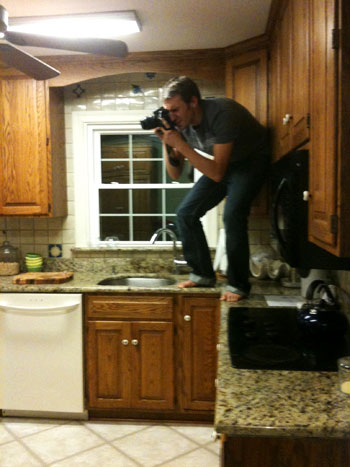
I like it a lot better now.

And once we add the 12″ deep floating shelves and a range hood over the stove, things like the sink window will look a lot more balanced (there will be 14″ of space on either side of it):
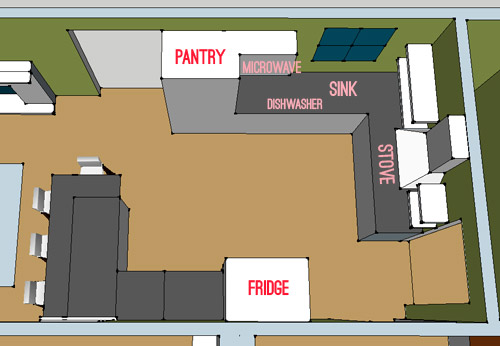
We’ll be back with an entire cabinet-painting tutorial complete with a detailed video and lots after photos on Wednesday when things are finally cured enough to hang the doors and add hardware. Ahhhhhhhhhhhhh, even typing that is more thrilling than I should admit. I’m off to watch paint dry. Literally. Ok, and write more book stuff. There’s nothing like an entire-manuscript deadline of the 4th to get the year off to a ca-razy start! But just like fiiiinally finishing our painted cabinets, handing in our huge 260+ page beast of a book should feel pretty darn good! Then we just have to shoot 100 secret photos/projects in our house over the next two months. Ah chaos, come on in and get comfortable. I hope you don’t mind an in-progress kitchen…
Psst- In case you were off caroling and cavorting, here’s a roundup of all the posts that you may have missed over the “holiday break”:
- Our ribbon-rific holiday card (here)
- A whole lotta cabinet puttying and sanding (here)
- Making some 2012 resolutions (here)
- Priming our pants off (here)
- A superlative-riddled December recap (here)
Glad to have ya back!

Jessica says
I can’t wait to see the cabinet doors all painted and hung. It’s going to look so amazing!
Also, thanks for sharing that you rolled and used a paint brush. Every time I end up using a brush on anything, it gets really streaky. But to roll afterward completely makes sense. Why I didn’t think of that, is beyond me. :-)
YoungHouseLove says
Aw, so glad to help! Our video of the priming and painting process should hopefully help even more (sometimes I have to see thing to totally get them, so I thought making some quick vids of the process could be handy).
xo,
s
Stephanie Phillips says
Gaaa! SO flippin’ exciting. And you ain’t lying about the before and after- what a different kitchen!
We have 1950’s cabinets (picture the flat doors that must be closed in unison or one will rest on top of the other) and they’d been painted previously. When we bought our house we slapped another coat of paint on them and they are chipping terribly. I want to strip them and repaint them so badly, but I keep telling myself that I’ll be replacing them soon. Ish. Maybe.
I should probably get to painting.
Ambierre says
Whoa I’ve never seen a “zero” on your comments before, guess I’m first : ) I am really starting to see it. The last picture was the one that got me nodding my head and saying “I’d take that baby to the market”! You guys deserve a break after the last few weeks. You’ve been rockin’ it. Happy new Year!
YoungHouseLove says
Haha, yessss. Someone is still taking babies to the market. Love it.
xo,
s
[email protected] says
i have a quick and rather silly question to ask you. when you install your flooring, will it just butt up against your island with a bit of quarter round to cover the seam? you won’t actually lift the island…or is that necessary?
YoungHouseLove says
Yup, since we won’t be lifting all of the perimeter cabinets, we want everything to be on the same plane (so if the peninsula bumps up over the floor it would be weird and wouldn’t line up). When you’re keeping all your existing cabinets you usually just float the floor and use quarter round or toe kicks- it should be completely impossible to tell that the floor doesn’t run under everything when we’re done!
xo,
s
Amanda @ Our Humble A{Bowe}d says
Looking fantastic already! I hated the waiting game. But, it’s worth it in the end.
Krysta @ Domestic for Dummies says
OMG I am so excited to see the cabinet doors hung!! Is it Wednesday yet? And congrats on almost handing in your book!
Janelle D says
Progress! So exciting. I hope you all had a very Merry Christmas and are enjoying 2012. Were you priming/painting on New Year’s Eve or did you take a little break to celebrate? :)
YoungHouseLove says
We took a few family breaks in there! It was nice to mix accomplishing something major and being together with family and friends!
xo,
s
Elizabeth says
It’s coming along great! Very exciting for you all. Can’t wait to see the finished product!
Jocelyn A. says
I love your blog and I’m especially loving seeing your kitchen come together!! It is going to be beautiful! Thanks for sharing all of your progress. :)
John @ Our Home from Scratch says
Love how those doors came out! I’m definitely going to use your cabinet paint suggestion next year when we do our built-ins. Can’t wait to see how this kitchen finishes up.
We got some painting done ourselves over the holidays.
http://www.ourhomefromscratch.com/2012/01/vestibule-painted/
YoungHouseLove says
Mmm, that looks gorgeous! Congrats!
xo,
s
Jeanne says
Will you be tiling the back splash and wall first, and then hang the shelves? Or will you hang the shelves and tile around them? I was wondering how you will handle drilling and hanging the shelf supports.
The cabinets are looking fabulous!
YoungHouseLove says
We’re 99% sure we’ll tile first and then hang shelves. There are lots of bits that will make going through the tile with very small marks easy and the floating shelf will go right in front of them so they’re completely invisible. Here’s hoping it works…
xo,
s
Krysta @ Domestic for Dummies says
On your “Like this post? Then might we suggest these” section it referred another blog? The title was baby bandwagon. I thought you guys were pregnant again! Guess not. But still weird. This was the link: http://www.shanty-2-chic.com/2010/04/baby-bandwagon.html
YoungHouseLove says
Haha- so random! Congrats to her! Haha.
xo,
s
Krystle @ Color Transformed Family says
The cabinets look really good. I like the white counters on taupe-gray cabinets. Amazing how paint makes a room feel so much larger.
Alisa says
Oh I can’t believe how clean everything looks now! I can’t wait til you get them hung and hardwared (it’s a word- I just made it up). btw, I think it’s hilarious that I posted with the same exact title last night (but mine is about waiting on a baby, not paint). Great minds think alike!
YoungHouseLove says
Haha, nice! The thing you’re waiting for is a tad more exciting than painting cabinets! Congrats!
xo,
s
Jennah says
I’m not sure if your dishwasher is otherwise sucky, but if not you could always spraypaint it instead of replacing it. My parents did that years ago and it looked totally fine. Of course, they were spraypainting a Harvest Gold dishwasher to become Bisque, so anything would have been an improvement. That dishwasher was so loud and ancient that I was scared to walk in the kitchen when it was running as a kid. (Oh, and mom still special orders everything in bisque/almond and it kills me. Outlet covers, appliances, trim…)
YoungHouseLove says
We got a great deal on a stainless one so it’s just sitting in the office waiting to be installed! Thanks for the idea though, it’s awesome for someone who wants to revamp their existing one!
xo,
s
Kay says
When I see the cabinet doors hung up all painted nice and white it will be like Christmas morning for me again. Can’t wait!
Katy says
Woohoo! It looks amazing so far, can’t wait to see the rest. I’m terribly excited to see how the cork floor will look, I’ve never seen it in person so this is as close as I’m going to get.
~Katy
Brittany says
In New Orleans, we don’t take our Christmas trees down until January 6! That’s Kings Day, and it symbolizes the end of the Christmas season and the beginning of Mardi Gras season for us – parades, king cake, and family/friends! (:
YoungHouseLove says
Wahoo! That means I still have a few days to enjoy mine!
xo,
s
Elisa @ The Self Life says
We go with Kings day too! Also, taking down a Christmas tree = saddest thing ever! The longer the better! :)
Abigail says
yes! the twelve days of christmas start christmas day and go until King’s day – it’s still Christmas! :)
Britt says
Yeah, and you don’t need to live in the south or celebrate Mardi Gras season to take advantage of that tradition! January 6th is also known as Epiphany, and Christmas decorations don’t come down in churches until then. :)
annabelvita says
In England it’s bad luck to leave it up past 6th January (after the twelfth night)
Julia @ Chris loves Julia says
Gah!!!! So stoked for Wednesday. Waiting is so hard. I used Ben Moore’s advance when I painted our not-so-nice kitchen cabinets earlier…errr I mean last year to tide us over until we can get nicer cabinets (hopefully this year).
http://chrislovesjulia.blogspot.com/2011/07/how-to-paint-your-kitchen-cabinets.html
It completely changed the vibe (since that post above, we have made a few other cheap tweaks and got rid of the bisque fridge–what’s with bisque!?) and the paint job is still flawless–but our cabinets are not nearly as nice as yours, so they’ll probably end up in a storage room somewhere around here.
P.s. You guys need a nap after Wednesday.
YoungHouseLove says
Wow- what a huge change! So glad to hear your experience with BM Advance is as good as ours! That stuff rules!
xo,
s
Julia @ Chris loves Julia says
Do I spy some smokey gray, chic nails in that first picture??!! You go girl!
YoungHouseLove says
Haha- you’re sweet. You know, when you have paint in your hair to greet your holiday guests, the least you can do is throw on some nail polish. Haha.
xo,
s
Emily says
Ahhhhh!!! So exciting!! :-) I love the cabinet color! I can’t wait to see the finished kitchen! It’s really fun watching everything come together! My husband and I are hoping to start our kitchen remodel this year – which includes taking out a wall to make a breakfast bar, adding a pantry, painting cabinets, and getting new countertops! And we will do the work ourselves. So watching your kitchen come together so beautifully is super exciting!!! :-)
Myra @ My Blessed Life says
It’s looking fabulous!!! :)
Magda says
Are you guys doing a clear poly coat on top? And what made you choose satin vs. an enamel cabinet paint? We have painted cabinets, if we ever need to repaint, do we need to sand down to bare wood?
YoungHouseLove says
The general pro recommendation is high quality stain blocking primer and 2-3 thin and even coats of super high quality paint (Advance is meant for cabinets without any top coat, since sealers can drip or yellow and even cause things to crack since they thicken the application). As for repainting cabinets, you don’t need to sand down to bare wood, just to rough everything up pretty well and then prime first (so it’s nice and “sticky” for paint to hold on for the long haul). Hope it helps!
xo,
s
magda says
How long do you wait between primer and paint? (to keep it sticky) and what grit sandpaper do you recommend?
YoungHouseLove says
We just follow the directions on the can (I think it said anytime between 12-72 hours after priming is cool to paint while it’s still “open” – aka sticky). As for sandpaper we use a low grit one (aka: 80 or so) and then a higher grit one to smooth everything out (around 150-200). Hope it helps!
xo,
s
Melanie @ Mailbox Journey says
I wasn’t sure about the white cabinets on white counter tops at first, but I love how bright it’s going to be! Lookin’ great! :)
April says
Ooooh!!! I am more excited for ya’lls kitchen than I probably should be!
Maria @ Vestir de blanco says
Wow, that’s a change! Congratulation in such a wonderful work.
Do you know about blophome? It’s free and it gives you super realistic layouts and 3D images. And you can master it in seconds.
YoungHouseLove says
Thanks! Never tried it but will have to check it out!
xo,
s
Anna says
Lovin’ it! I’m back working on the dissertation today – i understand manuscript deadlines! Do you have a bottle of champagne chillin’ in the fridge in prep for hitting that send key?
YoungHouseLove says
Oh man, I don’t. Better get on that though! Haha.
xo,
s
Anna says
;) even a bottle of passion pop’d be better than nothing! seriously, it’s a milestole worth celebrating with bubbles (or a shot of something….) ;) although, after a deadline i usually crumple into bed and sleep well after one glass!
YoungHouseLove says
Haha- you’re right!
xo,
s
jennifer rizzo says
It’s going to be gorgeous! You are going to be so happy with it! I still can’t believe how bright ours is!
Michelle says
Wow it’s really looking good!
Kelly-Anne says
I’m amazed how much of a difference a coat (or several!) of white paint can make in a space! I painted the cabinets in my first place a few years back and it looked like an entirely different kitchen! You can see the b&a pics here: http://craftyteacherlady.blogspot.com/2009/05/before-after.html
Can’t wait to see your space when the doors are up!
YoungHouseLove says
That’s amazing! What a difference!
xo,
s
Amanda says
I love the before/after picts thus far! Makes me wish I could paint my kitchen as well! Since I’m just a renter at this point I’m just going to have to live vicariously though you guys!
Kinda off topic I know, but did you guys install a plug around the island for appliances? I know you installed one down low for lap tops and such, but I can’t see you being ok with running cords – or extension cords down to it with little ones running around. I ask because my island doesn’t have a plug and it drives me crazy, I’d love to hear if you have a work around considered!
YoungHouseLove says
We actually have the electrician coming back to help us with some overhead lighting stuff so we were going to ask him to add one more plug on the peninsula side for us! We figured it would really come in handy even though we have the laptop plug already! Thanks so much for the suggestion.
xo,
s
Paige says
Your kitchen is going to look huuuuge! I mean, it’s already pretty big, but the old cabinets really made it feel smaller.
Excited for Wednesday!
Brooks_25Years says
I have been following the progress of your kitchen and I cannot wait for the final before and after pictures! It’s such a beautiful change. I also can’t wait for your floating shelves to go in, when I’m finally in my own place it’s one of my dreams to have floating shelves in the kitchen, I have been collecting mis-matched china from Anthropologie, (plate by plate and bowl by bowl…) and they need floating shelves! Happy New Year!
YoungHouseLove says
Ooh, your china collection sounds amazing! It’s going to look so good on your open shelves someday!
xo,
s
DONNA says
Happy New Year! The cabinet doors look amazing!
Just a few typos I picked up along the way…60 bucks and a week of ” putting”
backsplash tile hang “out” cabinet doors
there’s nothing like “a” entire-manuscript…hmm…not sure if it should be “an” ?
So enjoyed your morning post and I can’t wait for Wednesday!
YoungHouseLove says
Thanks! All fixed!
xo,
s
Misty says
I am IN LOVE with your new kitchen. It makes me want to paint my cabinets so bad!!! I ‘m so excited for you guys!
YoungHouseLove says
Aw thanks Misty! You guys are all so sweet to cheer us on like that.
xo,
s
Larissa says
Seriously. You guys are amazing! And I love your white teapot. Didn’t it used to be blue?
YoungHouseLove says
Haha, yes! You know me and white ceramic things. I couldn’t resist this guy when I saw him on clearance!
xo
s
Jami Denton says
Love it! I can’t wait to see the finished product.
Momlady says
Hey Guys..wow! Lookin’ good!
Did you experience any little bubbles in the paint using the foam roller?
YoungHouseLove says
No little bubbles, it definitely has a soft texture (not line-y like a paint brush) but when you apply super thin coats it sort of builds up to be exactly like a sprayed factory finish. I give all the credit to the paint- that Advance stuff is amazing!
xo,
s
Rina says
When I paint with a roller it looks like bubbles too. Why?
YoungHouseLove says
Hmm, maybe it’s the type of roller? Or the paint is of lesser quality? Or you’re rolling super fast so it’s riling up the paint? Or you’re applying a ton of paint (thin thin thin and even is the key). Hope it helps!
xo,
s
Jennifer says
HAVE BEEN CHECKING EVERY DAY TO SEE THE FINISHED PRODUCT!
SOOOOOOOO excited! I love a good before and after.
I hope you find some time to rest… you have earned it!
Rachel says
So it sounds like you write all the projects/directions for the book, THEN do them and take pictures? What if as you’re doing them you realize something doesn’t work and the directions have to change? Or have I gotten it totally wrong? :)
YoungHouseLove says
Haha, we have a few months to alter small tips and tutorials and other minute details in the book as we do each project (since some things might end up needing different approaches than we planned). We just need to provide all of the final tips and copy so they can start laying things out and we can plan all the photoshoots (since those have to be executed like magazine shoots it can be really complicated to hunt down supplies and get everything done for big shooting days). So there are some edits that can still be made, but they don’t have time to layout the whole book after the photos come in since this is a fall book, so we’re doing a lot of things at once!
xo,
s
Jessica D. says
What an amazing change for a little change! Wow, sorry about that horrible pun. Have you guys thought about adding shelving to the right side of the fridge? It just hit me when I looked at the 7th picture in this post. Looking great you guys!
YoungHouseLove says
I actually have a plan for that space that’s not shelf related since we’ll have a lot of shelving along the stove wall. I’d love to hang a big piece of art or even a mirror there- should be fun to keep things open and make it feel more like a room!
xo,
s
laraffinee says
I have been waiting for your cabinet painting sequence and I am THRILLED with your documentation of the process! I have been waitng to do mine – just plain scared to start- but your really thorough step-by-step reporting is so very helpful and valuable! Thank you so much! I can actually begin the process this month.
– a question about the coutertops: I have had coutertops (granite) waitng for months to be installed because of my cabinet painting phobia. You had new countertops installed first – no problem? What did you get- that is not granite but some kind of quartz? Is granite passé?
Thank you for this wonderful blog!
YoungHouseLove says
Granite is beautiful! We had it in our last house and really loved it. We just opted to go with white Corian for this house since we have heard it’s great (sort of like honed white marble but a lot cheaper – just $32 a square foot!). As for cabinet painting, last time we got our counters installed (in our first house) they scratched up a few of our gorgeous white cabinets during the install, so we vowed to wait to paint these until after the counters we installed so our paint job wouldn’t potentially get ruined. We have see it work either way though, so it’s your call! We just covered our counters when we painted to protect them and didn’t have any issues!
xo,
s
Izabela says
I just don’t know how you guys do it. For the last two months the hubby and I have been working on our little girls room, preparing for baby #2, and we are THISCLOSE to finishing, yet the closer we get, the less we do as we’re tired, and I think just overwhelmed. I do like how the cabinets turned out and cannot wait for more updates.
Happy New Year.
YoungHouseLove says
Aw, I can totally relate to feeling super tired and feeling worn out- especially when you’re prego! We just try to break things down into very small bite-sized pieces so it’s more manageable and not too overwhelming. Those little victories can keep ya going!
xo,
s
Andrea H Ross says
Wow it looks great. Glad to hear at least a few of the doors worked out. I was definitely one of the skeptics. I personally would think its worth it to sand them down and get it 100% right so it won’t be a touch up project later (I always hate those personally- and rarely get to them or do them as perfect as I would like).
I can’t wait to see how the kitchen turns out! And I love that you used your cabinets you already had and even used restore for the others!
Courtney says
Will you been painting/replacing the kitchen ceiling fan?
YoungHouseLove says
Oh yes, we’re doing a whole new lighting plan, so we’ll add two pendants over the peninsula and can lights in the other side of the kitchen for prepping/cooking!
xo,
s
Tania @ Carnoustie Lane says
It makes me so happy to see your painted cabinets! I’m a huge fan (of you and painted cabs). I can’t see any seams in your photos so it was well worth the refab of those few. I also can’t wait to see your penny tile up! Great job so far! Happy 2012!
Morgan says
A….L….M….O….S….T There!!! I can’t wait to see it all done.
Jona says
This makes me so happy! My big goal this year is to paint my kitchen cabinets and I’ve been a little reluctant since I know it’s going to be a huge undertaking….can’t wait for the video. I think I can do this!
Tania @ Carnoustie Lane says
Oh….and I used the BM Advance on my cabinets and that paint really makes a HUGE difference. Great to work with and awesome finish! It dries really hard, like a durable shell. It’s easy to clean too, even if scrubbed!
YoungHouseLove says
Yay! We have loved it so much in the office so it’s great to hear it works just as well in a kitchen!
xo,
s
Kristen @ Popcorn on the Stove says
The kitchen looks so clean with the light cabinets. I can’t wait to see the doors!
Christa says
What are your plans for the lighting in the kitchen? Are you planning to keep the fan?
YoungHouseLove says
Oh no- an all new lighting plan is gonna happen. Pendant lights over the peninsula and can lights over the cooking part of the room!
xo,
s
Penny says
Are y’all still planning on using that pretty seeded-glass Pottery Barn pendant light for over the sink? I saw it when I was going back through the archives, sorry I can’t remember exactly when it was.
YoungHouseLove says
We actually used a seeded glass light over our last kitchen sink and loved it! We sold that with the house but have a mercury glass one from Pottery Barn that we’re seriously considering for this one! Will keep you posted!
xo,
s