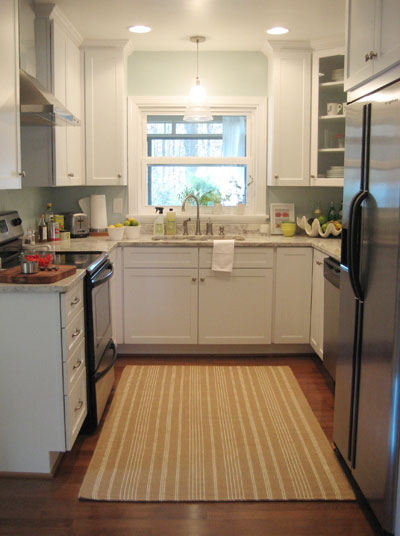
Ok, we’re calling it. The kitchen is officially done!
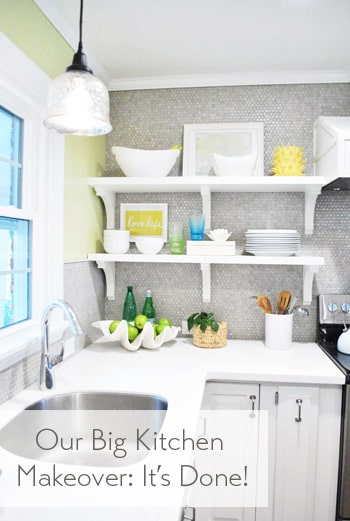
Of course that’s a lie and we still have a bunch of little things to complete, like:
- adding decorative molding to the back of the peninsula
- adding a message center/chalk board to the side of the pantry
- adding the last of the transitions/reducers to finish the floors (and that rectangle of fireplace tile)
- replacing the broken light in the fireplace area – most likely with a spotlight that washes down the fireplace wall
- adding some sort of window treatment (colorful roman shade?) over the sink
And of course we dream of refinishing the surrounding oak floors to match the dark mocha cork in the kitchen so our whole house is more seamless (more on that here) but that’s a down-the-line thing. Thankfully all of the big stuff and most of the small stuff in the kitchen is checked off the list and we’re so excited to see how this room has transformed in the last five months. Can you believe we’ve been slowly chipping away at this renovation since October?! Things have definitely come a long way…
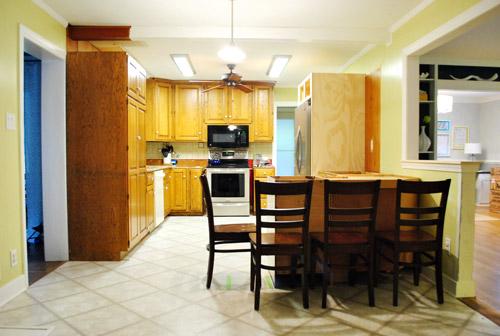
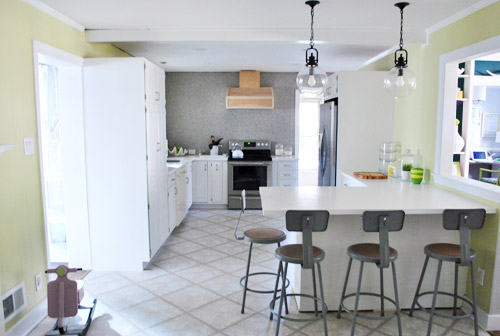
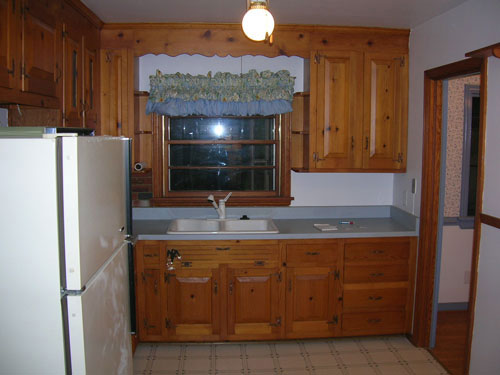
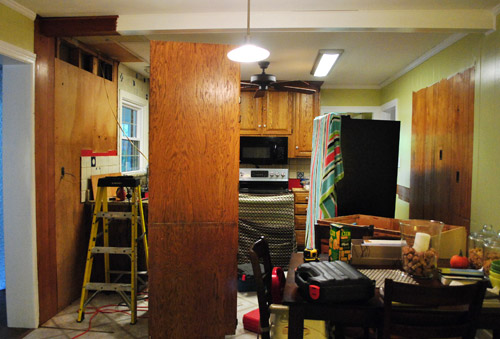
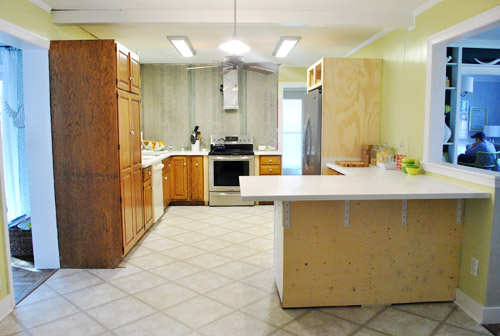
Just to save you from scrolling back, here’s the before again for comparison’s sake.
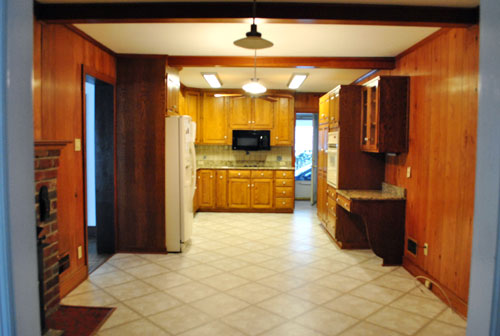
It really doesn’t even feel like the same room anymore. We can hardly remember the dark paneled kitchen that we lived with for almost a year while we planned our remodel and saved our pennies.
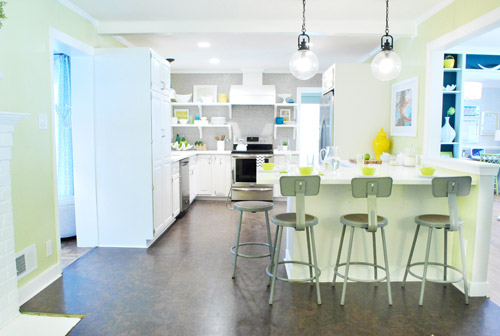
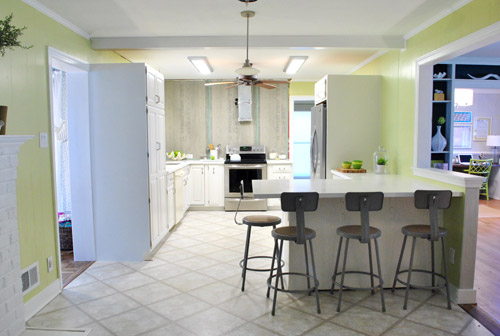
Here’s the makeover from the other side of the room:
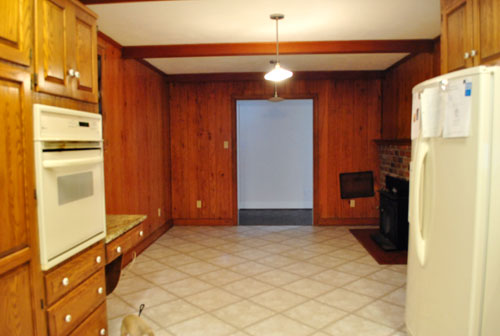
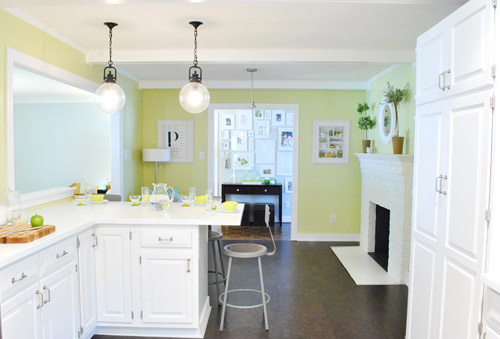
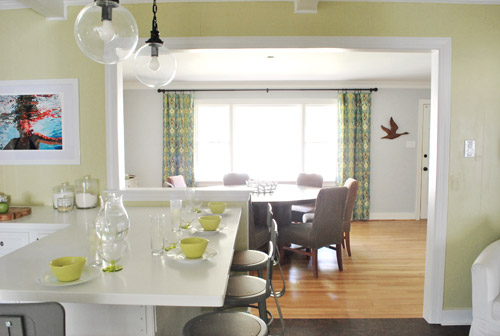
And here’s a before and after shot from a similar angle where we opened up the wall to create a nice big doorway between the kitchen and the dining room:
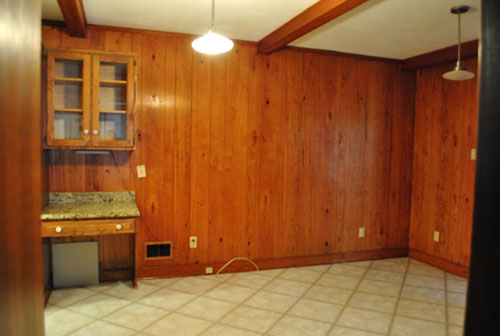
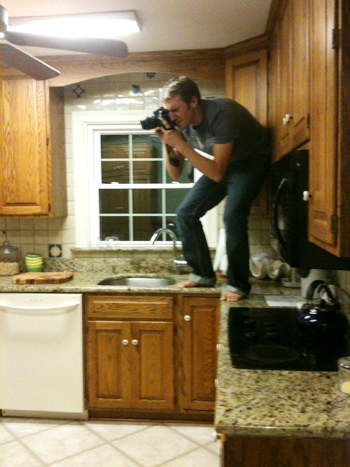
Oh and here’s another fun before and after comparison (from the doorway of the office that leads into the kitchen):
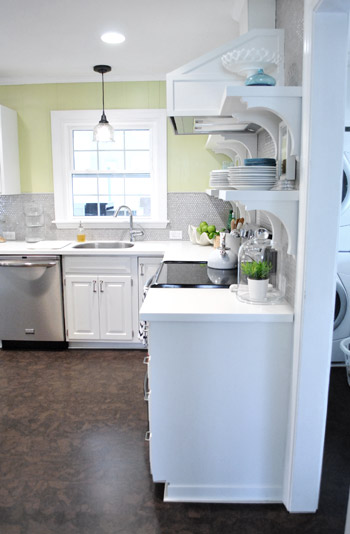
Here are a few more POVs of the room as it looks now:
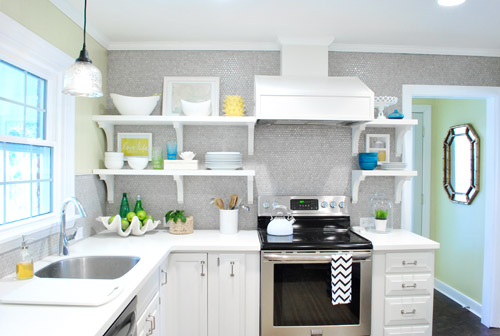
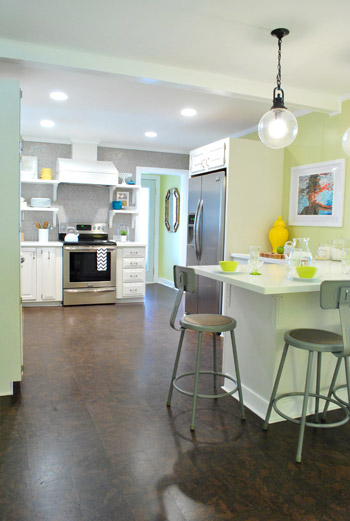
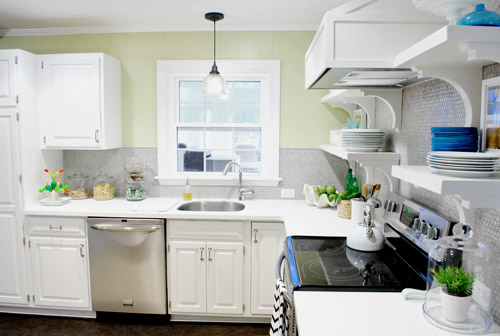
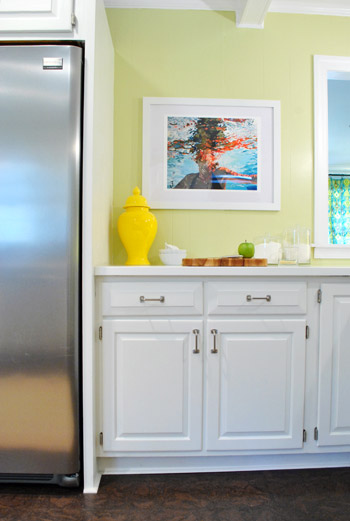
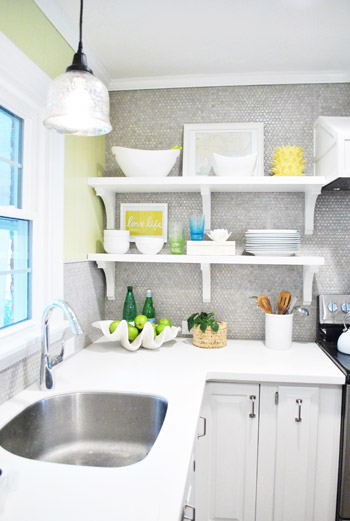
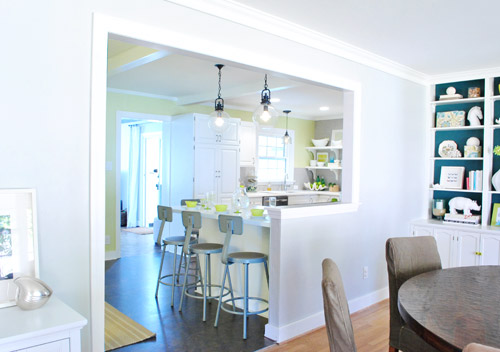
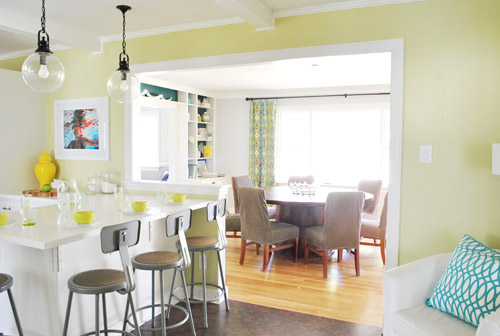
Lots of things are still in flux (items on the counters and shelves will definitely rotate in and out, which is fun for a kook like me). And these two 4 x 6′ rugs from our first house’s kitchen and third bedroom aren’t permanent…
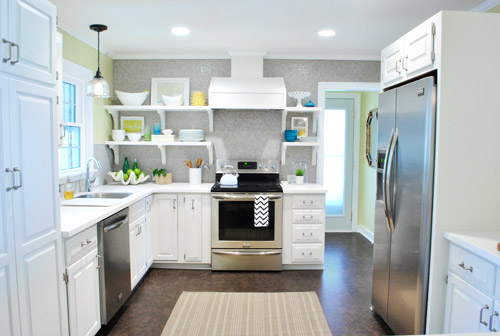
… we just tossed them down for a few shots, but we envision getting something new to help define those areas (they’re old and stained and not as soft underfoot as a few other options, so we’ll keep you posted).
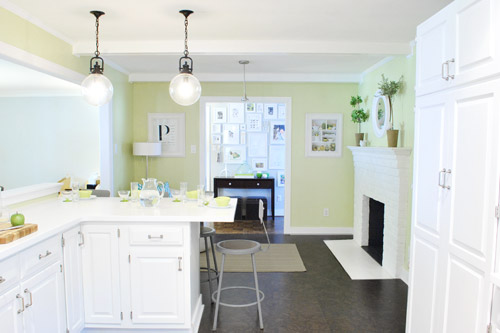
Oh and when it comes to the bar stools that we debated spray painting anything from a bright color to oil-rubbed bronze, now that the floor is so dark the silver color ties into the stainless appliances and looks nice and balanced in person. So we might live with them a while before we decide to defile them with spray paint or anything. Of course we’ll keep you posted.

And we actually have one more tweak that we’re seriously thinking about ever since a reader sent us a photoshopped picture of our hood with the top as wide as the bottom part (thanks Brooke!). She actually sent the pic on the 15th of February, but we decided to wait to finish up the kitchen (add the flooring, etc) before making any rash decisions…
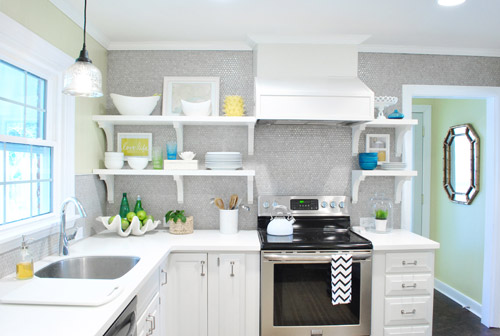
The good news is that we’re still smitten with the idea, so all signs point to beefing up the neck of the range hood someday! Of course we’ll keep you posted on that too.
But back to the overview of our big kitchen makeover. We definitely got really hands-on with this transformation (especially when compared to our first kitchen reno, which we managed but mostly outsourced, my how things change). It just goes to show you that over time you can learn as you go and five years later you might be way more comfortable doing a lot more than you did the first time around. Here are some of the things we did in our current kitchen to save money:
- doing all of the drywalling and trim on our wall opening into the dining room
- relocating things like our fridge, pantry, and stove to make a better work triangle by ourselves
- refinishing our original cabinets and reusing our faucet and sink
- getting additional base cabinets from the Habitat For Humanity ReStore to create a peninsula
- reselling things on Craigslist (our old granite, dishwasher, over the range microwave, wall oven, dining table, and fireplace insert)
- going with Corian over pricier granite or marble
- buying on-sale appliances over a tax-free weekend with Energy Star discounts stacked on top of that
- building our own cabinet around the fridge
- scoring our $350 range hood for just $60 on craigslist
- doing all of our own tile installation with on-sale penny tile
- building our own range hood cover and shelves
- buying inexpensive metal lab stools from a school supply website
- getting pendant lamps for over the peninsula on the cheap from a local outlet
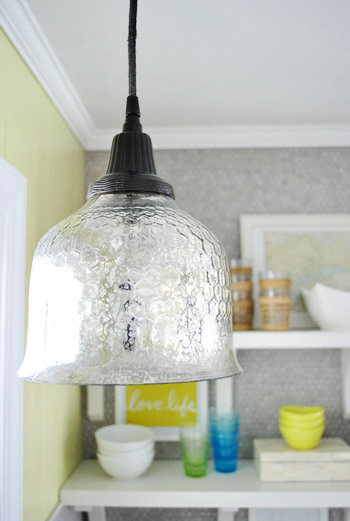
- spray painting an old $29 Pottery Barn outlet pendant to match the others for over the sink
- getting clearanced-out cork for the floors that we laid ourselves

And here’s an actual budget breakdown:
- New cork floor + underlayment from Lumber Liquidators (including the cork in the laundry room too): $848
- All new stainless appliances (originally priced at $3,776): $2,129 (we originally spent $2,384, but later switched the microwave)
- Opening the doorway into the dining room, which was done by a local contractor and then finished by us: $790 (which includes $90 of materials that we bought to drywall and trim it out)
- Additional base cabinets from the Habitat For Humanity ReStore to create peninsula: $88 (they would have been $500+ new)
- New pendants over island and sink: $149 ($60 for each globe pendant and $29 for the one over the sink)
- The cabinet we built around the fridge so it looks built-in: $90
- All electrical work (done by local pros over three visits): $711
- Wood filler, primer, and paint for refinishing the cabinets: $69
- JennAir range hood scored on craigslist (worth $350): $60
- Wood and brackets to hang/frame out hood: $115
- Wood & brackets & all hanging materials to make shelves: $141
- Corian counters in Glacier White from Home Depot ($33 a square foot): $1,700
- All new cabinet hardware and hinges: $173
- Backsplash (penny tile from The Tile Shop): $280
- Four industrial lab stools (from a school supply store): $168 (they were just $33 each plus shipping)
- Miscellaneous (screws, nails, glue, little cords/connectors for appliances, flooring & tiling supplies like grout and sealer, shoe molding, etc): $194
- Items we sold on craigslist to get money back to put into our reno: old black microwave: +$90, old fireplace insert: +$60, old dining table and chairs: +$120, old bisque dishwasher: +$90, old granite: +$350, old bisque wall oven: +$40 (total back: +$750)
- TOTAL SPENT: $6,955
Not bad since a large kitchen renovation of this scale (our room is 24′ x 12′), if outsourced would probably be around 30K (for a giant new doorway that leads to the dining room, an accent wall of penny tile to the ceiling, all new cork floors, all new appliances, refacing oak cabinets and adding a peninsula to match the original cabinets, all new Corian counters including a giant 3 x 5′ slab for the peninsula, an entirely new lighting plan, a built-in hood with custom built shelves, a relocated pantry, stove, and built-in fridge, etc). We originally budgeted 10K for the job, so we’re really happy to come in under!
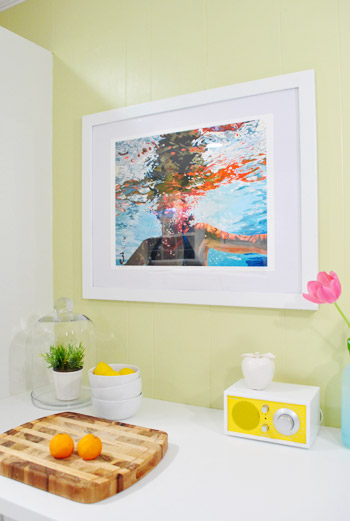
By contrast, our first kitchen renovation (from back when we both made bank working in advertising, haha) involved pricey granite, a lot more professional help, and all new cabinets.
It actually came to $20,500 (including the purchase of a fridge and stove that weren’t included in this breakdown since we bought them a year prior). And that room was only 13′ x 10′!
So although this second kitchen reno took us tons of time (we started this project back in October, and have probably put 5-10 hours a week into it since then – for a total of around 155 hours) it was definitely something that we loved doing – mostly on nights and during weekend Clara-naps. We almost never worked on it during the day on weekdays (when the blog is active and the bean’s awake one of us is a stay at home parent and one of us is on blog duty) so that might help those of you with a day job who wonder if you can pull off a major kitchen remodel like this on nights and weekends.
You can! It might just span across five months or so, but as long as you take things one small project at a time (it’s waaaay less intimidating than thinking of it as one big project when you break things down into bite-sized chunks) you’ll most likely live to tell the tale. And all the love and sweat that you put into your “new” kitchen will be totally worth it in the end.

Who’s excited to call this turkey done? Is anyone else out there about to start a big kitchen reno? What have you guys done when it comes to being hands on and saving some money by doing things yourself? We’d love for everyone to share tips about how they renovated their kitchen on a budget so this post can become an awesome resource for anyone out there who is thinking about getting started and would love to peruse a bunch of what-worked-for-me tips! And now we just owe Clara and Burger a big thank you: for sleeping through all the hammering and drilling and just generally being such great little DIY enthusiasts (Clara still loves to measure the cabinets with her tape measure since she remembers us doing it months ago).
A five month long kitchen reno can definitely “interrupt” daily life, but our little ones are such troopers, so we’re sending them both a big virtual kiss for their patience and excitement throughout the loooong and not-always-easy process! Our tip is to try to maintain as many working appliances as possible (which is easier when you’re working with your existing cabinets, but nearly impossible when it’s a full gut job). We only had a few days without most of them, if that, which was no sweat! In fact it totally paled in comparison to the 113 days that we were without our first house’s kitchen during that reno. Thank goodness for extension cords to keep the fridge running and the fact that moving our stove across the room didn’t mean losing the function of it!
Psst- To check out virtually every post about our kitchen renovation, click here, here, here, here, and here (hooray for monthly breakdown posts that have 20+ links in one place!).

Ainhoa@ALittleBite says
I love your budget :D
It looks great!
Kristen @ Popcorn on the Stove says
Absolutely beautiful! I love all the little details like the penny tiles, the hanging lights you chose, and the items you chose to fill the counters & shelves with. :)
Alisha says
You guys are SUPERHEROES! This is absolutely an amazing overhaul! And for that little amount of money? Congratulations it looks beautiful!
YoungHouseLove says
Thanks so much you guys! You kept us going the whole way. So encouraging and sweet!
xo,
s
Jess @ Little House. Big Heart. says
All that for under $7,000? That’s amazing!
I love how light, bright, and airy the whole room feels and how it opens your house from your dining room on. It is an amazing transformation and a gorgeous result. Bravo!
So, I have this bathroom…
YoungHouseLove says
Haha, be right over!
xo,
s
Melanie says
You guys did a fantastic job!
I’ll have to remember to break big projects down to smaller ones when I get a house. Great tip. :)
Now, what’s next? ;)
YoungHouseLove says
Good question! Haha. We’re all over the place. We want to do some landscaping stuff, some light bathroom stuff (paint and some inexpensive upgrades) and then plan to build a big walk-out deck this spring!
xo
s
Lindsay says
Where will the deck be?
YoungHouseLove says
It’s a secret! Haha. Just kidding. It’s actually going to be where the weird balcony to nowhere is that’s beyond the slider in our hall (off of the kitchen). We don’t use that side of the house at all since there’s no access, and having a deck with a little outside dining area right off the kitchen should be awesome!
xo,
s
Lindsay says
Oh sweet! That’s what I was hoping you’d say. I’m excited for that one!
Kim says
AMAZING! It’s unbelievable that it’s even the same room.
Did you ever think of popping out the seat on the stools and covering just that part in fabric, or adding a pad to the back? I like the stainless steel, so maybe adding something that way? I remember sitting on those stools in physics class in high school….mental aversion!
YoungHouseLove says
Yes, we’re not sure we can pop them out, but we talk about reupholstering the whole top or staining it nice and dark in that circle. Will definitely keep you posted!
xo,
s
annabelvita says
I think you should pick out one of the bright orangey pink colours from your fab art and paint the wood that colour.
YoungHouseLove says
Ooh that could be really fun!
xo,
s
Amanda @ Our Humble A{Bowe}d says
Wahoo!! It’s officially done and looks great! We had about the same timeline and budget you did. :) http://ourhumbleabowed.wordpress.com/2012/03/13/stick-a-fork-in-it/ Isn’t it amazing how long it takes, but it doesn’t feel that long? We got the bulk of ours done in a week and then it was detail stuff.
I like the photoshopped vent hood, too. Just feels more substantial and flows better. :)
YoungHouseLove says
Congrats on your kitchen Amanda! It came out amazing!
xo,
s
keri says
I didn’t realize I had been holding my breath since October…but I just let out a big sigh of relief!! That is beautiful…the before and after is like a breath of fresh air…just…WOW! You two must be so proud. I would move my bed into that kitchen and sleep in there just so I could stare at it while falling asleep. it’s that fantastic. congratulations!
YoungHouseLove says
Haha, I joked that I wanted to sleep on the cork the other night (it’s so cozy). Maybe we need to bring in some sleeping bags…
xo,
s
emily says
Congratulations on being 99.99% done!!! Your kitchen looks absolutely incredible, and I can’t believe it was just around a third of what you spent on the kitchen in your first house – that’s amazing.
Don’t know if you’re open to ideas about the stools, but every time I see them, I think they could do really well with just a little DIY cushion or other covering on the wooden seat part. I totally agree that leaving them unsprayed (at least for now) helps tie in the appliances, but what about bringing in some color on the seats? Just a thought!
Congratulations, again. It’s been so much fun to follow along with another one of your projects. Y’all are so inspiring!
YoungHouseLove says
Thanks Emily! We debated recovering or staining the seats in the beginning- they’re actually really comfy but who knows where we’ll end up! Some color to brighten them just there might be fun!
xo,
s
Jess B. says
It’s so beautiful. I adore everything – it all seems so fresh, so user-friendly, and so cost efficient! My favourite things! The penny tile, glass pendents, and cork flooring were all excellent choices, and make the space really special.
Congratulations on finishing the kitchen!
YoungHouseLove says
Thanks so much Jess!
xo,
s
Blythe says
Very very awesome! And I can’t believe it was less than 7k…you are awesome and have had me riveted to your blog everyday. What project is next??? :)
YoungHouseLove says
Well, we’re all over the place! We want to do some landscaping stuff, some light bathroom stuff (paint and some inexpensive upgrades) and then plan to build a big walk-out deck this spring!
xo,
s
Lindsay says
I think my favorite part of your kitchen is the colors you chose for walls and cabinets. The old one seemed so dark and dreary but just adding even the wall color really made a difference. Gives me stuff to think about when we buy a future house – a gallon of paint can really brighten any room up! Love the new kitchen!
YoungHouseLove says
Thanks so much Lindsay!
xo,
s
Ashley@AttemptsAtDomestication says
What a transformation! You guys did a great job and it looks wonderful! We wont be starting out kitchen reno for at least another year or so, but we’ll definitely be using your advice and kitchen as a guide when we do!
Sarah says
Love it!
So, what’s next? hah
YoungHouseLove says
Well, we’re all over the place these days. We want to do some landscaping stuff, some light bathroom stuff (paint and some inexpensive upgrades) and then plan to build a big walk-out deck this spring!
xo,
s
Julie says
Love Love Love. The white cabinets pop against the dark floors and the blue and yellow accessories add so much interest.
I found your website a month ago and you both have given me sooooo much inspiration. My finance and I recently moved into a 2,000 ft home in Chicago. We are a young couple so the task of decorating an entire house is daunting (and expensive) but you both have given me hope. It’s all about making a home comfortable (and pretty of course!) but most importantly, personal. Thank you so much for your blog posts and sharing your wisdom with us. I appreciate it greatly. xo
YoungHouseLove says
Aw thanks Julie! Good luck with everything- and have fun!
xo,
s
Katrina @ 'Sota is Sexy says
It looks incredible, you guys! Congrats on a job well done!!! And it looks WAAAAY more expensive than just 7K :)
Sandy says
Things look amazing, you guys! We are getting ready to start the planning phase of a kitchen renovation, but for us, our cabinets are the problem. So, I know that our budget won’t be as friendly. You did an amazing job!
Reenie says
WOW!!! And to quote one of the most used words on The Bachelor/Bachette…… “AMAZING” =)
YoungHouseLove says
Haha, someone told me it was one of the most overused words in the english language, which I believe!
xo,
s
Whitney Dupuis says
It looks amazing! I just can’t believe how far it has come and I truly can’t believe you guys did it yourself. I wish I could convince my husband to tackle projects like this with me.
By the way, remind me what type of paint is best for cabinets? We painted our cabinets white when we first moved in 4 years ago (they were previously buttery yellow with nasty nicotine stains. Now, though, they are completely scuffed up and dull. We need to paint them again before we move, but I would like to do it right this time.
YoungHouseLove says
We used Benjamin Moore Advance paint after a bunch of contractors recommended it and it’s awesome! Self leveling and goes on like butter with east clean-up (it’s low-VOC).
xo,
s
Melissa says
Sorry to butt in, but would that paint also work for painting over cabinets that are not real wood?
YoungHouseLove says
I would ask the paint pros to see if they think it’ll work for yours. You can even bring in a door or drawer so they can see/feel them to figure out what works best!
xo,
s
Candice says
I just want to say the kitchen looks absolutely amazing. I love it! I agree the chairs look great now with the darker floors it somehow makes them pop. Great job! Can’t wait to see your next projects!!!
Lori says
That is so lovely. Bright and cheery and welcoming. Makes ya happy just to look at it! And your choice of the artwork (swimming lady with the “fish”)? It looks perfect. Love the blog – the only one that’s a must-read.
Ade@fortheloveofpainting says
Looks great guys! We are trying to buy a house and I am scared to know the things we may have to do to the kitchen!
Vidya @ Whats Ur Home Story says
Looooove it, the pendants, all the light, the freshness, the crispness, the accents, especially that grellow urn next to the painting that brings in the accent color to that side! Fab! Now, how do you top that?
YoungHouseLove says
Haha, thanks Vidya! You’re always so sweet!
xo,
s
Ali Miller says
I know that everyone’s style is different, but I LOVE your style 99.9% of the time. However, I must admit I have looked sideways at your range hood several times. It just didn’t seem quite right to me. I like the change your other reader Photoshopped for you as well!
Tracy Napper says
Love the finished product! It looks awesome and you guys did a great job. We remodeled our lovely 80s oak kitchen 2 years ago for under $3000 (kept the cabinets but painted them black), changed the cabinet hardware, removed the soffit and old lights, scraped the popcorn ceiling, changed out the laminate countertop to IKEA butcherblock, new sink and faucet, painted the walls. We hired most of it out but still think we got a huge bang for our buck!
YoungHouseLove says
That’s amaaaazing! Sounds like a whole new room!
xo,
s
Wendy says
Wow!! Seriously amazing job you guys. And I can’t believe you spent under $7k!
We didn’t have the money to do a “real” kichen reno when we bought our house, so we worked with what we had. We painted our cabinets, spray painted our counter tops, and then installed our own drywall and flooring when we discovered a huge leak and massive termite damage.
http://www.oldtownhome.com/kitchen/index.aspx
The reno has held up well over the years, but I still can’t wait until the “real thing” in a year or two. :-)
YoungHouseLove says
Oh no! So scary about the leak/termites. So glad you guys got it taken care of! Your kitchen is so charming!
xo,
s
mariela says
Its lovely! Love the colors, the floors, the tiles, everything! Now that you finished it, are you thinking of painting the stools are different color? or would you leave them as-is? Love them as they are, but just curious!
YoungHouseLove says
We’re thinking we’ll leave them as they are for now since they tie into the appliances, but who knows where we’ll end up down the line! We’ll keep you posted for sure!
xo,
s
Jodi says
I LOVE it. It’s so bright and airy!!! You guys did a great job, and it was so fun to watch the transition… It doesn’t even look like the same room! :)
Hannah says
AMAZING!!! I don’t think any of us would really believe that you had done all that yourselves, and that it’s still the same house if we hadn’t seen it with our own eyes! It’s beautiful!
Lori says
Unbelievable!! Wow – a gorgeous kitchen for under $7K is incredible. And you must feel great knowing that it was your blood, sweat and tears that made it all happen. Time to take a looong nap now :-)
Michele says
you guys! well done, it’s just gorgeous. i loooooove how light, bright and airy it is. i looove the pops of citrus colors. and i looooove how grounded it all is by the rich flooring.
you did it right, i’m so impressed and inspired!
YoungHouseLove says
Aw thanks Michele!
xo,
s
Melissa says
It really is an amazing transformation. When you bought this house I was excited for you guys, UNTIL I saw the kitchen. Then I thought you two had lost your minds.
Just great. You two are magicians!
YoungHouseLove says
Haha, we just might have. Now I’m looking at our almost-an-acre property which is A COMPLETE MESS and wondering what possessed us to think we could make it over. Haha. One day at a time…
xo,
s
Christine says
I love the view from the kitchen, through the new door and into the dining room. You didn’t just remodel the kitchen… you opened up the whole living area!
Brandi @ His Shabby Her Chic says
I can’t even believe that’s the same kitchen! It is now my dream kitchen…seriously!
And also, October to now went by so fast!
Jamie R says
This is super impressive! And it looks great! Can you show us a picture of how the floor meets the white part around the fireplace? How did you handle that transition? Is the fireplace thing (I have no idea what this is called!) lower than the floor? Thanks!
YoungHouseLove says
Oh yes, that part is still on the to do list (we need to trim it out with a wood reducer). Will post all about it when we get to it! The wood was on order but it finally came in today so we’re hoping to tackle it soon!
xo,
s
Saleha says
Is there a new dresser in the dining room? Kitchen looks awesome!
YoungHouseLove says
Thanks Saleha! We got that a while back and it has been slowly moving around the house until we find a final resting spot for it. Haha. Of course we’ll blog about it when we do! It’s actually a side table – but it’s a pretty versatile little table.
xo,
s
Cat says
Oh I’m so glad you are going to beef up the hood! I was so hoping you would- I could see Sherry loving one of these signs up there:
http://www.etsy.com/listing/77688235/aloha-sign-wooden-hawaiian-hello
personally I’d love one that says Butter Bean for the kitchen since that’s what my mom used to call me as a kid :)
What a fantastic job you did on the kitchen!! Such an inspiration- that good things do take time but are so worth the effort!
YoungHouseLove says
Haha, so cute! Love them!
xo,
s
Monika says
Amazing you guys! And all for under $7 k. My favorite part is… everything. I just can’t pick! We recently did a bunch of upgrades to our house (and in the process found you guys) and used your tutorial for painting the cabinets. We even ended up with a very similar version of the globe lights. We did a lot less than you guys, but our upgrades cost us ~$2,500. I posted some photos for my mom and sisters here (blasslife.wordpress.com) if you’d like to take a peek. Thanks for all the inspiration!
YoungHouseLove says
Thanks so much Monika! Off to check yours out!
xo,
s
The Mrs @ Success Along the Weigh says
Simply stunning! I bow to your remodeling prowess and want to be you guys if…er…when I grow up! :) Before’s are kind of important huh? I wish I’d remembered to do that before I went nuts donating everything in the guest room but in 15 minutes when my chair gets delivered…now studio!
[email protected] says
Actually, my first kitchen estimator just left! I cringe to think what the price will come back: it’s a total gut/new appliances floor, the whole-shebang kind of thing.
I still tell darling husband that I can do it myself (but there’s only one of me), and he looks at me like I’m nusty….but I still think I could. Maybe instead of 5 months it would take me 10, but I’d have all day to work on it (well, at least until the bus comes!)
I just am nuts enough to still think about it.
And I’ll blame it all on your guys, ok?
Laura :)
YoungHouseLove says
Haha, we take the blame! Maybe there’s a way you can do some of it (gutting is easy, so is painting and installing lighting once the fixture boxes are there, etc). I’m sure you can cut the cost way down if you get in on it!
xo,
s
Teresa @ wherelovemeetslife says
That is not the same kitchen, and if you guys weren’t such great bloggers(documenting it all)I would call your bluff on that one. ;) haha But really though, your kitchen is an inspiration to me… when I think of what I would want my kitchen to FEEL like… you hit the nail on the head :)
Anika says
WOW! You guys should be so proud of yourselves! I can’t believe you did all that for just under 7k, insane. It really does look like a completely different room. Now put your feet up and just relax while you look at it; you deserve some time off between this and the next project.
NYer says
Gorgeous!
My favorite renovations are the huge opening in the wall and the peninsula. I am in awe of your ability to envision the transformative effect. Those two changes make me feel “how could it have been any other way?” but I certainly wouldn’t have been able to imagine it beforehand. My hat is off to you, with a very deep bow!
YoungHouseLove says
Aw thanks NYer! We bow back to you guys for keeping us excited and encouraging us along the way!
xo,
s
marianne says
WOW! I can’t believe the difference in price from your first kitchen and this one! I have seen people spend more on just their fridge than you did on this whole entire kitchen. Love it!
[email protected] says
Oh and rugs? Why cover those gorgeous floors?
YoungHouseLove says
I think we’re just weird. Haha. We had a rug in our first kitchen and it was so cozy. I think we generally love the look of dark natural (cork or hardwood) floors with an area rug to define different parts.
xo,
s
jodi says
it looks absolutely incredible! you guys did SUCH an amazing job. i am completely in love with the space. and i love seeing if from so many different angles. truly, job well done!
Carly G says
OMG!!! That kitchen is so amazing!! You guys rock! :) Aren’t you also thinking of adding some kind of window treatment above the sink?
YoungHouseLove says
Yes, definitely on the future agenda- forgot to add that to the list at the beginning!
xo,
s
Val says
Oh, it looks so good! You guys really outdid yourselves on this one. I can’t begin to imagine where you get the energy.
What are you planning for the flooring around the fireplace? A friend of mine just floated new bamboo floors throughout his place and he is trying to figure out what to do about that lip around his fireplace, too.
YoungHouseLove says
We have an order in for a few more transition pieces to complete the floor and that lip around the fireplace. We’ll just use reducers to frame it out and eventually will probably retile it to remove the lip. Will post about it as we go for sure!
xo,
s
Elise says
It’s so beautiful and I love everything about it!
Quick tip on the message board – I saw this chalkboard contact paper in action (and now I can’t remember where!) a few days ago, and it seems like a really simple way to do a message center next to the pantry.
http://www.amazon.com/Kittrich-Corporation-Chalkboard-Contact-Paper/dp/B000KKMO90/ref=pd_rhf_ee_p_t_1
YoungHouseLove says
Oh yes that stuff looks awesome!
xo,
s
Lara says
your budget breakdown just blew my mind! i’m so glad you’ve decided to keep the bar stools as is. i tried posting this last week, but i think it was eaten by your spam filter…i was flipping through the latest crate and barrel magazine and thought of your stools when i saw the lyle side chair. go check it out of you haven’t seen it yet. i just love the way they look on dark floors!
YoungHouseLove says
That’s too funny! Thanks for the tip – off to check it out!
xo,
s