Sherry is officially half-done with Clara’s canopy wall update, so thanks so much to all 900+ of you who commented with votes and additional suggestions! We shared tons of photoshopped images with Clara and she decided we should combine a few ideas, and well, the kid’s a genius and we can’t wait to share the photos. We might just let her decide what we should do in every room.
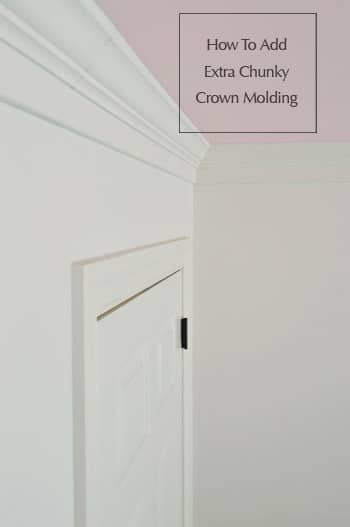
But I, ever the party pooper, was determined to check a certain project off of my list that was over a month old before Sherry got to work on that wall: adding chunky double-wide crown molding in there.
So yes, feel free to boo me because I cut the line and knocked it out before Sherry could say “what about my canopy project?!” – which explains why she’s only half-done right now. But she woke up early yesterday to get things moving, and just needs to check off a few more things before she can shoot it and share it – hopefully by Monday).
Back to me and my chunky crown. Around a month and a half ago when we painted her walls and ceiling, we didn’t bother to cut in where the white walls meet the pink ceiling so a thin yellowed line of paint remained. Why? Because I planned to install crown molding right afterwards. Soft emphasis on “right afterwards.”

We’ve posted about installing basic crown before (both in photographic and video form) but I wanted to upgrade things this time and beef this crown up bigtime. One, because I had mastered the basic kind first (doing this right off the bat sounded scary, but now that I’ve done a bunch of crown it sounded like a fun challenge), and two, because this house sports beefier crown in many of the rooms that have it, including our dining room, living room, bedroom, office, and foyer – so we wanted the new crown to match the original crown. To give it more presence, the builder appeared to have installed a piece of baseboard before adding the crown on top. See how much thicker it looks?
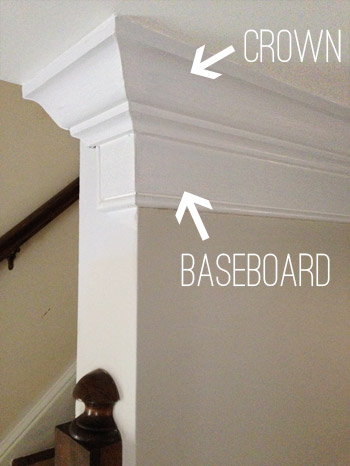
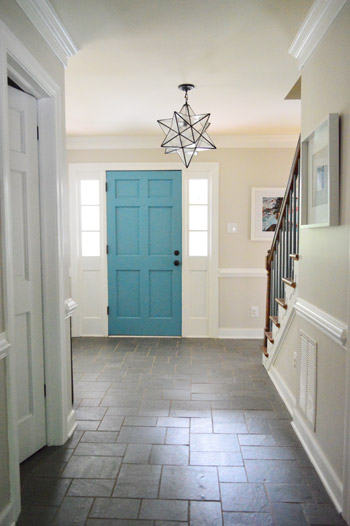
From further away it doesn’t look weirdly baseboard-ish or too thick or anything, it actually seems nicely proportionate with other woodworky details in this house (like the chair rail in some of the rooms, the paneled doors, and the window mullions).
So I purchased baseboard that was 3.25″ tall, which just meant I’d have to float it away from the ceiling a bit to achieve the look we wanted (I could’ve bought wider stuff but I would’ve just been paying for wood you’d never see). So I cut some spacers to help me to keep it a consistent distance from the ceiling all around the room and nailed that in with my nail gun (more on the one we have here). I was sure to use a level to double-check my placement too, since ceilings aren’t always straight and relying on spacers alone could produce some wavy results. Oh and I used a stud finder and a pencil to mark my studs with a dot on the wall lightly below where I’d be nailing them in so I knew where to drive those nails in to be sure I hit a stud for a nice strong hold.
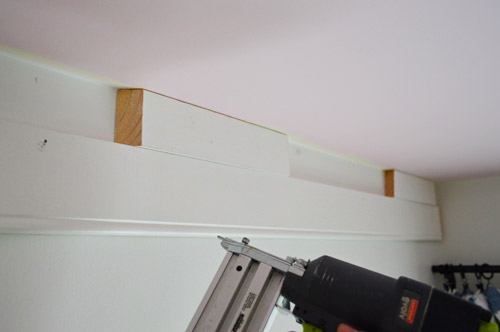
With my first piece of baseboard nailed up, I held up some crown to make sure we liked the look. Up close the baseboard part looked a little thick, so we walked into the other rooms to be sure that’s how it looked in there and to be sure we liked it. Sure enough, we loved the finish look, so we pressed on.
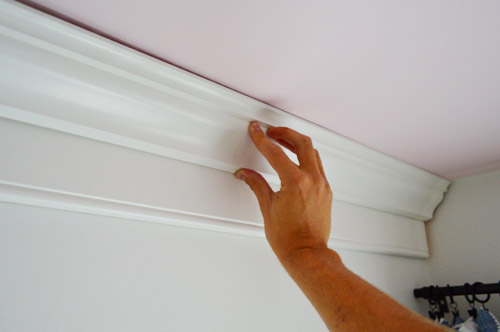
Getting all of the baseboard installed around the room went pretty quickly. It only required some simple 45° miter cuts in each corner, along with some 45° scarf joints where my boards weren’t long enough to span an entire wall. So it was a nice warm up to the more complex calculations and cutting that were to come with the actual crown.
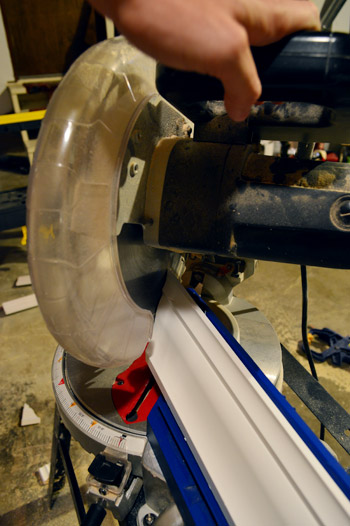
I relied on my Kreg Crown Pro again to help me make accurate cuts for the crown (here’s an affiliate link to the one we purchased). You can read a more about how to make those precise cuts in this post (or watch the video in this one). But the gist is that this Kreg tool (which I bought myself – we have no affiliation with them) helps you hold your board at the right angle on your miter saw. Since crown sits against your ceiling at an angle, it helps to cut on that same angle to get precise cuts so things match up nicely in the corners.
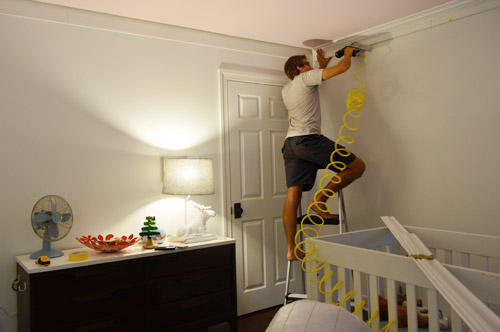
This part definitely took me longer and, thanks to a mid-day meeting, it wasn’t until later in the evening that I finally got all of the crown hung.
The next day it was time to caulk the seams to make the whole job look more finished. In addition to my corners and scarf joints, I also caulked where the baseboard meets the wall, where the crown meets the ceiling and where the baseboard meets the crown. That last step was especially helpful in making our base + crown combo appear more like one chunkier piece of molding instead of two pieces hung on top of each other.
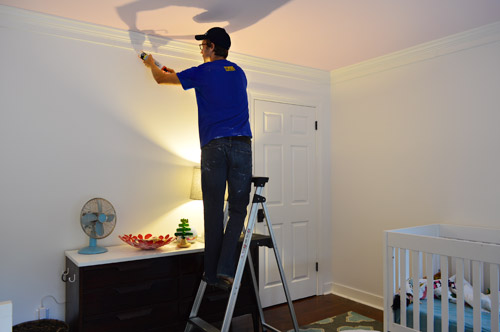
Then we got our touch-up paint on. After you caulk nail holes and gaps you always want to paint again to seal all of that in and get a nice glossy and uniform look (caulk can read as more matte and can even collect dust while the glossier part deflects it so it’s well worth a coat to cover that up).
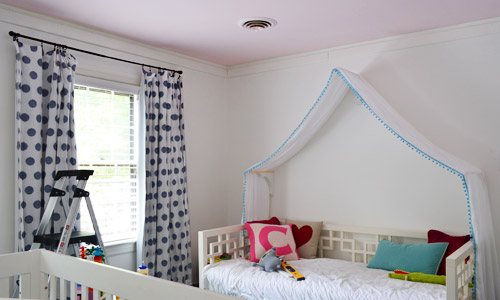
Here’s a detail of the finished job. We’re really happy with it! We thought we might not love it as much in a room with white walls (since it pops more easily when there’s color on the walls) but we actually really love the architecture it adds to the space. Sort of like how we find ourselves oohing and ahhing over those cool old buildings with white walls and thick crown that draws your eye up to the old tin ceilings… it’s not exactly like that in here (we wish!) but the pink ceiling is a fun focal point and the crown is like a big ol’ arrow pointing at it, which we really like.
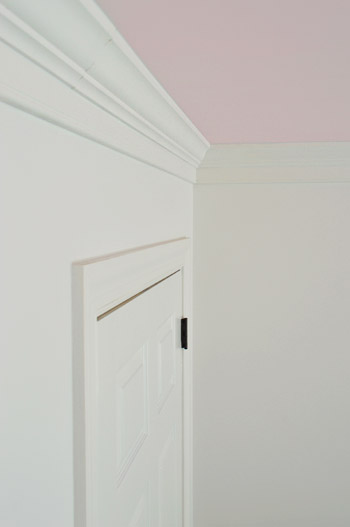
It definitely makes the room look more polished – so even though it wasn’t the most fun or dramatically transformative project, it feels good to have it checked off my list. As for Clara’s reaction, she likes the “wood things we hung up there” but Sherry’s probably the most excited because she now has free rein in there. And things are HAPPENING on that canopy wall, let me just tell you.
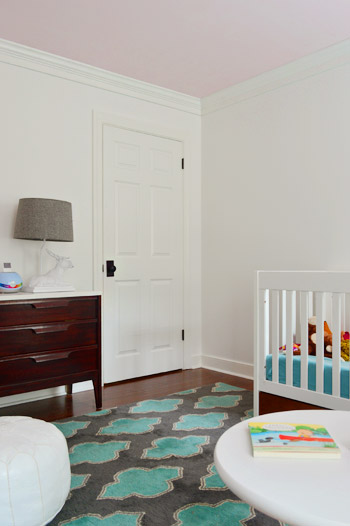
Oh and in the money department, the total cost for the project was $76 worth of crown and $61 worth of baseboard for a total of $137. The boards came pre-primed and we used some of the Simply White semi-gloss paint that we stocked up on back when painting the rest of the trim upstairs, but adding $25 to that amount should cover a quart of paint plus caulk if you don’t have those on hand. Rather than paint after it was hung this time, I had the foresight to spray it way back in early September when I was set up to spray the planks for our sunroom ceiling. See, I told you this had been on my list for a while. Just don’t ask me how long I walked by that freshly sprayed trim sitting there mocking me in the garage.
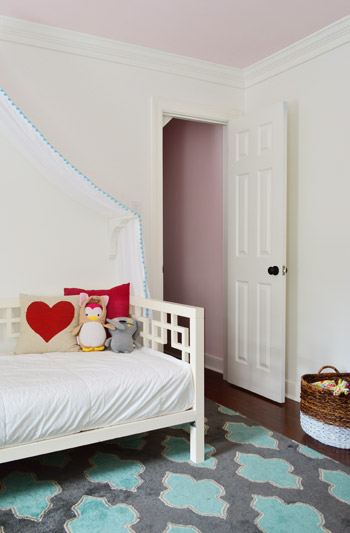
Only bad news is that now I’m jonesing to put more beefed up crown around the rest of the rooms upstairs. Our bedroom was the only room to already have it, so that means I have two bedrooms, two bathrooms, and a loooooong hallway with weird angles to do. Oddly enough, I’m excited about it. But maybe that’s just my affection for nail guns and miter saws talking.

Annie says
Totally unrelated to your post, but did you see the Novogratz collection at CB2? 7’s all over the place and a white ram head with gold horns. It has Petersik written all over it.
YoungHouseLove says
No way! I can’t wait to check it out!
xo
s
Lindsay says
But ohhhhh, the prices!! *covers eyes*
YoungHouseLove says
Really?! I always thought CB2 was the cheaper version of Crate & Barrel. Will have to check it out!
xo
s
Wendy @ New Moms Talk says
Very awesome!
We had to tear out all of the trim in our place, as it was mismatched. The same reality exists for the baseboards, but I haven’t yet to tear it out. I just don’t have the guts to do that, and for now bad baseboard is better than no baseboard.
One day it’ll be better, but for now we have bigger realities on hand… like concrete ponds removal while the sun is still shining.
Jessica says
Looks great! I love 2 piece crown moldings!
Martha says
Looks great guys! And I am loving the new shade on Clara’s moose lamp.
YoungHouseLove says
Haha, thanks Martha! Target!
xo
s
Allison D says
Looks great! I would love to add crown molding throughout our home but our ceilings seem too low and it wouldn’t look right with the door and window trim. Maybe I missed this in a previous post, but how tall are your ceilings??
YoungHouseLove says
We have 8′ ceilings here, and had them in our last two houses too and still loved crown. Even though you think it’ll make a room feel more squat by cutting into the wall color (even in a bold room like our last house’s deep teal guest room) somehow it draws the eye up and makes them feel more vertical if that makes sense!
xo
s
Crystal says
Our house has the same beefed up crown molding on the main level, the only difference is that our builder did not add base boards but added a small half round on the bottom and then just painted the wall between that and the regular crown molding the same high gloss white and it gives the appearance of beefy crown molding with baseboard. Definitely much easier…may want to experiment with that for the other rooms. Just an idea. Looks great in Clara’s room!
YoungHouseLove says
That’s cool! I’ve seen that on Pinterest and always wondered how it looked in real life! So glad it looks great!
xo
s
Lindsay says
This is how mine is done as well! Love the look of it!
Teri Bennett says
That’s how our house is too. Looks just like the pics of your downstairs crown. You can’t even tell unless you climbed up there and rubbed your hands against it.
Are you sure that’s an extra baseboard in the downstairs moldings or did they use the “trick”?
YoungHouseLove says
Oh yes, it’s definitely an extra baseboard going on with all of our house’s existing crown (we’ve both been up on ladders painting around it up close in the foyer and master and it’s one solid piece of wood that comes out the same distance from the wall the whole way). I love that the small trim + paint trick works so well though! Sounds awesome!
xo
s
Miki says
Our builder used the same trick as in Crystal’s home. We love it.
Tara M says
I’m another one that has the baseboard “trick” crown molding and it looks great. Very easy to install. Not sure when it started trending but my Dad put it my house growing up over 15 years ago (before Pinterest!). I tried to tell him that he was cool :-)
Love your crown molding skills! Quite impressive. I need to get my husband to tackle our naked rooms. I bought him the KregJig to motivate him. Here’s hoping he gets exciting about doing it as much as you, John.
Elizabeth L-A says
Wow! This really amps up the visual impact of the space! Super inspiring — would love to do this in the future to some of the spaces in our builder-basic new build townhouse. Any thoughts on what do do in rooms with some fairly drastic bulkheads?
YoungHouseLove says
Hmm, anyone ever done that? Or have inspiration image links to share with Elizabeth? I don’t know if just going around it or somehow stopping at the bulkhead would look better…
xo
s
Lindsay says
What’s a bulkhead??
YoungHouseLove says
I think it’s like a soffit, right? Picture a big boxy thing in the ceiling that contains a heating duct or something.
xo
s
Elizabeth L-A says
I thought soffits were more of an outdoor feature, but yes — a bulkhead basically lowers the ceiling at the walls by about a foot, to contain ductwork, etc. I’d love to say that it’s like having a bit of a coffered ceiling, but it’s definitely NOT a design feature…. ;)
Lindsay says
Ahh. That makes sense. Thanks so much!
YoungHouseLove says
Sure thing!
xo
s
Kelly says
I’ve seen the bulkhead vertical area painted a different color, which made it look purposeful. Like this:
http://www.pinterest.com/pin/41306521554262431/
Does the bulkhead go all the way around or is it just in certain spots? In that picture I linked it’s almost like a room divider.
Putting recessed lighting up there would be super cool too, but you’d have to search out some with a smaller footprint since there is likely important stuff up there and standard can light remodel kits take up a ton of space above the wall.
YoungHouseLove says
Love that tip!
xo
s
Megan @ Rappsody in Rooms says
Each time you do a post about crown molding I feel a bit more confident that this is something that I can accomplish. With the right tools and some patience I am already starting to chant, “I think I can, I think I can” in my head!
YoungHouseLove says
You can do it! Six months ago John was skeered and now he’s an old pro tackling the more complicated kind for sport! Haha!
xo
s
Contempo Space says
Nice how-to!
Crown molding is one of those seemingly little things that really makes a big difference.
Tara & Nicole Michael Crochet says
Looks so nice and finished! Question – When you go to repaint this room sometime in the future – do you remove the crown molding, of just tape it off, to paint the walls? Always wondered that.
YoungHouseLove says
I just cut in around crown molding, so to me it’s like window molding and baseboard – it’s permanent once it’s installed and I just use a short handled brush to cut in around it (tape optional!).
xo,
s
Abbey says
This reminded me of your Clara project: http://blog.westelm.com/2012/07/23/window-daybed-in-a-teenage-girls-bedroom-by-kriste-michelini/
YoungHouseLove says
LOVE IT!! Looks so cozy.
xo
s
Tracey Bradshaw says
Love it – crown molding (we call it cornice here Downunder) is really the icing on the cake o finishing off a room. It just adds that extra bit of something…
Rachel says
Lookin’ good! I’m pretty excited to see the hall turn out the same way, so it’s not just you. And I’m also looking forward to the sunroom tiling reveal (or did I miss that one?)
YoungHouseLove says
THAT TILE! We were going to grout it today and then… midnight thunderstorm. So we have to wait three more days for it to dry out (we have been waiting 3 days for it to dry out for weeks now but it keeps raining every three days and we’re back to square one). Picture John softly weeping in the corner and screaming “whyyyyyy!”
xo
s
Rachel says
Haha! I shall be keeping my fingers crossed for the rain to hold off for the rest of the week for you guys then! :)
YoungHouseLove says
Oh thank you, thank you!
xo
s
Rosie says
I heard something about how this summer/fall, most of the eastern US has been stuck in this weird weather cycle that just keeps repeating itself over and over – we’ve had some amazingly beautiful days up here in Vermont because of it, but that must mean that you’re stuck with all the rain :-(
YoungHouseLove says
YES! Stuck is the best way to put it! We don’t even have any pretty leaves yet. Just spots of sun surrounded by rain on repeat every few days…
xo
s
caroline says
I love the chunkier crown molding!!!! In the last photo what is in the left upper corner of the open door??? See the little white thing??
YoungHouseLove says
That’s an angled ceiling in Clara’s closet. It’s a funny little space in there that almost feels like a playhouse so I want to add wood shingles to that angled wall or something to play up the “playhouse” thing!
xo
s
Karyn says
Oooh… I can’t wait to see how you transform that closet into a playhouse for Clara!
Emily says
This really helps the ceiling pop- I love the unexpected pink on the ceiling! So fun. I wish we could put up crown molding in more of our house (its just in the living room and kitchen) but our upstairs rooms have slanted ceilings in a lot of spots so I imagine it would look weird/be a difficult install. John, are you up for a challenge?? Want to come down and put up crown at our house?!? haha
YoungHouseLove says
I’ll send him over after our next project! We shall call it Rent-A-John (wait, that sounds bad…).
xo
s
katie {deranchification} says
The new crown looks great – and makes everything look even more polished!
Mary | Lemon Grove Avenue says
Awesome before and after shots! Super classy :) We did the same two-pronged approach on our kitchen cabinets and totally love it. Here is the link to the post: http://wp.me/p3EWN2-Pl
YoungHouseLove says
That looks amazing! SOOOO BEEFY!
xo
s
Katie O says
I dig the beefier crown molding! We’re going to start the process of adding crown molding in our newly drywalled downstairs, and with our paneled doors (and soon-to-be-added box molding in our “library”), I think the beefier method would look great. However, I’ve never installed crown molding before, so on a scale of making cereal to climbing the Savage Mountain, how difficult would this be to install for a crown molding novice?
YoungHouseLove says
I would put it at making an origami swan. You can find clear and concise directions (and videos!) to follow, but you will probably have moments where you make wrong cuts and nothing matches up and it’s super frustrating. But that’s completely normal and it happened to us and it’s just how you learn- and by the end you’ll have it done and it’ll (hopefully!) all be worth it! Then before you know it you’ll start getting fancy like John!
xo
s
betty (the sweaty betty) says
tell john, feel free to come to my house once youre done with yours! I need some of this in my kitchen and master! my living and dinning room both have vaulted ceilings, but I think this would look awesome in the kitchen and master! I think I have 8′ ceilings as well. love it!
YoungHouseLove says
Haha, I’ll add you to his call list!
xo
s
luckythreads says
Love that you guys are installing crown! My home came with zero crown installed and it’s on my own long list of updates. It’s great to see some different options to just the basic crown. It’s also super helpful to see your technique. I watched a video where they coped all of the joints and it all seemed incredibly complicated…
YoungHouseLove says
Yes, that has always been confusing to us. Our cousin Megan swears by it, but even in person when she showed us how she did it we couldn’t really wrap our heads around it!
xo
s
Nancy says
I live in a Miami-vice 80’s contemporary (is that contradictory?) house, so no crown molding for me. I love the look, though!
Of course, we’re all on pins and needles for the canopy! Canopy! CANOPY! CANOPY!!!! Will this be Clara’s first official design project? (somehow I think not?)
YoungHouseLove says
Haha, that girl has been designing art and pumpkins and decorating other random things with me for a while, but this is her first big wall makeover for sure! If only I could get her to wield the roller with me (the mess wouldn’t quite be worth the reward quite yet… haha!).
xo
s
Crystal M says
Does Clara’s room have an angled ceiling? I have a vaulted ceiling in my living room and would love to add crown molding, but I’ve been concerned with how the crown will look with all the angles.
YoungHouseLove says
It doesn’t – it’s all just 8′ (flat) – but her closet does have an angled ceiling (see that little triangle of white in the doorway of the last pic?). Has anyone done crown on an angled ceiling? I imagine it would still look nice, right?
xo
s
Katie says
I have wondered the same thing! We have super tall angled ceilings and I love them…just really wish I could put some crown molding up there!
Cassie says
My in-laws have vaulted ceilings and their crown looks great!! Since it’s their living room also and that flows right into the stairway, kitchen, and another hallway, I think it looks better to include it than to just leave one room out (assuming all those other areas have the crown).
YoungHouseLove says
Great tip Cassie!
xo
s
Nancy says
I googled “crown molding on angled ceilings” and got some pics…I thought they looked fine. I have only google experience ;-)
YoungHouseLove says
Haha, I love google experience!
xo
s
Chell says
How tall are your ceilings? I’d love beefier crown molding, we have really wimpy moldings now, but our ceilings are only 8ft high and I wonder if it will make them look shorter.
Chell says
Never mind just saw a previous comment ;) Love the way they look!
YoungHouseLove says
Thanks Chell!
xo
s
Vidya @ Whats Ur Home Story says
Looks really nice. Our builder was nice enough to give these as standard for most of the common areas and the master. We love it. Looks very classy.
YoungHouseLove says
That’s such a bonus! Our first house didn’t have it anywhere, so we couldn’t wait to add it (we actually hired someone for that house)… and then we got addicted…
xo
s
Molly says
Looks awesome! I still love your front door/entry way/light fixture. I also love the rug in C’s bedroom… I can’t wait to see what she chose for her canopy! (:
Lynn @ Our Useful Hands says
I get why you wanted to cut the to do list line and get this one done John cause that just looks so beefy and finished. Our living room has some measly peasly crown on it and the walls are way bigger than the crown so it gets lost and it’s more like “Oh that’s cute, crown molding.” instead of “OH MY GOSH LOOK AT THAT CROWN MOLDING!” We are aiming for the second reaction one day.
My best, Lynn
Carli says
Love the molding! And that pink ceiling in so sweet! Clara must be loving her little lady palace :)
Gina M. says
Pink ceiling and closet walls??!!! Photoshopped or real life and did I miss the post on this? Loving it!
YoungHouseLove says
Real life! We did that a while back! Here’s that post for ya :)
xo
s
haverwench says
You’re planning to put up crown molding in the *bathrooms*? I don’t know exactly why that seems weird to me, but…that seems weird to me.
YoungHouseLove says
Oh yeah, we have big dreams! Haha! Check out these bad boys: http://www.pinterest.com/pin/197314027397059005/ , http://www.pinterest.com/pin/184858759678151030/ , http://www.pinterest.com/pin/208784132698542297/
xo
s
Renea says
The Kreg Crown Pro is awesome! Thank you for the tutorial on how to use it. We remodeled out master bath and put up crown… It made it so simple. Love your beefed up crown!
YoungHouseLove says
It’s such a good partner in crown crime, eh? John is a little too in love with his…
xo
s
janice says
Lookin’ good! I just love how your new place is coming together! Constantly amazed at the ‘quick’ progress you make !
Andreana says
What’s your thought on crown molding with popcorn ceilings? My popcorn ceilings are barely noticeable but I feel like the crown molding might draw attention to them. What do you think?
YoungHouseLove says
I think you might be right about it drawing attention to that ceiling texture. Hmm, can you test it for asbestos and scrape it? Or cover it with light wood planks like Layla & Kevin did at The Lettered Cottage? That looked really cool!
xo
s
Sonya says
We have popcorn ceilings and crown in the downstairs rooms in our mid-80s home and the crown still looks really nice. The popcorn ceilings on the other hand have been mocking me since we moved in, but I can’t imagine they’d look any better (or mock me any less) without the molding. Actually, the upstairs rooms don’t have crown and the popcorn is way more noticeable. Not sure if it’s the light or the size of the room or what, but I’m hoping to scrape it off the ceilings in the bedrooms and bathrooms before we someday maybe add crown molding in those rooms.
YoungHouseLove says
I love hearing that Sonya!
xo
s
Paula says
Our house had popcorn ceiling and crown molding and it looked fine.
Since then we have scraped all the ceilings and it looks so much better. BUT if you are going to do both, scrape first, then add the crown. It was hard to get the little bits of popcorn down that were being held up by the crown that was there and it took more scraping than rooms that had no crown yet.
YoungHouseLove says
Great tip Paula!
xo
s
Gayla says
I am totally in love with this crown. You did an amazing job. My husband ventured to crown in our master bedroom while I was on a trip. It was super sweet.. but a total disaster. He just straight cut all of his joints AND he used small pieces to understand the corners and added pieces in between.. totally debauchery. (especially for someone who works in the building industry) BUT I couldn’t stomach the thought of breaking his heart… so.. jacked up crown and all. I have sanded and caulked and sanded some more and if you squint with your glasses off.. It looks fantastic ;) I believe a Crown Pro would have helped… alot. Maybe I will add one on his Christmas list.. but then again, Maybe Ill hire someone next time ;) haha!
YoungHouseLove says
Aw, that’s so sweet! I think it’s hysterical that if you squint it looks perfect. Home Depot needs to sell glasses with bad prescriptions for projects gone wrong, so we can look at them and say “perfect!”
xo
s
paintergal says
Oh my gosh! Love it. Thanks for the clear instructions. Definitely going to consider this in our new house.
Gabbi @ Retro Ranch Reno says
It looks awesome! I really wish we had the skillzzz to install some crown in our house! It’s definitely on my “must-get-done-at-some-point” list for our house! Great job, John!!
Carole says
I see that you painted the trim before installation. Do you paint again after the caulking stage?
YoungHouseLove says
Yes! Forgot to toss that into the post, but after you caulk nail holes and gaps you always want to paint again to seal all of that in and get a nice glossy and uniform look (caulk can read as more matte and can even collect dust while the glossier part deflects it so it’s well worth a coat to cover that up).
xo
s
Leigh Anne says
Is there an advantage to painting the trim first and then painting again after, or would one/two coats after make sense? I’m a total novice at this stuff!
YoungHouseLove says
Good question! The advantage is that spraying it beforehand can take about 10 minutes for full coverage (the equivalent of two coats) and then you just need to touch up the calked spots (so going around the whole room doing touch ups might take another half hour and you’re donzo. But painting it in place might take an hour or two for two coats since you have to be more careful not to get any on the walls or ceiling (spraying it before gets all of those tight spots on the top and bottom of the molding, so you only have to worry about doing the middle caulked parts by hand (there’s less fear of getting paint where you don’t want it if that makes sense, and it goes a lot faster).
xo
s
Suzanne says
Looks GREAT! I liked the pink ceiling before but now I LOVE the pink with the crown. Very sweet and almost victorian. Can’t wait to see the canopy update.
Laurie says
I love the beefier crown and I’m jealous you get to have crown moulding. My ceilings are probably high enough for a little crown but all the walls and ceilings are textured. Some orange peel and some knock down because why be consistent?
Why do they do that to us? That texture just gets dusty. I’ve said it before, builders should not be allowed to build houses until they have been responsible for keeping one clean and cooking a Thanksgiving dinner in a house.
YoungHouseLove says
Oh man! I’ve seen people hang light wood planks on the ceiling to cover popcorn ceiling and then add crown and it’s the most gorgeous thing! I think Layla at The Lettered Cottage did that for something like $120 for the whole thing!
xo
s
Isabel says
Oh wow, looks great! Can’t wait to see Clara’s canopy wall! And the tile in the sunroom!! Is it raining still? We’ve had 0 rain in my Jersey neck of the woods in what seems like forever :(
Our house has lots of really nice details like chair rail, a 17th-century mantelpiece, a built-in hutch, moulding on all doors and windows but no crown :( My husband can’t wait to add some but we have no miter saw just a low-tech circular saw. We don’t know anyone that has a miter saw we could borrow so was wondering what’s John’s take on giving it a go with the puny circular saw and the Kreg Crown Pro. Thanks!
I started tackling the wallpaper yesterday. I had dreams of it peeling away like yours did, what a joke! There are not 1, not 2, but 3 layers of different types of wallpaper (all blue and white so there was definitely a theme there) so it’s going to take a while. I found some other tips online for when you have multiple layers so when it’s all said and done (2020 maybe?!?), I’ll be sure to fill you in. I’m oddly excited about it though… I have no clue what has taken over me!
YoungHouseLove says
UGH, the RAIN! It poured in the middle of the night last night. Picture John in the corner beating his head against the wall. Today was going to be the day. Now we are reset and have to wait for three more dry days in a row. But you apparently know about frustration because that wallpaper sounds like a nightmare! I hope you get it done someday and it’s oh so glorious! Would love to hear what works! And as for the molding thing, I’d totally rent a miter saw from Home Depot for the day. It seems like a circular saw couldn’t make those angled cuts with the precision you need, and tool rental is usually around $39 so it can be worth it instead of buying a tool if you’re only going to use it for a day or two!
xo
s
Isabel says
Poor John :( I will continue to do a rain dance over here so that it comes our way and you guys can finish the tile.
Of course, why didn’t I think of renting it? So obvious! Now I can bribe my husband and tell him we can rent it AFTER the wallpaper comes down to see if he’ll help me ;-)
YoungHouseLove says
Aw thanks Isabel! John appreciates the rain dance! And happy tool renting!
xo
s
jillian says
Gosh, I can’t get over how much better this room looks now that you’ve added this crown molding. Bravo!
On a side note, did you guys give up on the ‘monthly roundup’ posts for the time being? I love reading them so much – it helped remind me that anything can be accomplished in only one month, if you really want it to. Not that I actually get anything done, mind you, but it always served as a great motivator. :)
YoungHouseLove says
Aw thanks so much Jillian! We fell off on those after we moved, but we might bring them back someday! It really was nice seeing everything in one place and it definitely helped to keep us motivated too.
xo
s
Erin @ The Impatient Gardener says
Great job and it looks fantastic. I’m so impressed. We tried to do crown molding in our kitchen, failed miserably and called in a professional before we spend more money screwing up expensive molding. We did a very similar treatment in our kitchen around our cabinets and the double layer of crown molding turned out to be a godsend because our ceiling is amazingly unlevel (joys of an old house). By taking up the difference in the lower, flat piece of molding we were able to have that piece level with with the cabinet doors and the other true crown piece go all the way up to the ceiling, and you don’t notice any difference in how much of the bottom piece is showing from one side of the room to the other.
YoungHouseLove says
That’s really good to know! So if we have anything that’s not level it’s nice to hear that two-piece crown can help to remedy that!
xo
s
Yvette says
I love molding! I think rooms look naked without it. I had someone do my dining/living/kitchen area when I moved into my condo 6 years ago. I’d love to try it myself in the 2 bedrooms, but I just can’t bring myself to put money into a condo I’m underwater in. We did put down flooring before our baby due in February but that was worthwhile/necessary b/c of my allergies/asthma. Plus I’m worried our son will have similar issues.
I love the chunky molding – looks great!
YoungHouseLove says
The new flooring sounds awesome Yvette! And good luck with the baby!
xo
s
Bonnie says
We just hung crown for the first time, and used a Kreg Crown-pro based on your experience.
Our only trouble was that the crown pro + 5″ crown was too angled and wide to be able to be cut by our 10″ saw. We borrowed a bigger one for the job, so it all turned out OK, but I was surprised when the first cut didn’t go all the way through!
YoungHouseLove says
Oh no! That’s surprising! We’ve never had that happen. So glad you could borrow a bigger one for the job!
xo
s
Marie says
Ahhhh! I have that same yellow line around the ceiling that I left cause I was feeling ambitious and wanted to add crown but mine’s been mocking me for 3 years :-/ At least I can say I’ve got procrastinating down…
YoungHouseLove says
Haha, well we were in good company with you for a while there!
xo
s
Jeanie says
Are you guys still in love with the Craftsman Evolv nail gun? I’m in the market and I’ve got my eyes on it.
YoungHouseLove says
Yes, we have been very happy with ours. The only thing true about it was that the hose isn’t the greatest (people rating it said it cracked sometimes, which was true for ours) so we grabbed a new one from Home Depot and it has held up really nicely for us!
xo
s
Reenie says
Looks great!!
Can’t wait to see Ms. Clara’s design for her canopy. :)
Adam says
Looks great! I see you mentioned you caulk nail holes instead of using wood filler/putty. I recently did base board and used wood filler and then sanded which was more time consuming. Have you found the caulk easier to use? Does it still end up looking flush?
And what do you do on spots where two pieces meet in the middle (or did you have long enough pieces to span the room length)? Do you use caulk or putty or nothing?
I just bought the same nail gun /compressor combo. Can’t wait to try it out!
YoungHouseLove says
Yes, caulk is so much easier to use since you can smooth it with a wet sponge (or your finger) instead of having to sand it. For those vertical spots where they meet in the middle, we just squeeze caulk in there and wipe it until it’s flush. If anything shrinks up when it dries we just do another coat of caulk before painting it keep it flush.
xo
s
Michelle @ A Healthy Mrs says
I love chunkier crown molding & baseboards — we have obnoxiously tall baseboards, but I feel like they just do so much more for a space!
Lee Ann says
This looks great! I’ve debated adding crown molding to all my upstairs rooms, but haven’t decided yet. If I had really high ceilings, I’d install a fool-your-eye trick a friend used: He put a nice crown molding up at the ceiling, then came down about 6″ or so, and nailed a smaller piece of molding onto the wall. Then he painted the entire outfit the same color. His 12′ (yep!) ceilings are so far away, you can’t tell that it’s not one honking piece of molding.
YoungHouseLove says
Love that trick! Others have said they have it in their house and it’s really convincing!
xo
s