We’re soaking up a white Christmas over here! Nope, we didn’t wake up to any snow on the lawn, but there was a dusting of white elsewhere on the premises…
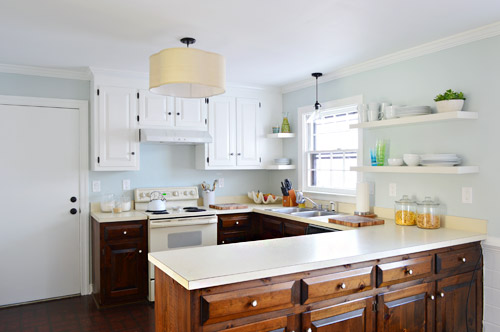
We used last week to sand, prime, and paint all of our upper kitchen cabinets and – shocker – we ended up going with white. So yeah, it’s a little bit different from our original plan to paint them a light gray-tan on top… and a little more like what we did in our last kitchen – but just for those uppers. We have a completely different plan in store for the lowers – and it actually involves wood stain and no paint at all – so maybe as we move into 2014 we’re getting progressively less predictable? Or more woodsy? We also have some ideas for those countertops which we’ve never done before (either a refinishing/paint technique or a concrete coating one – both of which are budget friendly, so they should be great for Phase 1).
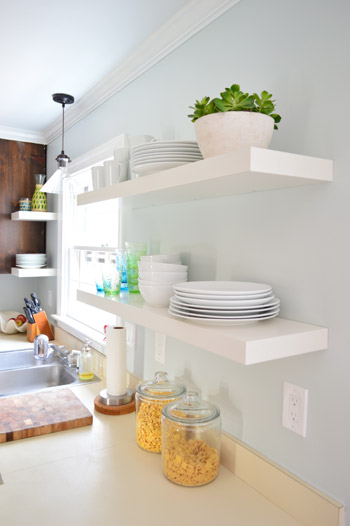
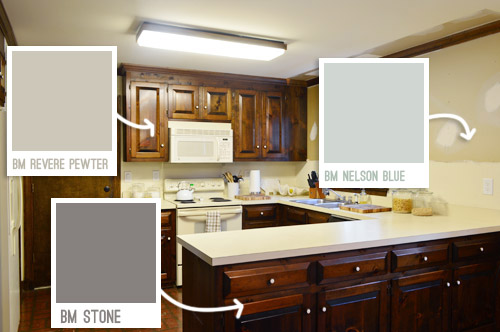
The tides shifted from Revere Pewter to Simply White (which is one of the top white paint colors out there)for those upper cabinets around the time that we installed the range hood and put up the floating shelves. While we liked the idea of the white shelves & hood contrasting with putty colored upper cabinets, we started to worry that also having the darker lower cabinets might just be too much going on (white and putty on top with a third darker color for cabinetry on the bottom).
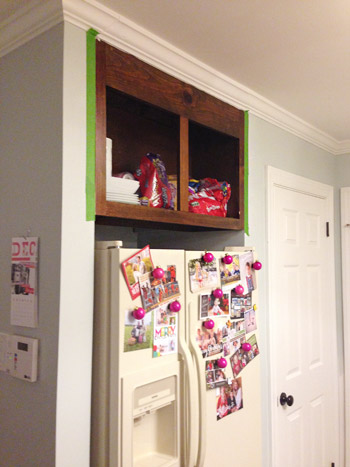
But the main thing we couldn’t wrap our heads around was a way to make crown situations like this one make sense with colored upper cabinetry. Usually crown matches the color of the cabinet, but wouldn’t it be weird to paint just a section of this crown to match the cabinets since there’s no indent where the cabinets end (it’s just one long piece along that entire area)? We already didn’t like the look of the mismatched cabinet and crown that we had going on, so continuing that theme with a new color on those uppers just didn’t seem like the right way for us to go.
So we went with white. As much as we wanted to do something new, we never like to do something different just for the sake of being different. And at least this way we can still stick with our plan to do the lower cabinets in a deep tone for that “tuxedo” look that we’ve always loved but never had the guts to try.
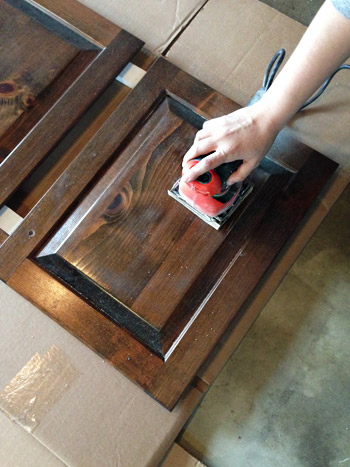
Now that we got through the why of what we did, let’s get a little into the how. Clocking in at nearly 2,000 words, this post is hardly short, but is gonna be quick and dirty compared to the picture-and-video-tastic tutorial that we did last time around since we used the same technique. So we’ll just share some broad details here, and you can reference that post for the nitty gritty. First up we removed the cabinet doors and gave every surface a light sanding, just to get rid of any glossiness and rough things up for better paint adhesion. Sherry used a hand sander on the doors in the garage with 150 grit paper, and I used an 150 grit sanding block on the frames inside.
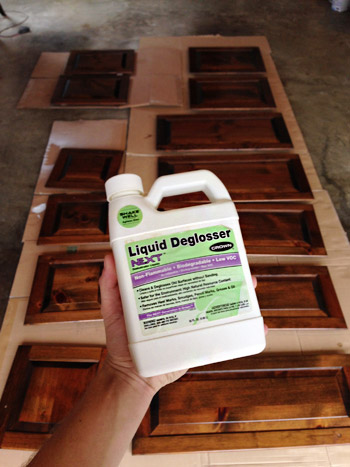
Next we wiped everything down with a liquid deglosser. This is a low-VOC brand called Next that we had leftover from last time (originally found at Home Depot, although we hear it’s not there anymore). It’s an optional step, but we figure it never hurts to prepare the surface – especially when it just takes a bit of wiping. Plus after you sand it’s a nice way to get the sawdust off.
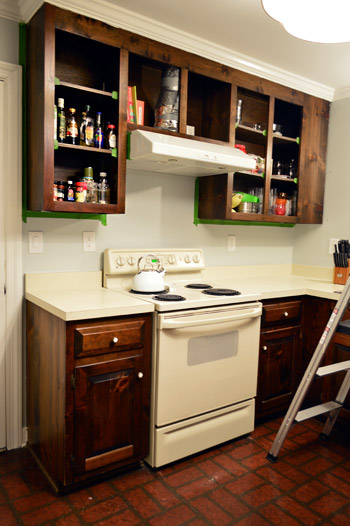
We then taped off the walls and other obstacles around the cabinets (like our newly installed hood) with painters tape to protect them and to make each of our sure-to-be-many coats go on as fast as possible.
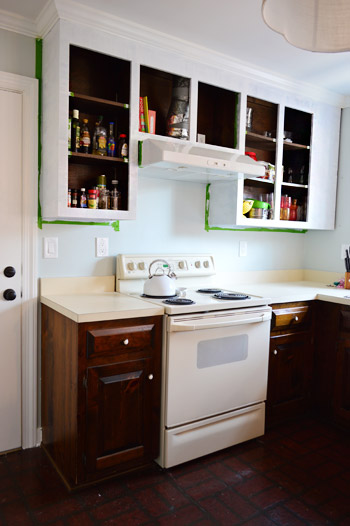
With everything taped, we primed the frames with a brush and a small foam roller. We used a Kilz Premium primer because it’s stain-blocking but still no-VOC. This picture is after two coats of primer. Sherry’s the cutter-inner of the family, so she did the brushwork with a short handled 2″ angled brush, and I did the foam rollering, following right behind her around the room so I could roll over the edges that she brushed for the smoothest finish.
We considered using our paint sprayer for those interior frames, but ultimately decided to do the indoor stuff by hand. The amount of taping and drop-clothing that would’ve been required to protect the kitchen (and the three adjoining rooms) from paint over-spray just didn’t seem worth it – especially when weighing the need for a functional kitchen (and not subjecting a pregnant lady and three year old to the fine paint mist that seems to linger afterwards).
But we did use the paint sprayer outside to prime and paint our cabinet doors. And by outside, I mean the garage (since we had quite a bit of rain last week that ruined any chances we had of spraying outdoors). I set up a little station where I could coat one door at a time and then lay them out to dry.
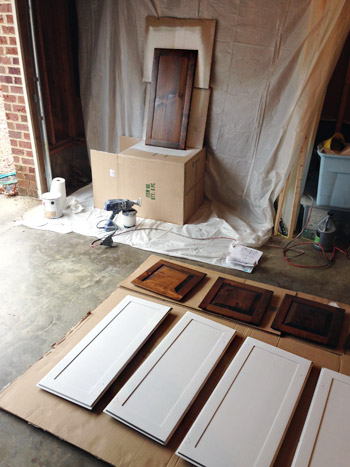
For anyone out there thinking about using a sprayer on doors during cabinet painting, it’s a great way to get a nice smooth coat with less effort than doing the whole thing by hand. But you’ll probably want to get your bearings by practicing on a few other things first (you might not want your first spray job to be cabinets since it can take a little while to master the whole not-too-thick-and-drippy thing).
Back to the spraying process. After 24 hours of drying time, I flipped them over and did the other side. The actual spraying was pretty fast, but the waiting for the thick coverage to dry (and cleaning the sprayer in between daily coats) didn’t make it the breeziest process in the world. Although it certainly required less time than all the coats the frames inside took.
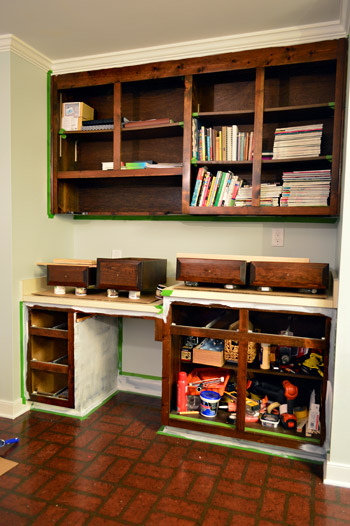
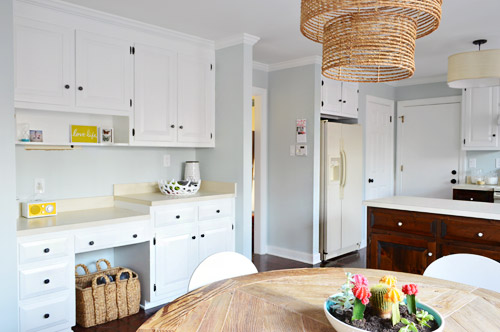
This is the desk area, where we also opted to paint the lowers. Both Sherry and I felt like this was all one unit (like a hutch in the eat-in area) unlike the peninsula-ed part of the kitchen, which we thought would look awesome with those dark lower cabinets. So over here we also painted the six drawer fronts by hand – since they didn’t detach from the drawers themselves. A lot of this cabinetry was surprisingly non-removable, for example the shelves inside don’t pop out (you’d literally need to demo out the frames to remove them). The picture below is after one coat of primer.
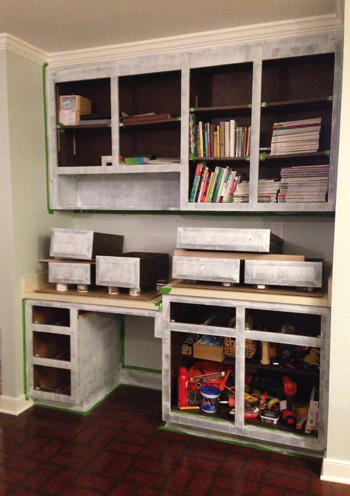
Note: much like our last kitchen, we opted to paint both sides of the doors, but to leave the inside of the cabinets unpainted (we think the contrast of wood inside + painted doors can actually be a nice combo when it’s done cleanly).
We opted to do two coats of primer based on what we learned when we painted the trim in this room. But you can see here that even that was still pretty spotty. You can also see where we used small pieces of painters tape to block paint from getting on the shelves for a nice clean look.
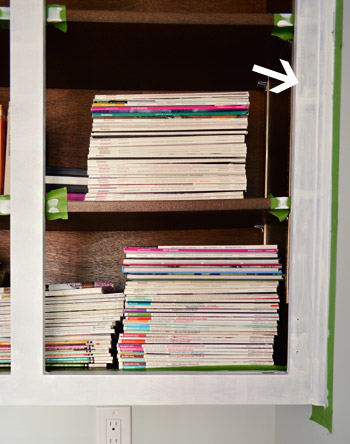
In the end, it took 2 coats of primer and 3 coats of paint in the areas that we did by hand (we used Benjamin Moore Advance in Simply White, which we love for the durability, the fact that it’s made for cabinets, the low-VOC non-oil formula, and the fact that it’s self leveling). Just for comparison, the doors that I sprayed in the garage only took one coat of primer on each side, and one coat of paint on each one (the coverage is a lot thicker, and you go through more paint, but it leaves you with a nice factory-like finish if you’re careful to avoid drips).
In short: spraying (even with that “cleaning the sprayer between coats” factor) is definitely faster – but I’m still not convinced it would’ve been a good choice for the frames since the entire room would have needed to be taped off for the entire process and a fine mist of paint and primer would have lingered in the air for a while.
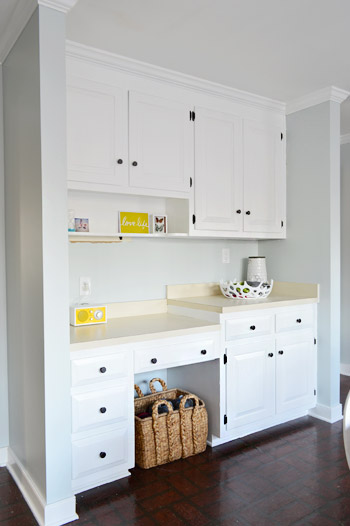
All told this was a week-long update for us, which can roughly be summarized like this – day 1: sanding, deglossing, primer coat #1, day 2: primer coat #2, day 3: paint coat #1, day 4: paint coat #2, day 5: paint coat #3, day 6: another full day of drying, day 7: re-hanging doors and adding the new hardware).
We also updated the hinges and the hardware. The hinges were a worn brass color, so we went oil-brubbed bronze with them since we liked the idea of doing contrasting hardware this time around (we’ve done brushed nickel in our past two kitchens). To help the paint job hold up on the hinges, we sprayed them with some “clean metal primer” first too, since we’ve heard such good things about this particular product (we’ve seen others use it specifically on moving parts like hinges, with luck – so we’ll keep you posted about how it wears).
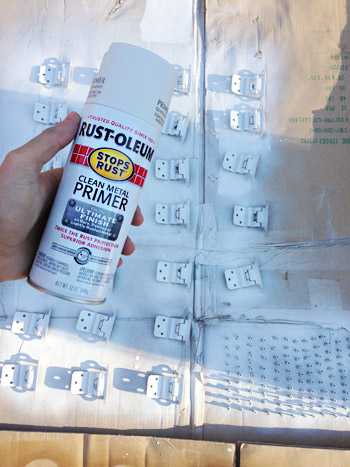
The ORB went on nice and smoothly when that coat of primer dried, and so far the hinges look great and have worked well (there’s no gumminess or grinding/peeling) so for about $11 it was well worth the update so far. Ultimately we’d like to have hidden hinges, but it’s not easy or cheap with these cabinets (these doors are half-sunk, and they don’t sell off-the-shelf hidden hinges for those type of doors) so we’ll save that dream for Phase 2.
We weren’t crazy about the shape and detail on the original brass and white knobs, so instead of spraying those we picked up a few boxes of the same Target octagon knobs that we used in our master bathroom, since they come in at under $2 each.
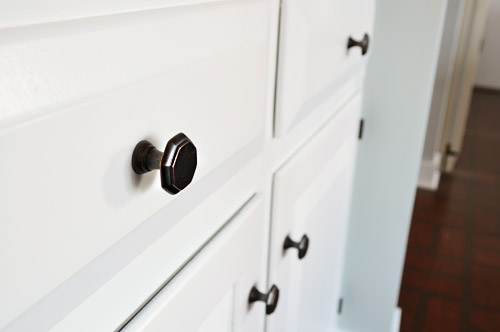
We like how high contrast they are against the white, which seems to be something we’re gravitating towards lately (think stair runner, our stenciled bathroom floor & dark vanity, etc).
Ahhhhh, this feels a lot more like home. Just ignore the faux brick floor, those old counters, and those off-white appliances – we’ll get there eventually.
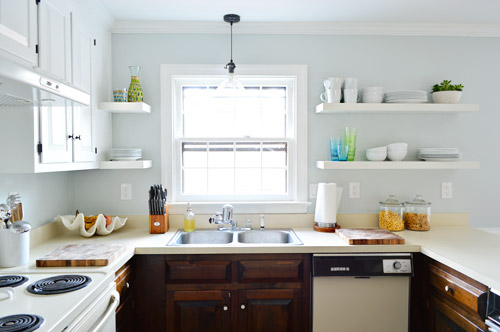
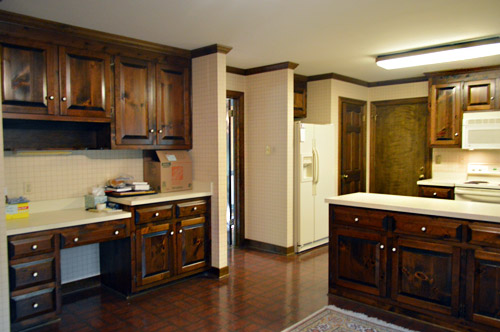
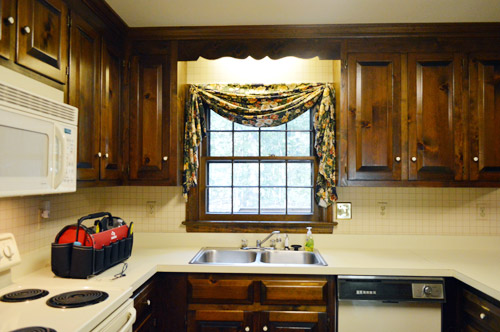
I think the before and afters from this POV really show the difference. This is what the sink area looked like on inspection day…
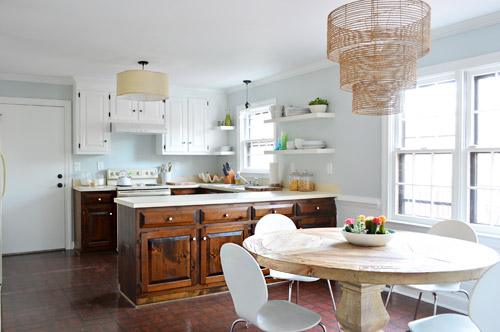
And here’s the same angle now.

We’re gonna tackle those lower cabinets this week – which is a place we’re again veering off course from the original plan. You’ll remember we said we liked the idea of a deep stone colored paint on them here, but then near the top of this post we mentioned stain. Now that the uppers are painted, we actually like how the wood tone is playing off of them, so we’re feeling less paint-y and more stain-y. Ah yes – THE PLOT THICKENS!
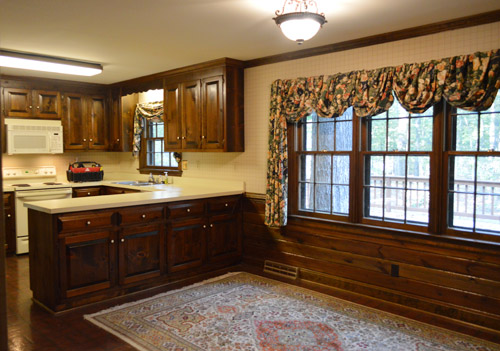
And just for fun, here’s one more throwback shot of our kitchen before we moved in. It’s pretty amazing what a series of affordable updates – like stripping wallpaper, removing a few cabinets, hanging shelves, and priming and painting the cabinets – can do.
Did anybody else tackle some big-ish projects over Christmas week? Or are you just gonna make us jealous and say you spent the week stuffing your face with cookies and watching Elf on repeat?
Psst- Sherry’s over on Young House Life chatting about New Kids On The Block and teacher gifts.

Silke says
Absolutely WONDERFUL !!
I love love love the difference!
Lisa says
Wow, looks amazing and so fresh. No new projects at our house, just a whole lotta playing with our baby boy’s new toys. :))
Angie says
Looks fantastic!!
Kate says
Looks great, but I can’t wait to see how the bottom cabinets turn out in “phase 1”!
No big projects last week as we were out of town, but on New Year’s day we’ll be ripping out the carpet in a large portion of our house to prep for getting vinyl plank flooring installed next Monday and Tuesday. I hope it goes well, it’s our first big project on our house and I’m nervous!
YoungHouseLove says
So exciting! Good luck Kate!
xo
s
Molly says
OH MAN THIS LOOKS AWESOME!!!!!!!!!
Julie says
This looks awesome! Also, I’m amazed that I got here before there are any comments posted. :)
But really, fantastic job–I can’t wait to see the reveal of the bottom cabinets!
Carly says
Do a concrete counter!!! =) I am thinking of doing it as well and I can’t find any good directions online, and you guys always have the BEST tutorials!!! I love the progress so far too =)
YoungHouseLove says
We’re definitely considering it! Will keep you posted!
xo
s
Shannon says
Carly, just in case they don’t go with concrete! :)
http://littlegreennotebook.blogspot.com/2013/07/diy-concrete-countertops.html
Aleigh says
Check out http://karapaslaydesigns.com/diy-ardex-concrete-countertops/.
I used her feather finish tutorial over my old bathroom vanity top and absolutely love it! Plus it cost me less than $30 for the mix and sealer!
Jedi Mama says
Oh, y’all! White kitchens are one of my love languages! (The other love language is spelled STARBUCKS CHAI LATTE.) This is starting to look quite fantastic. And if y’all decide that, shoot! You just DON’T have ENOUGH TO DO, then may I invite the two of you here? To my house? For a little spruce up? And by “little spruce up,” I mean TOTAL HOUSE REDECORATION! Great job on the cabinets!
YoungHouseLove says
Haha! I’ll be there, for the small cost of unlimited chai lattes!
xo
s
Laura @ Rather Square says
Wow. This is an amazing upgrade, just by painting cabinets! Love it. We didn’t do much house-project-ing this past week, just tackled all the snow that kept showing up outside. And planning our projects for 2014 (which includes painting our kitchen cabinets, coincidentally…).
http://www.rathersquare.com/2013/12/winter-wonderland/
YoungHouseLove says
Ooh, I love the planning process! Sounds like so much fun!
xo
s
Kim says
WOW! What a difference! It looks amazing! Very light and airy and soothing. Can’t wait to see how the lowers turn out.
Kelly says
I was wondering what your Christmas week project would be this year and once again you have outdone yourselves. It looks awesome, and I can’t wait to see what you do with the lower cabinets. The tuxedo look is something I have been hoping to do myself once I am out of a rental!
Jocelyn says
Hi there. I love the white cabinets, and will be using your post as further evidence to my husband that we *can* and *should* do this!!
I have a question that is sincere, though I fear it may be misinterpreted as judgy von-judge-meister (but I assure you, it is not!!) Here goes:
We are working on some projects at our house- taking carpet off the stairs, painting the ceiling, trimming out the kitchen… and I always struggle with kids vs. house projects. I can’t do a lot of these things during the evening hours when the 3 year old and 11 month old are asleep because the power tools would wake them- bedrooms are pretty close to family area- but during the day I am consumed with guilt when they want to play and we’re occupied. Sometimes it’s a two-person job and there’s no getting around it. How do you manage this? Do you take turns being the on-call parent? Do you get a babysitter? Enlist extended family help? I am sincerely interested in your advice, as I am seeking a balance in addressing our to-do list, but also wanting to be a fun parent! If you’ve already addressed this in a previous post, apologies- I’m pretty new to the site. Thanks in advance!
YoungHouseLove says
We do all two-person jobs either while Clara’s napping or in bed for the night (there was nighttime priming and a few coats of paint at night and some nap time work too, so we could get daylight shots of the progress for you guys). If Clara’s up, we usually just switch off with her, so there’s no two-person-projecting going on in those time slots, just because it’s an exercise in frustration (it’s so hard to do two things well like that, so we feel pulled in two directions whenever we attempt that). Hope it helps!
xo
s
Andrea says
Hi Jocelyn! I just wanted to share my experience–as a babysitter, not as a parent! When I was a young teen and just starting out babysitting, my neighbors hired me to watch their kiddos while the dad was present, but working on house projects or the yard. I think I was around 12 or 13 years old at the time… Anyway, I got experience babysitting, but a parent was present to answer questions when I had them. And for the parent’s benefit, I entertained the child while he got to finish up some projects that he wouldn’t otherwise be able to do! I was paid pretty cheap–at the time, I think it was $5/hr, which I was happy to receive! If you have some young teens or preteens who are interested in babysitting your neighbor, or family friends, or in your church/community group/etc, consider hiring them–it benefits both of you. :) Hope that this was helpful! -Andrea
braelin says
Just a ditto to Andrea’s comment– I did this too– was called a “mother’s helper” (pretty sexist, since really I was most often helping the dad by keeping the kids entertained so that he could do housework). In the early 90’s I think that I got $1.50/hour for this (ha!).
Stephanie says
I LOVE the Nelson Blue with your white cabinets, table, and pendants. Beautiful!
Rene @thedomesticlady says
Your cabinets give me so much hope for mine. Can’t wait to get started!
http://wp.me/p2cT1Y-1BP
Michele from IL says
The cabinets looks great! What are those pink ball magnets on your fridge….they look cool!
YoungHouseLove says
Those are ornament magnets we made a while back. We just glued pink ornaments to those round magnet disks you can get at Staples and we use them to hold up holiday cards.
xo
s
Angela says
I totally noticed the magnets, too! What a great idea! I may try to make them next year!
Mary | Lemon Grove Blog says
Omeerrrgaauuudddd. I LOVE it you guys! Talk about a before and after!
Catherine says
Wow! This looks fantastic! So you just sigh happily every time you look at the completed office area?
YoungHouseLove says
Yes! When I sit at the table at the right angle I can’t see the floor very much and it’s a pretty sweet “new” view for me! Haha!
xo
s
Heather says
Love it!!! But I’m waiting for the post on what you made Clara for Christmas!! Hehe ;)
YoungHouseLove says
Aw thanks Heather! We always finish that on Christmas Eve (literally) so we usually share it the week after Christmas. It’s definitely on the agenda for this week, we just have to go through a million photos and write up the tutorial. She loved it though, and we can’t wait to share it!
xo
s
Maureen says
Oh yeah!!! Can’t wait to see this also!
dana828 says
Love it! The difference between when you moved in to now is amazing–so much lighter and brighter already!
We will be painting our kitchen cabinets this Spring (as soon as it warms up enough up here in IA to paint in the garage), and we’re going for somewhat of a tuxedo look, too. Trying to decide between back bottom/white upper, black bottom/light gray upper, or dark gray bottom/white upper. Thinking we will try some photoshop tricks to help with the decision. I’ll definitely be using all your painting tips and tricks.
We spent Christmas Eve installing all of our new Kitchen appliances and moving furniture back to where it belongs. Finished at midnight, and got the tree put up at 12:30! :)
YoungHouseLove says
Wahoo! Nothing like a last minute sprint!
xo
s
Maureen says
Holy Schnikes guys! Such a difference!! Can’t wait to see what you do on the bottom. Especially since I was thinking of gel staining a piece of furniture and am hoping the gel stain is they way you are leaning here so I can see how you do it. :) Enjoy the kitchen!
Alix says
Holy wow!!! It looks so amazing. You guys did awesome as usual!!
Jess says
When I saw that picture, I thought “This looks SO YHL now!” I don’t know what it is, but something about the pretty pale blue with the white cabinetry feels very “you guys.” Is that how your last kitchen ended up? My memory isn’t that good!! Regardless, it looks good. Like really, really good :)
YoungHouseLove says
We certainly love a light and airy kitchen! They’ve all started out full of dark wood (paneling, brick, cabinets, window trim, etc), so I think that’s why we lean the opposite way each time. Our first kitchen was sort of an aloe green/blue with white cabs and light counters, and the last kitchen was white cabs with gray backsplash tile, white counters, and grellow walls (the walls later changed to a darker carolina blue color). I think this time the darker lowers (and darker counters) will be a big departure for us, but we love the airy-on-top thing!
xo
s
Manda Wolf says
Looks really good guys! Love the white, but I am really excited about you guys keeping the wood stain on the bottoms. For some reason that kitchen just screamed wood stain to me.
We covered out countertops in concrete here:
http://ourwolfden.wordpress.com/2013/09/06/concert-countertops/
They look great right after they are done, but no matter what you read I highly recommend trying the combo of concrete and sealer on a scrap board. The first one we did stayed sticky. Not enough that you would notice it if you touched it but enough that after a few weeks we had to break our spinning spice rack to remove it from the counter. The second try (after we reapplied the concrete) was the type we kept seeing recommended but after 3 coats it started to crackle and now it isn’t a watertight seal. So we are going to have to end up replacing them.
Just what we ran into, I’m sure you guys will have better luck!
YoungHouseLove says
Thanks so much for the info Manda! So helpful!
xo
s
Rebecca says
You know, those off white counters and appliances don’t look half bad! I mean, totally try something new and different but I wasn’t aghast when I saw the after pictures. I think the light fixtures helped tie everything in. Loving the ORB!
YoungHouseLove says
Aw, thanks Rebecca! We actually said the same thing (“not as bad as we thought…”) but we still think if there are some really affordable ways to make it look (or function) better, we might try them out!
xo
s
Allison says
WOW those white cabinets make sure a difference in that space! Your floors ALMOST look like hardwood now if you just quickly glance at the picture… Almost… ;)
Great job guys!
YoungHouseLove says
Haha! Almost! If you squint. If only they did in real life…
xo
s
Nikki says
It never ceases to amaze me how much paint and new hardware can change the look in a room! The white looks gorgeous. Now I’m scheming all the things I can paint in my home for a quick refresh!
Xandrea says
Your kitchens always turn out so beautiful and fresh. I love the white cabinets with the Nelson Blue. Do you think you’ll keep the new off white/cream light now that the upper cabinets are white?
YoungHouseLove says
Not sure, we’ve been on the fence about him (in person it ties into the tones in the wood table and the twine fixture in the dining area really nicely) and we actually like it more now that the cabinets are white and not wood, but we’ll have to see. We could see it being awesome in our master bedroom or something down the line, so we like that it’s flexible!
xo
s
Kelly says
It looks AMAZING. Wow.
Kelsey says
It looks great, it’s amazing what just painting the cabinets can do for the whole room. I think if you guys went for the concrete coating on the counter tops like Little Green Notebook did for their laundry room it would look great! I can’t wait to see how it all turns out.
Stephanie says
Such a huge impact! I love the update and can’t wait to see what you do next.
Penni McNamara says
You may have already answered this….but how long do you see this temporary kitchen lasting? 1 year? 5 years? Just curious :) P.S. Kitchen looks great so far.
YoungHouseLove says
We painted the cabinets, replaced the hardware, got new appliances, and did peel and stick floors in our first kitchen about a year before we could afford to do a full reno, so we think we’ll live with this one at least that long as we save up. It could end up being 2+ years depending on how much we want to change the layout and what appliances we fall in love with since how long it takes to save up for that stuff will definitely be a factor.
xo
s
Julianne says
Looks fantastic, guys! The desk area is such an amazing change for just adding paint. W.O.W.! It’ll be interesting to see what stain colour you choose for the lowers. I liked the idea of a deeper ‘stone’ colour to the lower cabinets, but everything you do seems to look great and I have no creative eye, lol. Looking forward to seeing more changes as they happen. P.S….wondering how you’re feeling these days, Sherry? and….Happy New Year! :O)
YoungHouseLove says
Aw thanks Julianne! My morning sickness has actually gotten worse (just lasts longer in the day again, after just being in the morning for a while) but I’m feeling great otherwise. The bun is constantly dancing around in there and I love feeling him boogie down. So much to be thankful for!
xo
s
Julianne says
I’m so sorry it’s gotten worse, but I love that you can laugh about it, at least, lol!
YoungHouseLove says
Aw thanks Julianne! We really are just so grateful the bun looks healthy and strong (he’s a big boy, according to our last checkup!) that I’m getting oddly immune to all the morning sickness. Maybe I’m just finding peace in the fact that it won’t go on forever, and I only have about 3.5 months left.
xo
s
Julianne says
I can’t believe that there’s only 3.5 months to go! What a blessing that he’s active, big & healthy. So excited for you & this new chapter in your lives. We’re looking forward to ‘meeting’ Barnacle Bun Petersik!
YoungHouseLove says
Aw, thanks so much Julianne!
xo
s
Stephanie @ Housewife Mama says
Ahhhh…those changes. I lived with wood cabinets and wood paneling in kitchen for over 2 years (think dark dungeon of doom) before I made my parents fly down here to help me paint them. Ok, maybe they came for their annual visit/granddaughters birthday party, but I still utilized my dad for his painting skills and my mom for her child-watching skills so I could help paint/dictate. We painted the paneling Valspars Mint Hint and the Cabinets White. We even ORB’d the crap out of the hardware too.
Side note: we had that same fridge for years. We only ever used half of the space in it so we sold it for $50 (in worse condition than yours) and found a much smaller, more modern fridge on CL for $80. Best $30 I have spent :)
YoungHouseLove says
THAT’S AWESOME!
xo
s
kearney says
i’m loving the white over wood more than I thought i would, too. can’t wait to see what’s next!
Theresa Sea says
Attempting (aka: work in process) to tear out the soffit in our main bathroom above the vanity. There’s a flourescent-tube light up in there, but no wires or pipes, so I figured what the hey.
YoungHouseLove says
Wahoo! That sounds like it’ll be awesome if it works! Good luck Theresa!
xo
s
Candace says
OMG this looks GREAT! I thought the master bath updates were my favorite project in the house so far…but this might be a close tie/runner up!
paintergal says
OK, you have motivated me to get to work on our kitchen cab’s. The doors have been primed and are lying in the basement. Still need to clean the boxes and primed those.
I love how you took out the cab’s on either side of the sink/window and replaced them with the floating shelves. Unfortunately that is not an option in this house. We crave every inch of cabinet space we have.
Nice to know that even the great YHL-ers change direction mid-project. :)
Kate says
I think it looks great! The white really was a nice choice. I have cream colored upper cabinets (gray/green lowers), and my crown molding is white to match the rest of the house. It doesn’t look weird or off in any way, but I can see how it might be with yours since there’s a bit of room between the door and the ceiling. You all definitely made the right choice.
I am excited to see what you do with the lower cabinets!
We spent our Christmas vacation building built in bookshelves in our new home office! My husband is building them from scratch and they look great so far, but it is a massive undertaking.
YoungHouseLove says
Those sound awesome Kate! From scratch built-ins = the stuff of dreams.
xo
s
Barbara says
So beautiful! Great timing for me, as I’m about to do this myself. I like that you did the cabinet painting before the countertops (because I can’t seem to decide on countertops but I can paint a cabinet). Ha.
Brit [House Updated] says
I love the white uppers, great choice! A few weeks back when I was feeling crazy and decided to repaint my upper cabinets I went with a greige and afterwards ended up wishing I had just gone white! But I’ll do white in our kitchen redo (fingers crossed for this spring!). Can’t wait to see the darker stain you do for the lowers. I agree that I really like the white and wood contrast, one of my favorite looks!
betty says
picture hearts in my eyes like that little smiley emoji! LOVEEEE the progress. its looking so much cleaner!i
i’m trying to convince my MIL to let us paint her dated cabinets white! but shes not convinced. we just ripped the carpet off her stairs on thanksgiving to reveal beautiful hardwoods!
YoungHouseLove says
Haha! I love the mental picture of those emoji hearts in your eyes.
xo
s
Julie says
It’s amazing. I just have a few questions.
Why didn’t want to knock the ” bar” and make an island like Kate’s house?
Also, I thought you guys said in the beginning you were going to get new cabinets this time?
Also, I wanted to paint my cabinets white, but I am worried that they will get dirty fast.
How do you keep it clean?
One last thing.
Where did you get your kitchen table?
Have a happy and healthy New Years.
YoungHouseLove says
Oh yes, this is Phase 1 for us. We like to save our pennies for major renos and live with rooms a nice long time before doing major things like changing the layout or gutting them and buying big ticket items, but small affordable updates in the meantime (like paint and removing wallpaper and hanging shelves, etc) are awesome for Phase 1. We did the same thing with the kitchen in our first house (even before we had a blog) and loved those make-us-smile updates while we waited for the big reno. You can read more on that here. Oh and we plan to reuse these cabinets in the garage for storage so it’ll be nice to have upgraded them even though we’ll get new kitchen ones eventually. When it comes to keeping them clean, we just wipe them down and it’s easy to get grease off – we love white cabinets and have never had an issue with staining. As for the table, if you search blardware on our sidebar that post will come up :)
xo
s
Mandy @ This Girl's Life says
Love it! Are the open shelves pre-made or did you make them yourselves? They look like IKEA LACK shelves.
YoungHouseLove says
Oh yes, they’re Ikea shelves! We blogged about hanging those last Monday for ya :)
xo
s
Kelli says
I love it! I also wanted to give you a heads up; we used rustoleum brand countertop paint (not the speckled many color one, just a single color) on our counters in our last house. We followed directions exactly, and gave them a full week to cure before touching them with ANYTHING. Unfortunately, they never seemed to fully harden. Anything we set on them (toaster, coffee pot, ceramic plate, etc) left little indent marks that never went away. And cleaning them was super stressful, because it felt like you would wipe the finish off if you pushed too hard or accidentally pushed a crumb across them with the rag. I’ve never used the concrete coating, but based on the HORRIBLE experience we had with the other coating, I’d definitely recommend going that way. Oh, and with Sherry being pregnant (like I was when my husband applied), you should probably know that the product is super fume-y (oil based). We didn’t feel comfortable with me or my 2 year old daughter coming back in the house at all for two full days after the application was finished. What a drag!
YoungHouseLove says
Eeks, that sounds terrible! I don’t think we’re leaning towards a kit like that (we hear they’re extra fumey) so we’d just be using sanding/primer/paint methods we’ve used on other slick surfaces or doing the concrete coating thing we’ve also been reading about. Will keep you posted!
xo
s
Bonnie says
Wow, night and day!!!
Michelle says
This looks fabulous, you guys!!!! It really is amazing what a little paint can do. It has really brightened up your dining/kitchen.
No projects here. My hubby has worked a lot lately. He was off for Christmas and then Thurs. and Fri. He spent Thursday doing his own thing, some much needed time to himself. Friday was spent at IKEA and the MOA, bumming around.. much needed family time. He is back to work (he works weekends too). Lots of house projects started, and not too many finished. Me and power tools are not a good mix. LOL
YoungHouseLove says
Oh man, Ikea around the holidays! I don’t know if that sounds super fun or crazy! Haha!
xo
s
Michelle says
This looks amazing! We have a section in our kitchen where we decided not to hang an upper cabinet. I want to do 2 shelves like your kitchen. Did you buy those shelves or make them yourself?
YoungHouseLove says
They’re just the basic Ikea lack shelves. We had them in our first house’s dining area and really liked them!
xo
s
Jessica says
Looks fantastic! We hung our cabinet doors over Christmas break. We just finished painting them…white! I couldn’t be happier with the results. We are also considering concrete counters.
Reenie says
WOW!!! What a diff. Love it.
Carrie says
Love it! I don’t know if it’s this way in real life but in pictures the dark wood doesn’t look half bad with all the new stuff going on. (then again, you guys do a great job taking pictures in lots of light so I’m sure it’s much darker on a daily basis). It’s awesome!