Whilst discussing office plans last week, a few of your comments about the blue trim situation in that room were the push that we needed. We were fooling ourselves to think we should paint all that trim by hand (we’re talking baseboards, crown molding, and five windows totaling 66 individual panes). So we decided to bite the bullet, break out the paint sprayer, tape everything off, cross our fingers and toes that we didn’t get any bleed-through on those wood floors, and say hasta la vista to some more blue trim this weekend.
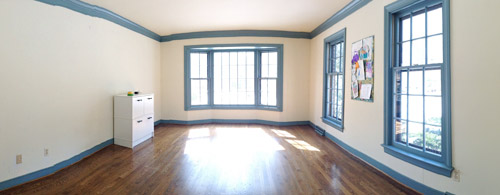
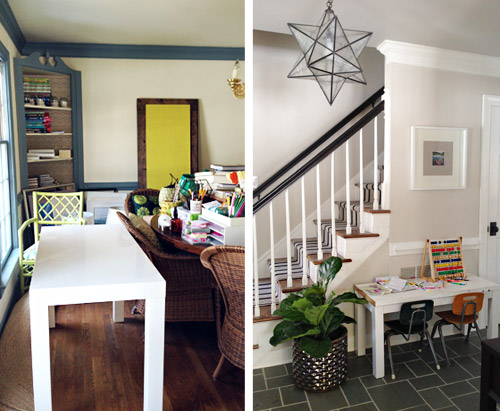
We had painted all of the upstairs trim with the sprayer before we moved in and before the new floors went down, which was an easy no-brainer decision (nothing to worry about ruining). But for the downstairs trim that we’ve tackled (just in the kitchen and foyer so far) we’ve worked by hand – mainly because those rooms needed to remain functional during painting, so we didn’t want to cover them with paper, plastic, and tape while a fog of paint-spray flew through the air. The office, however, didn’t have much furniture to move out, and could easily be sectioned off in a paint quarantine for a few days. So we went for it.
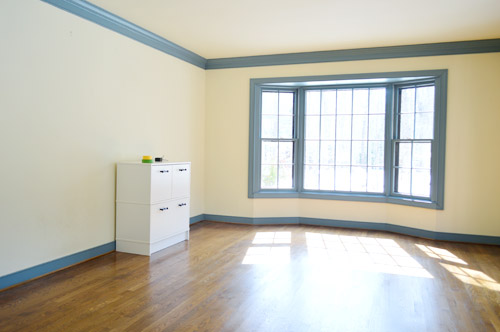
Last Thursday morning we emptied the room (except for the file cabinet, which was heavy enough that we decided just to cover it) and basically took over the dining room and foyer with all of the displaced items. Good thing we’re comfortable with chaos by now.
As excited as we were to attack this blue trim using a new method (we’ve never taped off a room to spray it before) we were both curious to determine if we felt like it was ultimately much of a time saver, since the prep is obviously a lot more intense. Although some things – like wiping down the to-be-painted surfaces and taping off the floor – would’ve happened anyways.
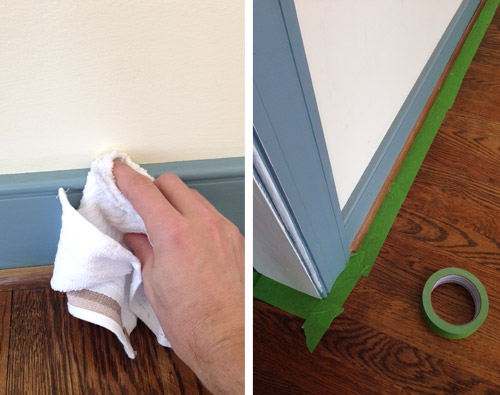
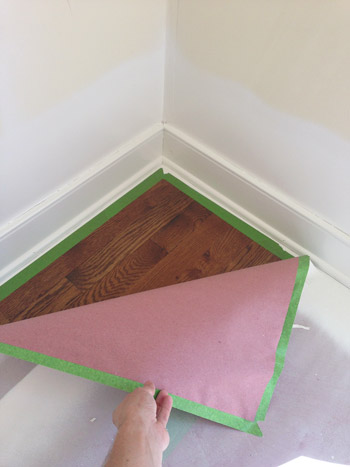
Next we rolled rosin paper out all over the floor since we’ve learned that paint mist gets EVERYWHERE from our particular brand of sprayer (which I’ll admit I’m growing less enamored with – we’ve since switched to this one). We did our tape edging and our rosin paper as separate steps, just so we could focus on getting the taped edges nice and secure (paint on the hardwoods = our nightmare) before shifting our focus to taping each row of paper down. It meant that we ended up using more painter’s tape than we probably needed to, but the extra precaution felt like good nervous-first-timer insurance.
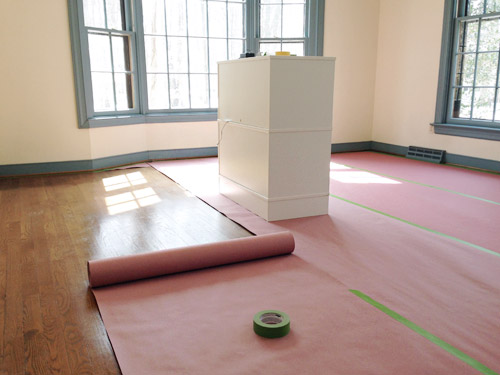
So here’s the room with the floors all taped over. Clara thought it was the coolest thing ever, especially when we let her come draw on the floors while we worked on the next prep step: windows.
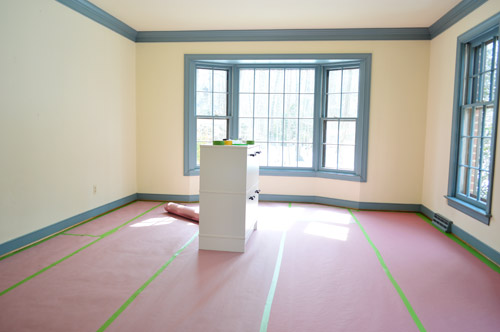
I’ll admit I was a bit perplexed about what to do with the windows. I’ve heard lots of talk about “liquid masking film” that you can paint on your windows before spraying, which helps the dried paint just peel off seamlessly afterwards. It sounded awesome, but after reading some message boards it started to feel too good to be true. Lots of pro painters complained that it took 2 or 3 coats of it to work, so most recommended just doing the old fashion scrape technique anyways.
Wanting to save ourselves a bit of trouble, Sherry came up with the idea to roughly cut some rosin paper squares and tape them to the center of each pane. We didn’t meticulously cover every edge, but figured this would at least save us time on the back-end from scraping the entirety of each of those 66 panes. I left one empty just to test if the paper was a waste of time (spoiler: it wasn’t – that uncovered pane was a giant pain!). Oh and that big paper-covered thing between the windows is Sherry’s overflowing bulletin board full of Clara-art that we decided to just cover instead of removing (it was nailed right into the wall at the four corners as opposed to hanging on a hook).
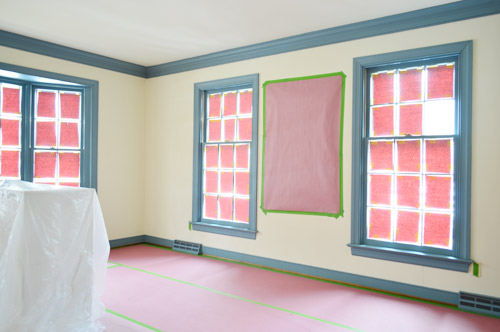
With furniture out (or covered), floors protected, and windows “dressed” our last prep step was to seal off the office from the rest of the house. We carefully taped up a tarp across the doorway (on both the inside and outside of the door frame) and then used this handy instant zipper thing we found at Home Depot (it basically sticks to any tarp and then you slice an opening as you unzip it, giving you a resealable doorway in your tarp. Best $10 we spent on this whole project. That thing was airtight, which meant it single-handedly kept all of that swirling primer and paint dust from sneaking out into the foyer (while still allowing me to enter and exit the room between coats for a lot less hassle than a taped off tarp would provide).
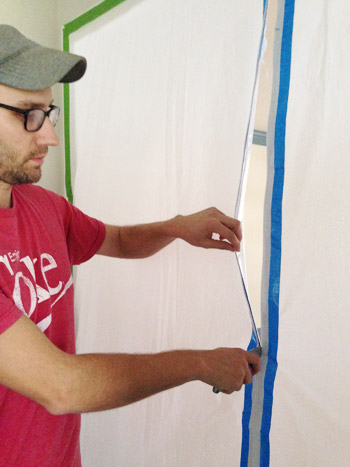
Next, Sherry saluted me and wished me luck as I loaded in all of my supplies: paint sprayer (lately we’ve been using this Wagner sprayer), extension cord, and a can of primer (we used Kilz Premium). I also got dressed in the painters suit and booties that I bought and told Sherry to send reinforcements if I didn’t emerge in a few hours. I don’t know why, but I was actually kinda nervous about how this would go.
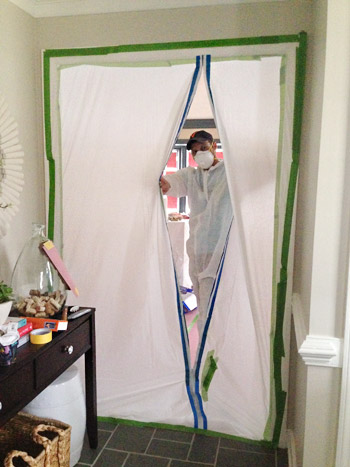
Well, it didn’t go great. At least it got off to a rocky start. For starters, my paint sprayer immediately got clogged, so before I could aim it at any blue trim, my hands were covered in primer and my sprayer was sputtering and leaking. About 30 minutes later, I was finally spraying. By this time it was about 4pm, and between clouds rolling in and all the paper on the windows, the room was suddenly pretty dark. And it only got darker as I sprayed the windows with primer. I’m so used to this room being crazy bright that I hadn’t even thought about needing a work light. Oops.
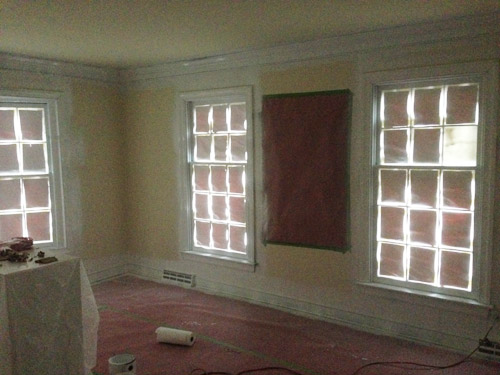
I actually didn’t own any work lights that we didn’t mind getting misted with paint spray (between this and just recently buying a dolly, you guys are probably questioning our preparedness) so I ran out to Home Depot after I was done with the primer coat and bought a couple, along with the trim paint that I’d need the next morning (Simply White in semi-gloss by Ben Moore – but here are some other top white paints you could use instead). The lights revealed that my priming wasn’t perfect, but it’d do the trick.
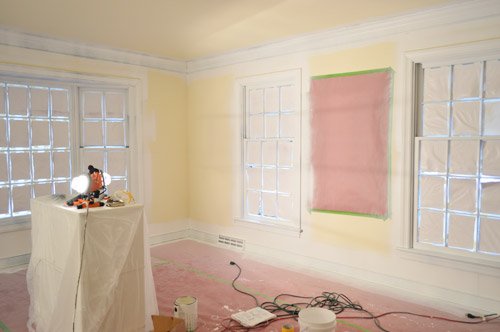
After letting the primer dry overnight (and thoroughly cleaning and de-clogging the sprayer) I woke up early the next morning (Friday) ready for my first coat of paint. This is the room right after I finished that coat. Note the paint fog.
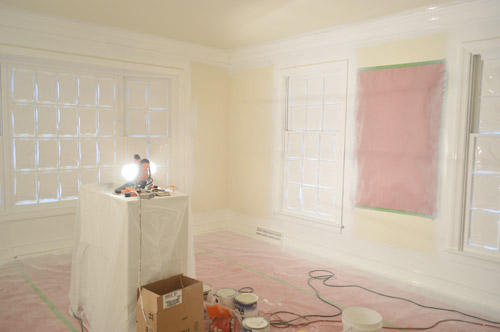
After cleaning the sprayer once again, I let that coat dry the entire day since we had showhouse stuff to do that afternoon in Northern Virginia. I was hoping the next morning (Saturday) would just be a clean up day, but we weren’t entirely satisfied with that single coat of paint. It did a great job covering, but it didn’t get all of the various nooks and crannies of the trim.
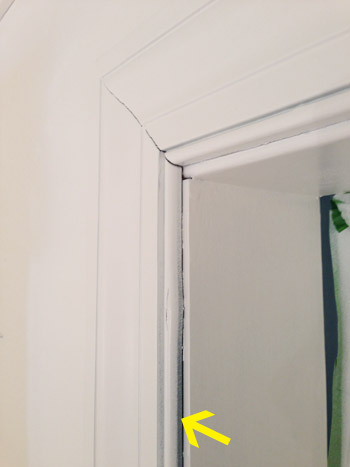
This was one of my fears about spraying this room because it’s virtually impossible to get all of the angles and sides of the trim in one swoop, and you can’t just go back right away and spray from a new angle because you’ll apply too much paint and get drips. So instead of getting to dive into clean-up with Sherry on Saturday, I did a second coat of paint in an effort to get those spots that the first coat missed.
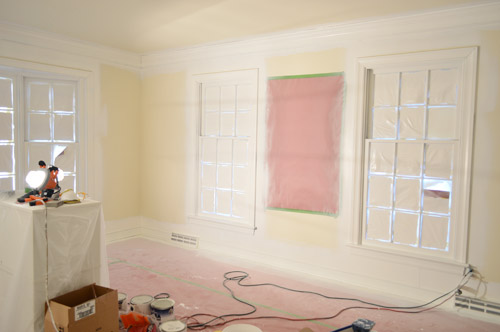
So now we were on Day 3 of paint quarantine in our office, which was also looking not so pretty from the outside. Luckily by now I think the neighbors are used to us always being the middle of a project, so it doesn’t really raise many eyebrows anymore.
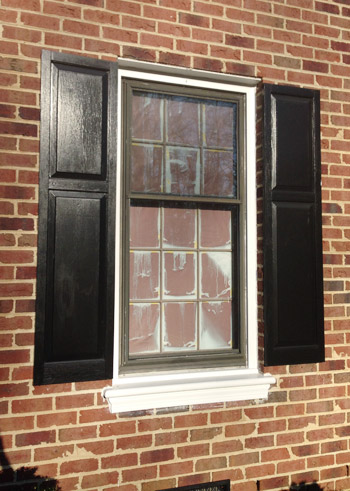
We let the second coat dry all day Saturday, and started the clean-up process yesterday morning. You can tell by the photo above that our homemade window coverings were far from perfect. We learned just how imperfect they were as we started to peel them off… leaving chunks of rosin paper stuck behind in various places. I was ready to curse our decision, and the time we had invested, in those quick little coverings.
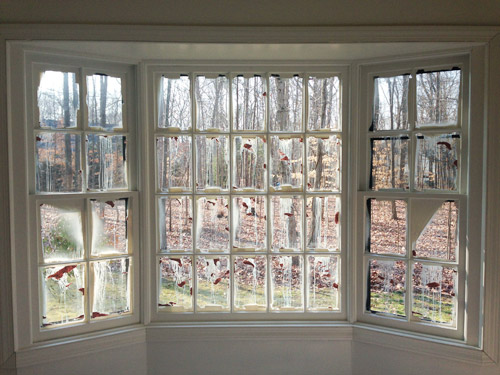
Sherry and I tag-teamed window scraping, since neither of us had the stamina (or the hand strength) to scrape 66 windows clean ourselves. The coverage was so thick (one coat of primer, two of paint) that it took lots of effort to peel it off, but some serious scraping did the trick. In the end, the best method we found was using straight razors to get most of the windows clean, and then going back to scrape the corners with an exacto (we also tried using a putty knife for those corners, which was a little bigger and harder to control, but also worked semi-well).
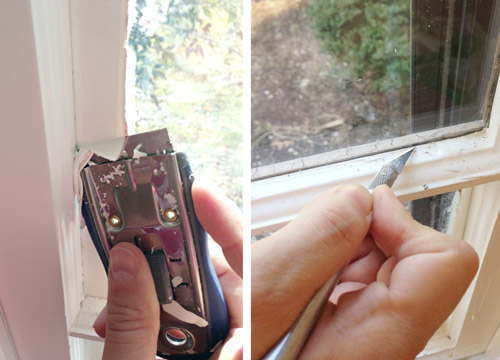
This basically ate up half of our Sunday (with breaks to feed Clara, hand her a few new activities, take bathroom breaks, etc). It sucked. I won’t lie. The whole time I was brainstorming what I’d do differently and it mostly boiled down to not owning windows, which I don’t think is a great solution.
But I said above that we don’t regret the rosin squares. That’s because the pane that we’d left completely uncovered was ten times worse. Maybe even a hundred times worse. My fantasies of this one magically peeling off in one giant sheet were far from reality. It was hard and grippy, so we could only chip it off slowly. It took Sherry a good 30 minutes to do just this one pane.
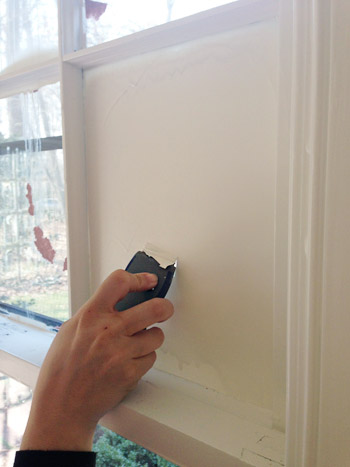
But by around one in the afternoon we had them all cleaned and enjoyed a nice celebratory lunch. It was glorious to have our bright office back (and even brighter).
We considered calling it quits from here (our hands were both aching) and we thought it might be nice to leave the paper down while we painted the rest of the room (walls & ceiling), but I was getting paranoid that our rosin paper on the floor had only performed as well as it had on the windows (I was picturing giant blobs of paint having leaked through) so we went ahead and peeled it up. And it was PERFECT. Phew!
So here’s the room as of now (Sunday afternoon, when I’m writing this). It’s looking a bit gnarly with all of the over-spray beyond the trim on the walls and ceiling… but there’s no blue in sight!
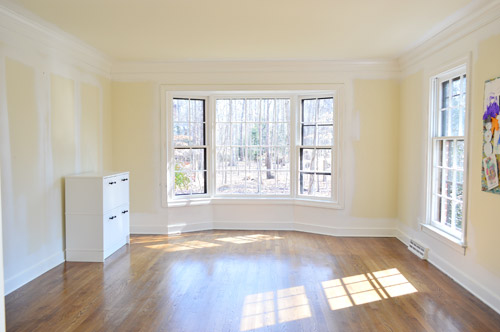
We’re excited to go ahead and paint the ceiling and walls, since we figure it’ll be easier with all of the furniture still out. And we’re used to painting without the floors being completely covered, so there was no harm done by pulling up all that rosin paper.
But our trim-painting task isn’t quite over. For some reason my second coat of paint was especially drippy (once again, I’m less enamored with our sprayer than ever – we now use this Wagner sprayer), so we had to sand down a bunch of spots that are still in need of some paint touch ups by hand.
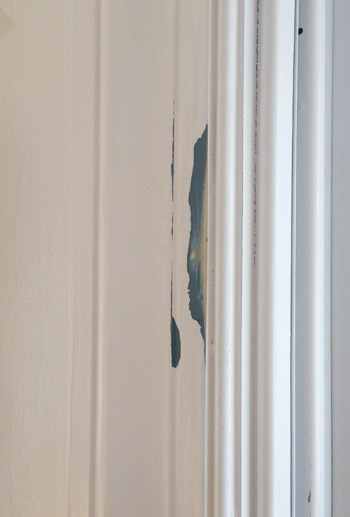
But before I break out the touch-up paint, we still need to do some caulking. I didn’t realize how rough some of our trim was looking until it was all painted white. So there are a bunch of spots where the moldings and walls meet that need some filling.
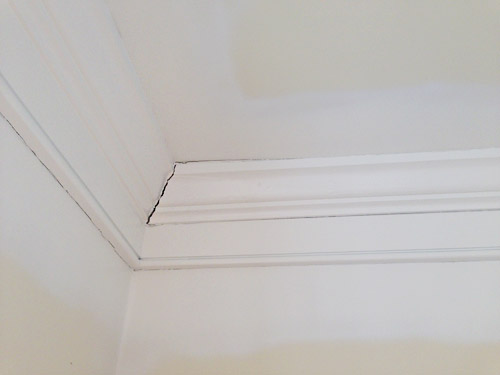
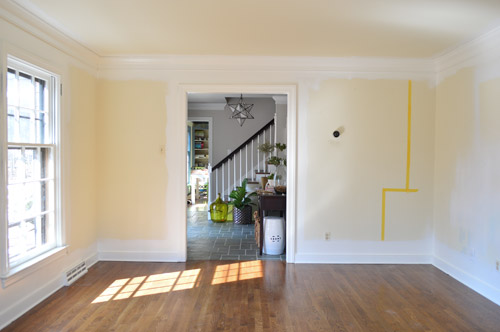
I also never noticed how yellow the paint was in there until now. Sherry and I are still debating colors. We’re both thinking of something nice and light, but not white – and maybe with a hint of color. Not sure yet. Though you can see below that we’re starting to tape off where things like the built-ins might go, just to try to picture everything and make a final call on layout/placement.
Oh, but the verdict on spraying vs. painting by hand? I’m not totally sure yet. Spraying was definitely WAAAAY faster when you just measure the time spent painting. It took me just about 30 minutes to do a single coat, so one primer coat and two paint coats were a total of just 1.5 hours spent spraying – versus a single coat probably taking around 4+ hours by hand. But we’ve still got some kinks to work out in our prep/clean-up system before I’m convinced it’s less trouble overall (for example, when we paint by hand, we don’t get nearly as much on the windows so it’s a lot easier to scrape, and we don’t have drips in the trim that we later have to sand and touch up).
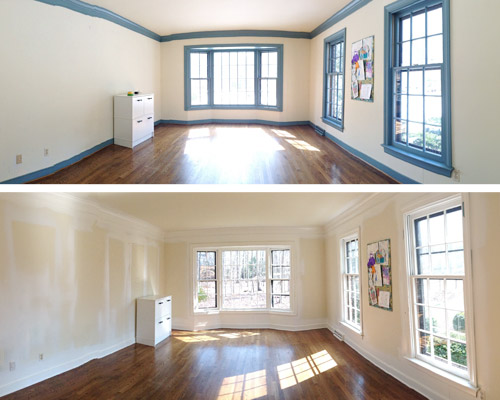
I’d love any tips or suggestions from those of you who are more well-practiced in the art of paint spraying. We plan to spray the dining room when the time comes since, like the office, it has little furniture and can easily be sectioned off. So I’d love to work out some kinks before taking that room for a spin – and then share all the “this worked better” tips when we get ‘er done. Can you believe that room is our last room with blue trim?! It’ll be a big day when it’s done.

Deb D says
Holy Moly!! That white trim really lightens up an already bright room. It looks awesome!!
Julia Kent @ The Domestic Blonde says
Hallelujah! The blue trim is gone! This is so exciting!
I agree with something light & airy for the paint colour… I can’t wait to see what you choose (and what layout you pick too!)
There’s only blue trim left in the dining room now, right? You’re so close to being rid of it all :)
YoungHouseLove says
Wahooooo! It’s a very exciting moment in our trim-centric lives. Haha!
xo
s
normaleverydaylife says
That looks so much better! It’s amazing what a fresh coat of paint can do. Did you consider doing just the window panes by hand? I wonder if that would save more time in the end?
YoungHouseLove says
That’s actually what we did upstairs in many rooms since we thought spraying them would be a giant mess due to the overspray, but we knew from that experience that 66 panes = a ton of priming and painting (it’s the most windows that we have in any room) so we decided to try the sprayer this time around.
xo
s
Heidi says
Can you explain, for those of us that have not painted double hung windows, how they get painted? Doesn’t the parts of the window that rub together when you lift them to open rub off the paint? And I’m happy to hear an update on the paint sprayer and how you aren’t sure about it anymore…we were thinking of getting one, but I will reconsider after your recent experience!
YoungHouseLove says
Good question! Thankfully the only part of our wooden double hung windows that rub together are the sides of the windows against the metal window slides. Those are on the left and right side, along the frame of the window – so we don’t paint those, just the wooden windows and panes themselves. So we’re just essentially painting the interior side of the top window (which has six panes) and the interior side of the bottom window (which has nine panes). They slide up and down in front of each other, but don’t actually grind against each other (they’re on separate tracks). We couldn’t spray with the windows open (we would have gotten paint on the screens, storm windows, and the house’s exterior) so when we do touch ups we’ll open all the windows and paint that small crack of blue that’s hidden when the window is closed. Hope that helps!
xo
s
Anele @ Success Along the Weighn says
My hats (respirators?) off to you guys. Just reading that gave me anxiety! :) I think I would’ve gone by hand just because I know me, that sprayer action would’ve had me throwing it across the room. I’m kind of bummed your sprayer is starting to sputter on you because I was going to get that one to repaint our furniture. (Tables, armoires, etc) I’ll be watching your adventures as always!
Mary | Lemon Grove Blog says
Ugghhh, sounds like this one was a pain in the tuckus! Between the windows and all that touch-up, it sounds like this one was a beast. But you guys, it was SO WORTH IT – that room already looks night and day better!
YoungHouseLove says
Thanks Mary! It’s so funny how bright it looks in there now. I’m so excited to actually get to work in there!
xo
s
Carrie K says
Thanks for keeping it real, John! Noting that some projects just outright SUCK help us mere mortals. :) And you’re right, the option of not having any windows wouldn’t really be a fun house. lol Thanks for a great start to the work week!
Robin says
Wow! What a difference! I wonder however if you could have used alternative tape for the floor paper – why use expensive frog tape for just paper on paper when masking/duck tape would be way cheaper and work just as well for the non-edging portions? Also could you have taped the windows?
YoungHouseLove says
Good question! We really wanted the seal to be nice and trustworthy when we were taping off the room, so it felt like a worthy splurge (Frog tape is known for blocking bleed better than other tape brands, and that has been our experience with it). Has anyone had luck using things like masking tape or duck tape without bleed or leaving stickiness behind? I’d imagine taping around the baseboards directly onto a hardwood floor (or on the windows like we did) with Duck tape might leave goo behind, and we worried masking tape could bleed or let paint sneak through onto our hardwoods or out into the hallway.
xo
s
Liz says
I think Robin meant using alternative tape to tape the pieces of paper together, not using duck tape to mask off the baseboards.
YoungHouseLove says
Thanks Liz! We worried that still could have resulted in over-spray getting into those cracks between the paper (aka: on the hardwood floors) if that tape didn’t hold.
xo
s
Emily says
I’m sure that I would have taped them off, then covered the tape with paint and then used more tape on the edges. I use a lot of tape… when I’m taping this off, when I’m wrapping gifts… when my Mom would watch me tape something she would say, “well, you are your father’s child.”
My dad is an auto body mechanic and he’s always spraying cars with paint. He uses the paper/masking tape combo to get all the way to the edge of the windows and cover trim. In my mind, he’s a professional spray painter and I’m planning to take him I’m pretty sure that I’m going to take him anything that we need to have painted with a sprayer. The calliber of a sprayer is going to have a big difference in your outcome and how comfortable you are with it. I doubt that you’ll need to do many more rooms with your spray gun, but maybe the next time you can rent a commercial grade one and see if that makes a difference. My dad’s gun doesn’t overspray too much and he has a lot of control with it.
The hardest part of my childhood was walking into the garage after school and not being allowed to touch the perfectly sprayed and shiny, wet paint on a car! It was so shiny that you really wanted to touch it!
YoungHouseLove says
So funny! I’m the same way, Emily!
xo
s
Natalie Waltman says
Normal masking tape would have worked fine for the paper! I use it all the time in my painting. The only time NOT to use it is where it will be in contact with the freshly painted surfaces as it is even stronger than painter’s tape so it can tear off all your hard work. No bleed through though and a lot cheaper!
YoungHouseLove says
Thanks so much Natalie! Good to know!
xo
s
Ashley says
Good morning! Thanks for posting all of your DIY work (mishaps and all). I just wanted to say- I notice y’all get the occasional snarky/slightly mean commenter. And wow- y’all react with such class and positiveness. It’s nice to see that it stops the comments from spiraling into a negative back and forth in the name of defending yourself (I don’t know how you manage to resist!). Thanks for being a spot on the internet that keeps it bright! :D
Carrie K says
I totally concur Ashley-they are so polite, polished and keep it light really well. Talk about grace in action!
Evelina says
100% agree!
Hemma says
and that class and grace is the reason why they are so very beloved by us fans/groupies! Chapeau!(transl. :”hats off”) as they say in France.
Heidi says
First, I am so thankful that all of the trim in my house is glossy white and bright. After reading this post I don’t think I’ll ever change it. More importantly, I’ve been toying with the idea of getting a sprayer, but after reading this that decision has been jettisoned from my brain. Maybe it’s because I’m a serious control freak and I trust my hand/brush combination better than I do a sprayer. I was nervous just reading this post!
http://jax-and-jewels.blogspot.com
Becca says
So this is not anything I’ve ever done…something I literally just thought of and could be totally off base…but would it make sense to put something like vegetable oil on the windows panes? Since grime can prevent paint from sticking couldn’t you just lightly grease them and then it would come right off? I guess you would just have to make sure you don’t get it on the part you actually want to paint.
YoungHouseLove says
We were wondering that too (in hindsight of course). We also thought “what if we sprayed them down with windex or something?” – I think our main thought was that anything liquid that could drip down and rest on the window frames of each of those 66 panes would have interfered with our paint job, so I would be nervous to try it. Anyone know of anything that you could apply without it dripping onto the windows themselves and mixing with paint spray or making things gooey?
xo
s
Karen says
Maybe vaseline?
YoungHouseLove says
Ooh that’s compelling! Anyone ever try that!!
xo
s
Amanda B. says
Crisco? I use that to rub on glass baking ware if I don’t have PAM or some other spray. NOTHING sticks to Crisco.
YoungHouseLove says
That’s so funny, I just thought of that too. Anyone use crisco?! Seriously, I think that could do it (and it’s cheap like vaseline too).
xo
s
Robin says
What about press n’ seal wrap?
YoungHouseLove says
A few others have asked that. Anyone try it?
xo
s
Cory Laine says
I had one child “paint” her bedroom window with Vaseline and it was a nightmare to get off the glass so I wouldn’t recommend that route:)
YoungHouseLove says
Eeks, thanks for the tip Cory!
xo
s
Kiran says
Vaseline works! Just wait for the paint thoroughly dry before cleaning the Vaseline off. But be very careful not to get the Vaseline anywhere you do want paint or the paint will rub off.
Jaimee says
I was thinking the same thing about rubber cement? I know the smell is strong but…
YoungHouseLove says
Anyone ever try rubber cement? I could see that working well, but I don’t know how much you’d need…
xo
s
Emily says
Rubber cement sounds like it could be a good idea. Maybe a combination, rubber cement to edge the glass and plastic to cover the majority of the pane?
Vegetable oil and press-n-seal also came to my mind. Sadly, with 66 windows panes, you could have tried them all and given us a breakdown of what worked and what didn’t!
My mom uses hand lotion when she paints her nails. She applies it around her nails and the lotion doesn’t allow the paint to stick to her cuticles. Any overpaint just wipes off when the nails are dry.
And would paint thinner and a cotton ball have helped you remove paint from the windows easier? Or nail polish remover?
YoungHouseLove says
Love all the suggestions! I think we’re planning to try a few of them on the dining room windows and report back!
xo
s
Jules says
Don’t use press in seal wrap. I used it on the glass shelves of my fridge, when I peeled if off every single gluey dot stuck to the glass shelves of my fridge. It took forever to clean that up, much worse than scraping paint with a razor blade.
YoungHouseLove says
Oh no Jules!
xo
s
JC says
If you try the vaseline/Crisco route, the key to clean up is using blue dawn mixed in your vinegar water. It cuts through the grease. With a 4 year old, 2 year old, and baby, I have some experience getting greasy things off of anything and everything.
YoungHouseLove says
Thanks for the tip JC!
xo
s
JG says
I wonder if liquid soap would work… It would certainly be easy to clean off. And not much sticks to “soapy residue”. Or maybe just rubbing a gooey soap bar on the window-?
YoungHouseLove says
That’s another good idea!
xo
s
Jennifer Armstrong says
Ok. I’m not sure if anyone’s mentioned this because I didn’t read all 480+ comments but… I watch Rehab Addict on HGTV. I don’t remember the exact episode, but Nicole Curtis once used a product she rolled onto the windows to prevent paint from sticking. I have no clue what she used but it sounded like it was made for that purpose. It just peeled right off after the paint dried and cleaned a super grimy window in the process. She used it on outside windows. Maybe something to consider hunting down for your dining room paint job.
Jennifer Armstrong says
So I got curious and googled.
http://www.amazon.com/Wagner-Power-Products-284001-Glass/dp/B000BPPPPY
Might be worth a try. 7 reviews. 4/5 stars.
YoungHouseLove says
Thanks for the link!
xo
s
Lisa says
I’ve used vaseline as a paint block before. But much like all your other prep decisions, vaseline is not without its issues. I’ve applied it with a thick piece of cardboard, which is fine. But getting it off is kind of a chore all by itself. You can scrape it off with more cardboard, but Dawn is the only thing that cleans the schmear that’s left. (that I know of). Where I’ve used it really successfully is around knobs and keyholes, etc. that I could remove. Then I just rubbed it down with a cloth to get rid of it.
YoungHouseLove says
Thanks Lisa!
xo
s
Lindsey says
Rosin on the floor, cut up grocery bags for the windows? I’m wondering if the rosin leaked on the windows because the paint was directly sprayed multiple times and the paper started to separate? I’ve had good luck before with plastic bags when painting mirrors and such with spray paint. I’m interested in the outcome because we are thinking about spraying our kitchen cabinets when we install them, but I’m not sure of the outcome.
I’ve had a horrible time painting our old cabinets by hand. The white coats never seem to be solid. I’m thinking about just doing a gray instead since I’m so sick of trying to get even coverage with white.
We had the same problem the previous poster mentioned as well, when we opened our windows after painting by hand, all the paint peeled where the windows connected. However, our windows are a hundred years old and do not have nice smooth tracks. Sadface!
YoungHouseLove says
Oh no, that stinks about your windows! As for grocery bags as paint blocks, I think that could work. We also didn’t tape our rosin rectangles off fully on all sides, but the weird thing was that the areas that were taped off were sometimes even harder to scrape since it was tape + primer + paint (making it thicker and gummier to remove in those spots) so it was hard to tell what would make things easier – although it was painfully clear that not taping them off at all would have been a nightmare! That one window was killer!
xo
s
Patricia says
Eons ago (while dinos still roamed the earth) my husband and I spray painted a two bedroom condo we were using for work. He sprayed EVERYTHING. Including himself. After the third trip to pick up even more paint, I told the paint guy I wasn’t going to divorce my husband. I would stay married to him instead, to better make his life a living hell …
We will never spray again. Tape and paint by hand. And we’re still married.
YoungHouseLove says
Hahahahahaha! I love it. The family who paints by hand together, stays together.
xo
s
Lisa says
HAHA!!! This is the best comment on here! Love it!
Kelly says
Having never tried a paint sprayer I can’t offer up any tips, but I am following along in the comments. Do you think a different sprayer would work better? Curious to hear what sprayers other folks have used or if the issues you faced are common among sprayers.
YoungHouseLove says
We’re beginning to think there are definitely sprayers out there. Jenny on Little Green Notebook has one that she seems to love, so we might have to try that one to see if it’s user error or our sprayer that’s gumming things up and causing those annoying drips that we’re having to sand later (it didn’t seem to be as bad about that in earlier projects, so it’s like it’s oddly getting worse).
xo
s
Cindy says
John, You might need to replace the tip of your sprayer. Also since you like to use up left over paint, are you using a screen to filter out any lumps?
Try contacting their customer service too if you are having issues. They are a good company so I would think that they would be willing to help.
http://www.graco.com/us/en/customer-care/contact-customer-service.html
YoungHouseLove says
Thanks Cindy. Will do!
-John
erin says
Sherry, you mention Jenny’s sprayer from Little Green Notebook – that inspired me to buy it but my husband and I have had MUCH LESS success than Jenny has. Not sure if it is user error or what, but after many many coats on a dresser that still had to be finished with a roller and calls to the manufacturer (who was wonderful, btw), we are still not convinced it was a worthwhile purchase.
YoungHouseLove says
Oh no! That stinks, Erin!
xo
s
Sara says
I also bought the sprayer Jenny on LGN recommended and I am NOT happy. I could not get it to spray right at all. :(
YoungHouseLove says
Oh no, that stinks!
xo
s
Lisa says
I only had one bout with a paint sprayer that was borrowed. In researching how to properly clean it, I was blown away by how very exact the process must be. If you don’t clean the tip well, the whole thing can seize (I think that was the word I found? Correct me if I’m wrong…) The one that I borrowed wasn’t cleaned well prior to my use and when I turned it on, it whirled to life and then hit a sudden stop (prior to even pulling the trigger). From all that I read, some paint had probably worked it’s way inside and was clogging the whole thing. There should be a way to know if you are really truly cleaning it correctly. (For some reason while writing this, the process of cleaning my breast pump tubing and attachments popped into my brain… if only it were that easy to clean a paint sprayer! Lol!!!)
K00kykelly says
My dad has a sprayer he loves and has used for numerous projects.
Unfortunately we discovered it doesn’t work as well with certain types of paint. We sprayed our ceiling using his sprayer and using ceiling type paint gummed it up. We were using 3 sprayer tips in rotation. One in the sprayer and the other two soaking in soap water. Uuuuugh! It was also ending up drippy although since it was the ceiling following with the roller was still easier. We know the sprayer was fine since we started out with the primer and had no issues. So maybe the type of paint is an issue?
Second thing is that a sprayer does a lighter coat. Maybe only 3/4 the amount of paint. You definitely have to plan to do more coats to get good coverage.
Also, love the zipper seal!!!
YoungHouseLove says
Great tips! Thanks Kelly!
xo
s
Treah says
I wonder if you taped around the paper with the painters tape it the windows would have been easier? Looks much better!
YoungHouseLove says
The weird thing was that the areas that were taped off (we didn’t tape all the way around like you mentioned) were sometimes even harder to scrape since it was tape + primer + paint (making it thicker and gummier to remove in those spots) so it was hard to tell what would make things easier – although it was painfully clear that not taping them off at all would have been a nightmare! That one window was the bane of my existence.
xo
s
Renee says
Or the pane of your existence!
YoungHouseLove says
Bahah!
xo
s
Lindsay Butler says
Love it!
A few suggestions I have from using my paint sprayer.
1) With the windows I think it is easier to tape with tape on both the window pane and the window. Just use your exacto knife to slice off the overlap on the window pane before spraying.
THEN get a cardboard template of your window pane size (About have an inch less in size) a rotary cutter and some cheap contact paper. Us the contact paper instead of the rosin paper.
It is just a little bit more prep work but saves you from any of the messy scraping. Plus when you use the tape and exacto knife method you do not have to worry about getting the tape perfectly placed inside all of those little squares.
YoungHouseLove says
LOVE that tip! Thanks so much Lindsay!!
xo
s
Bonnie K (BornInaZoo) says
I used this same method on my windows. It worked like a charm. However, use the cheap contact paper. I got mine at the dollar store. I ran out on the last pane & didn’t feel like running out for more so I used Contact brand that I had on hand. I seriously thought I was going to break the window taking that piece off.
YoungHouseLove says
Great tip!
xo
s
Linda says
I was thinking contact paper too (although I’ve never tried it)! Glad to know it wasn’t just a crazy idea of mine but that it actually works :-)
Sarah says
I don’t know how you guys do it! We have white trim but wood quarter round (which I hate…either all white or all wood, not both!) and the idea of just painting that makes exhausted. I’m getting ready to paint my library and hallway and I wanted a bright but not white color as well and I totally found it. Its called Aloof Gray by Sherwin-Williams. My love for this color knows no limits. And as it turns out Emily Henderson just used it on a recent makeover on her blog.
Let me just tell you…I felt super trendy when I found that out. :)
YoungHouseLove says
Haha, I love it! Send pics when you’re done. And good luck Sarah!
xo
s
Samantha @ Fabulous Fabris says
Wow! The white already looks so much better.
So glad the floors didn’t get any paint seepage!
Sarah says
And here’s to colored trim going to decor retirement. If that ever becomes a trend again heaven help us!
Mary Beth says
You guy are so inspiring – I love EVERYTHING you do and especially in terms of paint, you’ve answered countless questions for me while I stumble through our entire house remodel!!!
http://www.hystericallyeverafter.com
Thank you!!!!
And I can’t believe it – It looks so much brighter in there!
Mary Beth
YoungHouseLove says
Thanks so much Mary Beth!
xo
s
Stefanie says
All that white trim looks great! Can’t wait to see the color you pick for the walls. You may have already addressed this question elsewhere but I didn’t think was addressed above: Why did you choose not to also prime the walls and ceiling with the sprayer? Thanks!
YoungHouseLove says
We prefer to do those by hand since it only takes a few hours, uses less paint (sprayers go through more), and we get a nice even finish by hand (no drips to worry about). We also couldn’t get a clean line between all that glossy white trim and the walls with a sprayer without taping those off separately, which would be added time (and we’d hate for the tape to peel off our fresh trim paint when it came back down).
xo
s
Janette @ The 2 Seasons says
You might want to hold off on caulking the wood trim. The trim dries out and shrinks during the months when we use indoor heat, but in the months when there is more moisture in the air from the air conditioner and humid weather, they go back to normal size, and the gaps disappear.
YoungHouseLove says
Thanks for the tip Janette! We actually like to caulk when things are all shrunk (aka: when it’s cold) so the gaps are hopefully filled for future cold seasons. There doesn’t seem to be a downside when things swell up in the summer for us so far (the caulk doesn’t all fall out or anything), so I hope that luck continues!
xo
s
Crystal says
Oh man that looked like a tough job. After that I think I’d do the dining room by hand! (That is coming from the girl who still hasn’t done a quarter of trim in our house that we’ve lived in for going on 5 years.) I’ve mentioned liking the Little Critter sprayer before, for the price and very easy clean-up it has worked well for spraying doors. I’d say minimal overspray too.
YoungHouseLove says
Thanks Crystal! That’s the one Jenny at LGN has, right? It definitely has some great reviews. I’d love to try it to see if it’s a sprayer issue or user error. Haha!
xo
s
Crystal says
Yes! And I’ve obviously been reading too many Little Critter books with the kids since the name of the paint sprayer is just Critter! But in my defense, it is very little! :)
YoungHouseLove says
Hahah! It sounded right to me!
xo
s
Mia B says
We have an inexpensive big-box store Werner spray painter that was about $100-$150, but it takes forever to clean and has a tendency to spit spatters of paint at inopportune times, requiring me to do the spraying while DH follows behind with a roller to smooth out the spatters. Not efficient, and really annoying each time a spatter came out! We were thinning paint as instructions said, and used it at two different houses (one for all the walls in the whole house, and one for all the cabinets and doors) and neither time were we happy with it – with the additional prep time, just not worth it.
So when doing the trim and doors on this house, I bought a Critter. We ended up doing all the baseboards and door trim by hand due to time constraints but I just tried the Critter on four sets of louvered bifold closet doors about two weeks ago. It was just “eh.” It doesn’t have great coverage (the paint droplets are very fine, even adjusting it to max coverage and optimal air compressor settings per instructions), and took five or six coats, and I still see some patchy parts in the sunlight now that the doors are hung. My little compressor could only do one side of one door before I’d have to wait for it to refill enough to get more than a paint mist. Maybe a different compressor wouldn’t have such a problem keeping up.
It was also really hard to get the jar screwed on the spray head correctly – in fact, trying to tighten it I dropped a full plastic jar on the ground and spattered myself from the knees down and wasted a ton of paint. I’d say save the $50.
I think spray painting leaves a different texture than hand painting – it’s not as smooth. That makes it a hassle for hand touch ups after the fact – can leave shiny marks on an otherwise smooth surface. I think spray is kind of an all or nothing thing.
YoungHouseLove says
Thanks for the info Mia!
xo
s
Elle says
I don’t see that anyone else mentioned this yet:
“I hadn’t even though about needing a work light” – you meant thought.
Even pre-caulk, it’s looking good!
YoungHouseLove says
Thanks Elle! All fixed!
xo
s
Jen says
At least it is done and you have learned some things before you tackle the dining room. What about contact paper for the windows? Or the frosted glass film?
YoungHouseLove says
Thanks for the suggestions! Priming and painting frosted glass film or contact paper might completely fix/glue it in place (that would be my worry, like painting over wallpaper makes it harder to remove). Has anyone else ever tried those?
xo
s
Lee Ann says
The timing of this post is too funny. Earlier this morning, before checking in here, I had just discussed with a colleague that the trim in my house was sprayed when it was first painted, and that I really didn’t like spray-painted trim. It’s impossible to dust! (I like a nice, glossy paint coat that the duster, vacuum, etc., will glide over without getting “stuck” on the spray particles.) I’m strange; I like to paint trim. I put on music or some old movie in the same room, and just do a little at a time. On another subject, thanks for the feedback on the zipper closure. Have looked at using something like that many times and wondered if it really did the job. Love that you guys test-drive all this stuff for us! (And BTW – love the hazmat suit photo!)
YoungHouseLove says
I love that you love painting trim by hand. You are a special person Lee Ann. A rare and wonderful breed.
xo
s
Michelle says
I haven’t ever painted trim. We have a house where stained woodwork is throughout. My hubby prefers that, so I am stuck with it. But, if we ever finish our basement, it is white woodwork down there. I will have to remember that zipper thing for when we are sanding all that sheetrock, to keep the dust down there. We are replacing our cheap slider/glider (whatever you want to call them, LOL) windows on the main level and upstairs with new double hung Marvin’s. They all need to be stained/varnished, several coats of varnish. I think I did 4. I don’t spray them, but do it by hand. Movies and music playing, that is what I do too. I kind of like it.
YoungHouseLove says
Movies and music are the way to go!
xo
s
Sarah says
I’m getting ready to use a sprayer to paint my entire living and dining area in the front of our house. My cousin is a contractor and has a big, commercial style sprayer that you just put a tube in a 5 gallon bucket of primer and it pulls it through and I just use another hose to spray the walls/ceiling. It seems easier than toting a handheld sprayer, but I’m super nervous just the same.
YoungHouseLove says
They used that at the showhouse with a team of men. It was amazing! Had all the rooms (in a GIANT house) painted in like 4 hours. Insanely awesome.
xo
s
Kelley says
This is what I love about your blog. You try new things and are honest about the results. I appreciate you sharing the good and the not so good (ugh…scraping paint!).
Here’s to hoping your hands aren’t too achy to be able to enjoy a cup of coffee this morning!
YoungHouseLove says
Aw thanks Kelley! We both have claw hands going on today, but they thankfully can still grip spoons and cups. Haha!
xo
s
Kaitlyn says
The room looks great – you can definitely tell how much work this took, and it’s making me nervous for my own trim/door painting that’s about to commence in our ENTIRE HOUSE. AHH!
I will say though, I am shocked – not ONE Dexter reference in this post! That was the first thing I thought of when I saw John in his gear with the plastic room ;) Haha!
YoungHouseLove says
That’s hilarious because we made about ten million of those references in person. The paint fog must have clouded his Dexter-obsessed brain.
xo
s
Lisa@Double Door Ranch says
Hahaha how did this not occur to me?! I was thinking Breaking Bad with the set up in people’s houses but its totally Dexter!
Saneth says
Have you thought about trying Press and Seal plastic wrap on the windows?
YoungHouseLove says
Has anyone tried that?! I could see it peeling right off, or getting really rigid and fixed on the windows once it’s painted and primed (like how painting over wallpaper makes it a lot harder to remove).
xo
s
Kellee says
I haven’t tried press and seal wrap on windows, but I did put it on my glass refrigerator shelves (thanks to a tip from the sometimes-less-than-reliable Pinterest) and it was a nightmare to clean off the residue it left behind. Maybe it was the cold and would work better on windows in warm weather?
As always, you guys are awesome – it’s a joy to see all your hard work transform this house into such a beautiful place!
YoungHouseLove says
Eeks, thanks for the tip Kellee!
xo
s
Ami says
Hi there,
I happen to own the same paint sprayer as you do which I use for painting furniture primarily. I have seen photos of yours and it always looks amazingly clean. Mine became a complete mess the first time I pulled the trigger. I’ve been wanting to ask for a long time if you could tell us how you go about cleaning your sprayer inside and out. I really love the way the sprayer works for my purposes and do agree there is a major learning curve (and major mist). Also, do you find the sprayer stops working way before the paint container is empty? I gave up on using the plastic bag things because the sprayer stopped spraying way before the paint was gone in those and I wasted so much paint. Thanks for the advice. Here’s a couple of things that work for me when I paint pieces with glass inserts. Press and Seal plastic wrap works great to easily cover glass panes. Applying Chapstick to the glass closest to the trim also makes removal of paint super easy…for latex paint, that is! I tried it with a can of spray paint…oops! What a mess.
YoungHouseLove says
Thanks for the glass tips! So good to know! As for our sprayer, it must only look clean from afar, because it’s a mess up close. As for how I clean it, I follow the instructions in the manual for cleaning it after use, and I go through the process twice, just to be safe (including unscrewing the nozzle and cleaning that end as well). Mine seems to get most of the paint out of the container during each use, except for the last half-inch, which I just chalk up to the angle that I’m holding the sprayer, but if yours is leaving a significant amount there might be some other issue at work. And yes, I’ve given up on the bags too (I ran out and realized it’s easier not to hassle with them).
-John
Nancy says
All of a sudden, it’s a room with windows instead of windows with a room! Looking good!!
YoungHouseLove says
WahOoooooooOOOOooooo!
xo
s
CJRae says
It sure sounds like the project was a pain in the behind, but at least there’s no more blue trim in there now, right? One more room knocked off the list! Looking at how yellow the paint looks in there, I’m curious if yellow just went on a list of no-go colors for you guys, after all the painting you’ve been doing lately!
YoungHouseLove says
I think since so many rooms tend to be a yellowed cream or dingy off-white we are drawn towards different colors, just so we don’t accidentally paint a room something similar to what we’re painting over – haha!
xo
s
Carrie S G says
Looks amazing guys! And… dare I say… bigger?
Kristin C. says
Despite all your troubles, it looks great! Can’t wait to see the end result! Love all of y’alls ideas =)
Stacy says
I don’t know if you’ve mentioned this before, but which sprayer do you have? My parents bought me a Wagner Flexio for Christmas that I’ll be getting some good use out of in the next couple of weeks, and it is exciting but also terrifying. Granted, I’ll be spraying whole walls (I’ve had to put up new drywall in a bunch of rooms) rather than just trim, and I don’t have any flooring down yet, so there won’t be nearly as much taping. But the paint cloud still kind of worries me.
YoungHouseLove says
Here’s a post with info about that for ya (it’s a Graco sprayer). And good luck with your sprayer! We hear Wagner is awesome.
xo
s
Jody says
Kudos for attempting to cover the grilles. They are awful to paint. One method I have found that works pretty well, for me anyway, is to use the clear sticky back carpet protector stuff. It comes on a roll like seran wrap. Typically used for high traffic areas when movers come. I just peel a piece a little larger than size of the window pane and press it on. I use an exacto knife to cut along the seams of the grille and window. It left very little scraping to do later.
YoungHouseLove says
Love that tip Jody! Do you get it at a place like Home Depot? Does it have a brand name?
xo
s
Jody says
Home Depot is exactly where I get mine, but I can’t think of the brand name.
YoungHouseLove says
Thanks Jody!
xo
s
Kati M. says
I’m wondering what else you painted! I see some mysterious paint outlines on your solid wall! ;) You guys are awesome!
YoungHouseLove says
Good eye! Don’t mind those. They were two doors we had leftover from between the kitchen and foyer (we thought we could retrofit them for the office doorway) but they came out kind of drippy and we think we’ll just wait for french doors instead of trying to hang those heavy things.
xo
s
Evelina says
I was wondering that too!
Lindsay says
I see your window panes and trim are made of wood. Question for you- I don’t have any small panes like you guys, but my trim is made of metal and it’s black. Yuck. I’d give anything to make them bright white. Any tips on how to paint these successfully so that they don’t peel up? Spray? By hand? If at all?
YoungHouseLove says
I would think a good wipe down with deglosser followed by a light high-grit sanding, more deglosser, good primer, and paint should work. Anyone else tried that before?
xo
s
Kelsey says
Really Lindsay? I am thinking of installing new windows specifically WITH black framing! I think it’s unique and usually looks awesome when I see it. Does everyone else not like black window frames too??
Jessica says
We have old aluminum windows that are in good shape besides the face that they are black! We just used regular old spray paint (inside and outside). Our neighbors all thought we replaced them, and about a year later they are still in good shape!
Bethany Ann says
Kelsey,
I think it just depends on your personal preference. I’ve seen some windows with black frames that looked awesome and some that looked less awesome. You should definitely go for it!
jjf says
WOW.. what a lot of work. Is it really your sprayer or just sprayers in general? When I bought my house I had to paint all of the trim and it truly is a pain in the butt! What I ended up doing was freehanding it. Cut in and then fill in the middle and then lightly feather over it to smooth it out. Then for the 2nd coat I just did it broader, didn’t need to precisely cut in every time. I kept the can of paint, a brush, a wet rag and a card/piece of paper (to slide under the moulding if there’s space- to protect the floor usually. That’s easier than cutting in, but doesn’t always fit, gets painty and has to be replaced often. I used the rag to clean as I go, and wipe up spills or drips. Put some music on and accept that I’ll be doing this for a couple hours and that it’s more tedious than difficult, and it actually wasn’t so bad.
YoungHouseLove says
Thanks for the tips! As for our sprayer, we’re not sure if it’s user error, spray error, or a little bit of both. We have heard that a sprayer called The Critter from amazon.com is hugely loved by a ton of people, so we’re tempted to try that to see how it goes!
xo
s
Amanda B says
Our new house has the same issue with the trim not looking great and separating in some spots. Do you guys have a favorite brand of caulk that you recommend to use to spruce things up?
Thanks!
YoungHouseLove says
We have really liked Dap white paintable caulk for windows and doors. White and paintable are key, and it doesn’t seem to shrink up much.
xo
s
Lisa@Double Door Ranch says
So much better!! I’m sorry it was such a huge pain though. I don’t know which sounds worse, hand painting or all that prep and clean up with spraying. I wish I had some magic tip for you but I just have some cheering that you’re almost blue trim free! Whooo!!
YoungHouseLove says
Aw, thanks Lisa! That is pretty exciting in our blue-trim riddled world!
xo
s
Lauren says
It already looks so much better! I really hope you share the details on how you do the filling / caulking. I painted some wooden doors last summer and this winter they contracted a bit and now I have cracks in them. I’m curious to see how you guys fill in these cracks.
YoungHouseLove says
We’ll try to snap some photos of that process for you, Lauren!
xo
s
Amanda {NoDakNest} says
It looks like your windows slide up to open. Do the two panes overlap so there will be a blue strip showing when you do open the windows?
Amanda {NoDakNest} says
nevermind ;)
Alison says
I just LOVE what whitifying (is that a word?) trim does for a room! I totally feel your pain – we are also in the process of painting the ugly orangey wood trim on our first floor (used our sprayer to do the 2nd floor!) and we decided to do it all by hand – mostly due to the fact that half the rooms have carpet, and I have NO idea how we would spray with carpet in the way.
One thing we always do though is to caulk after we’ve applied two coats of primer. That way when we’re ready to apply the final paint coats, everything’s all nice and sealed up :)
Anyway, love the transformation – looking forward to seeing the color you choose and all the rest!
YoungHouseLove says
Smart! We like to do that too when we can too!
xo
s
Heather W says
Looks great and so much better white! Your post said this is the last room with blue trim but doesn’t your dining room still have the blue trim too? Just curious..
YoungHouseLove says
Sorry for the confusion! The dining room is the last room with blue trim (that last sentence is referring to that room, not the office). Hope it helps!
xo
s
Shannon says
What about ‘press and seal’ – have you seen that stuff? basically like saran wrap but has a little stickiness to it…..might be a pain to cut all to size but I bet it would do the trick!
YoungHouseLove says
Thanks Shannon!
xo
s
Jill Stigs says
Did I miss the dining room trim/built ins being done? I thought they were still blue as well?
YoungHouseLove says
Oh yes, they’re still blue. See them in the third picture of this post? We mentioned that the dining room is the last blue-trimmed room at the bottom of this post, so we’re hoping to glean some wisdom from other spray-experts before we bounce over there and give it a go.
xo
s
Sandy says
Congrats! Awesome that you only have one more room left with the blue trim. You guys have been rocking it! And, the room looks so much better now with the white trim.
I am with you on trying to decide which one is the great evil, prep and clean-up or time spent painting. Do you think it really would have only taken 4 hours for one coat of trim, though? All that ladder moving would have been crazy!
Can’t wait to see what you decide on for color in there!
YoungHouseLove says
That’s true! It definitely could have been longer than 4 hours, and dragging around a ladder would have bit the big one. I think it’s more that the little curveballs of spraying feel like kinks (needing to sand out drips, having to spend half a day scraping the windows) so the process feels less smooth than the tried and true by-hand approach. But we’re hoping to get better and learn some tricks as we go!
xo
s
Sarah says
We live in the area and our mid-century rancher had blue trim too. Such an odd design choice, but I guess it was popular way back when! :-)
Sarah says
You guys are sooo brave!! I have a hvlp sprayer that hooks up to our air compressor…but I’ve never been brave enough to paint anything inside the house! Although I have to say besides the clean up I agree spraying is waaaay faster…we too have been painting all our honey oak (yack) trim to white but we have been brushing it all…hats off to you guys! It almost makes me want to paint quarantine a room just to see if I can!!! Keep up the good work! Ps.I am anxiously awaiting the post on concrete kitchen counters!!!! :D
YoungHouseLove says
We got the Ardex! Wahoo! Now we just have to finish up a few other things (want to get the office a little further, finish the nursery, and then I think we’ll bounce back into the kitchen again). Since that room gets a ton of everyday use, it’s nice to have it back after painting and staining the cabinets, so we’re nervous to lose it again while we do counters…
xo
s
andrea says
I too am waiting for the concrete counters! hubby is desperate to try concrete on our bathroom vanity, but I’m super nervous. when I saw that you guys were trying this in your kitchen, I convinced him to wait till yours was done so we could benefit from your expertise :)