“It’s like a cable knit sweater on the wall!” That was my description after we installed the marble backsplash tile on the back wall of the laundry room. And under-cabinet sweaters are something I can get behind. It seems like just last week we were installing laundry room floor tile (oh yeah, because we were), but this time around we got to break out the tile we bought a while back for the wall behind our washer and dryer.
Here’s a shot from the future, with the laundry room more completed, so you can see how it all came together in the end:
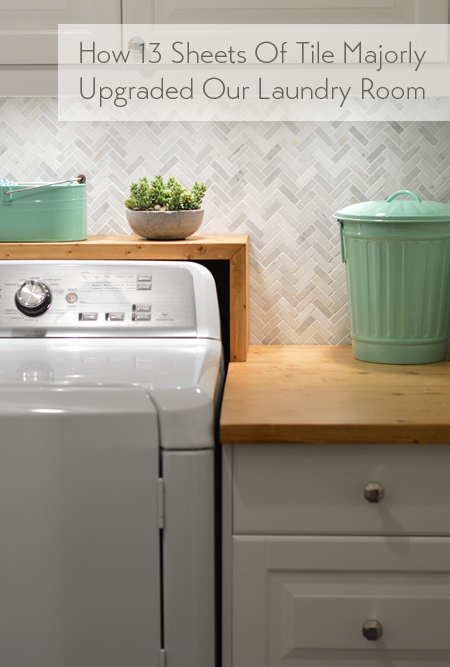
Exciting, right? Ok, we’re back to the present again. Suddenly the room feels a lot more upgraded than the blank box that we started with, and it only took 13 sheets of tile to do it.
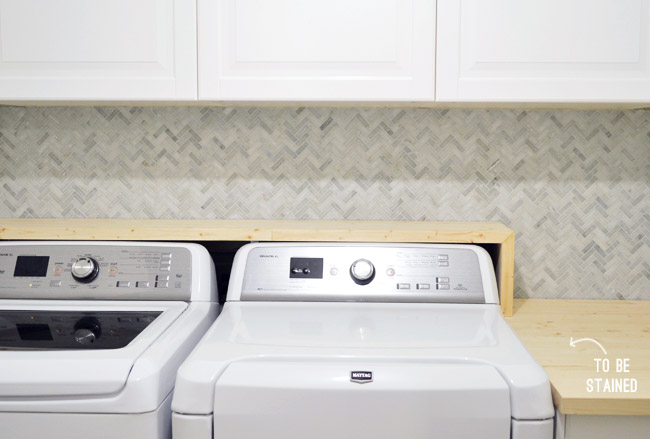
Try to ignore the unfinished shelf /counter since it’s half done (still needs to be stained/sealed/installed, so we’ll tackle that later this week). The important things to note about the shelf is that it will rest on some L-brackets and be completely removable, so we will still have easy access behind the appliances (we can even reach into that triangle between them while the shelf’s in place to shut off the water in an emergency). But thanks to that new shelf, no random socks will fall back behind the washer & dryer anymore – plus it’ll add some nice warmth & texture to the room.
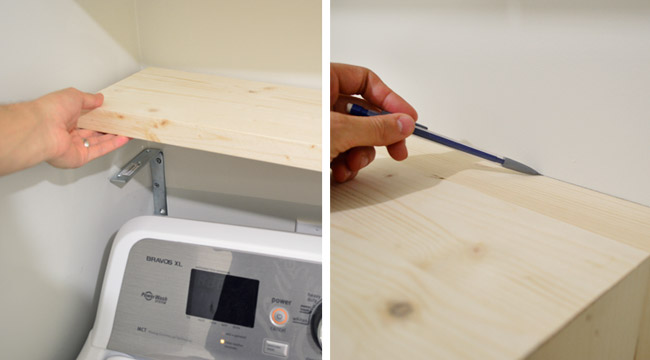
The only reason we constructed the shelf/counter before tiling that area is so we could mark a line to indicate how far down we needed to tile (and make sure we didn’t tile where those brackets would go, since hanging them first and tiling around them would be a lot easier).
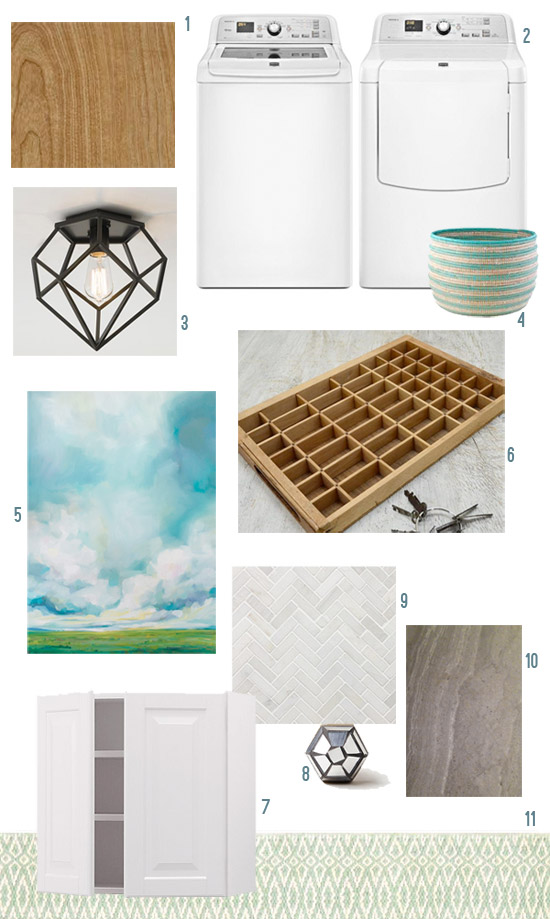
We’ll be staining the wood slightly darker, maybe somewhere in the vicinity of #1 in the mood board below (you can also see the wall tile down there as #9, which is the Hampton Carrera marble from The Tile Shop). Note: all sources from this mood board are in this post.
Two things were new about this tile job for us. We were taking a new type of tile for a spin (we made our own larger herringbone pattern out of marble subway tile from Home Depot on our old fireplace, but this tinier marble herringbone came in mosaic sheets, which we’d never used in combination with marble before – just on our ceramic penny tile). We were also using mastic for the first time, which would allow us to tile right over the painted drywall (we did sand it to get it a bit grittier first, though).
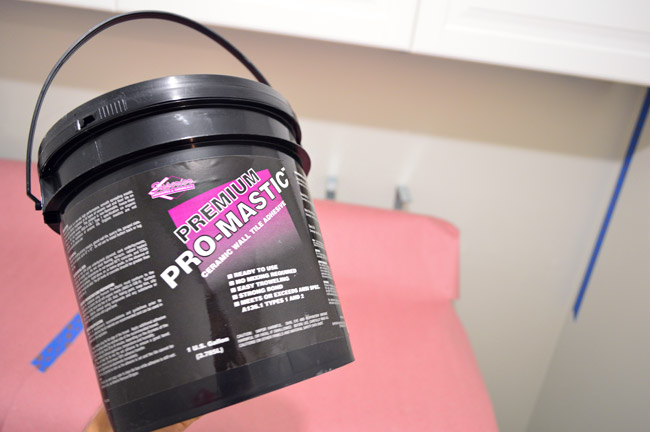
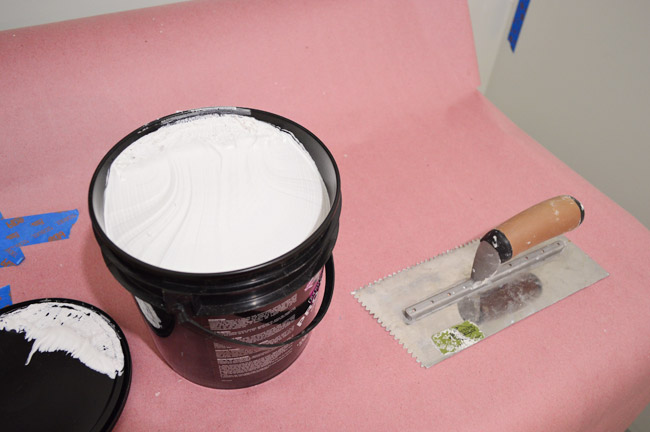
The mastic (from The Tile Shop) comes premixed and is sort of the consistency of spackle or drywall mud, but the process ended up being pretty similar to applying thinset, like we used on the floor. Although for the combination of mastic + this smaller mosaic tile, we used a smaller 3/16″ v-notch trowel to apply it.
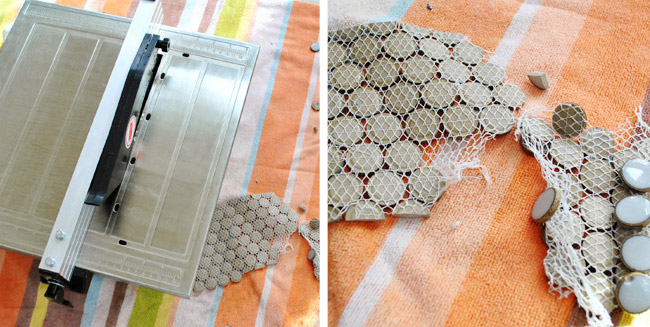
One thing that had us a little nervous about this project was cutting the tile without ruining too many pieces since it’s on back-order. Last time we used a mosaic sheet was the ceramic penny tile in our kitchen, and it took some trial and error to figure out how to make clean cuts (spoiler: the wet saw made a mess of the mesh, so tile nippers ended up doing the trick).
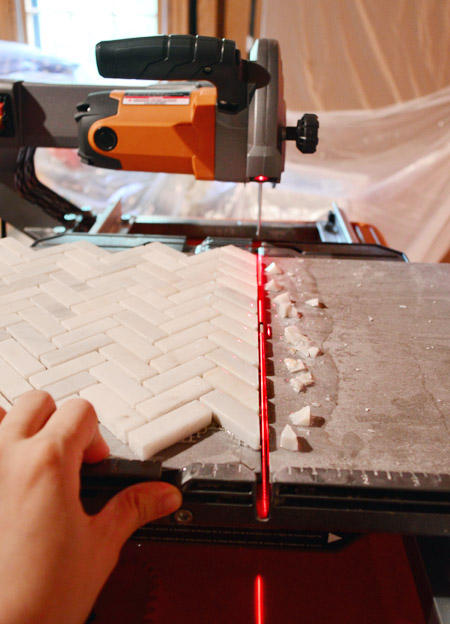
But some tips that we read online about marble mosaics had us convinced that the wet saw was the way to go this time. And it actually worked WONDERFULLY (did you hear our sighs of relief through the computer?). One big help was putting two scrap tiles (we hear you can use wood too) on either side of the blade so the mosaic sheet has a flat place to rest as it goes through and is cut.
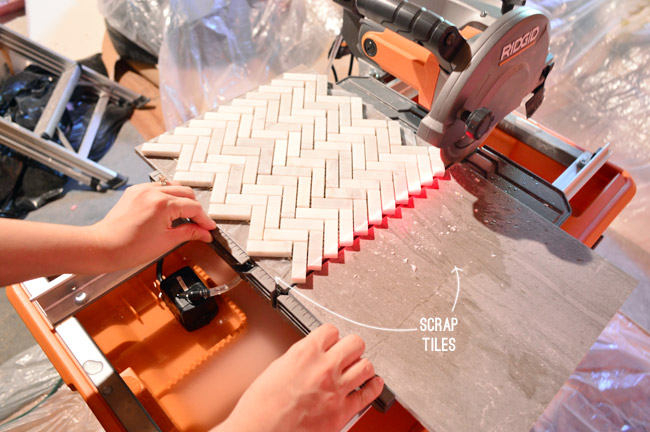
We were mostly just cutting the top off of a few tiles (so they’d sit flush against side walls or the underside of the cabinets), so we worried the blade would just push the little corners out of the way. But as long as we didn’t push too fast (and made sure there was sufficient water on the blade) it cut everything really well. Also, Sherry now wants to take the tile saw out to dinner. We have ourselves a love triangle.
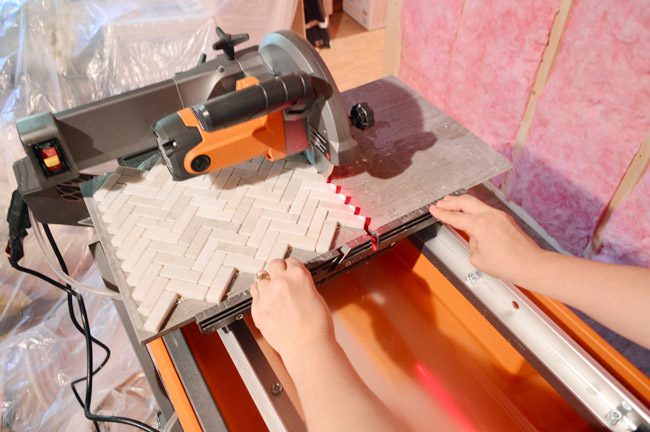
I’m pretty certain we wouldn’t have had the same luck with my old wet saw, since the rolling tray on our new saw helped to make this process really smooth (the laser line really helped us keep our cuts straight along the angled tiles too).
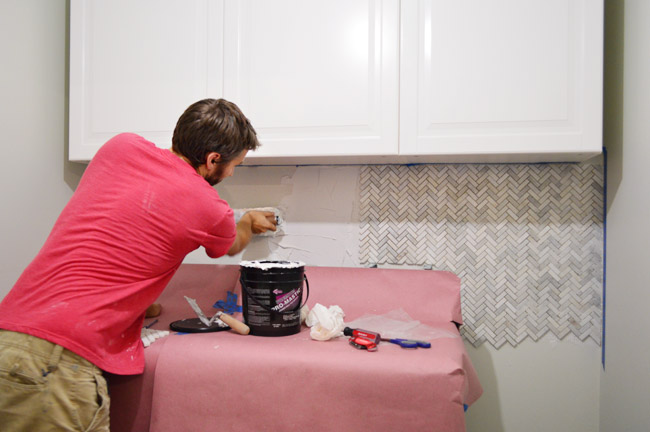
This is the only shot I got of applying the mastic, so don’t mind the skip ahead to being halfway done. Mastic does set faster than thinset (in our experience) so we only spread enough for two sheets at a time.
Once I got the mastic spread with the flat side of the trowel and then scraped with the v-notched side, Sherry took on the task of applying each sheet of tile and positioning it so it nested in without a seam. The instructions said to “twist” the tile slightly to make a good bond. Making crazy gnarled looking fingers is completely optional.
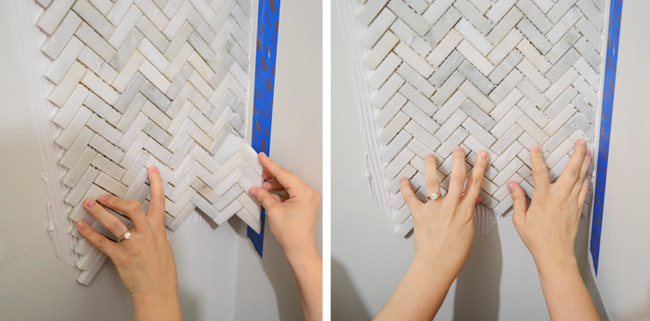
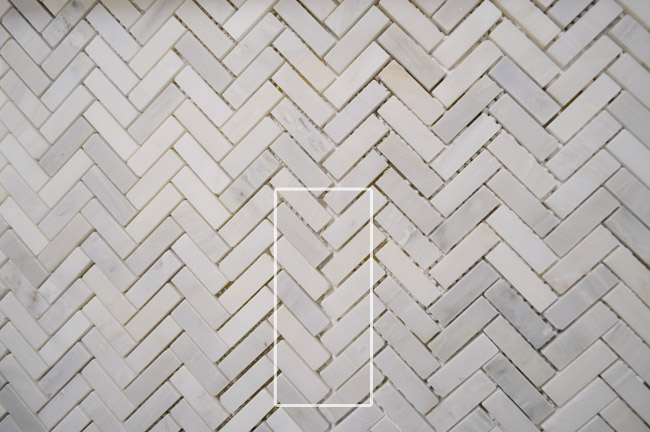
Much like laying sheets of penny tile, there was a careful eye needed (thank goodness I have Sherry) to make sure the pattern lined up between sheets. Some of the spacing on the sheets themselves wasn’t flawless, and sometimes if you stepped back you could see an obvious seam, so you had to sort of maneuver things to get them to fit better. Below is an example of an obvious vertical seam forming (see how that vertical zig-zag seems a little further apart than the rest?). To eliminate those, Sherry slowly smooshed the sheets together, or pushed them slightly higher or lower to bridge those gaps so they matched the rest.
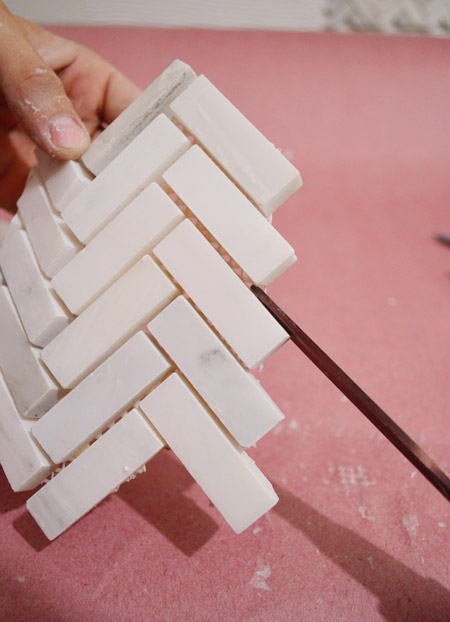
One thing that helped was to snip out some of the mesh backing that hung over the side that would nest better with the already set tile (we found that sometimes it got in the way of positioning the edge tiles close enough, so cutting it out made everything go more smoothly).
The other thing we did was that we staggered our sheets to further disguise any horizontal seams. Since we only needed 1.5 sheets (vertically) for the areas above the appliances (and 2.5 for the two vertical rows above the counter) it made it easy to start one vertical row with a full sheet at the top and a half-sheet on the bottom, and then start the next vertical row with the leftover half sheet at the top and a full sheet on the bottom.
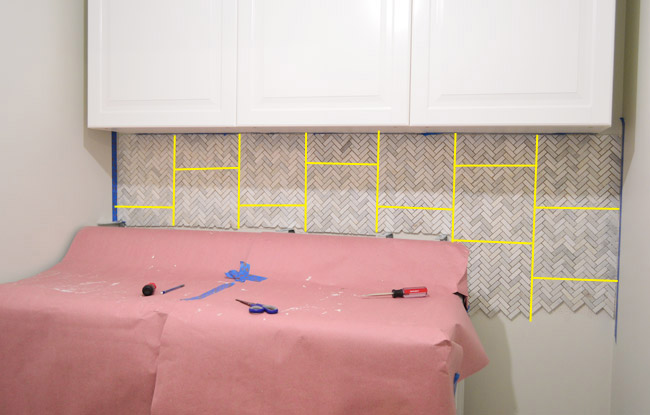
If all of the horizontal seams lined up across the entire back of the splash (for example, if all the top pieces were full tile sheets), it could create an obvious seam across the entire back wall, and we wanted to avoid that.
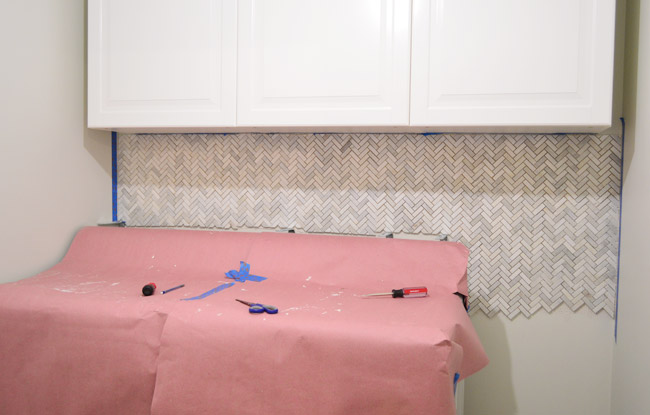
We managed to get it hung in about two hours on Saturday afternoon while Clara napped and Teddy kept himself mostly occupied thanks to a playmat-bumbo rotation (there may have been a nursing break in there). The mastic – which dries a lot faster than Thinset – was probably dry enough to grout on Saturday night, but we waited until yesterday morning just to be safe. Since the spaces between the tiles are larger than an eight of an inch, we used sanded grout (in the Standard White color from The Tile Shop).
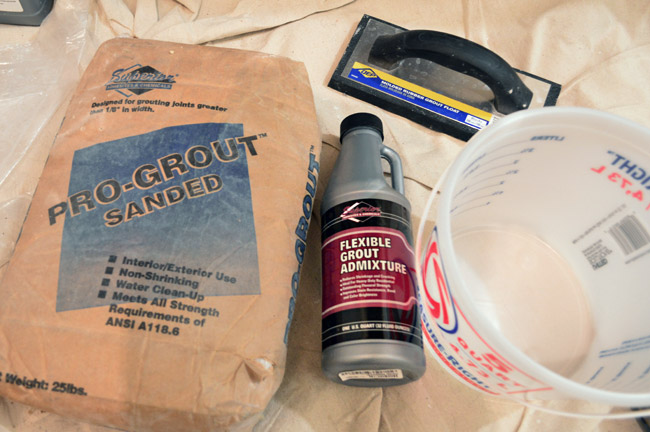
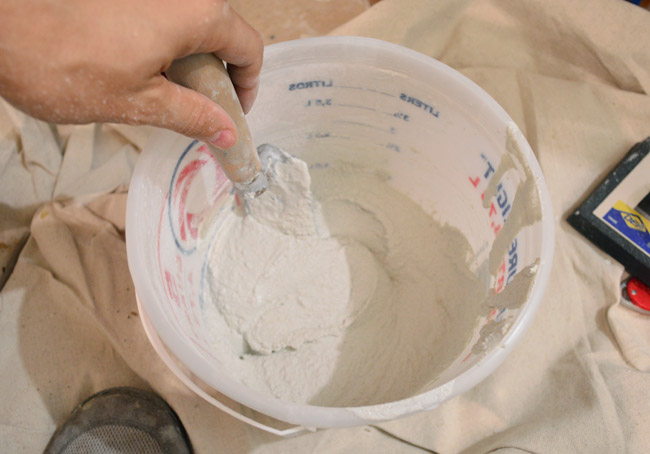
Even though this was a smaller area than the floor, it would require much more grout because of all of the gaps between the tiles. I mixed up enough to do about half of the wall, since I knew it would take more effort than the floor (so many cracks to smoosh it into!) and I didn’t want it drying out on me.
I also laid a scrap piece of wood where the shelf would sit to help catch drips, that way I didn’t grout half of the floor behind the washer and dryer while I was at it.
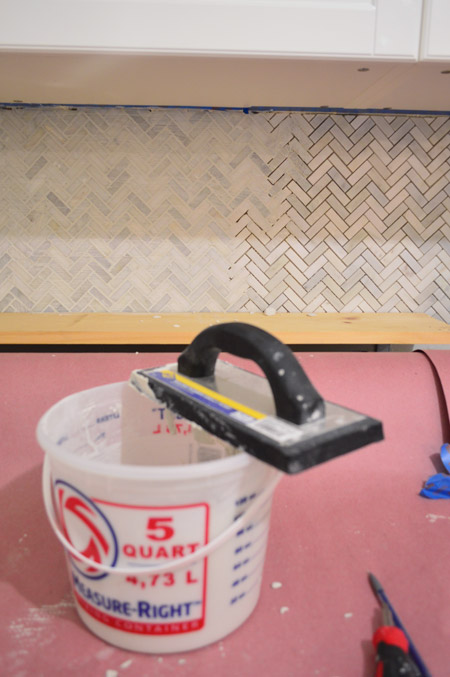
Once I had fully applied the whole bucket of grout (which covered about half of the wall) I wiped it down with a lightly damp sponge to smooth it out and remove some of the excess.
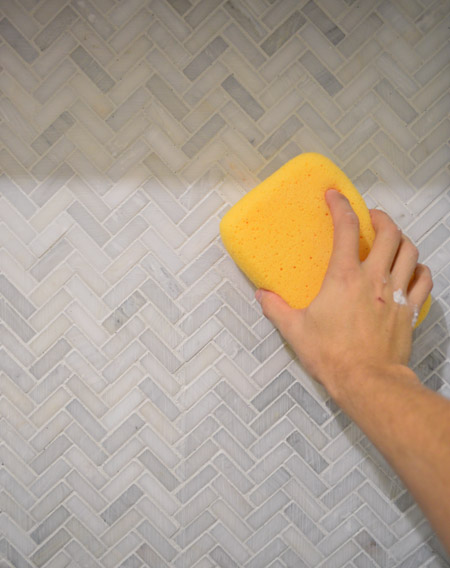
By now we know to expect some haze to appear as the grout start to dry. It used to freak us out (oh no, we didn’t sponge well enough!) but now we know it’s just an inevitable part of tiling (as least for us) and there are a few different ways to get it off.
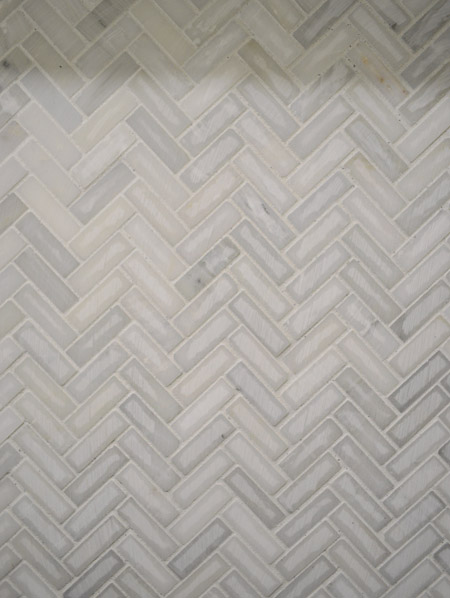
In the case of polished marble, a chemical (like a haze remover) isn’t recommended. So it was up to another weapon I like to call elbow grease. I used a microfiber cloth to buff some of the drying haze off the tile. It wasn’t a fast process, but it made a big difference.
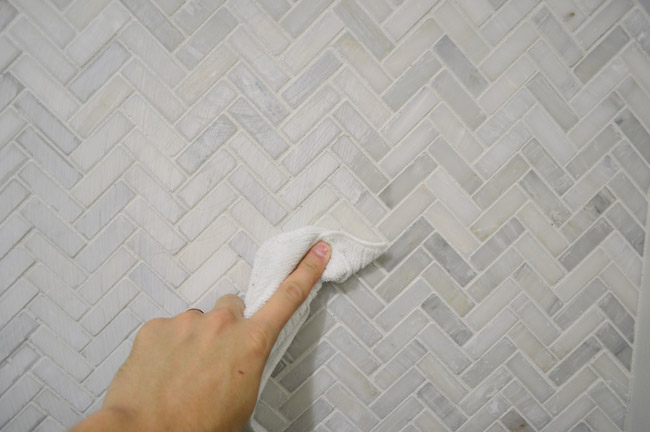
Here it is after two buffing passes, although Sherry wants to do one more, just to get it as gleamy as possible (polished marble can look dull unless you get every trace of haze off of it). I realize the edges looked a little ragged on the bottom, but…
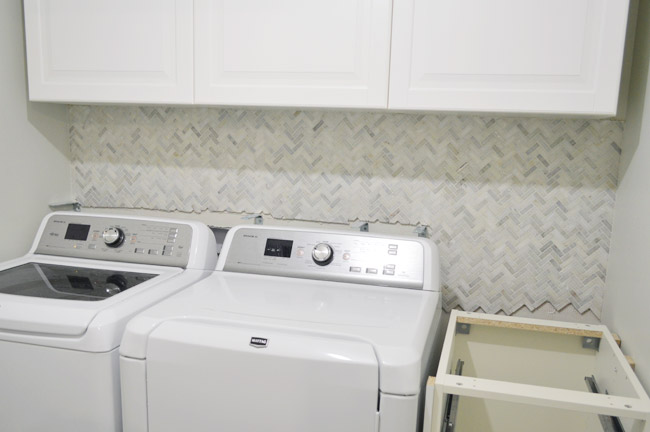
… that’s the beauty of the shelf and counter that will be going over it, once they’re all stained and sealed.
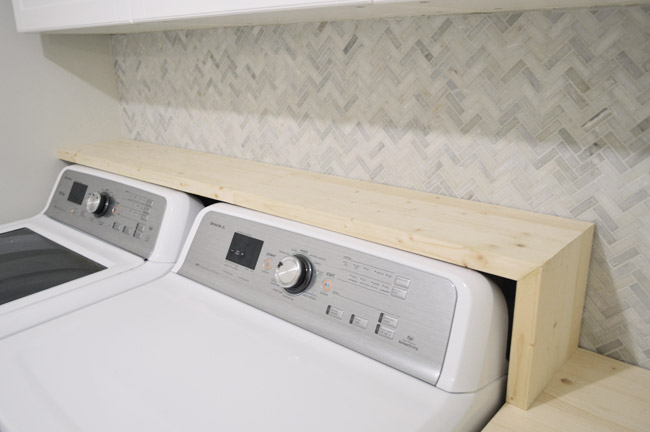
Update: Some questions came in about what happens if we get a new washer/dryer someday and need a new shelf placement and more tile. Width-wise, a new washer/dryer could slip right in since the spacing is standard (that side cabinet & counter could stay) but the height may vary slightly, so we might have to remake the little shelf on top (it’s removable so it wouldn’t be too hard). We couldn’t tile much lower since the brackets were there, but we did save extra tile & grout, so we can add that later if needed.
Speaking of staining the shelf & counter, we’ve started doing some tests on some scrap pieces to see what stain/sealer combo we want to use.
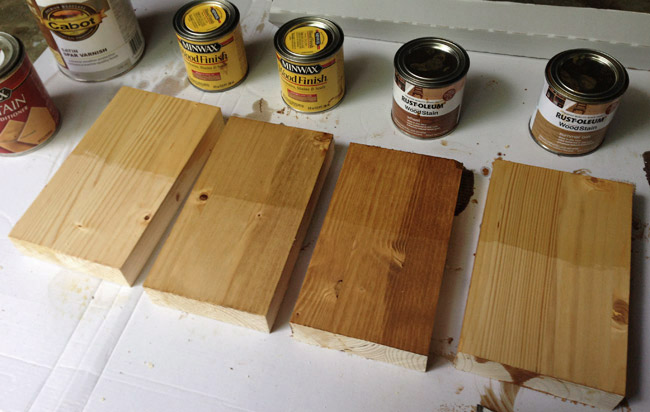
We hope to be back with the finished shelf & counter in a few days (just realized we owe you details on installing the washer/dryer and hooking up the overflow drain, so that’ll be in the next post too). Until then, here’s an updated to-do list:
Move washer & dryer and remove cabinetry(more on that here)Demo cased opening, side wall, back wall, part of the floor and the attic stepFrame new walls & doorways
Move laundry plumbing hook-ups & drains
Move laundry electrical plus other outlets/lights(more on those last four bullets here)
Move dryer vent & HVAC duct(more on that here)Hang drywall(more on that here)Add insulation(more on that here)Mud, tape, and sand all the drywall seams in the new room(more on that here)
Prime & paint laundry room and hallway walls(more on that here)
Tile & grout new laundry floor(more on that here)Hang upper cabinets and install lower cabinetReinstall washer & dryer(more on those two bullets here)- Stain, seal, and install the wood counter & shelf
- Rehang the laundry door & add our new glass door to the future bunk-room
- Add cabinet fillers, crown molding, baseboard, & door casings
- Install cabinet hardware & soft-close drawer upgrades
- Add a ceiling light fixture & under cabinet lighting
- Hang art, ironing board, and bring in other laundry room items (drying rack, trash can, etc)
- Finishing touches and repairs (fix the drywall in the garage, add the step to the attic, etc)
We still have seven bullets to check off, but having a working washer & dryer again definitely feels like we’re in the home stretch. Also, there’s a fair chance that Sherry is petting the tile as I type this. An intervention might be necessary.

LeanneS says
Love it! Will you be posting about where you got your butcher block for the counters? I’m wanting them for my laundry room but with a white washed look!
YoungHouseLove says
Yes, we’ll share all those counter/shelf details in our next post :)
xo
s
Anele @ Success Along the Weigh says
Looks so purty!! It’s coming together. You’re making me want to tackle a tile surround for our fireplace.
Erica says
Wow! This is looking great! I love that you make these projects look doable, even for a novice DIYer. Thank you for the details. And I am loving that shelf, easy and brilliant upgrade. :)
Courtney says
Wowee! its beautiful!! come do my laundry room next please! ;) this looks like a satisfying project, every step is making a huge difference!
Kathy G says
AGREE! This is really turning out beautiful! And such a great job on the mosaic tile, those seams can be crazy hard – I tried and couldn’t see any at all!
Question – was there a reason you decide to leave the tile at the bottom like that and not square it off? It looks a little “unfinished” to me?
YoungHouseLove says
It’s all covered by the counter/shelf, so it doesn’t bother us :)
xo
s
Isabel says
I would pet that tile too, it is gorgeous! Great progress!
Olivia says
I love love love how the laundry room is turning out.
This might be one of my favorite projects you’ve done so far. And that’s saying a lot.
YoungHouseLove says
Thanks so much Olivia!
xo
s
Silke says
I ‘secretly’ think that, since there are no bigger ‘overview’ shots of the whole room, you guys have secretly already been doing other stuff to it. Like maybe install baseboards?! Ammiright? Please let me be right!
Loving this room!
YoungHouseLove says
I wish! It’s just a tight room, and this post was all about that backsplash. We’ll have to share a wide shot later in the week. We have started attaching the side pieces to that side cabinet and adhering that to the wall so we can attach the counter though! It’s a start ;)
xo
s
Tory C says
You guys are the coolest cats on the block! This looks fantastic!
YoungHouseLove says
Ha, the coolest cats = the best thing ever. We need to bring that back like thebomb.com. Or is it too soon for that one?
xo
s
Margaret says
I was in Marshalls yesterday and heard a woman use thebomb.com. Thought of you, Sherry! :)
YoungHouseLove says
Bringin’ it back!
xo
s
Katie @ Little House of Four says
Love, love, love your tile choice and your whole idea for the room. I can’t wait to see it all done! Great job!
Emily, Our house now a home says
I am in love with that tile. I am currently putting subway tile with gray grout in my master bathroom… Well taking a break from tiling. We are babies and always use the premixed grout. Maybe we will out on big boy pants and mix it ourselves. Well, back to work gettingy tile’s done!
Samantha says
It’s beautiful! I think you guys convinced me to do something similar in our kitchen! :) also, I’m so impressed that your 4yo still naps! So jealous! What’s your secret?
YoungHouseLove says
I wish there was a secret! She just seems to still like them (she’ll say she’s tired and we’ll say “ok, I’ll tuck you in”). Sometimes she’ll say “I’ll just rest instead of taking a nap” and ten seconds later she’s out. Ha! Meanwhile her brother is in a phase where he’ll only nap while being held, but I can’t resist the cuddles.
xo
s
Emily, Our house now a home says
I am in love with that tile. I am currently putting subway tile with gray grout in my master bathroom… Well taking a break from tiling. We are babies and always use the premixed grout. Maybe we will put on our big boy pants and mix it ourselves in the future. Well, back to work getting my tile’s done!
Gabby {Cookie Cutter Unique} says
I’m starting to get a little green over this laundry room. Laundry and I have a love-hate relationship, as in, I love to hate it. If you need an excuse to spend more time in your new laundry room, call me.
YoungHouseLove says
Ha! Will do! One suggestion would be to unplug your machines for about 4 weeks. You’ll be ready to do cartwheels when they’re plugged in again ;)
xo
s
Patty says
Love it!! Can you guys come redo my laundry room? :-)
KatK says
Love that tile! I can’t wait to see the room finished. I’m wondering what will happen if — heaven forbid!– you have to get a new washer and dryer? Everything seems exactly set to the dimensions of these…. Are all washer/dryers the exact same???
YoungHouseLove says
Good question! Width-wise the space is pretty standard, so a new washer/dryer could slip right in and that side cabinet and counter could stay, but the height might vary ever so slightly, so we might have to remake the little shelf on top (that’s removable so it wouldn’t be too hard). We couldn’t tile much lower since the brackets were there, but we saved some extra tile and have extra grout so we could add that if we needed to down the line. Hope these don’t die on us for a decade or so though! Knocking on wood as I type this!
xo
s
Megan C. says
Love the tile! So much. Have you guys considered maybe a grayish stain? Like driftwood. A little beachy and distressed looking.
YoungHouseLove says
We definitely debated that, but worried it would make the room too gray/cold for us (the floor is gray and the appliances and cabinets are white, so we wanted to warm things up). We really liked how the warm baskets and wood tones looked balanced in the mood board we made, so we’re aiming for that :)
xo
s
Megan says
I’d love to hear more about the differences between thinset and mastic. You mention that mastic dries more quickly, but what made you opt to use something different for this project? Is mastic better than thinset for certain applications, etc.? Breaking it down could be a very helpful post for aspiring DIYers!
YoungHouseLove says
We got the mastic this time at the recommendation of the guy at The Tile Shop. He said it’s often used in non-wet applications (like a kitchen or laundry backsplash). You don’t have to add cement board behind it and it dries faster and comes pre-mixed, so those are three selling points, and it did seem to go on nicely and hold well right away. It’s not right for wet locations though, so for things like a bathroom floor or shower tile, thinset & cement board is the way to go!
xo
s
Emily says
Are you at all worried that when your new washer/dryer wear out that the next set won’t be as tall? And you’ll have a bare space of the wall showing between the appliances and the shelf? I imagine you’ll come up with a different solution, perhaps a box shelf instead, but I’m the kind of crazy that would spend the next 10 years worried about that and would have to go back and tile down the wall a little farther.
And if you are taking votes on the shelf, I think it should be a color similar to your hallway flooring. I like the darkest one in the photo you provided.
YoungHouseLove says
Thanks Emily! We couldn’t tile much lower since the brackets were there, but we saved some extra tile and have extra grout so we could add that if we needed to down the line :)
xo
s
EJ says
The tile is gorgeous! Did you consider tiling lower behind the shelf? What happens in the future if newer units don’t have the raised panel and instead are flush across the top?
YoungHouseLove says
We couldn’t tile much lower since the brackets were there, but we saved some extra tile and have extra grout so we could add that if we needed to down the line :)
xo
s
Leisa says
Hey guys, gorgeous tile!
Just wanted to let you know I keep getting a Yahoo ads pop up for poker. And every so often it takes me away from the page and to the App Store (even if I don’t press anything). I’m viewing on safari on my iPhone.
Hope it helps.
YoungHouseLove says
So sorry Leisa! We hate those, and will get them blocked asap!
xo
s
Leisa says
No worries, that constant battle must drive you nuts!
Nicole says
I am loving the progress on your laundry room! The herringbone tile looks great. I cannot wait to see the finished room. I think my favorite stain is the one to the far left.
Reenie says
Love it ~ so fancy… you may want to have a picnic on the floor to just stare at it and take it all in. Great job!! :)
YoungHouseLove says
I keep trying to convince Clara to play in there with me. Ha!
xo
s
Kathy says
I do believe y’all are going to have the prettiest little laundry room ever :)
Monique says
I love where the laundry room is headed! Just a little piece of advice that my parents and 2 friends of ours have learned the hard way… (especially applicable to upstairs laundry rooms), try to get into the habit of turning the water off each and every time you’re done the laundry. Yea it seems inconvenient, but a leak in the night, leading to a flood in the night is so frustrating and devastating. Especially after the work you’ve put in! Luckily my parents leak only caused a huge build up of water in an empty washer (front loader) and they caught it fast enough (the hot water wouldn’t stop slowly flowing into the lines), but our friends weren’t so lucky and the water seeped into the floor and caused damage downstairs as well (direct leak in the pipe from wall to washer). It’s an annoying thing to do but once you’re in the habit it might save you down the road!
YoungHouseLove says
Thanks Monique! I was so glad to realize that we can reach through that little triangle to flick those off. I pictured some scary leak with water everywhere and us having to stop and remove the whole shelf while things got worse, so it’s a lot easier to access them this way :)
xo
s
Jan says
I was thinking the same thing. Our valves aren’t two separate knobs, but a lever (looks a little like the thing Dr Frankenstein flips to electrify his monster-making process). One hand, one motion, no problem. And it’s not just the leaks that can be an issue–water pressure from things like the dishwasher can cause “water hammer,” I’m told, that can damage laundry valves if they’re open. But my dishwasher is 20 feet from my washer, on the same floor. Might not be an issue when things are on different floors.
Love the tile, by the way. That room is turning out so awesome.
Mammaw says
Love, love, love your choice of tile. Your laundry room turned out beautiful! Great job, you two!!
Treana B @ House of Bennetts says
I am not sure why this post made me think of Teddy’s bathroom habits, but just wondering if you guys have made the switch to the cloth diapers for him yet.
You guys are the cat’s meow at tiling too. Our first tiling adventure was probably a touch ambitious, but hey! Trial and error… so about those diapers…
YoungHouseLove says
Aw thanks Treana! We made the switch around 6 weeks ago, but then went back to disposables when we lost our washer/dryer to this reno. Now that they’re back in action, it’s so nice to see cloth buns again!
xo
s
Amanda says
Love this! Can’t wait to see the final product
Kelly says
When I clicked through to this post from your Facebook page, the magical Facebook metric offered the following in the “related article” section: http://mashable.com/2014/02/28/weird-knit-gifts/
So many weird knit items, so little time.
YoungHouseLove says
So funny!
xo
s
taria says
Looks really beautiful. I would suggest buying some extra tile so that when your machines are at the end of their life you can accommodate different shaped ones, if need be. Your home is wonderful.
YoungHouseLove says
Thanks Taria! We saved some extra tile just for that reason (we bought two boxes and only ended up using 13 sheets thanks to really careful cuts!).
xo
s
Sarah @ Sarah's Daybook says
Yahoo! It is looking better by the second! I love the look of all of those stains. Can’t wait to see what you chose!
Are you still liking the top-loading washer?
Sarah
YoungHouseLove says
Yes, we’re very happy with it so far!
xo
s
Alison says
I have to admit that, that uneven tile although unseen would bug the heck out of me. I would have cut it all of even and installed a piece of trim at the bottom.
Carla says
I’m not a fan of non-wood cabinets, but I do love how this room is coming together. Does the light fixture have a sharp downward point in the middle? I can’t quite tell from the photo. Not recommended in any space, especially one you will be standing under.
Just some fun shui perspective for you. :o)
The shelf is such a clever idea. It looks like it’s resting on top of the appliances or doesn’t have any space under it. That’s because it’s not attached to the wall yet?
I’m loving the natural wood element to warm up the grays and whites.
Are there any affordable solutions for tile cutters that aren’t expensive saws like what you have? We would like to muster the courage to tile our kitchen backsplash, but we don’t have a saw.
Really nice laundry room!
YoungHouseLove says
Thanks Carla! There are manual tools like tile nippers and scoring tools that can work (depending on the tile) so I would try those. They’re really cost effective! And our shelf won’t rest on the appliances, it’ll be about a centimeter higher thanks to resting on the brackets.
xo
s
Julia says
If you buy your tile at Lowes they will cut it for you for free!
Carla says
Oh, I meant to also comment on the tile.
The grout really softens up the busy pattern and edges throughout the tile. I’ll have to remember that when looking at sheets of tile with mesh backing. The before and after is pretty remarkable.
YoungHouseLove says
Yes, that’s one reason I love shopping for tile in person when I can (it’s usually displayed after it has been grouted, so you see the softer finished look instead of the more intense look of the sheet without grout).
xo
s
Laura says
Most important question, how do you have time to do these projects with the babes? I tried to hang curtain rods with a 1.5 year old and it was a disaster. Nap and bed time only? You guys have it figured out! :)
YoungHouseLove says
I wish we had it all figured out! The truth is that some days I can barely manage to feed the kids and keep them semi-clean, let alone wash the dishes or so laundry (I’m tying this on my iPhone as Teddy sleeps on my chest) but it really helps to aim/plan for a certain time (ex: when Clara naps on Saturday it’ll be Teddy’s awake time and I’ll hold him and feed him beforehand so he’s ready for some bumbo/playmat time and we’ll do as much as we can until he’s over it or wants another feeding). Four hands are a lot faster than two! Of course half the time we plan something and it goes totally haywire (like if Teddy only wants to be held when we assume he’ll want to do something else) so we just try to be flexible, laugh when we can, and soak up these baby snuggles.
xo
s
Sarah says
The way they’ve got it figured out is by making this their full time jobs. There’s two of them, so that’s 80 hours a week they should be spending on DIY/blog things.
YoungHouseLove says
I WISH we were logging 80 hours a week of DIY/blog stuff while being home with a 4 year old and a 4 month old (they’re a full time job in themselves). We certainly acknowledge that the choice to forgo hiring childcare help means our job description is more like part time parent/blogger/author, and has led to fewer hits & income, but I’ve never been a more hands on mom, and I’m so grateful that I didn’t miss out on those moments in the name of one more project or one more post! More on that here :)
xo
s
Kim says
Your timing is impeccable! I’ve chosen a very similar tile to use for my kitchen back splash and I’ve never tiled before (EVER!) I only hope that mine looks as great as yours when it’s all said and done. (I suspect, though, it will take me a A LOT longer!) I don’t know why, but mastic scares me. I was thinking about using a tile setting mat which I imagine to be similar what you used upstairs for the hardwood… Do you have any experience with this?
YoungHouseLove says
We’ve never used one ourselves but have heard good things. Anyone have any tips for Kim?
xo
s
Mila from Napa says
Yes! We used it in our last kitchen and loved it! The guy at Home Depot recommended it to us when we went to the DIY tiling class they offer. We are totally planning on using it again.
Mary Ann says
Kim I just did my kitchen backsplash with a mat , Musselbound bought at Lowes. The stuff is fantastic! I installed 12×12 inch sheets of small subway tiles and it worked beautifully. Since there is no waiting for mastic or thin set to dry you can grout immediately . Whole project done in a day
My brother is a professional contractor and he used the mats as a trial on the walls in a shower he was redoing for his daughter over two years ago. Still going strong! If there are any tiling projects in my future would never consider using anything else.
Mila from Napa says
Looks so good!!! I was so excited about starting a backsplash project this weekend…aaaaaand then an earthquake hit :-/ it was a no-go. Gahhh!
YoungHouseLove says
Oh no! So glad you’re ok!
xo
s
kristin @ W [H] A T C H says
that tile is gorgeous! great shelving idea.
Jamie G says
I absolutely LOVE the tiles, herringbone and chevron and oh so chic!
xo
Jamie @ SnapGinger
Karen F says
Looks great! Love the tile you chose. Sorry if you already answered this, but why did you install the cabinets and appliances before tiling? Wouldn’t it have been easier to tile without all those things in the way? I’m sure you had a reason, so I’m just curious!
YoungHouseLove says
Backsplash tile is almost always done after the upper and lower cabinets are in (it helps you to set those first so you know exactly where the tile should start and end). It also helps to keep things straight (we could run the tile along the underside of the cabinet as a guide).
xo
s
Kaija says
Looks great. Amazing how a small background area can make a big impact like that! Looks so upupgraded!
One question: When you hang those IKEA cabinets with the rail, doesn’t it leave them a bit off the wall (well that sounded weird)? My cabinets have maybe a half inch or so gap between the wall and the back of the cabinet.
Did you have this issue and if yes, how did you deal with that when tiling?
YoungHouseLove says
The bottom of the cabinet frame extends a little bit further back to account for that rail (in other words, it sticks out as much as the rail – making them sit flush/straight without any gap).
xo
s
Kaija says
I see, they’ve changed them! Mine (installed maybe 8 years ago)have a gap, and I’m not sure if that’s good or bad when tiling :)
YoungHouseLove says
I think it would be ok, maybe just tile a little bit into the gap if you can, so it looks like that whole wall is tiled and the cabinets were added on top of that?
xo
s
AMD says
Hi guys, looking good in there! I’m wondering what you mean in one paragraph when you say you haven’t worked with mosaic sheets in the past but then a few sentences later refer back to working with them for the penny tile? Maybe there is some difference you’re referring to between the marble on this project and the penny tile that I’m missing. Thanks!
YoungHouseLove says
So sorry, mastic isn’t a sheet, it’s the stuff you see John spreading on the wall. We have used mesh sheets of tile (penny and this one) but never used mastic to set tile instead of thinset :)
xo
s
AMD says
Thanks! I understood that about the mastic – I was going to scroll up and quote the parts I was talking about but it looks like you changed them already. Cheers!
YoungHouseLove says
Sorry, I’m an airhead! Totally didn’t understand your question, but someone else brought it up (with actual quotes) and I finally got it! Hope the new wording makes more sense :)
xo
s
kathy says
Did you consider tiling the wall before the appliances were hooked-up? It all seems so awkward to work around the w/d. Looking good!
YoungHouseLove says
Backsplash tile is almost always done after the upper and lower cabinets are in (it helps you to set those first so you know exactly where the tile should start and end). It also helps to keep things straight (we could run the tile along the underside of the cabinet as a guide).
xo
s
Lauren says
The wall looks great! I like the herringbone pattern. I’m surprised you used sanded grout though… That can definitely scratch polished marble!
Question: Why did you go for three cabinets as opposed to two with double doors (or four with single doors I suppose). Did they just not come in the size you needed? Because it appears you have a lot of excess space on either side of the cabinets that you could have extended into.
YoungHouseLove says
We experimented with four cabinets, two double doored cabinets, and three singled doored ones – either way we’d have space on the sides, so we thought 3 doors was less busy than 4 :)
xo
s
Jackie says
I’m liking the tile + shelf idea (and especially the herringbone) but I have to say I would have either tiled all the way down the wall or at least had the tile go straight across rather than having to potentially rejigger the shelf years from now. (Or worse, ending up with an odd tile-less gap if future machines are significantly smaller.) But then I am pretty big on what-if scenarios!
Samantha @ Fabulous Fabris says
I just love that tile! Everthing is coming together so nicely.
Darnetha | ChippaSunshine says
Looking good! I am currently doing our laundry room and love seeing what you come up with in your space. We have to plank the ceiling before we can put our cabinets.
Tamara @ Provident Home Design says
I love cable knit sweaters and I love the backsplash! Your laundry is going to be awesome!
Haley says
Looking good! I love how there is more color variation within the tile than in the inspiration picture.
Emily says
I’ve nominated you for a fun little blog award, since I’ve really enjoyed reading your all of your posts. They always get me laughing!
Here are the details: http://loveandthensome.com/2014/08/22/thanks-for-the-blog-award/
Leesha says
I love it! One questions I have is, what if you get something (like a stray sock) behind the washer and dryer? Looks like with a shelf over the top (which I love) it would be hard to get behind there to grab stuff. Just curious because I have loose things back there all the time! ha!
YoungHouseLove says
We actually added that shelf to keep things from falling back there! We can just lift it off (it’s removable so we can access stuff back there) but when it’s up it should play goalie so things don’t sneak back there as much.
xo
s