2, 4, 6, 8, Who Do We Appreciate? Planning!
And why do we appreciate it? Because we get burned when we don’t do it. At least we did on the frame arrangement we just hung above our sectional.
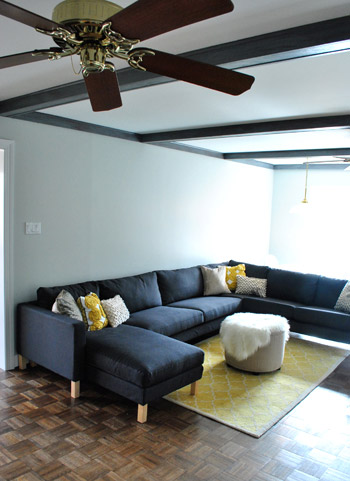
Here’s the story. We’ve always planned to take the big empty space above Karl and do a grid of large picture frames. We sort of envisioned it as a larger version of the frame grid that we hung above the couch in our old den…
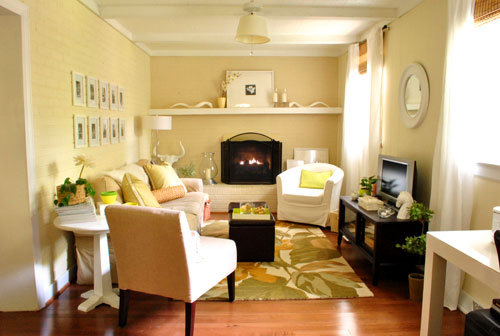
… but instead of 8 x 10″ frames we’d use oversized 20.5 x 20.5″ Ribba frames from Ikea for more impact (since we already own and love four of them – and they’re just $19 a pop).
After some rough math and holding up a couple of the Ribba frames that we already owned, Sherry and I determined that we wanted to do a grid of six frames (two rows of three) to fill the space in the middle of wall, allowing for some empty space on either side for two table lamps that would sit on the future console table that we’ll eventually build to go behind the sectional. Note: we moved the 5 x 8′ Pottery Barn rug into the guest room for my in-law’s stay, and it will eventually live there permanently, we just brought it back into the living room until we upgrade to a bigger rug, since we’re currently guest-less and Clara appreciates having a soft place to play.
Anyway, back to the frames. We went to Ikea, bought six new Ribba frames (they sometimes vary slightly in color, so we figured it would be safest not to mix and match old frames with new ones, and we have a ton of other spots for the four that we already own) and headed home to begin the whole hang-it-up process. When we got home with our six new Ribba frames from Ikea, I suggested that we tape up some paper to figure out how high we want them to hang and how much space to leave between them. After all, we both know these things are worth planning out. And luckily the paper that comes in the frame is almost perfectly sized to help you figure this out. So we started with two sheets to see how high to hang them.
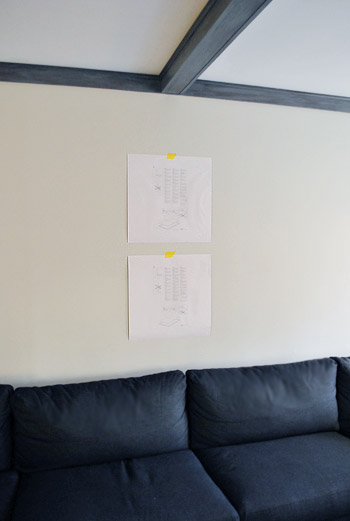
This is where things veered off course (thanks to me, I’ll admit). Sherry suggested that we tape up the other four sheets of paper to make sure we liked how all six looked together. Maybe I was just an eager beaver and wanted to get to drilling. Or maybe I decided we should blow it off because we had already accidentally thrown away one sheet of paper to complete the all-six arrangement. Whatever it was, I reassured Sherry that it would look just fine and we didn’t need to be all paranoid and hang the remaining three sheets to double-check everything. Famous last words.
She believed me (albeit hesitantly), so I started drilling. Insert happy testosterone filled sound effect here (there’s nothing like a little afternoon drilling). It wasn’t a fast process to measure, mark, and double check everything to make sure it was all lining up, so maybe an hour or so later I had five out of six frames hanging on the wall.
That’s when Sherry broke the news that the arrangement wasn’t big enough. We needed eight frames. As much as I hated to admit it (for more than one reason), she was right – the five frames looked too small on the wall (and adding the sixth wasn’t going to help). They floated awkwardly and just didn’t have the impact we wanted.
**I’d insert a picture here of giant Karl sitting awkwardly below those poorly placed frames but I was too pissed/disgruntled/ashamed to snap one.**
This was all my fault. Had I taken the time to tape up all of the sheets of paper we would’ve realized it before I put a single hole in the wall. I even would have taken a picture of the taped-up configuration to show you what a learning process taping them all up on the wall can be, and how grateful we were to have taken the time to complete that first to save a step. Duh, John. Grumble, grumble, grumble.
The next step was to take down the five already-hung frames with a big ol’ sour face and begin re-measuring everything so that eight frames would be centered above the sectional (and on that middle ceiling beam). Then came the not so fun process of not only removing the ten screws that were already in the wall (I was doing two per frame to be safe) but marking, drilling, and screwing in an additional sixteen. And since we already had two old Ribba frames that happened to match – finally, a lucky break – I was able to hang all eight frames in place without another four-hour-round-trip to Ikea, leaving us with this:
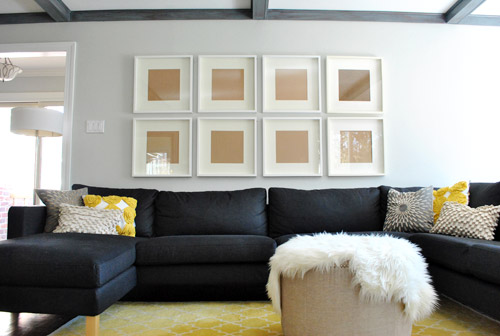
We definitely needed all eight frames. They should be just right when we add table lamps on either side of the arrangement after I build an über long console table.
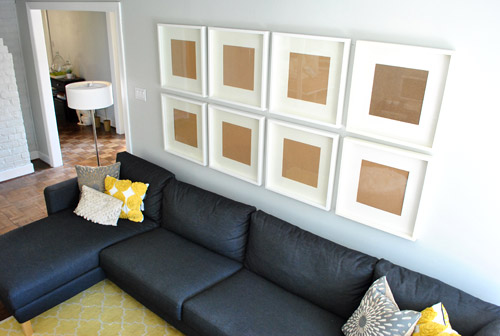
We’re still debating exactly what to put in them (maybe family photos? maybe something more graphic?) but we’re certainly glad to have the whole frame hanging part over with. Even if it involved a lesson learned the hard way. At least it was a mistake that only took time and energy (and a bit of humility) to fix. You know, as opposed to a big wad of cash. Oh and speaking of time and energy, there are still some holes and pencil marks from the first attempt that need patching. Sigh.
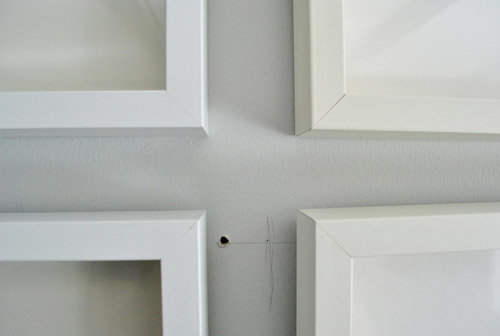
Wait, who am I kidding. That’s Sherry’s department. Have fun with that babe.
What about you guys? Surely we can’t be the only ones who’ve made the mistake of not planning well. Or maybe we are. But we’d love to hear some of your stories if you’ve got ’em. Bad planners unite!
Psst- Speaking of frames, we found a really cool one for displaying kid art (or any art that you like to rotate out without taking it off the wall and removing the back). Check it out over here on BabyCenter.

Jena @ Involving Color says
I JUST did the same thing! I went through all the measuring, hanging, and then my hubs took one look at it and didn’t like it. I didn’t either, but it took me a little while to admit it :). I was so bummed to take it down and start all over, but our new arrangement looks so much better. I love the way these frames look over your couch!
Amy says
Unbelievable! I am dealing with the exact same problem this morning! Went all willy nilly with the frame hanging thinking it would look more “organic”, nope, just looks…….bad. On my way to fill holes and PLAN. Martha Stewart is never wrong :)
driftwood haven says
Perhaps this tutorial I put together on how to hang pictures in an un-willy nilly yet organic way might help!
http://driftwoodhaven.com/2011/02/09/organized-chaos/
NYer says
love the frames!
Andrea says
I have FUBARed hanging frames more times than I care to admit. At least ikea gives you those papers to help out!
PS I just wanted to be among the first to comment LOL
YoungHouseLove says
Top three, baby! Haha.
xo,
s
Erin says
First, the video of Clara is adorable!! I usually don’t click on videos within blogs, but I’m so glad I looked at this one!
We haven’t done much to our condo in the almost 3 years living here… but your blog is helping inspire me to start soon. I think our first step will be a backsplash in the kitchen. We do have proof of the previous owners lack of planning– they did their own crown molding, and it is terrible! We actually got a $1500 credit for it when we bought the condo, but we haven’t done anything about it yet.
The frames look great in the end!
Kristen says
I would leave a comment about the frames, but I honestly can’t get over the video of Clara. She is beyond adorable, and that video pretty much made my morning!
YoungHouseLove says
Haha, so glad! I told John everyone would skip to the end and not even watch it. But it’s our favorite video ever so we had to toss it in there.
xo,
s
Larissa says
That video is the best part! She’s got quite a sense of humor.
Ashley says
I knew exactly which kid art frame you were talking about without even looking.. such a smart idea!
Amy says
Looks amazing as usual. I love the grouping of frames like this and have done it in my home as well! Great job.
Future Mama says
It looks GREAT with the 8!!!
Much love,
Future Mama,
http://expectingablessing.blogspot.com/
Katie G says
Looks great! Do you think it’s better to center frames over furniture or on the wall? In my daughter’s nursery, her crib is in a corner next to the closet and I can’t figure out how to center everything! Thanks!
YoungHouseLove says
Generally speaking (although there are tons of exceptions) I think frames make the most sense when centered over furnishings instead of centered on the wall (when you’re forced to make a choice and can’t have both of course). Since art should “connect” to whatever is under it to create one big composition that feels balanced, it just seems to look crazy if a frame is shifted to the left or the right so it’s centered on the wall instead of being centered over the desk/dresser/crib/etc. Hope it helps!
xo,
s
Julie says
When you mentioned the rug in the room, and how you’re getting a new one, I remembered this rug from Overstock Auctions that I came across yesterday:
http://auctions.overstock.com/Hand-tufted-Santana-Abstract-Wool-Rug-7-9-N-A-C02810/Home-Garden/item/46485592#PhotoGallery
If it struck your fancy, you would probably be able to get it for a song. (Insert more cliches)
YoungHouseLove says
Ooh very pretty! We’re a bit scared about how light it is with a pup and a baby (especially since the living room is the room where Burger goes in and out for bathroom breaks), but we’ll have to think it over for sure!
xo,
s
Samantha says
Hahaha! You’re not the only ones, BELIEVE me.
Am I the only one who’s going nuts about Karl’s placement? I am DYING to nudge him (and now the picture arrangement) a foot or two closer to the window and away from the doorway. Maybe I’m just crazy… and that DOES make sense, what you said about keeping everything lined up with the beams.
Can’t wait to see what else you guys do! Love the blog, house, and Clara vids!
YoungHouseLove says
Yup, when you’re in there the placement totally makes sense with that odd light hanging in the corner over the table and the beams centered with the art centered on them. But I think once we nudge him forward about a foot after building a big console table behind him it’ll make even more sense to everyone!
xo,
s
Lindsay says
I just don’t have the gift for decorating so y’all are saving my house with your ideas! Yesterday I hung curtains and after it all was up – they were crooked! I find out my ceilings are not completely level so it makes it totally look uneven. Instead of starting over, I wedged something in the curtain rod hook and bam…problem solved! Curtains will hide it anyway, right!?
ps…you guys are pretty much amazing!
YoungHouseLove says
Amazing solution. So smart.
xo,
s
Lindsay says
Hah – I was just going to say I had the same problem when I realized I ALSO have the same name. Go figure. In any case, I have windows/ceiling combinations that are nowhere near parallel. No fun.
YoungHouseLove says
That’s too funny! It’s the Lindsay curse. Good luck with everything!
xo,
s
Lindsay says
Uh-oh. My name is also Lindsay and I’m about to hang all my curtains! Better get the boyfriend to do that for me! He’s an engineer, so it’ll turn out okay. Right?
YoungHouseLove says
Haha. Right! Fingers crossed for you.
xo,
s
Christine says
I like how there’s four frames on one side of that center ceiling beam, four on the other. Nice balance there! And Clara’s crazy ride on the shopping card cracked me up. Isn’t it amazing how easily a happy baby makes all the big people happy, too?
YoungHouseLove says
It’s so true. She can have fun anywhere. Of course Ikea is inherently a fun place, even for us “big kids.” Haha.
xo,
s
Danielle Dziedzic says
Hey J & S,
Kind of off topic, but can you tell me where you bought the round pedestal table that was next to the couch in your old living room? Thanks!
YoungHouseLove says
That was a smaller pedestal table from Target that we made bigger and painted white by adding a tabletop from Lowe’s. More info here for ya: https://www.younghouselove.com/2008/08/our-very-own-design-dilemma/
xo,
s
Shannon says
When I first read this, I thought your mistake was not buying enough frames while you were at the store and my heart broke a bit for you. Are you with us in making a serious push for a Richmond Ikea? When we first bought our house, we made that drive three times in one week (buying, returning, changing minds).
But, honestly, I look a little like Clara when I’m in Ikea, so I can’t complain.
YoungHouseLove says
Hahaha, I look like that too! And yes, a Richmond Ikea would rock our worlds. Are you listening Ikea? Probably not, but it doesn’t hurt to ask. Haha.
xo,
s
Robin @ Our Semi Organic Life says
Where is the closest IKEA to Richmond? We’re moving to Richmond as newbies this summer and know we’ll be needing it! Our closest currently is in Charlotte, NC that opened last year and is over 3 hrs away.
YoungHouseLove says
We go to the Woodbridge one (the only one in VA) but it’s 2 hours away (4 hours round trip). Thankfully John has family in that area so we’re there semi-frequently.
xo,
s
Kristin says
Looks great!
I think we are OVERplanning at the moment because we just can’t decide whether we should buy the Kivik or Karlstad Chaise longue + loveseat combination. Both have their pros and cons…
We once hung a print on canvas over our desk that we had standing in a corner for almost a year. It was undamaged although it had fallen down a couple times, but when we tried to adjust it it slipped off the two nails it was supposed to rest on. It fell down and landed on the stapler on the desk, which pierced a hole into the canvas. We were tired and in a hurry that evening, so if we would just have waited another night to hang it the next morning (after waiting 11 months before that…) it probably would not have happened.
At least we were able to repair it.
YoungHouseLove says
That stinks! And totally happens to us. The whole doing it when you’re tired and in a rush thing is such a risk. So glad you were able to repair it!
xo,
s
Jessica says
When replacing the countertop in our bathroom, we assumed (first mistake) that all counter depths were the same since that was the case in our kitchen. We bought the length closest to what we needed, came home and measured and cut the counter to the perfect length and then the painstaking process of cutting the hole in the center for the sink to fit. “Voila!” I thought to myself only to take the counter into the bathroom and realize it was 5″ too deep for our cabinet and stuck out about 2″ past the edge of the wall. There’s not taking back a countertop with a big hole in it and exclaiming, “I’m pretty sure this is exactly how I got it at the store… please refund me my money.” That was an unfortunate and costly mistake.
YoungHouseLove says
Oh man we totally feel your pain on that one!
xo,
s
Rachel says
Just last week I put 7 holes in the wall trying to hang one picture frame (first too high, then lower, then lower again, wasted about 5 wall anchors, and broke a hanging hook off the frame. This is why I don’t start these projects at 10pm . . .
A couple days and a fresh head later, I replaced the hook, drilled the appropriate holes, and hung the picture in one whack. Yeesh.
Shunta says
Okay, now I have to search for a place in my house to put up these frames!! Love it so much!!
Elizabeth says
I love it!!! And you are totally right about having to plan Sherry, thanks for the reminder. My boyfriend is moving to a new place in Boston and requested I help him go to Ikea to pick out his furniture! Totally thinking about you guys for Ikea and I made a list of all the things he will need to buy and its totalling like $2500! They don’t ever have coupons right?? And I sort of remember something about if you use your debit card you get a discount next time? How does that work?
YoungHouseLove says
Does anyone know about this debit card thing? We’ve never heard of that. Although since we live two hours away sometimes I feel like we’re out of the loop. We just wait for sales (they do have them) and try not to buy everything at once (we pace ourselves, haha).
xo,
s
Elizabeth says
It looks like the one you guys use (Woodbridge) has a debit card thing, (*Bonus! When you pay with your ATM Debit Card, you will receive a discount voucher towards future Debit purchases. Please speak with an IKEA cashier for more details.) But I don’t think the Stoughton, MA one does it.
Leeann says
If you use your debit card, IKEA gives you a voucher for 1% of what you just spent to use on your next visit. I’m not sure if there’s a limit, but if you spend $2,500, you should get a voucher for $25 off your next purchase.
YoungHouseLove says
No way! Never heard of that! Thanks for sharing.
xo,
s
Annette says
In Germany at Ikea, the only real benefit of the debit card ist that it allows you to pay by installments. But that may be different in the USA as most people will pay for their credit card debt in installments anyway. You’ll probably find details about on their homepage.
I like my Ikea Family Card. It’s free, you’ll sometimes get coupons for small items and you get special deals for selected furniture. And extra discounts for the used section of Ikea.
Once again: That’s how it is in Germany. Not sure about the US.
Elizabeth says
OOh yay! I just called and the Stoughton, MA store does have the 1% coupon. If you make a purchase with your debit card it will print out that coupon and then you can use that coupon on your next purchase if you use a debit card again! Looks like we’re going to get $25 off!
Annette says
Hmm. Doesn’t look like it on the Ikea US homepage. Sorry. Ikea Family is their Customer Relationship program over here in Europe. It’s rather cool.
But I found the debit card thingy: At least on the hp of Ikea in Westchester County http://www.ikea.com/us/en/store/west_chester/services
Robin @ Our Semi Organic Life says
Yeah I’ve seen that at our Charlotte, NC IKEA. Normally by the end we’re too exhausted to realize but at the bottom of your reciept there’s a bar code to scan for the next purchase of $x off. Sometimes husband and I split up our order to get a fraction off the 2nd half from the coupon for the first half. Only snag is you cant use it for food, thus not helping you need for lindenderry soda or cinnamon buns on the way out.
Christine says
They also offer tons of sales in the back-to-school season (I believe its primarily August and September)…
Hope that helps!
Kirsten says
Yes, if you use your debit card you get a 1% off for your NEXT purchase via a fine-print memo at the bottom of your receipt–so hang on to that receipt! :) 1% obviously isn’t huge, but especially if you’re making a big purchase, every little bit helps!
Chelsea says
DIY is all about trial and error (and proving your husband wrong!) The frames look amazing. Can’t wait to see what art you choose!
Stacy says
fabulous! great job in connecting the dots, so to speak. Those 8 frames make a huge difference in that big space.
Thanks for also keeping it real. I almost felt like I was listening in on one of Johns’ confessionals:). ya’ll rock!
YoungHouseLove says
Poor John was so pissed at himself. Haha. I think he’s slowly getting over it now though. Hope he’s not scarred for life!
xo,
s
jordan says
LOVE the frames…..any ideas where the clara rug will end up?
YoungHouseLove says
Right now it’s in the playroom, so probably there? Not 100% sure since things tend to evolve and move around as we go!
xo,
s
Paige says
oooooo love the frames! My husband and I both have a small love affair with large frames…I might have to take a trip to ikea now! I always get stuck in their furniture department and then by the time we make it downstairs to the “accessory” section I’m wiped out (and usually broke) haha.
Not that your deco/reno is a democracy, but my vote is to put something graphic in the frames! I mean, I love family photos just as much as the next gal buuuttt, I can just envision something a little more ZAAAA! (that’s not technically a word, but hopefully it makes sense).
Patti says
I’ve made this mistake hanging frames too many times to count. I’m usually too hopped up to just get it done hence mistakes. Really love how your frames came out…as CS says, Winning!
Rachel H. says
I LOVE that video of Clara, and the 8 frames above Karl look fantastic!
Sarah @ The Strength of Faith says
Oy – been there! It looks fabulous now, though. :)
brandt @ New House on the Blog says
Believe me, I’m a meticulous planner. There’s something to be said about having the lightening bolt of inspiration, crafting a plan, carrying it out, seeing the end result, and knowing you did that all yourself. It’s a thing of beauty, really.
That being said, I’m almost a planner to the extreme. I’m trying to make it a personal goal to work on being a bit more spontaneous, allowing myself to live a little and go with the flow.
Planning out picture frames? Good to do, I’ll keep that on my “to plan” list. Planning out my drive home so I stop at the gas station at a specific time to miss the rush-hour home that starts exactly 4.375 minutes after I finish filling up? Probably something I can let go a little bit.
Dianne says
I love them!!!! Just what the room needed…
Jason says
This looks great!!! Can I go back to the height to hang things? Because I can never tell if my stuff is too high or what. I try for the middle of the object or the group of objects I am hangin to be at eye level is this right? I normally do a bit below my eye level actually because I’m 6’2″.
YoungHouseLove says
That’s a very general rule, but we like to eye things every time. See that pic of the two square pieces of paper taped up? That was all to establish hanging height. We just stood back and moved them around until they felt like they were visually connected to the sofa (and not awkwardly floating around too high in the room) without suffocating it and being right on top of it. Hope it helps!
xo,
s
Jason says
Thanks – I’m going to start doing this for everything, hanging a paper as a guide. I keep redoing everything in my house, height of art, curtains are on my nerves now…so they’ll be next and there is nothing wrong with them.
I need to finish the house and not worry about going back over stuff that is done lol!
Mel says
just wondering if you’ve ever tried 3M command strips for hanging picture frames. i used them for a frame hanging project, hated the arrangement and took them all down with no damage to the wall. that being said, i can’t speak to the longevity of the product!!
YoungHouseLove says
Yes! We love those for hanging smaller and lighter frames (these were so big and heavy we actually used anchors!
xo,
s
Stephanie @ A Life More Southern says
Love this idea. I’m sure you guys will find something fantastic to put in those frames! I’m also thinking of doing this same thing above the sofa in our formal living room – I went back and forth a long time between DIYing an oversized painting or two and the multiple frame idea…and I think the frames have won me over.
Annette says
Right now I’m still in the process of picking out Pictures that I’d like to hang. So far, during college and later on living in a shared apartment with a friend, I wasn’t in the mood to hang up pictures since it was all a temporary installment.
Now that I’m moving in with my boyfriend, I’d really like to make the apartment a home, even if it’s only rented. So it’s colors, new furniture, new decor and finally: Pictures on the wall. I so hope he’s better in measuring and drilling holes than I am. Things tend to get lopsided when I try and do it by myself…
Kristen says
The end result looks amazing…hopefully you’ll soon forget the frustrating during process (but not the lesson learned). I can’t wait to see what photos you decide to place in the frames – are you thinking black and white or color?
YoungHouseLove says
Not sure yet. Probably big graphic cropped family photos or something geometric and modern like a collection of patterns or prints.
xo,
s
Micha says
“Wing it” is my second name; I don’t generally plan much but I’ll take your word of caution once we get to the “hanging decoration” part! The frames are looking great there above Karl ;o)
play therapist mom says
Love that look!! I am now needing to find a spot in my living room for it. My wall behind my sofa has a pass thru on it, but maybe I can work around it!
ALittleBite says
It looks awesome with eight frames! I’ve been meaning to do this with Ribba frames for the wall behind the dining tables – but only six frames, haha. Now I know I should tape it up to see how it looks.
Also, I guessed wrong… when you mentioned yesterday you were working on some projects, I thought you’d be painting the dining room!
Christina J. says
Yup, happened when hanging cube shelves, I even measured twice before putting the holes in the wall! Argg!
Cindy says
I’m not allowed to put holes in the wall. EVER. I get my husband, tell him my plans, he finds the studs and does the measurements, and then takes care of hanging things.
It’s a lot safer that way, especially after I spent a week patching mistakes the previous owners made (extensive drywall repair!), I don’t want to have to fix my own.
LauraJane says
Looks great!
shanna says
it looks great! I think a wall of family photos would look amazing. Art would too, of course, but I am a sucker for pictures of family in a family room.
I did a gallery wall in my small living room and ended up having to completely redo it because I didn’t put the template on the wall first. So my frames went from couch to ceiling, and it looked insane. I took them all down (and like John was too angry to take a picture of how awful it looked) and redid them, taking my time, measuring and using kraft paper templates. The time it took to plan carefully in the beginning was well worth it. :)
Karen says
Quick question– how do you guys hang a picture frame? I tried checking through your website but didn’t find it. You use a drill instead of a nail and hammer? This sounds so much easier/better/smarter– please explain! :)
YoungHouseLove says
We use anchors. So we predrill a hole, slip an anchor in, then drill into the anchor (John did this twice for each picture since he was using the hanging wire system from Ikea and they felt more sturdy with two nails to hang across). Hope it helps!
xo,
s
L says
I decided that my husband would hang three large frames (from Target) over our bed. We got out the level and the measuring tape and everything. Two screws (complete with drywall anchors) per frame. These were going to be the most well-fastened pictures in the history of decorating–no risk of them ever falling on our head in the middle of the night!
As soon as we got them up and stepped back, we realized that they were absolutely NOT level. It wouldn’t have been a big deal on a single picture, but with three in a row, it looked awful. The problem? We had simply assumed that the two hangers installed on the back of each picture were aligned with each other–but they weren’t!
So this time we measured the distance between each hanger and the top of the frame, and after another hour of redoing the process with 1/8″ and 1/16″ adjustments, we finally had our pictures. Needless to say, I always measure the location of my hangers now.
YoungHouseLove says
Oh man I hate when that happens!
xo,
s
abby g says
Same thing happened to me with 3 dry erase calendars I hung (in a row) from Target! They need to get on board with their hangers on the backs of their items….! I left it.
valerie J. says
Sherry was right, 8 looks great over Karl. I really hate to be the first person to ask this, but are the 2 frames on the far right more ivory than the other 6 or is it a lighting thing? Centering the frames on the beam is perfect…would have looked odd any other way.
And my picture hanging mistakes? Instead I’m paralyzed with indecision and my walls are totally blank…I think that’s even worse. :)
YoungHouseLove says
Good eye! Those two are the frames that we already had, so they’re very very (almost undetectably) different in person, but it looks more pronounced in the pics for some reason. We definitely still plan to get two new frames the next time we’re at Ikea so they match perfectly (and reuse the two leftovers in another room).
xo,
s
Katie Truelove says
I absolutely adore Ribba frames! We have several (of different sizes) above our couch. We figured out the arrangement using measurement (laying out on floor, measuring wall and frames, etc) but the paper/tape thing is a great idea too– takes away some of the suspense though;)
Kara says
When you get over the burnout of this experience, I actually think 10 frames would look super awesome. I love that crowded look of a lot of frames, some even partially hiding behind lamps, that I’ve seen in a lot of shelter mags. Such an awesome focal point. But you guys have been through enough!!
As for what to put in them, if you found a really large map or other piece that could be cut into pieces and framed, I think that’s a neat look too. Though I also think you need something with bold color in there since this is a focal wall. Something abstract, perhaps? Even DIY art with giant brush strokes of bright colors. Just a thought.
Very fun project!
YoungHouseLove says
Love those art ideas (especially the cut up large map!). As for the ten frames, we actually considered that but they wouldn’t fit (they’d cover the light switch and crowd the doorway on the left). But we love oversized lamps so they’ll probably overlap the corners of the bottom frames on either side for that layered look. Can’t wait!
xo,
s
karen says
That looks so good above Karl! Love that Clara!
Amy Wolff says
Love it.. .
The first picture made me miss the old house.. for just a second- then I saw Karl and was over it….
YoungHouseLove says
Haha, I get like that sometimes. It’s more of a “those were good times” thing than an “I want to go back there and leave this house” thing though. Thank goodness because I don’t think the new owners would let us move back. Haha.
xo,
s
RC says
I bout some 9 x 9 in IKEA square frames before looking at how much it cost to print photos that (odd) size. Not cheap locally and not even possible at my local CVS/Walgreens type of photo labs.
Luckily I found out that mpix.com had great prices for lots of different sizes including square sizes. Mpix.com didn’t have 9 x 9 in as an option but they did have 10 x 10 in. So I printed my 9 x 9 in photos on 10 x 10 in by adding a white border in Photoshop to make it 10 x 10 and trimmed them down when they arrived.
I was very happy with the print quality and color reproduction. Just wanted to give you the heads up for a good quality but inexpensive resource for printing square photos.
YoungHouseLove says
Smart! Thanks so much for sharing that option!
xo,
s
Karen S. says
If you have a color printer that fits 11×17 paper you can also DIY by purchasing decent photo paper at Staples/OfficeMax (either matte or glossy)….works like a dream if you have a decent printer!
Nikki G says
ohhh… Our friends printed some of their wedding pictures using Mpix with a metallic background – they look amazing.