2, 4, 6, 8, Who Do We Appreciate? Planning!
And why do we appreciate it? Because we get burned when we don’t do it. At least we did on the frame arrangement we just hung above our sectional.
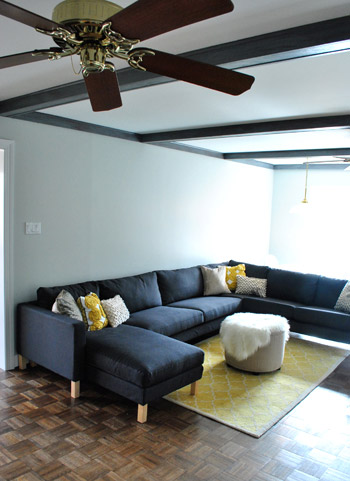
Here’s the story. We’ve always planned to take the big empty space above Karl and do a grid of large picture frames. We sort of envisioned it as a larger version of the frame grid that we hung above the couch in our old den…
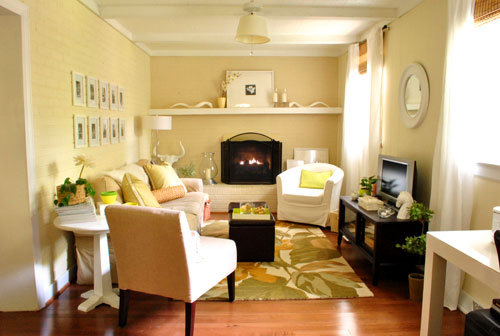
… but instead of 8 x 10″ frames we’d use oversized 20.5 x 20.5″ Ribba frames from Ikea for more impact (since we already own and love four of them – and they’re just $19 a pop).
After some rough math and holding up a couple of the Ribba frames that we already owned, Sherry and I determined that we wanted to do a grid of six frames (two rows of three) to fill the space in the middle of wall, allowing for some empty space on either side for two table lamps that would sit on the future console table that we’ll eventually build to go behind the sectional. Note: we moved the 5 x 8′ Pottery Barn rug into the guest room for my in-law’s stay, and it will eventually live there permanently, we just brought it back into the living room until we upgrade to a bigger rug, since we’re currently guest-less and Clara appreciates having a soft place to play.
Anyway, back to the frames. We went to Ikea, bought six new Ribba frames (they sometimes vary slightly in color, so we figured it would be safest not to mix and match old frames with new ones, and we have a ton of other spots for the four that we already own) and headed home to begin the whole hang-it-up process. When we got home with our six new Ribba frames from Ikea, I suggested that we tape up some paper to figure out how high we want them to hang and how much space to leave between them. After all, we both know these things are worth planning out. And luckily the paper that comes in the frame is almost perfectly sized to help you figure this out. So we started with two sheets to see how high to hang them.
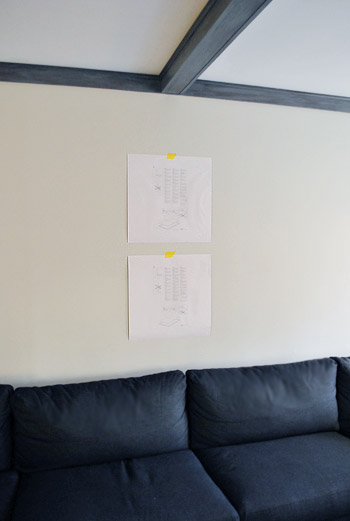
This is where things veered off course (thanks to me, I’ll admit). Sherry suggested that we tape up the other four sheets of paper to make sure we liked how all six looked together. Maybe I was just an eager beaver and wanted to get to drilling. Or maybe I decided we should blow it off because we had already accidentally thrown away one sheet of paper to complete the all-six arrangement. Whatever it was, I reassured Sherry that it would look just fine and we didn’t need to be all paranoid and hang the remaining three sheets to double-check everything. Famous last words.
She believed me (albeit hesitantly), so I started drilling. Insert happy testosterone filled sound effect here (there’s nothing like a little afternoon drilling). It wasn’t a fast process to measure, mark, and double check everything to make sure it was all lining up, so maybe an hour or so later I had five out of six frames hanging on the wall.
That’s when Sherry broke the news that the arrangement wasn’t big enough. We needed eight frames. As much as I hated to admit it (for more than one reason), she was right – the five frames looked too small on the wall (and adding the sixth wasn’t going to help). They floated awkwardly and just didn’t have the impact we wanted.
**I’d insert a picture here of giant Karl sitting awkwardly below those poorly placed frames but I was too pissed/disgruntled/ashamed to snap one.**
This was all my fault. Had I taken the time to tape up all of the sheets of paper we would’ve realized it before I put a single hole in the wall. I even would have taken a picture of the taped-up configuration to show you what a learning process taping them all up on the wall can be, and how grateful we were to have taken the time to complete that first to save a step. Duh, John. Grumble, grumble, grumble.
The next step was to take down the five already-hung frames with a big ol’ sour face and begin re-measuring everything so that eight frames would be centered above the sectional (and on that middle ceiling beam). Then came the not so fun process of not only removing the ten screws that were already in the wall (I was doing two per frame to be safe) but marking, drilling, and screwing in an additional sixteen. And since we already had two old Ribba frames that happened to match – finally, a lucky break – I was able to hang all eight frames in place without another four-hour-round-trip to Ikea, leaving us with this:
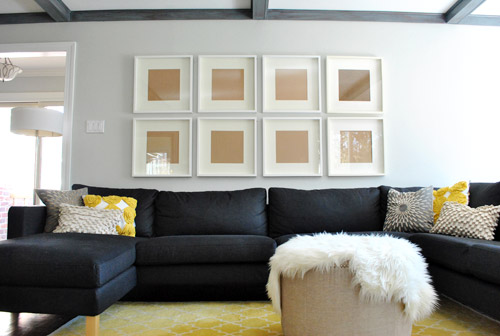
We definitely needed all eight frames. They should be just right when we add table lamps on either side of the arrangement after I build an über long console table.
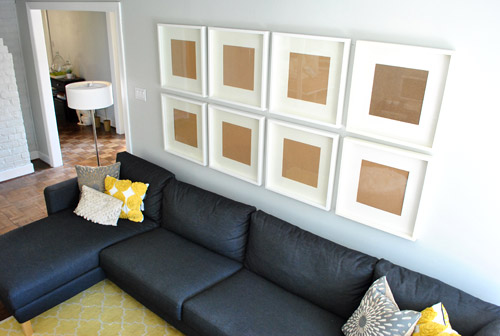
We’re still debating exactly what to put in them (maybe family photos? maybe something more graphic?) but we’re certainly glad to have the whole frame hanging part over with. Even if it involved a lesson learned the hard way. At least it was a mistake that only took time and energy (and a bit of humility) to fix. You know, as opposed to a big wad of cash. Oh and speaking of time and energy, there are still some holes and pencil marks from the first attempt that need patching. Sigh.
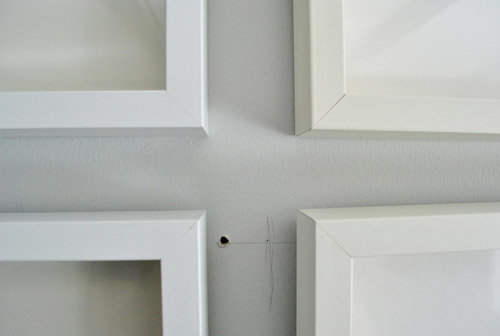
Wait, who am I kidding. That’s Sherry’s department. Have fun with that babe.
What about you guys? Surely we can’t be the only ones who’ve made the mistake of not planning well. Or maybe we are. But we’d love to hear some of your stories if you’ve got ’em. Bad planners unite!
Psst- Speaking of frames, we found a really cool one for displaying kid art (or any art that you like to rotate out without taking it off the wall and removing the back). Check it out over here on BabyCenter.

Christine B says
I’m with Clara I love ikea!!!
form2form.wordpress.com
Page says
How tall was the ladder you stood on to take that last picture? John isn’t that tall, is he?
YoungHouseLove says
Yup, he’s 6′ – my tall glass of water. Haha.
xo,
s
Kelly says
I’ve got a story even though I tried to plan accordingly. I built a faux fireplace from a mantel cap on clearance at Home Depot. The only thing missing from it was the 2×4 bracket that attaches to the wall first, then you slide the hollow mantel cap over it and secure with screws from the top of the mantel. Easy enough, right? Well, you need to find the studs first to mount the bracket. I bought a stud finder…a cheap stud finder. It showed me stud after stud and each time I drilled, no stud. Long story short, I ended up making eight giant holes in the wall for 3 screws. The funny part? It took me 3 more apartment re-locations and a new stud finder to finally drill the correct 3 holes for the bracket. Live and learn!
Serina Shook says
I think I ended up with nearly a hundred unused nail holes in the wall before I ended up getting it right (ok that might be a slight exaggeration).
http://applesforolive.wordpress.com/projects/wall-of-frames/
LOOKS FABULOUS!!!! Can’t wait to see some great art housed in them :)
blake says
Love it.
My biggest mistake was a total rookie move: painting the walls without living with a sample. The worst part, though, is that I was a repeat offender — I painted my living room/kitchen/hallway four shades of white before finding the right one.
Bought my first house in 2009 and decided white would lighten up the small space (everything was a soul-crushing pinkish beige — carpet, walls, vertical blinds and tacky window treatments).
As a renter, I’d never painted, and anyone whose shopped for colors knows that there are hundreds of “whites” and it can be the hardest shade to get right.
I bought the cans that said “White” — plain and simple. Turned out to be flourescent, with a blueish tint that drew attention to the less-than-perfect popcorn ceiling.
That was mistake No. 1. No.2 was repainting with a softer shade from Valspar called “Du Jour.” It was nice, but not warm enough.
At this point, I realized I should paint a large sample on the wall and live with it. I researched colors and decided on Benjamin Moore’s “White Dove” — warm, but some grey hues tone down the yellow.
Mistake No. 3 was painting the walls with the right color in the wrong finish. I used eggshell and quickly realized the satin finish is more my style.
I’ve since finished off the house in White Dove. After all that, it’s here to stay … for a while, at least ;)
Cindy says
Live and learn, right? (; I definitely know that feeling! My best suggestion for future projects is to use picture hangers, which can hold 35 pounds at least and have the tiniest needle that you put into the wall. The trick is that it enters at a 45 degree angle, so it’s sturdy and doesn’t leave a big hole in the wall! However, I do think the frames look amazing and I can’t wait to see them with pictures inside!
Erin says
Oh I LOVE LOVE LOVE that! FABULOUS!
-Erin (richmondthrifter.blogspot.com)
Bobbie Brown says
LOVE the frames!!!! I want them in my house NOW! Haha!
Amy says
I’m impressed at how straight you made 8 of those frames…I made my husband put 4 up last fall and he was so frustrated at making them straight! It’s not easy…
Just filled a couple large frames today with posters I made. I’m working on doing a Clara look alike nursery….you can read about the posters here:
http://jahaldeman.blogspot.com/2011/03/baby-room-posters.html
Robyn says
The best over used phrase would be efficient here: Been there, done that. I’m more of a just go with it girl. That is until I purchased a nifty laser level. Angels sang the first time I used it. (Holding right hand up) I will never not plan and use my laser level again.
Robin says
I love Karl and the frames! I think I may steal your idea with the frames. All of my walls our blank. I can never decide what to do. :)
How will you fix the holes in the wall? Just wondering since I have no clue what to do.
Thanks. Love your site.
YoungHouseLove says
Here are my steps:
1. Sand hole so nothing is bumping out or hanging off of it
2. Use flexible metal spackle knife to smear spackle into the hole (I recently discovered the Dap Lightweight Spackle in the red pail and I love it).
3. Swipe filled hole with spackle knife to create a nice flat application and shave off any excess
4. Wait to dry and sand each hole for even more smoothness
5. Paint each filled hole with a brush, feathering it out so the paint stretches about 4″ beyond each hole for the most undetectable look
Hope it helps!
xo,
s
Lori @ Richmond, BABY! says
The 8 frames look great! I definitely can see why you needed two more. And Clara is such a little cutie…how do you stand it?!!! :)
Mrs. Taylor says
It’s amazing! It’s like you’re taking my wish list for my living room and showing me what it’ll look like before I even have to life a finger! But, thanks to this post, I will be sure to measure and tape out a diagram first.
You two are amazing…flaws and all!
P.S. Loved the Clara video. Kids are so much fun!
Sarah says
I was just trying to hang a bunch of Ikea frames and found that the Ikea wire system was totally wonky — how do you get it so the wire is the same length and in the same place on each frame so that they hang evenly off of nails that are level?
YoungHouseLove says
We used the same length of wire and placed those clippy things in the same spot and then we’d hold it up and double check it before drilling just in case. If it was a smidge too high or low we’d just adjust the wire (no need to redrill the holes). Hope it helps!
xo,
s
Julie says
I just read 5 pages of comments to see if you had answered that question yet – I knew someone else must have had that same frustration! I also knew you’d have some great solution. Great tip to just fiddle with the length of wire to make those final adjustments. I had given up on hanging gallery-style frames after a particularly unsuccessful attempt in plaster walls.
The room looks great! Thanks for all the inspiration and motivation!
YoungHouseLove says
Glad to help! And thanks so much for reading back through the comments. You rock.
xo,
s
Giselle says
OMG, I hope to not be the voice of doom here cause John would have a syncope if he had to redo these, but aren’t they too low if you plan to put stuff on the console table?
YoungHouseLove says
Nope, we accounted for that (thank goodness). The lamps will go on either side of the arrangement, and we’ll only use the surface area in the middle for placing drinks or a book or two- so we won’t be displaying tall vases or anything that’ll interfere. Whew.
xo,
s
Twighee says
I must introduce you to my very best picture-hanging friend.
3M Velcro strips
http://www.amazon.com/Command-17203-Medium-Picture-Hanging/dp/B000OF6X48/ref=sr_1_1?ie=UTF8&s=hi&qid=1299614321&sr=8-1
They are not the old ones with the little hook. Put these on and your pictures won’t budge! Pictures stay nice and straight even when your little boys’ ball smacks into them. Wait, that’s my house…
(No, I don’t work for 3M or anything…just really love this product!) =)
YoungHouseLove says
We love those! Wish they worked with such heavy frames on our old plaster walls. We definitely use them for smaller frames- so easy!
xo,
s
Pamela B says
Oh man, the “doing things twice” game. I hate it with a passion. We’re building our own house right now and it has been the theme since day 1. Sometimes it’s innocent enough, but sometimes it’s just stupid. Like the bathtub fiasco.
We didn’t even have the plumbing roughed into the house yet when we saw some gorgeous $1000 soaker tubs on sale for $200 each. We were going to need tubs eventually, they fit the spaces, and the deal was amazing so we bought two. Fast forward three months to this past week. We’re getting close to buying tile and stuff to finish it off, so I go to measure the tub up that will be enclosed with glass for a tub-shower. Uh oh. Our beautiful fancy tub has rounded freaking corners that won’t work with glass doors! NOOOOOO!!!! We contacted a couple glass places and they both said that it would cost upwards of $2500 to make a curved glass enclosure. Serves us right for jumping the gun I guess, so it looks like we’ll have to un-install it and shop for another one. Anybody want a $1000 tub for $600?! ;)
YoungHouseLove says
Oh man I totally feel your pain. So sorry about your tub troubles! Here’s hoping someone wants them. Maybe try unloading them on craigslist?
xo,
s
Heather says
Hi guys, I am wondering what color Karl is. He comes in several colors (which can all look different online vs in real life), so I thought I’d ask which one your main man is outfitted in. Thank you and keep up your amazing work!
YoungHouseLove says
He’s the dark sivik gray one. Hope it helps!
xo,
s
jennski says
I’d love to donate a print!
YoungHouseLove says
Woot! We love your blog. And your amazing prints. What a sweet offer! We actually have a no-special-treatment-or-swag policy (we like to keep it real and tackle projects in a way that anyone at home could) but we definitely appreciate the thought!
xo,
s
Wom-mom Ethne says
I defer all the hanging, nailing, etc. to my husband. That way I can’t get in trouble for messing the walls up!
http://www.wom-mom.com
Carrie says
Clara’s video made me laugh. I have a feeling I will act the same way if I ever get to go to Ikea again!
Rose says
Karl sectional is definitely not available in Australia……………….grrrrrrrrrrrrr have given Ikea some grrrrrrrrrr feedback……Lord Ikea please hear all our ikea prayers……
YoungHouseLove says
We actually bought him in pieces (the corner sofa + the chaise add-on). Maybe that helps?
xo,
s
Rose says
Oh & btw……..in Melbourne. Australia the IKEA store is in a suburb called Richmond…….
YoungHouseLove says
No way! So there’s already a Richmond Ikea- just on another continent. Haha.
xo,
s
Julie says
There’s a Richmond Ikea in Canada too! Here’s hoping you’ll get one in your Richmond soon.
YoungHouseLove says
No way! Oh the irony.
xo,
s
Rachel says
haha! That video of Clara was precious :) She looked as excited to be at ikea as you guys were! (almost)
lonely wife project says
The good news is that it looks great! The bad news is that poor Sherry has to repair the wall. I dread that kind of work.
Sarah says
The frames look great! Good job! :)
Jo @ Jo In the Kitchen says
Those frames look great! It might be cool to do a mix of family pics and art, but I’m sure whatever you do will look awesome.
Amanda says
Awesome!
Clara is freakin ADORABLE!!! You guys definitely made the perfect little girl!
I’ve been thinking about doing the same thing along our wall (we also got a modular recently), but our couch has windows behind it! We’ve got one wall we can use, it has two chair currently in front of it, so we’ll have to figure out how many frames we need and the layout first.
Since you guys are postcard lovers, maybe you can steal our idea! We backpacked around Europe for 2 months for our honeymoon last year, and along the way we collect postcards from each place – we were carrying our lives on our backs, no way would we get anything heavier!! So we’re going to frame a bunch of those. I’m planning to have the same frames as you, so hopefully they’ll look good with postcards! If not… back to the drawing board!
I think I should start measuring soon, since our Ikea is over an hour away. New one being built right now, only 15 minutes away!!! Woohoo!!! :)
YoungHouseLove says
That’s an adorable idea! We have some awesome postcards that we’ve sent ourselves about vacations we’ve loved!
xo,
s
melise says
First of all I don’t know how you get any shopping done with that insanely cute child in the buggy! I’d be watching her the whole time and miss my whole purpose for shopping! Second, yes mistakes have been made a plenty while in the remodeling process. My hubby and I just installed some kitchen counters ourselves and we were so diligent and careful then he went to cut out the hole for the sink and the saw skipped and cut a gouge about the size of a quarter past the sink. yuck! oh well. live and learn and get some putty!
Genie says
I have a similar collection of frames in my home office. Not wanting to spend lots of money on prints but still wanting color, I opted for scrapbook paper. I got the thicker, more durable paper so it looks higher quality. I might mix some photos in the collection, too. Gotta love it! And since it was so inexpensive, I can change it whenever I like.
Jannell says
This will make you feel a lot better. Before we started hanging siding on our house we decided to put up foil faced foam board insulation on the outside. Being oh so eager to get siding, I fitted, nailed up and taped up nearly an entire gable end of our 2 1/2 story home- carefully fitting around doors and windows- without double checking our research. Turns out, post extra research, it worst idea for our old New England home. I had to take down the entire wall of boards! Did I mention it was late November? Talk about cold!
YoungHouseLove says
Oh man that stinks. I feel your pain!
xo,
s
Sara says
It looks great. I love gallery walls, mine is my favourite part of my house. I can’t wait to see what you put in the frames!
Kristin says
GAHHH!
I so feel your pain.
When my hubs sees me with a hammer and picture frames, he starts to get himself prepared to do some major filling.
I’m excited to see what you guys choose to put in those babies.
Speaking of babies…that Clara is beyond adorable. And she’s already an IKEA lover! One smart cookie!
Danielle says
Those frames look great! Can’t wait to see what you put in them!
Donna says
What I like is that you hung the frames before you put the artwork in them. I did the same with three large frames in my bedroom, mainly because I knew that was the hard part. My friend thought it was hilarious that I had three empty frames hanging on the wall. But it reassured me that the balance was just right. Finding and inserting the art work was a breeze.
Jessica says
Be still my heart, the Clara video is so cute, it kills me! Total cuteness overload!!!
r8chel says
My lack-of-planning mistake that came to mind when I read this was the time that I hung a paper towel holder on the wall over our utility sink. After I hung it, I realized that it was too close to the cupboard to slide the roll of paper towels on or off the towel bar. Oops!
YoungHouseLove says
I would totally do that!
xo,
s
Haley says
Love the grid of frames and can’t wait to see what you put in them. I am a fan of over sized family pics! :) I have been thinking about doing a grid of large photos in my hallway and replacing the wall collage of multi-sized frames that is currently there. It is starting to seem a little busy for me. So, I have a question, could I do a similar arrangement to yours with frames that are not identical? They are similar finish and size but the molding of the frames are different. Another question I always struggle with – mat or no mat?!?! Anyways – so glad to see this post because I have been trying to figure this out! Thanks!
YoungHouseLove says
We just do things by eye to see if they work, so we’d lay out the frames on the floor to see if the arrangement worked even without matching frames (I’ve seen it done before and it can look really cool, so I’m crossing my fingers for you). As for to mat or not to mat, that is the question. Har har. We usually love the look, but occasionally go mat-less, so maybe just eye that too and see what you think!
xo,
s
Penny says
Looks awesome! we have to make A THIRD trip to our IKEA which is 2 hours away in ATL :(
First our bedroom lamp we came home with was the wrong color. (we went there just to get one to match the one we already had)
THEN we took it back and got the right color…came home and it wouldnt turn on. womp womp. lol its turning out to be the most expensive lamp we’ve ever bought hehe
Gotta find a way (bribe) the hub to drive me back sometime soon!
YoungHouseLove says
Oh man that stinks! Here’s hoping the third time’s the charm!
xo,
s
Sara says
Sherry: 1. You sound exactly like what I have always pictured you to! 2. First time I ever check the comments on your blogs and I am amazed you actually respond to them! Thank you for taking the time. And 3. LOVE your blog!! Ideas and everything!
YoungHouseLove says
Aw thanks Sara. You’re sweet. I hope I don’t sound as annoying to you as I sound to myself. You know how you hate hearing your own voice on the answering machine? It’s like that for me in every video. Haha.
xo,
s
Ellen says
Am I mistaken… or is that the rug that you moved into the guest bedroom? Did you move it back… I’m confused.
Ellen says
oops. sorry, just re-read the post here. i guess my feed reader didn’t pick it up on the first read-through… maybe you added it later? anyway, neeeevermind.
Christina says
Glad you went with 8- looks awesome. Can’t wait to see what you fill it with!
Kimberly says
Love love love that video clip. She is adorable!
I am also appreciating the frames. I totally never measure, and usually should :)
Vanessa says
OK, I know everyone else is saying it, but Clara is a RIOT!! I have a 14 month old so I know cute, but Clara is taking the cake.
YoungHouseLove says
Aw you guys are so sweet. Picture me doing the proud momma perma-smile.
Love that girl.
xo,
s
Rebecca Foxworth says
I vote for mixing five black and white pictures in with three frames of mounted gray/yellow modern patterned fabric. You know…like extra square throw pillows…on the wall.
Wait? I don’t get a vote?
Emma says
The biggest planning error I had, thankfully, was something that could still be fixed. When we wired the new attic bedroom, we have a ceiling light and a wall sconce in the same circuit. We ran the wiring funny and once i decided that I wanted the two lights on separate switches, my dad busted a hole in the wall, and 2 in the ceiling of the closet, and had to cut and rerun and finagle around to get them to switch separately. Wasn’t too bad to clean up, but frustrating. And then, to finish the bathroom, we cut the wrong side of the bathroom door off to make it shorter. So then we had to move the hinges and move the catch on the door frame.
Julie says
I just wanted to say that I looove the video of Clara. It is hilarious and she is sooo cute! :)
kristen f davis says
oh my gosh – that video was hilarious. i laughed outloud – how cute!
the frames look awesome! choose your subject for framing wisely – you know those lovely ikea frames don’t like to be opened more than a couple of times without those stupid little metal parts falling off!!!
MelissaG says
That’s kinda funny “at just $19 a pop” !!?? That’s over $200 in just frames! Sure maybe not a lot for a frame but that’s quite a bit for most families all together….I’d so have to buy one or two at a time! Just noticing that this blog is going a little bit more high end it seems!
YoungHouseLove says
Yikes, $200 is a lot for frames! The good news is that we only spent $120 for six because we used two that we already had. Still not cheap, but we actually think 21 x 21″ frames for $19 is awesome (plus they came with thick white mats)! We looked at Target & Walmart and they were 25-35 bucks without mats, and forget about specialty frame shops ($50 plus a pop). We’re definitely still cheap-os. Just gave John a haircut in the kitchen to save $12. Haha. When it comes to house purchases, we just saved money for months before the big move, knowing that we’d need things like more furniture, rugs, accessories, etc since it’s a bigger home. Planning for these purchases is definitely key for us. And we don’t buy anything that we can’t pay off immediately, so we save, wait, buy, save, wait, buy. Hope it helps!
xo,
s