We’re back with the full rundown of basement projects that we took on to totally transform our spooky bug graveyard into clean and functional storage space. First let’s take a walk down memory lane to reminisce about the creepy jail-cell-looking room that we started with:
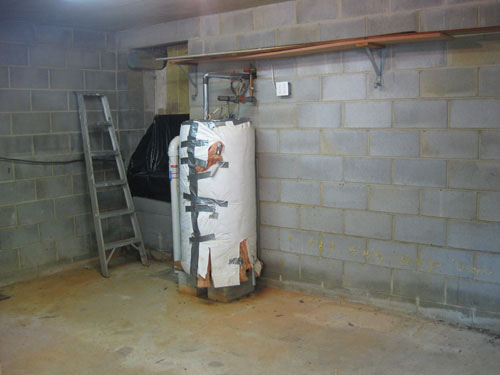
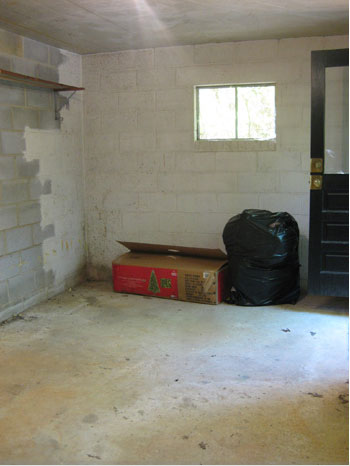
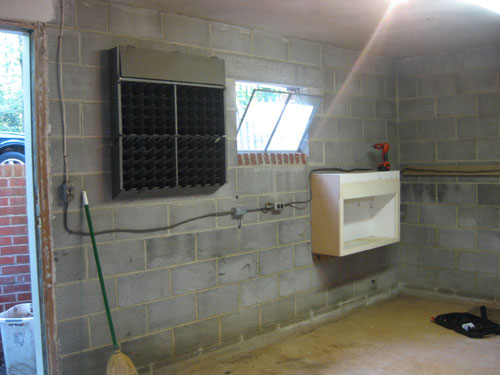
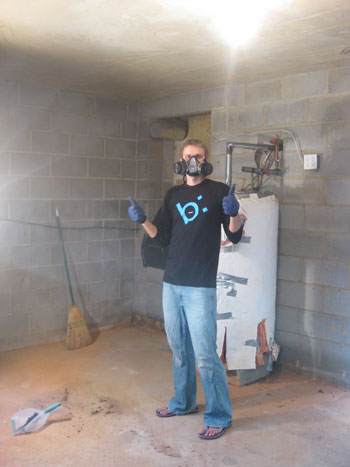
Gross eh? The worst was that although the exterior of the basement’s foundation was equipped with drains and graded to reduce water flow, we still had a bit of moisture seepage through those porous unsealed cinder block walls every time we got a good amount of rain. It wasn’t as if the room flooded by any means, but it was damp and nasty because water slowly oozed through the walls and pooled on the floors (so we couldn’t store a thing in there for fear of moisture damage and even worse… mildew). Yup, we had some of that too. So the first step was to effectively kill the mildew with a part-water-part-bleach solution and then Drylok the cinder block walls and concrete floors (with two thick coats of the tan-tinted oil-based formula) to cure the basement of all its moisture-related shortcomings. And since Drylok is seriously nasty stuff, don’t forget to break out the gas mask! Click here for more detials about this stage of the project.
Then we opted to coat the concrete floor with the same chocolate paint that we used in the sunroom for a rich and durable finish. Click here for more detials about this stage of the project.
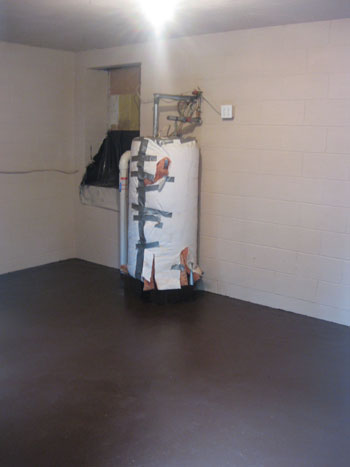
The difference that just the tan Drylok and the chocolate floor paint made in the room was pretty unbelievable- and our moisture issues were a thing of the past. As if to test our handiwork, Mother Nature dumped a monsoon of rain (weeks of storming and even a Nor’easter!) and our basement remained bone dry. Which was pretty amazing since many of our neighbors had basements full of water. Thank goodness for good timing! But those changes were just the beginning…
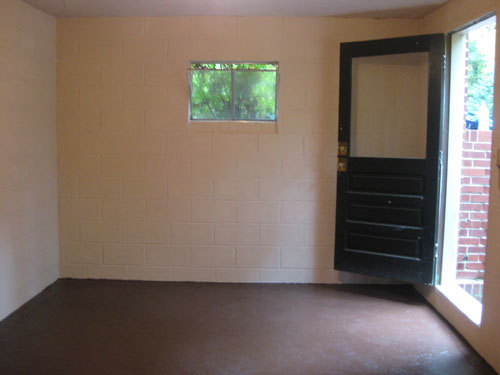
Then it was on to brainstorming the most functional (and budget-friendly) floor plan we could think up. We knew that because we wanted to use the basement primarily as a storage room, we needed to bring in lots of pieces that could house things like sporting equipment, seasonal decor, and even our artificial Christmas tree. So we thought hard about which furnishings would give us the most bang for our buck and landed on the idea of bringing in two armoires for concealed storage along with a book case for more boxes and bins plus a worktable (so we can sort through all those boxes without having to crouch down on the floor). For the full floor planing monty, check out John’s hands in the starring role of “graph paper method explainer” (watch it below or check it out on YouTube):
Click here for more detials about the floor planning and furniture brainstorming stage of the project.
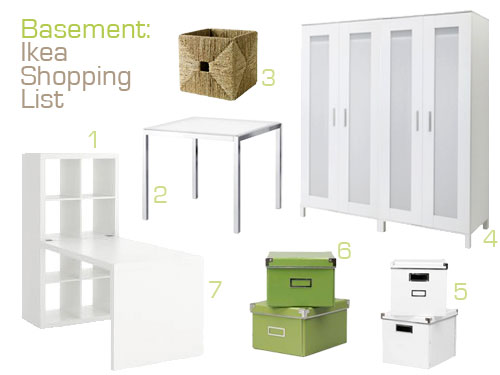
Afterwards our shopping list was pretty straightforward (although we didn’t end up grabbing any woven baskets in the end):
- Expedit shelf (included in the total Expedit Workstation) -$120
- Torsby table (already owned, so it’s free!)
- A woven basket or two – $17 each
- Two Aneboda wardrobes – $100 a pop
- A few white storage boxes – $12 for two
- And a few green storage boxes to keep things interesting – $12 for two
- Expedit desk (included in the Expedit Workstation) accounted for above
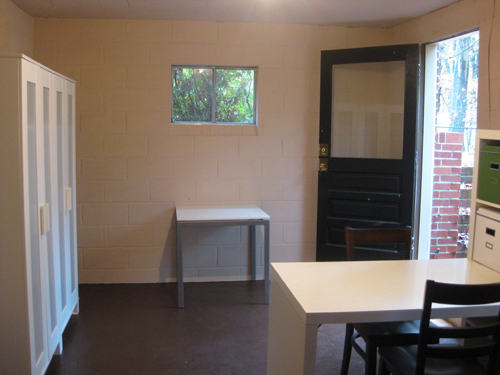
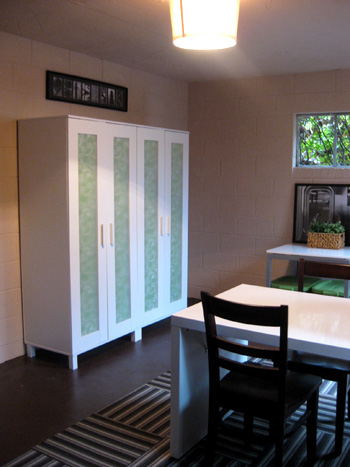
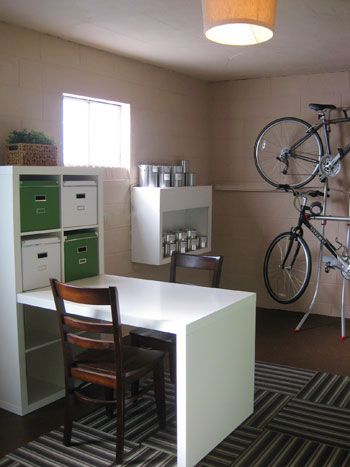
Grand total: We actually came in at $344. Not bad for a large 19′ x 13′ room full of storage (that was previously a bug graveyard). Especially when you consider that one armoire is usually around $500-$1000. Here’s the basement with all of our new Ikea purchases in their places. Click here for more detials about the furniture purchasing and assembling stage of the project.
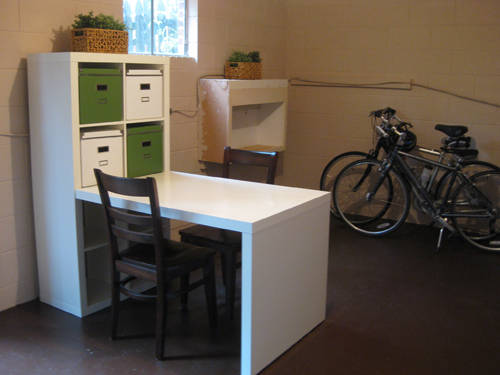
Then came the introduction of the awesome floor tiled area rug that one of our Fab Freebie sponsors (Flor) generously donated (along with gifting one to a lucky blog reader in this giveaway of yore). Thanks so much Flor! We love our playfully patterned squares, and the low pile and durable fibers make it the perfect choice for our highly-trafficked-with-wet-and-leafy-feet basement. You’ll also notice that we added the bike rack we found at Target (on sale) which we especially love since it maximizes the room’s vertical space and gets our bikes off the floor. It’s like totally functional art in the room (plus it’s freestanding so we didn’t have to wrestle with our insanely difficult cinder block walls).
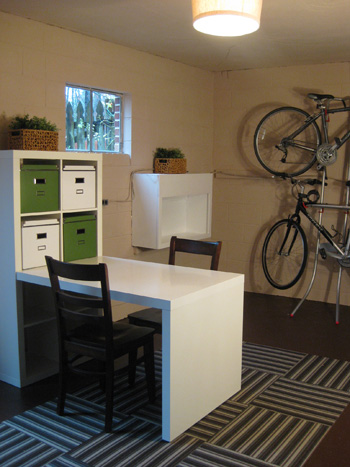
We also grabbed a $25 lamp shade from Target (which was meant for a basic table lamp) and inverted it to create a super affordable and polished looking linen shade that’s a whole lot prettier than the cold and industrial bare bulb that used to reside on the ceiling.
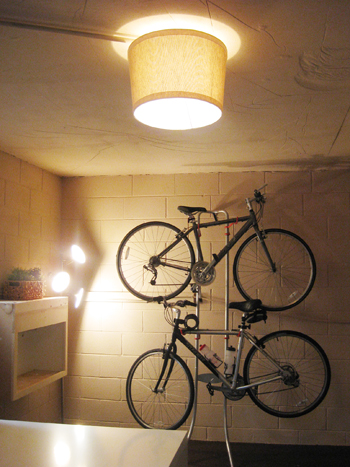
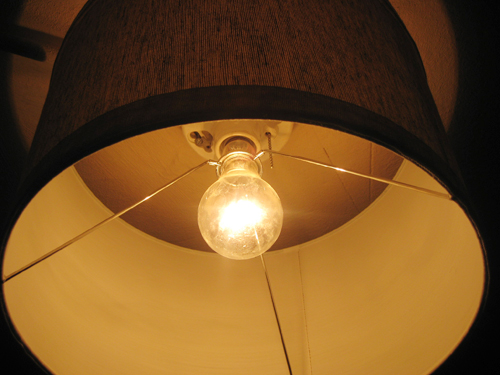
It was a simple as unscrewing the ceiling bulb, passing the base of the bulb through the loop of the lamp, and rescrewing the bulb into the ceiling fixture (so it effortlessly holds the lamp shade in place). Click here for more details on our carpet square rug, the bike rack, and our DIY lamp shade project.
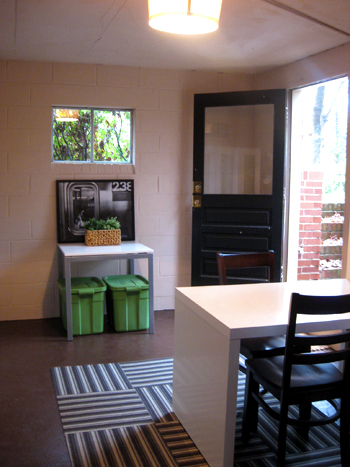
Then it was time to bring in an almost absurd amount of large plastic containers for organization and storage space to spare. You can see the two oversized green bins we snagged (that perfectly slide under the Ikea table). Even though they’re cheap-o storage containers we love the pop of color they add (and of course the function- they house all of our Christmas bulbs, ornaments, and feather trees).
And there are a whole bunch more where those came from in our storage armoires (many of which are still empty, so that’s handy for the future when our stuff expands with every year that we live here). Click here for more details about all the storage bins we brought down for instant organization.
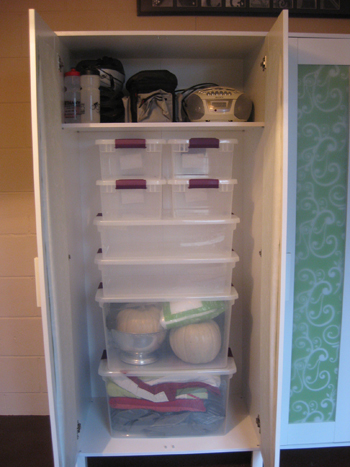
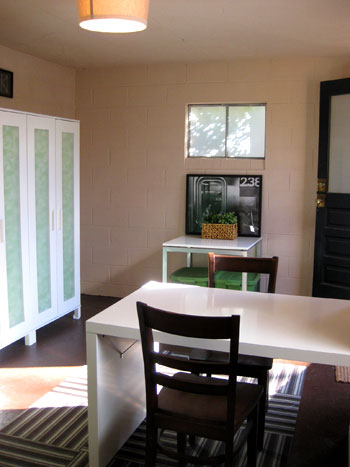
Then we spent less than $6 and used wrapping paper from Target to obscure our otherwise semi-sheer armoire doors (who needs to see all those plastic bins anyway?). Adhering it with double sided tape was quick and easy and the payoff was pretty amazing.
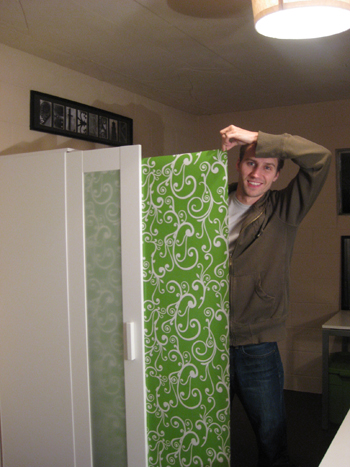
We especially loved pairing the swirly green pattern (which was muted by the doors) with the super linear striped rug. The effect was sort of boy-meets-girl, which we thought worked really well down here. Click here for more details about our wrapping-paper-lined armoire doors.
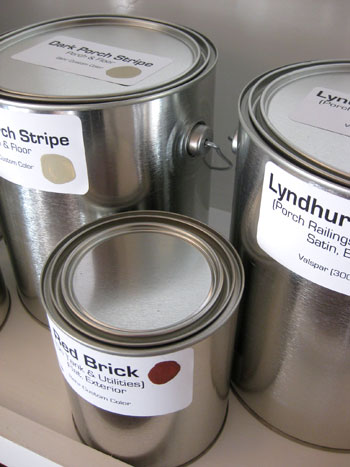
But even though we had plenty of storage space in those armoires and plastic bins, we still needed a spot to keep all of our paint on hand and in good shape (the basement is the perfect spot for a little “paint center” because it’s a lot more temperature controlled than the garage and we like to keep cans out of the house due to the off-gassing and the air pollution factor). A lot of our old cans were gooped up and past their prime (hardly sealing anymore, which means much of our paint was just months away from drying up and rendering itself utterly useless). And because nothing is more annoying than needing a drop of paint for a touch-up and opening the can to find a spoiled and sticky mess, we decided that investing a few dollars to upgrade each can to a new metal container that seals securely was definitely worth the time and effort since it would save all of our paint for years to come.
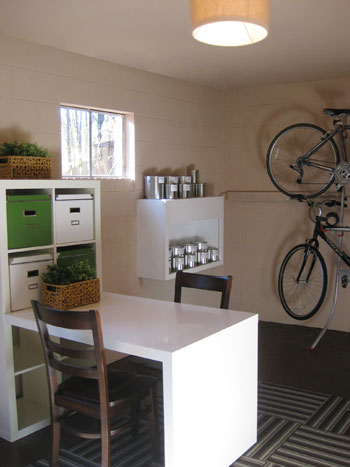
Plus we jumped a the chance to organize and identify our new paint cans (yeah, we’re nerds and we actually went to Office Max and got printed labels). But in our defense, they’ll really come in handy since we’ll never lose the name or the formula of any of our house’s hues again.
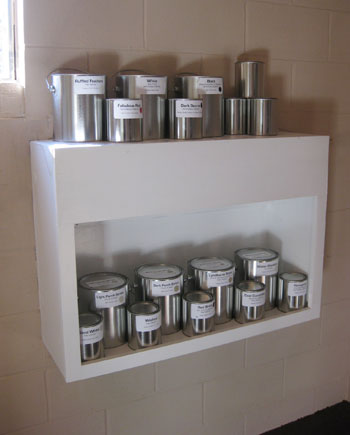
In the end our little matching paint can collection looked so good that it was actually worthy of being displayed out in the open (and we picked up a cheap-o paint pouring spout that will keep these cans pristine and easy to seal for the long haul). Click here for more details about our paint station project.
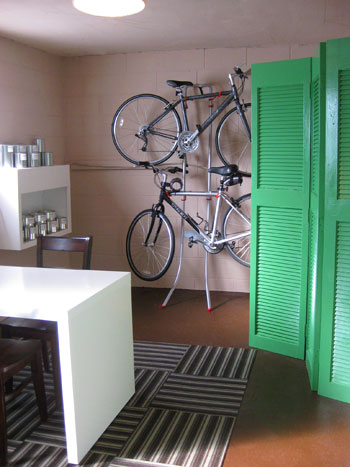
Then it was time to obscure our water heater, but we didn’t want to build anything around it that would be too permanent or difficult to move in the event that we need quick access. After filtering through ideas like a hanging an all weather curtain suspended from the ceiling or building a bookcase on wheels that can be pulled away in a snap, we decided that a simple folding screen made from secondhand bi-fold doors (picked up for just $18 at our local Habitat For Humanity ReStore) was the way to go.
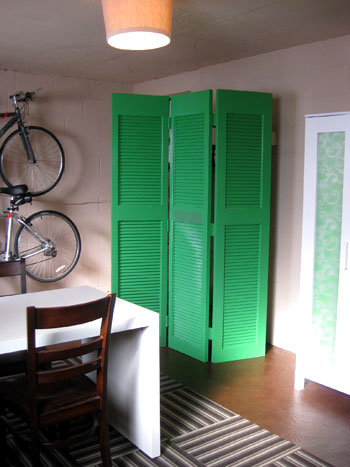
All we had to do was hinge them together (with the free hinges that came with the doors) and paint them a fun punchy color (that we plucked directly from the bins in our Expedit workstation and the plastic storage containers that we stacked under that table by the window). After a few coats of Benjamin Moore’s Bunker Hill Green 566 (which we had color matched to a quart of Behr paint so it only ran us $14) it was the perfect way to obscure that eyesore of a water heater without blocking access to the other side of the basement. Happily, we still have over 35″ to walk around, roll out bikes out, etc. Click here for more details about our DIY bi-fold door screen.
Then all that was left to do was apply a bit of window frosting film, which we accomplished in less than 40 minutes (and for under $27). We love how the light still floods the room (anything to keep it from looking as dark and prison-esque as it did before the makeover!) but it provides 100% privacy from the exterior, so no one can peer into our little storage mecca uninvited.
Oh and not only did we apply frosting film to the both of the basement windows, we also opted to cover the large pane of glass in the door for even more privacy and that posh and polished look. Click here for more details about our window-film application process.
Long story post short, we can certainly appreciate all that we gained from solving the moisture problem, painting the floor, selecting a workable floor plan, bringing in affordable furnishings, updating the lighting, adding a low-maintenance area rug, hanging bikes as art, papering the armoires, building a punchy green privacy screen, and frosting the windows. So there it is. The Cinderella story of a room that looked so sad-slash-terrifying and served absolutely no purpose other than to provide housing for neighborhood spiders. Heck, for old time’s sake let’s take one last look at the nastified room that we started with just a little over a month ago (afterwards scroll up to the last four photos to compare ’em to the “afters”):


And now for the much awaited budget breakdown. Here’s what we spent for the entire project:
- Drylok: $325 (from True Value)
- Floor paint: free (already owned)
- Ikea desk, bookcase, two armoires, storage boxes: $344
- Brown chairs at workstation: free (already owned, extras from dining set)
- Bike rack: $39 (from Target)
- Overhead lamp shade: $25 (from Target)
- Plastic storage bins: $73 (from True Value)
- Wrapping paper for armoire doors: $6 (from Target)
- Paint station: $58 (cans from True Value, labels from Office Max)
- Carpet tile area rug: free from Flor (who also gave one away to a lucky reader- thanks Flor!)
- DIY water heater screen: $32 (from the Habitat For Humanity ReStore)
- Frosted windows: $27 (film and supplies from Home Depot)
- Grand total: $930
Isn’t that surprising? We were totally shocked because we actually budgeted a few thousand dollars to turn that damp and freakishly infested dungeon into a clean and totally functional storage room. And when you think about how an armoire or a bookcase/desk combo can run you close to $1000 on its own, it’s pretty insane to think that we got all the furniture in the room and all the supplies to make the room waterproof & furniture ready plus all the extras like the bike rack, the lamp shade, the paint cans, the water heater screen and the window frosting film. I know, I know, we’re babbling. But we had to do the math like twenty times before we believed our eyes. Yeah, we’re officially flashing some jazz hands over here.
And because a few people actually requested a time breakdown as well, here’s a rundown of approximately how long each project took:
- Prepping, Dryloking and painting the floor: 25 hours
- Assembling and placing all furniture: 4 hours
- Grabbing the bike rack and storage bins: 1 hour
- Organizing storage bins: 1 hour
- Papering armoire doors and installing overhead lamp shade: 30 mins
- Transferring paint for paint station & printing labels: 1 hour
- Installing carpet tiles: 20 mins
- Building and painting water heater screen: 2 hours
- Frosting windows: 40 mins
- Total time spent: 35 hours and 30 minutes
We actually took our time and tackled all of these projects over the course of a few weekends and a few week nights (spread out over a month and a half). But if anyone’s in a time crunch and wants to devote more hardcore work days to the project, they could probably get ‘er done in less than four ten hour days (or two consecutive weekends, so there’s some drying time worked in after Dryloking and painting).
So that about does it for the basement wrap up. We hope you guys enjoyed this little step-by-step journey through our big makeover from start to finish. We’re definitely planning to use the “new” basement to store lots of stuff for years to come (we can only imagine how handy it’ll be when we amass all the extra equipment that goes hand in hand with having kiddos). But enough about us. We’d love to know how you use your basements (or attics or garages or any other bonus space). Is it strictly for storage or used to sleep extra guests or even converted into a cozy man cave or den for the whole family? Do tell.
Psst- Want to look back on our big basement makeover from start to almost-finished? Here’s the first post, the second post, the third post, the forth post, the fifth post, the sixth post, the seventh post, the eighth post, and the ninth post. Good times.

Emily says
Can I just say that you both are absolutely amazing? I am in awe every time I see the transformation of your rooms. You both are very talented and I wish I had a designers eye like both of you. Keep up the good work!
Kate @ Twenty-Six 2 Life says
Awesome job! I’m so impressed that you managed to do it all for under $1000 too. You really can have great design on a budget.
Jenny @ Words On Wendhurst says
Yay for no more jail cell! The basement looks great, and I love the color scheme you went with, that already works with the Drylok color. I love how you can make a basement, that’s used for storage, look chic and stylish. A+ youngsters!
Stefani says
You guys did a fantastic job. Speaking of storage spaces – I’ve been curious for a while if we’re ever going to get to see inside your garage? Is that another project coming up?
YoungHouseLove says
Hey Stefani,
Sure! Here’s a fun little post all about a big garage clean-up we did a while back: https://www.younghouselove.com/tackled-together-the-garage/
It still looks pretty much the same except for some bathroom demo rubble that we have to bring to the dump whenever we get a spare moment!
xo,
s
Jessica @ How Sweet says
I can’t get over how cost-efficiently you guys have been able to do things! I have been reading through the site and have found so many helpful tips!
Christina says
the basement looks great. loooove it! you guys are sooo talented.
Eric says
Wow, it’s great to finally see everything put all together. Great JOB! And yes, it’s incredible how much $$$ you save when you do it your self (As well as the satisfaction, and knowledge, and all that other great stuff).
Sarah says
I heart Ikea! Love your basement, lots of inspiration! We just picked up a wardrobe at Ikea for a kitchen pantry, and we’ll use them once we start our basement project, hopefully next Spring!
Ashley M. [at] (never home)maker says
Awww, congrats!!! It looks AMAZING! I mean — talk about transformed.
I think my favorite part is the little double-sided desk thing you have going on. That way, when you’re going through what you have stored down there, you won’t just rummage through it. Instead, you can sit, ponder, and thoughtfully select whatever it is you need, etc.
Carol N. says
What a great job and on a budget too! We have a full size basement, app. 2400 sq. ft. We finished all but the garage area into liveable space several years ago. We have an exercise room, an office, a full bathroom and a den or library room. We also have what I call my husbands ‘golf room’. When we built the house we made the basement very deep and the celing is not finished in that room so my husband can take a full backswing into a large net. He keeps all of his sets of golf clubs and practice paraphanalia in that one room so the rest of the space is (mostly) organized and ‘stuff’ free.
Cassity @ Remodelaholic says
It look so great. I am not sure how I missed the lamp shade idea, I LOVE it! I have some lampshades kicking about and that idea would be perfect for my laundry room so thanks! I’m off to go fix that right now!
Thalla-Marie says
Very inspiring! I am aching to do my own basement now! We don’t have any moisture issues, would you recommend painting the blocks instead of dryloking them? Were your cement blocks less than neatly mortared like ours?
YoungHouseLove says
Hey Thalla-Marie,
If you don’t have any moisture issues you can just use regular latex paint on brick or cinder block and it should suck it right up! In fact, you might want to prime everything so it’s less absorptive. Either way you’ll probably go through more paint than you would on drywall but the result will be so much more finished looking. Hope it helps!
xo,
s
Kelly says
You guys did a great job! The one thing I wish our home had was a basement. Hopefully our next home will have one!
Sherry (or John or even Burger)- who ever happens to be online :) Did you guys find out the sex of the baby or are you having a surprise? Sorry if I missed a post about it! :O)
YoungHouseLove says
Hey Kelly,
Good question! We have yet to find out the sex of the baby (that appointment is still a few weeks away) but we promise to share the big news when we know something! Stay tuned…
xo,
s
Chelsea says
Wow, what a huge improvement! It looks so clean and homey, too! It’s amazing what a little (or in your case, ALOT) of paint and some elbow grease (and a little decor) can do to a room. Fantastic! :)
When we moved into our first house in May, our basement was finished, but hadn’t been touched in about – oh, roundabouts 40 years. We had a fun “battle of the spiders” as well when we remodeled the space – but after new paint (and a gallon of caulk!), some carpet and furniture, it’s like a whole new (clean and spider-less!) space!
kay says
Very very nicely done!
One question, you don’t find the dark floor actually shows the dusty footprints? (I have dark-ish concrete stained floors that drive me nuts). I was determined that my next stained concrete would be much lighter (which takes allllll the fun out of it)…but I’m starting to wonder if it’s the high-gloss, not the color that drive me into crazy-swifer-fits? Any practical experience?
YoungHouseLove says
Hey Kay,
Good question! We actually used the same chocolate porch and floor paint in our basement that we used in our sunroom (directly above it) so we already knew we loved the color and the way it performs on a day to day basis. For the most part it’s very tolerant to dust and dirt (it actually hides it well thanks to the deep saturation) but occasionally salty snowy feel will leave light marks (which can easily be wiped away) that would probably be less obvious on a lighter floor. But because dirt and hair and all the other dark stuff that collects on the floor is less noticeable thanks to the darker color we’re super happy with our choice. Our guess is that there’s probably no perfect color since dust and dirt and chalky footprints come in all colors so they’re probably each more obvious on different backdrops. Hope it helps!
xo,
s
Sarah says
I am just completely amazed!! I’m going to pass this post along to my parents – they bought a new (old haha) house last year and are itching to finish the basement. They keep using money as an excuse but you definitely outdid yourself on this one – UNDER $1,000!!!!! Congratulations and thanks for being an inspiration!!
Kate says
well done you guys!
Shelley @ Green Eggs & Hamlet says
I didn’t see the two brown desk chairs in your breakdown. Did you already have those or were they a new purchase?
YoungHouseLove says
Hey Shelley,
Yup, we already had those chairs. Good eye! They’re actually from our dining set (we replaced two of the chairs with a leather storage ottoman just to keep things interesting) so we’re thrilled to have a place to store them where they actually fit right in (without fearing that they’ll get mildew or spiderwebs on them!).
xo,
s
Caitlin says
Truly an amazing transformation! It’s really inspiring to see what you did, and on less than $1000 to boot! I’ll have to show this post to my husband!
Tran says
I hope your city collects hazardous waste such as old paint. I’m glad my city does it every month, I would hate to know what people would do if that service were not available.
YoungHouseLove says
Hey Tran,
No worries! As we mentioned in our earlier detailed paint can post (which we also linked to in the post above) we drop all of our paint and stain cans off at our local recycling center which has a hazardous drop area especially for paint, primer, stain and other nasty solvents. Hope it helps!
xo,
s
Amanda says
Awesome job! That drylocking does NOT sound fun. But it looks so worth it, and great job being on a budget!
Angie says
As always – an amazing transformation!! I love how you show the progress in stages too. Funny timing – we are considering our basement “done” today too. The carpet is being installed as I write. We still have to do some decorating, but the really hard labor is over (we did most of it ourselves too, but we decided to leave carpet installation to the experts) And we can now have some extra entertaining space for the holidays. Congrats on another successful project!
Yulia says
So inspiring!!! I have a question about paint: you’ve mentioned before that you constantly do touch ups with paint. How do you do it without leaving touch-up marks? I tried touching up a few walls(that had been painted using flat paint), but afterward I was sorry that I did it. At certain angles it’s very obvious where I touched them up and I think that I’m going to have to repaint the whole wall once the weather gets better. Trim work seems to be forgiving, but how do you do walls?
YoungHouseLove says
Hey Yulia,
Touch ups with flat paint seem to work best for us when we’re using a quality paint brush (nothing all clumpy and dried out) and we apply soft feathery long strokes that go a few feet further than the area that needs to be touched up in all directions). By feathering the paint out in a wide radius (as opposed to glopping some paint on a small area in the wall) there’s much better blending and when things dry it’s nearly impossible to see where you touched things up. Hope it helps!
xo,
s
hjc says
Fantastic! It even looks like you have room for a third armoir on that wall if the need ever arises (although with your amazing organzational skills, you might never get as overstuffed as the rest of us!). We have a huge detached garage that is just brimming with *junk* after twenty years in our home. I’m sure we could get rid of most of it without missing a thing! Great job, as usual. Thanks for sharing.
Kim at Yellow Brick Home says
Shwew! That was quite the overhaul!
Well done, and the space looks very inviting!
Kerry says
Haha, do you guys watch Gordon Ramsay on the BBC America? Your headline on this post reminds me of the way when he cooks (especially on “F Word”) he says stuff like “Chicken with balsamic reduction: DONE.”
YoungHouseLove says
Hey Kerry,
We’ll have to check our Gordon Ramsay! We haven’t seen his show but he sounds quite entertaining. And a balsamic reduction sounds delicious!
xo,
s
Sabrina says
Just discovered your blog and can’t say enough how inspiring it is!
The hubby and I are in the process of house hunting and after spending time on your site, we’re much more open to getting house that needs a little more work. We almost feel let down now when the house is too nice! :)
Thanks for sharing!
Cecelia says
What? No wet bar and karaoke machine?
(kidding…)
Splendid job! I love everything you’ve done and can not believe how low you managed to keep costs!
Jennifer S. says
We have a 16’x22′ unfinished mudroom or utility room on our first level of the house. We have a laundry section, a craft table for the kids, pantry shelving, and an Expedit (5×5) shelving unit that we are in the process of converting to lockers for our children. I saw someone post a link on your facebook page about doing this and I snagged one off of Craigslist last week to try it myself. Thanks for the inspiration!
Christine says
What an amazing transformation! You really show what you can do with a lot of imagination and style and not too much money. Where can you get those paint cans? I also want to organize my disastrous paint collection.
YoungHouseLove says
Hey Christine,
We actually got them at True Value! Most hardware stores have them for just a few bucks. Here’s a post with more details about the whole project: https://www.younghouselove.com/tackling-the-basement-chapter-seven/
Hope it helps!
xo,
s
Stewart says
Love it!
My only question is about the floor – is it every sticky or tacky? I have seen a few painted floors before and when you move the furniture the paint pops and comes up.
-Stew
YoungHouseLove says
Hey Stew,
Good question! The floor has completely “set” in both the sunroom and the basement (we used the same Valspar Porch & Floor paint in both rooms) so we can easily rearrange furniture, rugs, etc without any tackiness or peeling paint. Perhaps the newer floor-specific paints on the market are better about this and you could give it another try? We love the Valspar stuff we used! And of course we always wait for the floor to thoroughly dry before placing furnishings back in the room (or there’s definitely a risk of pulling up paint with the furniture when you move things around). Hope it helps!
xo,
s
Stewart Pillow says
Sounds like a plan Stan! I would love to get my hands on [in] some fresh floor paint next spring!!
Lissa Grubbs says
Hi young things….
I know you’re busy, but I had a quick question about the basement re-do. Our house is 1906 vintage with old stone walls (not poured foundation) and a nasty-nasty floor. I’d love to superclean the floors and then paint them with the drylock. When I googled it, it said that drylock cannot be used on concrete floors. Seems in contrast to your A++ job. Advice please? Doing the happy dance because I’ve found an 18 year old young man to help me with this project.
Lissa
YoungHouseLove says
Hey Lissa,
The oil-based Drylock we used said it was great for any raw and unsealed surface like concrete, brick, cinder block- and we didn’t have any issue with it. Perhaps what you read said that it can’t be used on sealed or painted concrete floors? That would make sense since it’s most effective when it really soaks in to create an airtight and watertight barrier. If it helps, the True Value experts also recommended it’s use on our concrete floor, so we’d say go for it!
-John
Kat says
Love the job on your basement!
Question: We are re-doing our finished basement and want to brighten the place up a bit. Do you have any paint color ideas that would work in a dark basement with 2 windows?
We want to use the floor paint you used, but do you think it will darken the room?
Any advice would be much appreciated!
-Kat
YoungHouseLove says
Well you saw how dark and scary our basement was and it only has two tiny windows. Happily, some light tan on the walls with those chocolate floors really brightened and cheered the place up. So as long as you pick a light shade for the walls with those floors it should feel bright and welcoming. If tan isn’t your speed you could try a soft butter yellow or a light gray-bue. Oh and bring in some light furniture or upholstery. Hope it helps!
xo,
s
Margie says
Love your site and was just searching for basement ideas when I came across this post. Our house is from 1918 and has an old stone foundation. I’m not sure if it’s good to paint this the same way that you paint cinder block. Our basement definitely has the dark and spooky feel, and I’d love to find a way to brighten up the walls so that it’s a better place for storage. Any ideas?
YoungHouseLove says
You definitely want to read the can of Drylok to ensure that it’ll work on your stone foundation, but we believe that we’ve heard of others brightening up theirs in the same way that we did ours, so we say go for it as long as it’s recommended for that application. It’ll feel like a whole new room!
xo,
s
Micki S. says
You guys did an amazing job! I have a question-we are building a house with finished basement with little to no light down there-what type of lighting do you recommend to brighten it up? Thanks!
YoungHouseLove says
It’s all about personal preference. We love how an almost flush mounted oversized drum shade can look above a seating area or over a game table, and recessed lights are another way to brighten things up. You can also avoid wiring anything at all and just bring in an abundance of table and floor lamps to make sure it’s not too dark down there. Hope it helps!
xo,
s
maia says
do you mind sharing how ‘easy’ it was to mount the lampshade on the ceiling mounted light?
YoungHouseLove says
Here’s a post with more info for you: https://www.younghouselove.com/tackling-the-basement-chapter-five/
Hope it helps!
xo,
s
Barbara Berman says
I love love love this!! I already told my hubby we are doing this next spring, as I am pregnant now :) Thanks for all your beautiful I ideas on the cheap!!
Kristin says
Had a question about the Aneboda wardrobe…I was thinking of using this (or something similar) to put in our basement (almost done finishing it). It would need to go in a corner to hide a water pipe so the back of the cabinet would need to have a cut out (the pipe it a water shut off and needs to be accessible). My question is…do you think this would affect the sturdiness of the wardrobe if part of the back were cut into? Any other solutions you can think of to hide a pipe but still have access to it? I’ve thought of a screen/room divider with hinges too but I a guess some sort of table or shelf would hide it but also give me storage too. Thanks!
YoungHouseLove says
Hey Kristin,
Cutting into the back would compromise the sturdiness of it, but you could probably stabilize it again with a few L-brackets inside or even an interior 2×4″ brace. But if that sounds complex, the divider option is certainly less risky (if you don’t need the storage, of course).
-John
Michelle says
Hey you guys! We’re in the very, very beginning stages of cleaning up and planning a refinish for our basement and I’ve been catching up on your re-do here, nice job!
Our basement has got good “bones” to be a really usable space someday (which is sometimes rare with an older, new england home :) Anyway, we’re pretty hesitant to start the first step – Dryloking. It’s critical for us since we do have some seepage through the floor in the wet/humid seasons (now). The floor is not an issue – we’ll be fine with Dryloking that… but we ran in to a snag regarding the walls. Our concrete block walls are actually already painted… or sealed perhaps? We can’t tell, but we know they aren’t bare. If they’re sealed/Dryloked – whoohoo! Less work for us. But if they’re painted, that’s bad news. We know we’d need to strip all the paint and get down to the bare concrete to start the sealing process properly. SO, here’s my big question… do you know a way for us to tell? We don’t have noticeable seepage coming through the walls but don’t want to take the chance, ya know? Any advise you have would be great!
Thanks!!
YoungHouseLove says
Good question, Michelle – but unfortunately we haven’t encountered that sort of thing so we’re not sure how you’d tell if it were paint or drylock, Perhaps someone at your local paint department might have more expertise to share? If not, UGL (makers of Drylock) have a customer service number who could possibly help too: (570) 344-1202. Good luck! We’ll keep our fingers crossed that it’s already Drylocked.
-John
Susan says
Basement looks awesome! You mentioned above that you color matched a can of Benjamin Moore paint to a can of Behr to save you money. I know Behr paint is the best you can buy, but it’s so expensive. Is Ben. Moore just as good quality wise? I have a few pieces of furniture to paint and I want them to be good quality to sell so I don’t want to buy crappy cheap paint and disappoint a customer.
YoungHouseLove says
Hey Susan,
Benjamin Moore paint is actually a lot more than Behr paint but quite worth it to some people. Any paint from Home Depot or Lowe’s will do the job (it might just take more coats, and might not look quite as tonally rich as the expensive stuff). So either way you really can’t go wrong- it just matters how much high quality paint is worth to you.
xo,
s
Sayard says
Love the Petersik sign in the basement with the black & white photos.. I’ve got the photos to spell our last name which is also 8 letters but I can’t find a frame anywhere to fit it.. I can only find ones for 5-6 letters.. where di you get yours??
YoungHouseLove says
That was actually a gift from a company that makes them (so we imagine they make all sorts of frame sizes). Maybe one way to DIY it would be to buy a long glass frame and cut a mat with the right amount of openings for each letter. Hope it helps!
xo,
s
April says
Wow, nice work!! I’m curious… what did you end up doing with the crawl space opening? (I hope I didn’t miss it…) We’re trying to figure out what to do with ours right now, and it’s not in a position that could be conveniently covered up with, say, a folding screen.
Thanks!
YoungHouseLove says
Hey April,
We just painted the wood door that was there white and used weatherstripping around it to seal it off so bugs didn’t come into the basement. Oh and we added nickel handles to the door so we can easily remove it and put it back up with those handy handles. Hope it helps!
xo,
s
Julia says
So, my husband and I are fully remodeling our basement and I ran across a cool tool that I thought was the bee’s knees. (I also thought it was right up your alley.) It is called Cut-N-Crown. Ever heard of it?
I saw a demo at a home remodeling showcase and I bought it on the spot. Check out the YouTube video. It just seemed right up your alley!
YoungHouseLove says
Thanks so much! Off to check it out…
xo,
s
Christina says
Your (old) basement gives me some great ideas for our basement, which has a similar gloomy, concrete feel! Just thought I’d share a tip my dad gave me for storing paint – save the plastic half-gallon jugs that you can buy orange juice in (not the flimsy gallon jugs that milk comes in, but the hard plastic half-gallon size) and store your paint in there. It’s a great way to re-use those containers, and they are clear, so you can easily see the paint color. Plus the nice wide top makes pouring easy!
YoungHouseLove says
Love it! Thanks so much for sharing!
xo,
s
Marissa says
I was just introduced to your blog! Its awesome, specially since we bought an older home and this inspires me to be ok with having issues…..
We pulled out old carpet in our room and the concrete slab was smelly like mildew…….we bought some Drylok Latex Waterproof sealer and applied it after cleaning the floors with bleach and water…….I hope it works for us! We placed carpet over it I hope it works against any moisture. What scares me the most is mold you know? Good job on the basement!
Shanna says
Hello, Youngsters!
My husband and I are first-time homebuyers and the home on which we are currently under contract has a sump-pump in the basement. We believe water is a home’s worst enemy, so the fact that the home needs a sump pump is especially terrifying. Do you have any experience with sump pumps? Should we be concerned? Thank you for your insight!
YoungHouseLove says
so sorry, we don’t have any experience with them, but we’d definately recommend getting a full home inspection! Our best friends had a sump pump in the basement of a house they bought and it was malfunctioning and their basement was flooding, but once they got it fixed, all was good :)
xo
s
Laura says
Dear John and Sherry,
After reading about painting/sealing concrete floors and basement walls, I am scared to do it. It is like reading the warnings on the sheet of paper they make you sign at the doctor’s office. Because you moved you do not know the long term outcome on your painted basement. Would you find out what John’s sister did to her basement floor and how long it has lasted. We have no water coming into the basement but the floor does get dark (sweat) when it is very humid and mold grows down there. I hate to seal/paint it and then have it peel and be an awful mess. Thanks.
YoungHouseLove says
I think if you scroll through the comments on the post about John’s sister’s house (the House Crashing one) she stops by in the comments and shares what she used on the floor and how it was applied! Hope it helps!
xo
s
Courtney says
We are planning on painting our basement. It does not daylight out or have windows. Our gas furnace and gas water heater are both down there. I noticed you mentioned the fumes from drylok. Would we need those appliances shut off in order to paint? By the way y’all’s basement looks great!
YoungHouseLove says
Hmm, I’m not sure. Anyone have the answer for Courtney? Maybe call the number on the can (or website) to double check?
xo
s
Courtney says
AMAZING!!!! Now I know I can turn our unfinished basement into sn awesome living space on a budget! Thanks for the tips!