You guys may remember the sunroom quickchange that occurred a few months back when we turned our former third bedroom (which once housed a West Elm daybed and a desk) into Clara’s nursery. Being work-with-what-you-have people, we brought the daybed from that old bedroom of yore out into the sunroom, and we mentioned that someday we would hopefully get around to priming and painting it white for a more balanced look (since it’s about a foot away from our other already-white West Elm daybed). We actually didn’t think it looked too bad when it was dark since it worked with the metal framing on the glass doors that surround the room…

… but now that it’s primed and painted it definitely feels more balanced to us. You know we’re not huge everything-must-match people, but we thought since both daybeds had different pillows and a different design (one is a lot less intricate) that keeping them in the same white palette would keep the L-shaped arrangement from feeling too off-balance. Plus we have more tricks up our sleeves to add a ton of layered pattern, color and interest in future phases of this project (so the daybeds will serve as a nice calm foundation for the space). Stay tuned!

Of course it also helps that the trees are green again and we added some pops of color to each daybed (in the form of a few already-owned pillows that were displaced from the guest bedroom which we’ve since transitioned into our home office/guest bedroom/playroom). Oh and in case you’re wondering, the two floral pillows were a gift from a family member (we believe from Bed Bath & Beyond) and the larger blue pillow on the other daybed is from Marshall’s (snagged for $6 a while back).
And for anyone who’d like to know how we went about priming and painting our daybed, here’s the play by play. First we removed the mattress and the linens and placed all four feet on squares of cardboard:
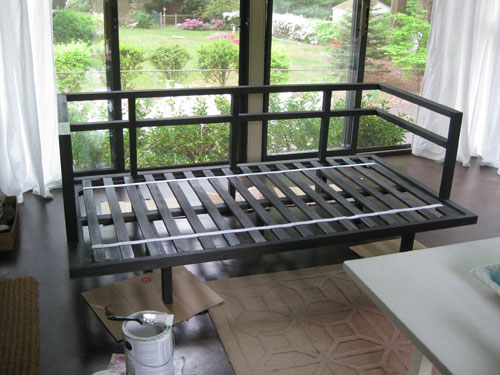
Then we used Kilz oil-based primer (to keep the wood stain from bleeding through and ruining our finish) that we applied as thinly and evenly as possible with a brush. Note: to anyone who doesn’t paint nearly every weekend, you might want to toss down a drop cloth to safeguard the rug/floor against drips. We’re just cocky little painters who make do with the cardboard-under-the-feet-method, but it has taken us years of painting our hearts out to get there. Oh and if your wood surface is glossy (covered in polyurethane or polycrilic) you’ll need to sand it first to cut the gloss and help the paint adhere. Luckily our daybed was a very matte finish (dry and absorbent feeling, sort of the opposite of glossy) so we didn’t need to sand.
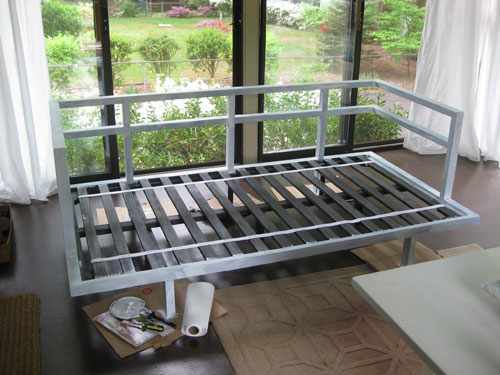
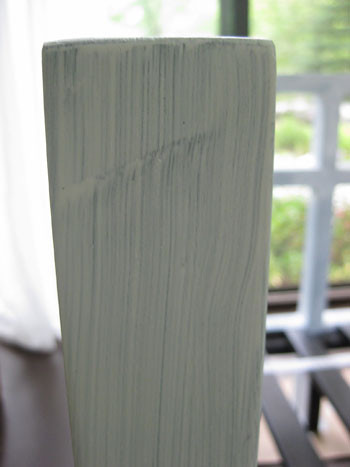
Usually only one coat of primer is necessary since you’re not trying to completely cover the piece and block out all of the black color, you’re just laying the foundation so the latex paint that you apply over it will stick well and that will block the color. It’s in primer’s nature to go on rather roughly (so never expect a perfect looking white effect when you’re done) and our best tip to you would be a nice even and thin application. It’s the people who try to load it on thickly for that matte look who run into tons of drying and bubbling problems later. Brush strokes are ok with primer- they’re practically unavoidable actually! In fact we snapped this close up photo to show you how one thin and even application of primer with a paint brush will most likely look. Then it’s time for paint.
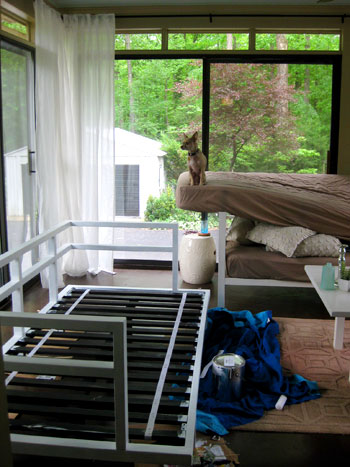
The day after we primed (just to give it time to cure up and dry) we applied two thin and even coats of white paint about an hour apart. We used Freshaire No-VOC semi-gloss latex paint in their stock off-the-shelf white color. And we actually used a small foam roller to apply the paint for a smooth “machine produced” look. This way it would match the other daybed’s look instead of having the painted quality that a paintbrush can produce when you use it to apply those thin and even coats of paint (neither a 2″ angled brush or a foam roller are bad choices for applying paint, so it’s really up to you to choose what you feel most comfortable with and whether you want the glossy hand-painted look or the smooth machine-made look – kind of like Ikea furniture).
Again, a thin and even application of the latex paint is key. Pop quiz: how many times have I said thin and even in this post? I apologize, but it’s super important. It really is the difference between a terrible result and a great one. That and ample drying time between and after coats, which is why we leave a day between primer and paint, at least an hour between paint applications, and 3-6 full days before putting things on the painted item and using it again. In this case we let our daybed dry for a full week before loading the mattress and the linens back on and moving it back into place. We just hate risking any creases or dings from being too impatient. So we lived with the daybed looking a little chaotic for a while, but Burger seemed to love his new lookout tower. Sometimes I swear our dog is a cat.
And after things were all put together again it looked like it had always been white:

Plus we’re happy to report that the color of our painted daybed looks a lot like that of our already-white daybed, so they really work well together. We’re not super neurotic when it comes to our white tones coordinating perfectly, so we didn’t do anything like bring home white swatches and hold them up to the white daybed to get the perfect match, but that’s definitely something that you can do if you want your painted piece to perfectly match something that you already own. Our similar white tones were just kind of a happy accident.

And although Burger’s perch on the displaced mattress is gone, he seems pretty happy with the result. We just love how light and fresh the room feels thanks to all that glass, the airy white furnishings, those pops of green and blue, and the breezy white sheers.

So that’s part one of phase one, and the theme of this phase is all about working with what we already have. Happily the cost for moving the daybed in and repainting it was zero dollars (since the primer and paint was already on hand along with the daybed that was freed up by the creation of our nursery). But we also had a dresser and a large mirror that were displaced from the guest bedroom when we converted that into an office about a month after finishing the nursery makeover. And we also needed a small wooden bookcase in the office (for Clara’s toys) so we swapped the one that used to live in the sunroom (along with the mirror above it)…
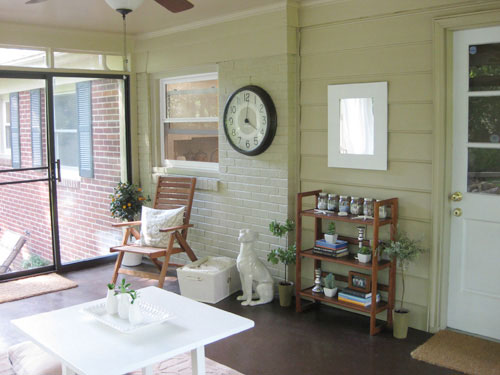
… with the dresser and mirror from the former guest bedroom.
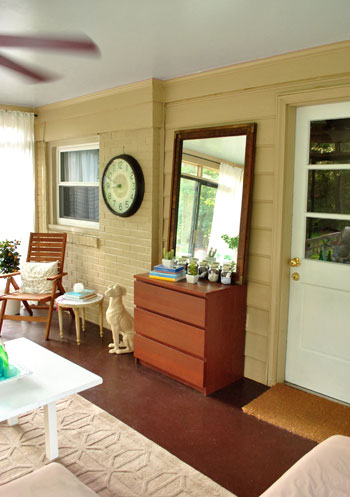
Everyone wins! The larger mirror and dresser provide lots of storage and reflect even more sunlight (along with our leafy green view) while the old sunroom bookcase can now be used to store lots of toys for Clara (the footprint of the bookcase is a lot smaller, so it works in the new office while the dresser never could). But again, this is just stage one of the sunroom switcheroo – so we have a lot more up our sleeves for this room in the pattern and color department! Hold tight for our next phase of the project.
But what about you guys? Have you ever moved a dresser or a daybed out of the bedroom and into a living area in your home? Have you painted something to help it fit in – or stand out? Spill it.
Psst- For more furniture painting tips and tricks, check out this very very very thorough tutorial. And happy painting!

Amy Wolff says
YES.. been waiting for this…
we have a sunroom just like yours…and didn’t want to do anything until I got your great advice.
SO.. did you paint the walls- especially the wall with the clock and dresser on it? It looks like a different color from the former pictures.
OR is it that great new camera you own?
THANKS :-)
YoungHouseLove says
Hey Amy,
It’s just that new camera and a different time of day, but the color can best be described as a wheaty tan tone. Here’s an old post about painting that wall with the clock on it (which used to be brick): https://www.younghouselove.com/we-painted-our-exterior-brick/
xo,
s
Cait @ Hernando House says
Love it! Can’t wait to see the next phase!
We’re doing some mini makeovers of our own, and we recently painted a tv console turned window seat to add a pop of color: http://hernandohouse.wordpress.com/2010/08/13/window-seat-revamp/
Amanda @ Our Humble A{Bowe}d says
We have a small dresser that has moved all over our house: http://ourhumbleabowed.wordpress.com/the-grand-tour/
It’s good that it’s so lightweight! We’re considering using a daybed as a couch, if we can make the back pillows work…
kristin says
This article came at the perfect time! I was planning on tossing my husbands desk from his high school days (honey colored wood desk) but thought instead I could paint it white, switch out the doorpulls and use it as a craft station for my kids. I had no idea where to start when painting furniture so now my list is ready…Home Depot here I come!
Jessica @ How Sweet says
It is looking fabulous!
Ericka says
I am impressed with your painting skills! My husband would have a heart attack if he saw me painting something with just some cardboard squares underneath the legs and the area rug in close proximity! Although I’ve painted a TON of things in my life, I still manage to be a little bit messy:)
marianne says
I primed and painted an old bedroom set and now our bedroom feels almost like a vacation beach house!
http://www.flickr.com/photos/mszeto/sets/72157624169460404/
and just for fun – here’s what I did with out media room:
http://www.flickr.com/photos/mszeto/sets/72157624363147954/
Rachel @ The Avid Appetite says
Love your ability to repurpose what you already have! Looks great – an inspiration as always!
Candice Matthews says
The room looks beautiful! Does the primer you use keep you from having to sand most furniture refinishing projects?
YoungHouseLove says
Hey Candice,
If a wood surface is glossy (covered in polyurethane or polycrilic) you need to sand it to cut the gloss and help the paint adhere. Luckily our daybed was a very matte finish (dry and absorbent feeling, sort of the opposite of glossy) so we didn’t need to sand. Hope it helps!
xo,
s
Mallory @ R. Simple Life says
Yes!! I have been anxiously awaiting these posts. I’m very drawn to your sunroom for some reason. I love the way the two daybeds look like they were meant to be together.
I recently painted two outdated, ugly $1.50 lamps to make them work for our house. In Air Force Blue, none the less. http://malloryandjon.blogspot.com/2010/08/shedding-some-light-on-situation.html
Mary says
Following your online how-to, I just finished a redo on a round wooden kitchen table, snagged at Goodwill for $35. Top was natural wood with sparkle glue and permanent marker (somebody’s kids had fun; the bottom/legs were an dark blue. Everybody say, “Ugly!” So I sanded, primed, painted white (twice), and varnished that baby, and now it’s too gorgeous for words. BTW, I snagged 6 already primed wooden kitchen chairs at a yard sale this weekend for $15, and I’m ready to start painting again. $50 for a kitchen table and 6 chairs since we already had the primer/paint/varnish. Thanks YHL!!!
Carol N. says
Looks great! I am all about repurposing what you already have. I use two dressers in my sewing room to store needlepoint supplies and have repainted those and given them matching hardware so they look better together. Earlier this year I moved a sideboard from our dining room to the sunroom to hold napkins and placemats as well as board games we play out there on the small dining table. You will see a ton of storage from having the dresser out in the sunroom.
Chris says
Looks amazing! I am in the process of painting our bedroom furniture white. Once question though…you guys didn’t do any sanding? I find it tedious and maybe I can get away with not doing it too!
YoungHouseLove says
Hey Chris,
If a wood surface is glossy (covered in polyurethane or polycrilic) you need to sand it to cut the gloss and help the paint adhere. Luckily our daybed was a very matte finish (dry and absorbent feeling, sort of the opposite of glossy) so we didn’t need to sand. Hope it helps!
xo,
s
Erin says
The Better After blog yesterday declared “white paint for president” and I agree. Once again, white comes through!
Are you guys just using fitted sheets on the daybeds? I have one but I never really know what to put on it to make it more “couchy” looking.
YoungHouseLove says
Yup, those are just cheap-o fitted sheets from Target. I think they were like $4 a pop. We decided to pick two of them up in the same tone but use different pillows to keep the daybeds looking related, but not like twins. The pillows really seem to be the trick to getting that couchy look. Hope it helps!
xo,
s
Catherine says
I love your makeover series posts! I always get so excited with anticipation. This one is no exception–can’t wait to see what else you do!
Dennis says
It looks great guys!
Patti says
I love how the dresser/mirror combo looks in the sunroom … more so than the bookcase that was there originally. Good tips for painting the furniture, thank you. I plan on painting the top of my dresser black and I’ve never painted furniture before, so this helps alot.
Stephanie says
Looks great! Just two quick questions.
1.)Is the reason you didn’t have to sand the daybed because you used an oil base primer?
2.) When I have used a foam roller in the past to paint a semi-gloss paint on trim, it seems to bubble up a bit and I end up going over it with a brush b/c it scares me. Am I doing it wrong with the foam roller? or do those little bubbles go away?
I love that no paintbrush look, but my trim still looks great, but maybe I was using too much paint? I was just to much of a scaredy cat to see what happened.
Thanks!
YoungHouseLove says
Hey Stephanie,
If a wood surface is glossy (covered in polyurethane or polycrilic) you need to sand it to cut the gloss and help the paint adhere. Luckily our daybed was a very matte finish (dry and absorbent feeling, sort of the opposite of glossy) so we didn’t need to sand. As for a foam roller, we recommend the super small 4″ kind. Then just apply the paint slowly, thinly, and evenly (quick rolling can rile up the paint and cause bubbles). Of course if you get a better result from a brush stick with that (some people are definitely better at certain application processes so go with what works for you!). Good luck!
xo,
s
TD says
You guys are seriously awesome!! When I saw the two day beds together I liked it, but I didn’t love it. You were so right about that balancing thing. I love the newly painted bed. Can’t wait for what else you have cooked up in there.
Diana says
Have you ever talked about how to clean up oil based paints/primer? That is really what is keeping me from using them.
YoungHouseLove says
Mineral spirits! We do our clean-up outside too so it doesn’t stink up the house. Hope it helps!
xo,
s
Beth @ bethcooks says
The colors look so great now! It’s awesome that you were able to do this for free. Great job guys!
liz @ btb says
I found a giant (fake) clam shell at the thrift store a few weeks ago and painted it gloss white. While it isn’t furniture, we’ve already used it in the kitchen (for hand towels), the bathroom (to hold soaps) and in our guest bedroom to hold midnight munchie snacks for our guests so they wouldn’t have to sneak into the kitchen.
http://bontempsbeignet.blogspot.com/2010/08/clam-digger.html
Jen says
Love your sunroom! I’ve always wanted one!
We have a chest of drawers in our living room..We don’t use end tables because we have a huge sectional so it sits at one end of the couch(up against the wall/in a corner) & I use it for all of our picture storage! I love it but I’m ready for it to get a new look!
Megan says
How did you all hang your clock on the bricks? I have a clock that I have been trying to hang on a brick wall in my kitchen. I tried using those adhesive hangers, but the clock kept falling. Thanks!
YoungHouseLove says
Hey Megan,
We use a masonry drill bit and carefully drilled a pilot hole into the mortar between two bricks and then were able to bang a nail into the hole. It’s been hanging for nearly four years now so it seems to work like a charm!
xo,
s
Lisa says
From my pre-married days I had two very nice nightstands that did not go with any of our bedroom furniture and were too big for our guest room where the rest of my pre-married furniture went.
So the nightstands are in our dining room. They actually work really well, the drawers give me plenty of storage for things like linens, silverware, and a fondue pot. Plus, the thing I loved when I bought these nightstands was that above the top drawer they have a little shelf that slides out. It’s perfect for serving in the dining room.
Rachel says
I love the new look of your daybed and what you’re doing with the sunroom! It looks like such a relaxing place to work or hang out.
I have a dresser that I got for free from my landlord back in, oh, 2006? I repainted it then because the finish was looking dismal, and I wanted to hide the chunks of veneer missing. It’s still yellow and turquoise but will soon get a new paint job when we move next month (thinking of using it for dining room storage, perhaps). My question for you guys is if you have any tips on restoring patches of missing veneer on old furniture pieces? Clearly I’m not deeply invested in the piece, but I would like it to look a smidge more classy than it does now. Thanks youngsters!!
YoungHouseLove says
Hey Rachel,
We haven’t actually taken on a project like you describe, but maybe using wood filler in those areas will help even them out? Good luck!
xo,
s
Lindsey says
Have you guys heard of the “Skippyjon Jones” children’s book series?? The comment about Burger thinking he was a cat made me think of the book my children have. If not, you should check it out! I’m sure Clara would enjoy them!
YoungHouseLove says
Hey Lindsey,
We’ll have to check it out! Thanks for the suggestion!
xo,
s
Amanda says
I love it!
Here’s two questions from a painting newbie:
1) Why did you use an oil based primer instead of latex. I always thought I needed to use a latex primer if I was going to use latex paint, but I guess not! Are there advantages to oil primers?
2) Do you ever spray paint? I’ve got a dresser and bookcase I’m repainting and I’m so tempted to spray paint.
Thanks!
YoungHouseLove says
Hey Amanda,
Oil-based primer is what the pros use and we have tried using water-based as a “shortcut” and all that happened is that the wood we were painting bled through and ruined our white finish… so now it’s all we use! It works seamlessly with latex paint (it’s just oil-based paint that can’t be followed by latex paint). As for spray paint, we use that for certain projects (like metal outdoor chairs for example) but for anything that’s wood and will be living indoors we have found that we get a far more durable and seamless finish with the method we outlined in this post- so that’s definitely what we’d recommend for your dresser and bookcase. Hope it helps!
xo,
s
Katie H. says
When I lived in my first apartment I had a long dresser that I put in the living/dining area as a buffet type deal. It worked well. I also ended up painting that dresser and the matching headboard black. And THAT was tough because they’re the cheap fiberboard/mdf stuff. I had to sand the crap out of them (by hand because I STILL dont own a sander) and then paint like a hundred coats or so before the paint stuck.
Mandy says
You guys never cease to amaze me! I love the way you always see how to repurpose things, I am slowly starting to get to that point. We have a living room set that includes a couch, loveseat, chair and ottoman in our living room but really needed a coffee table. I knew there was only room for the table or ottoman but not both, so came up with the idea of using the ottoman as a coffee table too! We went to HD and got a piece of pre sanded 1/4 inch panel and stained it with the stain we used on the porch and just sit it on the ottoman whenever we need a cofee table! We got it cut just an inch bigger on all sides so its safely perched there, and we can just tuck it behind the entertainment center or under the couch when not in use. You have really helped me get my creative juices flowing, love your blog (and house)! :)
AnnabelVita says
Great job! And you really are getting to be cocky painters if you don’t even move the rug.
I have a little bedside table that’s been painted a million colours and started off in my mum’s vicarage bedroom in the 40s!
My next furniture painting project is an old French child’s daybed (maybe a former cot?) that I’m going to paint up and make into a love seat.
Kate says
Funny you should say that! Just this past weekend I started working on repurposing an “old” piece of furniture. Back in college my then-boyfried-now-husband bought me a white Shabby Chic (from Target) vanity and stool set. I have used it for many years as a place where I got ready in the morning. Now that we are older and in the beginning stages of transitioning our “extra bedroom” (this is where the vanity used to be) into a someday-maybe nursery I had an idea to repurpose! I took the mirror off the back of the table, sawed off the pegs that held it on and used some wood filler and sandpaper to smooth it out. I have primed and now I’m in the process of painting a few coats of black paint. I bought new brushed nickel knobs for the drawer and I am going to put the table in our dining room. I LOVE how it looks! As far as the upholstered stool– I am painting that black too and reupholstering the seat in preparation of giving it a new home in our Master Bedroom. Just for looks– maybe a stack of some pretty books on top. Total cost… $6 (knobs) for the table and $4 (material) for the stool!
Thanks for the continuous inspiration!
Kate says
I wish I could have a dresser in the living room, it would be great for storage! Maybe in a future home where I have more space than our current apartment.
I recently painted the top of a a $5 Craigslist coffee table to make it blend in more (and to spiff it up). The veneer top had seen better days, but all the rest of it was in nice shape, so I just primed/painted/poly’d the top a dark brown. Since the bottom is a darker wood than anything else in the living room, the brown top helps it blend with the brown couch/dark brown wood on a chair (our side tables/tv stand/tv trays are all lighter wood).
One question: I know you guys use lots of poly on top of furniture. Our coffee table seems to be getting od markings that almost look like the poly is coming up slightly (the spots look slightly lighter than the surrounding areas) but when I rub them with a finger they disappear again. I can’t tell if just the movement of things is leaving a wierd mark on the top of the (satin) poly or if it’s actually coming up (and me rubbing it forces it back down). Have you ever seen that before?
YoungHouseLove says
Hmm, we haven’t! But if they disappear after you rub them maybe it’s just a smear or a mark on the surface that you’re able to rub away? Hope it helps!
xo,
s
Maura says
A friend just shared this site with me and what a joy it is! Me and my husband are recent first time homebuyers and I also have a teeny blog (in Richmond!) and this is a fabulous inspiration! I love your style and energy! I was starting to feel a little overwhelmed but now I have a renewed sense of determination to fix up our house!
Nichole@40daysof says
It looks great! I do have a dresser in my breakfast room. I changed the knobs from tiny silver ones to oil rubbed bronze.
There’s a picture on this post:
http://40daysof.wordpress.com/2010/07/27/bay-window-curtain-rods/
Kris says
Hello! Sorry if you’ve answered this question before, but I’m about to tackle painting an old dresser, so I thought I’d ask the pros.
My landlord has gallons upon gallons of Behr’s primer+paint-in-one (white latex, semi-gloss). If I sand down the satiny finish of the dresser first, do you think I could use that? Or should I not try to cut corners and pick up some oil-based primer? For what it’s worth, the primer+paint worked beautifully on an unpainted door, but I know that’s a different animal altogether. Thanks!
YoungHouseLove says
Hey Kris,
We’ve had nothing but issues and compromised results when we skip the oil-based primer so it would be our recommendation to use it. Hope it helps!
xo,
s
Amanda @geekdetails says
I love your sun room, you guys have done great things with it. I started painting furniture shortly after I started reading your blog. To date, I’ve painted our dinning room table and thrift store chairs, a new coffee table (great shape, bad finish, now pretty), shelves and bookcases. You have excellent advice on how to not mess up the project!
And I totally covet your daybeds/sunroom combo. It seems like the perfect place to read and nap.
YoungHouseLove says
Glad to hear you’re having such success with all those painting projects!
xo,
s
Sophie says
I’m in the middle of a painting project at the moment (:
We’re redoing our living room, and since we’ve moved in there have been big, black beams on the ceiling. With our old brick fireplace, it gave a nice ‘cosy cottage’ feel. But since our house is not a cottage, the fireplace was ugly and the majority of the beams don’t actually support anything, I decided I had to do something about them. One of the beams conceals a steel strut where a load-bearing wall was removed by the previous owners, so we ruled out removing all of them except that one. If one stays, they all have to! So, I’m in the middle of painting them white to match the ceiling. It’s quite tough going at the moment since I’m not used to holding my arms above my head for the vast majority of the day, but about 1/3 of the room is done and it already feels so much bigger!
Your little daybed painting project looks great! And I agree that Burger does seem to act like a cat sometimes, but being a cat owner myself, I can see a difference. Where Burger seems eager to explore and investigate his new climbing frame/mattress, my cats would not care. They’d just lay there and not even bat an eyelid at our foolish human antics (demonstrated by my cat Oscar who didn’t even flinch when my dad was using a very loud electric sander this morning.)
Wow, that was a long comment. Must be some kind of record! (:
YoungHouseLove says
Haha, that’s too funny! It’s true, Burger would act like he couldn’t care less if he were actually a cat! Hehe.
xo,
s
candace @ thecandace.com says
Three cheers for your sun room – it’s my favorite room of your house. The outside is so green and fresh with those lovely windows and I love your fabulous dark floors. I think the newly white daybed fits nicely and it’s always an inspiration to see you switch things around! Loved the post!
Michelle Gourley says
yey! the sunroom post we’ve been waiting for! loving it. have a hunch that something in the sunroom is about to get the fancy stencil treatment… :o)
in painting news, i’m about to put the 1st coat of poly on an old desk that i painted white. i wasn’t ready to give up the 2″ Purdy brush for the first coat of white paint, but i went for the foam brush (trusted Sherry!) with coat #2 and I LOVED IT!! SO MUCH FASTER and SO EVEN (especially on the top of the desk). i think i may still be using too much paint for my “thin and even” coat with the roller, but i’m sure i can wrangle up something else to try my roller on… :o)
Angela Fowler-WElls says
Love your room but I just have to say that I can’t get enough of Burger. When I see him in one of your pictures it just thrills me. I know you guys are busy but I wish Burger would post a little more on his blog……
CasaCullen says
it’s so amazing how painting the other daybed white really unifies the room! YAY for repurposing other furniture…might i say, i even think you should paint the dresser white!??!?! or even a pop of fun color? :) you know us, we love some white paint too!! great job, y’all! cheers – the CC Crew
nikki says
That looks great! Love the tutorial with primer. I don’t think I’ve ever seen a foam roller. My hubby and I are renovating our kitchen (on a budget and repurposing our existing cabinets)and we painted them…but didn’t use the roller…I notice small brush lines. We still have some paint left, so I hope it’s not too late and we could do another coat but use the roller to cover the lines? They’re not deep, but if you’re up close you can see them.
YoungHouseLove says
Hey Nikki,
Yup, it absolutely should work. Just keep things thin and even! Good luck.
xo,
s
Bromeliad says
Nice job. Looks both fresh and cozy.
Cheryl says
A couple of questions: one on painting and the other on daybeds:
1) We followed your directions on a previous post on painting wood furniture, to a T! We painted our oak counter stools black and added the polyurethane coat at the end and we were patient plus in the drying process. A few days later, we notice that we missed a few places with the black paint on early every stool (and we REALLY tried hard not to . . . ) so I touched up with black. Now all the places I touched up is very obvious as the polyurethane is shiny shiny and black paint touch-ups are not. SO: my question is — should I go over just those spots with the poly-coat or recoat all the chair with the poly-coat? As is, this is not lookin polished or good.
2) Re. West Elm Daybed: do guests report a good sleep? Is the daybed easy to sit on, not too wide and well supported in the back. We’re trying to decide — sleeper sofa, like a Rowe, or a daybed for overflow guests. Love the contemporary lines of the West Elm daybed!
Thank you for sharing your re-do’s. You are helping us all re-purpose what we have. I love to shop at home, whenever possible.
YoungHouseLove says
Hey Cheryl,
You best bet is to repoly over those areas that you touched up and see if it blends. If it still looks mismatched, a gentle sanding with 150+ grit paper followed by one thin and even coat of black paint and poly (the next day) should do the trick. Good luck! As for the daybed, it’s just a twin mattress on it so it’s as comfy as the mattress you buy. We have little mattress pads on ours so people seem to like them (we even spend the night in there for fun from time to time and it’s always comfy… until the sun gets us in the eyes in the morning!). As for comfort when sitting, it’s great for laying down and reading a magazine or sitting around for a bit, but it’s definitely deeper than a sofa so you don’t get the same ergonomic feeling of a sofa which is not too deep for your legs to bend when your back is against the pillows. But that definitely doesn’t keep us from hanging out nearly spring – fall out there though!
xo,
s
xo,
s
lana @ make a house a home says
i love the double daybed idea! we have been trying to figure out the layout to our sunroom – it has THREE doors and it a bit of a challenge when it comes to placement of furniture. thanks for the ideas!
LauraC says
Looks great guys! I agree the sunroom looks more cohesive with both daybeds white.
Quick question: I ran into an issue while painting our buffet table a couple weeks ago. I used oil primer and everything looked great, but the front four legs are round, with a lot of intricate carvings, a total pain to paint with a brush. So I did prime them but thought I could spray-paint them with some Valspar glossy white (rather than use the latex with a brush I used on the rest of it), and it would look a lot smoother. But the spray paint bubbled, peeled, and cracked as soon as I sprayed it! I didn’t see anything on the label about not using on an oil-based primer. Have you ever run into this issue? The rest of the buffet looks great, but the front four legs are awful and will take forever to fix!
YoungHouseLove says
Hey LauraC,
That’s so odd! We’ve never heard about that at all, and we’ve definitely used an oil-based spray primer like Kilz followed by latex spray paint. So sorry we can’t be of more help!
xo,
s
Jillane says
Would this painting technique apply to an interior wrought iron railing on a staircase? Although I would love to replace the thing altogether, I can’t right now. It started as a yucky, peeling black color. I would like to paint it white to make it a little more appealing and to open up the space. I already sprayed it with the Killz primer and it was a big mess! I don’t know why I didn’t paint it on; at the time I only thought of the spray primer. Anyway I am now ready to do the white coat – do you think a little foam roller would be a better option than spraying again or using a brush? Not sure how I will get in all those nooks and crannies. But the spraying was such a mess and the fumes were no fun either! Thanks – you guys are amazing! :)
YoungHouseLove says
Hey Jillane,
Yup, following that spray primer (assuming it was oil-based and not water-based) with black latex paint in semi-gloss or gloss should do the trick. We definitely recommend a paint brush and a few thin and even coats. Should work like a charm!
xo,
s
Miranda says
Awww! I just love Burger! He’s the cutest!
Wendy says
Am current using and have been using a chest of drawers in the living room as a TV cabinet. We have the TV on top and all the drawers are great for storage. We originally got it because it was super inexpensive (we went to an auction that was after a furniture convention in town….cheaper for the furniture guys to sell at a huge discount than ship the furniture to where it came from…fluke that we were there) and we wanted the TV higher off the ground. From there, we have also acquired a wardrober that we repainted, added shelves, and use as a storage cabinet in our formal living for dishes and stuff that don’t work well in the kitchen (really to get the breakable stuff out of cabinets the baby can reach).