That’s right. I broke out the word dastardly. And I know we should be hard at work on our office cabinets, but that’s a big job (aka: a weekend job – maybe even a two-weekend job) and I have been giving this rocker the stink eye since November (yes, even before we moved). For anyone who can’t even remember that far back (me), here’s a recap: I originally picked it up off of Craigslist for $25 because I really liked the simple lines of it. Then it sat untouched for over nine months until this weekend.
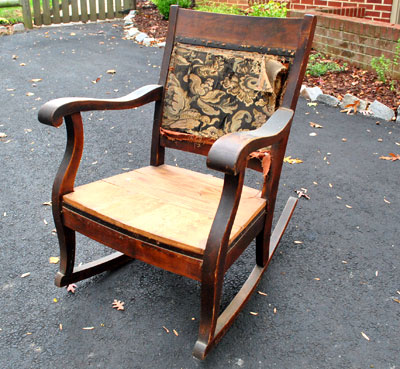
Why? Well, no sooner had I gotten it home than I realized I had no earthly idea how to reupholster it. At all. I mean I knew how to do the bottom (I’ve redone seats before) but the hole at the top completely confounded me because it had to look finished on both sides. Le yikes.
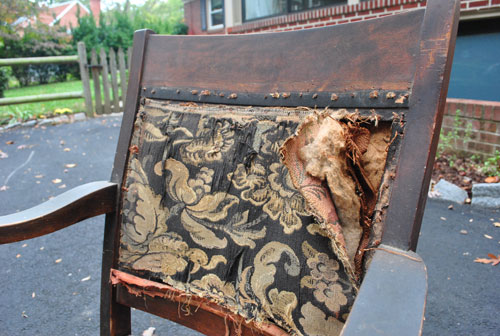
But I posted this call for help a while back and a bunch of you guys were awesome! I definitely learned that there were probably about ten ways to skin that cat (gross expression, sorry – but it was comforting to hear that even some very experienced folks described many different ways I could “go”). So it gave me the confidence to tackle it right away put it off for nine months and begrudgingly give it the old college try over the last few days.
I will disclaimer this entire process much like when aliens took over my body and I made a quilt for Clara, which is to say: I went rogue. I took in all the advice from you guys along with some google tips and some suggestions from a reupholstering-fiend friend of mine… and just played it by ear and did what seemed to work as I went along. So with that out of the way, allow me to share the madness that is Me vs. Rocker. Which is not to be confused with Man vs. Wild (Bear Grylls I’m not).
Oh and because this process was so involved, it actually took me a few days of work. Which meant it was a multi-phase thing involving lots o’ pics. So I broke it right down the middle for ya (since 40 pics in one long rambling post = madness that even we can’t endorse). So here’s the first half. And the second half is in the hopper for tomorrow (still have to snap some after pics for ya, but it’s almost all set).
Anyway, here’s how it all went down: First I gave my rocker the stink eye one last time. You know for old time’s sake. Then I got to work pulling staples and nails out of the frame along with the ratty old upholstery to see what I was dealing with.
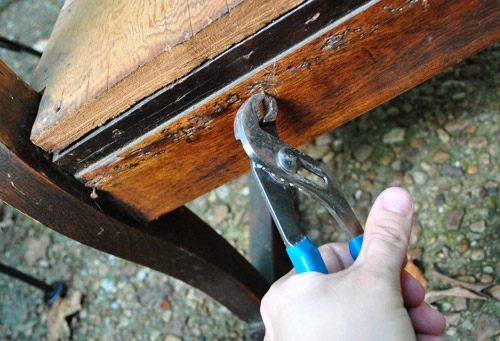
Oh and my tip would be to use a small channel lock pliers to pull things out. It was much easier than the back of a hammer or a needle-nosed pliers for me (although I still had to pull like crazy, this gripped better so I didn’t go flying backwards after tool slippage).
After about an hour I had a nice little pile going on. But I was only about 30% done.
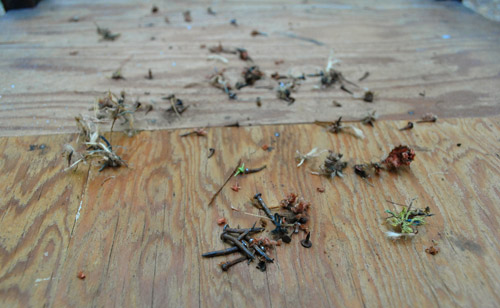
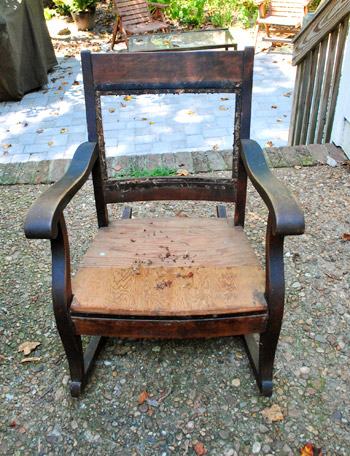
So I kept pulling old nails and tacks for a few more hours, and then removed the two wood seat slats and was left with this:
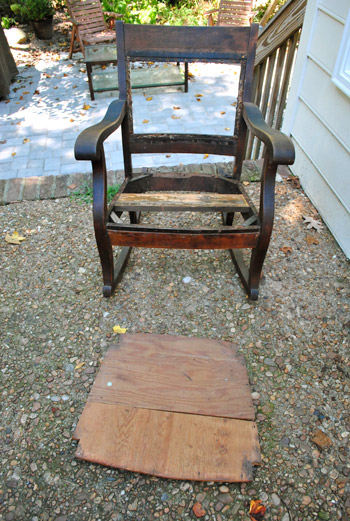
It was a pretty ugly sight for three-ish hours of work. And I knew I had some serious wood puttying and sanding to do when it came to the frame (to get it ready for some rich dark stain). But I was tired. So I decided to move onto a less strenuous step that I figured I couldn’t mess up. Upholstering the weird little two-pieces-of-wood seat. First I decided to tape them together so I could upholster it as all one thing (as opposed to two with a weird little seam). I just used some delicate surface painting tape because it didn’t need to be super heavy duty stuff (like sticky duct tape) because I knew once the batting and fabric were in place they’d hold it together for the long haul.
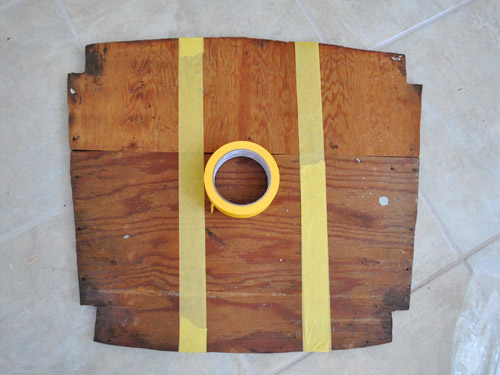
Then it was time for a bunch of layers of extra-loft batting. I used “Soft N Crafty” from JoAnn, which I purchased back in November when I thought I was going to tackle my chair (kind of embarrassing that I then just packed it up and moved it and it continued to sit around untouched for 8+ months, but whatever). I knew I could have used a big piece of foam for the seat, but I actually prefer wood seated rockers like this (John’s mom has the most comfortable one ever) so I decided I didn’t want too much cushion goin’ on. But I also knew that staple gunning one layer of extra loft batting around the back wasn’t going to do much…
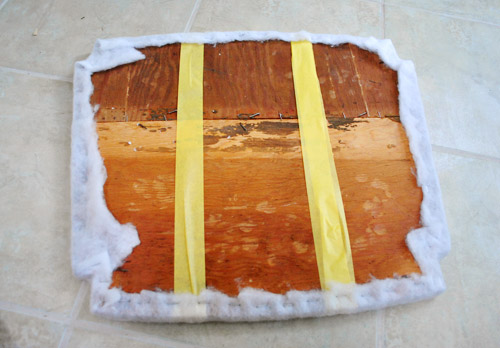
… so I applied a second layer…
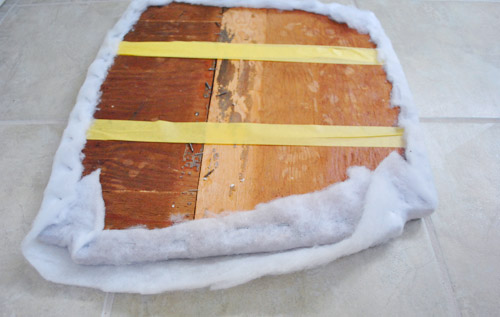
… and then a third, fourth, and fifth. By the end it was plush without being super sink-in squishy, which I liked. Nice and firm with a bit of softness.
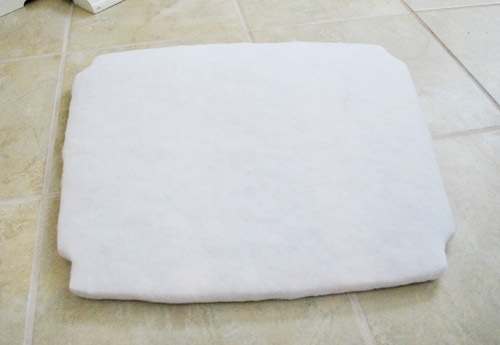
Here’s the point where I wanted to throw everything out the window. Yup, after five layers of batting applied staple by staple, I realized that the seat needed to be able to bend to fit past the arms and legs and actually lay flat on the base.
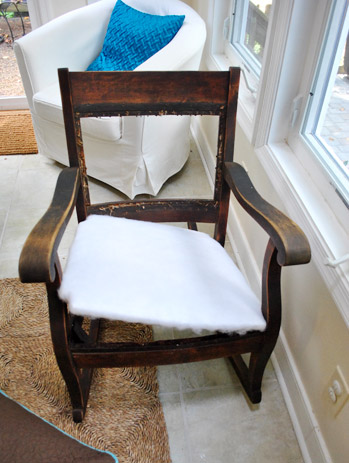
So I nearly broke down with visions of having to restaple five layers o’ batting after separating the two pieces of wood so they could hinge forward for just a second to be slid into place. Thankfully my sweet husband (who I always describe as the brains of this operation) pointed out that I didn’t have to unstaple anything and could just turn the seat over and cut the yellow tape that was running across the back and the batting should be flexible enough to fold forward (it wasn’t like I was trying to stretch it backwards or anything).
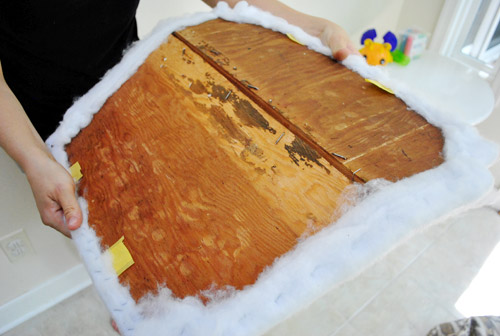
Worked like a charm. And apparently I was so excited I took this completely crooked picture in celebration:
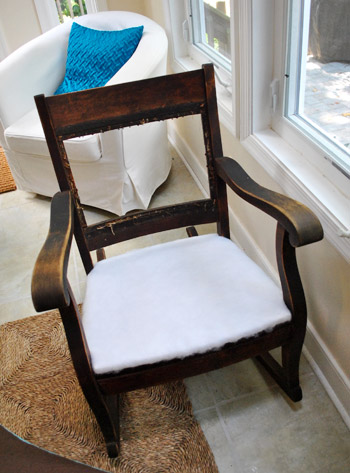
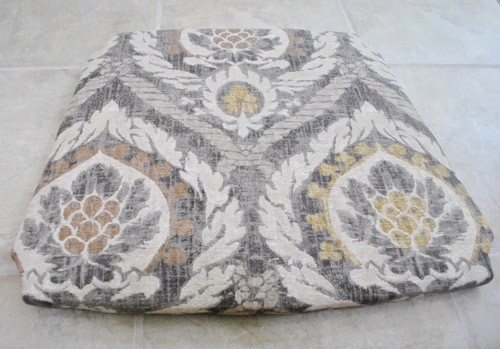
Then it was time to reupholster my seat. I was super excited about the “Kravet Design” remnant fabric that I found on clearance at JoAnn for… wait for it… $2 a yard (I got two yards for $4). At the time that I grabbed it I had no idea what I’d use it for, but after woefully glancing up at my biggest failure (Mr Rocker, sitting untouched in the sunroom for nearly a year) I realized that the fabric would look really pretty on it (with some rich dark stain to set it off). The pattern of my fabric meant that I would have to take the time to center it before stapling anything, so here I am roughly folding it around the seat to try to find a center line and see how it might look in place:
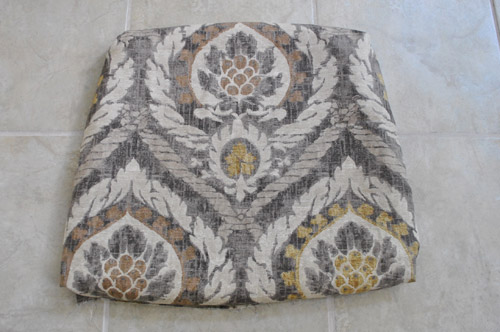
Then I flipped everything over and just shot one staple into the top middle and one staple into the bottom middle (while pulling things tight). This way I could flip it back over and ensure that I was indeed still centered (and if I wasn’t I just had two staples to pop out with a flat head screwdriver.
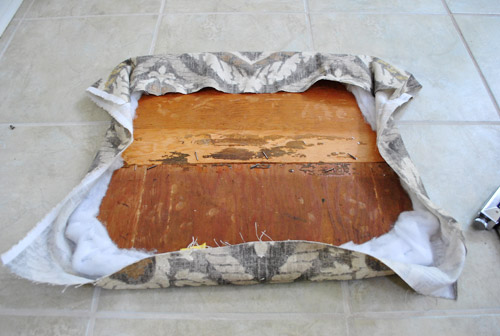
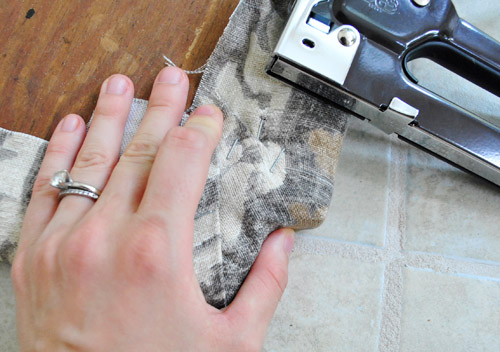
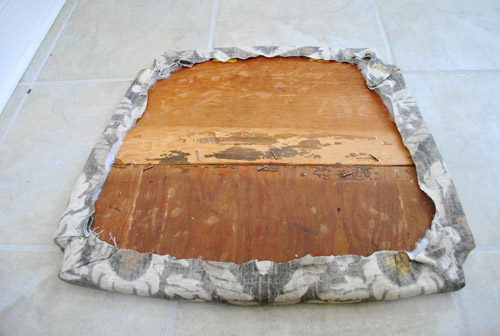
Happily, I was right on track, so I pulled things tight and shot another staple through the middle of each side of the seat, just so it was being held firmly at the noon, three o’ clock, six o’ clock, and nine o’ clock positions. Then I kept the fabric firmly pulled and continued to staple all around the rest of the perimeter. When it came to the carved-out corners, I just folded the fabric like I was wrapping a present – again being sure to pull things taut and use a few staples to hold my folds in place (so it would look nice and smooth from the front).
Here’s what it looked like from the back when I was all done with my staple job:
And here’s what it looked like from the front. Purty, right?
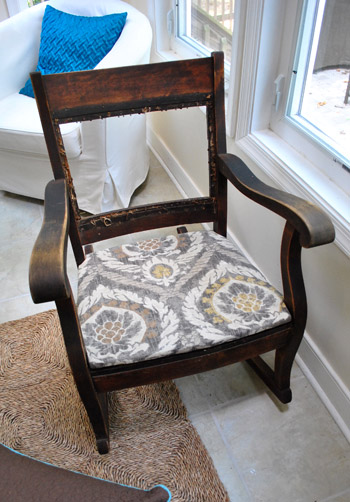
Then I shoved it back into the seat to make sure the batting and fabric still allowed the seat to hinge forward a little bit to squeeze in. Whew, it still worked. And in the distance I heard angels singing.
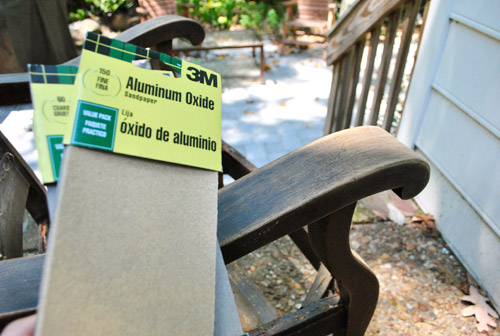
Then it was time for the strenuous frame-readying step. I used wood putty to fill some of the holes that might be visible (like the ones under the seat along the front of the chair’s framing) and sanded everything to rough it up and ready it for some rich dark stain. Since I had some liquid deglosser on hand I gently swiped that over the entire chair after some rigorous sanding (I used low grit paper followed by higher grit paper to smooth everything out).
This is when I was forced to face the music: stain, even dark stain, wouldn’t make this chair look as flawless and something opaque like a rich deep coat of paint. Because even after all that putty, sanding, and deglossing, it was looking so inconsistent in certain areas that I knew it wouldn’t soak up stain evenly. Boo. And although some folks wouldn’t dream of painting wood, we’re definitely ok with it (especially since this is just a $25 cragislist find and not a family heirloom). So I threw my rich dark stain idea out the window and ran to the arms of an old friend. You guessed it: ORB.
I’m telling you, my name is Sherry and I’m addicted to oil-rubbed bronze spray paint. But thanks to having a nice built-in primer and applying three very thin and even coats, it actually took on the look of a rich dark wood (and had more dimension than plain old chocolate paint thanks to the subtle metallic quality of the finish). Here’s a picture that I snapped after two coats (you can see that it’s not completely seamless and even yet- but the third coat did the trick).
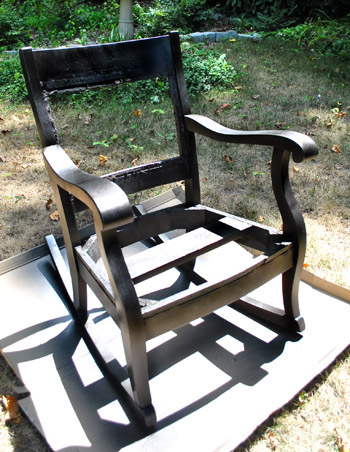
Oh and you can find more general spray painting tips here (lightly misting it while keeping your arm moving all the time is key).
And because I hate to end on that poorly shot, blown out, two-coats-out-of-three spray painting pic, I thought I’d fast forward a little to give you a glance at Part Two of The Glee Project The Rocker Project. Here she is (not completely finished, but getting there). I’ll be back with more details of that whole shebang (and some final after shots) for ya tomorrow.
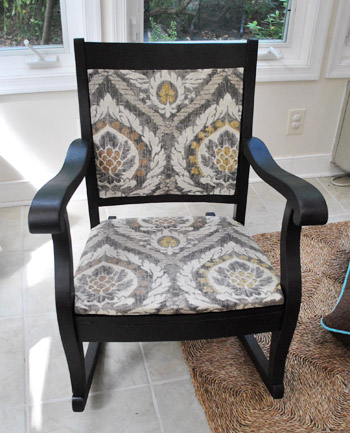
Update: A sweet commenter (thanks Laura!) just told us that our chair fabric was actually on the cover of the Ballard Designs catalog, so we hopped over there and learned they actually sell a chair that’s upholstered in exactly the same fabric for $600-800 (depending on the finish of the chair) and the fabric is being sold on its own for $32 a yard!
What about you guys. Do you have any projects that you’ve put off for an epically long time? Is there something that intimidates you, like two-sided upholstery does to me? Are you completely unsurprised that I basically try to solve every problem in my life with ORB? Can you believe that darn seat wouldn’t fit on the chair after five layers of batting-stapling? At that point I truly wanted to set the entire thing on fire.
Reference: https://www.productexpert.com/best-ergonomic-office-chairs/.

diana says
Love it, and I love how you’ve centered the pattern!
Fran says
I have this exact same rocker (it was my granddads) and havent known what to do with it. This is great! Thanks guys!
heather says
I am a huge fan of re-using old (and normally better built) pieces of furniture and items. You guys did a really fantastic job on this chair. It’s absolutely beautiful!
Bree says
This is absolutely lovely, you do such beautiful work!
Amanda @ Our Huble A{Bowe}d says
Well, the ORB looks good, at least. It almost looks like an ebony stain. I had considered painting my outdoor bench, but I decided to show the wood some love (that sounded bad) and refinish it. My bench cushion is taller than the original and I thought about tearing it apart to make it shorther, but my laziness kicked in and I left it. I also sat on, more like jumped on it, the seat really hard to get it to fit.
http://ourhumbleabowed.wordpress.com/2011/06/14/outdoor-bench-refinishing/
I feel your pain about the seat cusion not fitting. At least you found an easier solution!
Amanda @ Our Huble A{Bowe}d says
P.S. The top paraghraph says ‘sink eye’… Just thought you’d like to know. :)
YoungHouseLove says
Haha- thanks!
xo,
s
Kim says
Oh my gosh, it looks so pretty already! I am surprised spray paint could look that good on wood. Maybe I can ORB the bamboo settee we found on the curb-whaddya think?!?
YoungHouseLove says
It looked really good on the wood legs of our living room desk and of Karl the Sectional too, so I’m all for ORB on wood! Haha. But who’s surprised about that?
xo,
s
annabelvita says
OOOH, ORB bamboo sounds fancy
Debbie says
Glad you’re tackling that chair!
AarthiD says
Part of me almost wishes you had just because seeing the chair aflame would have been funny, hahaha.
Your ORB addiction is totally understandable. I mean, seriously, it makes everything look awesome, plus y’all don’t overuse it in a single room. It’s always, like, accent bits and whatnot.
As far as projects go, I am so bad about my scrapbooking habit. I keep buying stickers and printing pictures and then shoving it all into a shoebox and ignoring it. It’s badsauce.
For what it’s worth, I love the material for the seat/back and gosh it was a total steal. I can’t find a bloody Michael’s or Joann’s around here, or else I’d upholster my walls yesterday.
Kate says
I have been waiting for you to get back around to tackling that chair! Very exciting!
I currently have a hutch sitting in my living room that I’m scared to death of. Mostly because I’m afraid that after primer + paint it will still smell like smoke. Or that my painting skills will massively suck and it won’t look as good as I want it to. Or that the primer and paint will be too thick for the clearance the bottom doors have (which equals none). Sa far all I’ve done is just kept wiping it down with water and vinegar to cut the smoke smell (which it is helping).
YoungHouseLove says
Ooh the vinegar wipe-down is a really smart tip!
xo,
s
Kate says
It can take off a bit of the finish with it (especially if you use a high ratio of vinegar and rub instead of just swiping it), but that doesn’t matter if you’re painting it!
YoungHouseLove says
So smart! Love it!
xo,
s
Katrina says
Found this recipe online for cleaning yucky smoke smell/residue:
1 gallon water
1/2 cup ammonia
1/4 cup vinegar
1/4 cup washing soda (found by the laundry soap at WalMart, mine was in a big yellow box that looked like a baking soda box)
Use rubber gloves and a rag – Judging by how dirty the water got (three batches to do one bedroom in our new house), it works pretty well!
That, and put baking soda on a plate in the cabinet, and stalks of celery – you’ll look crazy (esp if the internet guy comes to hook up your house while you’re not home and can’t explain… voice of experience), but it works! :)
YoungHouseLove says
Thanks so much for sharing!
xo,
s
Maya says
Looks beautiful!
What if you put this rocker in that corner in your office? I seem to remember you wanted a chair to put there but didn’t have one specifically in mind. Then you can claim this project as part of the whole office makeover… see, you MEANT to wait until you started to see the office come together… :)
YoungHouseLove says
You’re reading my mind! I was just telling John it might need to live with us in the office!
xo,
s
Pip says
Ooo that last shot is tantalising ! Way to leave us on the edge of our seats. You are truly an ORB fiend, S. My procrasty-project is a 40+ year old table that belonged to my late father and has had many lives as a workbench, potting table and most shamefully living in pieces for 10 years in my garage. Thanks to yhl I’ve bought a new table top and put the frame back together. Nearly there!
YoungHouseLove says
Wahoo! Go Pip, go!
xo,
s
liz says
LOVE IT!!! I can’t wait to see more pics!
Julie (from Pocketful of Joules) says
Holy crackers, the finished project looks amazing!
You have a typo in the first paragraph about having a sink eye — but I’ve decided that a “sink eye” is a new thing and even scarier then a stink eye. And it totally reminds me of Joey from Friends saying that it’s a “moo” point (instead of moot) because it doesn’t matter like a cow opinion.
YoungHouseLove says
Haha- the sink eye does sound pretty dangerous.
xo,
s
Cindy says
“Joey from Friends saying that it’s a “moo” point (instead of moot) because it doesn’t matter like a cow opinion.”
DYING!! Man, I loved “Friends.”
Brita says
To this day, when I think something is dumb, I’ll say “it’s a cow’s opinion. It’s moo.”
YoungHouseLove says
Haha, I think I need to start using that around here.
xo,
s
Maureen@This (Kinda) Old House says
This looks fantastic! And that fabric is beautiful! I will be doing this soon to my home office chair. Hope it looks as good as this!
Elizabeth says
That looks AWESOME! And I just finished listening to that radio show, you were great Sherry!
YoungHouseLove says
Aw thanks Elizabeth!
xo,
s
Emily says
You *were* really great! You sounded so laid back and relaxed. I would have been shaking in my boots! :)
YoungHouseLove says
Thanks so much! I can’t believe that because I was shaking in my boots! Literally, my hand was shaking when I drank something during the commercial break. Haha.
xo,
s
Kristin H. says
Omg shut the front door Sherry you did not seem one bit nervous for even a SECOND!! I was so jealous the whole time, thinking how incredibly stupid I sound during interviews and how come Sherry can sound so perfect and put together!! ha! Great interview I loved it.
YoungHouseLove says
Man that’s nice. John should have taped me on the Flip cam during it, just pacing and shaking and cringing after answering something. Haha. Not pretty!
xo,
s
Heather says
“By the end it was plush without being super sink-in squishy, which I liked. Nice and firm with a bit of softness.”
That’s what she said. ;)
YoungHouseLove says
Oh snap. You got me good.
xo,
s
dinah says
lol that’s the best “that’s what she said” comment I’ve heard.
Janelle says
It looks great so far. You make upholstering look so easy. You almost have me thinking I could try it! Haha. I hate that moment when you’re in the middle of a project and you realize that “sugar”, something won’t fit or stick or stay-up. But I have to say I do feel pretty accomplished when I figure out a solution, like you did!
Danielle says
Lovely! That fabric really looks great. I still haven’t finished my found-by-the-curbside patio chairs for various reasons but perhaps this can be the “pinspiration” for me to get cracking on Saturday morning…
SingleMama says
It looks beautiful! Also, I don’t think I have ever noticed your ring before–GORGEOUS!!
YoungHouseLove says
Aw shucks, thanks. John did good. Haha.
xo,
s
Dana M says
Good catch! I agree. LUV it!
Robin @ Our Semi Organic Life says
I ran across a chair like this for free out on the street yesterday on Semmes Avenue, considered taking it but knew it’d take more than 9 months for me to get around to tackling it. So glad it came out well for you!
Jess @ Little House. Big Heart. says
It’s gorgeous! I have dreams of salvaging something like this. Something about seeing the hubs say “Really, you’re buying THAT?!” in a thrift shop/antique store and then having him have to eat his words when the finished project turns out GORGEOUS. Just a little fantasy of mine. Don’t judge. I’m twisted like that. :)
But seriously. I love that fabric. Can’t wait to see the finished product!
Tijana says
Looks great!!
Years ago my mom bought a chaise lounge and wingback chair that she wanted to recover. We took all the fabric off and gave up.. haha! In our defense it was basically impossible for us to recover them without all the tools, they both had these metal teeth that you had to wrap the fabric around and we had no idea how to do it!
Stephanie Handy says
I’m actually in the middle of my first BIG reupholster project (also a wingback) after doing a few smaller things like chairs/stools. A good tutorial I found linked through to this video on how to use the metal teeth: http://www.youtube.com/watch?v=9EyaBF1FYz8&feature=player_embedded
YoungHouseLove says
A wingback sounds soooo intimidating to me! Thanks for sharing the link! And good luck!
xo,
s
Stephanie Handy says
Well, so far it’s just been pulling out staples, although this has lead to all the trash they ever stuffed under the seat falling out from where it was hiding inside the upholstery! SO GROSS. Been keeping a Dustbuster on hand so I don’t have to touch that stuff.
I did, however, get it for free and the frame is solid, so no complaining.
I’m pulling off the last piece of old fabric tonight after work, however, and am psyched to actually order my fabric (a nice grey cotton I found on sale at Hancock for like $6/yd). I’ll be posting about it on Friday so I’ll be sure to share. =)
YoungHouseLove says
Good luck!!
xo,
s
Chris says
Oh my word it’s beautiful! I’m in LOVE!
I hope someday I’ll be able to see the beautiful through the ugly at the second hand stores and have the courage to tackle them!
You’re amazing!
bridget b. says
nice!
Ashley says
I love it, it looks great! Wonderful job! Looking forward to tomorrow’s post!
Dara says
I can’t believe how aweosome the ORB paint looked on that chair. I might have to go and pick up a can of that. Its amazing! Loving the fabric, the chair looks great. Congrats on finally getting it done.
Jordan says
Wow! This may be my favorite project yet. It is beautiful! The fabric is amazing and all your work was so worth it! I can’t wait to see more after pics!
Ann L says
I bought a mid-century modern chest of drawers at Goodwill for $25 a few months back, but the veneer was pretty chipped off in some places so I didn’t think re-staining would be an option because of the inconsistent way wood filler absorbs stain. I didn’t want to paint it a crazy color because our bedding is pretty colorful and brown paint on furniture to me always looks cheap and flat and just blah! But ORB?! I never thought about it! It’s dark enough to mimic the dark stain I wanted to use, it’s paint so I don’t have to worry about uneven “soakage” of the stain (is that even a word), and the shimmer will maybe give it a little extra somethin somethin that makes it look less cheap and home-made than plain old brown paint. LOVE! Wadda ya think, worth a try?
YoungHouseLove says
Totally worth a try! Good luck!
xo,
s
Melissa says
I always wanted the courage to do something like this, but I always chicken out. Reupholstering looks very similar to stretching canvas for painting, which I can do. Maybe I need to man-up and go get-em.
Molly says
Looking good! Can’t wait to see the finished product! Are you putting a different fabric on the back?
The fabric you chose reminds me of one I used on a Queen Anne side chair in our master. I tried many different placements–it was challenging not having the center of the ikat pattern in the center of the chair. Like a target for your bottom!
You can see it toward the end of this post.
http://thenestinggame.com/2011/05/16/summer-nights/
YoungHouseLove says
Same fabric on the back! I figured something neutral with some pattern was the way to go (since we don’t know what room we’ll slip it into). As for your chair- so pretty! Love the fabric!
xo,
s
Laurel says
It looks so wonderful, way to go! I think everyone has at least a few of THOSE projects that haunt us for months, but sometimes I enjoy having them because they feel so much more satisfying upon completion. A mini at-home version of Everest. :)
Molly says
I love this! Just wondering what type of staple gun do you use…we have one that just doesn’t work all that well & I need a new one to finish my bedroom chair redo! I hope mine turns out as fantastic as your rocker!
YoungHouseLove says
We just have a 15-ish dollar one from Home Depot. It’s brown and has the letters GS on the side. Hope it helps!
xo,
sit
Jenn says
My staple gun went missing recently and I went and got my husband’s hammer tacker from the garage to finish the project. It is so amazing. Maybe I just had a really bad staple gun, but hitting the item to be stapled like with a hammer rather than having to pull hard to staple while holding the stapler steady has been life altering. Since you’re in the market for something you might want to look into one.
YoungHouseLove says
Ooh that sounds heavenly.
xo,
s
Anna says
I think your ORB obsession is spreading. I had to visit 3 stores in Richmond before I could find a can for a weekend project…and when I did, it was the last one!
kimb says
sorry, but i wish you had spent more time on it and tried the stain to keep the historical value to the piece, this just looks like something from ikea.
YoungHouseLove says
We figured it was just a $25 cragislist find and not a family heirloom, so the ORB choice worked for us- but to each his own! We definitely know some folks who would never paint wood over staining it and that’s cool too!
xo,
s
kimb says
It’s not that I would never paint wood, I wood (ha) and I don’t know were this chair is going, but something along the lines of your huge console table would have looked good. Or if you were going to paint it go bold with a fun bright colour like purple or green or something. just an opinion.
kimb says
now that I looked again there’s yellow in the fabric
YoungHouseLove says
Yup, there are definitely some subtle golds and yellows in the fabric and once we add a pillow and put it into a room with some color (aka: not the completely untouched sunroom) we think it’ll be perfect for us! But we definitely know someone else might paint it purple or green and love that look too!
xo,
s
Debi says
I really love the fabric Sherry. Oil rub spray paint is great I am addited to a black version.
I am taking what I have learned from you and I am trying my hand at Curtains. I have purchase 2 panels of these curtain I just love. I bought them long so I could cut them off and use The Iron on “HEM TAPE”. This is for my kitchen window which I don’t want the curtains to go to the floor. I am going to use what I have cut off to make Valances for my sliding glass door in the kitchen as well. I am going to channel my best Sherry and try my hand at this!!! This weekend will be the test to see if I have learned from the master!!!!!
YoungHouseLove says
Good luck Debi! You can do it!
xo,
s
jess says
Looks great! Congrats on tackling the project! Love the fabric choice!
Ang says
Looks great! You have definitely inspired me not to be afraid of pre-loved furniture.
My epically-put-off project is, well, my entire house just about. We bought it in late 2009, have painted and replaced furniture in only two rooms, and haven’t even hung pictures up. For shame.
Cindy says
I hear you. July 2009 here. *sigh*
Lisa in Seattle says
June 2009 here. Our art is sitting on the floor waiting to be hung. We’re going around and around about carpeting and fireplace stone. The living room still has those horrible vertical blinds. Cheer up – I once heard that you “get” three years to move in. I’m sure we’ll all be totally settled in 2012!
Ang says
Thanks for making me feel better, ladies. :)
Shelley says
I hear you there..it’ll be three years in October for us..we did a lot of work last summer (about 1/6 of the house is more complete) but just a lot of ideas and no “doing” really since then!
Regards,
Shelley
Martina says
Wow! That rocker looks ah-mazing! Love the fabric you chose; looks very professionally done with the pattern all centered and fancy. :)
Don’t feel bad about the 8+month delay on refinishing the rocker, I’ve had a chair that I bought fabric to re-finish over 2 years ago — life has a way of distracting one with other projects.
Can’t wait to see the second half!
Christina says
THAT. LOOKS. AMAZING.
Makes me want to go find an old beaten up chair and give it a whole new “pretty” life :)
good job girl!
E.Lefebvre says
Beautifully done! Although I must say, I was a little sad the stain didn’t work. I have a soft spot in my heart for the “old wood” look and loved the pictures of the arms on the rocker before. You’ve motivated me to do my own chair project. I’ve found about 50 different “could be the one” chairs to reupholster, but haven’t yet been motivated enough to buy one and start.
Stefanie A says
Have you guys heard of the new IKEA Share Space? I just recently discovered it and it’s awesome! Thought of you guys and all your IKEA stuff you could share over there.
You’re so brave for tackling this chair, I would have run the other way and never looked back.
YoungHouseLove says
Never heard of it! Thanks for the tip!
xo,
s
zana says
looks superb!!!
Susan says
What you’ve done looks great, but part of me wishes you had stained it even if the stain wouldn’t make the chair look flawless. I think a more “imperfect” look would have kept with the character of the piece rather than the ORB…esp with your fabric. ORB seems to make everything look so uniform and new that it doesn’t gel with this older rocking chair for me. Just my thought anyway, but it looks great regardless!
Cara D says
The rocker looks great. I have a very old rocker my grandma got at an auction. I am getting ready to redo it for the nursery. It looks way worse than yours but has great lines and is solid. I have all the shredded upholstery and stuffing out. It was so old it was stuffed with straw! Mine has springs in which all need retied and I had to get one of the braces fixed plus I need to fix a broken arm on it. I have been delaying starting it but i need to just go for it. It will truely be my best before/after pictures if i can complete it.
Tiffany @ The Nest Effect says
You are incredible! I can’t wait to have a house someday to be able to create something awesome from something trashy. Inspirational indeed.
Eve says
you make everything look so easy and beautiful! great job guys!
molly says
This looks lovely! And, can I just tell you how often I crack up reading your posts? You guys make me laugh while also inspiring/motivating me.
Melanie @ Mailbox Journey says
it looks amazing!
Tiffany Nevil says
Holy.Cow. I can’t believe how gorgeous that turned out! I was doubting it for a bit…but wow. Love the ORB. You’ve made our family addicted to spray painting things BTW…Thanks ;)
annabelvita says
Looks awesome. My biggest procrastination so far is delaying hanging a massive school room map we bought in France (it was above my bed in the link I posted yesterday, I’ll spare you the blog spam!) for well over a year. Like you, we moved in the meantime. The stupid thing was, it is so massive that it’s really awkward to store flat, would have been SO much easier to just hang it up (it only took two command strip hooks).