In Monday’s appliance post we mentioned a couple switches (like wall oven out, stove in) but that was just the beginning. And then yesterday we shared that we were contemplating a new spot for the fridge. Well, it has all been settled. And we’re excited about it. But before I lay out the new layout for you, let’s talk demo again.
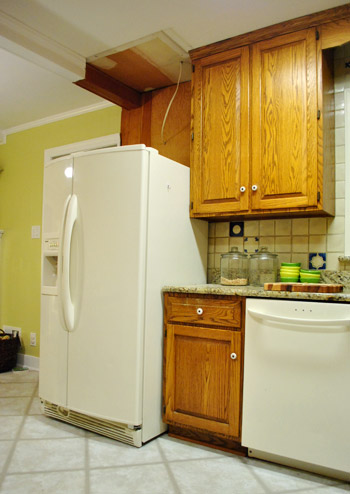
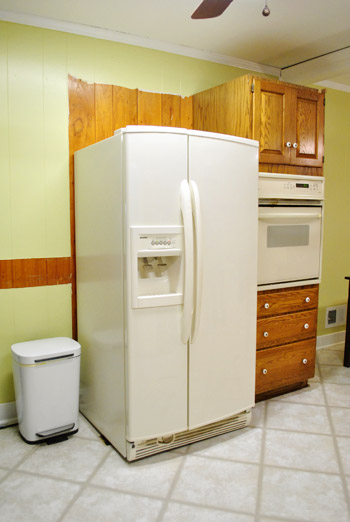
This past weekend we found ourselves poised to purchase a slightly smaller yet not counter-depth fridge at the Sears Outlet (aka Scratch & Dent) – which was basically short and narrow enough to fit into the existing fridge spot but a bit deeper (so it actually would have stuck out into the room more since they don’t generally make fridges as small as they did 30 years ago).
But at the last second, something stopped us.
On one hand we were so proud for finally locating a fridge that fit our tight space, but on the other hand it felt like we were compromising on a few things (size and finish – we really wanted fingerprint-proof stainless). So we revisited a seemed-weird-at-the-time idea: moving the fridge to a new spot (which we had been thinking about on and off since embarking on this crazy kitchen adventure). Where might we put it? Why here, of course:
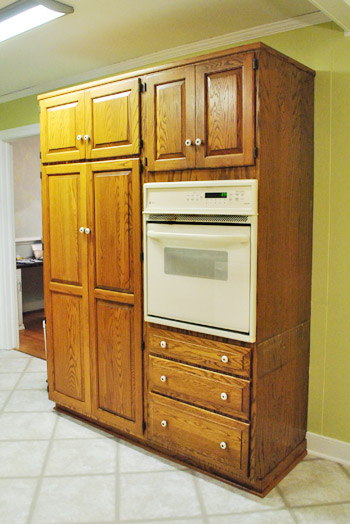
By coincidence, the big pantry cabinet on the opposite side of our kitchen was exactly the same width (36″) as the spot where the fridge currently resided on the other side of the room (this doesn’t include the cabinet that houses the wall oven – which is a gonner now that we’re switching the wall oven out for a range). So if the pantry could be moved, then the fridge could come over to this wall. That would not only allow us to get a taller fridge, but also a wider one. Meaning we could get the awesomely counter-depth-yet-spacious Frigidaire Gallery that we had our eye on (and eventually purchased, as mentioned on Monday).
Plus it would mean the fridge isn’t the first thing you see from the front door (after we add the big kitchen/dining room doorway). This move was actually suggested by a few friends of ours about a month ago in that “if-you-could-ever-move-the-fridge-to-the-other-side-of-the-room-it-might-be-nice-not-to-see-it-from-the-door-but-it-might-be-too-complicated-so-in-that-case-never-mind” way.
Taking those measurements was all we needed to run down to Lowe’s and buy all of our appliances at a deep discount – including the wider and taller but still counter-depth fridge that we wanted all along.
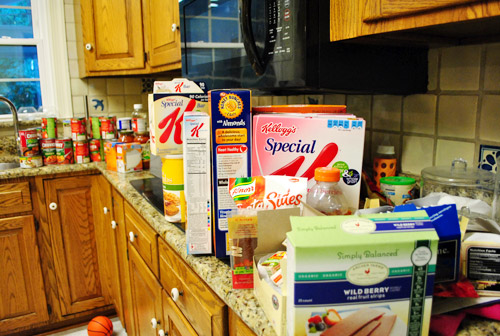
Which was kind of a bold move considering that we hadn’t actually moved the pantry into the old fridge spot to confirm that they were interchangeable. So true to “we’re paranoid” form, we couldn’t let a week or even a few days go by without making sure we could actually make the switch. So after removing the side wall and cabinet over the fridge on Monday night, it was time to move the pantry across the room last night. First we emptied out the pantry onto the counter… giving us momenatry flashbacks to our last kitchen makeover / disaster zone.
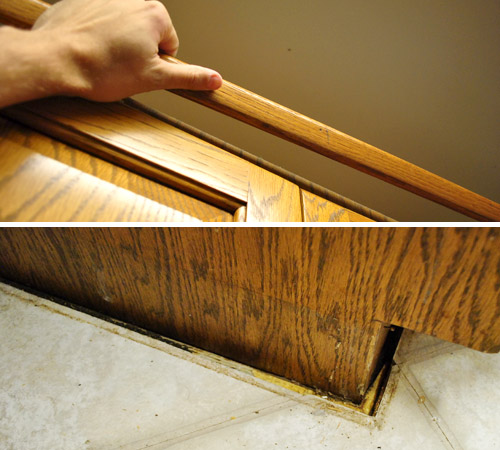
Then we used a hammer and flathead screwdriver to remove the trim on both the top and bottom of the pantry.
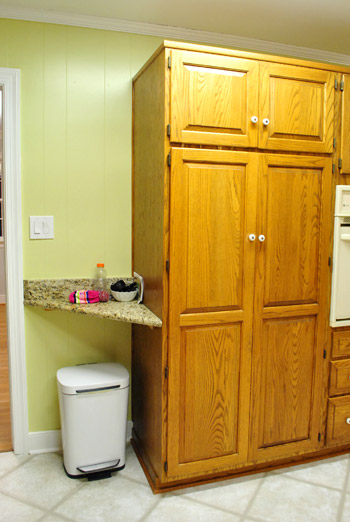
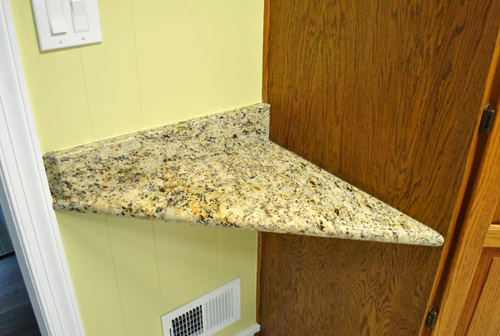
Then we had to remove this little triangle o’ granite that we use as a drop spot for keys and such. As functional as it was, we never liked the look of it. So we weren’t exactly distraught to see it go.
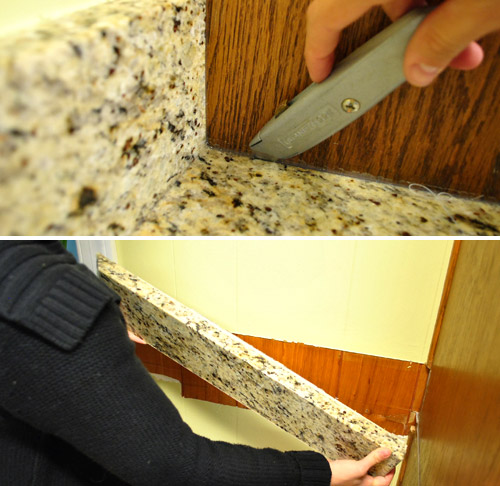
Having already removed some granite in our bathroom and on the other side of this pantry cabinet, we knew taking it out would be pretty straightforward. We just sliced some of the clear caulk adhesive and then pried it loose with a screwdriver and crowbar.
Ooooh, lucky us! More weird unpainted paneling sections to stare at.
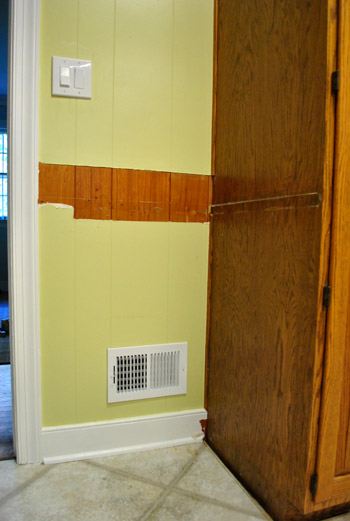
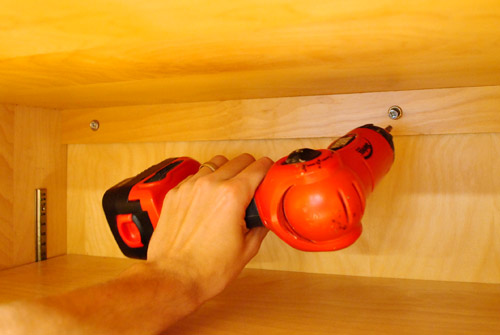
See that heat/air register above? That will stay put (the fridge goes where the pantry is, so it’ll be to the right of that vent- not in front of it). Anyway, with trim and triangle gone, I unscrewed the cabinet where it was attached at the back (to the wall) and on the side (to the wall oven cabinet).
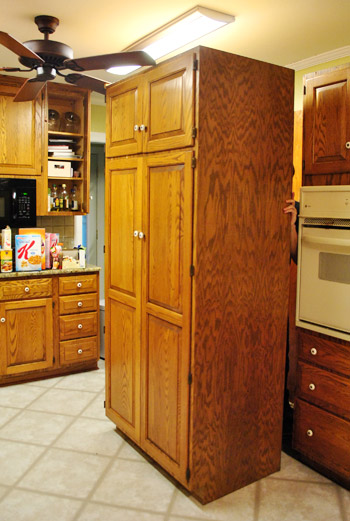
Then with a little bit of shimmying back and forth, we were able to walk the pantry cabinet out of its little hole in the floor. I pushed while Sherry pulled (and paused to snap photos).
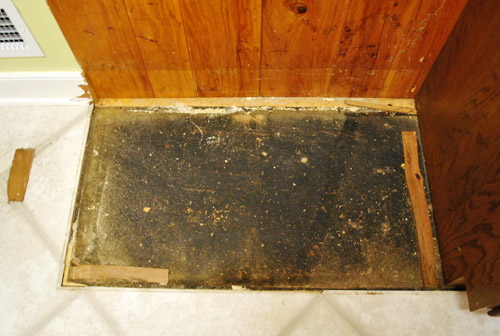
Speaking of hole in the floor, it again confirmed that we don’t have hardwood floors running under this half of the kitchen. Just some gross underlayment and subfloor. Pretty.
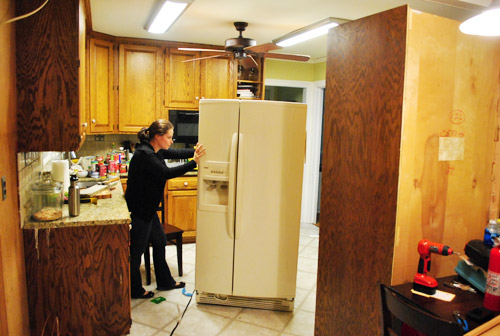
Anyways, back to the little do-si-do between the pantry and fridge. With the pantry out, we unplugged the fridge and rolled it to its new home. Look how intense Sherry looks as she pushes that baby around (speaking of babies, she wants me to say that she’s not pregnant – her sweater just bloused out ambiguously for this picture).
With the pantry in its new home, I screwed it back to the wall (and into the cabinet beside it) so that it could be restocked with all of our food. Oh and when it comes to dropping in a water line for the new fridge location, that’s actually pretty simple. We did it in our first house when we moved the fridge across the room too (home improvement stores sell little DIY kits).
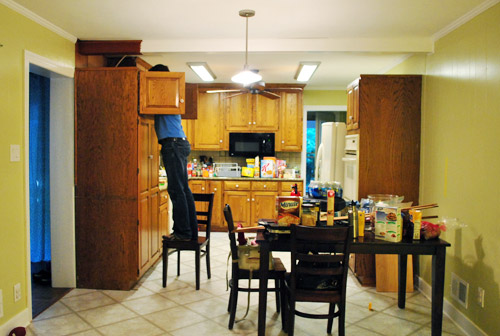
Now let’s look at the room tidied up a bit. But remember that:
- the white fridge sticks out too much, but our new one is about 6″ less deep
- the shallower fridge will be shifting to the right (away from the door behind it) so it will feel a lot less cramped
- the tall cabinet next to the fridge will be switched out with a regular height bottom cabinet so that side of the room won’t feel like a giant overbearing armoire
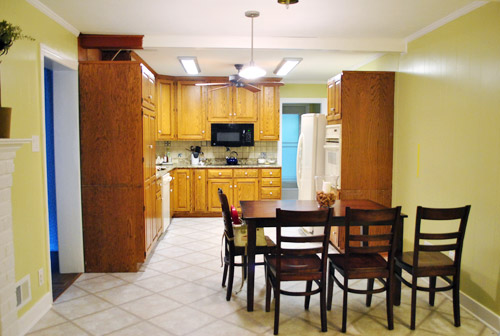
We love the switch, and here’s why. It gives us an additional six inches of space between the corner of the planned-peninsula and former-fridge / now-pantry. Since it was already a comfortable walking space before, we’re gonna use the extra space to extend the peninsula by about three inches. So we get both a slightly bigger walkway and a slightly bigger peninsula.
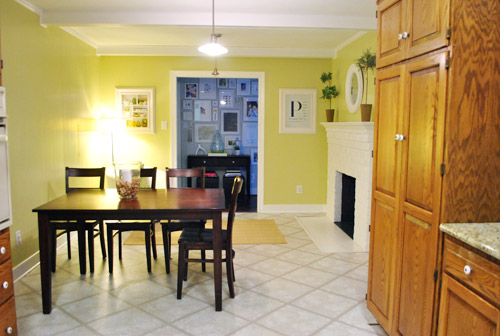
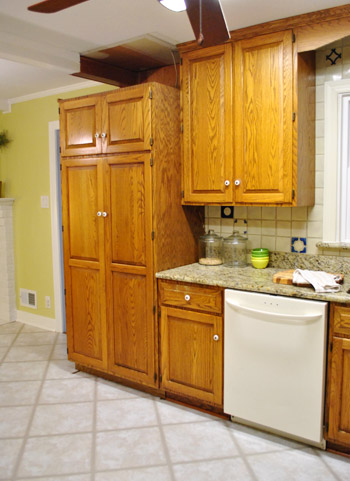
Visually the pantry just feels less intrusive than the fridge did, since it now sits flush with the cabinets beside it. And once it’s painted white it’ll feel even lighter and more seamless.
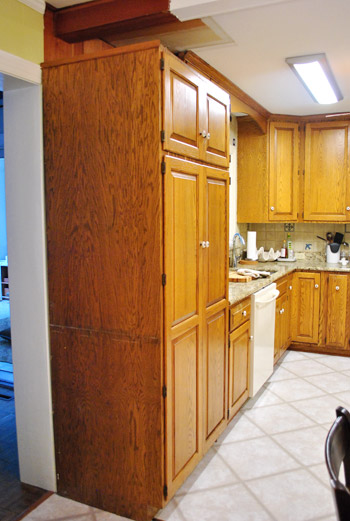
On the other side of the kitchen, things are looking a bit worse (thanks to all of the now-exposed paneling) but that’s easy enough to fix with some primer and paint. Once the new shallower fridge is built in and shifted over a few inches to the right so it opens up that side of the room (once the wall oven cabinet is removed) it’s gonna look much better. Plus, it’s actually more convenient over here. I can get to it from the sink with one foot pivot, rather than a bunch of sidesteps. And the work triangle is actually a triangle now.
The best part? When we open up the wall to the dining room, you won’t see a big stainless fridge as soon as you walk in the front door. Of course the ceiling-height cabinet to the right of the pantry looks crazy but that’s going to get adapted too (as also mentioned here).
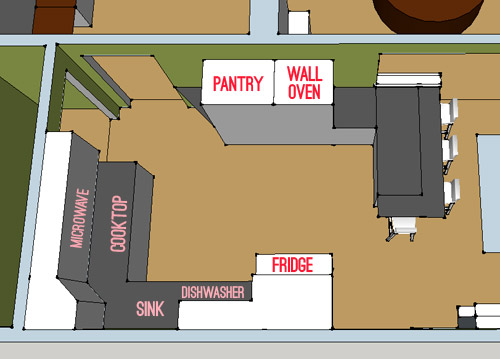
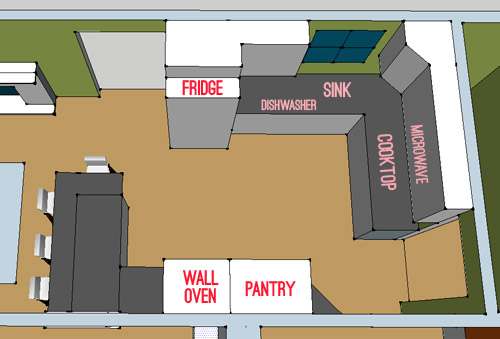
I know all of this furniture moving, cabinet demoing, and appliance purchasing probably has your head spinning, so we’ll try to clear things up. I’ve tapped my slowly-progressing Google SketchUp skills (mentioned here) to roughly render the kitchen as it was laid out when we moved in (with the exception of the peninsula and doorway to the dining room that we added in):
But here’s how it’s going to be after a few switches:
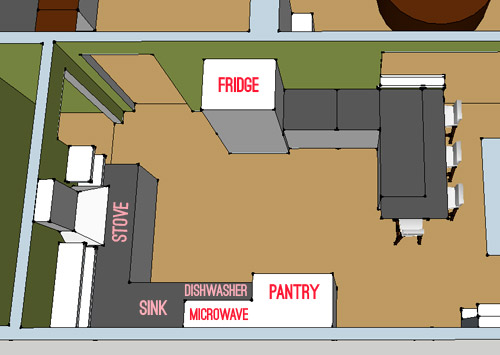
Here’s a breakdown of what’s happening:
- Pantry and refrigerator are switching places (in case you missed it)
- Cooktop and the base cabinet under it will be replaced with a range
- Wall oven and the wall oven cabinet will be switched out for the base cabinet under the cooktop (so it’s not big and heavy on that side of the room anymore)
- Over-the-range microwave is moving from over the cooktop to over the countertop next to the pantry & getting built-in (just like the one in our last kitchen)
- Exposed vent hood is going up in place of the current too-low microwave/cabinet combo (it’s not to code)
- Wall of cabinets is turning into open shelving (we know it’s not everyone’s jam but it’s ours, especially with all of the added concealed cabinetry thanks to the peninsula)
- We also have a pretty fun idea for the backsplash that we’ll share (with inspiration pics galore) soon
- Dishwasher is staying put – hip hip hooray!
Here’s another view to help you out. Once again, the before…
And the someday:
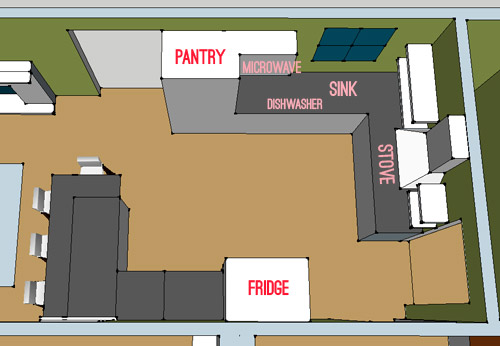
Here’s what we’ll gain:
- better work triangle
- less expensive appliances (buying a new wall oven and cooktop could have been 2K more than the range we got)
- a much more open feeling (instead of being surrounded by upper cabinets & giant armoires/pantries of wood on all sides)
- more space between the peninsula and the perimeter of the room
- more counter space (since we’ll remove the wall oven cabinet that frees up more usable surface area)
- more balance thanks to one tall object on each side of the room (the fridge on the right and the pantry on the left)
- no more view of the fridge from the front door
Is your brain hurting yet? Sorry ’bout that. Lots going on! We’ll keep ya posted. Next on the agenda is getting our appliances delivered and building in the shallower fridge in its new spot and installing the dishwasher, microwave, and range (which necessitates removing the counter and a base cabinet to make room for it). Should be interesting. Anyone else have any experience shifting around some cabinetry and appliances to make their kitchen more functional (and hopefully more beautiful)? Tell us all about it.

Pasc says
Trying to decide on our kitchen too, it’s SO hard!
Ashley J says
It is inspiring, the energy you two have! I love the re-arrangement of appliances. It will look great! Especially with painted cabinets!
Kristen @ Popcorn on the Stove says
I like the switch-up! The kitchen looks great. I can’t get over the fact that you can just unscrew everything and move it around. I think all the cabinets at my parents are nailed and glued to the walls. Do you need to bring in a plumber for the fridge so it can still make ice and get water??
YoungHouseLove says
It’s actually really easy to run a water line for a fridge (we did it at the last house when we moved it across the room too). They sell little DIY kits at Home Depot and Lowe’s and it’s just some simple plastic tubing that goes under the house (from the sink base cabinet into the floor and then back up the floor on the other side). From the crawl space we can just poke it thought (there’s actually already an existing hole in the floor for it in the new fridge location- which makes us wonder if it was there originally!
xo,
s
Karen J says
It’s easy if you have a pier and beam … not so easy if you have a slab foundations :(
YoungHouseLove says
Oh yeah- this is true.
xo,
s
Annette Young says
Ahhhh. So it’s easy if you have a crawl space. Notsomuch if you have a concrete slab, like we do….
Mandy says
We actually ran ours through the cabinets. Drilling a hole at the back of the cabinets, behind the stove, through the cabinet in between the stove and fridge. It was way easier doing it that way, for us at least. My husband and FIL did it in about a half hour
YoungHouseLove says
So smart! That works too!
xo,
s
linda says
karen, we have slab floors…. no crawlspace… no basement…. and when our water line to our fridge sprung a leak in the wall *gasp* we closed off that line… got some tubing (maybe he bought a kit????) and ran it through the very backs of the cabinets around the kitchen to the fridge! he just drilled a small hole in the side walls at the very back of the cabinets and where it goes behind the range he put a length of PVC to run the tubing through to protect it from the heat of the oven! it’s totally a DIY project!
YoungHouseLove says
So smart to use PVC to protect the heat!
xo,
s
linda says
heh heh! shoulda read all the posts! see that mandy did the same thing we did!
Tia says
I was so excited when you said “it’s so easy” because we need to do that. But we have a finished basement, so it isn’t easy at all. Cue the wop-wop music!
YoungHouseLove says
Oh man- sorry! As someone else mentioned, sometimes snaking it around the back of your cabinets can work (if the sink and fridge are connected by cabinets).
xo,
s
Saleha says
This makes total sense for your space!
grace says
This is going to look so much better and be so much more functional. Really great decision! Can’t wait for the rest of the makeover (even though I know it will take a while)! Awesome, awesome, awesome job. Love it!
Ben says
Your SketchUp skills are progressing quickly! Nice work John!
YoungHouseLove says
Thanks man! It feels slow going, but at least I learned how to bring in stools for the counter instead of building them out of shapes.
-John
Karen J says
The layout helps a lot; I was really confused before. But are the stove and range labels backwards or am I still confused?
YoungHouseLove says
Where John puts the word range, he means cooktop. Sorry about that! We’ll be switching it out for a stove/range. Will change it asap!
xo,
s
Amanda @ Our Humble A{Bowe}d says
Oooh, I love it! That frees up a lot of space, too. Everything will look fantastic when it’s all painted crisp white.
hyzen says
It’s looking awesome already! What a nice break that the pantry and old refrigerator are the same width.
Future Mama says
Agreed! Glad that worked out!
Much love,
Future Mama
http://expectingablessing.blogspot.com/
Rhonda says
I’m glad it worked out! It’s a great layout. Much improved
Thais Bessa says
The fridge/pantry swap definitely looks better!
Forgive my ignorance, but where is your sink? If I remember well, is it above-ish the dishwasher???
YoungHouseLove says
So sorry- just added the sink to the diagram. It’s right next to the dishwasher.
xo,
s
Barbara says
Looks great! Way to work with what you have and come up with a great floor plan :-)
Melanie @ Mailbox Journey says
I absolutely love the switch! I can’t wait to see all of the new appliances in place.
Jenna says
So glad to see you are starting your kitchen reno…i am doing the exact same thing right now so, i will pretend we are in it together! Just want to mention that i don’t see a sink in your layout mock-up?
YoungHouseLove says
Just added it! Sorry about that.
xo,
s
Lindsey says
Very exciting! The layout definitely seems more practical. Have you thought about making the doorway to the office wider so it continues the open concept feeling? If one of you is in the kitchen and the other in the office it might make the rooms feels more joined together and connected for conversation/company.
YoungHouseLove says
We’re not sure if it’s worth widening that but it’s definitely something we talk about! We’ll have to see where we end up!
xo,
s
annabelvita says
Love it! Totally genius and going to look great.
What sort of height backsplash do you think you’ll go for?
YoungHouseLove says
That’s a surprise! Haha. More details (and a ton of inspiration pics) soon!
xo,
s
annabelvita says
I asked because I was picturing subway tile all the way to the ceiling, at least behind the open shelving and the stove/hood.
But maybe I’ve just spent too long on pinterest…
YoungHouseLove says
Could be….. hahahaha. So excited to spill the beans.
xo,
s
Emily says
Sherry, I totally stalk your pinterest boards just to see if I can guess what you’re up to next. Dying to see where your concrete countertop planning goes. I have a few concrete countertop pins of my own…
Renee says
Looks great! It makes me excited to think about all the possibilities in my own kitchen. I look forward to seeing your progress each day. Keep up the good work!
John@Our Home From Scratch says
You guys are putting in a full range hood too! Nice. Looking forward to this install. We’re probably going to do that in our kitchen soon as well. Our builder didn’t vent our over the range microwave, so we’re going to yank it!
Lori Wojciechowski says
I <3 open shelving in kitchens!
Megan says
Looks good! What about hook-ups for the water and ice maker? DO you have those on the other side?
YoungHouseLove says
Dropping in a water line is actually pretty simple! We did it in our first house when we moved the fridge across the room too!
xo,
s
Megan says
Never mind. Just saw your answer.
Lisa says
I’m so excited that you are getting going in force in the kitchen. Can’t wait to watch it evolve. We switched out some upper cabinets for open shelves last year and I LOVE it!
Sayward says
I love it! I cannot wait to own a home, and I’m obsessed with open shelving in the kitchen. I pin images of kitchens with open shelving all the time.
Also, at the very end of your post the word “lot’s” doesn’t need an apostrophe :)
YoungHouseLove says
Thanks Sayward! Off to fix that.
xo,
s
rachael says
Let me know if I’m reading this wrong but it says in your list of bullets that: “•Over-the-range microwave is moving from over the range to over the countertop next to the fridge & getting……”. But the fridge was moved. Isn’t the over the range microwave being moved to over the countertop next to the pantry’s new home? Thats what it shows in your pictures, at least.
YoungHouseLove says
Yes! Thanks – off to fix that!
xo,
s
Tracie says
Microwave next to the Fridge would actually be a better place for it. Someone reheating leftovers won’t be in the way of someone actually cooking or putting dishes away. The cabinet above the dishwasher can then be for dish storage.
Can you tell I’ve spent way too much time researching the layout for my own kitchen reno? :)
YoungHouseLove says
It came down to what we wanted to look at while sitting at the peninsula so we prefer nothing hanging down in front of the person in the stool to the right. So art or a mirror there instead of a big hanging microwave was our pick!
xo,
s
Sandra T says
Hey, Tracie is right…my microwave is over my stove, and my husband and I are always in each others’ way when we’re cooking! I love that YHL’s kitchen is so big and therefore, versatile…it’s gonna be great!
Stephanie says
So the upper cabinets will be open and will be modified by you to be the same height as the panrty? Or, are you getting all new open cabinets? Love the changes! You guys are great at thinking outside the box and not being afraid!
YoungHouseLove says
We’ll be adding open shelving (DIYed or purchased extremely inexpensively) along the stove wall with the range hood. But there will still be a few closed upper cabinets that are the same height as the pantry (over the fridge and to the right of the pantry, for example).
xo,
s
Sandy says
FANTASTIC!!! Oh I’m so excited for you guys! Cabinet painting prior to putting floor down no?
YoungHouseLove says
We’re super unsure about that. Since we have to remove the old vinyl (which is glued down) before laying our cork (to keep the floors the same height) there’s going to be some rigorous scraping- so I’m afraid freshly painted cabinets might get beat up. But I’m also nervous about getting white paint on the cork. Who knows where we’ll end up!
xo,
s
Jill says
Why not just remove/scrape the old floor, then paint, then lay the cork?
YoungHouseLove says
There will be all sorts of sticky glue on the floor, so we think removing the vinyl needs to be immediately followed by underlayment and cork.
xo,
s
julianna says
(replying to Sherry’s reply, not to Sandy’s comment)
Can’t you remove the vinyl and scrape, then live on the subfloor for a week or two while you paint (and anything else messy) before putting down the cork? Or, if you don’t want to do that, there’s something called red rosin paper that you can get in the flooring department at Lowes or Home Depot to put over the new floor to protect it (just be absolutely certain the floor is clean underneath — no grit to scratch it up as you do things on top of the paper).
Looking forward to seeing your progress!
p.s. can’t see all of the comment I’m typing — sorry for any typos!
YoungHouseLove says
Thanks for the tip Julianna! We’re not sure if the sticky glue that covers the subfloor would benefit from just being covered by underlayment and cork right away, but we’ll have to see where we end up!
xo,
s
annabelvita says
Rip floor up, paint cabinets, lay floor?
YoungHouseLove says
See, it’s just an issue with the sticky glue under the current vinyl. Not sure if we can paint with that on the subfloor, but laying down the underlayment and cork right away will take care of that. We’ll keep you posted!
xo,
s
Sara says
I painted our kitchen cabinets about a year before we ended up ripping out the old flooring in the kitchen. We had ceramic tile set in morter with mesh that was placed directly over the original 1990s sheet vinyl flooring which was glued to a thin plywood layer and attached with about 10 million staples to the subfloor. We had to rent a demolition hammer to break up the tile and then spent many more hours scraping up the rest of the vinyl and plywood underlayment.
Even with all the broken tiles flying through the air, I only had a couple small scratches on the new cabinets. However, all the dust from the tile demo coated every crevice and surface in most of the house and I had to do major cleaning for months to get rid of the dust. I had to take everything out of my kitchen cabinets, wash the cabinets inside and out and wash every thing that was in the cabinets. It was a nightmare.
However, if you are simply ripping up vinyl, I think you would be ok with painting the cabinets first. Hopefully your vinyl floor comes up easier than ours did. There was seriously a staple probably every inch holding the old floor underlayment down. I still cringe everytime I watch HGTV and someone is ripping out old flooring, I get bad flashbacks!
YoungHouseLove says
Thanks for all the recommendations everyone!
xo,
s
Brianne says
We peeled up the old vinyl floors in our kitchen. It’s a good idea to put the new floor down asap because it’s super sticky and hard to walk on, plus everything will stick to it. When you peel them up, make sure to heat them with an old blowdryer to melt the glue a little first, that way you’ll get a whole tile up at once and not just pieces of it if you only scraped it. Also, wear gloves. If you’re nervous about painting with the new cork floor, you could also maybe put all of them down except the ones that would touch the cabinets and put those down after painting? Just an idea.
YoungHouseLove says
That’s really smart!!
xo,
s
Jennifer says
It’s going to be so great! And I know I sound weird, but I can’t wait to see what you do with the wall space over the counter by the new fridge location. Something involving the new backsplash? Fun art? Open shelves for cool storage? So many possibilities! Wow, I sound PRETTY dorky.
Jennifer says
Or wait – is that where you mention the wall of cabinets becoming open shelving? Never mind. :)
YoungHouseLove says
Haha- my mind is doing the same thing! So many options!
xo,
s
holly@LoveofLifeblog says
LOVE this switch. And I also love that you have to provide pregnancy-non pregnancy updates to the blog readers! Most people only have to deal with family but you get the added bonus of extra thousands of interested people!
YoungHouseLove says
Haha- the first thing I thought when I looked at that picture was: great, looks like I’m hiding something!
xo,
s
Julia @ Chris loves Julia says
It never even crossed my mind to switch cabinets around. Like–my mind. is blown.
And John! The sketches look fantastic!
Renee says
Love it! Practical and will look great/be thoroughly enjoyed! We bought a large house big enough for our family but desperately clinging to the 80s in style in order for us to afford it! I love all that you do – it gives me hope that I could do that too! Or you could just come on to Louisiana for a visit and a little brain-picking! lol!
jess says
You may have already answered this (not sure), but what are you going to do for countertop on the side of the fridge and peninsula? Have you been able to find granite that matches? Love the new layout, though!
YoungHouseLove says
We’re not really in love with the current granite (it’s pitted and chipped in a few spots and not a color we’d choose) so we think paying for more of it to complete the peninsula feels odd. Instead we’ll be craigslisting it and putting that money towards another option. We’d love to DIY some concrete counters if our room can handle them (they can be heavy!).
xo,
s
Jess @ Little House. Big Heart. says
Gutsy move!
It looks like it should have always been that way! I agree with Kristen too, it’s crazy that you can just unscrew everything and move it around!
Lauren Spekkers says
Wow – you guys are so speedy! I’m still drooling over the changes in the office, and before we all know it your kitchen will be well on its way to perfection! I love the new location of the fridge – and while I know you guys aren’t big drinkers and partiers (it’s YoungHouseLove after all, not YoungFratLove) – some open shelving right next to your barstool/peninsula area on that exposed wall would look fab! A great way to show off any nice glassware or dishes and super-convenient to serve refreshments to guests…even if its just a Shirley Temple in a sippy-cup for Miss.Clara! ;)
YoungHouseLove says
Haha, it’s definitely something we’re considering (among hanging a mirror or some art to switch things up and look less kitcheny).
xo,
s
Alice says
I like it! I am so jealous of the big fridges you all have in the US, here in the UK we only have teeny tiny ones as standard (and the American-style fridges are expensive, upwards of £600). We’re saving up for one!
Gaidig says
American-style fridges are just as expensive here. It’s just that people pay for it because they can’t imagine having smaller ones. :)
(According to the appliance post, they paid £666.90 for a fridge originally priced at £1,143.74.)
Alice says
Ah, in my mind for some reason it was around $600? Oops!
I have lived my whole life with a small fridge so far (a bit like this http://direct.asda.com/Indesit-BAAN134-(UK)-Fridge-Freezer/001549686,default,pd.html?cm_mmc=Shopping%20Engines%20ASDA%20Direct-_-Google%20Base-_-Fridge%20Freezers-_-Indesit%20BAAN134%20(UK)%20Fridge%20Freezer&istCompanyId=71f4ae42-94c5-4821-aa58-05eff6da2486&istItemId=xpmqxaip&istBid=t) and there have been lots of occasions I’ve had to do some pretty special re-organizing to get all our food in!!
Anna says
I live in America and we have the tiniest little fridge like the one you linked to, Alice! It’s a total anomaly over here. People come over and say “oh! I love your tiny fridge!” but it is SO HARD to fit anything in it. We have to go grocery shopping constantly and are always trying to throw things out or use them up. We can’t even stand a beer bottle upright on the shelves. Each unit in our building is exactly like ours, with tiny tiny fridges (and they’re condos, not apartments). I have no idea why they did it that way. I can’t wait to move and get back to a giant, American-size fridge!
ESBlondie says
This is brilliant! I can’t wait to see all the upcoming progress.
Jill says
The new layout makes perfect sense – love it! We recently (with the help of a contractor) demo-ed our entire kitchen, including knocking down two walls and put in a new one (though we’re waiting to replace the appliances a bit down the road). I agonized over the layout, but think we ended up with a great space. Maybe you could house crash us sometime if you’re up in Alexandria again (though I’d want to finish up the other work first, which may be a year or so away!) xx
YoungHouseLove says
We’d love to! Feel free to send pics when you’re done and we’ll try to work something out!
xo,
s
Allison says
I’m so glad you’re embarking on a kitchen re-do! Ours is tentatively planned for summer 2012, but we’ve already pulled out a pocket door and doorway trim (to fit our new fridge into the kitchen) and moved the fridge to its future location, complete with water hook-up (Woot! Ice maker!). It currently has a work-in-progress look to it, and I’m glad to see your kitchen in a similar state!
Nicole says
Love the blog!
I get a bit confused with all the writing though. Maybe less words = more reader friendly (and not saying the same thing 3 and 4 times in a row)…definitely just some reader feedback though!
: )
YoungHouseLove says
Thanks Nicole! After four years and 2,000+ posts we’re still learning how to blog. Haha. Short and sweet is hard for us- especially with so many changes and questions that pop up as we go- but we’re trying!
xo,
s
Meredith says
Ha ha!! I get it. YHL is really fond of using ( ) frequently. (You know, because adding extra details in parentheses to explain things more thoroughly is their style.) I just skim over it – the same way I go “yada yada yada” when my cute southern sister in law leaves us a voice mail saying the same thing over and over and over again.
Jennifer says
You guys are the bomb-diggity-bomb!
YoungHouseLove says
Aw schmanks. Right back atcha.
xo,
s
Michelle says
Looks great! How exciting!
After your “3 ways to 3D post” a little while back I was inspired to see what I could do with my kitchen. I used the IKEA tool and, even though I won’t be purchasing an IKEA kitchen, I’m really excited about updating my kitchen for the first time ever. It’s about the same size as what you had in your old house but my fridge is right next to the stove. Yeah, we’re moving that, it’s item #1 on the list! Thanks for the inspiration and have fun.
YoungHouseLove says
Aw good luck!
xo,
s
Kristen says
Love it! Any thoughts on adding a faucet for pot filling over the new stove? I know that is a little extra plumbing work but they sure are functional and look fantastic with a little coat of ORB!
YoungHouseLove says
Since the sink is so close to the home of the future range we figured it wasn’t worth the extra expense – but in those spacious kitchens where things are further apart we love a pot filler!
xo,
s
Christine says
We also moved our fridge, and even though it was a pain and we had to also move the water line for the ice maker, it was so worth it. The kitchen functions so much better that it’s like a different room. Don’t you love being able to reuse the pantry but in a different place??
YoungHouseLove says
Yes! So glad that worked out! Could have been doing the ugly cry on the floor last night. Haha.
xo,
s
carly says
Do you mind providing the dimensions of your kitchen?! It looks huge!
YoungHouseLove says
Sure- it’s really long (25′) and not that wide (11′). Sort of like a bowling alley. Haha.
xo,
s
Laura says
I love it! It makes so much more sense than how it started out. Nice work guys!
I am very interested to see what you do with the backsplash. We have a peninsula, but we aren’t sure if we should bring the backsplash all the way out on the wall to the end of it.
julianne says
When we redid our kitchen two years ago (has it been so long??) we moved our dishwasher so it is next to the sink and put in a corner cabinet with lazy susan in its place. It’s so much more functional now I don’t know why it wasn’t there in the first place. Plus, who decided having cabinets with deep, inaccessible corners was a good idea? We got rid of two of them and now I can see my pots and pans. We also added two cabinets under our work counter that weren’t there before. Such simple things I don’t know why they weren’t done in the first place. Oh 1970’s builders, what were your thinking?
Lisa says
LOVING the new plan! Wow, you guys amaze me with your imagination and vision. And I’m so jealous – the cabinets in my 1950’s house were built in place and can’t be separated or moved – complete demo and replacement is the only option, and that is NOT in our budget. I am so excited that you are moving full-steam ahead on the kitchen reno and can’t wait to see the backsplash, countertops, and eventually the entire transformation!
Miranda says
You’re not alone, Lisa. We’ve got an original 1950’s kitchen as well with all built in-place cabinetry and scallops over windows, too (ew) so the only choice we have for this completely dysfunctional for this day and age kitchen is to completely demo it…which, as you know, takes tons of dough. One day, though? ONE DAY! Good luck on yours :)
Rachel Tatem says
Looks great! We less than a year ago revamped our kitchen… or actually more like we started from scratch
Charlene @ Sweetchic says
You guys are so insanely, unbelievably ambitious!! But in the most awesome way possible!!
Monique says
I’m digging the pantry/fridge switch!!
MJB says
I’m not good with change… even someone else’s change… but I liiiiiike. The view from the chairs on the peninsula is better this way. Under the old plan, it felt like you would be looking at the side of a cabinet. This is much more open.
If John has nothing to do (between running new water lines to the frig, installing cork floor, putting up a new backsplash. Whew, I’m tired just thinking about it!) I’d love to see a sketchup view of the kitchen from the peninsula/fireside chair.
YoungHouseLove says
Oh yeah- we can probably just swing that sketch around for that viewpoint. We should work that into a future post for ya!
xo,
s
MJB says
A mission should you “choose to accept it.”
Since there are a few trains of thought re: the knee wall, maybe a future post could show the view to the kitchen from the dining room with:
1. knee wall.
2. peninsula as piece of furniture (no drywall)
3. various degrees of open-ness (not a word, but ya know what I mean) between the kitchen and dining room.
You’ve been telling us that opening up the two rooms too much would look weird. You might have to show us. Then I will shut up. Promise.
YoungHouseLove says
Haha, sure! It’s officially on the (admittedly very long) to do list!
xo,
s
Jessica says
I love the new pantry location and the open shelves you showed on the one wall. Do you have any plans for the wall to the right of the fridge? Or any replacement for the triangle granite on the left? I can’t wait to see more progress. Nice work!
YoungHouseLove says
We’re not sure about that space. I think we’ll build in the fridge and see what we think.
xo,
s
Mary says
I keep thinking open shelves for cookbooks and artwork and keys would look fantastic in that awkward little space! Kinda like you built next to the washer/dryer in the laundry room.
Kristin says
The new layout looks like a “double L” from above – makes so much sense!
When we renovated our kitchen, we played around with tons of layouts, only to realize that the existing layout was perfect from the start when we just added two upper cabinets for storage. That said, our kitchen is very tiny and has a slanted ceiling. I think there is not even a single wall that would be wide enough for a fridge like you have, haha. But we love our tiny kitchen!