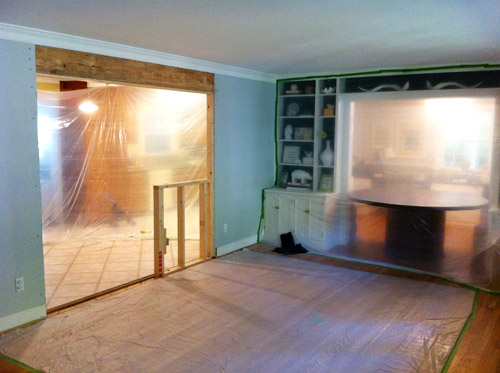
As exciting as it is to have both that section of wall and the contractor gone, there’s still a lot of work ahead of us before our opening is finished. Unless this is your idea of beautiful dining room:
Oh and speaking of the contractor, locals have been asking for Steve’s info – and now that we’ve worked with him and were extremely happy with his result, we’ll share (we only like passing along people’s info after we work with them, to be sure they’re someone we’d recommend). He’s a licensed Class A contractor as opposed to a handyman (so he doesn’t hang doors or build furniture or do odd little jobs), but if you have any big structural work (like knocking down walls, building additions, etc) he’s your guy. His email address is [email protected].
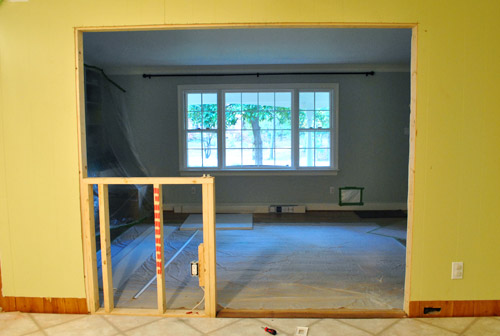
But back to our next steps with the opening. We left the protective plastic up because drywall installation was next up, which can be kinda dusty itself (especially the sanding part). We don’t consider ourselves to be drywall installation experts by any means (it was my least favorite part of our bathroom renovation two years ago) but this particular job seemed straightforward and small enough that it’d be silly to hire out. We just needed a span of it across the top of the doorway on the dining room side (to cover the exposed header on that side) and a few sections around the half-wall.
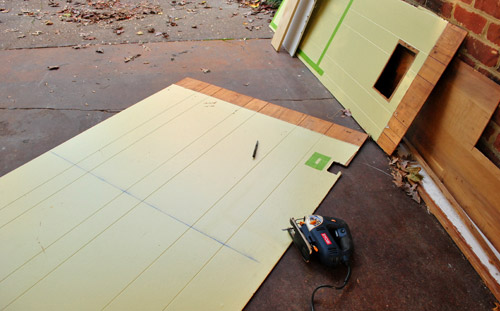
And actually, the kitchen side of the half-wall will be paneling instead – which is why we had the contractor leave all of the scraps from his demolition. So I simply measured, marked, and cut using my little jigsaw. It was super quick and easy.
So easy that I went ahead and set the cabinet against it before proceeding further (Steve actually suggested doing this before drywalling the back so I could see my studs which would allow me to drill into them more easily/accurately). Note: there will be a 12″ counter overhang behind the peninsula with stools tucked under it, so you won’t see very much of the half-wall from this direction at all when we’re done. And we’ll be topping the half-wall with a chunky wooden ledge to add even more function and balance.
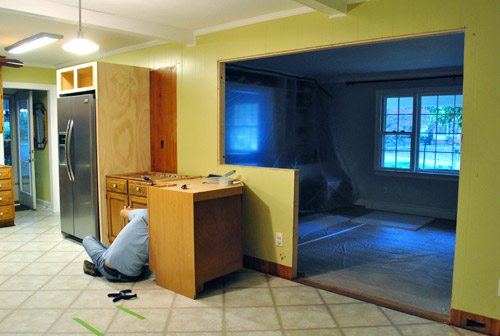
Already looking more finished, right?…. right?
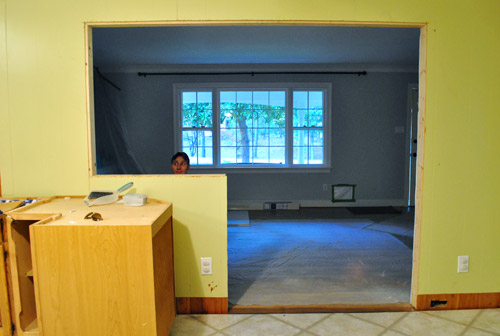
Okay, not really.
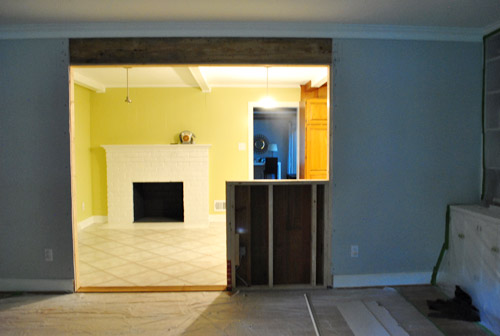
But I was kind of avoiding my next task: getting the drywall pieces home. Obviously I can’t fit a 4ft by 8ft slab of drywall into our Altima. And renting the truck at Lowe’s or Home Depot is always an option, but spending $19 to transport $14 worth of drywall seemed silly. So I took another suggestion from Steve The Contractor: cutting the drywall to size before bringing it home. Which is how I found myself setting up shop in the Lowe’s parking lot. Have I no shame? Nope. Especially to save a buck (or 19).

Basically I brought my tools with me (measuring tape, pen & blue chalk line to mark, razor blade to cut, yard stick as straight edge, towel to try to keep the car clean-ish), bought my drywall, and spent about 45 minutes carefully measuring, slicing, and snapping my pieces to size outside. The drywall in the dining room is actually two panels thick for some reason, so I had to cut two of each size to keep it flush for a hopefully seamless result.
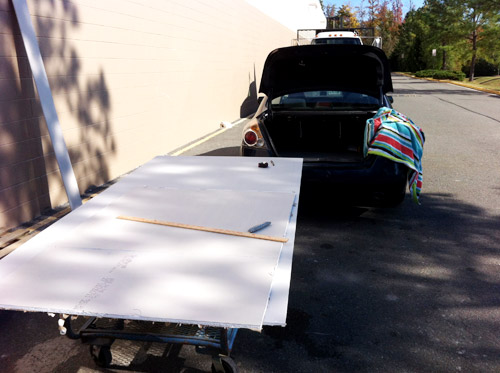
I managed to get my half wall pieces (plus a few scraps) in the trunk…
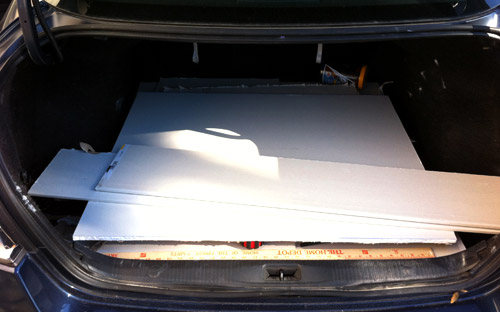
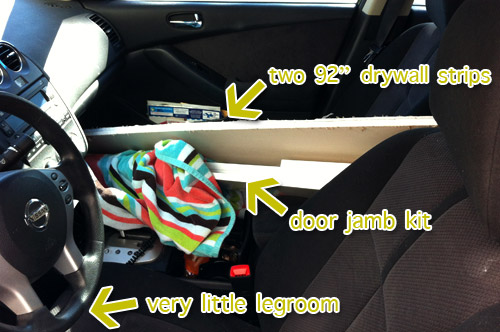
…and the long pieces for covering the new doorway header barely slid through the middle of the car (along with the door jamb kit, but that’s for my next phase of the project). Booyah!
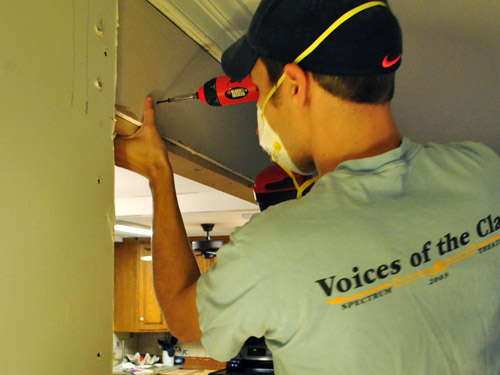
Even though it was a bit awkward working in a public parking lot, it was nice to come home and jump right to screwing the drywall into place since it was already cut to size. Sherry helped me by holding one edge up and then I’d screw a few “holding” screws so she could hop down and take flattering photos like this:
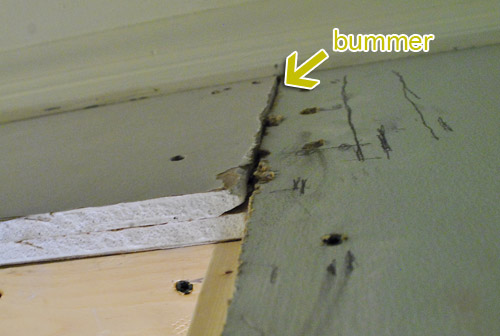
But this is where my wow-this-is-going-better-than-I-expected luck ran out. Despite my best measuring efforts (we even took photos of a tape measure next to the existing drywall and the drywall in the store to pick the right depth), my new doubled-up drywall was a smidge thicker than the existing doubled-up drywall. And a smidge is not acceptable when it comes to drywall. This would have looked all sorts of awkward even with mud and tape and some sanding (it would still read as a slope when the light hit it).
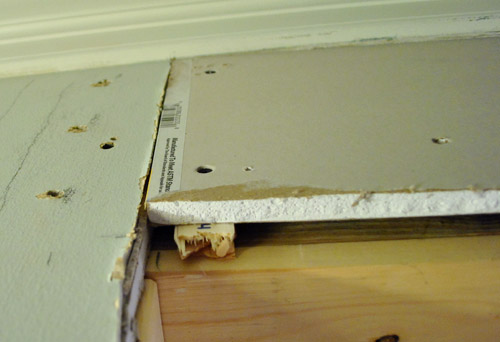
So I ditched one panel and relied on a technique that I used while hanging hardibacker and drywall in the bathroom that we gutted: shims. I added some wood shims to get my new drywall flush with the rest of the wall. Only I didn’t have that many shims and furring strips, so I also had get resourceful and dip into our stockpile of paint stir sticks to help us out. We learned that a few of them screwed together were actually just as dense as a furring strip or two. And since the wood + steel header is beyond solid, everything held nice and firmly. You can see them poking out there a bit on the bottom (don’t worry, that’ll all get covered by trim).
I basically repeated that process for the big panel on the half wall (being sure to get things as flush as humanly possible before drilling). I know what you’re thinking. Yes we’ve accrued quite a stash of stir sticks over the years (probably because they give us one when they hand over our paint and we usually paint right away when we get home so the paint is still stirred from the store’s mixing job).
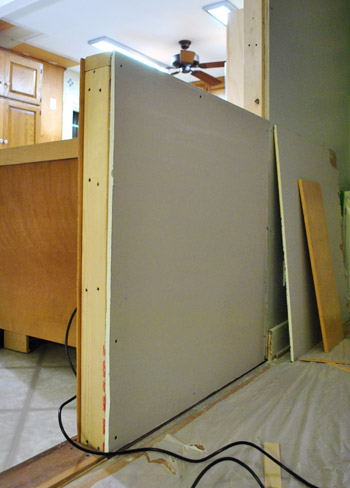
Fortunately for that little end cap I didn’t need to match any existing drywall thickness (since it’s a new plane) – so a single piece of drywall just went on straight into the wood frame. Then we used some metal drywalling corner strips to make the edges a bit sharper. Although they’re typically not meant for where paneling and drywall meet, we’re no strangers to “improvising” along the way, and you’ll see how it all turned out a bit later (spoiler alert: looks good).
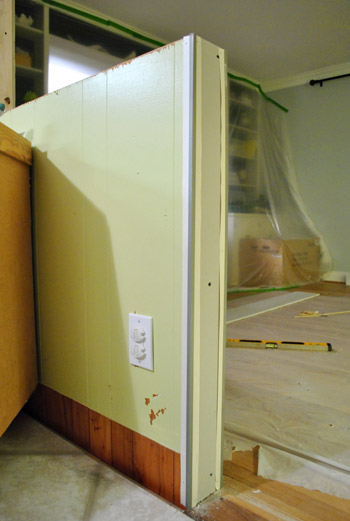
So that completed the hang drywall part (with only one minor hiccup, thankfully). Next up was the drywall mudding part. I left that to Sherry because she has more finesse than I do when it comes to that stuff (at least I tell her that to get out of doing it – the same way she’s better at cutting in).
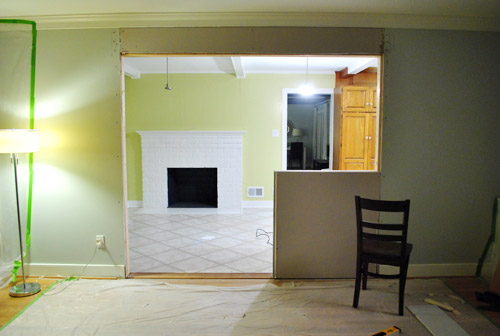
So Sherry broke out her spackle knives (the girl has a nice assortment) and started the fun process of taping, slapping up some drywall mud, smoothing it, letting it dry, sanding it, and then repeating that process. Although she didn’t tape this crack since it was especially tight (not even much of a crack thanks to a super tight fit).
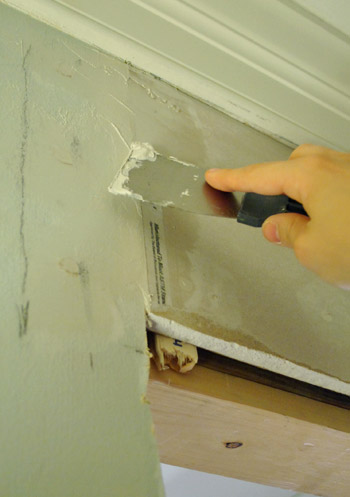
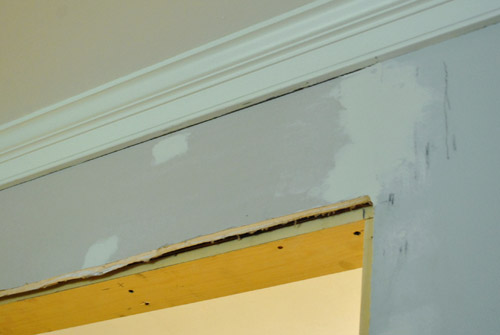
She ended up doing three rounds in most spots, since she wanted things to be as smooth and seamless as possible (she decided to caulk that crack up near the crown molding instead of trying to get mud in there with a putty knife, so that’s why it’s untouched in this photo):
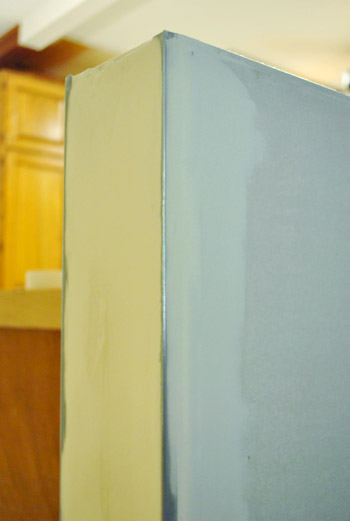
As for the corner things we used around the half-wall, they actually came out really well (admittedly better than I hoped, since I always worry that something catastrophic might happen to leave the walls looking weird and lumpy). Of course I realize as I write this that I didn’t take a photo from the other side so I’ll have to work one of those into a future post. But the corner piece and drywall mud seem to work just fine with the wood paneling – and once it’s all primed and painted it’ll effectively be “sealed” in there for a nice durable and straight-looking end result.
So… it’s definitely looking more finished than it did this morning… but nowhere near totally finished.
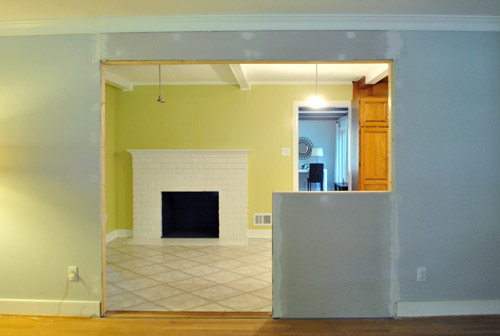
I’m the first to admit that the entire opening still looks kind of crazytown because:
- there’s not any trim to unify it with the other doorways nearby
- the baseboards aren’t complete on either side (they just end at the half-wall)
- there’s no wooden ledge above the half-wall to add some extra function and balance (we’ll tackle that along with the trim/baseboards next)
- there’s not a big peninsula with stools and a giant slab of counter behind the half-wall to make sense of it
- there are lots of things we have to prime/paint, so it’s looking extra rough
So the whole thing is sort of out-of-context right now. But it’ll get there – slowly but surely. Oh and we mentioned this in a past post (this one), but for anyone tuning in now, here’s why we opted for a half-wall instead of a full opening with a peninsula floating between each room:
- we didn’t want the peninsula to look like an afterthought (like it was placed in the middle of a doorway without much planning)
- we thought the half-wall would ground the peninsula, so it would feel solid and supported (instead of more like it’s floating between two rooms)
- we already have four base cabinets in the dining room thanks to the existing built-ins (so we don’t need additional cabinetry/storage)
- because of those existing built-ins, we thought an open bookcase, cabinet, or other form of built-in located less than three feet from the giant wall of existing built-ins would be a bit much
- our threshold would be a lot more seamless (if the half-wall weren’t there, there’d be an awkward strip of cork flooring between the peninsula cabinet and the dining room floor)
Next up? The door jamb, that ledge on top of the half-wall, and trim. Then comes primer and paint. And THEN it’ll start looking finished – especially once we begin to assemble the peninsula behind it. Of course there’s still the whole half-countertop-less kitchen going on (more on that here) but at this point we like to think of that as a minor detail.
Psst- Sherry got in on an interesting discussion about what’s in and what’s out over on Centsational Girl today. It’s definitely one of those fascinating everyone-has-a-different-take reads.

Stefanie says
Twenty inch blades on the Impala!
lol, love the song reference. Takes me back!
The entire project is shaping up and already looks amazing so I can only imagine how much better it’s going to get. Can’t wait to see those cabinets and penisula in place. Probably feels like a completely different space now huh? Funny how adding some light/openess to a room can do that.
Chelsea says
this is my favorite title of a post this far! good work. Also loving the kitchen too… :)
Joy says
No drywall tape on the seams? Do you know something I don’t know? (Just asking because I hate that step.)
YoungHouseLove says
Sorry – just added a note about that. We used tape on all the long seams and cracks- just not on that area pictured because it was such a short tiny hairline joint where things met (it’s the same method we used in our bathroom a few years back).
xo,
s
Amanda @ Our Humble A{Bowe}d says
It definitely looks more finished than this morning. :) I can see it coming together nicely. If you want to take a peek at our kitchen progress, here’s what it’s currently looking like: http://ourhumbleabowed.wordpress.com/2011/11/07/just-face-it/
What kind of wood are you planning to use for the half wall top?
YoungHouseLove says
Just some sort of whitewood or pine I think. We’ll paint it white to work with the trim.
xo,
s
Rebecca says
This looks fantastic! I can’t wait for the finished result :)
Julia @ Chris loves Julia says
So much better! We are in the midst of installing some recessed lighting in our basement and the electrician told us to be prepared to repair some sheetrock in the ceiling…..my eyes got real big and then squinty.
This post will definitely help me (hopefully) do that “repair” work.
Rebecca says
Out of curiosity, is there a reason you didn’t tape your sheetrock joints before mudding? Things are looking really good; I’m always amazed at how much you guys accomplish at once!
YoungHouseLove says
So sorry – just added a note about that in the post. We did tape- just didn’t take a pic of the bigger joints that we taped and happened to snap one of a tiny crack that I didn’t bother taping since it was so tight.
xo,
s
Katrina says
I’m loving the changes so far – it’s so dramatic and inspiring. I’m impressed with your ability to envision this when you walked through the house the first time. It is also amazing what opening up that wall did to your kitchen paint color – it’s so much less day-glo in natural light!
Jen says
Looking great!! Do you not tape before putting up the drywall mud? By the pictures it didn’t look like it but maybe I just can’t see it? I always thought you had to tape the seams…
YoungHouseLove says
I taped some of the longer seams but didn’t end up taping that short area where they met since John did the best job fitting the drywall (there was hardly a crack let alone a seam).
xo,
s
Shannon says
John! That is hilarious that you cut the drywall in the Lowe’s parking lot. When I suggested to my husband that we do the same thing, he looked at me like I had two heads. But, he did it! Can’t wait to tell him that we are not alone…
CP says
Whaaa? Doesn’t everyone cut drywall in the lowes/home depot parking lot?
I usually try to snap it about 4 to 6″ oversize so I have a second chance to finetune the dimensions and cut it again when home. Just wear clothes that can get dusty, bring your matte knife, a ruler or 1×4 for making a straight line, and a piece of lathe or dowell to place under the drywall so you can gently press and snap cleanly after you have scored it. Presto!
Meredith says
It looks fantastic, what a great feeling to be so far along in the process!
Kristin @ Ogo's Love Nest says
I feel you’re excitement! It’s coming along great and I think it’s going to be better then I imagined.
Thanks for his info, I was hoping you’d share it!
Michelle @ Ten June says
HA! You would with that title. Drywall is hands down my least favorite part of renovations… so not fun. But good luck and keep up the hard work! Oh and thanks again for doing the interview with me over on Centsational Girl today- I think everyone is loving the article! : )
YoungHouseLove says
It was so much fun! Thanks for including me!
xo,
s
Meredith says
Best. Post title. Ever.
And the wall looks nice, too.
Kara says
I agree!!
becca says
we are doing drywalling at our house right now, and we definitely used my paint stirrer stash as shims too. question though: our outside corner metal things that we bought had paper tape on the outside of them. it looks like on yours the metal is still showing. do you just paint over that?
YoungHouseLove says
We used this kind on our bathroom a few years ago and liked it (the notes on the wall at the home improvement store indicated that it’s the most error proof) so we’ve been fans ever since. Haha. I’ll just prime and paint it for a nice seamless look. Pics when we get there!
xo,
s
Meg@Keeping up with the Jenks' says
omg- I love John setting up shop in the parking lot!! I wish I could have seen that.
My husband used to drive a mini cooper and people would stop and stare at us whenever we left Lowe’s- that thing would be packed with even more stuff hanging out the window and strapped to the top. Good think we only lived around the corner.
Drywall can be so tricky (especially mudding)looks good. Great job guys!
Leigh Anne says
Gotta love a Lil Troy reference – and the wall progress is pretty sweet too. Best of luck as you tackle the next part of your list!
Courtney says
Ahhhmazing!!!! I love it, and I can NOT wait to see the finished result.
Allison says
I’m so excited to see it all finished! Did you get any sleep last night?
YoungHouseLove says
Haha- hardly!
xo,
s
Angela Hanson says
Do you have to do any sort of texture on the new drywall??? We have a small area to patch in our basement and I’m wondering what the easiest way is to get the texture to match the existing. Do they make some sort of spray texture??? Thanks!!!
YoungHouseLove says
We don’t have textured drywall. Hmm, maybe try asking at a home improvement store or googling around?
xo,
s
Rebecca says
They do make spray texture-in-a-can. You’d probably find it near the paint aisles, or by the tubs of joint compound. The kind I’ve used comes with a few different nozzles for different sized texture. You can get a really good match depending on your current texture (some are easier to match than others). Hope that helps!
Julia @ Chris loves Julia says
We are doing a basement reno and needed to match an existing orange peel texture. Homax makes a great spray on texture. You can adjust the nozzle depending on how textured you want it. They even have a water-based formula so you don’t have to deal with the smelly formula. :)
Shelly S says
Lowes and Home Depot have little spray cans of texture. You will want to do some practice sprays on scrap material to perfect the distance required to match your surrounding wall. It is super easy though.
Cheers!
Amy B says
As others stated the spray can texture works well. Note that some texture in spray knock down. If the wall has bumps but looks flat spray on the texture, wait a few minutes and the carefully go over it again with a large drywall knife to get that flattened out look.
jeff_williams says
Just a tip for other readers and not necessarily relevant to Angela’s case… If you have texture that’s been built up by layers of paint put on by a roller than just take a paint brush and stipple the primer on. New sections of drywall disappear and look like they’ve always been there.
Diane @ The Perfectly Imperfect Life says
Not sure if you’ve already gotten an answer on this, but yes, they do make texture in a spray can, which is MUCH easier to work with than a hopper that sprays texture on a larger scale. They generally have different settings, so you can match up to your existing texture. I recommend practicing on something a bit first.
Just check the paint section at your local home improvement store. You should find it there.
Kari says
Looking great guys! That drywall went up fast! It will be so nice to be able to enjoy the fireplace from the dining room now.
Kristin says
It’s looking so good already (even with the craziness)! I admire your courage to just take the leap and do it. We’ve been wanting to open a wall from our kitchen to our main room (living, dining, open area), but just don’t have the guts to do it yet! Can’t wait to see the kitchen all done! :-)
Amy says
Wait, where the drywall tape? I didn’t see any tape in the pictures! Please tell me you used tape! It will crack later if you don’t!
Amy
YoungHouseLove says
Yup! Just added a note about that. I used it on all the cracks and longer expanses – just not in that 6″ span pictured (the drywall was so tight there wasn’t even a crack to seal- just a hair where they touched that I knew mud would fill without any worries of cracking later). It’s the same method we used in our bathroom a few years back with success!
xo,
s
Amy says
Hmmm… cracking is not due to how tight the pieces fit together, it’s what the drywall is screwed to that determines that. If two pieces of drywall are screwed to two different pieces of wood, then the movement of the wood due to expansion/contraction would cause cracking. If they’re two different pieces of wood, they would not move together. I couldn’t tell if all of the new drywall was attached to new wood, or if some of it overlapped old wood. Believe me, I learned this the hard way! I still have one place above a doorway that cracks diagonally off the corner, even after two pieces of tape on it! The corners of the opening are notorious for cracks (where your seams are). Drywall installers always make sure the seam is not at a corner, but in the middle over a door because of these problems.
YoungHouseLove says
Thanks for the info Amy! We have our fingers crossed that that little untaped crack will be ok. We did the same thing in our first bathroom (taped the large spans and just mudded and sanded and primed and painted the small super tight cracks) and the small untaped areas never cracked or anything (even though we took plenty of hot showers and things that I’d imagine would make things expand or contract over the 1.5 years that we used it after the reno).
xo,
s
heather says
If it cracks the most likely scenario will just be to sand everything down on, tape, re-mud, sand and repaint. Not the end of the world. In our house we had these horrible cracks and then when we were prepping the common room I realized I could actually grab the tape, and rip it off the wall in one fell swoop – with the paint over it and everything. It almost rivaled finding heavy duty eyebolts holding out closet rod in, and rebar under our wood decking. I only *wish* I had a blog back then. My husband says I should do retro renovation posts, I’m not sure I can bring myself back to it haha.
Jill @ Mission Decorate says
WOW, you have been busy! Have you slept at all in the last week? It is really looking great. As always, excellent work.
YoungHouseLove says
We save sleeping for the weekends. Haha. Kidding. But I was almost too excited to sleep last night. Kept getting up and staring at the new opening. Haha.
xo,
s
Christine says
It’ll be so nice to walk in the front door and be able to see a fire burning in the fireplace!
Ashleigh says
I was waiting for a Dexter comment with the Sherry has a collection of knives (putty knives that is) :-) Looks AMAZING. I just drool over you guys every time I come over here.
YoungHouseLove says
Haha, I thought the same thing when I was proofing this post. You win for first mention!
xo,
s
jordan says
I know why you added that half wall…..to really put your mark on the place. The openinger is a GIANT P…..for Petersik!!! Ok, this may win corniest comment of the day, or just be one of those “happy accidents” that always seem to happen in your projects….but is kind of cool! Thanks for sharing all your hard work!
YoungHouseLove says
Hahah- I was joking about that with the contractor. It’s one big monogram.
xo,
s
Marie says
Ha! I’ve totally set up shop in a parking lot before–my Grandma had asked for a potted plant for her birthday, so I stopped by Home Depot to grab one on the way to visit her. All of the actual plants had ugly pots, so I also bought a big, nice pot and potting soil and repotted the plant right there outside of the Garden Center.
YoungHouseLove says
Haha- love it.
xo,
s
melody says
I LOVE that you can now see the fireplace from yet another room!
Vonda says
Looking good y’all! Also, I cracked up at the title & with that title I think $herdog would be most appropriate!
Katie says
I haven’t been following the blog very long, but now I’m hooked! My twin sister, Karla Wall, turned me on to it and now it’s something we call eachother everyday to talk about! Looks amazing! Wish I had the time/skill to complete some similar projects! So many ideas and a huge wishlist…someday! Good luck the rest of the way!
YoungHouseLove says
Aw, you have no idea how giddy that makes me. Tell Karla I say hi!
xo,
s
Karla says
Haha Hey guys! :) I love how the kitchen is turning out! I’m painting my cabinets tonight! :) Charcoal gray!
YoungHouseLove says
Ooh good luck! Sounds lovely. Send pics!
xo,
s
Katie says
I will, thanks for taking the time to comment back on my post! I’m sure she read the comment and is excited too:)
Kristi says
I am so impressed with how much progress you guys are making already!!! Never would have thought about cutting things to size in the home improvement store parking lot! I wonder if they have outlets around the building to plug in a drill or saw!?
Also – GREAT post title!!
Loving all of the so-up-to-date posts and progress! It must be so much work – but just know that your adoring fans are so excited for them!! You guys rock!!!
Jen @ The Decor Scene says
HELLO OPENING!!! Now that is what I’m talking about….well you guys are talking about it, but I’m lovin’ it!!! Such a great choice that you opened this wall. I love the view from both sides. You must still be running around with smiles on your faces. :)
Kyley and Ammo the Dachshund says
I still can’t believe you guys don’t own an SUV considering all the diy projects you undertake. I would die without mine! :)
P.S. the progress looks great, I love it. Makes me want to take a sledge hammer to my kitchen!
Hilary says
Looks perfectly positioned with the fireplace. Woo hoo! And HA to John in the parking lot-at first I thought you meant that Lowes was cutting it for you, but good for John for not giving a damn!
KB says
Its going to be sooooo nice once you get the fireplace working to sit in the dining room with family on Thanksgiving and Christmas around that big beautiful table and be able to enjoy the fireplace in both rooms! Your home is turning out soooooo wonderfully cozy! I was thinking that you guys should get another karlstadt chaise since they sell them separately to put in the kitchen or maybe 2 of the karlstadt chairs, because one chair won’t just do it, the kitchen is going to be the best room ever when your done. Love you guys and great job!
Jules says
This whole post I kept thinking about that part in Mean Girls-
“Say crack again.”
“Crack.”
PS looks great.
YoungHouseLove says
Bwaahahah.
xo,
s
Becky@OrganizingMadeFun says
Oh, my goodness! This brings back so many memories of our kitchen wall tear down:
http://organizingmadefun.blogspot.com/2010/07/weekend-project-tearing-down-wall.html
I totally feel for you because I know all the mess and mayhem that’s ahead. But, now our kitchen is amazing and it was so worth it to get it opened up. Plus it was so tiny and now so big!! Looks fantastic!
Becky B.
http://www.organizingmadefun.com
Organizing Made Fun
YoungHouseLove says
Holy cow- that’s crazy awesome!
xo,
s
Teresa says
I was wondering how you would work the paneling in with the drywall… exciting times!
Andrea @ Hot Mess House says
I love this post so hard! From the cutting drywall in the Lowe’s parking lot, to the drywalling DIY (I’m really intimidated by drywall – this post shows me that maybe I don’t need to be!), to the keeping and reusing of materials – so much win! Thanks for the inspiration!
Bea says
Great tip about cutting drywall in the parking lot! It wouldn’t be a lot of fun in the winter though- lucky we are having such a nice fall. Your wall looks fantastic, you guys are amazing!
Meagan says
I love the shot of the corner cabinet next to the half wall. I am really starting to see how the peninsula is going to look. I am so excited to see this process continue!
Michelle says
You have rocked my world today Petersiks!!! All these years I thought it was “wanna be a baller, SHOCK COLLAR”…shot caller definitely makes more sense.
YoungHouseLove says
Hahah, I used to think that the Maroon 5 song that says “This Love Has Taken It’s Toll On Me” was “This Love Has Taken Liftoff On Me”
No idea what that even means. John never lets me live it down.
xo,
s
Ashley says
just laughed out loud and got some funny looks in the office… I’m going to start singing in “shock collar”
Becky S. says
I asked my husband “What’s a Baltimore Jack?” from the Bruce Springsteen song “Hungry Hearts”…he has teased me for over 30 years about that!!!
Vanessa says
Hilarious…up until the moment I read the title I also thought it was shock collar. Wow…and to think how cool I thought I was when I sang that song back in the day. *Blushing!
Christie says
I read in a comment that your drywall isn’t textured. So do you just paint right over your drywall after its been taped and seams and nailheads mudded? I didn’t know about this option, if so.
YoungHouseLove says
I usually tape sand, remud, sand, remud, sand, and prime… then paint!
xo,
s
Meredith says
This is a very regional thing…and can also vary by current trends or price point of the home in some areas. My south east coast relatives think I am crazy because I think it is weird that their walls have no texture on them – just paint. Here in AZ, my house built 12 years ago had a spray knock down, a version of orange peel that gets a putty knife over it to knock down the spray bumps. Higher end homes of the same period, like my parents, had skip trowel. Now, my house that we just built, has a skip trowel texture – as do most homes these days. It is hand applied with a trowel. Almost gives it a stucco/flat venetian plaster look.
Erin @ Stumbling Tongues says
Gah! This is my favorite post title ever :) If only you had 20 inch blades on the little Altima. Ha!
The progress is looking fantastic — can’t wait to see more!
kbb says
you probably have already been asked this, but are you not taking the flooring down to subfloor to put into the new floor?
YoungHouseLove says
Can’t mess with it due to the discovery of an asbestos liner under the vinyl tile. Thankfully the cork is thin and can float above our existing floor so we’ll only have about a quarter of an inch difference and with a tiny threshold to bridge the gap it should be great (we had one at our first house about that height and never even noticed it).
xo,
s
Penny says
OK, that shot of John’s head peering out like a Muppet over the half wall is killing me.
YoungHouseLove says
Hahahah- he’s my little drywalling muppet.
xo,
s
Ashley says
Best. Title. Ever…
Good thing you didn’t have to miss a new Modern Family last night in lieu of dry-walling. :)
Olivia says
Clever post title. However, I believe it is spelled balla… ha!
YoungHouseLove says
Haha- John was using the formal spelling of the word.
xo,
s
Nikole says
20 inch blades on the Impala . . . ha ha!
Love this post – it gives me hope that dear husband and I can tackle some of the drywall installation and repair that our kitchen and bathroom updates will inevitably require! YHL: inspiring, as always!