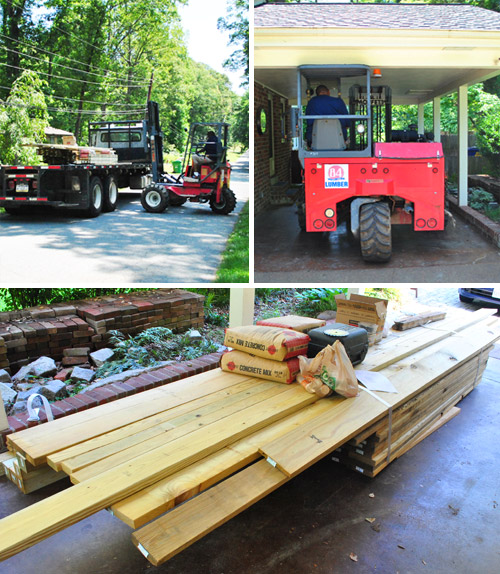
Good news: we made progress on deck building. Huzzah! Bad news: we didn’t make as much as we’d hoped. Harumph. I’m kind of having flashbacks to our bathroom remodel project back in 2009, when we’d schedule a long weekend with my dad to hopefully complete the whole thing but found ourselves just having started tiling by the end of the last day with him. But that’s just how real DIY life tends to go. So let’s rewind to the middle of last week when we got all of our materials delivered from our local 84 Lumber store (totaling about $1,000 including delivery and screws/metal hardware/concrete for footers/etc). That all went smoothly, especially when we realized that our carport was barely tall enough for a forklift to fit under. Seriously, the top of it just grazed an old plant hook hanging from the ceiling. Phew.
My dad arrived on Thursday morning to lend a hand while Sherry Clara-wrangled/tended to the blog/took pics/conferred as we went. We all spent the first hour-ish talking through the plan together. It was my chance to double-check that I knew what I was doing (or at least sort of knew what I was doing) and my dad’s chance to get up to speed. Here’s roughly what our deck frame will look like (except it’ll have stairs, which we’ll talk more about when we get to that step) thanks to the plan that 84 provided me. Oh but this isn’t the plank pattern that we’ll be attempting (that can be seen in this post).
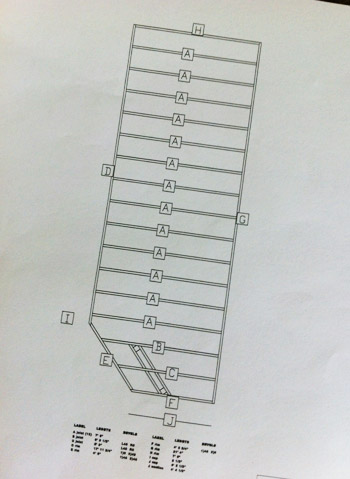
I realize that’s not a terribly descriptive picture, so bear with me. The only thing to note right now is that our deck-itself (not including the stairs) only requires two posts (near labels B and C) since most of it will be attached directly to the house. The only mid-project inspection from the county needed is a footing inspection, which ensures that I’ve dug my post holes to the right depths and widths. So theoretically I could just find those points, dig, get the inspection, and then do everything else. But Sherry and I figured we should start other portions of the deck before the footing inspection because (A) they’ll help us be more precise about our exact footing placement so there are no woopsies later on and (B) the inspector can warn us if we’re off track with anything else during the footing inspection – rather than telling us to take everything apart once the whole sucker is done. So the focus of Thursday’s work was to hang ledger boards and joists. Allow my little Photoshopped picture to explain that a bit further…
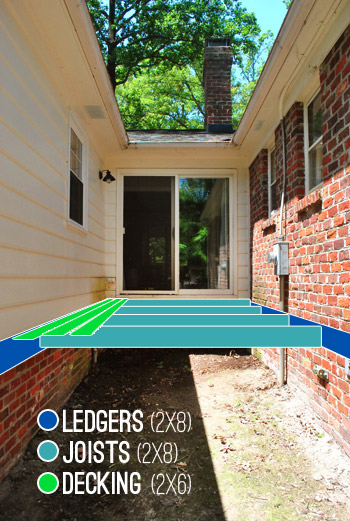
The ledger boards are bolted or screwed into the house on both sides, then joists will attached to each side, creating a span on which the decking boards can be nailed. Pretty simple, right? Well, there’s all sorts of considerations and steps that need to be taken – especially in regards to hanging the ledgers. For instance, they need to go all the way through your house into the band board (i.e. not just into the siding or brick facade) and you need to install flashing to prevent moisture damage. This graphic from decks.com is the closest thing I found online (after LOTS of searching) to what the whole dealio looks like:
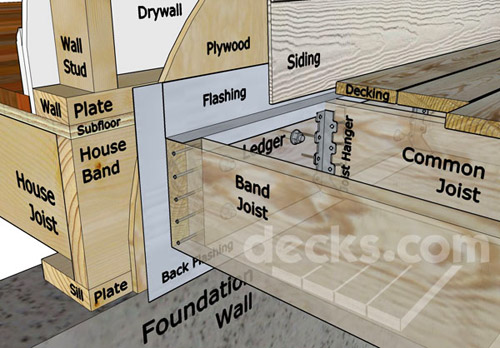
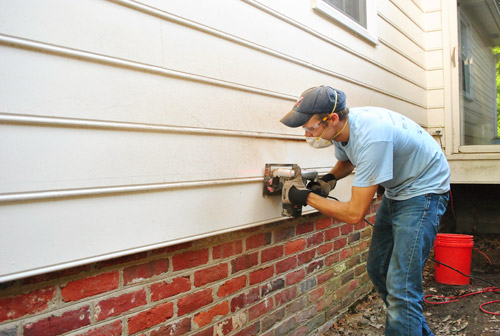
So our first actual step was to installing flashing. Our county just requires back flashing, but I also plan to add some on the top too since after a bit more research we hear it’s generally a good idea to further protect things from water damage and rot. I had trouble finding info about attaching flashing to brick, until I happened upon these “Flash The Ledger Board” steps on One Project Closer‘s deck tutorial. Looks like my first step was to “trench out one of the horizontal mortar joints above the ledger board” about an inch – which I did by setting the depth of my circular saw and using a masonry blade:
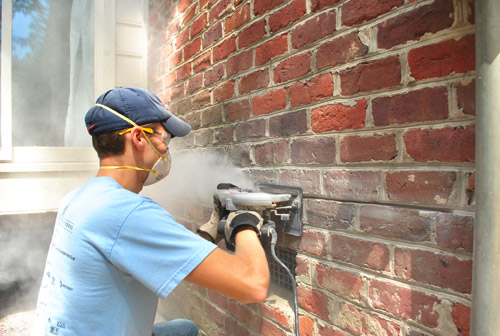
It was quite dusty. At this point Clara and Sherry were glued to the sliding glass doors inside, watching all the action. And Clara started yelling “fire is hot!” because all the dust actually looked like hibachi smoke (more on how we might have permanently scarred her with that experience here). But it was all good. No actual fires started and Clara simmered down and actually enjoyed watching the process when Sherry explained that the white dust was kind of like snow (the girl loves Frosty, so we were all good from there).
The idea here is that we could fold over a small hem on the end of the flashing and stick it into the exposed joint, sort of wedging it into place (though it also says to add a bead of clear silicone caulk over the seam, which we’ll also be doing). You can see my test strip of flashing below. I’m using vinyl flashing, since standard aluminum flashing isn’t recommended for pressure-treated wood applications (and is actually not permitted by our county). My other option was copper, but it was about three times the cost and seemed more finicky to work with, so I went for the cheaper and easier option.
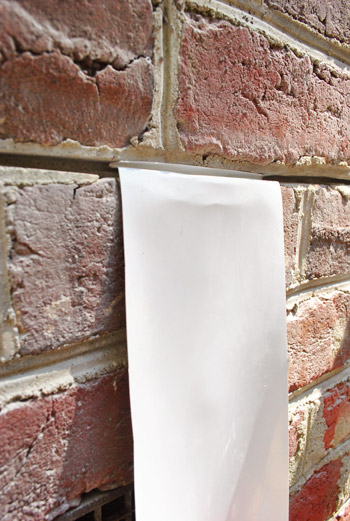
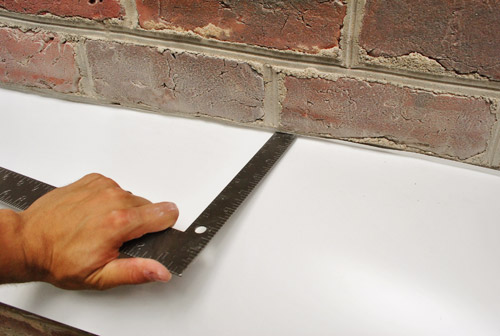
I rolled out the right length of flashing, cut it with my scissors, and bent the folded hem by hand (which was actually really easy to do). Though it did take the assistance of a ruler to actually force it back into my trench (probably a good sign that it’ll stay in place).
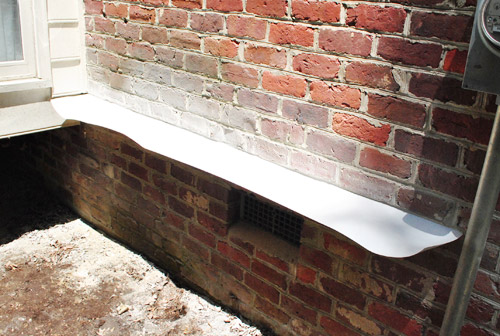
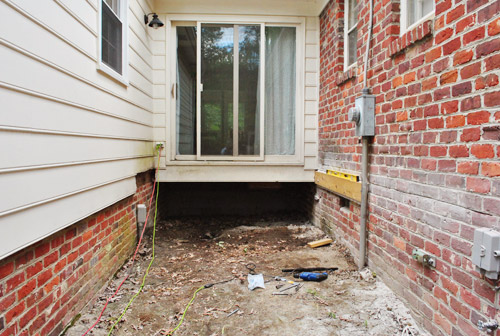
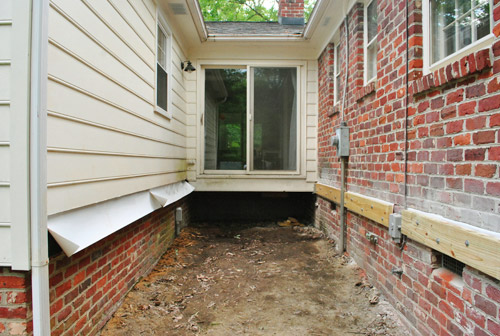
Here’s our first piece of flashing in place (though it will lay flat against the house once the ledger is attached by being drilled through the brick over the length of flashing). This is a good time to point out that the ledger board on the brick side of the house will be broken into three sections, since we have to work around a couple of obstacles like the electrical meter on the right side of this picture (thankfully the electrical municipality in our county is all good with us building this deck although it makes the height of the meter a bit lower so someone reading it will have to crouch). The lesson: be sure to call yours to make sure there’s no odd zoning rule like “the meter must be at eye level” that could ruin your deck-building plans. We hear in other parts of Virginia this entire deck could have been a no-go due to that rule.
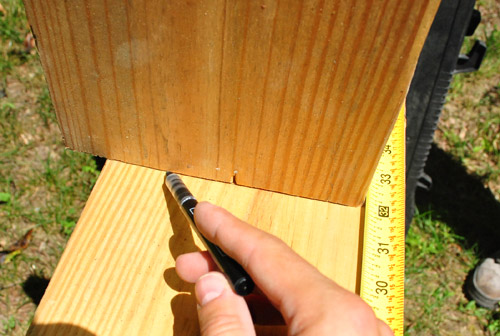
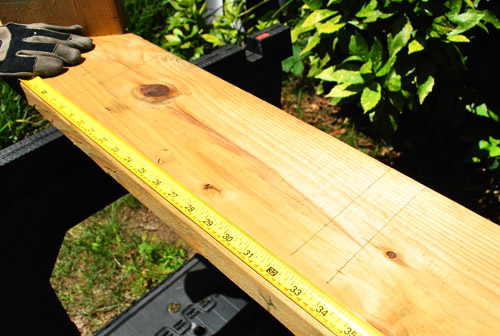
With the flashing held in place, we went to work on our first piece of ledger board (a 2 x 8′ board of pressure treated lumber). I cut it to length using the circular saw and starting by marking where my joists would go (my county guidelines required them to be no more than 16″ apart when measured center to center). I used a scrap piece of 2 x 8 to draw where they would go so I was sure not to place any screws in the way.
Speaking of screws, our county is very specific about those, as illustrated by this graphic in their deck guide:
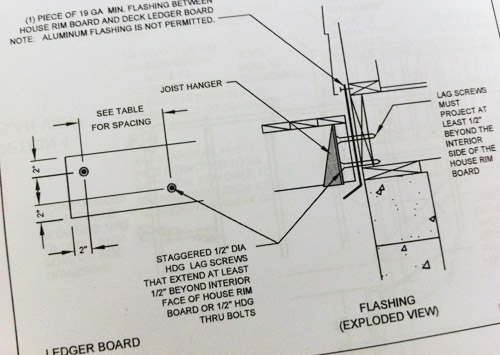
The spacing guide said my screws needed to be no more than 23″ apart. I opted to do them at 16″ increments because it’d be easier to remember that I just had to do one between each joist.
So after marking the ledger board and pre-drilling some pilot holes in both the wood and in the brick, my dad held the board in place so that I could get our first screw in on one end just enough to hold the board up. When then checked that it was level and put a screw on the other end the same way, that way we didn’t have to exhaust ourselves holding it up against the wall.
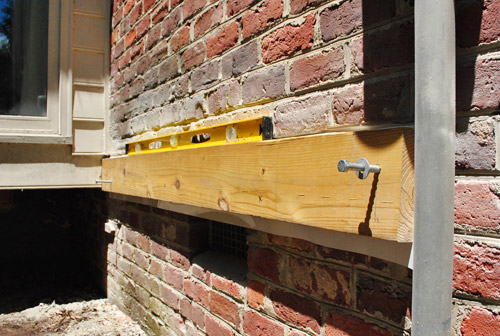
The screws we’re using are technically HDG (hot-dipped galvanized) lag screws, which are one of only two types of screws that are approved by our county. They’re massive: 1/2″ thick, 6″ long, with a big hex head on the top. My power drill didn’t have enough torque to help me, so we had to hand wrench all of them in place…
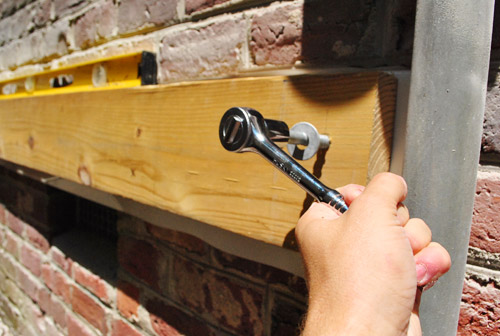
… fortunately my dad had the bright idea of buying a piece of $2 scrap pipe to extend the handle of our socket wrench to give us more leverage. It actually made it quite easy to drive them in.
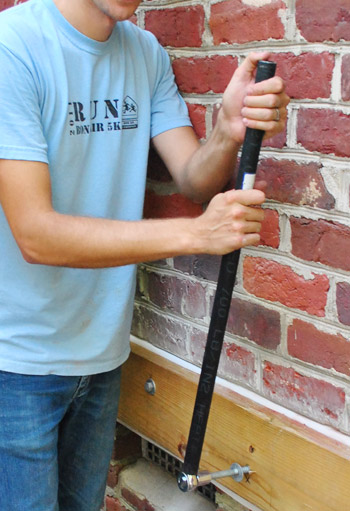
The not so easy thing? The hiccups we hit that caused some delays. First off, we had to go out and buy longer screws – 8 inchers – because the county requires the screws to stick out the other side of the house’s band board. When I checked on our first two screws in our crawl space I could see the 6″ guys weren’t making it all the way through. The 8″ screws did the trick, but we had to be more delicate with them because a couple of them broke off mid-way, requiring some extra work to remove the broken screw and drill new holes. So by about 2pm (after over four solid hours of work), this is all we’d accomplished. Can I get a womp-womp?
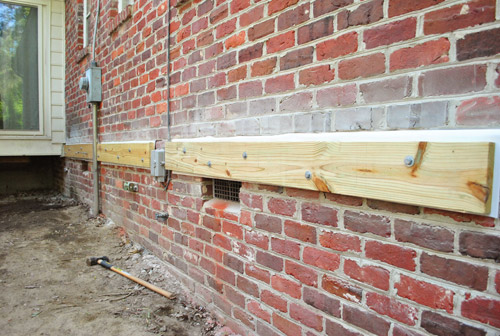
Fortunately we found our rhythm after lunch (my Whopper must’ve done wonders) and made lots of progress in the next couple of hours – completing the rest of the ledger board on the brick side of the house. Woo hoo!
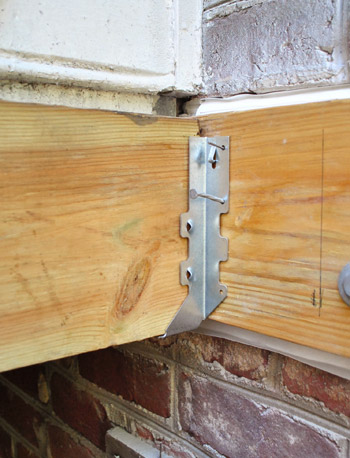
Wasting no time to celebrate our accomplishment, we turned our attention to the ledger board on the siding side of the alley. I wanted to make sure it sat level with brick-side ledger, so we decided to temporarily set a joist to help us out. The joists attach to the ledger boards in these metal hangers. I just loosely nailed in it place at this point.
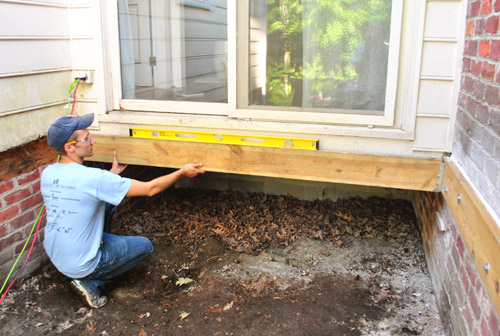
After having cut another 2 x 8′ board to act as a temporary joist, I held it up using my level as a guide. Then I marked the siding wall to indicate where the top of our ledger on that side should go.
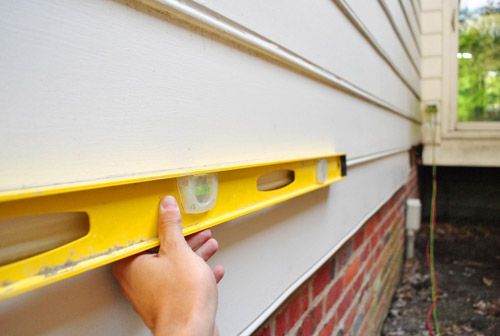
Since a ledger board is never supposed to attach through siding, it meant we’d need to remove the siding that was in our way. And since we have wood siding, it meant cutting it with a circular saw. Not gonna lie, the idea kinda got me nervous. It just felt so wrong to cut into perfectly good siding. But I measured up from my ledger board mark to accommodate for the width of the decking (as well as a small extra gap, which I had read was helpful to keep moisture from getting trapped against your siding). Then I used my level to make a straight line down the length of the wall. A laser level would’ve done this much faster, but we had left it at my dad’s house. Oops.
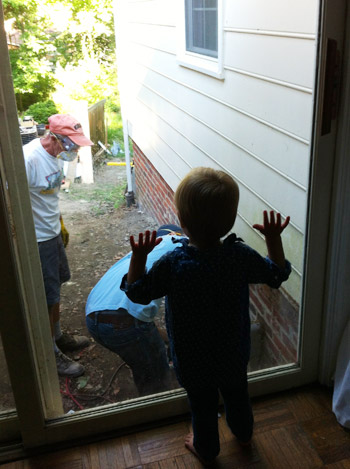
This must qualify as the “exciting part” of the day, since Clara again became glued to the window. I’d like to pretend she’s fascinated by construction, but really I think she just wanted to get her grandpa’s attention (picture a broken record of hearing “Hi Tom Tom! Hi Tom Tom! Hi Tom Tom!” like a kid on the way to Disney asking “Are we there yet? Are we there yet?”).
After setting the depth of my circular saw to be sure I’d only go through the siding (and not the band board of the house), I followed my line as carefully as possible.
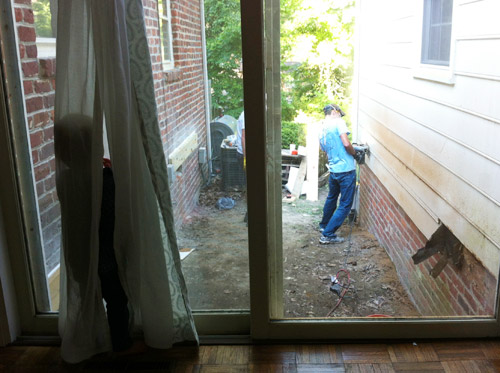
The noise and the dust from the saw must’ve been too much for Clara, as this is about the time she took cover in the curtains.
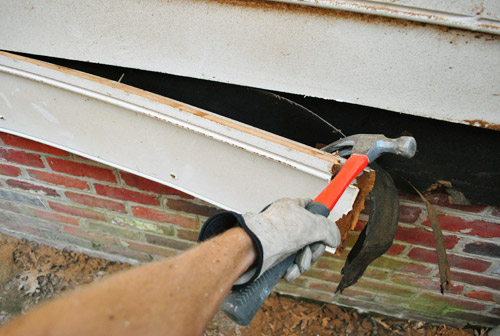
Once I had my line cut, it took a bit of prying but we quickly got all of the wood siding loose from the wall. It was a beautiful sight.
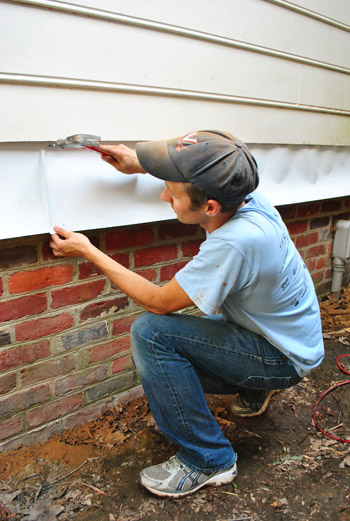
It was getting on about 6pm at this point, and Sherry and my mom had dinner waiting for us inside. But since a thunderstorm was forecasted for that evening, I wanted to at least get the flashing up on the now exposed siding-side of the house. To do this I took sheets cut to length and shoved about 5 or 6″ inches up under the bottom edge of the siding so that it overlaps. Then I nailed the flashing in place right under the siding (I’m later going to use silicone caulk on these nail spots to make sure moisture doesn’t seep through and will also run the bead that I’m supposed to add across the flashing on the brick side of the house).
With that, we decided to call it a day. We didn’t get anywhere close to measuring for post holes. Heck, we didn’t even get both ledger boards up. But I feel really good about the work we did accomplish… even though it doesn’t look much like a deck yet. We hear it’s this leveling and framing stuff in the beginning that takes the most time, but really lays the groundwork for a nice long-lasting end product. So we’re looking forward to smooth sailing when we get all of this annoying stuff out of the way. Here’s hoping, anyway! We certainly won’t be setting any speed records for our construction method since we can only work on this baby about one or two days a week, but we figure that’s actually pretty close to how it works for most evening-and-weekend-DIYers out there.
Oh and I definitely could’ve earned the “dirtiest” award for the day. Between the dust kicked up by cutting out the mortar and slicing off some of the siding, I was quite the looker. Sherry especially loved that goggle line I was rocking.

So next up will be finishing the ledger board installation and making some pretty sizable footing holes. Then we have our first inspection. And you know we’ll keep you posted. Here’s hoping slow and steady wins the race builds the deck…
Who else is in the midst of a project that’s taking them longer than expected? Have you been hitting snags or are things just more complex and time consuming than you anticipated? I know I always feel better knowing I’m not the only one behind on a project – and it’s also pretty satisfying to get something done right, even if it means things take a little longer to knock out. Hope to be back with more deck progress later in the week! Until then, I can be found trying to get all of the sawdust out of my eyebrows…
Pssst- See how we stated planning the deck here, how we cleared the alley so it was ready for building here and here, how we selected our deck materials here, and how we got our permit here.

Melanie@MJ says
Things are really coming along. I love how you guys just jump in there and get things done. I can’t wait to see the deck when it’s finished. :)
Anne says
Wow, looks like a LOT of hard work with sore muscles and all the nice little extras that come with DIY. :) But it’s funny how that makes you appreciate the small things like taking a long shower and a comfy bed!
Lindsey @ arkadian belle woods says
YAY! I know you are both excited! Can’t wait to see the progression!
Katy @ The Non-Consumer Advocate says
In the midst of a project that’s taking longer than expected?
Umm . . . My husband and I bought our fixer-upper in 1996 and have yet to complete the projects.
THAT was longer than expected.
Katy
YoungHouseLove says
Hahaha, we know all about taking years and years to get ‘er done Katy!
xo,
s
Donna says
Katy? Are we married to the same man? Let’s just say I can relate! Donna
Kristen @ Popcorn on the Stove says
These projects always end up taking longer than expected but they’re still so exciting! I got nervous for a second that you were laying out the planks like the way they look in the print out haha. Can’t wait to see Day 2!
r8chel says
That sequence of photos of Clara first at the door, then in the curtain cracks me up!
Amanda @ Our Humble A{Bowe}d says
That happens to us a lot lately. We’ve got tons of projects in the works, some weather dependent (ah hem, a roof). When the weather is nice, Ben is up there tearing cedar shakes off. When storms roll in, he works inside on our bathroom. But the bathroom that should have taken a few weeks to finish is now going on two months. http://ourhumbleabowedblog.com/2012/05/30/youre-so-vain-vanity/ I guess we’ll get there eventually. Just like you will with your deck. At least you’re not on any time line, right? Take your time and do it right. That’s all that matters.
YoungHouseLove says
That bathroom is looking good Amanda!
xo,
s
nicole says
this is random, but my husband wears that same Virgina hat everywhere! they’re practically twins.
YoungHouseLove says
Your husband sounds like a smart man. :)
-John
Jess @ Little House. Big Heart. says
That picture of Clara in the curtains is adorable. :)
I guess I never realized that deck construction was so intense! I thought you just slapped the boards together up against your house and viola! You have a deck. Now that I think about it, your way seems much better. :)
Nicole @ Post Grad says
Ugh I feel you! We’re trying to renovate our RENTAL (why we offered to do this for our landlord, we no longer have any idea) bathroom. Thought we’d replace the floor over the weekend, but found black mold in the THREE layers of linoleum and spent the weekend in hazmat suits on one of the hottest summer days we’ve had so far. Oh and then the cops may or may not have been called on us. I guess hazmat suits and black garbage bags look suspicious in Baltimore. Feel free to read about our weekend project here.
YoungHouseLove says
Oh my gosh no way! That sounds intense!
xo,
s
Nicole @ Post Grad says
Haha I think it was more hysterical than intense, but maybe that was a combination of the heat, exhaustion, and all the mold spores we’d been inhaling. So worth it in the end!
robin @ our semi organic life says
What progress! You’ve got a great dad helper and a great mini fan Clara!
erica says
Looks good – We built a pergola a few weeks ago and attached a ledger board to the house for it. Drilling through brick made me nervous but once we got the board up and the posts in the ground, the rest went a lot quicker! Can’t wait to see more of the progress!
my honest answer says
Don’t be disheartened, that’s great progress for one day! You’ll be surprized how quickly it takes shape once you get to the deck bit, because that’s really just the finishing touch!
Riki says
Every single project takes like twelve times longer than I think it will.
Examples:
– “Oh! I should be able to paint this hallway in like one morning.” (haha, yeah right . . . 9 doors to cut around).
– “How long can it possibly take to rip up the old floor in the kitchen?” (Answer: two days)
– “I’ll plant these three shrubs by myself. It’s only three holes, it’ll be a piece of cake!” (Cue a frustrated call to my father when I realized one of my holes was actually in the middle of an old buried tree stump).
You’d think I would learn to estimate more accurately, but so far no luck there! haha
Brynn says
You are in good company Riki!
Cara says
Yep – 2 years ago, we built a deck too. Everything took a bit longer than expected, but it was a lot of fun DIY – my husband and our uncle – and I! I couldn’t believed I learned how to use the saw.
Good Luck! It will all be worth it, and you can be proud of saying you did it yourself.
bridget b. says
wow, you rock for doing this yourself. i’ll have to live vicariously through this post.
and poor Clara, i think she really *was* traumatized by the whole hibachi incident! hopefully she’ll be able to look back on it and laugh when she gets older. :)
Amanda says
Wow, that looks like a lot of work – but I’m sure it’s so exciting to be getting it all done! I’m so excited to see how it all turns out!
Donna says
Just remember John: slow and steady wins the race! Can’t wait to see it after you build it and Sherry decorates it!
Tamara says
You guys are the living probe that if somebody really wants to do something, no matter how difficult it is, the objective is reachable! Bravo *aplause*
Chloe says
Eeek, can’t wait to see the finished product!
I think you should make these for Clara while she still loves worms!
http://www.instructables.com/id/Bowl-of-Worms-Anyone/
YoungHouseLove says
So cute!
xo,
s
Rebecca @This Nest is Best says
We are DEFINITELY in the middle of a project that’s taking much longer than we expected! We got the majority of our home’s hardwood floors refinished, which forced us to live in the kitchen/living room while they were worked on. Which prompted us to get some much need plaster repairs and paint projects completed while all of the furniture and stuff is out of the way. What I expected to be a week long in convenience has us starting week five of living in our “tiny house” – we have high, high hopes of moving back into the rest of the house this coming weekend!
ruthy says
i can’t believe you’re taking on this project…I got overwhelmed just looking at your floor plans! ya’ll are amazing!
Rachel says
We’re working on our first apartment and everything seems to have something go wrong… Now I just expect it but I guess I’m never surprised when something doesn’t go the way as planned. :)
Thais Bessa says
Oh guys, I feel your pain, so let’s commiserate. Our “taking much longer project” is also deck related, but removing. The house has a two level deck and zero green, so we wanted to remove the lower to lay down some turf. We thought we could get everything done in one long weekend over Easter. HAHA! First, it rained during the whole weekend. Then we discovered that the upper deck had some wobbly boards. After lifting them for a close inspection, we discovered the former owners, aka lazy piglets, did a horrible job and the joists were rotten. Pause to replace joists, taking time and unforeseen expenditures. Since then it pretty much rained all the time in the UK until mid/late-May. With another bank holiday in early June we decided to finish it all. HAHA 2. It rained again all the time since then. Seriously. We managed to lay the turf down and get some raised flower beds built. But we still need to re-stain the remaining deck, assemble furniture, put curtains in the gazebo, wall art, assemble our daughter’s wendy house and slide etc etc etc. I just want it to stop raining and get this done. It’s been dragging since April, my daughter sees her unassembled slide in the garage and asks to play everyday. :(
Sorry for the long comment, I guess I needed to let it out my chest, lol.
YoungHouseLove says
Aw Thais, so sorry for all the snafus! Hope it’s smooth sailing for you from here and your daughter is playing in no time!
xo,
s
James says
My experience:
1. Every project seems to require three more trips to Lowe’s/Home Depot than you expected.
2. Mortar dust covers you and seems to never let go.
3. There’s nothing more fulfilling for the DIY-er than fast food from a drive-thru.
Tiffany says
Haha!! So true!
Christine says
I think you guys got a TON done— especially considering that there are only two of you and you are doing it yourself/selves. It will be AWESOME when it’s done. I can see lots of nice palms and potted flowers already.
Ashley@AttemptsAtDomestication says
It’s really cool to see you guys working on this project! I’m so excited to see how it goes!
Krystle @ ColorTransformedFamily says
I think it it’s cool that your dad is helping you out on this project. It may be taking longer than you anticipated but it will be worth it and hopefully with Clara’s supervision things will pick up.
LauraElle says
We are in the middle of a project that is taking way longer than expected. Ripping out paneling and hanging sheetrock, doing the mud, taping and paint is simple. It’s been 7 months!
However, my husband had a bicycle accident. He flipped over his handle bars and hit a concrete barrier with his chest- which resulted in bi-lateral broken ribs, two [small] lung punctures, a broken collar bone & shoulder blade. [He’s fine now, had a good recovery- although he cannot wait to get back on his bike.] The sheet rock was finished right before his accident. We’re going to hire someone to do the mud and tape and I’ll finish the paint and installing the new baseboards and trim. The baseboards and trim are painted and cut, waiting on me in the garage.
Life does happen in the middle of a DIY project, that’s for sure.
YoungHouseLove says
Oh my gosh, I’m so glad your husband is ok! That sounds so scary!
xo,
s
Sarah Bentham says
I’m not sure how the “critters” are around where you are, but around my place (Ontario, Canada) we have skunks and groundhogs that LOVE making their home under decks. A trick my dad taught us is to use landscaping cloth (to prevent those crappy weeds growing up between deck boards) and then chicken wire on top to prevent tunneling creatures from creating dens under the deck. We just pulled apart our deck (from 1978!) and found a gigantic groundhog hole. We have tried to live trap it, but it is so fat that it just uses its bottom to keep it open while it feasts on the free cat food we baited it with. We have cleared it out, chicken wired it and we’re hoping it will discourage it enough to keep it from coming back.
Anyway, just a thought. Make sure the chicken wire bends up at the sides or else they’ll just move it aside. Love the blog – very inspiring!
YoungHouseLove says
Thanks for the tip Sarah! We have heard that landscaping fabric with gravel over it makes it pretty inhospitable for most creatures, but never heard of the chicken wire tip!
xo,
s
Trela says
Long projects? Our 5 week basement job (it was studded when we bought it, now we’re finishing off all but the furnace room) which just began week 10…
My dad, though awesome, is NOT good at this type of thing, fortunately my husband and his uncle are!
Cory says
Those county codes are intense – my wife and I just moved to one of the few cities in Virginia which is nice because the cities are too small to create/enforce many building codes. (It does result in some rather eclectic neighborhoods.)
Without ever having painted before, we decided to paint the entire upstairs of our new house this weekend (3 bedrooms, kitchen, hallway, and living/dining room). We figured we’d finish prep in about an hour on Friday evening and be done with painting by Saturday afternoon. I’m not sure what math we were using. We were lucky to have six people assisting on Saturday and three on Sunday – we did get it all done (minus some trim fixing) but it took every person and every minute of the weekend. And about five unplanned trips to Home Depot.
I have to thank you for your many paint-related posts – especially about painting over wood paneling.
YoungHouseLove says
Wow- that’s an amazing amount of painting you got done! Congrats!
xo,
s
Steph says
Clara hiding in the curtains + “fire is hot” = she is the cutest kid on the planet, ever, end of story! SO sweet!
I think this is HUGE progress for one day? I admit I’m overwhelmed just reading this. You guys get major props for actually figuring it out and doing it! I love the real time updates, it makes me feel better when I don’t finish a protect as quickly as I hoped!
Merideth says
Painting all of the trim in my house…I just finished the hallway this weekend and now absolutely abhor door casings. Also, we finally finished staining the deck Friday night – yes!
Jane says
Ahh that clara peeking thing is so cute! OK , so guess what?! remember i asked you about karlstad and ektorp on firday..we made a trip to ikea on saturday and big karl is coming home..Woohoo..and the best part ikea was having a special on all sofas..so we got almost 190$ worth store credit…which we applied towards a day bed..hows that for a deal ;-)
I was wrong about the comfort level, while the karlstad has a low back compared to the ektorp, the seat depth is much more for the karl which provides great comfort..Cannot wait for it get home!!
YoungHouseLove says
Wow- that’s awesome! Congrats!
xo,
s
Ally says
Way to go John and Tom Tom ! :)
This weekend, my fiancé and I were watching Brian Baumler’s show on HGTV. During the big reveal, they showed the fireplace makeover…all of a sudden, I excitedly point and blurt out:
“That’s $herdog’s yellow beehive Mothers Day vase from West Elm!!!!”
Darryl casually turns to me and says: “Are you speaking English? ”
Haha!!! :)
Xox
YoungHouseLove says
Hahahaha, I love it!
xo,
s
Karen @ The Quaint Cottage says
I love this project. I can not wait to jump into an outdoor project soon (retaining wall and patio). You give me the inspiration to finish my inside job so I can. Can’t wait to see the updates.
Jenn @therebelchick says
I have some serious deck envy right now! I can’t wait to see the finished job. We are saving up for our own deck right now…and yes, I am stalking your deck posts for ideas for our own! ha ha! :)
Heidi P. says
Wow. Wow. Wow. My head is dizzy from all the details and exactness that deck-building requires. Hats off to you.
Amelia R. says
We’ve learned the same thing from the few years we’ve been diy-ing: projects either take way longer/are more difficult/need more materials than imagined, or we way over-plan and have a bunch of leftover time or stuff. I guess that’s just the nature of diy!
Can’t wait to see more shots in-progress!
(p.s. I thought it might have come up already, with as many people as read this blog and as many times as I’ve seen you use it. . . “wop” is a slur for Italian American immigrants. I get that you’re just using it as a sound effect . . . maybe there’s another way to get that across?)
YoungHouseLove says
Thanks for the tip, that has actually never come up! I haven’t heard of that slur (and I’m Italian American!) so of course we never meant any offense by it! We’re just referencing the whole sound effect thing from well-known skits like this on SNL– you know, it’s like a sad trombone sound? I think it’s even in cartoons! We’ve also seen it written out in lots of places and just never made a connection with it being offensive! But thanks again for the tip.
xo,
s
Amelia R. says
I love Debbie Downer! Yeah, I totally get the reference. And I know that’s how you mean it. My (Italian) sister-in-law was reading over my shoulder and brought it up to me awhile back, so I wanted to let you know.
YoungHouseLove says
Thanks Amelia! Always good to know these things!
xo,
s
Brynn says
Try “Womp” ?
YoungHouseLove says
That’s a great idea! Will try to use womp-womp from now on.
xo,
s
heather says
I had never heard this “wop” thing either, but I definitely go for the ‘womp womp’ for the same sound effect haha.
Lindsey says
Great job so far! I can’t wait to see what it looks like when finished! I find most DIY projects take more time than expected.
Our recent discovery is that trying to be a plumber is no easy feat (even when you had a plumber walk you through it!)The previous owners redid their(now our) kitchen, but installed the piping wrong, so the sink doens’t drain right. My fiance’s little afternoon project of fixing this has turned into a VERY long ordeal. But on the bright side, our sink is draining a little faster now!
YoungHouseLove says
Yay for small victories!
xo,
s
Lori says
Looking good, guys! Slow and steady wins the race, right?
I had planned on painting the front door this weekend, but when the AC went out Friday evening and the temp in the house went up to 84, I knew that DIYing was not going to happen any time soon. Hoping to get it fixed today…
YoungHouseLove says
Oh man, hope you can get ‘er done soon!
xo,
s
Kristen says
Can I just say I just read every word of that post?! Even though we’ll more than likely never, ever build a deck. You’re writing is just so good and you somehow make a topic (to be honest) I don’t care a whole lot about seem interesting. So much so that I found myself really looking at the graphics and trying to understand every part. The most impressive part is if I remember (I think you said this in the very early days of your blog?) that you had (at most) maybe picked up only a hammer a few times before. Color me very impressed! :-)
YoungHouseLove says
Aw thanks Kristen! We’re just trying to figure stuff out as we go along! And John and his dad are totally my hero for getting so much done, even if they feel like they’re behind!
xo,
s
TY Lee says
All of my projects take me longer than I think they will. I’m constantly thwarted by the weather (ah, rainy Seattle, why are you so full of rain?) and my lack of a garage. That’s kind of what happens when your “workshop” is a 3.5 foot wide balcony. Le sigh.
Don’t worry, my story has a happy ending, in that I’m closing on my house in August, and *gasp* there’s a garage! Usually it’s the guys that get all excited over garages and work spaces, but I’m stupid giddy thinking about all the new tools I’m going to buy now…
YoungHouseLove says
Haha, that’s so exciting!
xo,
s
Lauren@FilingJointly says
Yay for deck progress! I remember when my dad built his deck, he thought he’d get it done (with help) in two weekends. It took…slightly longer than that.
My husband and I moved about a month ago, into a much bigger place. And before we moved we sold all of our old furniture on Craigslist. So we’ve been living in a pretty empty home for a while. But all of our new furniture is finally getting delivered tomorrow!
I am so excited to not live out of boxes anymore.
YoungHouseLove says
Yay, sounds so exciting Lauren!
xo,
s
maria says
ummm seriously… impressive! bravo x 1000.
Gabriella says
So exciting!! Can’t wait to see how it turns out. Cutting the brick would freak me out a little – I’d be afraid I would goof it up. :-)
Lynn @ SafeBeauty says
We are realizing that slow and steady is what is keeping us sane in this whole house remodeling biznass. Before you know it, you’ll be done with this project and onto the next in no time. Rome wasn’t built in a day…or was it Richmond?
Right now, what is taking forever is the fact that I have strep throat and hopefully will be over it by the weekend so I can start ripping out the blooming rose petalled wallpaper in the kitchen.
My best, Lynn
YoungHouseLove says
Aw man, hope you’re feeling better soon Lynn!
xo,
s
Megan says
Good luck! My dad has built a lot of decks in his life and we will be using him when we build a small one off our back screened in porch. It won’t be as big as your’s (at least that I’m aware of, hubby has a different idea, I’m sure!) but we get the joy of attaching the posts to a solid concrete patio that’s 4′-ish from our screened in porch. Can’t wait to see the rest of it!
Sarah says
It’s been so fun to watch your diy skills grow over the years. You guys are doing some heavy duty stuff now!
Melissa says
Totally off subject but I can’t help but notice that John and his dad may be at odds with their school allegiances (John’s UVa hat vs. his dad’s VT t-shirt). Whats the scoop???
YoungHouseLove says
John and two of his three sisters went to UVa, but his other sister went to VT – so sometimes John’s dad throws her a bone an wears Hokie stuff. Haha.
xo,
s