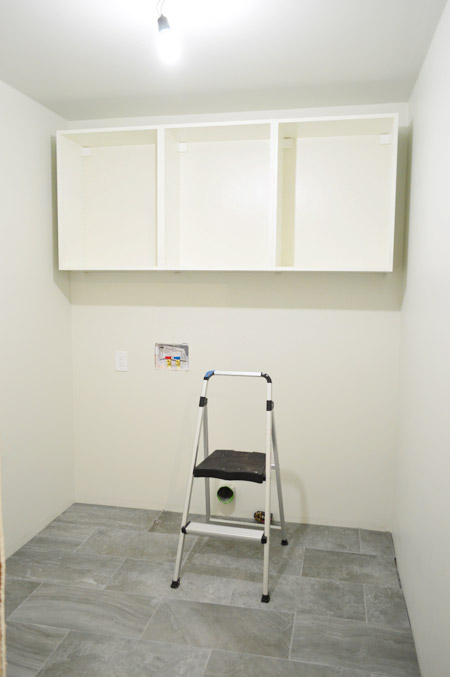
This post was shaping up to be a weird one (well, weirder than our baseline weird). We were simultaneously trying to hang Ikea cabinets in our laundry room and re-hook up the washer & dryer, but as of yesterday morning we were sort of stuck half-way through both projects and this was the best progress shot we thought we’d have for you today:
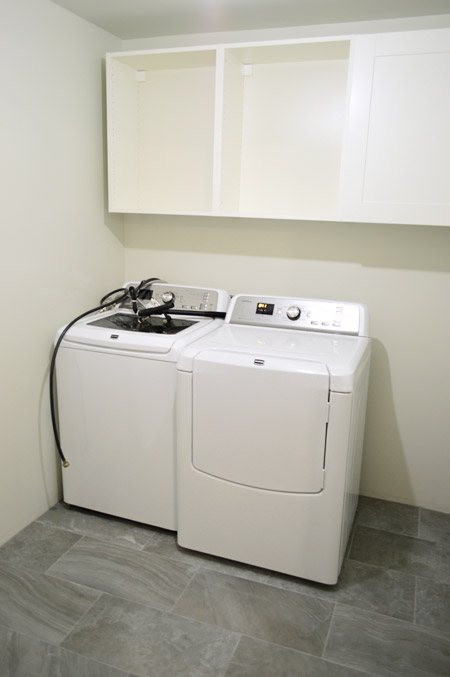
But thanks to some last minute pieces falling into place over the last 24 hours, we have working appliances that have been completely re-installed (picture Sherry dancing for no less than twenty minutes with an elated baby in her arms laughing at her) and doors on our all of our cabinets (more dancing – also singing). I’ll get into appliance installation details next week (getting the overflow drain and washer pan connected took some effort) but today is all about cabinets.
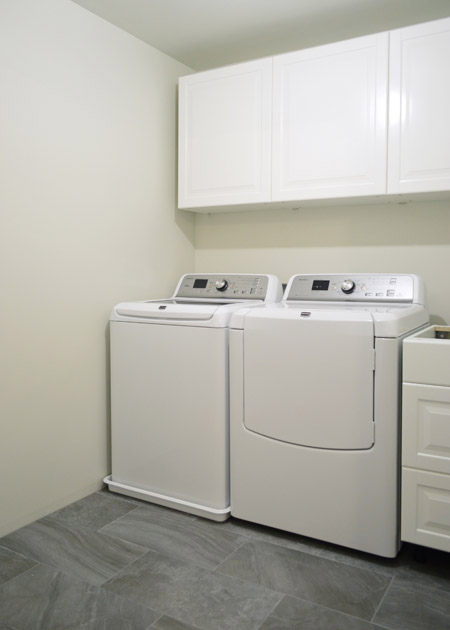
We’ve been wanting to take Ikea cabinets for a spin since we’re heavily considering them for our eventual kitchen remodel. We hear great things about them and pretty consistently see them popping up in high end homes thanks to magazines like Dwell, Domino, and House Beautiful, yet we’ve gone a bunch of other routes in the past. We’ve done the custom cabinet thing in our first house, and the second-hand / work-with-what-you’ve-got thing in our second house (we refinished our existing cabinets and added used ones from the Habitat ReStore). It’s funny that despite all of the Ikea in our life, we’ve never actually dabbled in their cabinetry. So the laundry room felt like a perfect lower-risk test space to learn the process and to help us determine if we want to go this route in the kitchen down the line.
We started by using their online Kitchen Planner to map out the space. We actually used it before to help envision our last kitchen, even though we weren’t purchasing their cabinets. In general it’s a pretty easy (and free!) online tool to play around with – although I did have to insert a dishwasher into my plan, since they don’t have a dryer option. Before long we had a plan and a shopping list that we could print out and bring to the store.
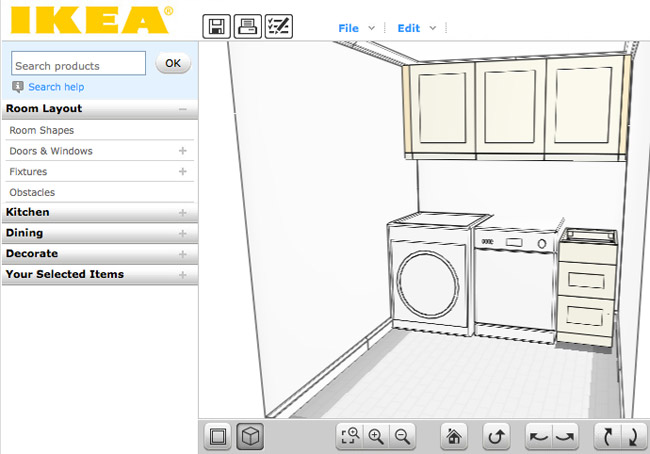
The above shot is the plan after the kitchen expert at Ikea helped us fine-tune things. I’m glad we arrived with an idea of what we wanted (it saved a ton of time!) but I’m also glad we consulted with one of their employees before our purchase (it saved some unnecessary purchases when she went through the list and explained that some things weren’t necessary for this type of installation). She also helped to point out some trim that we might want to add to hide our under cabinet lighting (last minute decision = under cabinet lighting, just to help us see & treat stains more easily).
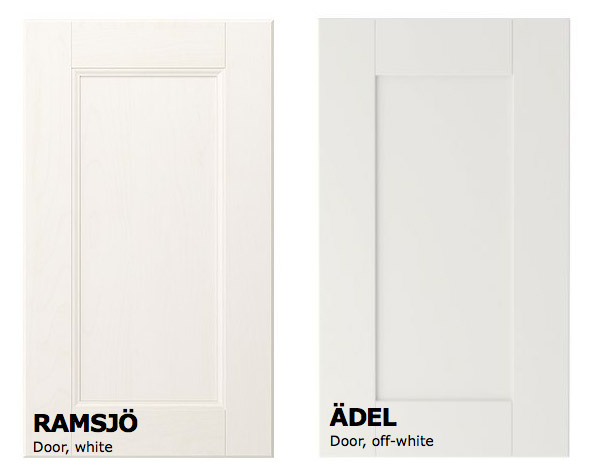
While we were there, we also made a change in our cabinet door decision. Online the Ramsjo looked closest to what we wanted, but in person it had more of a whitewashed wood look (with some pink undertones). The Adel, even though it was labeled “off-white” appeared to be a lot closer to the solid white look we wanted. It wasn’t perfectly white, but we’re used to Ikea stuff being ever so slightly creamy.
Everything was in stock, so about an hour (and 800-some-dollars) later we were packed up and back on the road. Which was a good thing since we were doing this on a Friday afternoon, which is pretty much the last time you should attempt traveling I-95 South near Ikea (we were doing a few other things in the area, so it definitely wouldn’t have been the time we’d pick if we were just hitting Ikea and returning home).
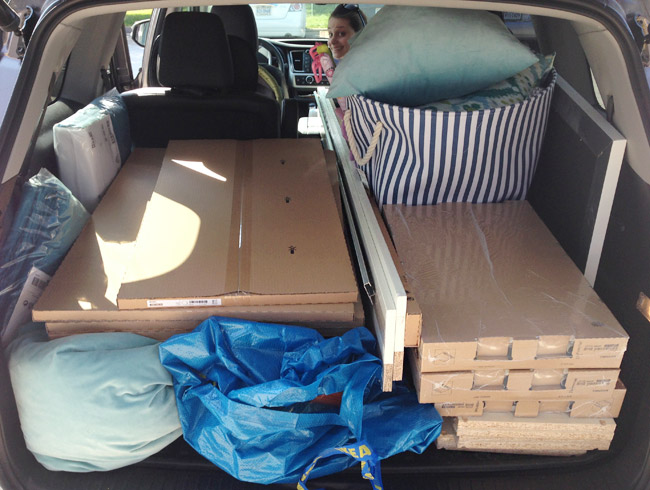
We gritted our teeth through the normal rush hour / summer Friday traffic. And just as we got through it… they closed the highway entirely because a truck spilled acid all over the road. Sooooo yeah. I trip that’s normally two hours took about three times that long.

Once we had them home, it was time to put them together, which we hear is the most dreaded part of an Ikea kitchen. It wasn’t so bad for us since we were only assembling three upper cabinets and one lower one. Plus, we did the three uppers assembly-line-style (not to be confused with Gangnam Style) so it went faster.
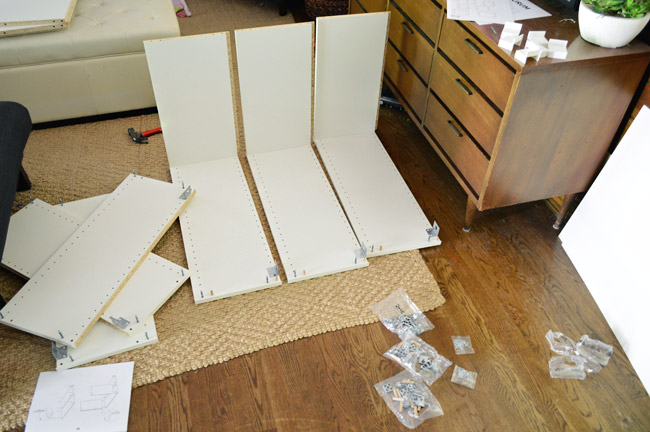
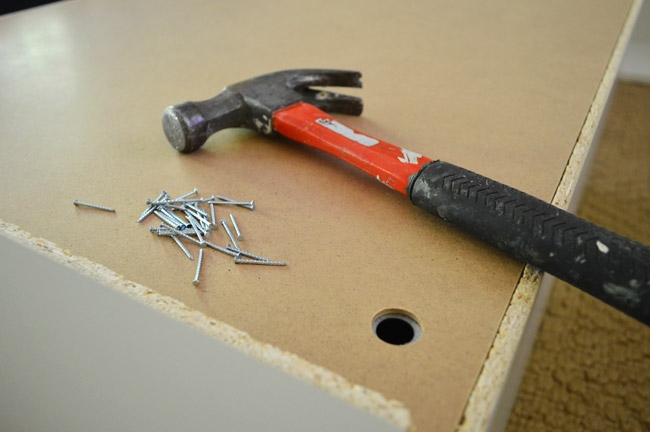
Actually, the most annoying part was nailing the panels on the back of each one, and that wasn’t even that bad (it just took a while since there were around 24 nails for each cabinet).
I have to say, we were both pretty impressed with the hanging system Ikea uses. In all of the Ikea kitchens we’ve seen online and in magazines, we never realized that the uppers aren’t screwed to the wall like traditional cabinets. Instead, they all hang from a metal rail that you install directly into the wall studs, which made hanging them ourselves (and keeping them aligned) a lot easier than other methods we’ve tried in the past.
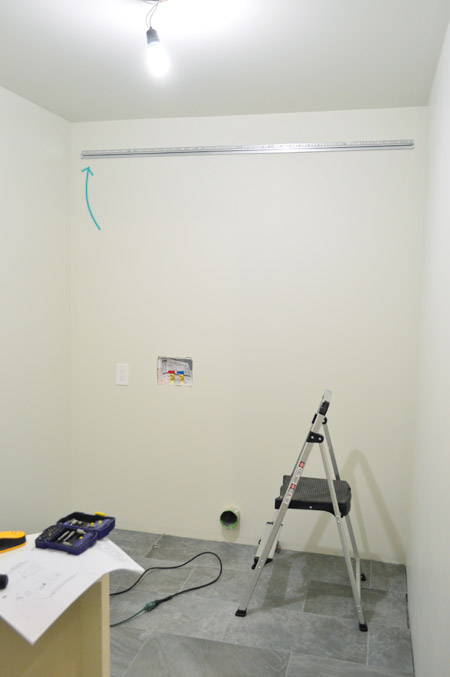
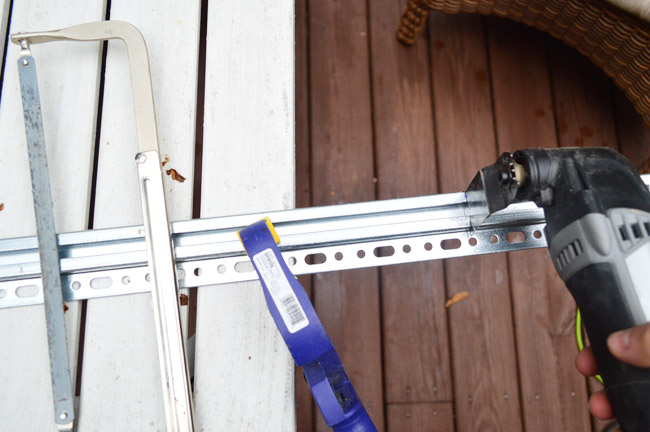
The metal hanging rail comes as one 80″ long piece, but we only needed ours wide enough for the three 24″ cabinets. The instructions suggested a hacksaw, but our Dremel made the job much faster.
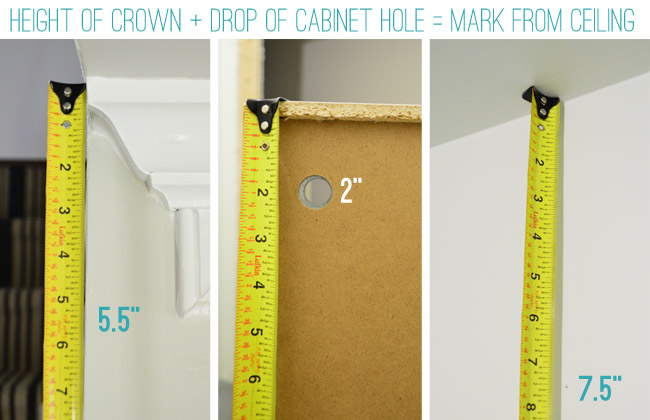
Determining how high to hang the rail took some planning. We’re going to finish off our cabinets with the same crown molding that matches the rest of the house, so we had to account for the height that would add, as well as the fact that the cabinets attach to the rail a few inches down from the top of the cabinet.
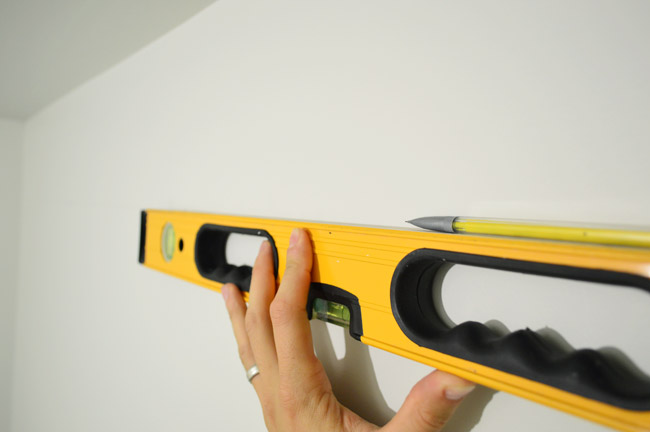
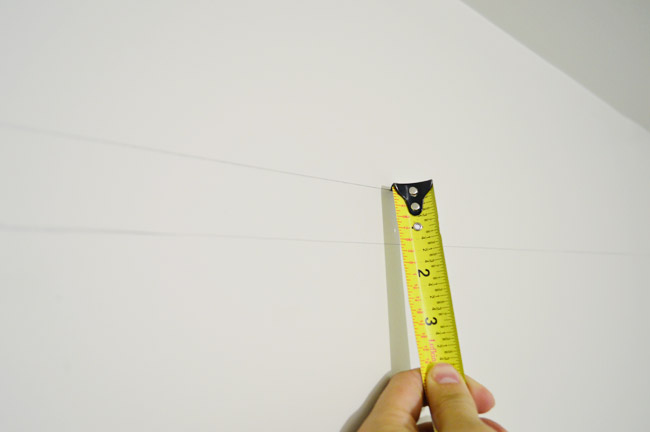
Once I had my mark (which I made in the center of that back wall) I drew a line across the rest of the wall with my level.
But I soon realized that the line I marked wasn’t very helpful since it would be impossible to see behind the solid metal strip that the cabinets hang from. So I noted how much higher I needed to mark the wall to give myself a more visible reference point.
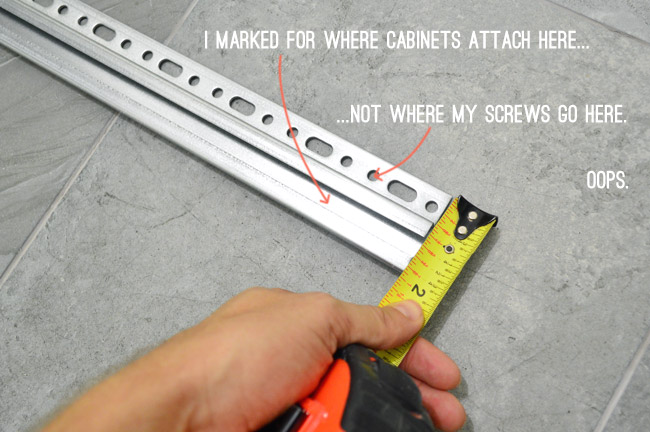
And so went the second line on my wall.
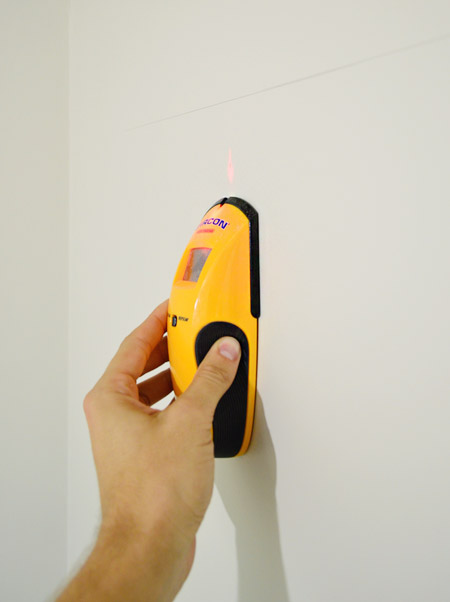
We also marked the studs so we were sure our screws would be going into something solid.
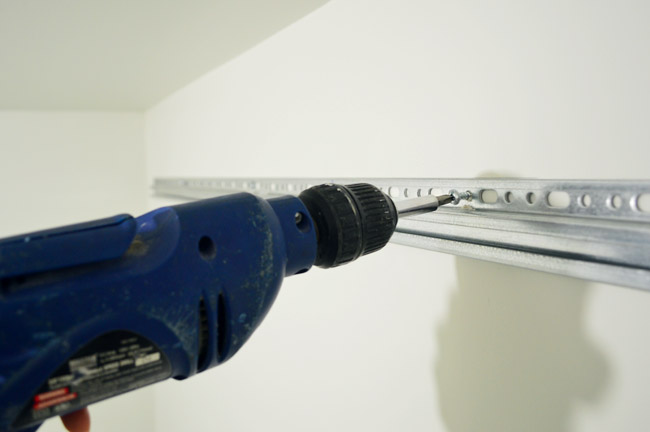
The wall is pretty flat (i.e. it doesn’t bow or dip anywhere) so we could just directly screw the metal rail into each of the studs. But according to the instructions, you might have to shim it if your wall is a little wavy.
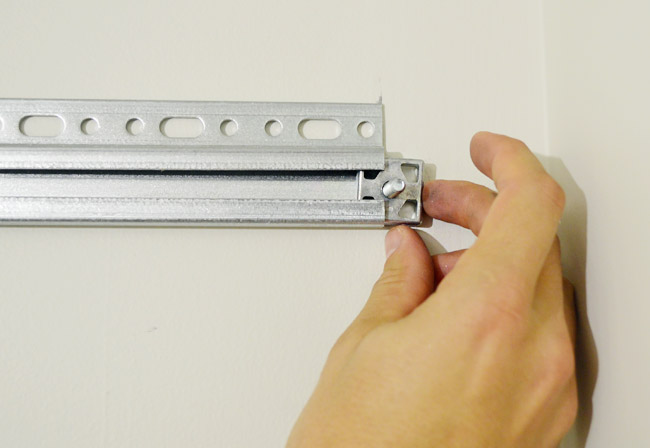
With the rail securely hung on the wall, we slid in the bolts that each cabinet frame would hang from.
The cabinet frames aren’t very heavy (at least without shelves or doors yet) so it was easy enough for one person to hoist them up and place them on the bolts (Sherry did one herself without any sweating or cursing). We secured them one at a time, so the first one to go up was that middle one, then I did the right one and Sherry did the left one.
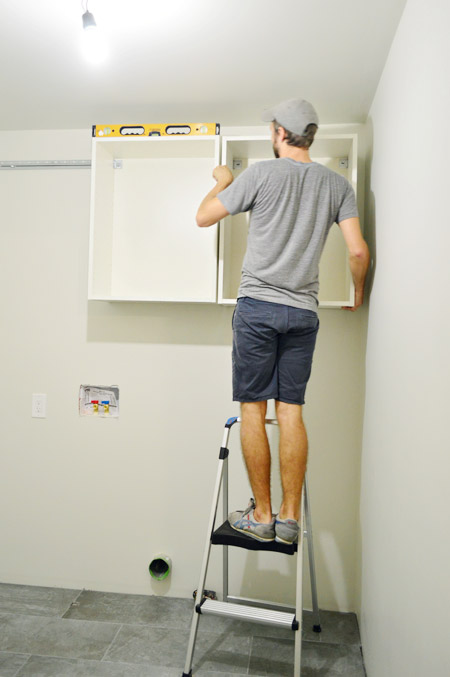
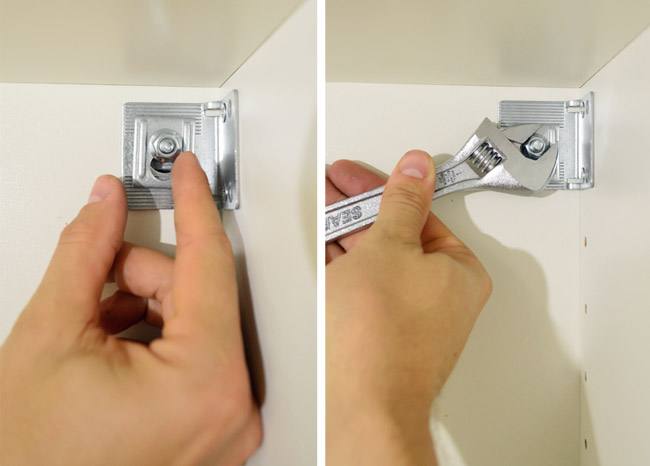
Once they’re resting on those two bolts, you add a metal clip and a nut – then tighten everything with a wrench. The clip allows you to adjust the placement slightly in case you need to level things a little. As you can see above, we rested a level on top to make sure each cabinet was straight as we went.
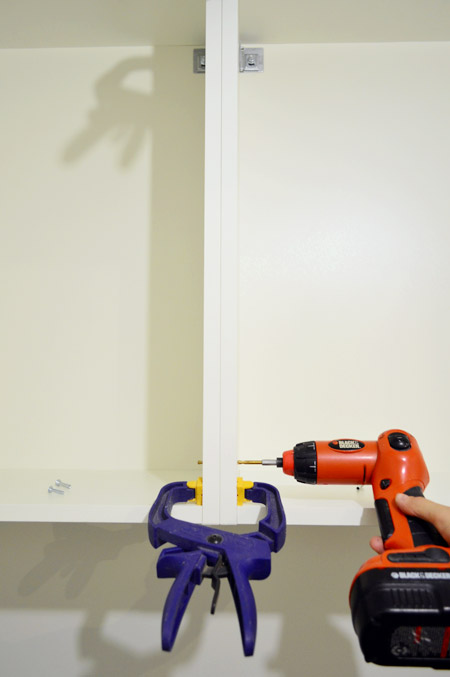
Once all three were up, we clamped them together at the edges so we could bolt all of them together to make one solid unit (this also eliminated any gaps between them). Once clamped, I drilled through one of the peg holes using a 3/16″ bit. NOTE: I realized afterwards that you should do the very bottom and very top hole, not the second one in – since those are used for the door hardware, but it was easy to correct – it just meant doing it twice.
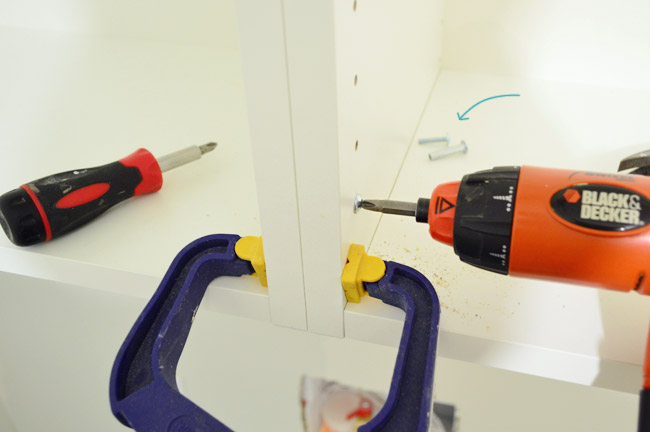
With a hole drilled through both cabinets, I used the supplied screws to make the connection tight.
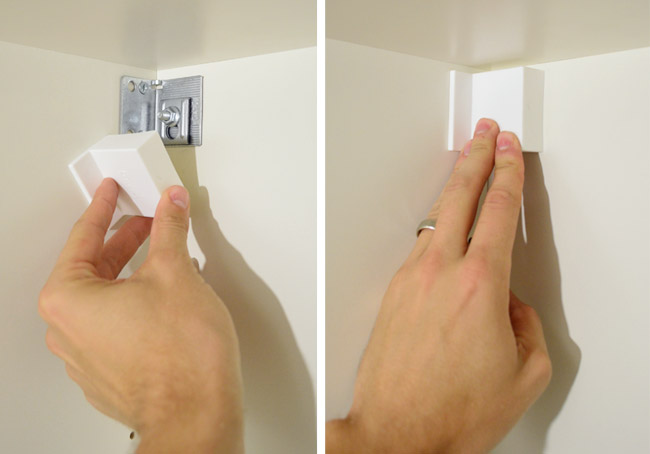
The final step was snapping on the white plastic caps to cover the hanging hardware on the back of the cabinet.
So here are our three uppers sitting pretty on the wall. Definitely an improvement when it comes to storage & function, but not super impressive looking since they still need some wood filler pieces on the sides and some crown on the top. Oh yeah and shelves and doors.
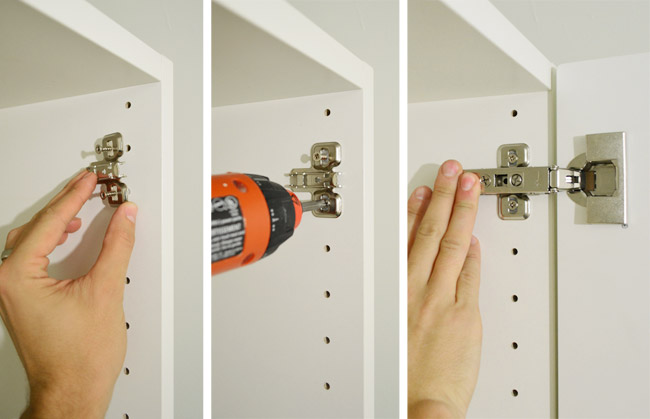
The doors were pretty easy to add, since the hardware that Ikea sells uses pressure to attach everything (there’s no drilling holes or anything). The various screws can help you adjust the placement, but our first one seemed to sit nicely against the frame without touching them at all.
What wasn’t so nice? The color. It’s harder to detect in photos than real life, but the Adel door front was looking a lot more cream than we hoped it would look (it’s a few shades darker than the other slightly cream Ikea furniture we have). It looked especially yellow next to a Simply White scrap piece of baseboard – which is what all of our home’s trim/baseboards/doors are painted.
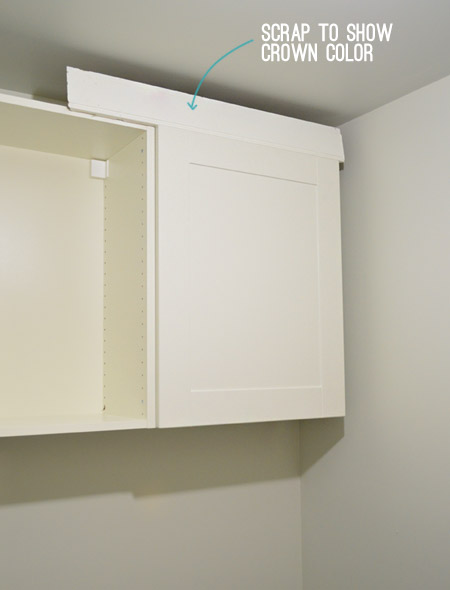
We didn’t expect it to match perfectly, but after some Googling (which we wish we’d done before our Ikea trip) we realized that Ikea sells a door style that people say matches Simply White almost perfectly (what are the odds, they actually shouted out our house’s exact trim/door color?!). Meanwhile the style we bought is said to match Benjamin Moore’s Paper Mache (which is notably less white). Oops. We sadly overlooked the Lidingo door style since the picture on Ikea’s website makes it look a lot darker/yellower, but here’s an example of how the matching paint swatches look SO DIFFERENT than the photos of the doors online:
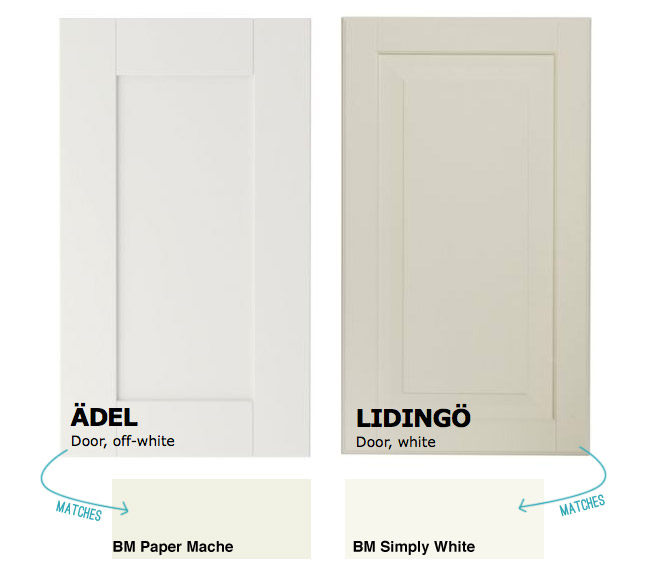
And while the Lidingo door style isn’t as clean-lined as the shaker style that we’re usually most attracted to, it definitely fits the style of our house and looks pretty great in other Ikea kitchens we’ve scoped online (we’ve always liked Dana’s over at HouseTweaking, so learning that she used them was definitely a selling point). But most selling of all was the fact that there was actually a door style that is said to match all of our house’s doors and trim. I know I’ve said what are the odds already, but really, what are the odds?!
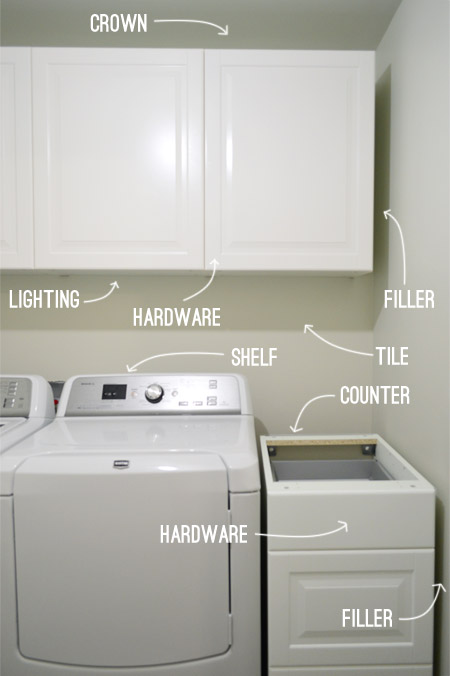
So… we halted door installation and started planning a return trip to Ikea. Cue the eye twitch and flashbacks to highway closure traffic. But by some MIRACLE, it turns out my parents were visiting my sister and cousins in Northern Virginia on Tuesday and could swing by Ikea on their way home and get the new Lidingo doors for us. They are such an improvement over the Adels that we couldn’t wait to hang them last night after we got the kids to bed. We even tucked the base cabinet in there for kicks, although it still needs to be secured to the wall to be officially installed (along with needing trim pieces on the sides, hardware, a counter, and a toe kick).
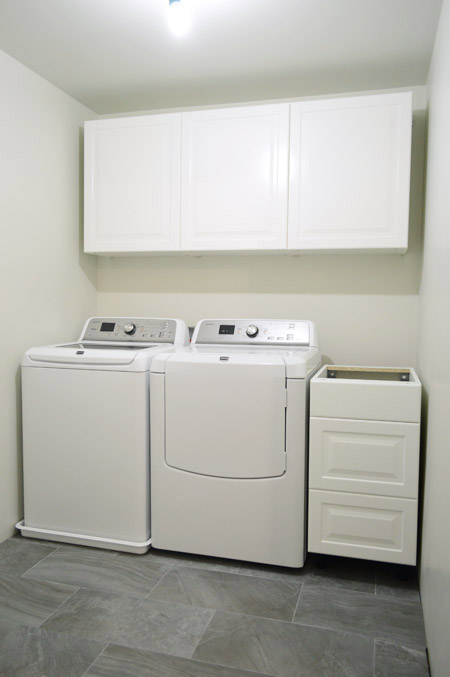
Actually, our to-do list is still pretty long in the cabinet department. But those little details are what makes it all come together, so we’re psyched to dive into them.
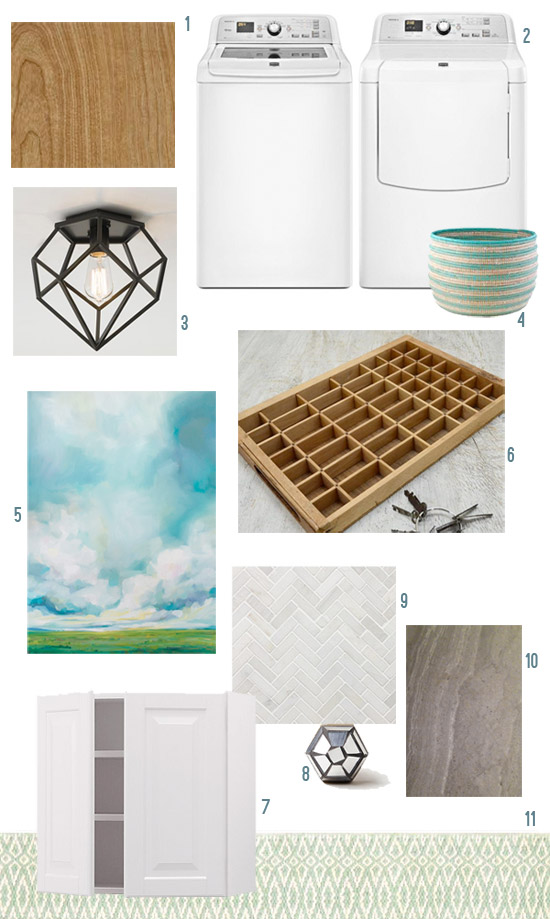
It’s definitely still more of a blank slate in here, so we’re especially excited to bring in some wood tones to break up all the white – in the form of a butcher block counter among a few other items (you can read about those plans here).
We still need to return the doors and drawer fronts in that first color (we only unboxed one), but we’ll be driving through that area again in a few weeks so it’s not too much of a pain to stop in and drop those off (he says while crossing all appendages that no unforeseen traffic issues arise). Also, here’s how I feel about being able to do laundry at home again:


Ryan says
I love that I’m not the only one who maintains a baseline level of weird. Lookin’ great so far, guys!
Stevie says
Looking good! My current laundry situation is in my garage, I’m having a little laundry envy over here. You guys make things look so easy, and for that reason I’m gonna try my hand at some DIY in the near future. I’m sure I’ll need backup for my backup hahaha..
YoungHouseLove says
Sometimes we need backup for our backup! Haha! And sometimes thing work – even if you get the wrong doors first. Good luck!
xo
s
Mary Beth says
I’m so jealous that you have an actual laundry room. Lol. One day I will show you a pic of what I deal with. Haha.
And “baseline weird” made me laugh right out loud. I find I like people more who have one.
:)
It’s really coming along in there.. what a big job. I think it’s going to look really light and crisp when it’s all done. Can’t wait to see!
MB
Grandma Nancy says
My son’s company sent him to Germany for a couple of years. Turns out that it’s a local custom to take your kitchen cabinets with you when you move! Perhaps that is why IKEA uses the hardware they do to hang the cabinets.
YoungHouseLove says
No way! That could totally be why!
xo
s
Jenn(ifer) says
That’s actually only in parts of Germany… And here they sell it without that metal rail – since most houses here have more solid walls we don’t need to find a way to attach them to the studs like you do(which I guess is why you get the rail, as they only allow for attaching them on one certain part of the cabinet and not along the whole back of it) but instead use wall anchors and screws. The inside is the same though with the small clip and the cap.
Looks great so far – and I totally recommend ikea kitchens. Putting them together isn’t really all that hard and they are a great value. I also love that new organizing stuff for inside the cabinets, trash cans or whatever is just one small ikea visit away (10 minutes drive in my case).
Greetings from Germany
YoungHouseLove says
Really interesting!
xo
s
rachael says
Looks awesome, I can’t wait to see the finished product.
PS. You’re funny today, John!
Julia Tudor says
We’ve had an Ikea kitchen for about 5 years now. Absolutely love it! We get a lot of compliments on it.
YoungHouseLove says
So happy to hear that!
xo
s
nicole says
We just gutted and redid our kitchen ourselves! with the lindingo cabinets (getting ready to post after pictures here soon! finally, a function family kitchen!). Not only was Ikea incredibly affordable (1/3 the cost of HD), but the quality and the ease to put everything together?? Can’t beat it. My husband was thrilled with the rail hanging system, especially since we have 17 cabinets. And it was easy enough that I even hung a few myself.
We have just stock white trim, not tinted, but it still looks great with how white these doors are. A great find from IKEA!
YoungHouseLove says
That sounds awesome!
xo
s
Heather says
We used Lidingo cabinets in our kitchen remodel and love them so far! My contractor brother said they’re just as good if not better than a lot of the high end cabinet companies, so you really can’t go wrong. It looks beautiful so far!
Oh, and splurge on the $7-ish soft close additions to the drawers. They’ve saved my preschooler and toddler’s fingers many times!
YoungHouseLove says
So glad to hear that! And we got the soft close upgrade since we heard they were awesome!
xo
s
Mary | Lemon Grove Blog says
Yep! I know that feeling of being reunited with the washer/dryer all too well. Everything looks awesome, but I bet the best part is having the washer/dryer back in action! :)
Beks says
Sweet! It’s getting there! I love watching your progress. :-)
Caitlyn says
Please use your pull to convince Ikea that SE VA needs an ikea like yesterday.
YoungHouseLove says
Oh man in our dreams. That would be amazing.
xo
s
Alicia M says
You guys can’t have 2 Ikeas and be THAT spoiled!! ;) Here in NW Iowa, the nearest Ikea is Minneapolis (4 hour drive) or the soon-to-be open Kansas City store (5.5 hours). I’m SO jealous!
That being said, we used the Adel cabinets to install a wet bar in our basement (took a truck/trailer to MN! Picked up a u-shaped Karlstad while we were at it) and we love it! I wouldn’t hesitate to put an Ikea kitchen in my house…that is if the store was closer :(
Nikki says
New Orleans does too…6 hr to Houston for the nearest Ikea. I’m from SE VA to take for granted the 2.5 hr drive…it hurts..lol
Caitlyn says
It’s only 2.5 hours on a map, add in terrible traffic always and it’s more like 6 hours each time. If ikea would ship everything on their website then I would understand the sparse locations of the stores.
Kat says
Looks so great! Love all the materials and the artwork is always a good boost in the laundry!
Corinne says
We redid our kitchen last year with those IKEA and we love them! My DH was able to install them himself and although the family room FULL of ikea boxes was daunting they were not that bad. Still happy with them 1 year later! We used the big drawers instead of cabinets in some spots and those are the best.
Dana says
Are the fronts of the base cabinet Adel, or Lidingo?
Thanks!
YoungHouseLove says
All Lidingo!
xo
s
Jessica Horton says
LOVE this! I’m so jealous of your laundry “room” instead of the closet we have. Question… did you ever consider having those base cabinets on the opposite side of the washer/dryer? Then maybe you could extend the counter top out on the left wall of the room?
YoungHouseLove says
We thought about that for a while but it felt like it could be too tight. We also like the washer & dryer not being against the guest room wall so they’re hopefully not as loud.
xo
s
mary says
looks awesome, guys! We’ve done 4 IKEA kitchens – cabinets with custom counters, backsplashes, etc. I have a few good before/after sets, which I’ll send your way, if you’re interested. Two of the kitchens in particular were much like the ‘Dana’ link you provided – complete eye-popping transformations….
We LOVE ikea kitchens, and now that our teens are going off to college, we’ll be moving again (need less house and we’re itching for another house project (12 houses in 25 years!). We’ll put another IKEA kitchen in – their drawer organizers, soft touch closures, ability to change the doors, and of course, price, make them a phenomenal choice. Every time people come over, they’re blown away by the kitchen and 90% don’t know that it’s IKEA (the other 10% usually have IKEA if they recognize it). The absolute key is to use custom finishes – (hardware, lighting, counters, etc)to make the look your own.
We, by the way, have done 2 of the last kitchens in the Adel and really love the clean look. I think we may go a different route with the doors next time, but we’ve LOVED the Adel look (and a lot of IKEA hackers have even painted them, yes, painted thermofoil- and successfully!.
Let me know if you’d like pics of our transformations, and again, I’m drooling over the laundry room. A white, clean laundry room UPSTAIRS in the house is absolute PERFECTION!
YoungHouseLove says
They sound amazing! Would love to see pics!
xo
s
Gilly says
Mary- I want to see your pics too! Need all the help I can get to convince my husband that we can do this :)
mary says
I’ll send them on tonight when I get home!
Alex says
12 houses in 25 years! I thought we were crazy for having 5 houses in 20 years. Mary, you have more energy than I do!!! I would love to see the remodel pictures. I’ve done a cosmetic up grade to our current kitchen, but would love a total remodel including a layout change.
kristin @ W [H] A T C H says
i have been want to use ikea cabinets too — these looks great!
Christine says
We put up a little cork board with T pins in our laundry space and use it all the time for stray buttons, a little envelope of collar stays for my husband’s shirts, making smiley faces with thumb tacks, even single socks!
Also, we have Ikea cabinets in the kitchen of the house we just moved into, and love them. These are older Ikea cabinets, so some of the drawer joints have gaps. I think those issues have been corrected in recent years. The cabinets are so space-efficient, though, that we don’t care. We have unpacked all of our kitchen stuff and still have a couple of empty cabinets. WHAT??
YoungHouseLove says
That’s awesome!
xo
s
Angie says
$800?? Looking forward to your budget breakdown post! Looks great so far, guys. :)
Audrey says
Looks great! I have a similar setup in my laundry room and was wondering if you were thinking of incorporating a drying rack in any way? I am looking for something creative for sweaters or just for other small items you normally don’t put in the dryer (like bras and swimsuits…) I currently have a simple collapsible one on the wall (Leifheit 83250 Telegant 70 Mounted Clothes Dryer from Amazon), but it’s not good for bigger items…
YoungHouseLove says
We definitely have been thinking about that! Those things will be part of the finishing touches. We’re still considering how we use things, and how we’ll integrate items like a garbage can it drying area and all that.
xo
s
Meghan says
We just installed two Ikea Grundtal towel bars in our laundry room as drying racks. I love them! They each have four bars that swing out for hanging clothes, and lay flat against the wall when not in use.
YoungHouseLove says
Those sound awesome!
xo
s
Stacy says
It looks like there’s an actual Grundtal laundry drying rack for $20. It has more bars than the towel rack, and folds flush with the wall when not in use.
http://www.ikea.com/us/en/catalog/products/10177178/
YoungHouseLove says
I love that one! Was just eying it a little while ago!
xo
s
Anele @ Success Along the Weigh says
Gotta love progress!
Is it weird that of all the pictures, I was most happy to see the stud finder we just bought is the same one you guys use?
It is? As you were.
YoungHouseLove says
Ha!
xo
s
AnaMaria says
Love the idea of a butcher block countertop in this room. I wouldn’t have thought of that for a laundry room….but I think it will look very nice. My husband will probably have to do something similar in our garage/laundry area with cabinets,super helpful pictures as always!:)
Linda says
Grandma Nancy’s son in correct- not just the Germans but most Europeans take their kitchens with them when they move. Aprartments don’t include the kitchen cabinets or appliances. However, many renters (and buyers) will sell their kitchen to the next renter, it makes things easier for both.
It is also why IKEA keeps their components fairly standard- in case you need to add cabinets or reconfigure years later. I had some minor reconfiguring done about 8 years after my initial IKEA install to fit a larger refrigerator. Though my cabinet fronts have been discontinued, it was nothing a good custom woodworker couldn’t match.
One last European fact- did you ever wonder why laminate floors float? The Europeans take their floors with too! (Though again, they are often bought by the next renter.)
YoungHouseLove says
No way!!
xo
s
Annelies says
Linda, I wonder where you are from. I know from German friends they indeed take kitchen cabinets with them when they move, but here in Belgium no one does that and we definitely don’t take the floors with us either. It’s all part of the deal when you rent/buy and would be weird to come into a place where it is all removed.
Jenn(ifer) says
That’s only partly true for Germany, aka in some regions. Floors: yes that can happen, but many landlords install laminate floors now too. The floating is mainly for the expanding with temperatures.
We do however hardly ever have lamps or curtains in a rental and you are expected to bring your own and take them with you again when you move out, so everyone can have what they really like (that was so strange to me when I started reading US blogs, why would you leave such a statement piece like a lamp behind?).
Greetings from Germany
Birgitte says
As a Northern European dweller, I have to admit – I’ve never heard of this done. Could it be a German thing? With property contracts the default here at least is that all installed things come with the property (as in cabinets, built ins, etc), but appliances need to be specifically mentioned in the contract to stay. Not to say these things don’t happen, or even that they aren’t common in places, but I don’t think it’s a standard across all of Europe to bring either kitchen cabinets or floors when moving! ;)
Kaija says
I agree with Birgitte. This is very region-dependent. Never heard people moving or trying to sell or rent a house without kitchen cabinets or floors in Finland or Scandinavia.
Sarah says
Italy is another region where they take their kitchens with them… My friend that lives outside of Venice, Italy just took her kitchen with her when she moved. She said that is what everyone does there.
YoungHouseLove says
So interesting!
xo
s
Louise says
That is really coming toghether nicely. Whites are a deep pool to dive into. NCS codes are usually quite helpful, or if you use RGB? Anyway, as pretty as that looks there is something of a mystery going on here that I cannot wrap my head around. There are two major differencies to home appliances in the US and Sweden. The first are vacuums. The second are washing machines. What is the magic with a top-loaded washer? Is it easier to empty or are they more stable or what can it be? There has to be practical with them since you loose some considerable counterspace for folding with two machines like that. Someone who can help my itching brain?
YoungHouseLove says
The pros we hear about them is there’s less bending to load and unload, they can be larger capacity, and you can fill them and open the top to soak things (front loaders need to drain before you open the door). We also like not having the mildew issues front loaders can have around the rubber ring. So far we’re really happy with ours!
xo
s
Alex the Airhostess says
Louise,
Our top load washers use a lot more water than European front load clothes washers, but they do a really amazing job of getting things clean. Happily, our utility costs (water, sewer, gas, electricity) are WAY lower in the U.S. My new top loader is nearly as efficient on water usage as a front loader, minus the funky smell issues common to U.S. front loader machines.
When I washed things in France while studying abroad (14 years ago), the subsidized campus laundry rate was $9 a load for a wash cycle. Those prices quickly pushed me into the more environmentally-friendly wear-it-a-few-times before washing habit. :)
Laura says
I’m not going to lie – at first glance all I could think was “Wow, that’s a LOT of white!” Glad you reminded me of your previous post with your plans of adding some color and texture. Looking forward to seeing how it pans out!
Laura @ Rather Square says
Love it! We haven’t used Ikea cabinets before, but are the doors and cabinet frames pretty interchangeable? And can you still see the different white of the frames when the doors are open/closed?
YoungHouseLove says
Oh yes all the frames are the same if you do white or off white or cream or whitewashed, just the fronts and filler pieces and drawers have a color range, since you see that from the front.
xo
s
Jan says
Great progress! I can’t believe you went that long without laundry with a newborn. Very very brave!!!
Janet says
Sherry, can you reach the cabinets? My height and reach over washer would have been the measurement for me. I guess you have the side cabinet for every day storage. Uppers for occasional.
The room is looking awesome.
YoungHouseLove says
Oh yes, easily! Will have to share pics.
xo
s
caroline says
unrelated question – did your show house ever sell? would love a follow up post/comment! :) cabinets look great – we are putting up our kitchen backsplash this weekend!
YoungHouseLove says
Yes! Sold! We owe you guys an update :)
xo
s
Kelly R says
Having spent several years of my life back in college working as a kitchen planner at the IKEA in College Park, this post brings back SO MANY memories! I hope you all love the cabinets– and I totally agree with you– the suspension rail system for the upper cabinets really is genius!
Laura says
I just built an Ikea Hemnes dresser last weekend and the hardest and most frustrating part was nailing those silly little nails in the back panel… I only had 16 but I may have given up after 6… ;) I figured… if it starts falling off… I’ll nail some more in! haha!
Heidi says
Great info on IKEA cabinets! We might actually have to consider them for our kitchen remodel when we get to it in a few years. On a totally different subject, what kind of stud finder do you have? Ours is not exactly reliable, although it works better on Sheetrock walls then it did on the plaster walls in our first house!
YoungHouseLove says
Ours is by some off-brand from Home Depot.
xo
s
Casey Atterbury says
I LOVE the progress! Seeing the appliances in the space gives such a better feel for how big the new room is! LOVE it!
Christine says
Ha! We just completed hanging an Ikea wall open shelving system (Algot) this past weekend. It took us 72 hours and worked off the same cross bar (I think they called it a Suspension Rail) system. It looked simple, but goodness, it took us a while to figure it all out. We learned two things: Ikea needs to add words to their pictures and 2) never take a shortcut and think you know more than the Swedish about their own product installation! :-) Great job – your laundry room looks fantastic and I’ve loved all the meaty posts this week. A DIY post on Wednesday made it seem like the old days – in a very good way!
Laura says
Oh Gosh! All I can think about is being stuck in traffic for six hours with a newborn!! Hope Teddy was sound asleep or that Sherry was able to pop him out of his seat long enough to feed him. Darn those traffic jams – never helpful when you’re a nursing mama!!
YoungHouseLove says
There were a ton I nursing stops, for sure!
xo
s
Katk says
I installed an ikea kitchenette at work, and we loved it. Except… After a few weeks, the steam from the electric kettle we kept on the counter had caused one of the doors to swell and split. So we had to replace that door and be more careful about the kettle placement!
YoungHouseLove says
Great tip!
xo
s
Sarah says
These look great! You are making me want to get our laundry closet more organized… because who doesn’t love everything sprawled all over the closet floor? And your weirdness makes my day more enjoyable so thank you!
Jenna says
Quick question – how high are the bottom of the cabinets from the floor? They look super high in these photos, and I know Sherry is a shorty like myself. Sherry – can you reach them without any problem? I know bending over the washer/dryer and trying to reach stuff on shelves above is super hard for me… just wondering! I’m LOVING the new laundry room!
YoungHouseLove says
Oh yes, without a problem. Will have to share pics!
xo
s
Lindsey says
Love love love how it’s coming out! Have you considered putting the bottom cabinet between the washer/dryer for more symmetry?
YoungHouseLove says
We thought we’d prefer to transfer laundry from the washer to the dryer without a cabinet in between, so function won out.
xo
s
Pamela says
We actually have an 18″ cabinet between our washer and dryer and its very functional because I keep most of my washing supplies in it (no uppers). What did take a bit of finagling was getting the counter height the same as the w/d height (actually put the cabinet on casters). This made one continuous flat surface which has come in handy.
Jen @ The Decor Scene says
I love our Ikea cabinets in our laundry room. We even have the same doors you guys picked. We have had ours up for a little over 3 yrs now and love them. But we have the horizontal cabinets in our space, it just worked better for the tight area we had to put them in. They even have the “quiet close” door feature which we love. No slamming of doors that way. ;)
http://thedecorscene.blogspot.com/2011/03/laundry-room-cabinets-installed.html
Oh day when we have to redo our kitchen (years from now) I want to use Ikea cabinets for sure. Hoping for a better layout too when that happens. lol ;)
Can’t wait to see how the rest of the laundry room turns out for you guys. It already looks awesome!!! :) Happy dance!
Jen @ The Decor Scene says
Oops I see you had to pick another style cabinet. My bad. That is what I get for reading quick and skipping and then going back to read it all. lol. Love the new style/color doors as well. ;)
Gabby (cookiecutterunique) says
I95 S on a Friday evening; you’re nuts! As someone who lives in NoVA but owns a house in Richmond, I’ve done that drive many times, it’s awful. The cabinets were worth it though, it looks great.
Margo says
Love the cabinets!
Everything’s looking pretty white, though. Does the paint color look more olive-y in person? The pictures make it look like it’s trying to be white but we know from Teddy’s room that it is more olive-y, which I think would look good in here.
YoungHouseLove says
Yes it’s hard to shoot it but it’s sort of lightly olive/khaki. Once art and wood comes in I think it’ll be more balanced!
xo
s
Katja | Shift Ctrl Art says
It looks so good in there! I was excited to hear that you are considering an IKEA kitchen. IKEA is coming out with a brand new system early next year. New fronts too. AKURUM goes away and the new ones will be called SEKTION, I think (I am secretly an IKEA spy ;))But for instance there is a new base that will have 8 of the same height drawers. (excitement)
When we put the backs on the cabinets, we glue them on and nailed them with our nailing gun. That goes much faster and the backs don’t come off later. Back in the day the IKEA cabinets came with a little pocket of glue for that. They don’t anymore, but we just never stopped doing that.
Those little nails they send along for it are so great for hanging small pictures around the house because they have those flat heads.
We recently built a seating bench with a tower, with shortened cabinets, then wrapped in fillers and panels. http://shiftctrlart.com/Blogpost/unfv/Master-bath-progress-Shortened-builtin-IKEA-seating-bench-and-cabinet-tower
YoungHouseLove says
That’s awesome!
xo
s
Sara says
This looks amazing! Congrats, you two. Also: am I the only one who kept saying “Lidingo ate my baby!” and giggling to myself while reading this post? No? Okay: I guess that’ll be the sleep deprivation, then.
YoungHouseLove says
Bahaha!
xo
s
Juliet says
I’m curious to know why you decided to change the cabinet fronts rather than just spray paint the original ones you had in simply white? They’re both lovely, I’m just curious if you thought about it.
YoungHouseLove says
They have a 25 year warranty but not if you paint them, so we wanted the warranty and the factory finish if it was possible!
xo
s
Jennifer says
We used Ikea for our bedroom closet. I don’t know if they do the same for cabinets but we bought the internal lighting system which turns on automatically when we open the door of the closet. It’s really nice, especially for those things up high. Might be something to consider adding.
YoungHouseLove says
So nice!
xo
s
jaclyn says
Looking good so far, I can’t wait to see the end result!
My husband is totally under the spell of “IKEA = CRAP” but I am a big believer that it all depends on how you treat your furniture.
I had the Malm bedroom set for almost 8 years and it still looked brand new when I finally got rid of them and they were just as sturdy as the day I bought them. My mother-in-law however has a few of the Malm dressers for storage in their home office and they are totally trashed and wobble when you walk by. She was complaining one day about the IKEA quality…long story short it turns out they are really rough on their furniture and she admitted to over-stuffing the drawers and her daughter even uses the bottom drawer as a step-stool to reach the top of the dresser! Well duh, then yeah Ikea doesn’t stand a chance!
Their $20k kitchen remodel with the fanciest of fancy KraftMaid cabinets with all the special thermo-bond coatings and whatnot barely lasted 5 years so….yeah, let’s all just be a little gentler on our cabinetry and furniture!
End rant. LOL
Allison says
Wait, so my husband isn’t the only one under that spell? How do we break it? Because it really cramps my IKEA style! Haha.
Catherine says
I often think that when I see things on Craigslist. I can’t believe how trashed some things look! I just don’t understand treating your furniture that way. Oh well, each to his own!
Rachel says
Lol! I’m an IKEA geek, so the first thing I thought when I saw you’d bought ADEL was ‘that’s not ADEL, that’s LIDINGO.’
I’d be interested to see how you get on with them, as I’d love to one day remodel my kitchen with a mix of the white and brown/black LIDINGO. For now I’m painting my old cabinets white, with lots of help from the videos you made while doing your second house’s kitchen – very useful, thanks!
Helene says
Will you place the handles in the same position they used on House Tweaking? It makes the more traditional style cabinet fronts look more modern and will also help with the asymmetry of three upper cabinets.
YoungHouseLove says
I do love that! Depends what hardware we end up going with!
xo
s
robyns says
You know Sarah Richardson uses IKEA cabinets in a lot of her projects and I know she has a high quality threshold. That being said, she never worries about the door tint. she just sends them out to be “sprayed”. OH to be able to Richardson everything! It certainly does open up possibilities!
YoungHouseLove says
Haha!
xo
s