Woo to the hoo. We did it. We met our self-imposed Tuesday morning deadline and finished our clothespin chandelier as part of our little (completely unofficial) Pinterest Challenge (not sponsored by Pinterest or anyone else, just dreamed up by Katie B to make us stop pinning and start doing stuff that we’ve already pinned).
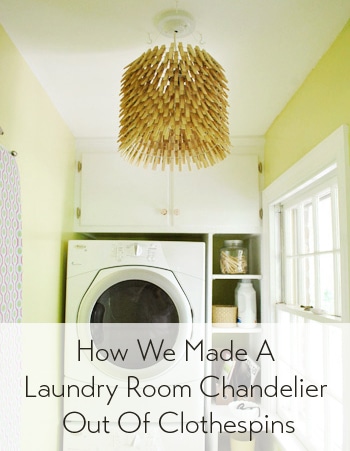
Here’s how it all went down. We already explained the whole Pinterest Challenge thing here, which is where we snuck in a few photos of our supplies, like this one below:
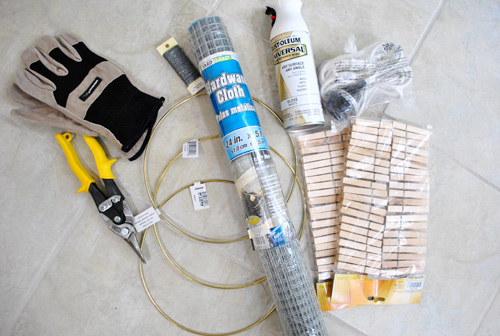
We actually didn’t end up using those three 10″ metal rings from Ben Franklin, but the rest of the stuff came in handy. So for those who can’t quite make everything out, “the rest of the stuff” is: a $4 light kit from Ikea, part of a roll of hardware cloth (aka: wire fencing) from Lowe’s, white gloss spray paint, some old wire from our craft drawer, gloves & metal snips for handling/cutting the wire fencing, and two bags of clothespins (we actually ended up needing eight bags of them in the end).
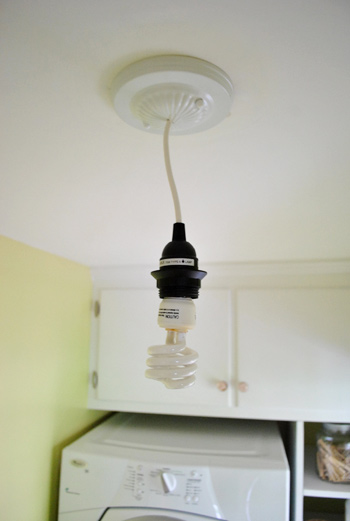
As for the $4 light kit from Ikea, it’s a plug in light kit (meant to be swagged) but an electrician friend of ours taught us that it can also be converted into a hardwired fixture by clipping off the plug part, exposing the wires within the cord, and connecting them to the wires in your overhead junction box (with the power off of course!). Then we just added a $5 ceiling canopy from Lowe’s (that white medallion looking thing that finishes things off).
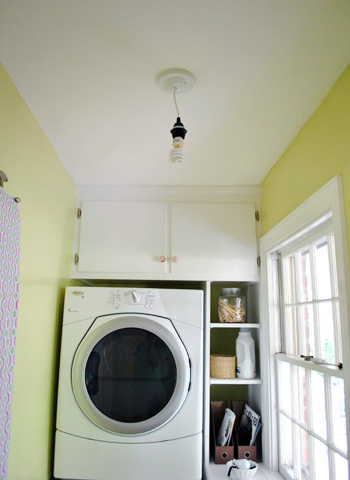
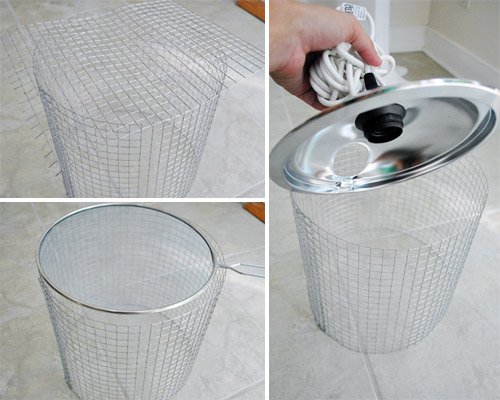
Of course that dangling light kit is nothing pretty, so we got to work constructing a drum shade-ish thing out of wire fencing. First I donned my gloves and used the metal snips…
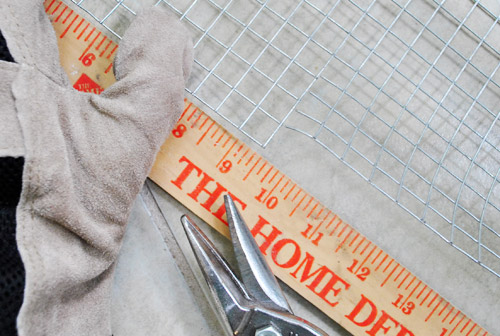
… to cut out a strip of wire fencing that was approximately 9.5″ tall (since we wanted our shade to be about 10-11″ tall when completed and we had to allow for some dangling clothespins to make it a little longer than the frame).
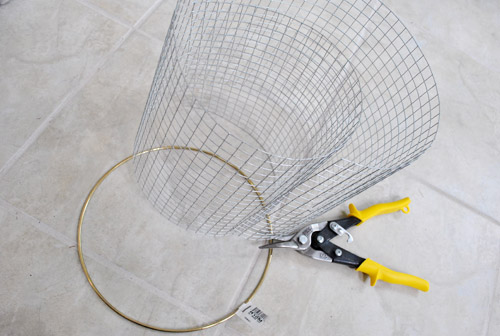
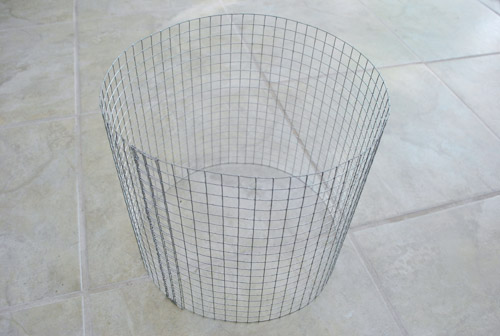
Then since the ring was 10″ wide, we just made a loop of wire fencing with a 10″ diameter and used craft store wire that we had on hand to bind the fencing to itself to create a nice drum shade-ish loop o’ metal squares. It was at this point that we realized we didn’t need the 10″ ring at all since the wire fencing held its shape really well (we worried it would be all floppy and wonky).
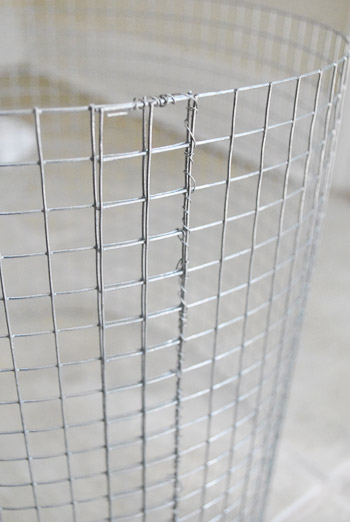
Oh and as for some details on the wire that we used to secure it, it was 22-gauge stuff. It’s actually thinner than the wire that we pictured in the supply photo up top (thank goodness for having lots of spare wire around!) because it ended up being easier to twist while still being rigid enough for a good hold.
The next obstacle was figuring out how we’d affix the ceiling mounted light kit to the wire “shade” that we were making. We contemplated a few things – like cutting a piece of scrap wire fencing in a circle to bind to the top (and then cutting a circle in the middle for the light to drop into). We even scavenged for some items to repurpose, like a kitchen splatter guard and a stove burner drip pan (the last of which almost won, since the light kit perfectly screwed through the existing hole in the bottom). But ultimately it got vetoed because it would’ve blocked too much light – and the extra hole in the top would have cast a weird ray of light onto the ceiling. So you’ll see our eventual solution in the “after” pics. Oooh, the suspense.
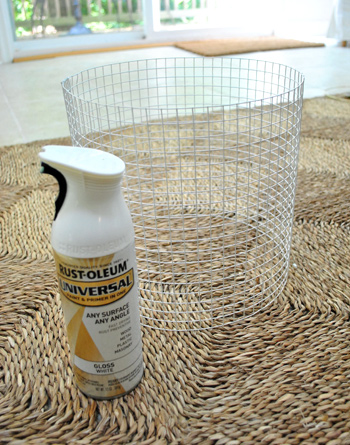
Next I sprayed the wire fencing with white gloss spay paint that we already had in our little basement spray paint collection. I did this for two reasons:
- we thought glossy white would work with the ceiling canopy that we added and look a little more polished (although some folks might love the industrial look of unsprayed wire)
- some metal fencing like this can have traces of lead in it, so although we weren’t sure ours did, we handled it only with gloves on waaay away from Clara (on the tile floor of our sealed-off-from-the-rest-of-the-house sunroom). Layering on a few thorough coats of spray paint is like sealing old lead-painted walls with fresh new coats of non-lead paint (which is the recommended method, as long as the old paint isn’t flaking or peeling).
Here she is all sealed/sprayed:
Then it was time to play with clothespins. Which may or may not have been harder than we expected to track down in the right size for our wire fencing.
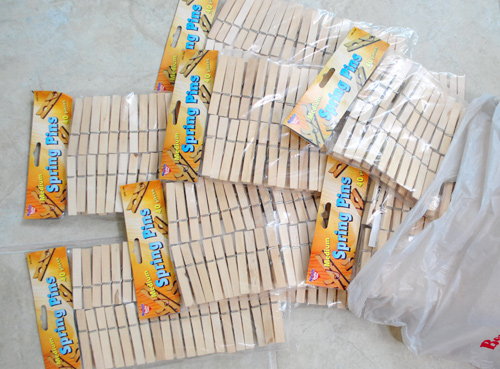
We used eight bags of “medium” sized clothespins from Ben Franklin (snagged at $1.99 for each pack of 40) to play around with a few different “patterns” for our light fixture.
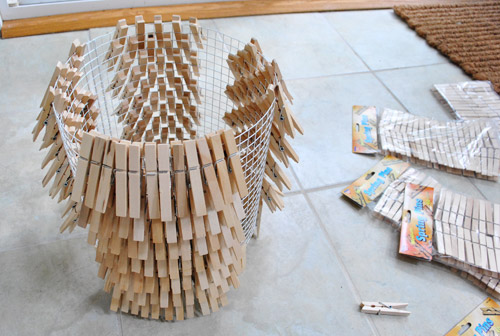
The first pattern was a straightforward row by row effect. We just clipped pins in a horizontal row and then skipped two rows below that and then pinned another row beneath that.
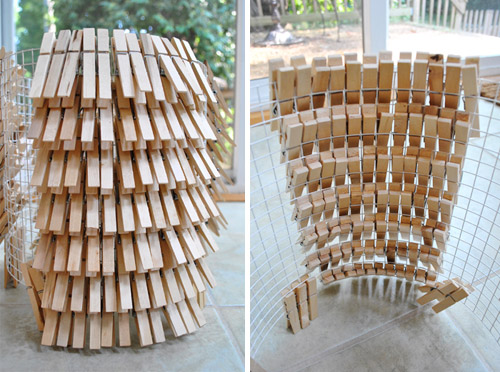
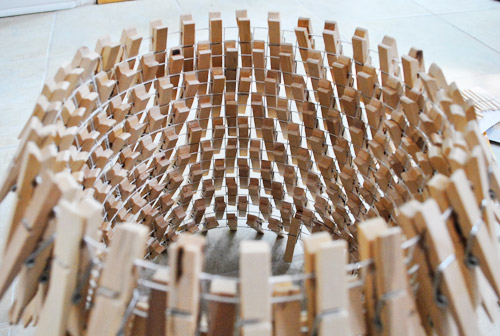
We also tried a more random pattern that you can see better from the inside shown on the right (we basically alternated squares for a zig-zag-ish effect):
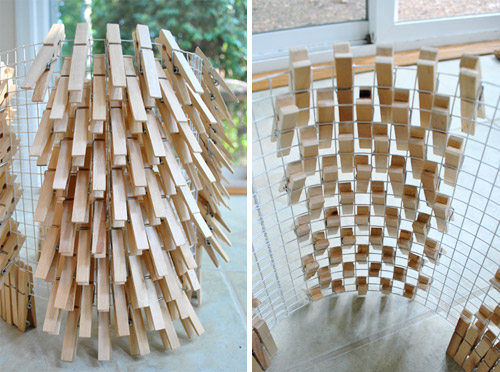
We also tried playing around with a diagonal design, which was fun but hard to deal with at the top and bottom of the shade since there were lots of empty squares that looked kind of odd:
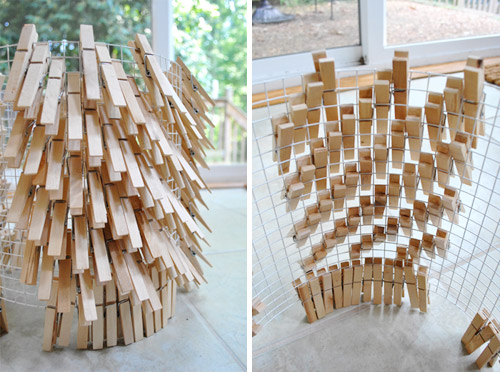
I call this design “The Space Invader” after the old school video game. See the shot on the right below? There are totally two space invader guys hiding in there.
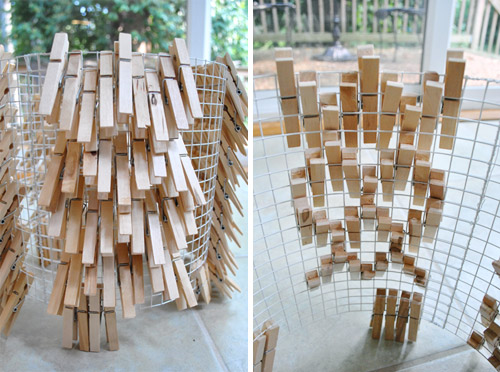
Pretty much right away we narrowed it down to two favorites. The row by row pattern that we did first, and the zig-zag-ish pattern that we tried out second. So John held the shade up with the light on and both patterns facing out so we could take photos of each one and look at them together and decide. Going into it I was all about the row by row thing and John liked the zig-zag better.
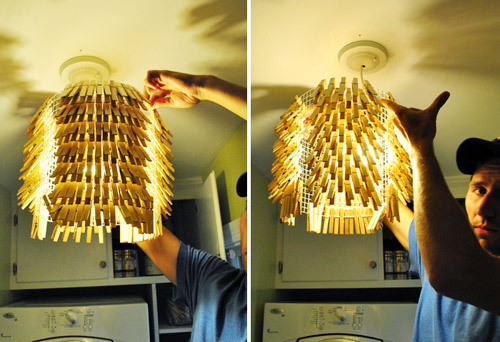
Guess who won again? John. Seeing it even for a second I knew he was right about the row by row pattern blocking way more light than the zig-zag configuration. And it felt airier and less heavy so we were both gung-ho as soon as we saw it in fake action (just look at John’s excited face above). But really, we were giddy pretty much from this point of the project on. So then we just (giddily) removed the other clothespin patterns and clipped them all around the shade in our finalized zig-zag design.
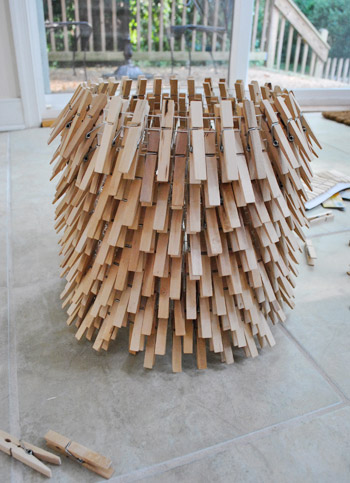
We just got lucky that we had secured the wire fencing in a way that created an even number of squares around the top so our pattern could “loop” without getting awkward and having a seam. So if anyone at home is going to try this, we’d definitely recommend having an even number of squares when it comes to the perimeter of the shade.
And now for our hanging solution:
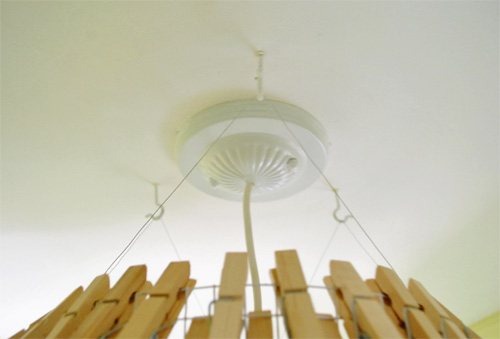
Yup, it was just more of the wire that we used to bind the wire fencing into a drum and three heavy duty ceiling hooks that we screwed nice and securely into the ceiling with heavy duty anchors (don’t want to get clothespinned to death).
Then we stepped back and high-fived for five straight minutes. We’re in love.
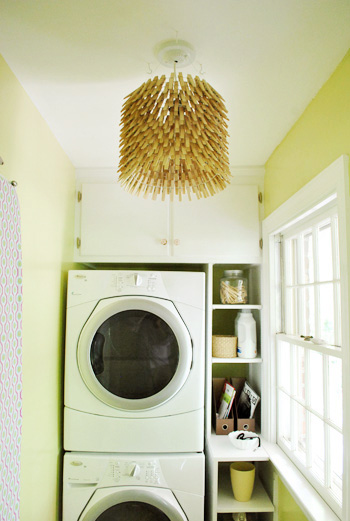
I bet you’re surprised we didn’t spray paint that sucker white (or ORB), huh? We even debated staining or dying the wood pins, but in the end we actually really liked the au naturale look because:
- it ties into a few baskets in those built-ins
- it makes it more obvious that it’s a light made of clothespins, which we think is part of the fun
- it glows in a sunny yellowy-tan tone whenever the light is on, which is nice and warm – and works great with the grellow walls
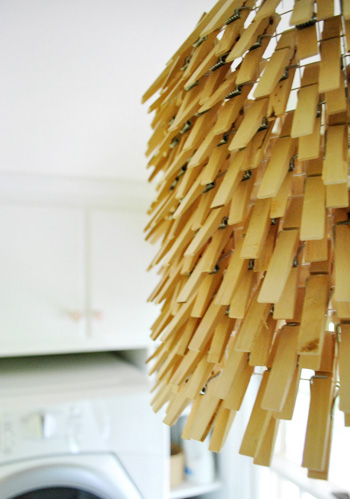
Isn’t it fun?
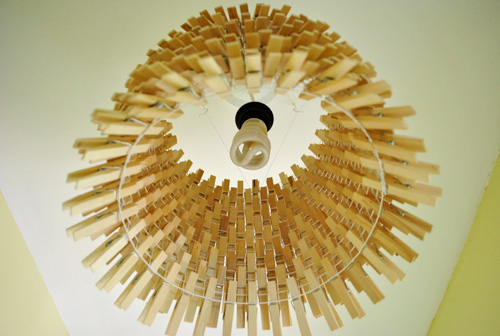
This shot from below reminds us of a sunburst mirror:
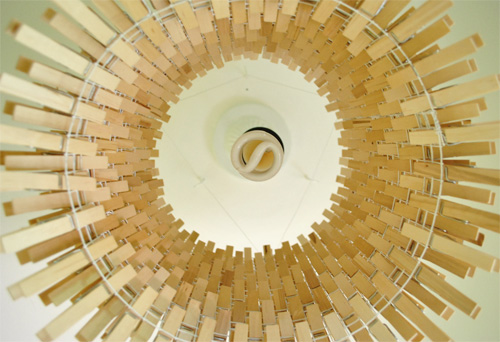
Oh and when it comes to safety, lots of lamp shades are made of flammable things like paper or fabric (or even driftwood, etc) but the key is to keep that stuff well away from the bulb (and to use cooler burning bulbs like CFLs or LEDs to be even more on the safe side). You also want to give the heat plenty of room to escape (ideally around the top and bottom of the shade if possible).
Here she is all lit up:
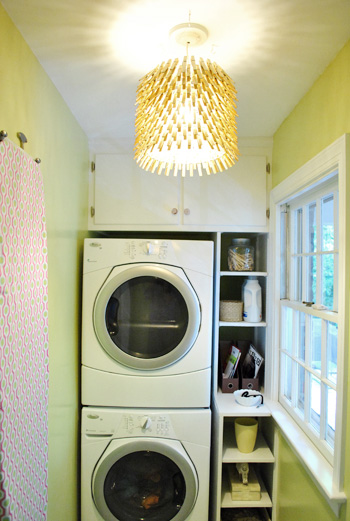
We think it’s one of the coolest things we’ve made to date, just because it’s so quirky and sculptural. And it’s all thanks to Katie Bower’s big Pinterest Challenge idea and two projects that inspired the heck out of me over on the eye candy capital that is Pinterest. Specifically, this project (originally from here) and this project (originally from here.
Check out the pretty starburst pattern that it casts on the ceiling:
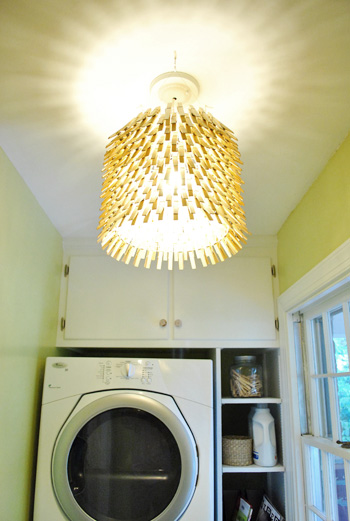
Now for some stats (because we’re mathy like that): we used 320 clothespins (exactly eight packs) and our clothespin shade weighs four pounds.
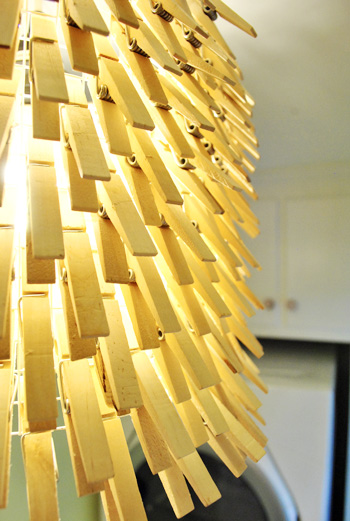
And here’s the whole budget breakdown thang ($herdog just got twangy on ya):
- 8 packs of 40 medium-sized clothespins (from Ben Franklin): $16
- Pack of hooks for the ceiling (from Home Depot): $1
- Roll of hardware cloth (aka, wire fencing) from Lowe’s: $8
- Hemma light kit (from Ikea): $4
- Ceiling canopy for light kit (from Lowe’s): $5
- Wire for securing / hanging wire frame (already owned): $0
- White spray paint (already owned): $0
- TOTAL: $34
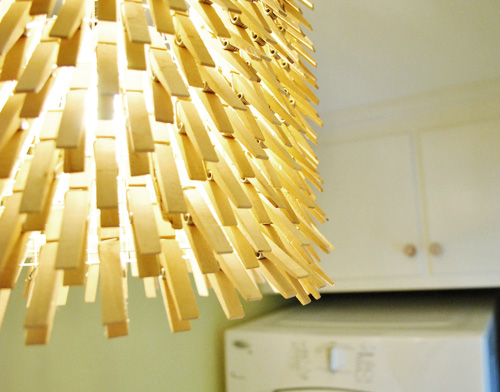
As for if it interferes with heads or flailing arms while switching laundry, this picture shows how high it actually is in the room (and thanks to it being centered in the space, it’s not right above the washer and dryer, it’s a few feet behind it in the middle of the room). We have 8 foot ceilings and the bottom of it is 16″ from the ceiling, so even 6′ tall John doesn’t have any issues with it (since the bottom of it is almost 7 feet from the ground). He even washed a load of diapers and a load of clothes just to be sure.
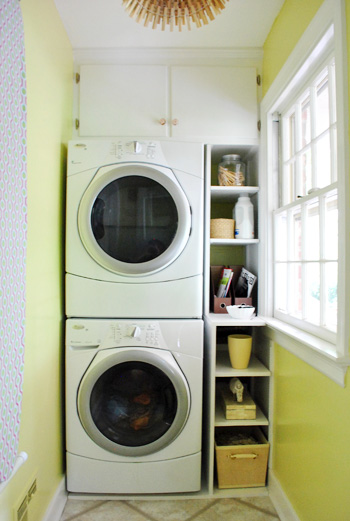
Can you tell we added our new shoe caddies after we shot this pic? Oops. But anyway, there you have it. A whole bunch of pictures and words about our Pinterest Challenge. And a whole bunch of clothespins.

Oh and don’t forget to check in on Katie, Emily, and Lana to see what amaaaaazing projects they whipped up (they’ll be sharing theirs sometime today as well)! A few hints: one has to do with a mirror and one has to do with a fridge…
And now here’s the part where we invite you to share all of the fun Pinterest Challenge projects that you guys have tackled in the last week (right along with us, well at least virtually with us). If you’ve already blogged about it, just:
- click on the blue “Add Your Link” button with the odd cartoon head at the bottom of this post (you might have to do some scrolling, depending how many projects are added)
- add a link to your specific blog post about your project in the url field (not your home page)
- where it says “name” write a descriptive name for your project (ex: “Clothespin Light Fixture”) as opposed to your actual name
- we’d also love if you could quickly link back over to our project posts within your own (here’s Katie’s, Emily’s, Lana’s, and ours) – it’s also nice to link to your inspiration project on Pinterest as well as to directly link to the original project/site, just so they get some love too.
And if you’d rather just link over to your project in the comment section, feel free to do that – or even add a link to a free photo sharing site like Flickr with your pics if you don’t have a blog (remember to set the gallery to public so we can all see it). We can’t wait to see what you’ve been up to! Geeked out and excited doesn’t even begin to describe it.

Carol says
LOL Yes, it WAS moving above Clara ominously, LOL why was john all RUDE and say- ‘No its Not.’ LOLOLOLOL rewound it like four times.. ok 10.. and Loved Sherrys reaction. …hahahah ok.. so patient LOL!!
sooo funny, easy john, easy.. LOL
YoungHouseLove says
Haha, John actually says: “Oh it’s in there good” – he is a mutterer though, so it’s hard to make out! Haha.
xo,
s
Pamela says
I understood John’s words just fine! Nah, he didn’t come across rude at all. He seems like an awesome guy/husband/super-sweet Daddy (with razor-sharp wit & humor), as well as possessing amazing talent with building nice things from scratch for your home! :)
Shelley says
Ahhh!!! That is insane in the membrane, hahaha! Really one of the coolest lights I’ve ever seen for a laundry room. Way to go guys :D
Heidi P. says
I am in LOOOVE!!!!!! That is AWESOME!
Heidi P. says
Question for you: If you HAD spray painted it white (which is what I will someday do when I make this :), how would you have gone about it? Would you have doused the whole thing in spray paint after assembly? or done each clothes pin individually to make sure it covered every inch?
YoungHouseLove says
I think I would have laid out all the pins on cardboard and sprayed the fronts and sides and then waited for them to dry and sprayed the backs. Then I would have put it together and given the whole thing another misting of paint, just for good coverage (I fear I wouldn’t get into all the crannies if it was already assembled before I started to apply paint. Hope it helps!
xo,
s
Julie M says
I’m a little late to the game but I participated in your pinterest challenge too. Thanks for the kick in the pants to get something done that I’ve been wanting to for a while.
I linked you on my blog post about it http://neatandpretty.com/pinterest-challenge-measure-up/ . Yea for Pinterest!
Rebecca says
I checked out the other four blogs and liked your project best (and you guys did it without interns helping, lol!) I liked Katie B’s until she wrote “wahla” instead of “voila” and then I lost interest in the Bower Power. (Spellcheck anyone?)
jeanie says
John & Sherry– Help!!
I am such an avid fan but I don’t have a website to link in the Pinterest Challenge. By the way, this is the most exciting thing I’ve seen in blogging a long while. I have a Pinterest project of zebra,giraffe and leopard patterned fabric on deer antler/ wall decor to share but I am more than a little techno-challenged. What is the eazzzzziest way to send to you? I have email and fbook but am getting tech support from a genius tomorrow so there may be more options w/ more help.
I adore YHL- what a STAR that precious Clara is!!
YoungHouseLove says
I would upload the pic (or pics) to a site like Flickr (it’s 100% free) and then set the album to public and comment with the url so we can head over and take a look (along with everyone else)!
xo,
s
Beth says
Thank you so much for doing this challenge! In addition to moving me from my computer to actually DOING my Pinterest inspirations, it’s helped me find countless really cool blogs I might not otherwise have discovered.
Heather says
This may just be the COOLEST thing I’ve ever seen! LOVE.
Mary says
Oh that is so fun. Awesome to have hanging in your laundry room. To bad that your clothespins are not made in America because then you could have a great made in the USA product.
OMG Ponies! says
Your lampshade photo was posted on icanhascheezburger.com’s Must Have Cute webpage.
:)
YoungHouseLove says
Wahoo- thanks for the heads up!
xo,
s
Tasmin says
OK, I’m hooked. Can someone extend an invite to Pinterest for me pretty please :) [email protected]
Tasmin says
wow that was quick, thanks! better get repinning :)
tracy a says
sherry & john….i’ve been dreaming lately about the house i hope to build (we’re nearing the close date on a piece of land…so exciting!!) and am wondering about diy light fixtures like this. well, any diy type project that is directly related to the actual house. did you find in your last place that it impacted resale? or if there were projects like this (the close-pin fixture), did you replace them with store bought options? i have so many ideas, and am trying to weigh my love of diy with my practical husband, er mind. :)
any advice??
YoungHouseLove says
Hmm, we made a pendant lamp for our guest room and the buyers wanted that along with all the other lights to convey as-is (they also bought all the curtains, the bed frame, and all of the storage furnishings in the basement too). If you want to take something when you sell, you can always replace it, but if the buyers want something like your clothespin light I would leave it and just make another one in the new house if it’s not too much trouble (they have an inspection and everything, so if you’ve draped fabric over a bare bulb and it’s not to code or something they and you should be told). Hope it helps!
xo,
s
clarissa says
Loved seeing your accomplishments. I too have a pinterest account, and am saving many things to do that I like. I need to get busy, and I must say you have inspired me to get going.
kate says
Pinterest is SO inspiring! Love what you did with the clothespin light fixture. I am a photographer and re-did this chair to use as a photo prop! So much fun! Pinterest was awesome for finding ideas and inspiration!
Here’s a link to a before and after picture in Flickr:
http://www.flickr.com/photos/56791828@N06/6016953304/
Can’t wait to see what you do next!
~kate
Tanya H. says
LOVE it! Absolutely perfect laundry room fixture!
Mara says
Love this!! The funny thing I was just telling some other Pinterest obsessed friends that I will probably end up actually ‘making’ only 1/100th of all the pins I’ve got. I love that 500 people took this challenge. Way to get people inspired!
Tanya Anurag says
This looks absolutely wonderful. I will pin it. Yes, I am still pinning ideas :D
Going by the links uploaded here I say one thing for sure… you girls have motivated a lot of others to start doing and not just pinning.
I am hosting my first link-up party – Tea Time Thursdays @ Kreative Korner. Would be glad to see some of your awesome posts there. Hope to see you at the party.
http://tanyaanurag.blogspot.com/2011/08/celebrating-one-party-time.html
Amy says
Love the clothespin pendant! I think I may try making one for my kitchen. Quick question: How long are the clothespins? I bought some today at Michael’s and the only ones they had are 3 3/8 inch (and sadly sold in 24-packs and they only had three packs left -UGH). I tried doing a comparison of size according to the pictures you posted, and it looks pretty close. Are they the same size as yours? Thanks for your help!
YoungHouseLove says
Hmm, ours said “medium” as the size. They’re around 3″ long though, so the ones you had might be them (although ours came in packs of 40). Hope it helps!
xo,
s
jeanie says
Love–love this Pinterest Project.
Checkout the Flickr Pinterest Challenge Photos.
Sorry I didn’t pin the inspiration pik awhile back.
S&J, your chandy is a winner — Congrats.
YoungHouseLove says
Off to check them out!
xo,
s
Kati says
What overachievers you are – actually using “pins” for the first ever pinterest challenge. How perfect for the laundry room. Nice work! I love seeing what all of the other readers are up to. Happy pinning!
[email protected] says
I finally finished my Pinterest Challenge project! Whew! Take a look at my West Elm look-alike chandelier (originally $300.00, DIY’d for $72): http://www.ahappyplacecalledhome.com/home/2011/8/9/you-light-up-my-life.html
Thanks again for the encouragement to act on my pinspiration!
YoungHouseLove says
That’s beyond gorgeous! So inspiring!
xo,
s
Niki says
Hey guys!
I made this for my laundry room as well! Our ceilings are too low for a pendant light. So I just hung it around the light fixture with hooks from the ceiling. I had to make it bigger in diameter and height so that it would fit around the double light fixture we have. I think I used around 350 pins but I spaced mine out a bit more. Thanks so much for the inspiration! I love it!
YoungHouseLove says
Sounds amazing! We’d love to see a pic if you ever have a moment to post a link or upload one on our Facebook page!
xo,
s
Niki says
I forgot to add the link to the pic… sorry :)
http://www.facebook.com/photo.php?pid=20150967&l=c7c09e2e96&id=504365025
YoungHouseLove says
It looks GORGEOUS! Love it!! Thanks for sharing the pic!
xo,
s
Red Red Completely Red says
Ah, a little slow on this challenge… it took me a few weeks to simply pick the pin to recreate! Here we have it, though — art a la Astrid. Who needs acrylics when you’ve got leftover Benjamin Moore sitting around? :)
http://redredcompletelyred.blogspot.com/2011/08/pinterest-challenge-fine-art-edition.html
YoungHouseLove says
So cute!
xo,
s
Jeanette says
Do you think a ‘pin’ light like this would look ok in a kitchen? I have recessed and under-cabinet lighting for cooking and just need my center kitchen light to glow. I love the architectural vibe this has – and I could make it a bit wider and perhaps paint it white? What do you think? I love it, but am afraid it might look strange…
YoungHouseLove says
I think it’s not over the top these-are-clothespins obvious, so I would totally use it in a kitchen! And painting it white might be really fresh and fun!
xo,
s
natalia says
Check this clothespin mania out:
http://www.stumbleupon.com/su/25Btcm/www.crookedbrains.net/2009/10/interesting.html
keep up the good work. good vibes to you <3
YoungHouseLove says
Woah- that’s awesome!
xo,
s
Julie says
Just watched this video and kept getting a weird RP Funding pop up. I can send you a screen shot if you need one
YoungHouseLove says
Ugh- so sorry! You know we hate pop ups (so they’re never authorized). Can you tell us what ad was on the sidebar in the main spot (under the search bar) if you remember? That way we can hopefully block it from now on. Thanks!
xo,
s
Anne says
This is cool! You actually make me want to decorate..which is crazy because my walls are white.
Jen says
Wow you guys did awesome! Wonderfully executed ^.^
Oh and i wanted to tell you thank you Sherry! Because YOU got me onto Pinterest and now I’m addicted. So I’ll be attending the PAA meetings now. (pinterest addicts anonymous) Along with my sister and her entire work, thanks to me. ^.^ Haha. No really, I love the site and you’re blog is super awesome. I love how detailed your tutorials are, and how green you and John try to keep things. My husband and I are very eco-friendly also and we want our little one to grow up the best way possible as well.
Thanks for sharing you’re projects with the rest of the world! It’s much appreciated. :D
Jen XD
Sarah@StyleandCentsability says
Love this!!! Now I just need a higher ceiling in our basement! Maybe I could do a smaller pendant…
humanmama says
Amazing! I love it. It’s so chic… retro but not too much. I don’t usually like this kind of thing but I love it (love!). Thanks for posting!
Alexis says
Love this light! So inspiring! I have a question that we thought you’d be able to offer some insight to. We have a pull string flouresant light (yuk) above the sink in our kitchen and obviously are looking to change it out with something cooler. While at Ikea recently, we picked up a stainless steel colander and thought we could diy a hanging chandelier with it. Since we want it to hang (not flush mounted) and it’s a pull chain light (so it needs it’s own switch on fixture), so you have any ideas? Sorry for all these words!
YoungHouseLove says
We’ve only ever switched out a pull-chain fixture for another pull-chain fixture (we couldn’t figure out how to make it work without a chain). Anyone have any ideas?
xo,
s
mh says
Hey guys,
my name is Martin Huberman, I´m an Architect and Designer from Buenos Aires, and Creative Director of Normal™ my design studio. We were looking at some pictures of our lamps on the web and we ran into your site.
The lamp you are posting (the second reference picture) is called ioio (after my grandfather) and is made out of 1080 clothepegs.
I really love the video of your child playing with the lamp, it happen a lot with ours….
and I really like that our design inspired you to create…
Saludos from Buenos Aires.
mh
YoungHouseLove says
AMAZING! So great to hear from you. Love it!!
xo,
s
Becky Green says
WOW!!!!!! What a BEAUTIFUL JOB you’ve done!!!!! It’s SOOO PERFECT for the laundry room!!!!!!!! Makes me want to run out & buy all the supplies!!! LOL You REALLY did a FANTASTIC JOB!!!!! :)
Amanda says
This is fabulous, I featured it on Craft Gossip ) http://homeandgarden.craftgossip.com/clothespin-drop-light/
YoungHouseLove says
Aw thanks so much Amanda!
xo,
s
Elisabeth says
John and Sherry, I kept thinking of you and your clothespins as I was making this hanging pinecone out of plastic spoons so I thought I’d send it along. Thank you for the inspiration–it’s amazing what beautiful things you can make out of random, everyday objects! http://www.mygrowinghome.com/2011/11/diy-holiday-pinecone-balls-guest-post.html
YoungHouseLove says
So charming! I love it!
xo,
s
Dawn says
Hi,
Do you know how I get get an invite to Pininterest? I would love to play but don’t have a log in for it. P.S. I’m a single gal with a dog but love your blog.
YoungHouseLove says
Just drop over to our facebook page and request that someone send you an instant invite! Folks trade them around pretty fast over there. Hope it helps!
xo,
s
Nicole B. says
It turned out amazing! Great job.
I have been eyeing Ikea’s FOTO pendant light fixture but noticed it has to be plugged in as well. Could I do the same, cut the plug to expose the wires and have an electrician install? The lamp is so cheap and just what we’re looking for, but I was bummed to learn it’s a plug in, and my wires would show… yuck. Is it easy to do or would you recommend an electrician to do it?
YoungHouseLove says
We’ve tackled cutting the plug off and hardwiring a few times (for our clothespin chandelier in the laundry, for example). We find it pretty straightforward to do, but if you have any hesitations I’d call a pro. I don’t like to mess around when it comes to electricity!
-John
TRex Tray says
Fantastical! Excellent detail to this blog. Great photos, great writing and a HUGE thanks for making a project I’ve been wanting to do seem less daunting.
Annie says
I am in love with this! Also in love with your blog! My husband calls it my porn! We live in Chesterfield County VA and last year bought our first home last year; a 1968 Ranch! This week we are painting our paneling and you have put my husband at ease. Thank you for your inspirations!
YoungHouseLove says
Haha, that’s so funny! Good luck with everything!
xo,
s
Annie Josey says
Love this! I just moved into a new apartment, and I’m definitely trying it out after I get everything else unpacked :)
decoguy says
What a great idea, thanks! I like how you pointed the clothes pin downwards, that way the light expands outwards in the room. I find it hilarious how fitting it is, creating a clothes pin light in the laundry room =) would you consider painting it? if so how wouild you spice it up?
YoungHouseLove says
You can spray paint it or stain it to spice it up!
xo,
s
Misty @ 2brokebruces says
They say that imitation is the sincerest form of flattery… so I just want to tell you that I shamelessly copied your clothespin light idea in my laundry room! I love it! Thanks for all the great ideas on here…I am addicted to your blog!
YoungHouseLove says
Wahoo! That makes me so happy!
xo,
s
Junkin Revival says
Love it! Glad you went with the zig-zag pattern……..the starburst it casts onto the ceiling tops it all off!
Ti says
Hi! I just wanted to say that I am new to your site. I saw the remodel of the laundry room………..and was inspired. Our laundry room is a bit wider than yours, but not as long. It’s a *tiny* square. I needed a new washer and we got a stacking set and placed a cool, old small locker/wardrobe next to it. I made your clothes pin chandelier and it looks very cute indeed. It was quick (which I need with three boys under 6 running around), unique, and perfect to brighten up the small space. Thanks for sharing your wonderful ideas! Cheers. Ti
Jenn says
I think this would make a great gift for my mom! Her laundry room has just a lonely little plan lightbulb…way too boring. My only question is this: Her laundry room is in the basement, and so it’s pretty dark down there (she doesn’t have those beautiful windows you guys do!). Do you think it will block too much light down there since it’s a dark space? It doesn’t look like it did in your room, but again, with the big windows and natural light it’s hard to tell. I’d love to hear what you think!
YoungHouseLove says
Hmm, is there room for a floor lamp too, or a table lamp just in case? It might offset the light missing from windows nicely!
xo
s
camille says
I love this idea. My sister came down to Hawaii to visit and she gave me a belated christmas gift of your autograph book! AHHH I am so excited. I would want to do this idea but it might have to wait until I purchase a REAL house :/ Great book btw, i get a rush when I touch it lol
YoungHouseLove says
Awww, that’s so sweet of you! Glad to hear you’re enjoying it.
-John
Anna Rose @ The How-To Gal says
I love fun, quirky decor in functional spaces. It just makes doing laundry or other mundane tasks so much more fun!
Mike says
This is a great idea! It doesn’t require too much skill, which means it’s right up my alley. I would, However, recommend playing around with the pins a little more. I like that you can change the patterns, but with some sharpies, paint, or even crayons, you could add some color to the lamp! This could brighten or dim the light based on the personal preference.
Amanda says
Soooo, it’s raining here in Maine today…. I have been wanting to try this for a couple of years now. I think today is the day I attempt a shot at it! Thank you for being an inspiration. My house is so sad, no decorations and we purchased it 3 yrs ago. I have all these crazy ideas in my head and what I would like my house to look like, but I can never put my thoughts together in the store, and come home with stuff that I don’t like once I get it back to the house. Feeling pretty stuck!