Let’s make a floating frame, shall we? I did a little frame hack that’s super easy and free if you have a few basic items on hand – or only a few bucks even if you don’t. So for anyone out there who likes the look of a floating glass frame but doesn’t want to pay around twenty bucks for one, you can probably use an old frame that you already have to whip one up.
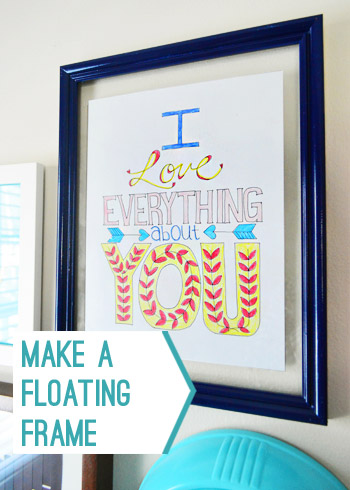
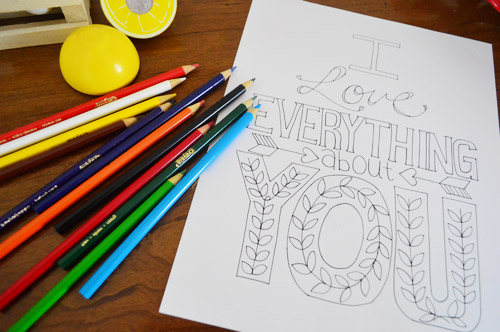
First, I colored this cool printable that I mentioned in that original art-hanging post (which I got here, printed on card stock at home, and colored with regular old colored pencils).
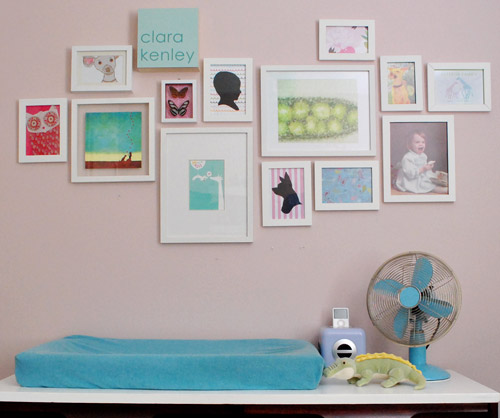
Then I was about to run out and buy some large paper to use as a backing or mat when I thought… what if I just let it float behind the glass? Sort of like the art in Clara’s nursery that floats in a store-bought frame from Target (it’s the frame on the bottom-left of this old pic).
But instead of changing gears and running out to Target in the hopes of finding another floating glass frame, I took apart the regular old frame that I had and looked at it. And I realized that if I removed the backing, added a hook to the top of the frame so it would hang, and secured the art to the glass and the glass to the frame, I’d be good to go. So I gathered just a few materials…
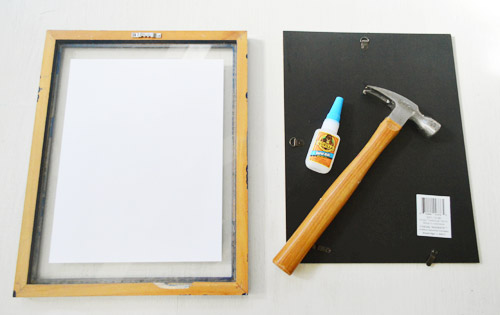
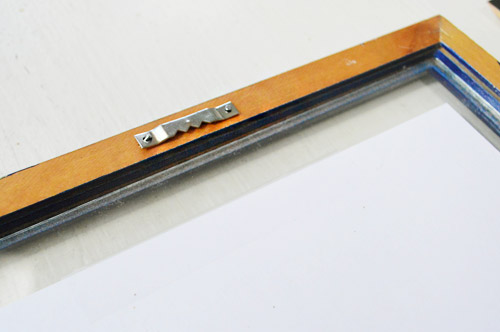
Material #1: A sawtooth hanging attachment, which I nailed into the top of the wood frame (make sure it’s centered so your frame hangs straight). These guys are usually four for 99 cents at Michael’s, by the way.
Material #2: Super glue, which I used to glue the glass to the front lip of the frame. This picture is like one of those “reenactments” on TV (you know the ones where the reenactor looks nothing like the original person being interviewed in one of those crime or ER stories). The reason it’s a bad reenactment is because I got too excited and glued the glass to the front lip of the frame and then realized I forgot to take a picture of the process…
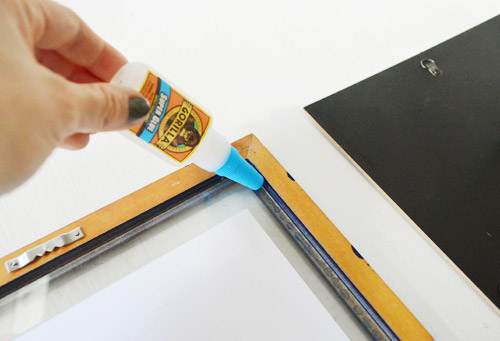
So just imagine that the cap is off of the glue, and the glass is actually lifted out of the frame. Yup, I just ran a thin bead of glue around the entire outside lip of the wood frame so that when I dropped the glass back onto the lip it would be glued in place. If you look closely at this picture you can actually see the dried glue along that lip, which isn’t visible from the front of the frame since the lip is there. Note: this doesn’t change anything about being able to clean either side of the glass – you can just lift the frame off the wall and wipe the back of the glass if you’d like.
Material #3: Nada. You’re done.
The result? Well, once it was all dry, I had a floating glass frame. As for how I attached the art, I used regular old clear scotch tape applied to the back of the art. I just overlapped it ever so slightly so the very very tiny top edge would meet the glass along the top of the printout and the very tiny bottom edge would meet the glass along the bottom. Lo and behold, it actually worked. Since it’s such a thin sliver it’s not noticeable from the front – even when you get close (I was pleasantly surprised that the tape didn’t show). And I only needed that one piece on the top and one along the bottom, so it was held nice and smooth.
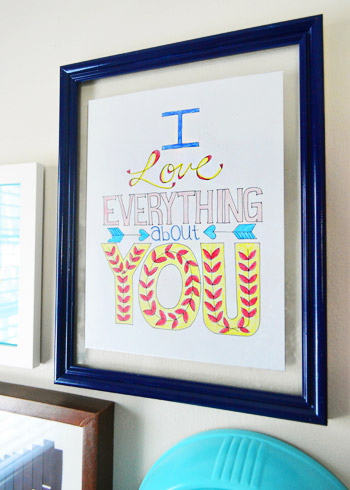
If the tape was all awkward and obvious, my next plan was going to be trying spray adhesive – lightly spraying the front of the printout and carefully sticking it to the back of the glass in a nice centered position. Although I would only do that to something that’s not valuable or one-of-a-kind (so a free printable is a good example of something I’d dare to spray right in the face).
Speaking of that, my suggestion for this little frame hack would be to avoid using it to hang anything super valuable or irreplaceable since there are two notable differences:
- there’s no back pane of glass or piece of cardboard protecting the art from the rear (instead of being sandwiched like the art in most frames, it’s backless like a Carmen Electra dress). I’m not sure how much of an issue this poses, since it’s essentially just sealed in a box made by the the frame that touches the solid wall behind it on all sides, but it’s a difference so I thought I’d mention it.
- you’re putting a bit of clear scotch tape on the back of the art (which is actually something I do a lot when I frame things the traditional way as well, but it’s not the recommended method whenever you’re framing anything that’s especially valuable or irreplaceable).
That being said, for hanging a free printable that you printed and colored at home, well, it’s pretty darn perfect. I figure since we’ve got approximately nine million and seventy eight traditional frames in the house, two floating glass ones are a fun little twist. Have you guys added anything (or subtracted anything) from a frame or some other item of wall decor to give it a fresh spin? Spill the frame-hacking beans.

Melanie says
I actually just talked about a frame I bought over the weekend (http://mailboxjourney.com/2013/02/14/latest-additions-the-framed-mason-jar/) it came with matting, but I’ve never been a fan of the stuff. So, I removed it, and let the painting (By Katie Daisy) take up the entire frame.
I’ve always wanted to do a floating frame though. I’ll have to keep this post in mind for future reference.
Happy Valentine’s Day to you guys! ♥
YoungHouseLove says
Happy Valentine’s Day to you too Melanie!
xo
s
Kristen | Popcorn on the Stove says
The floating frame is a fun touch – glad to see it’s an easy time to DIY one!
Anele @ Success Along the Weigh says
I am so unobservant…I didn’t even notice that was a floating frame in the original post! DER! But now that it’s been pointed out, I love it!
Madeline says
I bought a $2.99 HUGE Goodwill frame, took out the art, & used the backing to create a big modern monogram. Beats paying for expensive art!
http://createbakecelebrate.blogspot.com/2013/02/create-modern-monogram.html
YoungHouseLove says
Really fun!
xo
s
Sydney W. says
Wow, a Carmen Electra reference. Love it, love the frame. Happy Valentine’s Day!
Diane @ Vintage Zest says
Ha! I thought the exact same thing! Totally fun reference in whatever context, but especially this one. :)
Wendy @ New Moms Talk says
Thank You!
I love simple things that make such a difference!
Surprising the hub with one of those in a bit. I hope he likes it as much as I did this post!
Gabriella @ Our Life In Action says
So cute! It definately makes you do a double take. I would have never thought of that….which is a little sad. But it’s Valentine’s Day so now I’m happy again. LOL!! Sorry, I’m kinda on a chocolate heart high right now…I’ll be right as rain in a couple of hours. ;-)
Happy Valentine’s Day!
YoungHouseLove says
Haha, Happy Valentine’s Day Gabriella!
xo
s
Kelsi R says
You can also sandwich the art between two panes of glass at that size. The image still appears to be floating, but it’s protected from the back and no adhesive needs to seen from the front!
-Kelsi Roth
http://www.americanframe.com
YoungHouseLove says
Oh yes, that’s a great tip for anyone who wants to dash out for more materials like an extra pane of glass :)
xo
s
Jess @ Little House. Big Heart. says
What a great project! I really like the technique (even if it is one of those “Duh! Why didn’t I think of that?!” projects). :)
Amber @ Healthy, Wealthy & DIYs says
I love everything about it! hahaha. So cute, I will definitely have to try this out.
YoungHouseLove says
Haha!
xo
s
Ashley@AttemptsAtDomestication says
That’s an awesome tutorial! I’ve always really liked the look of a floating frame, so this is great! Definitely going to have to try it!
YoungHouseLove says
Aw, good luck Ashley!
xo
s
Michelle says
I love that Frame color!! Did you buy it that color or paint it? If you painted can you tell me what it is? I want to do 2 nightstands in that beautiful blue! Happy Valentine’s Day!
YoungHouseLove says
We painted it with Navy spray paint from Home Depot. Wish I still had the can (it’s long gone) but I believe the color was just listed as “navy” and it was by Rustoleum.
xo
s
Liz Marie says
I love this DIY! So simple & makes a huge impact in a gallery wall. Thanks for sharing!! I also love the idea of coloring a printable.. genius! xx Liz Marie
YoungHouseLove says
Aw thanks Liz!
xo
s
Martha says
Very cute! I used e6000 glue one time to re-enforce an old frame. Im very clumsy and ill end up with sticky fingers if I used super glue! lol
Happy Valentine’s Day guys!
YoungHouseLove says
Happy Valentine’s Day right back Martha! And as for super glue, I totally get sticky fingers too, so the key was to just drag it along the lip to deposit the glue and drop the glass panel right onto the lip (gently of course) so my fingers didn’t have to touch the glue :)
xo
s
Chelsea @ Riding Escalators says
Oh the many uses of Gorilla Glue! I just used it yesterday to glue my finger to my work shoe (which was not the initial purpose – I was trying to re-adhere the heel.) Whatever the purpose – it’s good stuff! Love this idea too!
Happy Valentine’s Day!
YoungHouseLove says
Hahahahahah!
xo
s
Laughing Abi says
I took an inexpensive IKEA frame that was meant to hold 3 photos and used it to hold one big picture instead. The twist is I put the three-opening mat back in over the top of the big photo. Wow, that sounds really confusing, doesn’t it? There’s a pic here. It’s the CHICAGO photo on the right side of the grouping. http://www.laughingabi.com/diy-2/sharing-imperfections-my-photo-gallery-wall/ Happy Valentine’s Day!
YoungHouseLove says
So cute!
xo
s
Cathy says
If truth be told, I’m actually focused on the toy alligator on Clara’s changing table-obviously never noticed it before. Any chance you remember from whence it came? It would make a perfect baby gift for a friend. Thanks!
YoungHouseLove says
Oh yes, it’s by Plan Toys and we got it through amazon.com. She has loved that thing for years!
xo
s
Sandi Maxwell says
This is super cute and looks quick and easy. Thank You so much, I have been looking for ideas for grandaughters room. This is perfect! Thanks for sharing!
YoungHouseLove says
Aw, you’re welcome Sandi! Good luck with it!
xo
s
Megan says
I recently floated pictures in an antique window and bought clear corner adhesives to attach them to the pane. They’re hardly noticeable and for a couple of dollars I got a giant roll of adhesive corners that will last through any future projects I want to complete.
YoungHouseLove says
Love that!
xo
s
Jaimee says
Megan – I was just getting ready to post the EXACT. SAME. THING! I have an antique 3 pane window and put a picture of each of my 3 kids floating in the panes and used the adhesive dots! I always get so many compliments on it – great minds think alike ;0
Koliti says
I transformed a shallow light-weight wooden box. First I decoupaged scrapbook paper to the back. The box edges were thick enough to allow small screws – wrap wire around one screw, add a colorful bead alternating with a clothespin (leave plenty of space between beads and clothespins), wrap wire around other screw, shorten wire, tighten screws and VOILA! Ever-changing shadow-box display.
I’ve also seen frames transformed with wire and clothespins.
Sherry, love the floating frame look. In your thrift/yard sale adventures if you happen across “glaser points” pick them up – they are little pointy metal things that you push into the side of a frame with a screw driver to secure the glass. Then you don’t even have to wait for the glue to dry!
Also if someone should have two frames with the same size glass – they could take the two pieces of glass to make the floating frame look in one frame and do the wire & clothespin look in the other frame.
YoungHouseLove says
Love the tips!
xo
s
Elise says
This may have been mentioned already, but you could also use Washi tape to attach the picture to the glass. Of course the back of the Washi tape would be visible, but that might look cool depending on what tape you use :) Thanks for the hack – I need four floating frames for artwork in our pantry and this may be just the thing I need to do!
YoungHouseLove says
Love that tip!
xo
s
Annie says
if ONLY i had seen this a week ago before i ordered a custom mat for a strange-sized print of a painting that i bought. next time for sure!
YoungHouseLove says
Aw, next time for sure Annie!
xo
s
Anne @ Planting Sequoias says
Very cute! I have that printable sitting out on my desk all ready to color…I’m a little late to the whole Valentine’s Day thing, but I guess it applies throughout the year, right? At least most of the time. ;)
YoungHouseLove says
Haha, totally!
xo
s
Heather says
I found four old windows in our attic. I am dying to pull them down, clean them up a big, maybe paint over the yellow with white, distress, and hang. I can’t wait to get them up in our bedroom. It’s been in the back of my mind for almost a year. I NEED to do it sometime. :)
YoungHouseLove says
That sounds so charming!
xo
s
Mrs.M in MI says
We’ve made a few floating frames in our house by going to Lowe’s and buying a extra pane of glass, which they cut to size for free. The last one was 16″ x 20″ and I think it cost less than $5.
Also, Carmen Electra went to my high school. Back then her name was Tara Patrick.
YoungHouseLove says
NO WAY!!!
xo
s
Rachel says
I was just wondering if it was possible to DIY this yesterday! Thanks for figuring it out for me :)
YoungHouseLove says
Aw, you’re welcome Rachel! Glad to help!
xo
s
Annie says
There was an old Mad magazine cover from the 70’s that I wanted to put in a floating frame without having to go buy one of course, so I used some translucent contact paper (wait, is all contact paper translucent? or is some of it clear?)on the back of the glass, sandwiching the print between the two. It gave it the floating effect I wanted, but also added an element of vintage to compliment the print. Holla for (less than) a dolla!
YoungHouseLove says
Smart!!
xo
s
Leah says
Awesome tip! My parents love floating frames, so we’ve bought a million from Michael’s (okay, more like 10). It is a really fun look.
Jen says
Great tutorial! Also, totally unrelated from your post today, did you see that your book is mentioned on Design Sponge today? http://www.designsponge.com/2013/02/10-great-books-about-love.html
YoungHouseLove says
No way! Thanks for the heads up!
xo
s
Megan @ Rappsody in Rooms says
I love floating frames yet have always been mad they are semi-expensive. This is a great idea to make your own!
YoungHouseLove says
Aw thanks Megan!
xo
s
Amanda Morgan says
Great tip! I have used floating certificate frames (you can find them inexpensivly at Wal-Mart, I added a link to them below) to hang irregulary shaped pictures and art. They typically come with both sides of the glass, so it can make the process a little easier.
http://www.walmart.com/ip/Canopy-Float-Picture-Frame-Black-Set-of-2/10404222?findingMethod=rr
YoungHouseLove says
Love that!
xo
s
Kim says
Nice tutorial, but I was really hoping to see you post one about the paint sample art piece. It took me a few times of looking at it to even realize that it was make from paint samples. I would love to replicated it for our baby’s room. Please teach me how you did it.
YoungHouseLove says
That’s actually a project in our book! So there’s a full tutorial in there for ya! Hope it helps :)
xo
s
Gesci says
I was going to suggest the second pane of glass (for art that’s less replaceable) as well. Lowe’s has it, but also most towns have glass shops that will have UV-resistant glass as well. Then you can go frameless or build your own frame!
(I’ve been pondering ideas for some antique maps we have, so this has been on my mind quite a bit lately!!)
Love the DIY, though, and it really is a perfect low-cost option for easily replaceable art!
Elisa says
I love that this is a “reenactment” hilariously adorable!
Judy says
If you didn’t want to glue, sometimes the frame has a groove that you can wedge window screening spline in to hold the glass in place. Used to do this for my pressed flower floaters, but it doesn’t work with all frames.
YoungHouseLove says
That’s an awesome tipe!
xo
s
Daria Crisan says
It’s not my idea, I’ve seen it somewhere but I forgot where so… To make a “floating” frame, simply paint the backing the same colour as your wall.
YoungHouseLove says
That’s smart!
xo
s
Seriously Sassy Mama says
Gorilla glue and scotch tape. I have so many frames I do not use. Great idea.
Melissa @ Loving Here says
This looks awesome! I tried (fairly unsuccessfully since the pages kept falling out of the frame!) to do this with some vintage magazine pages for Christmas. Eventually, it worked, but I had a lot of trouble getting the tape to stick to the glass…until I stopped trying to worry about letting it show (only overlapping a fraction of a fraction of an inch) and just overlapped it about a quarter of an inch in the end. It was worth it, but I’m definitely glad to know even the masters say it’s okay to just let the tape “show!”
It’s mentioned in this post http://lovinghere.com/how-we-decked-our-halls/
YoungHouseLove says
Love that!
xo
s
Jenifer says
OMG! I am totally in love with this project! I can’t wait to get home from work and dig through the ton of frames I have and try it out. YIPEE!
Jenna says
I love buying a bunch of thrift store frames and painting them all the same color. I used mine for a wall collage. You can see it here: http://pinterest.com/pin/251990541619707478/
Thanks for the great tips! Always love what you two come up with. Happy Valentine’s day!
Clementinebean.wordpress.com
YoungHouseLove says
Love that!
xo,
s
Emma says
I just want to say that, hands down, my favorite part of this entire post is “instead of being sandwiched like the art in most frames, it’s backless like a Carmen Electra dress.” I’m not sure why, but that analogy had me cracking up at my desk, which led to awkward questions from my cube-made…haha!
YoungHouseLove says
Haha!
xo,
s
Katie L. says
I love how Clara’s new room is coming together! If the artwork is irreplaceable or you don’t want to use tape, you could always buy an extra pane of glass. I have gotten them for a couple dollars at Michaels and Hobby Lobby. Home improvement stores also sell glass panes fairly cheap, and they will usually cut them to size for free.
YoungHouseLove says
Great tip!
xo,
s
Judy Clark says
I tried to download the print and had difficulties. Has anyone else had that issue.
Thank You.
Judy
YoungHouseLove says
Anyone else had issues?
xo,
s
Elvi says
I love the floating frame idea and the drawing, it’s so happy and cheerful!! Suits the room :)
I’ve recently did the same thing with the floating frames for my postcard collection. I bought cheap frames from Ikea and made one frame out of two by sandwiching the cards between the pieces of plastic (I apparently bought the cheapest ones) from the frame. I stuck them to the wall with poster tack (landlord issues) and I saved the leftover frames for another project to be.
Kathleen @Home Wasn't Built In A Day says
What a neat idea! I always thought those floating frames looked officey, but with a cute kid printable it gives them a whole new look!
Jessi says
Would double-sided tape work
YoungHouseLove says
I think you’d see that through the glass (the print goes face down on the glass). Hope it helps!
xo,
s
Stephanie says
I love the whale trays! Where did you find them?
Stephanie says
Nevermind! I followed the links and found out!
Rhys says
Great article Sherry. My wife and I have so many bare walls in our home. We take frames and walk them all over the house, me holding them up, and Sarah saying “it looks good there too!” We’re still early in the home design phase but check your blog out frequently for ideas. We just started a blog too for our DIY and life adventures!
YoungHouseLove says
Aw, it sounds like fun! Happy blogging and picture hanging!
xo,
s
Jeanna Sanchez says
Love the frame gonna give this one a try. You guys are hilarious, every post I find my self laughing out loud! Love the post about the The voice and Adam Levine, Happy Valentines Day!
Jess says
Love how Clara’s room is turning out! Random question – do you remember where you got the ipod dock that’s next to her changing pad in the pic of Clara’s nursery art wall?
YoungHouseLove says
That was from amazon.com a few years ago. Hope it helps!
xo,
s