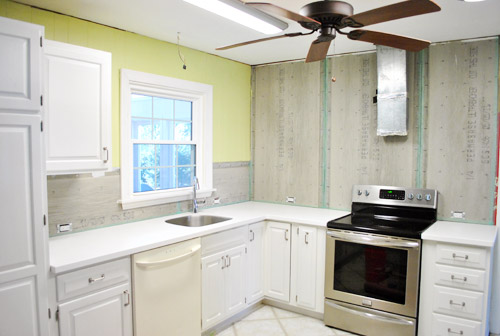
Monday’s backsplash post kinda dove straight into the middle of the project, so we thought while we were back to share our progress we should rewind a smidge to explain a bit more about the process for anyone else out there who wants to tackle something similar. First we had to prep the room. So everything came off the counters.
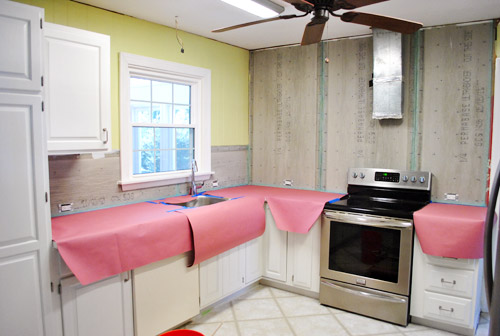
Then down went the rosin paper (from Home Depot). It was recommended by our counter installation guy when we mentioned we were doing a backsplash. It’s basically like brown construction paper, but with an added moisture barrier that keeps any thinset drips from seeping through. We covered each of the counters with cardboard (for extra protection against sharp trowel corners) then taped rosin paper over it, with the painter’s tape going right up to the wall.
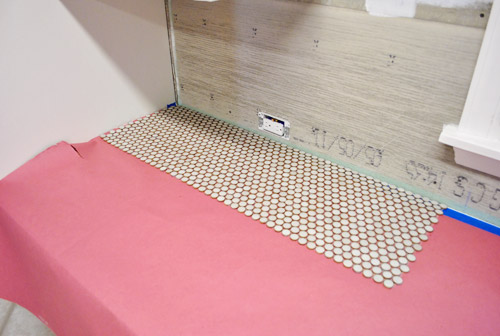
Finally we got to start planning our tile placement. We decided to start in the corner under the microwave because it felt like a nice fairly inconspicuous spot to learn the ropes. And it was basically three sheets wide in that area, so we took it as sign that it’d be an easy way to get our feet wet.
Not knowing how long it would take to make cuts, we didn’t want our whole batch of thinset to dry out while we fumbled with the nippers for an hour (which happened, as you know from Monday’s post). I’m glad we took it slow to start, but we later learned it’s MUCH faster to put up as many full sheets as you can and then just backfill with cut pieces along your edge (even if you have to use some freshly mixed thinset to place those).
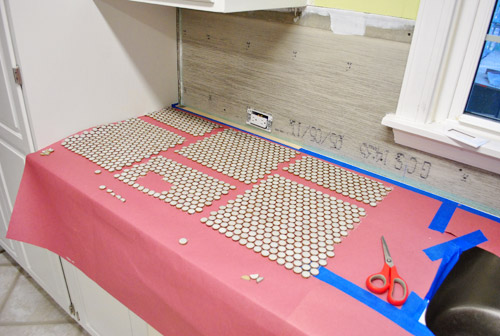
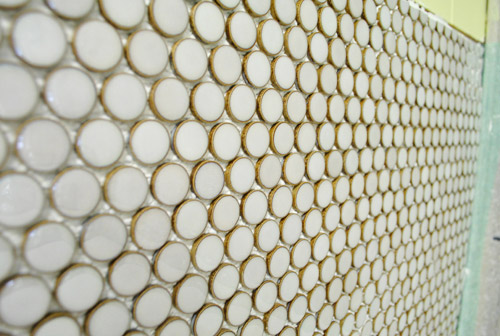
The staggered pattern is to help disguise the seams by alternating where they lie. So instead of your eye catching one long horizontal seam, things are mixed up a little so there’s hopefully a more seamless effect once it all gets grouted.
Anyways, now that we were FINALLY ready to put some tile on the wall, I had to mix up the thinset (we got this kind from The Tile Shop). Not gonn lie. This step made us nervous because we ruined a whole bag of grout during our first house’s bathroom project by misreading the label and pouring in too much water. Oops. So we read the bag about ten times and then found this Ask The Builder video on YouTube. And we’re happy to report that we had no trouble getting our thinset to the right consistency.
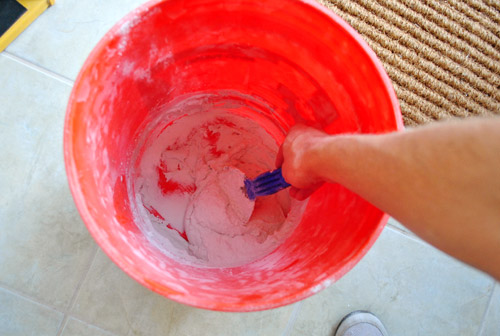
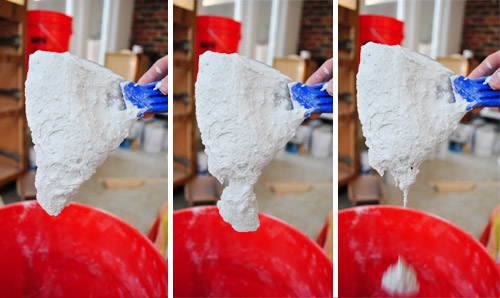
As we’ve heard, the thickness is supposed to be somewhere in the neighborhood of toothpaste or pancake batter. It should hold together, but still be loose enough to spread – and fall slowly off your putty knife like so:
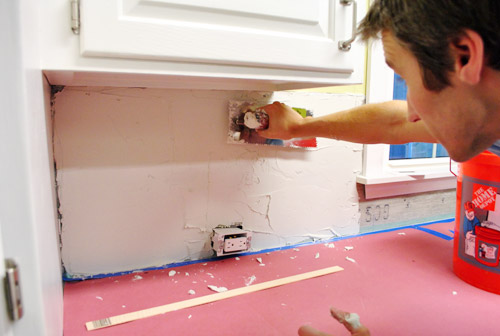
With the thinset mixed, we spread it on the wall using the flat side of the 3/16″ notched trowel (from The Tile Shop). I also used the putty knife sometimes since it fit better in the tight space.
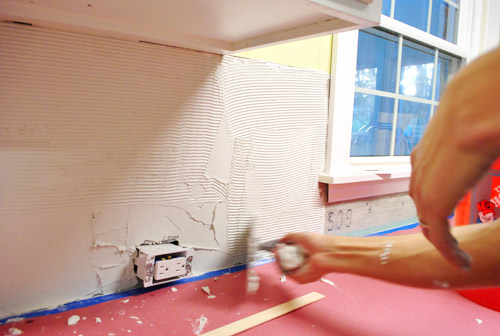
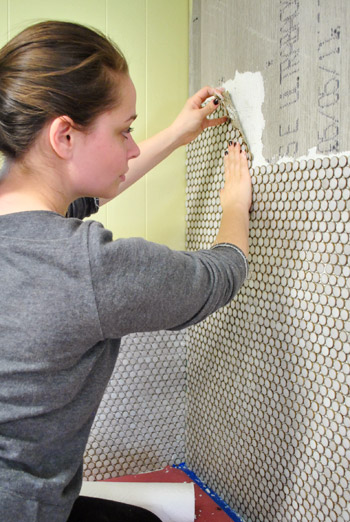
Once it was on and fairly even, we held the notched edge of the trowel at a 45-degree-ish angle and scraped along the thinset, creating little grooves to grab the tiles (we used a small 3/16″ trowel notch since we’ve got small tiles).
And at last, the first tile sheet was pressed into the wall. It was scary and awesome all at the same time.
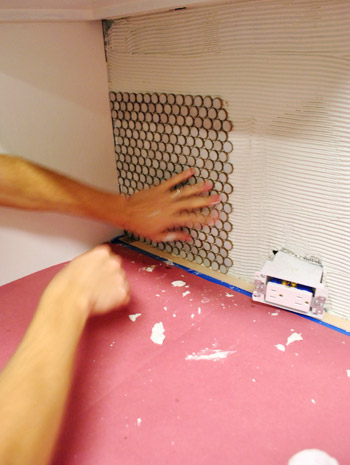
Oh, and we used a veryveryvery thin piece of scrap wood as a spacer against the bottom so that we’d be sure to leave some room between the tile and the counter for caulk (you don’t want tile resting right on your counter, so a tiny smidge of space akin to the spacing between each tile is ideal). So our wood spacer was about as thick as a paint stick if that helps you picture it. Maybe even a little thinner.
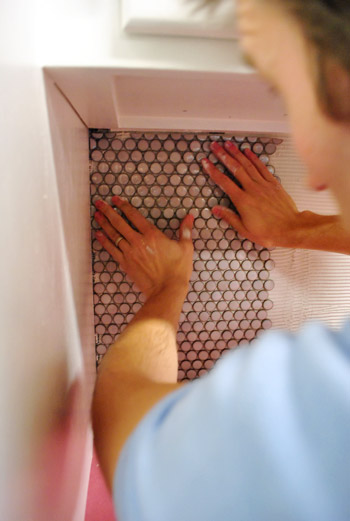
These pieces were fairly easy to lay because there was a lot of stuff (counter & cabinets) to help keep things straight. So once we actually started tiling, it didn’t take us too long to get to the point that you saw on Monday (maybe an hour and a half?). We had just spent so much time prepping that we were too spent to continue on into the night…
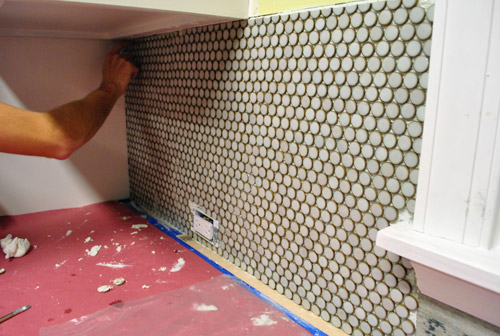
… but the next day we had our mojo back and made our way along the sink wall with renewed energy. We even removed the piece of molding under the window so we wouldn’t have to do any tile cuts around it (we’d just place the molding on top of the finished tile for a seamless look).
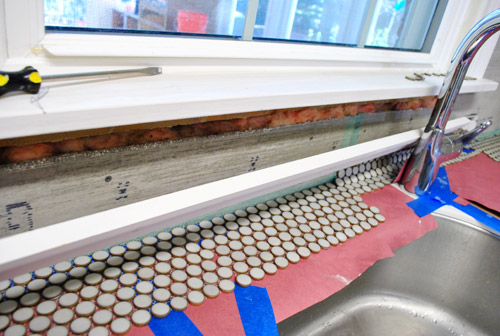
This time we were a bit less type A and didn’t plan out all of our cuts ahead of time… we just removed the full tiles that would interfere with the disposal switch before mixing up thinset and back-filled the rest as we went (popping off half and full tiles and sticking them wherever we needed to fill those in).
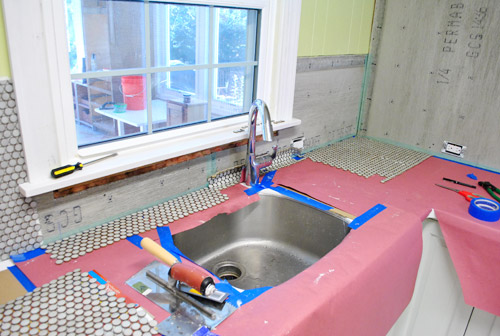
So this whole part went pretty quickly, especially in comparison to the day before.
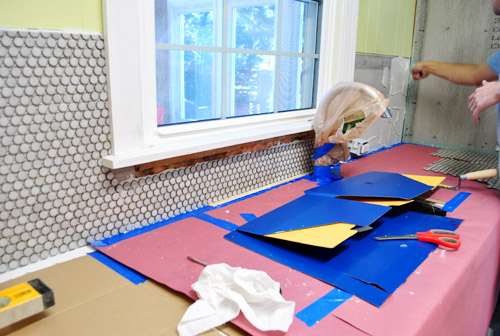
But Clara didn’t give us much of a nap, so we had to call it quits and clean up before we could move our tiling party onto the big back wall. Sigh. At least we got one side done! It’s the easy side, but still. Oh and see how the widow looks off center? Once we add the open shelving to the stove wall there will be 14″ of space on either side of the window so it’ll look nice and balanced again. Note: we’ll share how we’ll be “capping” those 14 inches of tile on either side of the window that won’t be under a cabinet or shelf as soon as we can snap pics to explain things better.
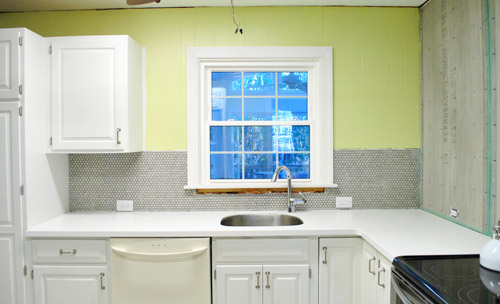
We’re hoping the back wall goes relatively quickly. On the one hand, it’s a huge space to tile. On the other, we’re sort of getting the hang of it now AND the wall is pretty much all full tiles (aka: fewer cuts).
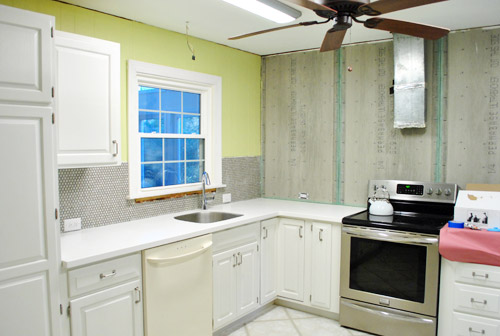
Until then, we’re just enjoying the work we’ve already done. We’re pretty much obsessed with it actually. The weirdest thing is that our favorite thing to do is look at it in the dark. I can’t explain it, but it sort of gleams at night. Like it’s wet. We love that fancy shine. It definitely elevates things like our white Corian counter and our painted cabinets. Can’t wait to grout it and see the finished result. And replace that dishwasher with our stainless guy (just waiting to get the floor down so it runs under it).
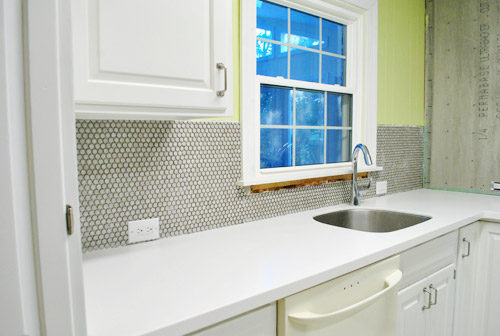
What penny tile lacks in quick application points, it makes up for in looks-good ones. We read so many things online about folks having issues lining them up and hiding seams but ours seem to be pretty easy to slide around in the thinset until we like how it’s all lining up.
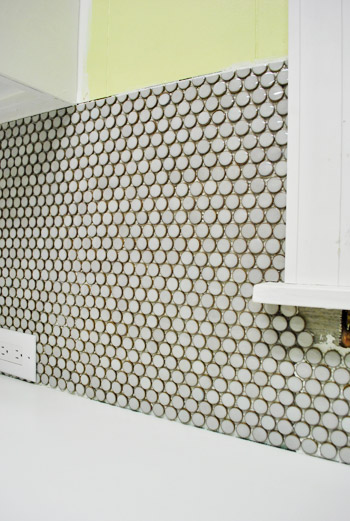
So we just stand there and keep noodling until we get nice even rows. So as tedious as it can be, the result is 100% worth the finished result in our humble opinion.
In writing this post I also realize we mentioned that we’d make another video and completely spaced on that. Next post for sure! We wanted to show you how we spread and scrape the thinset and set (and scooch around) the tile. Good thing we still have an entire wall to do. Haha.
But wait, you don’t think we stopped there, do ya? Late last night we got a chance to start some of the back wall. Slowly but surely is the name of the game here (we wish we could snap our fingers and be done, but… we tried and there was still a whole wall to tile). Our goal is to be completely finished by the end of this weekend. We’ll just inch along through the weekend and hopefully be back with some wide shots of a fully-tiled-monty post on Monday! Look how serious Sherry is about it. Hah.
Anyone else doing tile stuff? We went into this project not knowing if it would take us three weeks or three days, so I’d say that we’re pretty excited if we get to share a completed tile job around a week after starting it. Not too bad for just stealing evenings and the occasional nap time to chip away at it. So if you’re wondering if you can do it, penny tile can be slow going, but it’s definitely not the hardest thing we’ve tackled. It’s probably not even in the top ten actually. So… you can do it.

Diana @ Boy + Girl says
This is looking great! We are going to be doing our backsplash ourselves when we re-do our kitchen so I’m glad you’re sharing!
-Diana
kristen says
penny can!
Angela says
What did you guys do about outlets? We’re doing a backsplash soon and have seen so many suggestions as to how to deal with the depth difference of the tiles
YoungHouseLove says
We just tiled right up to the “outlet hole” (haha, that’s obviously a technical term) and once the face plates are put on they rest on the tile so they’re nice and fitted looking! We’ll try to snap some pics of that in our full monty reveal for Monday. Can’t wait!
xo,
s
Lizzy says
i don’t know the proper name for them but most hardware stores sell extender thingys for outlets – they basically clip on and bump the outlet out a bit so that it isn’t sunken into the wall. also, we’ve even just used longer screws when screwing the actual outlet thingy into place. (i know, so many technical terms!) once the face plate is in, everything is flush!
YoungHouseLove says
Oh yeah- really smart!
xo,
s
betty in munich says
Hey Sherry, look at you and your gorgeous manicure! Love that nail polish color and love that you can tile and have pretty hands too!
YoungHouseLove says
Haha, don’t look too close it’s all chipped!
xo,
s
jeannette says
sue the napkin would be so proud. the pale grey/white/grellow/chocolate cork is worderfully exciting. the penny tile is visually/texturally very interesting. your fine arts eddication is shining thru, miss s. thanks for a good look at corian, too. granite is so 2008.
YoungHouseLove says
Aw thanks Jeannette!
xo,
s
jeannette says
i have another question. a lot of couples come to blows when working together on a house. y’all aren’t. (or maybe you are and you’re into it.) srsly, what are your top 10 hints for avoiding divorce during reno?
YoungHouseLove says
Haha- we definitely can let the stress or frustration of something not going as planned get to us- and we definitely fight! We’re human! But we try to remember that we’re on the same team. We both want the same thing. So we’re frustrated at the situation, not each other. That helps to remember!
xo,
s
Emily says
It looks great, guys! The penny tile to the ceiling is going to look fabulous, especially over the sink! I can’t wait to see more progress :-)
Mackenzie says
I am so excited for you guys! The title looks amazing! Keep up the fabulous work and momentum :)
Kim says
I totally have “Furry Wall” from Get Him to the Greek in my head now–except now it’s “Penny Wall”!
It’s looking so good! :)
karla says
I wish I could like this comment! I laughed out loud! :)
Mary S says
Speaking of your hardest projects… would you ever do a “Top 10 Hardest Projects” post? I think that would be really interesting!
YoungHouseLove says
John and I were just talking about it! We’ll have to do it!
xo,
s
Priscilla says
What are you guys going to use as edging along the wall where you cut the tiles? When I did a mosaic tile shower in 2005, they didn’t sell Schluter strips in that depth (1/8 inch or something like that), but they do now. I ended up not using anything and it doesn’t look as finished as I would have liked. I have seen people put molding up along the edge (in a restaurant) but didn’t think that was a good solution for a wet area. http://www.schluter.com/6846.aspx
YoungHouseLove says
We’ll share those edging details in Monday’s post! Just want to get it done and snap pics since they explain so much more than words!
xo,
s
Alexis Peck says
i LOVE it.. its comming along so nice. while my husband was deployed i re-did the bath room. tiled the floors, put subway white tiles on all the walls with blue glass tile… it can be a pain in the butt.. but the results are soo worth the time… and doing your homework ahead of time helpls.. IE mesuring EVERYTHNG twice maybe three times and cut onece :)
YoungHouseLove says
That sounds so pretty! What a nice project for your hubby to come home to!
xo,
s
samantha says
I have to say that the whole kitchen is coming along nicely, I have to admit that I did have my doubts as to how it would look, but now that the kitchen doors are painted and the tiles are on the way up, its looking pretty good! :)In fact the whole house is coming along nicely, (I got use to the old one with its Young house love style)
Maggie says
Please post on your blog how it goes when you grout. I helped my brother use mosaic tile in his bathroom, and grouting with all those spaces between the tiles was a really time consuming process, plus we didn’t know there was grout with sealer already in it, so we ended up having to grout and seal about a million joints, and it took (it seemed) forever. So your experiences in this part of your kitchen tiling project would be just as helpful as your posts on the first part of your backsplash/wall job. Thanks.
YoungHouseLove says
We’ll definitely keep you posted! It sounds weird but we can’t wait to grout because it means we’re done with tile! Haha.
xo,
s
Heather says
Thank you so much for your blog. Not only is it extremely helpful, but also inspiring! I decided to tackle my powder room and a little over a week ago I ripped everything out of it and started with bare walls and floor. Hubby and i wanted 1″ hex tiles, so we bought them, bought all the supplies and I watched the same video you did … last Friday I mixed up my thinset and went to work. It is lovely!! I hope to have pix up soon on my blog, but I just wanted to say thanks … have fun … looks great!!!
YoungHouseLove says
Aw that’s amazing! Congrats Heather!
xo,
s
Shavonda says
The tiling is looking great guys! We are planning on tiling a backsplash in our kitchen next month actually, so Im soaking up all the great info. Ill be on the look out for that video soon as well. Looking at your kitchen makes me want to paint my cabinets white so badly. Been wanting to for a while but now im even more convinced that it would be the best decision for us. Anway great post and great tile!!
Megan says
We have a shower to tile. The hubs has done the inset soap / shampoo holder, but we still have the rest to go (he installed the tub awhile back). I told him “I bet Sherry tiles, so I can do it too!” Now onto cutting our travertine and getting our thinset on! haha
Also, I realize that could have sounded mean. It was supposed to be a compliment. Like you have inspired me to work around the house. :)
Lastly, the hubby appreciates that through your blog I have started wanting to work with him on the house. So thanks for sharing your lives with us — and how working together is fun (and brings you closer together)!
YoungHouseLove says
Aw, that’s so sweet! That really is one of the most rewarding things about blogging – all the folks who get excited to do stuff to make their own house a home. Totally makes me all warm and fuzzy. Happy tiling!
xo,
s
Robin O says
I can hardly stand it! Can’t wait to see the finished room!
Crystal says
Just curious are you loving the paint color for the walls with the kitchen tile, cabinet paint color, counter tops etc?
YoungHouseLove says
Yup, in person we love it! It adds some color to an otherwise white/neutral space and it ties into the dining room, living room, etc. It definitely can look funky on certain monitors though- but in real life we’re into it!
xo,
s
Nicole says
It looks so good! I love that tile. Is it weird that I want to lick it? I can’t wait to see the whole wall.
YoungHouseLove says
Haha, come over and lick it. I double dog dare you.
xo,
s
heather says
First – that penny tile is pretty! It fits you guys so so so so so well. I love that it just screams John and $herdog. I’ve been ogling some seaglass subway tile that we will likely never be able to afford (I have no idea how much it costs – next time I see one of the tile subcontractors I’m going to ask him haha.)
Also, has opening your kitchen changed the look of the sesame paint? I know natural light vs. non natural can change the look entirely. For example, we put a sample of Koi Pond (SW) in our kitchen and during the day it looked like uh…a hiney blowout but at night under the light it looked like a beautiful green color. We definitely didn’t use it for our kitchen but I have up in my office and I LOVE LOVE LOVE it. All green and pretty since almost zero natural light gets in there, and the light that does hits the opposite wall. I noticed on Clara’s play kitchen the sesame looks more golden/yellow than green. Just curious if it’s starting to do that in the kitchen too now that it’s all open?
YoungHouseLove says
It seems to look a bit lighter with more natural light- and maybe a bit more golden-green than grellow (it’s definitely not super yellow looking like her play kitchen is for some reason). It’s one of those colors that changes a ton, so sometimes it’s yellower and sometimes it’s greener.
xo,
s
Meaghan says
Wow! It looks amazing guys! I love the penny tile. When we did our backspalsh I picked a larger tile with glas mosiac accent totally wished we had used a smaller non-accent tile. The larger ones just look a little odd in such a small kitchen.
http://diybymrc.blogspot.com/2011/06/kitchen-update.html
A quick question for you – are you tiling behind the stove and rangehood? I can’t tell if the range hood is hanging from the ceiling or attached to the wall and am wondering how you’ll handle that.
YoungHouseLove says
Aw, your kitchen looks fabulous! What a great bang for your buck! As for our tile, we’ll be tiling the entire wall that will be seen, so the slice of wall behind where that range hood duct comes won’t be tiled (since there will be a big hood in front of it).
xo,
s
Lindsay says
Looking good!! Can’t wait to see the finished product…I’m sure you guys can’t either!
Jacqueline says
Looks great guys!!! Can’t wait to see it finished.
We (well, my hubby) just tiled our kitchen too – white subway tile.
And our laundry too.
We are at the tail-end of a complete (year-long) renovation of our entire house. Which slowed down for the past few months with the arrival of our first baby last August.
YoungHouseLove says
Wahoo! Congrats on the bun and the reno!
xo,
s
Saleha says
Are you planning any windowtreatments? Or will you leave it naked? Looks great already!!
YoungHouseLove says
We’re not sure since it looks into our sunroom. Might leave it naked for a while and see where we end up…
xo,
s
Amy says
Great post! So this isn’t in your top ten hardest projects? Please share that top ten list! And maybe your top ten easiest, highest pay-off projects as well! :D
YoungHouseLove says
We’d love to do that! Soon hopefully!
xo,
s
Megan says
Your penny tile is JUST BEEEAUTIFUL! Keep on keepin’ on.
You say at the end of this post that this is not the most difficult thing you’ve tackled. Not even in the top 10.
You make everything look so approachable and simple, so I’m curious…what ARE the top 10 most difficult DIY projects you’ve tackled? The ones you weren’t sure you could make it through (but you did, of course)??
YoungHouseLove says
Haha- we’ll have to write a post about that! I can’t wait to see if John agrees with me!
xo,
s
Larkin Garbee says
This looks great! I’ve been stalking the site waiting for this to go up. A little tip if you feel like doing it: Add 1 more sheet to the areas to the left and right of the window and it will draw your eye up a bit more. Otherwise, great job! Penny rounds are certainly not the easiest to do (especially under the window where there wasn’t any durock to bond to). Keep up the good work. I always enjoy reading your blog.
YoungHouseLove says
Aw thanks Larkin! We decided to stop the backsplash on the sink wall at the standard 18″ mark since we wanted the tile to line up all the way around (not be taller on either side of the sink) – then the wall o’ tile above the stove can be the star!
xo,
s
Cassandra says
We just did some tiling in our new half bathroom. It definitely wasn’t as extensive of a project but it still took us quite a bit of time! We’d love it if you checked it out!
http://ckandnate.blogspot.com/2012/01/half-bath-finished.html
YoungHouseLove says
Cute! Looking good in there!
xo,
s
Maggie says
sherry, you look like angelina jolie while hanging that tile…..looking good lady!
YoungHouseLove says
No way- you’re the second person to say that! I’m totally flattered!
xo,
s
Monique says
John, I laughed when I read the last line of your post, “…you can do it.” I am all thumbs at home improvement stuff. But I do admire the accomplishments you both have made in both homes. Personally, I think I’d better stick to sewing. This I can do. :-)
YoungHouseLove says
Haha- I’m all thumbs at sewing!
xo,
s
Monique says
If I lived closer, I’d suggest bartering…sewing projects for home improvement projects. :-)
YoungHouseLove says
Haha, I need someone local to help me sew stat!
xo,
s
Kirsty says
It’s gonna look so FABULOUS!! Well done guys, the kitchen is looking so beautiful already, so excited to see it come together! xo Kirsty
Anna says
Hi Sherry! Love the tile! Quick question – are your outlets spun sideways and pushed to the bottom so as to not break up the tile? I’ve heard of people spinning them and tucking them up under their light rail… Just wondering if there is an advantage to either way… I’m tiling soon! :) Cant wait to see the big wall!
YoungHouseLove says
Our outlets were just like that when we got the house so we kept them, but it’s very nice to have them low and horizontal so they don’t stick up very much and break things up!
xo,
s
Justin says
No tile projects, but I did build a desk and tried my hand at “antique glazing.” I think it came out quite nice.
http://justinandkatie.wordpress.com/2012/01/11/antique-ish-desk-reveal/
When people ask me how I have time for everything, I tell them, “you should see how much John and Sherry do.” Of course I get looked at like I have three heads.
I just assume everyone reads this blog.
YoungHouseLove says
Haha- that’s hilarious! And it looks amazing. Completely and utterly amazing!
xo,
s
mp says
It looks SO GOOD!!!
heyruthie says
OK. so just double checking: you just eyeballed the tile and “leveled” it with the cabinets/counter. You didn’t use an actual level, right?
YoungHouseLove says
We didn’t but it was because we had so many lines to work off of (the top of the counter is level, the cabinet above that are is level, the windowsill is level, etc). For the big wall we actually plan to break it out to check ourselves as we go!
xo,
s
Meredith @ La Buena Vida says
You guys have probably already answered this, so I apologize in advance if you have, but do you guys think this will be your “forever” home? Do you guys take things like a potential re-sale into account when you do bigger projects like tile, or just do whatever you guys love, regardless of whether it’ll sell well or not?
Some day, I want to do a turquoise backsplash in the kitchen. But, it just doesn’t seem like a good idea to do now because this probably isn’t the house we’ll be in forever…and turquoise tile is a lot more difficult to change than turquoise paint, you know?
YoungHouseLove says
I have learned never to declare that anything will be my forever house to the internet at large ever again (haha, I did that with our last house and John rolled his eyes… and sure enough he was right). The thing is that we love this house and I’d love to be here forever (or at least a decade or two) but John knows me better than I know myself and his best summary of things is that “we love house hunting and house fixing-up too much to stop here.” So we plan to be here a while (at least 10 years or so) but who knows what could happen! I know what you mean about doing what you want to a house vs. worrying about resale though! We generally try not to do anything that would completely sabotage resale (ex: turn a bedroom into a moon bounce room) but when it comes to adding personal touches in the form of paint and easily-change-able things we’re all for it! As for the turquoise backsplash it’s so hard because you’re right about it being difficult to change out but I can see how you’d want to make your house feel like yours. Maybe try a bunch of turquoise accents like paint or a window treatment or art or a turquoise tea kettle and fruit bowl and see if that tides you over?
xo,
s
heather says
I think this is such a massive improvement, and I’m in awe that you can do this yourselves. But…. I just want to voice that my eyes are being drawn to your cabinet hardware in a way that makes me think it’s too busy. I know y’all are more ocd about your stuff than anyone else could be. Don’t resist the impulse to replace the cabinet pulls with knobs in order to reduce the clutter of it all. Solid nickel finish, not the eyeball thing.
YoungHouseLove says
We love our new hardware but it’s definitely one of those personal preference things for sure! Once we grout the tile you’ll see if soften a bit and look less busy (without grout it’s a little more contrasty) so maybe that’ll help ya!
xo,
s
Kate says
So I’m curious… what is on your top ten list of most difficult tasks you’ve ever tackled?
YoungHouseLove says
Haha, you’re not the first to ask- apparently we should do a post about that soon! Should be fun to see if John agrees with me!
xo,
s
Danielle says
I love it already! Looks gorgeous guys! Can’t wait to see the finished project – and I’m sure, neither can you!
Nora says
Great job!!
karla says
It looks beautiful! Your kitchen has come such a long way! You are doing a great job!!
May I ask though, Why did you have to stop when Clara woke up from nap? Have you ever considered just having her going off and playing on her own? It may be good to have her explore and play on her own and gain some independance! Just a thought! :) Although, I must say it seems like you two are very loving, caring, parents!
YoungHouseLove says
It’s just too messy to do with a toddler running around! The whole floor gets coated with thinset dust and she’s just 20 months old so we don’t leave her alone in her room with the door shut or anything quite yet!
xo,
s
Angela @ Happy Fit Mama says
It’s looking awesome! The hubby and I are inspired to start planning our DIY of our kitchen.
Joy Franks says
What gorgeous hands John has! Those long, slender fingers!
YoungHouseLove says
Haha- I know! They’re his mom’s. I’m jealous.
xo,
s
Sarah Jane says
I’m getting ready to tile! :) from the tile shop too, pumped to use your 10% off code, thank you thank you thank you. (http://m.tileshop.com/aHR0cDovL3d3dy50aWxlc2hvcC5jb20vbmF0dXJhbHN0b25lL29ueXgvSG9uZXktT255eC1NZWRsZXktTW9zYWljcy8xOTkyLmFzcHg%3D)
i’m a month or so behind you guys in the kitchen renovation process…and moving much slower. but it’ll get done one of these days! Last weekend we built the cabinet/panel surround for the fridge, thanks for that post! It was good to have your pictures to reference and confirm we were on the right track.
I’m sure when the backsplash is ready to go up i’ll be revisiting these posts!
YoungHouseLove says
Ooh that’s some pretty tile ya got there! And congrats on your new fridge cabinet!
xo,
s
Linda @ It All Started with Paint says
I’m following along on your journey here … exciting to be near the finish line!
You two play so nice with your diy. My husband spent an hour-and-a-half last weekend putting up a new extension rod for the shower curtain. Yep. You read that right. ONE-AND-A-HALF HOURS. The trip to the hardware store. Half an hour trying to get the plastic wrap off. Then he broke it when putting it up (he blamed it on faulty equipment). Back to the store. Another half hour getting plastic wrap off. And success. He’s cursing and I’m stifling a laugh. I insist that he guest posts on my blog about the experience …
… yeah, that’s why I wield the nail gun … and he does the laundry.
Linda
[email protected]
YoungHouseLove says
Haha, we definitely have projects like that – they just refuse to go well! Haha.
xo,
s
katelyn says
ooooo, i’m intrigued.. i’d totally read a blog post about your top ten hardest projects you’ve tackled. well, actually i’ll read anything you write. annnnyyythhaanng. ;)
YoungHouseLove says
Haha thanks Katelyn! We’ll have to write out our top ten list (and see if J and I agree!).
xo,
s
Kelly @ Eclectically Vintage says
Looking good!! I’ve never tiled before so I am very impressed!
Sounds like something you should link up to our Imagine the Impossibilities Challenge on Jan 31!
http://www.eclecticallyvintage.com/4/post/2012/01/imagine-the-impossibilities-challenge.html
My challenge is organizing and purging 16 years worth of “stuff” in my basement – scary!
Hope to see you there.
Kelly
YoungHouseLove says
Love that challenge! Just left a comment about it actually – so much fun! Good luck with your purge!
xo,
s
Alexis says
I feel like i’m waiting with bated breath for your kitchen reveals. I had no idea that you’d need to stagger the penny tiles to hide seams. I guess I just thought it was a little zig-zag-gy on it’s own and would hide seams naturally (if that makes sense). I’ve been dying to put up some white subway tile in our kitchen, but y’all are giving me penny tile ideas!
BTW Sherry I showed my husband the reply you wrote to my comment yesterday excitedly saying “Sherry typed my name!” and he promptly called me a nerd. :) You and John are neck and neck with Beyonce in terms of famous people I would love to meet.
YoungHouseLove says
Haha- you’re making me blush!
xo,
s
Amanda says
I adore that tile! it looks amazing, and it’s going to do so much for the kitchen! Can’t wait to see it all finished!