We’re soaking up a white Christmas over here! Nope, we didn’t wake up to any snow on the lawn, but there was a dusting of white elsewhere on the premises…
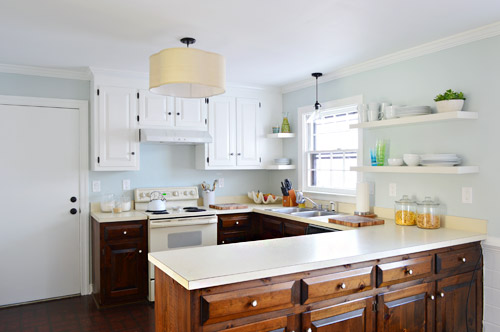
We used last week to sand, prime, and paint all of our upper kitchen cabinets and – shocker – we ended up going with white. So yeah, it’s a little bit different from our original plan to paint them a light gray-tan on top… and a little more like what we did in our last kitchen – but just for those uppers. We have a completely different plan in store for the lowers – and it actually involves wood stain and no paint at all – so maybe as we move into 2014 we’re getting progressively less predictable? Or more woodsy? We also have some ideas for those countertops which we’ve never done before (either a refinishing/paint technique or a concrete coating one – both of which are budget friendly, so they should be great for Phase 1).
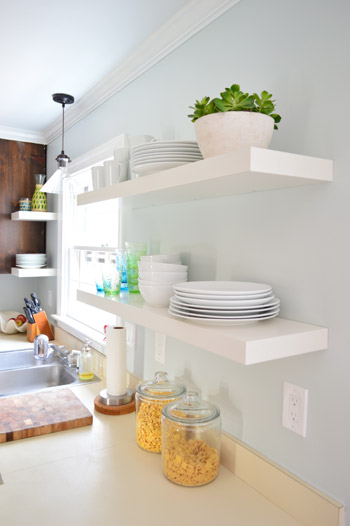
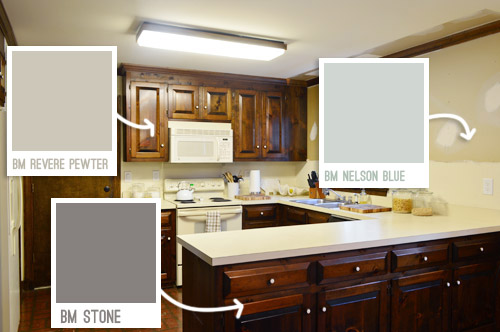
The tides shifted from Revere Pewter to Simply White (which is one of the top white paint colors out there)for those upper cabinets around the time that we installed the range hood and put up the floating shelves. While we liked the idea of the white shelves & hood contrasting with putty colored upper cabinets, we started to worry that also having the darker lower cabinets might just be too much going on (white and putty on top with a third darker color for cabinetry on the bottom).
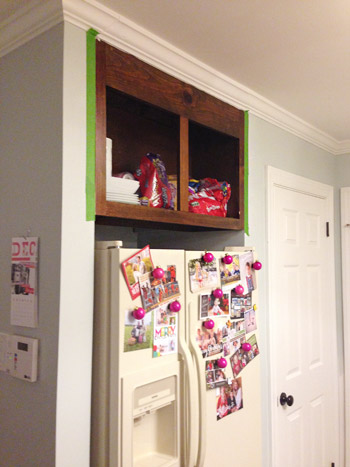
But the main thing we couldn’t wrap our heads around was a way to make crown situations like this one make sense with colored upper cabinetry. Usually crown matches the color of the cabinet, but wouldn’t it be weird to paint just a section of this crown to match the cabinets since there’s no indent where the cabinets end (it’s just one long piece along that entire area)? We already didn’t like the look of the mismatched cabinet and crown that we had going on, so continuing that theme with a new color on those uppers just didn’t seem like the right way for us to go.
So we went with white. As much as we wanted to do something new, we never like to do something different just for the sake of being different. And at least this way we can still stick with our plan to do the lower cabinets in a deep tone for that “tuxedo” look that we’ve always loved but never had the guts to try.
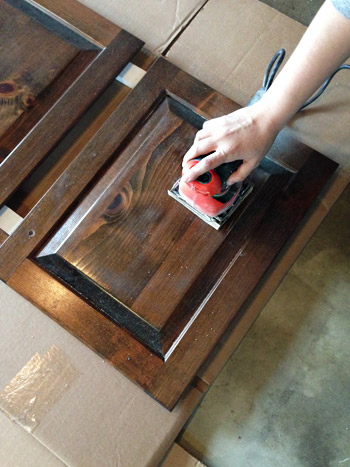
Now that we got through the why of what we did, let’s get a little into the how. Clocking in at nearly 2,000 words, this post is hardly short, but is gonna be quick and dirty compared to the picture-and-video-tastic tutorial that we did last time around since we used the same technique. So we’ll just share some broad details here, and you can reference that post for the nitty gritty. First up we removed the cabinet doors and gave every surface a light sanding, just to get rid of any glossiness and rough things up for better paint adhesion. Sherry used a hand sander on the doors in the garage with 150 grit paper, and I used an 150 grit sanding block on the frames inside.
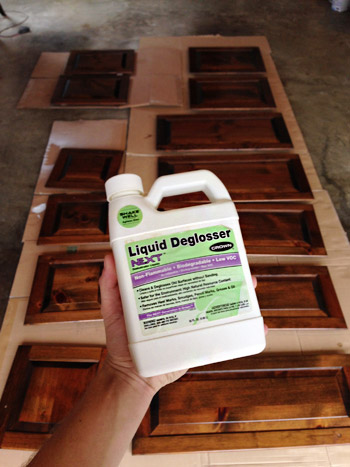
Next we wiped everything down with a liquid deglosser. This is a low-VOC brand called Next that we had leftover from last time (originally found at Home Depot, although we hear it’s not there anymore). It’s an optional step, but we figure it never hurts to prepare the surface – especially when it just takes a bit of wiping. Plus after you sand it’s a nice way to get the sawdust off.
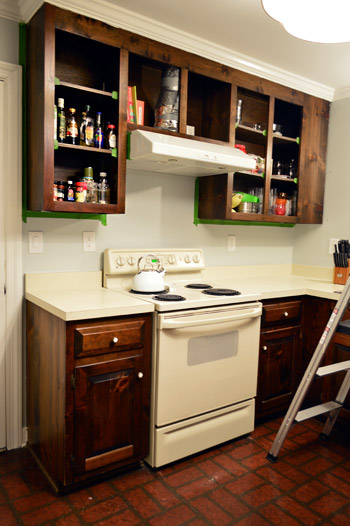
We then taped off the walls and other obstacles around the cabinets (like our newly installed hood) with painters tape to protect them and to make each of our sure-to-be-many coats go on as fast as possible.
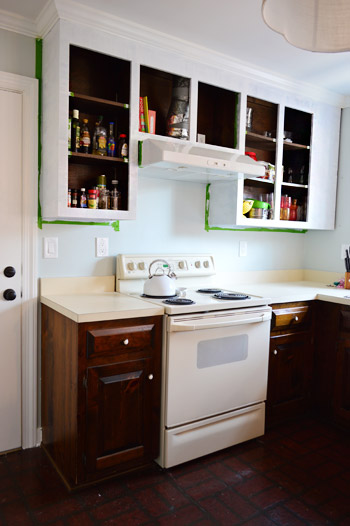
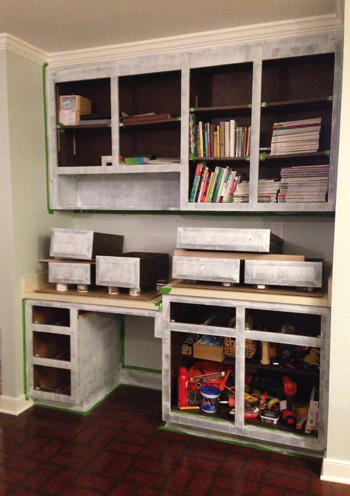
With everything taped, we primed the frames with a brush and a small foam roller. We used a Kilz Premium primer because it’s stain-blocking but still no-VOC. This picture is after two coats of primer. Sherry’s the cutter-inner of the family, so she did the brushwork with a short handled 2″ angled brush, and I did the foam rollering, following right behind her around the room so I could roll over the edges that she brushed for the smoothest finish.
We considered using our paint sprayer for those interior frames, but ultimately decided to do the indoor stuff by hand. The amount of taping and drop-clothing that would’ve been required to protect the kitchen (and the three adjoining rooms) from paint over-spray just didn’t seem worth it – especially when weighing the need for a functional kitchen (and not subjecting a pregnant lady and three year old to the fine paint mist that seems to linger afterwards).
But we did use the paint sprayer outside to prime and paint our cabinet doors. And by outside, I mean the garage (since we had quite a bit of rain last week that ruined any chances we had of spraying outdoors). I set up a little station where I could coat one door at a time and then lay them out to dry.
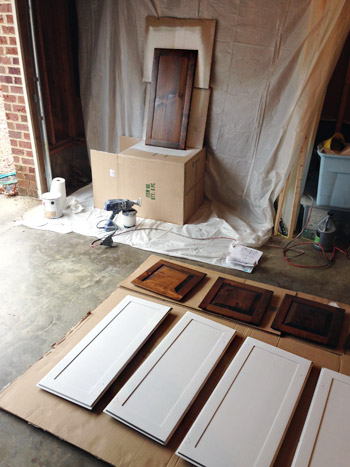
For anyone out there thinking about using a sprayer on doors during cabinet painting, it’s a great way to get a nice smooth coat with less effort than doing the whole thing by hand. But you’ll probably want to get your bearings by practicing on a few other things first (you might not want your first spray job to be cabinets since it can take a little while to master the whole not-too-thick-and-drippy thing).
Back to the spraying process. After 24 hours of drying time, I flipped them over and did the other side. The actual spraying was pretty fast, but the waiting for the thick coverage to dry (and cleaning the sprayer in between daily coats) didn’t make it the breeziest process in the world. Although it certainly required less time than all the coats the frames inside took.
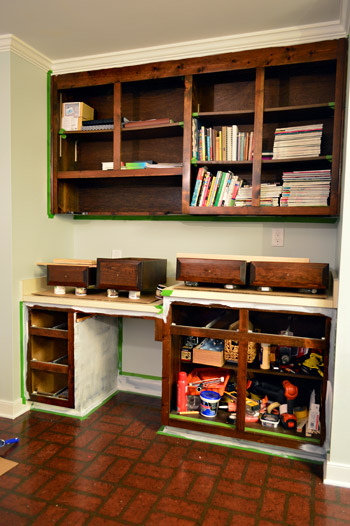
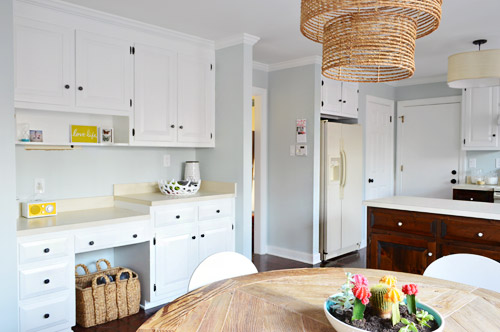
This is the desk area, where we also opted to paint the lowers. Both Sherry and I felt like this was all one unit (like a hutch in the eat-in area) unlike the peninsula-ed part of the kitchen, which we thought would look awesome with those dark lower cabinets. So over here we also painted the six drawer fronts by hand – since they didn’t detach from the drawers themselves. A lot of this cabinetry was surprisingly non-removable, for example the shelves inside don’t pop out (you’d literally need to demo out the frames to remove them). The picture below is after one coat of primer.
Note: much like our last kitchen, we opted to paint both sides of the doors, but to leave the inside of the cabinets unpainted (we think the contrast of wood inside + painted doors can actually be a nice combo when it’s done cleanly).
We opted to do two coats of primer based on what we learned when we painted the trim in this room. But you can see here that even that was still pretty spotty. You can also see where we used small pieces of painters tape to block paint from getting on the shelves for a nice clean look.
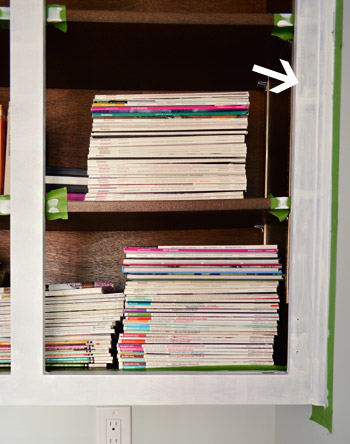
In the end, it took 2 coats of primer and 3 coats of paint in the areas that we did by hand (we used Benjamin Moore Advance in Simply White, which we love for the durability, the fact that it’s made for cabinets, the low-VOC non-oil formula, and the fact that it’s self leveling). Just for comparison, the doors that I sprayed in the garage only took one coat of primer on each side, and one coat of paint on each one (the coverage is a lot thicker, and you go through more paint, but it leaves you with a nice factory-like finish if you’re careful to avoid drips).
In short: spraying (even with that “cleaning the sprayer between coats” factor) is definitely faster – but I’m still not convinced it would’ve been a good choice for the frames since the entire room would have needed to be taped off for the entire process and a fine mist of paint and primer would have lingered in the air for a while.
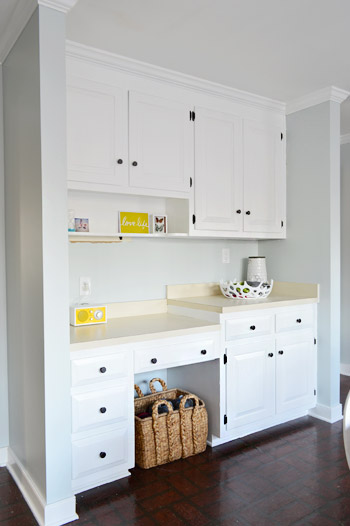
All told this was a week-long update for us, which can roughly be summarized like this – day 1: sanding, deglossing, primer coat #1, day 2: primer coat #2, day 3: paint coat #1, day 4: paint coat #2, day 5: paint coat #3, day 6: another full day of drying, day 7: re-hanging doors and adding the new hardware).
We also updated the hinges and the hardware. The hinges were a worn brass color, so we went oil-brubbed bronze with them since we liked the idea of doing contrasting hardware this time around (we’ve done brushed nickel in our past two kitchens). To help the paint job hold up on the hinges, we sprayed them with some “clean metal primer” first too, since we’ve heard such good things about this particular product (we’ve seen others use it specifically on moving parts like hinges, with luck – so we’ll keep you posted about how it wears).
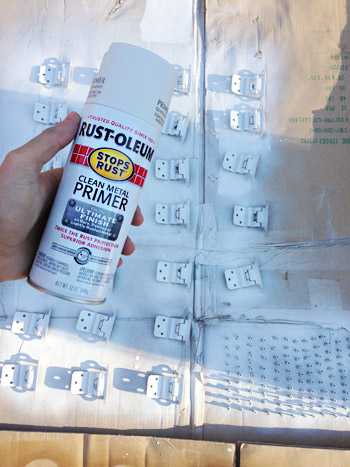
The ORB went on nice and smoothly when that coat of primer dried, and so far the hinges look great and have worked well (there’s no gumminess or grinding/peeling) so for about $11 it was well worth the update so far. Ultimately we’d like to have hidden hinges, but it’s not easy or cheap with these cabinets (these doors are half-sunk, and they don’t sell off-the-shelf hidden hinges for those type of doors) so we’ll save that dream for Phase 2.
We weren’t crazy about the shape and detail on the original brass and white knobs, so instead of spraying those we picked up a few boxes of the same Target octagon knobs that we used in our master bathroom, since they come in at under $2 each.
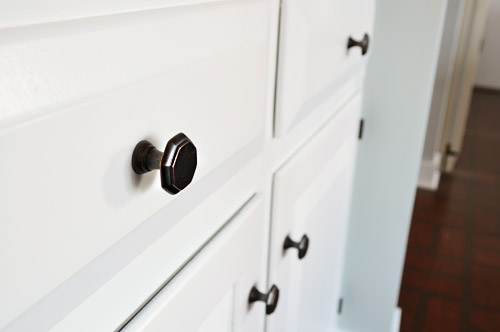
We like how high contrast they are against the white, which seems to be something we’re gravitating towards lately (think stair runner, our stenciled bathroom floor & dark vanity, etc).
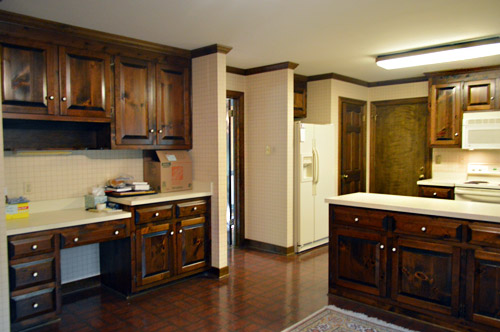
Ahhhhh, this feels a lot more like home. Just ignore the faux brick floor, those old counters, and those off-white appliances – we’ll get there eventually.
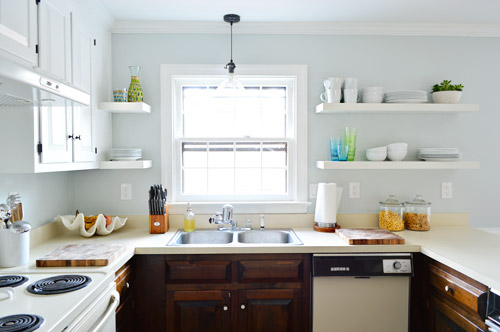
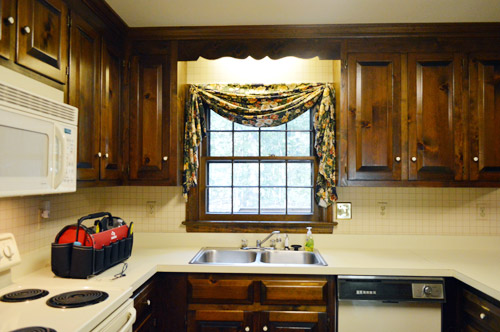
I think the before and afters from this POV really show the difference. This is what the sink area looked like on inspection day…
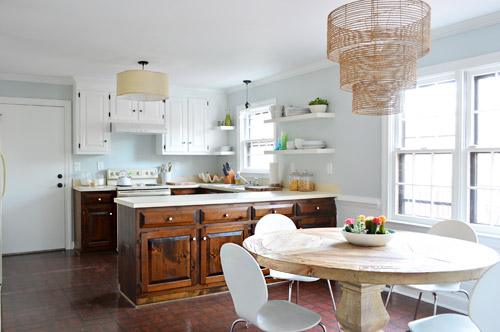
And here’s the same angle now.

We’re gonna tackle those lower cabinets this week – which is a place we’re again veering off course from the original plan. You’ll remember we said we liked the idea of a deep stone colored paint on them here, but then near the top of this post we mentioned stain. Now that the uppers are painted, we actually like how the wood tone is playing off of them, so we’re feeling less paint-y and more stain-y. Ah yes – THE PLOT THICKENS!
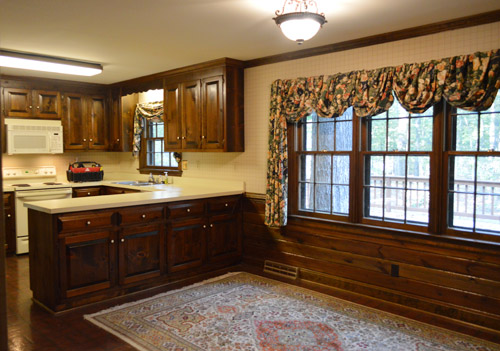
And just for fun, here’s one more throwback shot of our kitchen before we moved in. It’s pretty amazing what a series of affordable updates – like stripping wallpaper, removing a few cabinets, hanging shelves, and priming and painting the cabinets – can do.
Did anybody else tackle some big-ish projects over Christmas week? Or are you just gonna make us jealous and say you spent the week stuffing your face with cookies and watching Elf on repeat?
Psst- Sherry’s over on Young House Life chatting about New Kids On The Block and teacher gifts.

Brittney says
Looks so much better and different! We had some old, ugly blue laminate counter tops in our upstairs kitchen (yeah, we bought a “duplex” and are turning it back into a single family)that we painted. It turned out really well. We used it for a bout 2 years and never had any issues. We had to be careful about leaving anything wet on there, because it would stick to it. For short term, painting it was a great alternative. We also painted the sticky tiles on the floor and that worked out really well too. We were on a super tight budget since I was still in college ha. Good luck with phase 1 of your kicthen. It is looking great. :)
YoungHouseLove says
Aw, thanks Brittney! So good to hear from you guys about your experiences with various methods!
xo
s
Stevie says
Do the cabinets have knots in them? It’s hard to tell in the picture. I’m totally dreaming of a white kitchen but our cabinets are that knotty pine and I worry that the knots would show through the knots and look weird.
I honestly cannot believe how quickly you guys can transform a home. I know it’s been a few months but I’ve been in my house a few years and I’m no where close!
YoungHouseLove says
Yes, they have a bunch of knots and high contrast grain spots right now, but the beauty of certain stains is that they cover those more (some bring them out, and some hide those differences in tone) so the ones we’re leaning towards will give it all one rich wood tone, but minimize knots and all that jazz.
xo
s
Jessica says
GORGEOUS! You’ve inspired me to tackle our kitchen – hopefully I can get my husband on board. How difficult was it to replace the kitchen light? We have that same florescent and I’d love to see it go!
Can’t wait to learn about concrete countertops, too!
YoungHouseLove says
We blogged about that a few weeks ago- it ended up being pretty simple! You have a few holes to patch where it’s bolted into the ceiling, but other than that it’s a lot like switching out another fixture (assuming your fixture box is centered under that big light box).
xo
s
Katie O says
I just can’t get over the befores and afters of your kitchen. It’s like a breath of fresh air! I can’t wait to see what you do with the bottoms. I love the look of bright white paint with stain – when we made our dining room table, we painted the legs and apron white and stained the top.
I’m in serious nesting mode, which has pretty much taken over my home life. We’ve been busy getting our home organized and clean for the arrival of Baby #3 at the end of February. Since I’m doing a home birth this go around, every square inch of my house must be clean, just in case I decide it sounds like a good idea to deliver in my upstairs hall closet or something crazy like that!
YoungHouseLove says
Haha, I love it! Happy nesting!
xo
s
Susan says
Wowza! That looks fabulous!
I wasn’t quite getting your explanation of the conflicting colors with the crown molding, but totally understood it when I saw the after picture. Good call with the Simply White.
Can’t wait to see the finished base cabinets. I’m guessing some Espresso stain like your bath vanity…
Nice job!
Jenny Mills says
We bought our house a year and half ago, and it reminds me a lot of your new house. It had nicely painted white but during our time here I realized one thing… they didn’t use a primer! Our kitchen looks HORRIBLE now! I plan on redoing them soon but I want to build new doors to update it when I do. This just makes me want to do it even more!! I love how a little paint changes the whole look!
YoungHouseLove says
That sounds like it’s going to be awesome Jenny! Good luck with the doors!
xo
s
Heather says
Now that you are making progress on the cabinets, are you getting a more definitive answer to whether you will do peel and stick tiles in this phase? It seems with every improvement (which look awesome, btw) the floor sticks out even more.
YoungHouseLove says
Yes, I think we’re leaning towards doing something, although I’m not sure what yet…
xo
s
ale norris says
it’s looking amazing so far! we have carerra marble in our kitchen and as much as i LOVE the look, i’m afraid of how it’ll look in a few years. so we’re considering eventually doing the concrete thing too.
Megan @ Rappsody in Rooms says
Wow! You were really busy this Christmas! But what a result! I love that you are going for the stained look on the bottom. That sounds exciting! Especially with all the neat stain colors now I think it will be classy but slightly unexpected. I also can’t get over how that built-in looks now! Gorgeous!
Sylvie says
It’s amazing how much the white brightens up the room. I’m in the (looong) process of painting wood trim in our house. I also sanded and use kilz primer, but for some reason the second coat of primer seems to make the first coat peel off! Any ideas what went wrong??
YoungHouseLove says
Oh no! It sounds like you might have an issue with oil-based sealer under your water based primer. I would go back and sand everything smooth and then use oil-based primer. You can follow that with water-based paint, because oil primer “neutralizes” old oil sealers so that bubbling/peeking shouldn’t happen. Good luck!
xo
s
Alexandra says
LOVE IT!
It looks so good! I’m glad you went with white. I was a bit worried about the light gray, I think it would have looked too random (I may be a smidgen too invested in your design choices …)
I bet your kitchen is very happy now, it looks like it is taking a huge breath after being all stuffed up for a long time :)
YoungHouseLove says
Haha, thanks Alexandra!
xo
s
Samantha says
OMG! This looks amazing!!
Alo, good to see the Cacti are still alive ;)
YoungHouseLove says
I can’t believe it! The funny thing is that I haven’t watered them once. Not once! They truly thrive on neglect.
xo
s
Kristen says
This looks awesome.. My kitchen cabinets look exactly like your’s beforehand. We have a house full of dark wood and windows like your’s. Silly question but did you have to replace the windows or is there a way to paint the frame and seperater pieces inside? I really want to do this but don’t know if the cabinets are sturdy enough.
YoungHouseLove says
We just painted our window frames (they were wood) so we didn’t have to replace anything. Hope it helps!
xo
s
Erin @ The Impatient Gardener says
God I love you guys. The rest of the world is running around wrapping presents and preparing menus (all of which I’m sure you’re doing too) and you guys are painting cabinets! Of course I love it, since I’m in the camp that believes white paint improves almost anything. I never thought I’d say this, but your kitchen is becoming quite tolerable (no offense, it’s just that, well, I didn’t have the vision you guys did). Can’t wait to see what you have in store for the bottom cabinets.
YoungHouseLove says
Haha! So funny! Thanks Erin!
xo
s
Shannon says
This is seriously looking amazing! The white uppers do so much to brighten up that kitchen!
Just a thought, that off-white fridge would look awesome with chalkboard paint during phase 1! The contrast along with the ORB accents would be lovely!
http://www.pinterest.com/pin/117234396523490143/
:)
YoungHouseLove says
I keep telling John that! He worries it’ll hurt the value if we want to craigslist it down the line (when we get new appliances for Phase 2), so we’ll have to see who wins the fridge battle!
xo
s
Molly S. says
You should look into chalkboard vinyl. You could just stick it to the fridge and it works just like chalkboard paint. Then when you’re ready to craigslist the fridge you can just peel the vinyl right off! Makes for easy decor without ruining what’s underneath! Best of both worlds- you get the chalkboard, and John gets a fridge that’ll still be untouched when you sell it.
YoungHouseLove says
Really smart!
xo
s
RobinD says
Having been to the kitchen-cabinet-paint-rodeo before, I like how you summarize the work without exact;y emphasizing how much work it is! It is a huge job, but well worth the effort. I am liking the contrast of the black hardware. Even if it’s not your forever kitchen, it sure is nice.
Big projects over the holidays? um, yes. We just sold our old house, moved into our new condo AND I picked up a free-lance editing gig, so I took time off from my real job. I am working long days to wrap it up. This is my first time editing a sewing book and it is so much fun! For a person who likes work, I guess :)
YoungHouseLove says
Oh my gosh, you’ve been busy girl! Good luck with all those irons in the fire – and congrats on the house sale!
xo
s
Jayme says
We did a concrete overlay on our kitchen counters and love it!! Your kitchen is looking awesome already!!! Looking forward to seeing what you do with the rest of it!
Shellie says
I’m sure you’ve already heard from Katie Bower, but I so so recommend the Encore concrete kit for your countertops. It’s a great kit that makes it so so easy. We did it about a year ago and minus 1 or 2 small chips, they still look amazing. Us novices did it over a three day weekend and could not be happier. The only 2 issues we had were 1) getting a smooth finish on the vertical backsplash surfaces (don’t use a chip brush like they recommend. You will have concrete brush marks.) and 2) The kit had more dye than necessary, so instead of a mid-dark gray, we ended up with black. We still love it, but it something to watch out for. Can’t wait to see what you guys do!
YoungHouseLove says
Thanks for the tip Shellie! I forgot that she used that for her mom’s kitchen, so I’ll have to reread that!
xo
s
jenn @ beyond the stoop says
looks so good! I can’t believe how much light it brings in!
Jennifer says
OMG! I am in love with where this is going and it is just phase 1! I definitely like the sink view with the shelves, but I cannot get over the desk/fride view. It looks like a whole different room. This kitchen update is just the motivation I need to paint our kitchen cabinets…I have wanted to do it for the last 5 years, but I keep chickening out.
Lisa @ Double Door Ranch says
WOW!!!! So fresh and so clean, clean. Now it’s starting to feel like a YHL home. :)
I worked my butt off this holiday season. Finally getting my craft room under control and it’s turning out so great! I’ve also made a ton of progress on a console behind the couch, similar to your last house. Haven’t blogged about any of it yet though! Make progress in one area, stall in another. I don’t know how you guys do it!
YoungHouseLove says
That sounds awesome Lisa! Congrats for end-of-the-year progress!
xo
s
MaKaela says
I just picked up Revere Pewter for my kitchen walls and Simply White for my cabinets Saturday! Glad to see I made some good choices! Thanks for all the tutorials, they really help with my remodel!
YoungHouseLove says
That sounds so pretty!
xo
s
Diane says
Hmmm … maybe gel stain for the lowers? GF’s Java??
I need to “get on that” in the dressing room of the master bedroom. I Java’d the master bath cabinet earlier this year but have a 5′ vanity and mirror shelf that’s still oak. The list only gets longer, doesn’t it?
YoungHouseLove says
Yes! The list just keeps getting longer! Haha!
xo
s
Meghan F says
Wow what a difference! It looks amazing and can’t wait to see the rest of the changes too. I love a white kitchen!
Shannon says
Do you worry about how well the paint will hold up when you replace the counters or are you planning on replacing the whole thing in phase 2? We are saving for new counters but I’m itching to paint badly!!
YoungHouseLove says
We actually painted our cabinets in the last house using this method right after getting our cabinets replaced and replacing them didn’t damage the cabinets in any way, so that hopefully will put your mind at ease. We will eventually be moving these cabinets into the garage and gutting the kitchen for a more major reno down the line, we just have to save up for that, which takes us years (we also don’t like to rush into major layout changes, etc) so we usually do cosmetic stuff like this first, live with things for a year or two, and then finally we’ll have the money for a real reno (and will finally know what we want, haha).
xo
s
Marianne in Mo. says
Really amazing how much it changed the look! You guys are workhorses! And yeah, pretty much ate my way thru this past week. Had to, so there would be room in the fridge again! ;-))
YoungHouseLove says
Haha, I love it! It was in the name of fridge efficiency.
xo
s
Evelina says
Congrats on getting such a large project out of the way! It looks so gorgeous and airy now! Can’t wait for the bottom half :)
Gem says
Oh good, I’m glad that you went with the white on top! I loved the idea of you going for a different colour but I really thought it’d end up being too busy after you revealed the white hanging shelves. Excited to see the contrast between the lower cabinets, though – should be fun!
Hope you all had a lovely Christmas!
YoungHouseLove says
Thanks Gem!
xo
s
Erin says
This looks AMAZING! I think the office nook area is my favorite part (for now).
m says
Do you find it better to sand and then degloss? Seems the opposite order would be better, but seeking experienced advice!
YoungHouseLove says
Oh yes, we like to sand and degloss because there’s all this sawdust after sanding, so deglossing gets that dust off and makes sure there isn’t any grease or other lingering grossness that the sanding might have missed in those edges, grooves, etc.
xo
s
Meggan says
Love the Phase I, it’s really looking great so far! So much brighter, it’s amazing what paint will do. With the off-white fridge, I’ve seen people do the chalkboard paint and thought that may be something to try that would be fun for Clara too :) A couple of cans of spray paint could really change the look, and tie in with darker cabinets. I’ve also seen a bleached oak look for cabinets, kind of like your raw/natural looking table that would be cool…
Always love what you do :)
I spent my free time over the holiday putting antique dictionary pages all over my office as wallpaper and am loving it!
YoungHouseLove says
Those antique dictionary pages sound like so much fun! As for the chalkboard fridge, I keep telling John that would be fun! He worries it’ll hurt the value if we want to craigslist it down the line (when we get new appliances for Phase 2), so we’ll have to see who wins the fridge battle! I have also been looking at white appliance paint since that might make them look new and not hurt cragislist value, so we’ll keep you posted!
xo
s
Alyson says
I FREAKING LOVE THIS!! Seriously. It’s a whole new kitchen and it really looks amazing! Never doubted you guys for a second. You just make me want to go and do something drastic in my own house…ahhhhh! :)
megan says
We painted our upper and lower cabinets with Benjamin Moore Advance — we used Simply white for the upper and Grey for the lower. We love the look but I will caution you – based on our experience – that the darker color has not held up as well for some reason. We sanded, primed 2 coats, sanded, painted, sanded…on and on coat after coat (3 coats) and followed the instructions of the BM paint expert which told us to allow 2 days drying time between paint applications.. we used a paint gun and they look awesome however – they take up to 60 days to cure so we made sure to put down a barrier before putting in heavy pots. The corners of the cabinets and edges of the paneling seem to wear easily and I find myself doing paint touch ups every couple months. Not what I was wanting after the long process we went through to DIY that project. Also, with the darker color you will notice that if you get water on them – it leaves strange discolorations that do eventually go away after drying. Just wanted to share our experience! Hope yours turns out better!
YoungHouseLove says
Thanks so much for the tip Megan!
xo
s
Amy says
Love the white! Any thoughts on painting the fridge as a Phase I project? A chalkboard finish might be kind of fun! Can’t wait to see what you do with the lower cabinets and countertops…
YoungHouseLove says
I keep telling John that would be fun! He worries it’ll hurt the value if we want to craigslist it down the line (when we get new appliances for Phase 2), so we’ll have to see who wins the fridge battle! I also like the idea of spraying them white with appliance spray paint just for a cleaner and more “new” look, so we’ll keep you posted!
xo
s
Emily says
I love the white! I’m currently painting my cabinets white but its a much slower process. I was wondering since y’all are planning on moving these cabinets to the garage if you’ll keep them white for the garage or paint them again?
YoungHouseLove says
Yes, we’ll keep them the color we paint them (so we’ll probably hang some white uppers for upper storage and bring the wood lowers in there as the lower garage storage).
xo
s
bfish says
Your efforts have made a HUGE difference in the appearance of your kitchen — it is so much more inviting (and no longer dated-looking). Great job on this project!!
Jeanie says
The transformation is INCREDIBLE. I wish I could just paint our cabinets – unfortunatly they were handmade by the previous owners, and not well – so they need to be replaced entirely. :( Also, I am SO HAPPY to see that you guys have some junk behind those cabinet doors! I’m not alone!
Britiney says
We completely reno’d our powder room – stripped wallpaper, added beadboard, new paint color and matching linens and new mirror. Almost done with that and will be so glad when it’s finished! I can’t believe what a difference the white cabinets make in your kitchen. Everything you guys do is so inspiring and well-done!
YoungHouseLove says
Thanks so much Britiney!
xo
s
Kacy says
WOW looks amazing! We are going to tackle painting our kitchen soon and I’m so nervous about how it will turn out. Thank you so much for the detailed posting!
GreenInOC says
It looks soooooo good! Love the new direction the cabinets are going, can’t wait to see the end result!
I can’t remember, the update your countertops get in Phase I, are they staying or are you going to replace them in Phase 2?
YoungHouseLove says
Aw thanks GreenInOC! We’ll be changing the layout in Phase 2, so these cabinets will go to the garage (possibly with the counters) and new cabinets and counters will go in (in a new configuration) for Phase 2. Just gotta save our pennies, so we think it’ll be at least 1-2 years for that.
xo
s
Kelli Fox says
wow wow wow – i love love love it. I had to go back and read the other posts you linked to (master bath, etc.) and i am loving everything y’all are doing. We actually did tackle a pretty big project here – our tray ceiling in the master was in really bad shape. Husband repaired it all, painted it and all the crown mold in the room, then painted the ceiling a contrasting gray.. we’re changing up the trim around the windows/doors, then painting the room. exciting stuff! like your kitchen!
YoungHouseLove says
That sounds so pretty Kelli!
xo
s
Lauren (in PA) says
Sort of bummed you didn’t go with the gray uppers, but totally get why. That would have been nice to see.
It looks great!
Your anxiety levels must drop with every bit of darkness you guys are eradicating with your paint brushes!
Maria says
Absolutely LOVE the white cabinets with the Nelson Blue! Cabinet painting is on my list for sure in 2014. As for Christmas week projects, I painted the sewing machine cabinet and matching chair that I picked up on CL for Libby. It is a vintage Kenmore machine, and works like a charm! The cabinet and chair got a fresh coat of simply white, and the existing hardware was fun, so I just spray painted that. The super cute bench seat chair had a lovely 50’s vinyl covered seat, so that got replaced with black velour (on clearance at Joann’s!)…heading to ikea this week to add some floating shelves above it!
YoungHouseLove says
That sounds awesome! Congrats on all the progress Maria!
xo
s
Ashley says
Yeah I (stupidly) tackled my huge living room disaster four days before Christmas! I stripped the popcorn ceiling, repaired some holes & cracks, sanded the whole thing, then painted it BM ultra white. I figured since i had the room emptied of furniture and REALLY hated the cement-gray color on the walls, I should just repaint the entire foyer/room/dining room….two coats of primer, two coats of paint! I still have to do all my cutting in tonight, but the difference is INCREDIBLE for my little cottage bungalow–the entire room is bright clean and open–no more feeling like I live in a cave! Now i just need to exchange my too-large, too-dark sectional for a sleek, more minimalist sofa–I’m thinking of the IKEA karlstadt, actually!
And then I’ll start on built-ins….I don’t know WHY I feel the need for major projects right now–maybe it’s New Year syndrome? Thanks for sharing this update–I also want to redo the kitchen in my own Phase 1 project soon, so this was helpful!
YoungHouseLove says
That’s awesome Ashley! I can’t believe how much you did! SO EXCITING to start the New Year that way!
xo
s
Sarah says
I love them! I’m so excited about your idea to stain the bottom cabinets! The added layer of texture and warmth will add such a wonderful element to your kitchen. :) I do have a few questions for you! My husband and I want to paint our cabinets white as well and we were wondering why you don’t use a polyurethane over the white? Also, I also live in the same area as you and know all about the rain and cold that you guys are getting right about now. Does the rain and cold change the drying time or is your garage heated? We have a huge shed in our yard but it isn’t heated so I wasn’t sure if it was going to effect the curing time. I’ve been putting off paint our cabinets until it gets warmer but I wasn’t sure if it was necessary.
YoungHouseLove says
These days the pros don’t really recommend poly over paint (especially the Advance paint we used, which is made for cabinets) since it can yellow and chip/drip, so the paint itself has a sealer top/coat in it, and its nice and durable! We really have loved it (we used it on our office built-ins years ago, then on our last kitchen cabinets, and again in here). As for our garage, it’s not heated, but it wasn’t too bad this week (a few 50/60 degree days, etc) so it seemed to not hurt drying time (we only needed to spray things with one coat each, so they got about 48 hours to dry between each coat instead of 24 like the indoor stuff that took a lot more coats). If you live somewhere with really cold winters I would read the can and follow the tips (if it says not to use it below 50 degrees and it’s 30 there, I’d definitely wait!).
xo
s
Margret Helga Gudmundsdottir says
WOW!!!! This looks sooooooooo much better than before, which I guess was the whole point, right? ;) Really amazing…you guys make it look so simple. Thank you for sharing with us :)
Melissa says
Oh man, I know people hate these old laminate counters but I can IRON on them. No pad. Nothing. I can throw down fabric and iron straight up on my counters. (I sew from time to time.) I figure if I can iron on them, daily wear and tear from our family of six can’t touch them. Right now, for me that’s a HUGE win!
YoungHouseLove says
No way! That’s awesome! Ours have these weird little stains in a few spots that we assumed were burn marks, but maybe they’re a chemical cleaner or something that eroded them?
xo
s
Cait says
For what it’s worth, I love my DIY concrete counters. Our kitchen is greyish-blue with white cabinets and white subway tile backsplash. We had ugly blue laminate counters but I didn’t want to spend a fortune updating them yet – the concrete counters were supposed to be a no-risk temporary solution but they really pulled everything together and it looks AMAZING. They were so easy to do, like frosting a cake. I sealed them really well and try to wipe up spills quickly, so they’re holding up nicely so far. Good luck with whatever you decide to do!
YoungHouseLove says
I love hearing that Cait! Do you remember the exact brand that you used to seal them? We hear some sealers can have more issues than others, and yours sounds awesome!
xo
s
Cait says
I used a combination of Cheng Concrete Sealer and Cheng Countertop Wax, which I bought on Amazon. Both were very easy to apply using the directions here: http://www.concreteexchange.com/sealing-+-waxing-the-countertop.html. I think I did 3 coats of each initially, and I’ve re-applied a quick coat of wax twice since I did the counters this summer, just to be safe. It sounds like a lot more work than it actually is, and it’s definitely worth it!
YoungHouseLove says
Thanks so much Cait! So helpful!
xo
s
Joanna says
The cabinets look awesome! We did a concrete overlay on our kitchen counters about 2 weeks ago. We used Ardex Feather Finish and two types of sealers (one to penetrate and the other to act as a top coat). I did a ton of research on the sealers before applying them, and while no sealer is perfect, I think the combo we chose was as good as it gets. We have had 2 holiday parties here since having them and so far they are holding up great! I definitely think they are a great option for a Phase 1 — especially since they only ran us about $75 to $100 for materials. I can’t speak for them in a more long term sense, but I think ours will be great for at least a couple years if not longer. I think the key for us was definitely taking our time to give them a really good sanding between coats and then sealing the crap out of them at the end. :)
I don’t have a blog to link you to with directions, but maybe I should start one! The internet is definitely lacking on this type of tutorial.
Good luck!
YoungHouseLove says
Thanks so much for the tips Joanna! I’d love to know the exact names/brands of the sealers you used! Sounds like they worked out really well!
xo
s
Joanna says
I should have also mentioned that we LOVE them and they look amazing! :)
The penetrating sealer we used was 511 Impregnator Sealer. We did 3-4 coats, one right after the other. This one is a little fumey and I have a baby so I just waited until he was napping in his room and then aired out the house really well after. It can be a little cold this time of year but I just opened up the house for a good 15 to 20 minutes.
The top sealer was Behr Wet Look Sealer(found in the paint section). We did about 3 coats of that with the proper drying time between coats. Then we just waited the full cure time for that sealer to use the kitchen again. This top sealer had some bad reviews but if you just apply nice thin even coats there should be no problem. It’s very similar to polyacrylic. Just resist the urge to lessen the time between coats! We have had no trouble with things sticking to it at all.
Both of these were bought at Home Depot. The result is high gloss which we decided was best for a kitchen to wipe up spills and such. If water is left too long it will soak through but it dries quickly. Also I have cooked a number of times and oil splatters are easily wipeable with no staining so far. I am very happy with the results overall. I’ll probably re-seal with the Behr sealer every 6 months or so just to make sure they are protected.
I hope this helps!
YoungHouseLove says
Love all the tips! Thanks a million!
xo
s
Susie says
Hi- love the updated kitchen! Question- we are considering the same kitchen table and just wondered how you like it? Thx!
YoungHouseLove says
We love it! It’s really been great so far with spills (we have a messy little three year old who eats at least two meals a day on it).
xo
s