We’re soaking up a white Christmas over here! Nope, we didn’t wake up to any snow on the lawn, but there was a dusting of white elsewhere on the premises…
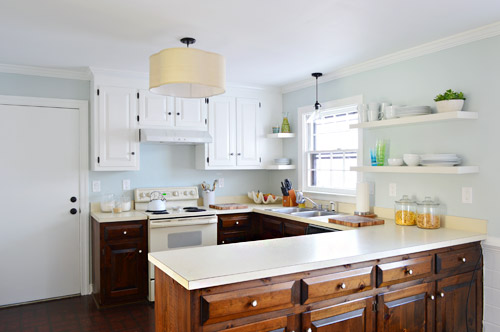
We used last week to sand, prime, and paint all of our upper kitchen cabinets and – shocker – we ended up going with white. So yeah, it’s a little bit different from our original plan to paint them a light gray-tan on top… and a little more like what we did in our last kitchen – but just for those uppers. We have a completely different plan in store for the lowers – and it actually involves wood stain and no paint at all – so maybe as we move into 2014 we’re getting progressively less predictable? Or more woodsy? We also have some ideas for those countertops which we’ve never done before (either a refinishing/paint technique or a concrete coating one – both of which are budget friendly, so they should be great for Phase 1).
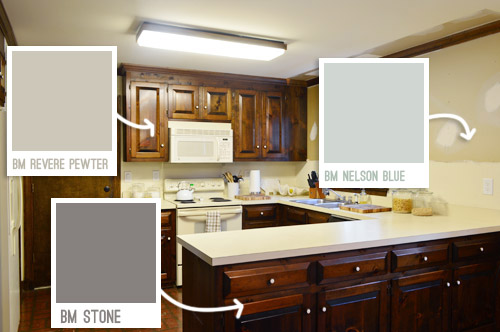
The tides shifted from Revere Pewter to Simply White (which is one of the top white paint colors out there)for those upper cabinets around the time that we installed the range hood and put up the floating shelves. While we liked the idea of the white shelves & hood contrasting with putty colored upper cabinets, we started to worry that also having the darker lower cabinets might just be too much going on (white and putty on top with a third darker color for cabinetry on the bottom).
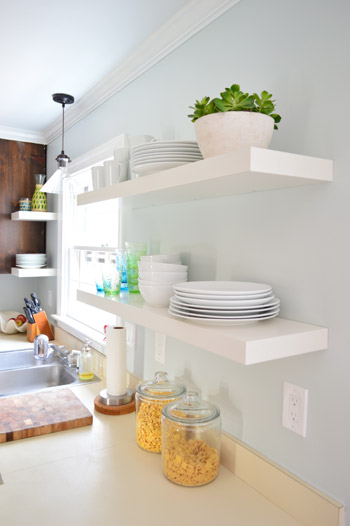
But the main thing we couldn’t wrap our heads around was a way to make crown situations like this one make sense with colored upper cabinetry. Usually crown matches the color of the cabinet, but wouldn’t it be weird to paint just a section of this crown to match the cabinets since there’s no indent where the cabinets end (it’s just one long piece along that entire area)? We already didn’t like the look of the mismatched cabinet and crown that we had going on, so continuing that theme with a new color on those uppers just didn’t seem like the right way for us to go.
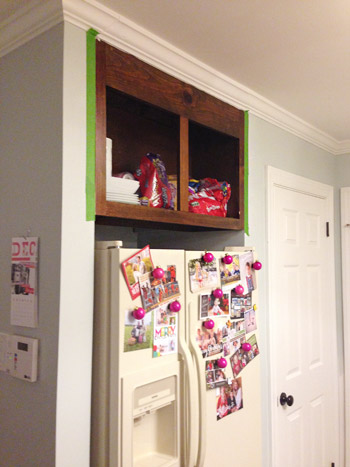
So we went with white. As much as we wanted to do something new, we never like to do something different just for the sake of being different. And at least this way we can still stick with our plan to do the lower cabinets in a deep tone for that “tuxedo” look that we’ve always loved but never had the guts to try.
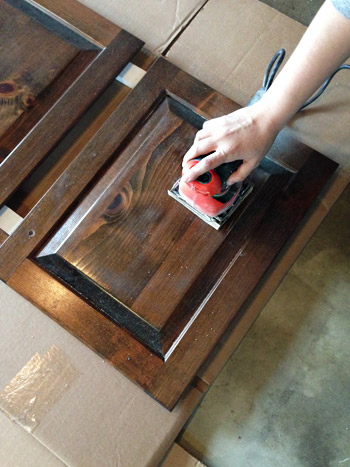
Now that we got through the why of what we did, let’s get a little into the how. Clocking in at nearly 2,000 words, this post is hardly short, but is gonna be quick and dirty compared to the picture-and-video-tastic tutorial that we did last time around since we used the same technique. So we’ll just share some broad details here, and you can reference that post for the nitty gritty. First up we removed the cabinet doors and gave every surface a light sanding, just to get rid of any glossiness and rough things up for better paint adhesion. Sherry used a hand sander on the doors in the garage with 150 grit paper, and I used an 150 grit sanding block on the frames inside.
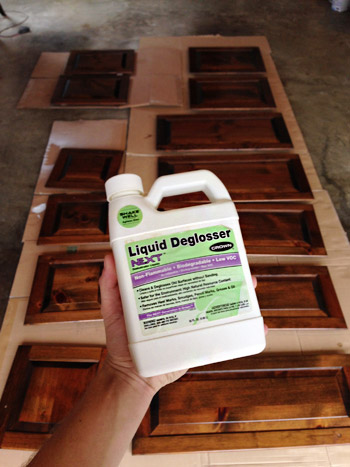
Next we wiped everything down with a liquid deglosser. This is a low-VOC brand called Next that we had leftover from last time (originally found at Home Depot, although we hear it’s not there anymore). It’s an optional step, but we figure it never hurts to prepare the surface – especially when it just takes a bit of wiping. Plus after you sand it’s a nice way to get the sawdust off.
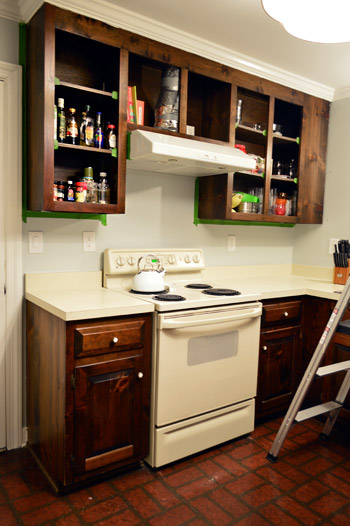
We then taped off the walls and other obstacles around the cabinets (like our newly installed hood) with painters tape to protect them and to make each of our sure-to-be-many coats go on as fast as possible.
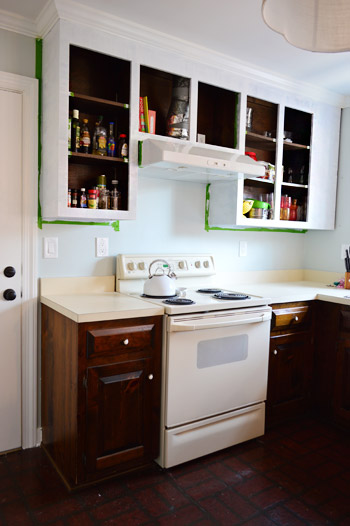
With everything taped, we primed the frames with a brush and a small foam roller. We used a Kilz Premium primer because it’s stain-blocking but still no-VOC. This picture is after two coats of primer. Sherry’s the cutter-inner of the family, so she did the brushwork with a short handled 2″ angled brush, and I did the foam rollering, following right behind her around the room so I could roll over the edges that she brushed for the smoothest finish.
We considered using our paint sprayer for those interior frames, but ultimately decided to do the indoor stuff by hand. The amount of taping and drop-clothing that would’ve been required to protect the kitchen (and the three adjoining rooms) from paint over-spray just didn’t seem worth it – especially when weighing the need for a functional kitchen (and not subjecting a pregnant lady and three year old to the fine paint mist that seems to linger afterwards).
But we did use the paint sprayer outside to prime and paint our cabinet doors. And by outside, I mean the garage (since we had quite a bit of rain last week that ruined any chances we had of spraying outdoors). I set up a little station where I could coat one door at a time and then lay them out to dry.
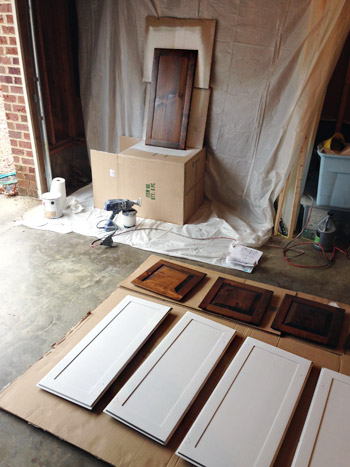
For anyone out there thinking about using a sprayer on doors during cabinet painting, it’s a great way to get a nice smooth coat with less effort than doing the whole thing by hand. But you’ll probably want to get your bearings by practicing on a few other things first (you might not want your first spray job to be cabinets since it can take a little while to master the whole not-too-thick-and-drippy thing).
Back to the spraying process. After 24 hours of drying time, I flipped them over and did the other side. The actual spraying was pretty fast, but the waiting for the thick coverage to dry (and cleaning the sprayer in between daily coats) didn’t make it the breeziest process in the world. Although it certainly required less time than all the coats the frames inside took.
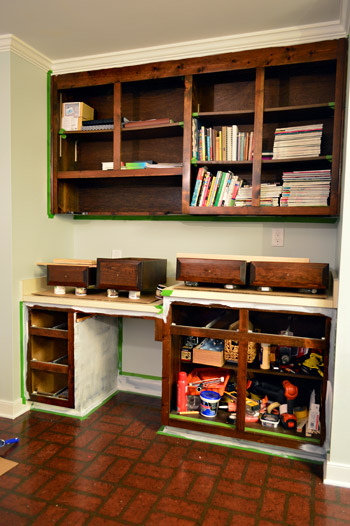
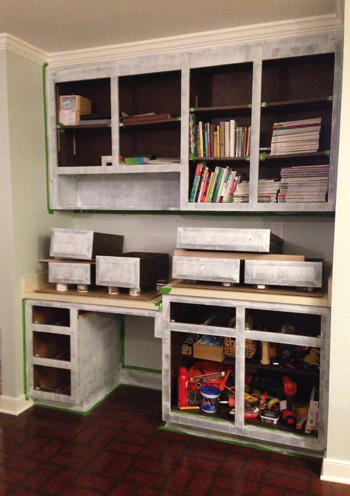
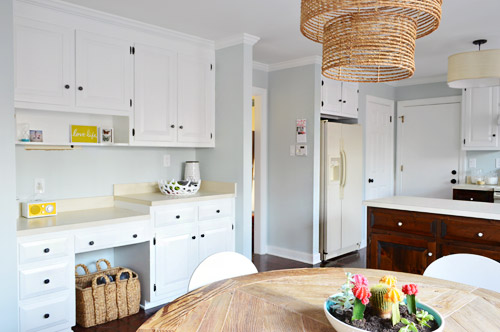
This is the desk area, where we also opted to paint the lowers. Both Sherry and I felt like this was all one unit (like a hutch in the eat-in area) unlike the peninsula-ed part of the kitchen, which we thought would look awesome with those dark lower cabinets. So over here we also painted the six drawer fronts by hand – since they didn’t detach from the drawers themselves. A lot of this cabinetry was surprisingly non-removable, for example the shelves inside don’t pop out (you’d literally need to demo out the frames to remove them). The picture below is after one coat of primer.
Note: much like our last kitchen, we opted to paint both sides of the doors, but to leave the inside of the cabinets unpainted (we think the contrast of wood inside + painted doors can actually be a nice combo when it’s done cleanly).
We opted to do two coats of primer based on what we learned when we painted the trim in this room. But you can see here that even that was still pretty spotty. You can also see where we used small pieces of painters tape to block paint from getting on the shelves for a nice clean look.
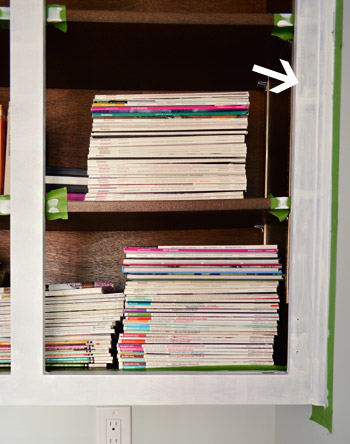
In the end, it took 2 coats of primer and 3 coats of paint in the areas that we did by hand (we used Benjamin Moore Advance in Simply White, which we love for the durability, the fact that it’s made for cabinets, the low-VOC non-oil formula, and the fact that it’s self leveling). Just for comparison, the doors that I sprayed in the garage only took one coat of primer on each side, and one coat of paint on each one (the coverage is a lot thicker, and you go through more paint, but it leaves you with a nice factory-like finish if you’re careful to avoid drips).
In short: spraying (even with that “cleaning the sprayer between coats” factor) is definitely faster – but I’m still not convinced it would’ve been a good choice for the frames since the entire room would have needed to be taped off for the entire process and a fine mist of paint and primer would have lingered in the air for a while.
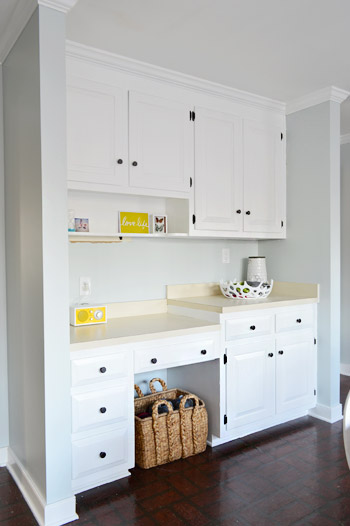
All told this was a week-long update for us, which can roughly be summarized like this – day 1: sanding, deglossing, primer coat #1, day 2: primer coat #2, day 3: paint coat #1, day 4: paint coat #2, day 5: paint coat #3, day 6: another full day of drying, day 7: re-hanging doors and adding the new hardware).
We also updated the hinges and the hardware. The hinges were a worn brass color, so we went oil-brubbed bronze with them since we liked the idea of doing contrasting hardware this time around (we’ve done brushed nickel in our past two kitchens). To help the paint job hold up on the hinges, we sprayed them with some “clean metal primer” first too, since we’ve heard such good things about this particular product (we’ve seen others use it specifically on moving parts like hinges, with luck – so we’ll keep you posted about how it wears).
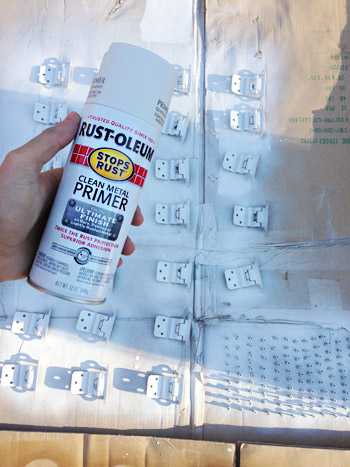
The ORB went on nice and smoothly when that coat of primer dried, and so far the hinges look great and have worked well (there’s no gumminess or grinding/peeling) so for about $11 it was well worth the update so far. Ultimately we’d like to have hidden hinges, but it’s not easy or cheap with these cabinets (these doors are half-sunk, and they don’t sell off-the-shelf hidden hinges for those type of doors) so we’ll save that dream for Phase 2.
We weren’t crazy about the shape and detail on the original brass and white knobs, so instead of spraying those we picked up a few boxes of the same Target octagon knobs that we used in our master bathroom, since they come in at under $2 each.
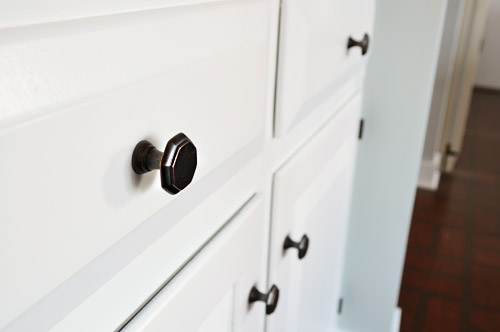
We like how high contrast they are against the white, which seems to be something we’re gravitating towards lately (think stair runner, our stenciled bathroom floor & dark vanity, etc).
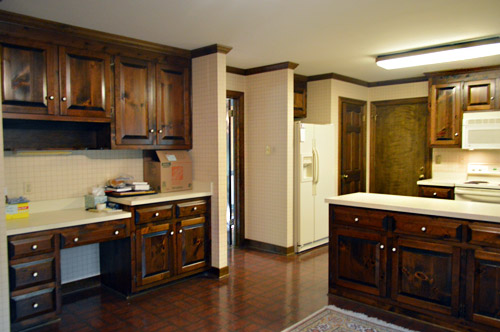
Ahhhhh, this feels a lot more like home. Just ignore the faux brick floor, those old counters, and those off-white appliances – we’ll get there eventually.
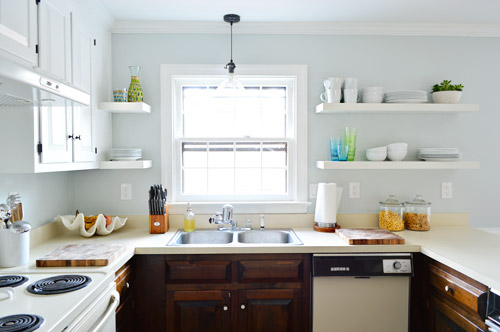
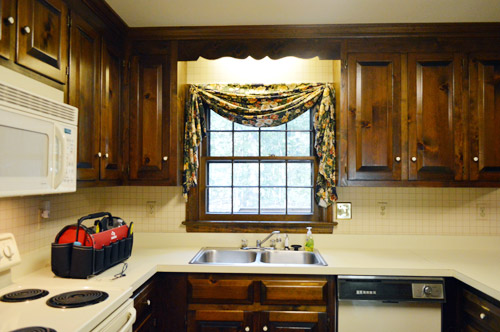
I think the before and afters from this POV really show the difference. This is what the sink area looked like on inspection day…
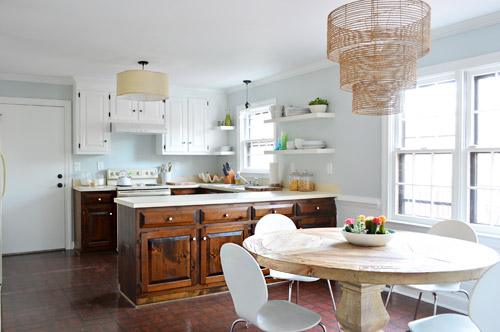
And here’s the same angle now.

We’re gonna tackle those lower cabinets this week – which is a place we’re again veering off course from the original plan. You’ll remember we said we liked the idea of a deep stone colored paint on them here, but then near the top of this post we mentioned stain. Now that the uppers are painted, we actually like how the wood tone is playing off of them, so we’re feeling less paint-y and more stain-y. Ah yes – THE PLOT THICKENS!
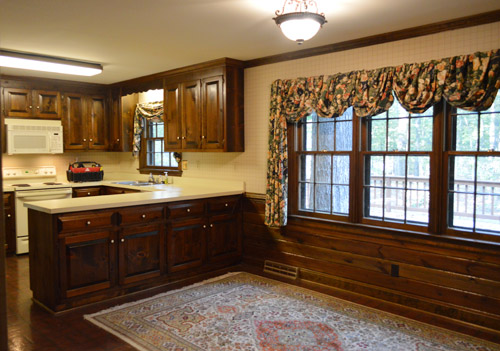
And just for fun, here’s one more throwback shot of our kitchen before we moved in. It’s pretty amazing what a series of affordable updates – like stripping wallpaper, removing a few cabinets, hanging shelves, and priming and painting the cabinets – can do.
Did anybody else tackle some big-ish projects over Christmas week? Or are you just gonna make us jealous and say you spent the week stuffing your face with cookies and watching Elf on repeat?
Psst- Sherry’s over on Young House Life chatting about New Kids On The Block and teacher gifts.

Carli says
Looking good! I bet it feels like a breath of fresh air in there :)
Fraser says
Looks great (of course)! We just moved into our first big girl/boy house a few weeks ago and spent this past weekend painting the main level. We loved your choice of BM Moonshine and how it looked with the natural light in your old house, so that’s what we chose. Now it really plays off our new mid-tone oak floors and white crown and is much more us than the builder beige. xo
YoungHouseLove says
Love that!
xo
s
Rene says
Yay, progress! The changes are incredible, can’t wait to see the rest of phase 1.
I had a thought for you about the almond colored dishwasher. I had one like that growing up and the front plate on the door was reversible. One side was almond but the other side was white. That might be a good way to reduce the almond quotient while you wait for the chance to update the unit. If I remember, you just have to remove the plate on the top edge of the door, slide it up and flip it around, but I’d consult the internet first since that was twenty years ago for me.
YoungHouseLove says
Love that tip! Someone else mentioned it last week and I can’t wait to try it!
xo
s
Sara B says
It looks beautiful! Love to see how you guys take a space and make it yours. I have been considering painting our cabinets as well, but they are not real wood. Would this method work on those standard builder cabinets?
YoungHouseLove says
Hmm I’m not sure since we have only done it on wood ones. Anyone have tips?
xo
s
Sarah | The Cyclist's Wife says
Paint is magic. The end.
Kee says
I have noticed that in this new house you are using almost exclusively BM paint. Previously you used a lot of BM colors color-matched to Olympia. I wonder, was there any main reason for the switch? Is it because you are working closely with BM now?
YoungHouseLove says
I think everyone has different favorites, but after trying a bunch of brands over the last seven years (Olympic, Behr, Glidden, Benjamin Moore, Mythic, Valspar), I think if you blindfolded us we could easily pick out Benjamin Moore paint from Glidden/Behr/Valspar/Olympic (I think anyone could, there’s just a thickness and faster coverage to it) – so we tend to prefer Benjamin Moore for that added coverage/durability if we’re doing a more permanent/major project (ex: painting cabinets, painting walls). We might be biased because we create a color collection with them each January, but we’ve used their paint since well before that partnership, and we always pay for our own paint, so we truly do like it best. If we’re doing a small crafty thing (like painting a plant pot) we might use a tester of Behr though, and we recently used Olympic on the stenciled floors in the bathroom (since we’ll be removing the subfloor to tile that space down the line when we do a full reno).
xo
s
Courtney says
Your kitchen looks so amazing and really inspires me to keep plugging away at mine! We recently just finished doing our countertops with a concrete overlay! I loooove them! It was so easy and the cheapest way we could find to redo them besides paint (even that might have been more expensive!)We followed the directions on this blog http://karapaslaydesigns.com/diy-ardex-concrete-countertops/ and they turned out wonderful. So far they have been easy to clean and here’s to hoping they hold up for a few years! I got a really good deal on the concrete mix on ebay so to do all of our counters only cost us a grand total of about $70! (including foam roller covers and sanding pads). I would definitely recommend doing this for your phase one!
YoungHouseLove says
That’s so awesome!
xo
s
Amy says
Looking great- can’t wait to see the stain! What is the plan for the refrigerator in phase 1? Might be fun for Clara to try some chalkboard paint to spruce it up.
YoungHouseLove says
I’m campaigning for that. John thinks when we Craigslist it we won’t get as much if we spray it. Will have to see who wins ;)
xo
s
Rachel says
I just wanted to write you a short note to let you know how incredibly inspiring you both are!
My husband and I will start saving for a house in 2014, and our budget will be very very tight. I started looking around at some of the realty sites for our area and was so disappointed at how UGLY (and very 70s inspired – ugh!) all of the houses are in our price range. I never in my life imagined it was possible to make something so dark, brown, and depressing into something airy and beautiful until I found your site! (Seriously, I thought if you wanted white kitchen cabinets you had to buy NEW ONES. Oh, me…) Now I am so excited because I can now see POSSIBILITY in houses instead of just wood paneling, wood trim, and horrid kitchens!
So thank you to the moon and back! XOXO
Rachel
YoungHouseLove says
Aw I’m so glad! That’s so sweet!
xo
s
Heather says
I too love the contrast between the white and wood I excited to see how it turns out!
We white washed our 1970s massive brick fireplace and started taking down our lovely popcorn ceiling (after we tested all negative for asbestos of course).
Just an FYI before we moved into our house 2 years ago the previous owner put the rustoleum countertop coating on and it is an eye sore as it gets worn, so we are replacing countertops. Just an heads up if that was on your list of options!
YoungHouseLove says
Thanks for the tip!
xo
s
Nikki M says
Nice job! I decided to refinish my dining table and chairs. Started the job with my friend yesterday and doing final staining today. Oh the sanding! :/
Lise says
That looks amazing! I’m always surprised how much paint can change things. We are tacking our laundry room. We’re painting the oak cabinets and trying to figure out how to cover the grain. I’m hoping the results will convince my husband that our oak kitchen cabinets (that the previous owners stained with red color) will look soooo much better painted! Any tips for hiding wood grain??
YoungHouseLove says
In our last kitchen we had a hint of grain and didn’t mind it, so I’d just say to embrace it, but here we have hardly any! I’d definitely use a self leveling paint like Advance to hide as much as possible. And spraying it applies it thicker (two coats vs one by hand) so that might help too. Good luck!
xo
s
Andrea says
What an amazing transformation some simple painting can do! I *LOVE* the look of the ORB hinges and knobs contrasting with the white cabinets! Will you keep all the knobs and hinges uniform for the darker lower cabinets also? Or will you have lighter ones for an opposite contrast? I’m not very good at interior design, so I can’t envision which would look better. ;)
I spent most of December making homemade Christmas gifts (jam, chocolate truffles, beaded jewelry, etc). Two weeks before Christmas my husband and I found out that we’re pregnant (WOOHOO! Due in August!), so that has definitely changed our priority list for the next several months! :)
YoungHouseLove says
Love hearing what you guys did over the break! As for the hardware, we’ll keep it all ORB for consistency I think!
xo
s
Tory C. says
This looks great! I started to paint my fake wood cabinets and peninsula from a faux maple to pure white. I started this as just doing it by hand and it has been a disaster! I decided to enjoy the holidays and get some paint sprayers and set up a station in the spring. This post has given me the umph that there is a light at the end of the tunnel! I also didn’t prime, so I will be sure to do that!
Tania @ Run To Radiance says
I love it! So glad you went with white! :) We did all white cabinets from Ikea (the old ones were unsalvageable!) and we got fancier ones for the uppers and basic ones for the lowers. We have a super open floor plan so only 3 upper cabinets, but we are going to start working on a really fun idea I have to make our island look more like furniture and less like cabinets…lol hope i live to tell about it. :)
YoungHouseLove says
I hope so too! You can do it. And good luck!
xo
s
ximena says
It looks great! I’ve noticed you have change the lighting in the kitchen already. Do you have pictures of the change? I have the same lighting in my kitchen and want to change it.
YoungHouseLove says
Yes, we blogged about changing those out about two weeks ago (it wasn’t too hard) so if you scroll back or search for changing a fluorescent light it’ll hopefully pop up :)
xo
s
Marcia says
What is a half-sunk kitchen cabinet door? John referred to yours as that being the reason you couldn’t use invisible hinges. Does the inside of the slab actually stick out into the inside of the cabinet? Never heard of such a thing!
YoungHouseLove says
Yes, half of the depth of the door is wide and hits outside (along the frame) but half of it sinks into the hole for a really firm seal.
xo
s
ximena says
BTW! We bought our house 3 years ago and it was so brown and dark. I found your site and I was totally inspired. Now everyone loves walking into my house because it’s so fresh and light, including me!
Nancy says
Hey You Two —
Just love your site and can’t believe what you’ve done with your kitchen. This is an unsolicited suggestion, but you may want to add inexpensive butcher block counter tops to your kitchen (I got mine from Ikea) and I painted my lower cabinets a green/grey with open shelving in white for “upper cabinets.” I stained my counters the same Red Mahogany as my floor color (despite what my beau suggested and all of his friends) and LOVE the look. Just a thought!
YoungHouseLove says
That sounds awesome!
xo
s
Jenelle says
Your kitchen look so amazing!! My fiance and I just bought a new house this past May. There are cabinets in the laundry room that the original owner put in there when she redid the kitchen. We really want to paint them white because right now they don’t match. However, these cabinets are not wood. They are more like a laminate plastic like material that is trying to look like wood. Do you have any suggestions for painting these? Prepping steps and/or products? Thanks!
YoungHouseLove says
Anyone attempted this? Feel free to share tips or what worked!
xo
s
Stacy says
I read somewhere that you can paint over laminate as long as you prime first. I found that out reading another DIY blog – http://www.livelovediy.com/2013/06/how-to-paint-laminate-furniture.html
Leslie C says
I love how much brighter the kitchen is looking!!
So I ran across this news story this morning and thought I would share it…..
http://www.myfoxdfw.com/story/24328249/woman-attacks-man-with-ceramic-squirrel-when-he-doesnt-get-beer
Who knew ceramic animals could be so violent!
YoungHouseLove says
So crazy! Never use ceramic animals for evil!
xo
s
Leslie says
Looks great! I definitely think the contrast between the white upper cabinets and darker lower cabinets is going to look nice. I’m gravitating towards that look myself.
Rebecca says
Oh my…it just looks better and better with every picture you post. As some one doing a similar interim reno (painted the cabinetry, replaced hardware, counters are next but no major work in hopes of gutting in feverish years) it’s really inspiring to see a similar reno go so well.
My vote is for the concrete countertop option…because I totally had that on my list (until damage to the counter resulted in it needing to be replaced) and I have really high hopes for it being fantastic!
Sandra says
Breath of fresh air!
Annie says
Hi John & Sherry!
I haven’t read all the comments so maybe you’ve already addressed this but I’m curious about how much the wood grain shows through and whether it makes them look “cheap”. I know this is just a temporary reno for you guys so I’m really asking for my own behalf. We have “oak” cabinets and I would love to paint them but they have a texture to them and I’m just not sure how nicely it would paint.
Any thoughts?
:) Annie
PS. Sherry, you are a good sport about your MS. I had MS for 18 weeks with my first son and it totally sucked. I was not nearly as pleasant about it as you seemingly are! Hang in there….
YoungHouseLove says
Aw thanks! As for the texture, at this house it’s really smooth and unnoticeable (spraying puts it on thicker we think, and it could just be the grain). In our last house we had some but it looked awesome anyway. Really clean with the white paint. Hope it helps!
xo
s
Annie says
Just scrolled up and saw the same question — we have the builder grade ones as well. (Hence the “oak” in quotes.)
Anyone have any experience? I guess one way to know is to test it on a piece of similar scrap picked up from a salvage place.
Debbie says
Looks great! I would love to see lighter wood cabinets to match the table and lights. I’m off to hang a mirror and artwork. You all have inspired me.
Gabbi @ Retro Ranch Reno says
So. Freakin’. Amazing. Can’t wait to see what you have up your sleeves for the lowers! :)
Katie says
Sorry if I missed it, but what white paint did you guys use? Thanks!
YoungHouseLove says
Simply White is the color and the finish is satin and it’s the Advance line by Ben Moore (we used it years ago on our office built ins and fell in love).
xo
s
Jessica says
So excited to see if you guys go with the concrete overlay since that’s what I want to do to my kitchen counters!!
Kelly says
Looks great! I love the white – it makes everything else look so crisp! I can’t wait to see what it will look like with the stained lower cabinets – I think that’s a great choice.
I really hope you choose to do a concrete-over-formica treatment somewhere because I’ve been dying to try this on my ugly green formica kitchen counters.
Good luck with staining!
Sherry says
For your countertops, I highly recommend the Ikea butcherblock. It looks great with white and is pretty cheap and easy to work with. Plus, when you do phase II, if you still want to upgrad, you can repurpase the butcher block easily into a table, shelves or countertop somewhere else (or carve into cutting boards and give them away as presents!). Toss in the Dosmjo double-sink and you’ll have a handsome improvement without the mess of concrete covering.
YoungHouseLove says
That’s a fun idea too!
xo
s
Vickielovesjeff says
Loving the kitchen so far guys! Nice work! My kitchen is also about to undergo the tuxedo treatment. I’m wondering what you’re planning as far as hardware finish on your dark lowers. Will you do the same dark oil rubbed bronze finish to match the rest or mix it up a bit to avoid the dark hardware on dark wood? I’m kind of stumped. Thanks! :)
YoungHouseLove says
I think we’ll go with the same orb stuff down below to keep it simple since the cabinet colors are going to be different.
xo
s
Stephanie says
After the primer coat on the hinges, what kind of spray paint did you use to get the oil-rubbed bronze look? I’m in the middle (well almost finished) painting ALL of the trim in our house from honey oak to simply white. I love how paint can transform a house – and I love how your kitchen is coming along!
YoungHouseLove says
Rustoleum has an awesome ORB can with a trigger spray nozzle called All Surface Universal, so that’s what we used (we have had luck with it before on a ton of projects).
xo
s
HeatherMay says
I love the change by the window but it was the built in desk area that made me really say wow. It looks completely different with the new paint and hardware! One question, can you tell me where you got that super sweet little yellow radio that is on the desk/shelf? I’d love a little shock of yellow like that to replace the buzzy radio in my kitchen.
YoungHouseLove says
Aw thanks so much! It was from Joss & Main. The maker is Tivoli if that helps!
xo
s
Susan C says
I have been toying with painting my kitchen cabinets white or going dark with a gel stain….now you are making me think I can do BOTH?!? Why didn’t I think of that….. Can’t wait to see how your kitchen progresses. I also just read about a concrete coating on counters that I found on Pinterest. I’ll let you guys try that first though!! I have BEAUTIFUL dark green laminate counters and lots of them, so switching to granite is going to be pricey and is going to take a lot of saving up. I love my big kitchen, but it is expensive and time consuming to do updates…
Stephanie Acker says
Amaze balls. Just pure, glorious AMAZE balls. You guys are so inspiring and productive. I can’t stand it.
Lindsey says
Hi guys! SO GLAD you went with dark wood on the bottom and white on the top – that’s my plan for our kitchen and I envisioned it looking really great in yours when you showed us your original ideas. Btw, I store all of my magazines in my kitchen, too :) Great work, and Happy New Year!
Sarabeth says
I’m absolutely loving these updates! It feels so light and open now! Do you have any suggestions/tips on how to get the same feel in a kitchen that has less natural light? My poor little kitchen has just one window above the sink and often could be as welcoming as a dungeon. Would white cabinets and grey (Revere Pewter??) walls work? Merry Christmas and happy New Years!
YoungHouseLove says
Ooh yes, that sounds gorgeous and would definitely lighten things up!
xo
s
Stacy says
I love it! Quick question though – what kind of paint do you use for your trim/crown?
YoungHouseLove says
Semi gloss is the finish we like, and it’s Simply White by BM.
xo
s
Stacy says
Thank you! I know you’ve posted that in the past but I just couldn’t remember and have a ton of trim to get to.
Gina says
Sorry guys, not to be mean, but this is kind of disappointing. Its the same formula as usual; white cabinets and blue walls. With the open shelving, its pretty much the same as house 2. I understand you are doing something different with the lower cabinets, but its all just too similar to what you usually do. I would think in a temporary phase 1, you would get more daring and creative. I think the black pepper color you used in your bedroom would look great on the walls in the kitchen and provide some interest and contrast that is sorely lacking. Its just all to ‘sterile’ looking. It needs more warmth.
YoungHouseLove says
We’re actually thinking about Black Pepper for the dining room with white built-ins for fun contrast! And concrete counters plus wood lowers is going to be such a fun departure for us in the kitchen – either that or dark counters, which we’ve never done either. I think it’ll evolve into a mix of what we love (we liked open shelves, so we’ll probably want them wherever we live) along with some new choices (different counters, stained lowers, different floors, dark hardware, etc). In phase 2 we want to do a fun backsplash tile, appliances in a different finish than stainless, new counters, an island, and heated tile floors – so that should be fun too!
xo
s
anonymous says
here’s the thing… its THEIR house. and if they like something, its not up to you to tell them if that’s right or wrong. yes this may be their job to post about stuff, but they still have to live with these changes day in and day out and if its what they like, its what they like. this room feels so much airier now, in my opinion.
Kelsey says
Looks fantastic! Painting dingy wood cabinets white is such a breath of fresh air for a kitchen. I painted mine two summers ago, including the insides (since they were rough and ugly), and while it was an insanely huge job it was so worth it. I just got done doing the laundry room cabinets last week, and it makes a huge difference in there too!
Just in case any of your readers are looking for more product ideas, I’ll share what I’ve used based on the recommendation of my local paint guru: I primed with Zinsser Smart Prime, which is low-VOC, super stain blocking, and has incredible adhesion. For the paint I went with Benjamin Moore Waterborne Satin Impervo. It goes on incredibly smooth and actually self-levels, so you wind up with a great finish. It’s also held up very well under heavy use in my kitchen. Neither one is cheap, but I’ve only had to use one coat of primer and two coats of paint on all the cabinet projects I’ve done, so that saves quite a bit of time and money.
YoungHouseLove says
So awesome! Thanks for staring!
xo
s
mary says
Looks so much better. I’ve done that… it’s so much work.
I would’ve gone for white hinges because the contrast to me highlights that the hinges are the old-style, exposed ones. They never really disappear like hidden ones do, though.
Choua says
Looks awesome!!!! I always love what you two do.
Laura in Mississippi says
Like everyone else, I love it! Y’all never disappoint!
I am so happy to hear that you are considering a painted-uppers-with-stained-lowers combo. We renovated our kitchen last year and I did the same thing. My uppers are Sherwin Williams ‘Snowbound’ with lowers that are stained in Minwax ‘Special Walnut.’ And I love them, and get tons of compliments too! People always say it’s one of those things they’d never think of, but they love the look. (pics: our kitchen is the cover photo on our builder’s facebook page https://www.facebook.com/batwoodcontruction)
I chose the combo because I’ve always loved the look of a white kitchen but with 4 large dogs and a farmer-husband I didn’t want to spend my life cleaning my lower kitchen cabinets! I can’t wait to see what you guys come up with next in the kitchen!!! Happy New Year!
YoungHouseLove says
Sounds so gorgeous!
xo
s
Taya says
Wow! What a difference! It looks awesome and so much more open and modern!
lauren says
Lovely cabinets! Thanks so much for doing this post. I have been staring at our worn out cabinets for 3 years trying to figure out what to do to them. It seems like such a multi-day process I chicken out!
We did do home improvements over the break. We are replacing our floor to ceiling metal closet doors. We added drywall to shorten the height and I used the paint sprayer you inspired me to get to paint the doors. Thank you for all your tips!
Stephanie says
Oh my that is quite a dishwasher! I’ve never noticed it in the previous posts. How’s it working out for you guys?
YoungHouseLove says
It works great but doesn’t look too cute! Haha!
xo
s
Amanda says
I love this!!! I think it will look great with a darker stain on the bottom cabinets.
So, I’ve been wondering- how does it work if one wants to submit a “Reader redesign”? We made over our rental kitchen with a very small budget earlier this year and thought it might be fun to send in the “before” and “after” to you guys…
YoungHouseLove says
There a “contact us” link on the button on our sidebar with our smiling faces on it. Can’t wait to see!
xo
s
Kristen says
I vote for concrete coating the countertops! Would love to tackle that one this coming year myself so a tutorial would be huge!