We’re soaking up a white Christmas over here! Nope, we didn’t wake up to any snow on the lawn, but there was a dusting of white elsewhere on the premises…
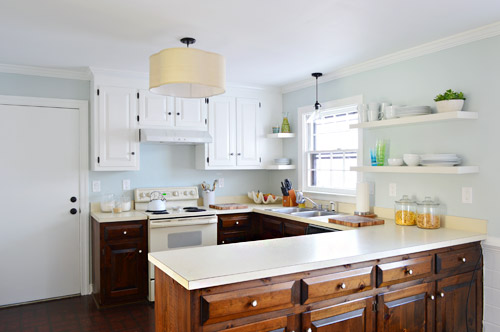
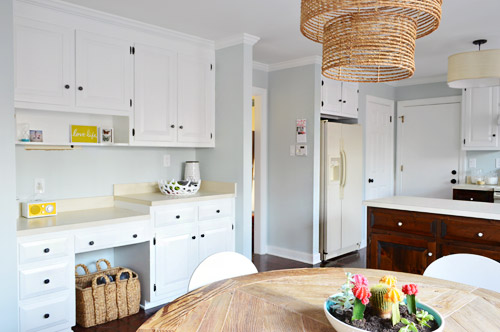
We used last week to sand, prime, and paint all of our upper kitchen cabinets and – shocker – we ended up going with white. So yeah, it’s a little bit different from our original plan to paint them a light gray-tan on top… and a little more like what we did in our last kitchen – but just for those uppers. We have a completely different plan in store for the lowers – and it actually involves wood stain and no paint at all – so maybe as we move into 2014 we’re getting progressively less predictable? Or more woodsy? We also have some ideas for those countertops which we’ve never done before (either a refinishing/paint technique or a concrete coating one – both of which are budget friendly, so they should be great for Phase 1).
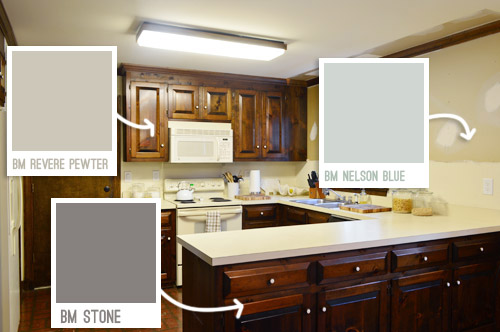
The tides shifted from Revere Pewter to Simply White (which is one of the top white paint colors out there)for those upper cabinets around the time that we installed the range hood and put up the floating shelves. While we liked the idea of the white shelves & hood contrasting with putty colored upper cabinets, we started to worry that also having the darker lower cabinets might just be too much going on (white and putty on top with a third darker color for cabinetry on the bottom).
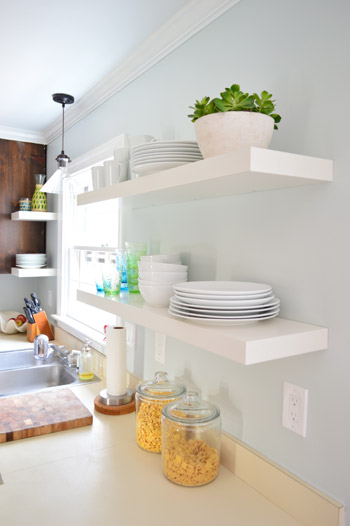
But the main thing we couldn’t wrap our heads around was a way to make crown situations like this one make sense with colored upper cabinetry. Usually crown matches the color of the cabinet, but wouldn’t it be weird to paint just a section of this crown to match the cabinets since there’s no indent where the cabinets end (it’s just one long piece along that entire area)? We already didn’t like the look of the mismatched cabinet and crown that we had going on, so continuing that theme with a new color on those uppers just didn’t seem like the right way for us to go.
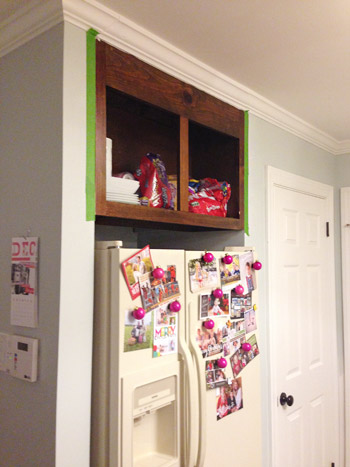
So we went with white. As much as we wanted to do something new, we never like to do something different just for the sake of being different. And at least this way we can still stick with our plan to do the lower cabinets in a deep tone for that “tuxedo” look that we’ve always loved but never had the guts to try.
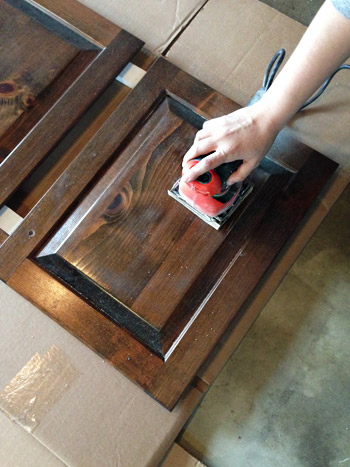
Now that we got through the why of what we did, let’s get a little into the how. Clocking in at nearly 2,000 words, this post is hardly short, but is gonna be quick and dirty compared to the picture-and-video-tastic tutorial that we did last time around since we used the same technique. So we’ll just share some broad details here, and you can reference that post for the nitty gritty. First up we removed the cabinet doors and gave every surface a light sanding, just to get rid of any glossiness and rough things up for better paint adhesion. Sherry used a hand sander on the doors in the garage with 150 grit paper, and I used an 150 grit sanding block on the frames inside.
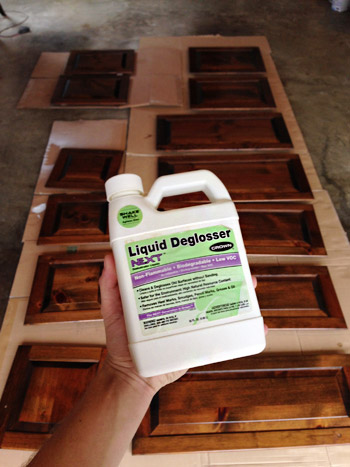
Next we wiped everything down with a liquid deglosser. This is a low-VOC brand called Next that we had leftover from last time (originally found at Home Depot, although we hear it’s not there anymore). It’s an optional step, but we figure it never hurts to prepare the surface – especially when it just takes a bit of wiping. Plus after you sand it’s a nice way to get the sawdust off.
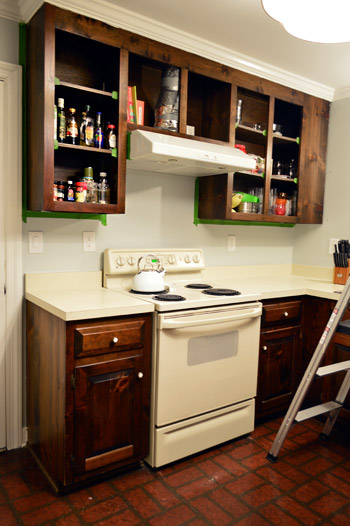
We then taped off the walls and other obstacles around the cabinets (like our newly installed hood) with painters tape to protect them and to make each of our sure-to-be-many coats go on as fast as possible.
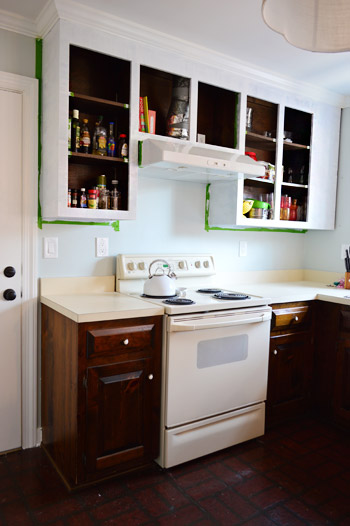
With everything taped, we primed the frames with a brush and a small foam roller. We used a Kilz Premium primer because it’s stain-blocking but still no-VOC. This picture is after two coats of primer. Sherry’s the cutter-inner of the family, so she did the brushwork with a short handled 2″ angled brush, and I did the foam rollering, following right behind her around the room so I could roll over the edges that she brushed for the smoothest finish.
We considered using our paint sprayer for those interior frames, but ultimately decided to do the indoor stuff by hand. The amount of taping and drop-clothing that would’ve been required to protect the kitchen (and the three adjoining rooms) from paint over-spray just didn’t seem worth it – especially when weighing the need for a functional kitchen (and not subjecting a pregnant lady and three year old to the fine paint mist that seems to linger afterwards).
But we did use the paint sprayer outside to prime and paint our cabinet doors. And by outside, I mean the garage (since we had quite a bit of rain last week that ruined any chances we had of spraying outdoors). I set up a little station where I could coat one door at a time and then lay them out to dry.
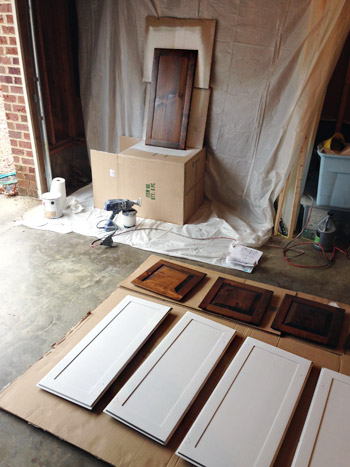
For anyone out there thinking about using a sprayer on doors during cabinet painting, it’s a great way to get a nice smooth coat with less effort than doing the whole thing by hand. But you’ll probably want to get your bearings by practicing on a few other things first (you might not want your first spray job to be cabinets since it can take a little while to master the whole not-too-thick-and-drippy thing).
Back to the spraying process. After 24 hours of drying time, I flipped them over and did the other side. The actual spraying was pretty fast, but the waiting for the thick coverage to dry (and cleaning the sprayer in between daily coats) didn’t make it the breeziest process in the world. Although it certainly required less time than all the coats the frames inside took.
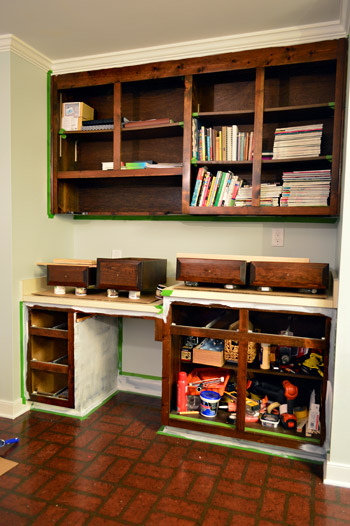
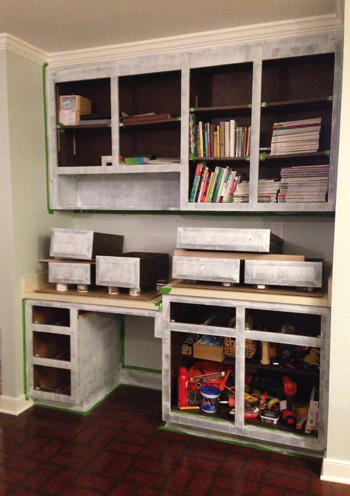
This is the desk area, where we also opted to paint the lowers. Both Sherry and I felt like this was all one unit (like a hutch in the eat-in area) unlike the peninsula-ed part of the kitchen, which we thought would look awesome with those dark lower cabinets. So over here we also painted the six drawer fronts by hand – since they didn’t detach from the drawers themselves. A lot of this cabinetry was surprisingly non-removable, for example the shelves inside don’t pop out (you’d literally need to demo out the frames to remove them). The picture below is after one coat of primer.
Note: much like our last kitchen, we opted to paint both sides of the doors, but to leave the inside of the cabinets unpainted (we think the contrast of wood inside + painted doors can actually be a nice combo when it’s done cleanly).
We opted to do two coats of primer based on what we learned when we painted the trim in this room. But you can see here that even that was still pretty spotty. You can also see where we used small pieces of painters tape to block paint from getting on the shelves for a nice clean look.
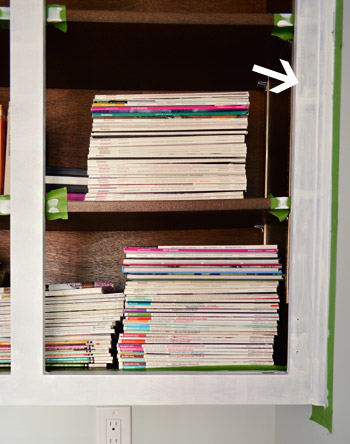
In the end, it took 2 coats of primer and 3 coats of paint in the areas that we did by hand (we used Benjamin Moore Advance in Simply White, which we love for the durability, the fact that it’s made for cabinets, the low-VOC non-oil formula, and the fact that it’s self leveling). Just for comparison, the doors that I sprayed in the garage only took one coat of primer on each side, and one coat of paint on each one (the coverage is a lot thicker, and you go through more paint, but it leaves you with a nice factory-like finish if you’re careful to avoid drips).
In short: spraying (even with that “cleaning the sprayer between coats” factor) is definitely faster – but I’m still not convinced it would’ve been a good choice for the frames since the entire room would have needed to be taped off for the entire process and a fine mist of paint and primer would have lingered in the air for a while.
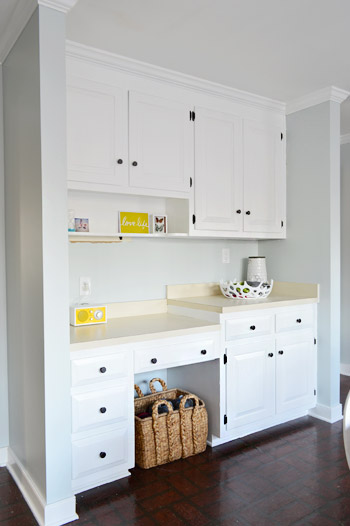
All told this was a week-long update for us, which can roughly be summarized like this – day 1: sanding, deglossing, primer coat #1, day 2: primer coat #2, day 3: paint coat #1, day 4: paint coat #2, day 5: paint coat #3, day 6: another full day of drying, day 7: re-hanging doors and adding the new hardware).
We also updated the hinges and the hardware. The hinges were a worn brass color, so we went oil-brubbed bronze with them since we liked the idea of doing contrasting hardware this time around (we’ve done brushed nickel in our past two kitchens). To help the paint job hold up on the hinges, we sprayed them with some “clean metal primer” first too, since we’ve heard such good things about this particular product (we’ve seen others use it specifically on moving parts like hinges, with luck – so we’ll keep you posted about how it wears).
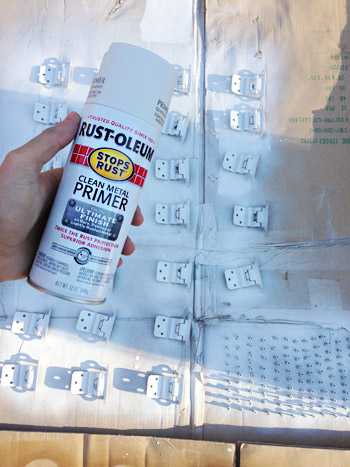
The ORB went on nice and smoothly when that coat of primer dried, and so far the hinges look great and have worked well (there’s no gumminess or grinding/peeling) so for about $11 it was well worth the update so far. Ultimately we’d like to have hidden hinges, but it’s not easy or cheap with these cabinets (these doors are half-sunk, and they don’t sell off-the-shelf hidden hinges for those type of doors) so we’ll save that dream for Phase 2.
We weren’t crazy about the shape and detail on the original brass and white knobs, so instead of spraying those we picked up a few boxes of the same Target octagon knobs that we used in our master bathroom, since they come in at under $2 each.
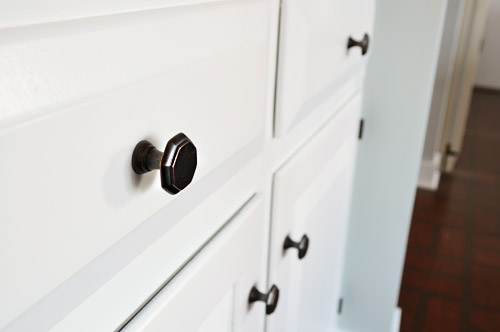
We like how high contrast they are against the white, which seems to be something we’re gravitating towards lately (think stair runner, our stenciled bathroom floor & dark vanity, etc).
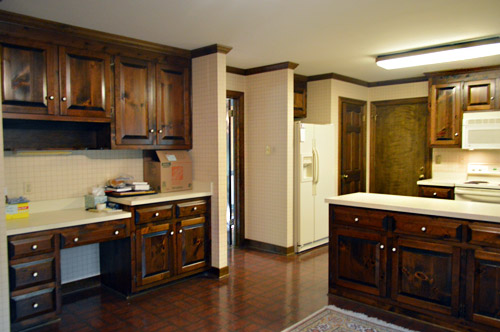
Ahhhhh, this feels a lot more like home. Just ignore the faux brick floor, those old counters, and those off-white appliances – we’ll get there eventually.
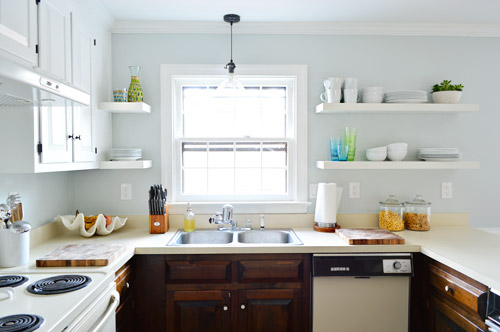
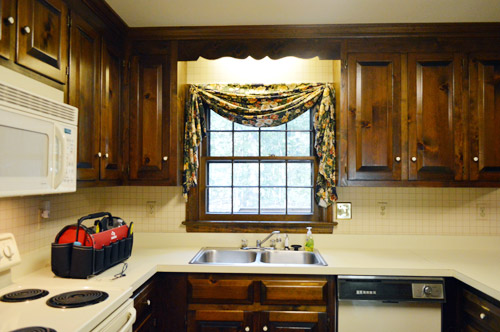
I think the before and afters from this POV really show the difference. This is what the sink area looked like on inspection day…
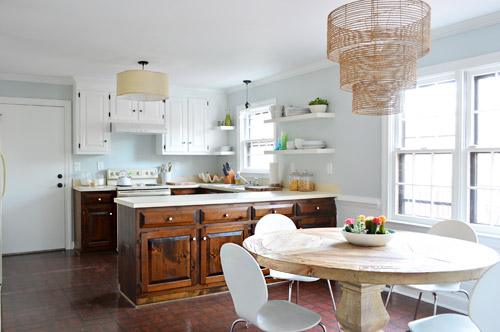
And here’s the same angle now.

We’re gonna tackle those lower cabinets this week – which is a place we’re again veering off course from the original plan. You’ll remember we said we liked the idea of a deep stone colored paint on them here, but then near the top of this post we mentioned stain. Now that the uppers are painted, we actually like how the wood tone is playing off of them, so we’re feeling less paint-y and more stain-y. Ah yes – THE PLOT THICKENS!
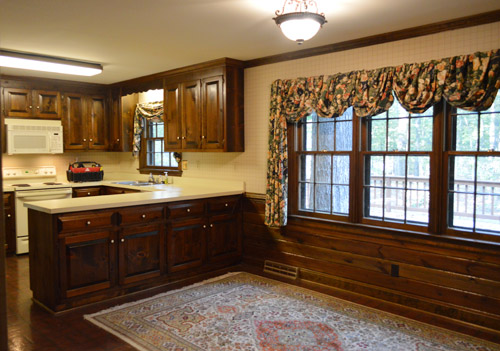
And just for fun, here’s one more throwback shot of our kitchen before we moved in. It’s pretty amazing what a series of affordable updates – like stripping wallpaper, removing a few cabinets, hanging shelves, and priming and painting the cabinets – can do.
Did anybody else tackle some big-ish projects over Christmas week? Or are you just gonna make us jealous and say you spent the week stuffing your face with cookies and watching Elf on repeat?
Psst- Sherry’s over on Young House Life chatting about New Kids On The Block and teacher gifts.

Emily says
It’s beauuuuutiful!
Karen says
AMAZING!! I noticed you use a no-VOC primer, but only a low-VOC paint. Did Sherry paint with the low-voc paint? I am wondering if this is safe while pregnant as I am planning a project myself with low-voc paint and am 4 months pregnant.
Thanks for your feedback.
YoungHouseLove says
I use a respirator whenever I’m sanding or using low-VOC paint, but it seems to work if I’m not doing it for super long sprints of time (I get out of breath faster being prego, so if I need a break a step away or go outside to relax for a sec).
xo
s
Alana says
I admire your ability to put together a room piece by piece, and manage to have everything work together in the end. I’m going to be completely honest and say I was not sure about the new light fixtures in the kitchen. But with the lighter color palette, they look great! Seriously, I still have the nerve to question you guys every so often ;)
How do you decide on things like light fixtures without having a complete kitchen design to go off of? I am in the process of updating my kitchen this way, and I don’t have such good luck.
YoungHouseLove says
I think it really helps for me to put them all together on white (like the mood board I made) since I knew the ceiling would be white and expected the cabinets to be light – although we were planning for taupe at the time). It’s really hard to picture things in a dark wood room so looking at them on white is sort of a “cleansing” step. Haha!
xo
s
Sheila F. says
Cabinets look wonderful. Thinking about campaign strategies for a chalkboard fridge. Don’t Craigslist it. Use it later in the garage. It will be useful for cold drinks while working out there. Also extra food and beverage cooling for parties. Also great foe when Clara is playing outside and wants a cold water. AND the Chalkboard will be useful for jotting down notes and measurements while working on projects. I rest my case. lol
YoungHouseLove says
That’s another possibility for sure!
xo
s
Ann says
I like the changes you are making! Are you planning to gel stain the lowers?
I know you have probably covered this before but my memory is lousy. What brand/model paint sprayer do you use? I have some end tables to paint and I think a sprayer would do a better job than a brush.
YoungHouseLove says
It’s a Graco True Coat II I think. We love it! As for the lowers, we are still debating stain finishes and types but will keep you posted!
xo
s
Stephanie says
So beautiful!
Question: I tried to figure out from the pictures, did you paint just inside of the cabinet frames or did you stop flush with the cabinet fronts?
YoungHouseLove says
We did the lip of the frames, but not the back or sides of the cabinets if that makes sense.
xo
s
Krystle @ Color Transformed Family says
The entire transformation looks great but I think my favorite part is the desk area off to the side. I love the basket under the counter and how un-80’s it looks painted white!
Heather @ What Does She Do All Day? says
It looks great! I didn’t start painting, but I did make a trip to pick out color swatches to paint my kitchen cabinets. I’ve now got swatches taped to the cabinets so I can start the difficult process of narrowing down to the winning color(s).
YoungHouseLove says
That’s exciting! Good luck!
xo
s
Sayre says
I love this. We moved into our house 6 years ago and one of the things I’ve always wanted to do was our kitchen. It wouldn’t be a major renovation, but I wanted to move our fridge to the opposite wall and put in a peninsula where the fridge used to be. I’ve been following this particular renovation with much interest but today, I suddenly realized that we have the SAME KITCHEN! Yours is already in the configuration I want, but yours is where I’ve been heading for years. I need to beef up the electrical stuff on the side of the kitchen where I want the fridge, but this is actually where I’m heading. I’m showing this to my husband because even though I’ve been telling him for a long time, he can’t envision it. Now he can. I’m thinking that I want grey tile for my countertop though. Sort of a light to medium grey.
YoungHouseLove says
Sounds really pretty!
xo
s
Jen says
Nice work guys! Such an amazing improvement! What do you guys have lined up for the next few weeks worth of projects?
YoungHouseLove says
Oh gosh, we just take things a day at a time but we’d love to stain the lower cabinets and keep trucking in the kitchen. And maybe start planning the nursery and remove the wallpaper in our master bath? We’re also doing a lot of fun showhouse stuff so we owe you updates on materials (tile, flooring, lighting) along with photos of how the house is coming along.
xo
s
JG says
Love your choices of white and stain, and figuring out your reasons!
Have you seen what Door Sixteen did for kitchen floors? That might be a good cheap Phase I option for you:
http://www.doorsixteen.com/2013/10/29/installing-a-plywood-plank-kitchen-floor-part-one/ and http://www.doorsixteen.com/2013/11/14/installing-a-plywood-plank-kitchen-floor-part-two/
(Although maybe not in black for you!)
Another thought is- would you replace your countertops for Phase I if it was inexpensive enough? We ended up using Ikea PRAGEL laminate countertops in the black stone effect, which (if they haven’t changed it) is a great look- not pretending to be real, and not a flat color- so it ends up looking by choice, instead of “having to” buy laminate. And it is only $60 for 6 feet / $70 for 8 feet! Might end up being cheaper than a countertop paint kit or cement kit! It is easy to cut as well, so it is great for DIY.
We didn’t do much, but we stopped by Lowes for a bunch of tile… :)
YoungHouseLove says
Love that!
xo
s
Julie says
Love it! I’m still living with my phase 1 (it’s been three years) and perhaps why I love yours so much is because we’ve gone with similar colors! One idea for you, I covered my cream fridge with chalkboard paint (and added primer for some fun chevron stripes).
YoungHouseLove says
That’s another fun idea!
xo
s
Karen says
Loooove it! I especially like the desk area that I had apparently completely missed.
Since you are obviously so clever and brave enough to tackle anything, why not paint your fridge? Can super hubs do that with his paint sprayer? Special paint, I’m guessing. Just an idea.
Beautiful. Simply beautiful!
YoungHouseLove says
I’m actually gunning for chalkboard paint or even just white paint on it (and the oven) so we just have to get John on board. Haha!
xo
s
Jackie says
Hi!
Love the lightened look of the kitchen. My husband and I were considering painting our old and sad cabinets but they’re real wood covered in laminate. Do you know of anyone who painted over laminate and if they were successful? Thanks!
YoungHouseLove says
Anyone have tips or suggestions on this subject? We’ve never tackled this ourselves, but it seems like something a bunch of you guys are curious about!
xo
s
Gina says
http://www.centsationalgirl.com/2010/04/go-right-ahead-and-paint-that-laminate/
How about this?
Natalie says
LOVE the white. We did something similar in our outdated kitchen last year (http://www.oregonshirzads.blogspot.com/2013/02/the-kitchen-is-finished-for-now.html) – painted cabinets white, but did a dark stain on the island and command station. The contrast is really great. I can’t wait to see how yours all turns out!
YoungHouseLove says
That came out so nicely! Thanks for the link!
xo
s
Anne says
The kitchen looks great so far! Just curious – when John sanded the frames, was it literally a VERY light sanding (basically just a tiny amount to rough them up a smidge)? I noticed in the shots you left everyhing in the cabinets which makes me think little dust and very light sanding occurred otherwise you probably would’ve removed items so they weren’t covered in a dust layer. I’m asking because I’ve painted a few of our bath vanity cabinets and I think I go a bit overboard on the sanding and cause more of a mess than necessary. Thanks and Happy New Year!!
YoungHouseLove says
Yes it was just to rough things up with a sanding block, so there wasn’t a lot of sawdust flying or anything. Then wiping things down with deglosser allowed us to nip into the cabinets and grab and little particles that may have settled in there, but there thankfully weren’t a lot.
xo
s
Bethany @ Dwellings by DeVore says
It looks so fresh and clean! You guys have made so much progress!
Connie says
looks so good! I love the idea of staining the lowers instead of painting them and I’m especially interested in that process and how it turns out!
YoungHouseLove says
Wahoo! So excited to do it and share the details!
xo
s
Chelle says
It looks AMAZING!!!!
I have a couple of questions regarding paint. I remember reading in a previous post that you guys have mentioned having Benjamin Moore colors matched at other locations such as Lowe’s, and my question is how exactly do you do this? Do you have to have a color swatch from Benjamin Moore? Or do you guys take in leftover paint to have matched?
I have fallen in love with several BM paint colors as possibilities for our master bedroom, however, the closest BM retailer is almost 3 hours away from where we live. Any advice you guys could offer would be greatly appreciated.
YoungHouseLove says
Yes if you have a swatch it’s helpful but they can also look up the formula in the computer a lot these days, so just asking to see if they have it can be helpful. Good luck!
xo
s
Sydnie F says
I get Benjamin Colors matched at Lowes all the time. I just tell them the BM color and they look it up for me. No swatch needed so far. Good luck!
Jenny says
Beautiful! We just had our kitchen cabinets painted white and it really brightens up the room. I especially love your light fixtures, especially the one over the kitchen table. Where did you get those?
YoungHouseLove says
Thanks! We blogged about those a few weeks ago. The one over the table was from Joss & Main.
xo
s
Cheryl says
I’m amazed at what a long way you have already brought your kitchen. Beautiful! (Plus, it’s kind of nice to take a break from unpacking and see a little inspiration :))
Sydnie F says
Looks fantastic guys! We are hoping to do our cabinets in the spring or fall and this post made me all tingly with excitement. I do have one question: do you worry about lower temperatures outside affecting your paint drying? We live in Baltimore and we are holding off on our painting because we are worried, but you guys seemed to soldier on.
Also, I vote for concrete counters. Jenny’s LGN tutorial seemed pretty comprehensive and looked great. Good luck!
YoungHouseLove says
Yes, I would read those paint cans and follow them if you’re doing any painting outside (if it’s all inside you should be fine with the temps in the house assuming they don’t drop to freezing or anything at night inside). I think ours said not to apply it under 50 degrees and thankfully it was 50-60 in our garage when we did them, but if it’s 30 degrees out you definitely don’t want to be painting in the garage!
xo
s
Courtney says
Am I stupid or…where did you put your microwave? :( haha sorry!!
YoungHouseLove says
We’re in the process of moving that into the pantry! Just have to move a shelf and paint in there and we can post about it!
xo
s
HeatherM says
Please don’t do cement countertops! My aunt has them, and even though they have a good sealer, it is such a porous material that it would get permanent rings every time someone left a glass of ice-water on the counter. And I don’t even want to get into the time her car spilled a whole pitcher of water with lemons all over that counter.
As for cabinets, I agree I like the wood tones on the bottom , but the one picture where the bottom cabinets look mahogany is my favorite. I would definitely go with a dark wood tone over a light one!
YoungHouseLove says
Thanks for the cement tip! We have heard from folks who have been unhappy with marks and others who love theirs (seems like some sealers perform better than others). Will definitely do some more research and keep you posted!
xo
s
Elisa says
Love it! The brightness looks like the ceilings were lifted!
caroline [the diy nurse] says
It looks so much better! I bet you’re singing up a storm in there with all that bright light :)
Bree says
HOOOOOOLY MAN
that is all I can say …
It is amazing !!! you guys blow my mind every single time … It really shows how simple and inexpensive it can be to get a pretty wow effect
You guys Rock!
<3
Stephanie says
I LOVE your exposed hinges…they really pop now! It looks wonderful, guys. I barely recognize the room from when you moved in!!
Julia says
Lovely bright kitchen!
I have (hallway) painting plans for this week, I only hope it turns out as bright and cheerful when I put white paint on dark wooden trims.
This post also unfortunately means that I’ve caught up on your blog (I started reading from the beginning sometime back in September). I’m going to have to find another to supplement my reading (or maybe get the book!) but I’ll definitely still be here getting my daily fix.
Thanks!
YoungHouseLove says
Aw thanks Julia! I think you deserve a bumper sticker like “I survived the YHL archives, without turning into a zombie.”
xo
s
Jennifer says
we actually also painted our cabinets except ours had old flat ugly cabinet doors so we added trim to them to give them more of a shaker feel. We have almost all the upper doors finished and are moving on to the base on New Years Eve. Nothing like ringing in the new year while sanding or priming some cabinets.
YoungHouseLove says
That sounds awesomely transformative though! Those shaker frames make my mouth water…
xo
s
Emily E says
We painted our hallway, office, and the dark wood paneling in my daughter’s room. You can check out the before and afters on my instagram, if you want…
http://instagram.com/emsreadingroom
We also starting refinishing the red oak floors we found under the carpet. I’m pretty DIY’ed out, but I’m still trying to reach the finish line before January 6 when I have to go back to work/school. The cabinets look fantastic. I’m almost tempted to paint mine as a phase 1 project before we re-do our kitchen in a couple years. Especially since I’m not positive we’ll be in this house long enough to do a major remodel…
YoungHouseLove says
That looks awesome! Thanks for sharing the link Emily!
xo
s
Alisa D. says
Wow! Looks fantastic! Happy holidays!
Susan says
Great job Sherry and John. Your cabinets look great. You two are really becoming painting pros!
I was wondering if you were by chance going to use General Finishes gel stain on your lowers? My sister used it in Java on two of her bathroom vanities and it looks awesome. The really cool thing is its super easy and a little goes a long ways. She gave me the leftovers from a half pint can and I’m going to try it myself in out master bath. It’s really rich looking when it goes on and you can still see the wood grain even though it is really dark.
Can’t wait to see the lowers. The difference in the kitchen already looks amazing.
YoungHouseLove says
Ooh, I’ve never even heard of that but we haven’t picked something yet, so it’s definitely a possibility! Will share whatever we choose and hopefully get started asap!
xo
s
Susan says
I live on the west coast (Olympia Wa.)so that may be a brand available in our area. They do have a web page and are available through Woodcraft and Rocklear.
YoungHouseLove says
Thanks so much for the info!
xo
s
Sally Thompson says
I love all the updates in the kitchen! Only one issue with this blog entry…I think Clara’s past the “toddler” stage and can be called “preschooler” now. Haha! Your little bean is growing up!
YoungHouseLove says
You’re totally right! Sometimes that just slips out!
xo
s
Gina says
I want to paint my white fridge a bold color like red or orange. Perhaps you guys could paint your off white one as well until you decide on something new. Then you can tell me how you did it! Love the transformations. -gina
YoungHouseLove says
Ooh, that would be bold! A vintage green chalkboard paint color could be fun!
xo
s
AutumnTao says
I have no intention of ever painting my kitchen cabinets myself… and yet I find myself reading through your lengthy posts and other random topics just bc I love the story you tell. You are fabulous, and your kitchen looks amazing. I’m always stoked to see a post from you in my reader. Keep up the great work and cheers on the baby. Happy New Year!
YoungHouseLove says
Thanks so much AutumnTao! So sweet of you to say!
xo
s
Jess says
That looks wonderful!
I have an unrelated question for you. I’m about to move into a new place that needs a fair amount of love. One of the first things on the list is getting all the walls painted because the previous owners smoked indoors. I’d prefer to live there a little while and paint room by room, but the smell is so intense that we can’t wait on paint (among other things). How would you approach painting the entire interior of a house before you’ve lived in it? Do you have any suggestions for “safe”, go-to color(s) for Phase 1 walls?
You guys are a tremendous inspiration. Thank you so much for sharing your lives with us!
YoungHouseLove says
Hmm, that’s tough. You definitely want to use a Kilz odor-blocking primer first (make sure it says that on the label, and maybe even calls out smoke smells because just paint might not be enough to block it). You could just prime it all and leave it like that and then live with it (it shouldn’t smell anymore, and primer is cheap and pretty easy to use). Then over time you can pick colors for each room as you get more of an idea of what you want to do!
xo
s
Diana says
I know it looks a lot like your second kitchen but I really liked that kitchen so this looks great!! I love the blue and white.
And you keep magazines in your kitchen?? That made me laugh. In an amused way, not laughing at you way. =)
YoungHouseLove says
Oh yeah, we used to keep them in the built-ins in the dining room, but this house has just one set of those in the living room here, so they ended up in that office nook!
xo
s
Sue says
That is a stunning difference! I have a 40+ year-old mobile, so a lot of projects aren’t realistically on my wish list (other than replacing the whole house, which isn’t in the budget), but I’ve been wanting to re-do my kitchen. Painting the cabinets is do-able, and I followed the links earlier in the comments to look at the concrete counters which sound like a possibility too. Thanks for the inspiration, as always!
YoungHouseLove says
Love that! Good luck Sue!
xo
s
Megan says
I do hope you go with concrete skimming on your counter tops. I’ve been dying to learn more about it.
It looks beautiful- can’t wait to see the continued progress.
Laura says
Just wondering…
You’ve mentioned numerous times that John thought it may bring down the Craigslist resale value if you painted/chalkboard painted the fridge
I can’t help but wonder…
1) How much John thinks you would get for an almond/off white fridge to begin with… (just really have no idea!)
2) Perhaps you would get more for a cool chalkboard fridge. I’m sure a lot of Craiglisters would love a supercool fridge for a rec room and have no idea how to do it themselves.
Maybe the fridge would be worth more with chalkboard paint!
YoungHouseLove says
Yeah, those are points I’m trying to make in the great fridge debate! We’re really both not sure how much a sprayed fridge could fetch (some people might assume it was done poorly since spray painting something insinuates it was sort of in rough shape to begin with, and since the fridge is in good condition (and is a french door fridge with an in-door ice maker) we think we could get a fair amount for it – maybe $100?).
xo
s
Barbara says
What I wouldn’t do to have you two in my house for two days. I’m astounded by what you can get done. It looks fabulous.
YoungHouseLove says
Aw thanks Barbara!
xo
s
Audrey says
Love it!
One suggestion – now that you painted the upper cabinets white and you’re considering staining the lower cabinets, I think it would look great if you took one of your original-plan colors and painted the door to the garage. If you paint it: (1) a color will hide smudges better than white, and (2) it will add some contrast in that corner to draw the eye away from the off-white fridge. I know you plan to replace the door (and whatever you come up with in there will look great), so it’s just an idea :)
YoungHouseLove says
That’s so funny, because on the same train of thought I’m campaigning tobe able to chalkboard paint the fridge! Will have to see if I can get John to go for it!
xo
s
Carrie says
We bought a kit from Daich for our counters that I’m excited to use.
YoungHouseLove says
Let me know how it goes!
xo
s
Sherri says
I am glad you went with white. It complements the wall color so well. Everything looks so bright, open, fresh, and so much more spacious. Hey guys- that was a nice shout-out from Maxwell of Apt. Therapy on you bathroom floor stencil. He’s impressed with you two and rightfully so!
YoungHouseLove says
Aw, thanks Sherri!
xo
s
Nicole M. says
Looks great guys!
I’m actually tacking this very project right now fir the first time. I’ve been reading all of your tutorials and getting myself psyched up to ger er done.
I have a question, did you have any issues with paint bonding to the cabinet doors? It looks like you sprayed them in a garage? I’m wanting to do the same thing, but the paint says not to use if the temp is below 50. It has been in the 30s here, and I’m worried about painting in the garage with those temps.
Any thoughts?
YoungHouseLove says
I would definitely follow those paint can instructions if you’re doing any painting outside (if it’s all inside you should be fine with the temps in the house assuming they don’t drop to freezing or anything at night inside). I think ours said not to apply it under 50 degrees and thankfully it was 50-60 in our garage when we did them, but if it’s 30 degrees out you don’t want to be painting in the garage!
xo
s
Val says
I’ve done only one staining project but it was a new, unstained bathroom cabinet and I learned a thing or two.
1. Besides mixing the stain very well before starting, it’s really important to stir it *frequently* as you work, to keep the pigment/coloring consistent.
2. It really does make a difference to sand between coats of stain using a fine grit sanding sponge or sandpaper. Don’t skip this step because the results are worth it.
YoungHouseLove says
Thanks so much for the tips Val!
xo
s
Kate says
I would love to see you guys tackle the concrete counter tops. We plan to do this shortly in our own kitchen however we are currently still working on the bathroom remodel. we used peel and stick marble tile that we grouted in a brick pattern and plan to use the same in the kitchen which will look great with the concrete counter tops. Love the work you guys are doing. your kitchen is laid out very similar to mine so you guys are making me super impatient to start my kitchen before our bathroom is complete :)
YoungHouseLove says
Ooh that floor sounds cool! I’d love to see pics!
xo
s
Bobbi says
The before/after difference is MAGICAL. It doesn’t even look the same at all even though a good amount of the original pieces are still there.
Meleah says
It looks great! So much larger too! I look forward to the reveal of the lowers. :)