We’re soaking up a white Christmas over here! Nope, we didn’t wake up to any snow on the lawn, but there was a dusting of white elsewhere on the premises…
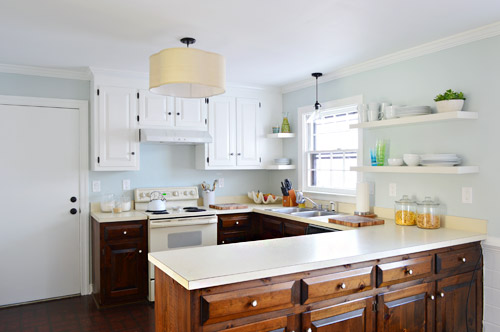
We used last week to sand, prime, and paint all of our upper kitchen cabinets and – shocker – we ended up going with white. So yeah, it’s a little bit different from our original plan to paint them a light gray-tan on top… and a little more like what we did in our last kitchen – but just for those uppers. We have a completely different plan in store for the lowers – and it actually involves wood stain and no paint at all – so maybe as we move into 2014 we’re getting progressively less predictable? Or more woodsy? We also have some ideas for those countertops which we’ve never done before (either a refinishing/paint technique or a concrete coating one – both of which are budget friendly, so they should be great for Phase 1).
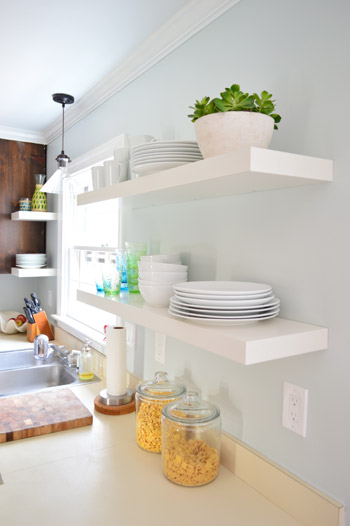
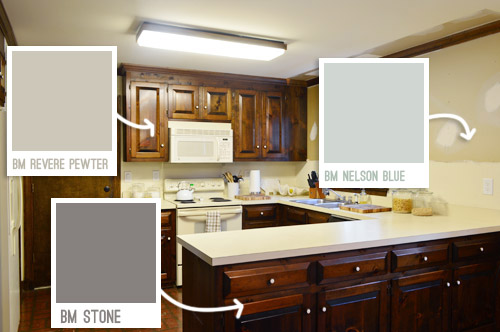
The tides shifted from Revere Pewter to Simply White (which is one of the top white paint colors out there)for those upper cabinets around the time that we installed the range hood and put up the floating shelves. While we liked the idea of the white shelves & hood contrasting with putty colored upper cabinets, we started to worry that also having the darker lower cabinets might just be too much going on (white and putty on top with a third darker color for cabinetry on the bottom).
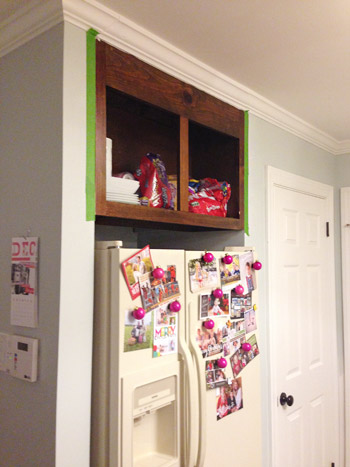
But the main thing we couldn’t wrap our heads around was a way to make crown situations like this one make sense with colored upper cabinetry. Usually crown matches the color of the cabinet, but wouldn’t it be weird to paint just a section of this crown to match the cabinets since there’s no indent where the cabinets end (it’s just one long piece along that entire area)? We already didn’t like the look of the mismatched cabinet and crown that we had going on, so continuing that theme with a new color on those uppers just didn’t seem like the right way for us to go.
So we went with white. As much as we wanted to do something new, we never like to do something different just for the sake of being different. And at least this way we can still stick with our plan to do the lower cabinets in a deep tone for that “tuxedo” look that we’ve always loved but never had the guts to try.
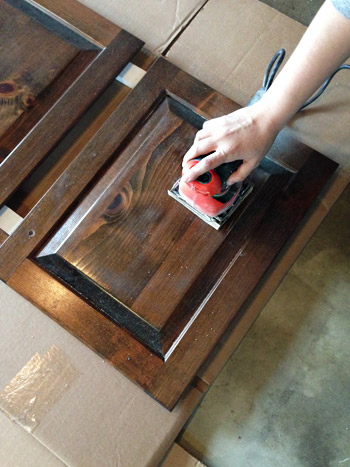
Now that we got through the why of what we did, let’s get a little into the how. Clocking in at nearly 2,000 words, this post is hardly short, but is gonna be quick and dirty compared to the picture-and-video-tastic tutorial that we did last time around since we used the same technique. So we’ll just share some broad details here, and you can reference that post for the nitty gritty. First up we removed the cabinet doors and gave every surface a light sanding, just to get rid of any glossiness and rough things up for better paint adhesion. Sherry used a hand sander on the doors in the garage with 150 grit paper, and I used an 150 grit sanding block on the frames inside.
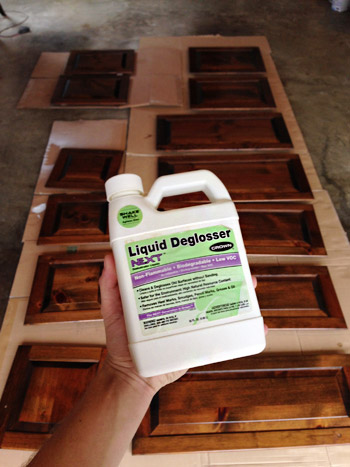
Next we wiped everything down with a liquid deglosser. This is a low-VOC brand called Next that we had leftover from last time (originally found at Home Depot, although we hear it’s not there anymore). It’s an optional step, but we figure it never hurts to prepare the surface – especially when it just takes a bit of wiping. Plus after you sand it’s a nice way to get the sawdust off.
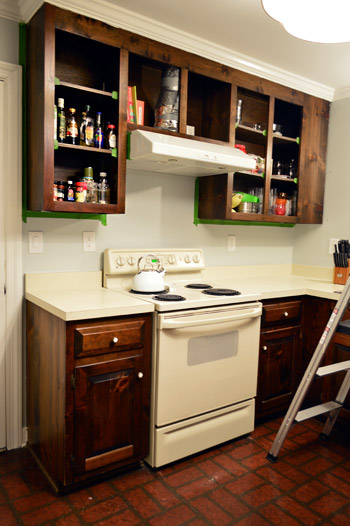
We then taped off the walls and other obstacles around the cabinets (like our newly installed hood) with painters tape to protect them and to make each of our sure-to-be-many coats go on as fast as possible.
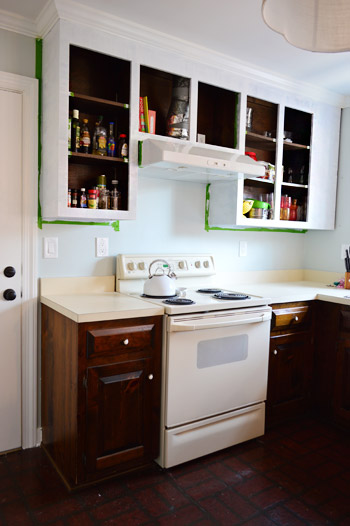
With everything taped, we primed the frames with a brush and a small foam roller. We used a Kilz Premium primer because it’s stain-blocking but still no-VOC. This picture is after two coats of primer. Sherry’s the cutter-inner of the family, so she did the brushwork with a short handled 2″ angled brush, and I did the foam rollering, following right behind her around the room so I could roll over the edges that she brushed for the smoothest finish.
We considered using our paint sprayer for those interior frames, but ultimately decided to do the indoor stuff by hand. The amount of taping and drop-clothing that would’ve been required to protect the kitchen (and the three adjoining rooms) from paint over-spray just didn’t seem worth it – especially when weighing the need for a functional kitchen (and not subjecting a pregnant lady and three year old to the fine paint mist that seems to linger afterwards).
But we did use the paint sprayer outside to prime and paint our cabinet doors. And by outside, I mean the garage (since we had quite a bit of rain last week that ruined any chances we had of spraying outdoors). I set up a little station where I could coat one door at a time and then lay them out to dry.
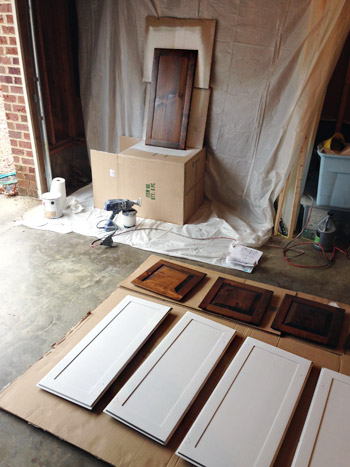
For anyone out there thinking about using a sprayer on doors during cabinet painting, it’s a great way to get a nice smooth coat with less effort than doing the whole thing by hand. But you’ll probably want to get your bearings by practicing on a few other things first (you might not want your first spray job to be cabinets since it can take a little while to master the whole not-too-thick-and-drippy thing).
Back to the spraying process. After 24 hours of drying time, I flipped them over and did the other side. The actual spraying was pretty fast, but the waiting for the thick coverage to dry (and cleaning the sprayer in between daily coats) didn’t make it the breeziest process in the world. Although it certainly required less time than all the coats the frames inside took.
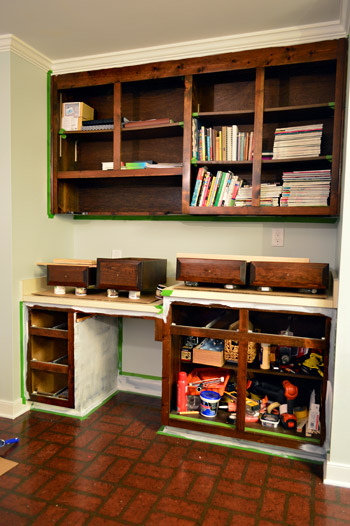
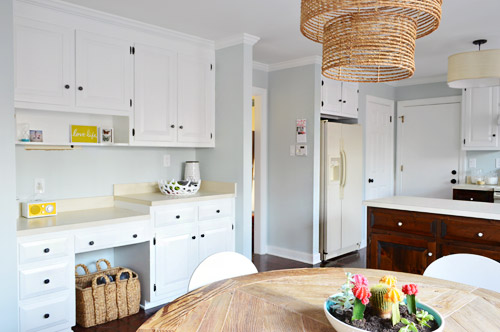
This is the desk area, where we also opted to paint the lowers. Both Sherry and I felt like this was all one unit (like a hutch in the eat-in area) unlike the peninsula-ed part of the kitchen, which we thought would look awesome with those dark lower cabinets. So over here we also painted the six drawer fronts by hand – since they didn’t detach from the drawers themselves. A lot of this cabinetry was surprisingly non-removable, for example the shelves inside don’t pop out (you’d literally need to demo out the frames to remove them). The picture below is after one coat of primer.
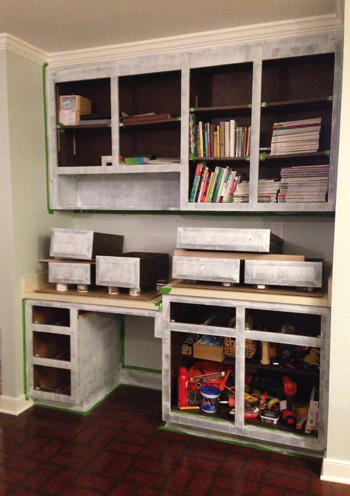
Note: much like our last kitchen, we opted to paint both sides of the doors, but to leave the inside of the cabinets unpainted (we think the contrast of wood inside + painted doors can actually be a nice combo when it’s done cleanly).
We opted to do two coats of primer based on what we learned when we painted the trim in this room. But you can see here that even that was still pretty spotty. You can also see where we used small pieces of painters tape to block paint from getting on the shelves for a nice clean look.
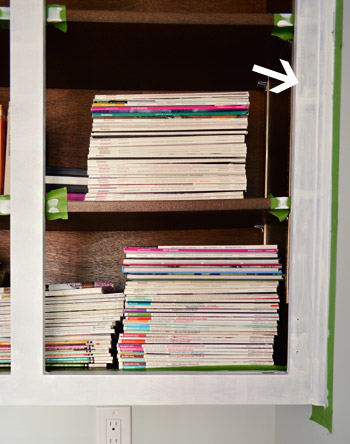
In the end, it took 2 coats of primer and 3 coats of paint in the areas that we did by hand (we used Benjamin Moore Advance in Simply White, which we love for the durability, the fact that it’s made for cabinets, the low-VOC non-oil formula, and the fact that it’s self leveling). Just for comparison, the doors that I sprayed in the garage only took one coat of primer on each side, and one coat of paint on each one (the coverage is a lot thicker, and you go through more paint, but it leaves you with a nice factory-like finish if you’re careful to avoid drips).
In short: spraying (even with that “cleaning the sprayer between coats” factor) is definitely faster – but I’m still not convinced it would’ve been a good choice for the frames since the entire room would have needed to be taped off for the entire process and a fine mist of paint and primer would have lingered in the air for a while.
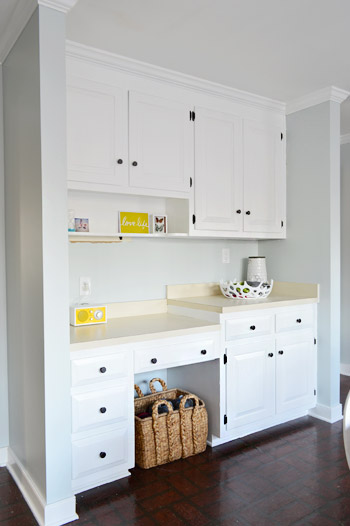
All told this was a week-long update for us, which can roughly be summarized like this – day 1: sanding, deglossing, primer coat #1, day 2: primer coat #2, day 3: paint coat #1, day 4: paint coat #2, day 5: paint coat #3, day 6: another full day of drying, day 7: re-hanging doors and adding the new hardware).
We also updated the hinges and the hardware. The hinges were a worn brass color, so we went oil-brubbed bronze with them since we liked the idea of doing contrasting hardware this time around (we’ve done brushed nickel in our past two kitchens). To help the paint job hold up on the hinges, we sprayed them with some “clean metal primer” first too, since we’ve heard such good things about this particular product (we’ve seen others use it specifically on moving parts like hinges, with luck – so we’ll keep you posted about how it wears).
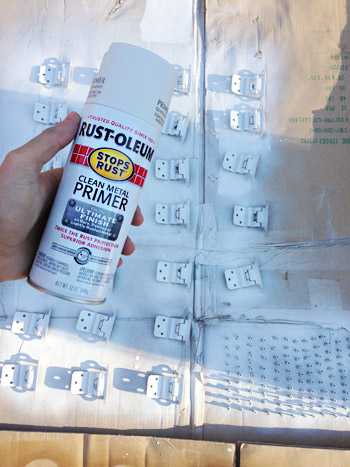
The ORB went on nice and smoothly when that coat of primer dried, and so far the hinges look great and have worked well (there’s no gumminess or grinding/peeling) so for about $11 it was well worth the update so far. Ultimately we’d like to have hidden hinges, but it’s not easy or cheap with these cabinets (these doors are half-sunk, and they don’t sell off-the-shelf hidden hinges for those type of doors) so we’ll save that dream for Phase 2.
We weren’t crazy about the shape and detail on the original brass and white knobs, so instead of spraying those we picked up a few boxes of the same Target octagon knobs that we used in our master bathroom, since they come in at under $2 each.
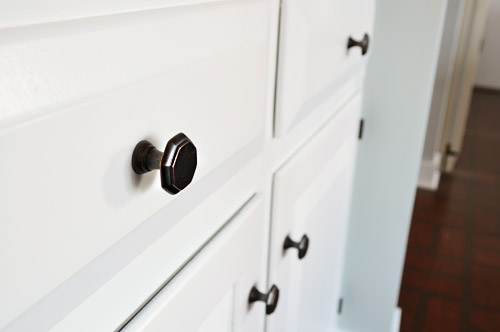
We like how high contrast they are against the white, which seems to be something we’re gravitating towards lately (think stair runner, our stenciled bathroom floor & dark vanity, etc).
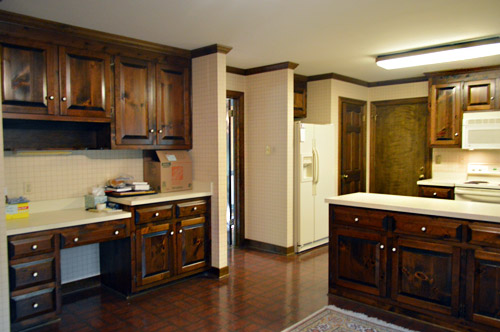
Ahhhhh, this feels a lot more like home. Just ignore the faux brick floor, those old counters, and those off-white appliances – we’ll get there eventually.
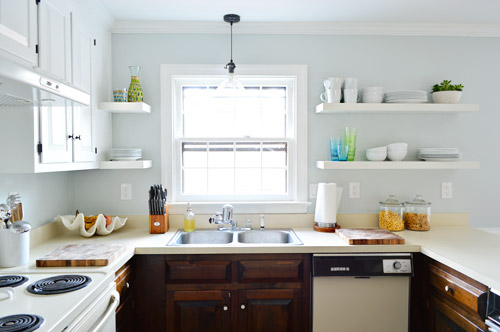
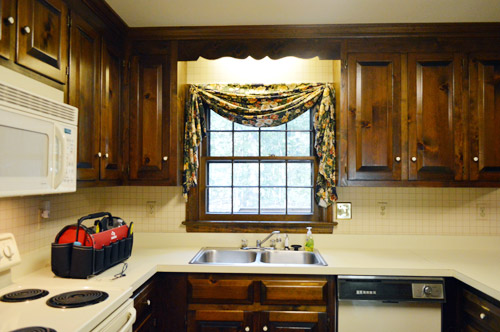
I think the before and afters from this POV really show the difference. This is what the sink area looked like on inspection day…
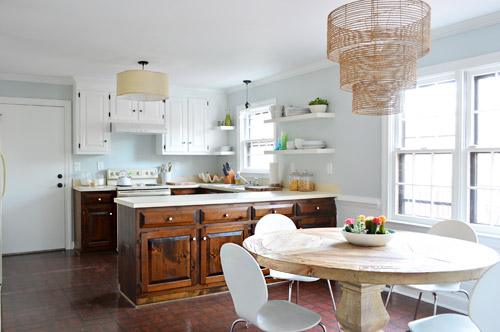
And here’s the same angle now.

We’re gonna tackle those lower cabinets this week – which is a place we’re again veering off course from the original plan. You’ll remember we said we liked the idea of a deep stone colored paint on them here, but then near the top of this post we mentioned stain. Now that the uppers are painted, we actually like how the wood tone is playing off of them, so we’re feeling less paint-y and more stain-y. Ah yes – THE PLOT THICKENS!
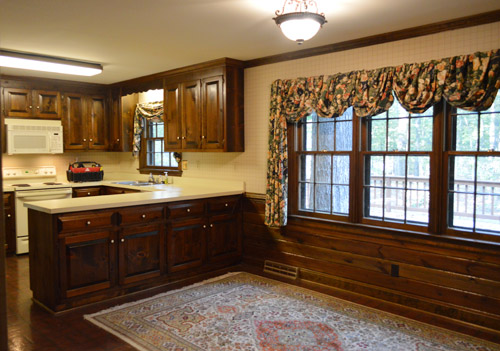
And just for fun, here’s one more throwback shot of our kitchen before we moved in. It’s pretty amazing what a series of affordable updates – like stripping wallpaper, removing a few cabinets, hanging shelves, and priming and painting the cabinets – can do.
Did anybody else tackle some big-ish projects over Christmas week? Or are you just gonna make us jealous and say you spent the week stuffing your face with cookies and watching Elf on repeat?
Psst- Sherry’s over on Young House Life chatting about New Kids On The Block and teacher gifts.

Kelly says
What a huge job. It looks great!
My husband and I just laid nice plywood over pukey looking linoleum in our kitchen, and are just awaiting our awesome stencil to arrive from Royal Design Studio! Thanks for giving me the courage to stencil a floor! I am so excited to have artwork on my floor! and the pukey linoleum to be gone!
YoungHouseLove says
So exciting! Hope it turns out awesome. Would love to see photos!
xo
s
Jill says
I’m curious about the stain on the lowers… darker or lighter? What about a paint stain in a taupy-grey? Lowes has one I’m about to jump on for my nightstands. It looks very similar to the grey-brown furniture at IKEA.
By the way, what brand/model of paint sprayer do yall use? I’m fixin to purchase one tomorrow or Wednesday…
Thanks!
YoungHouseLove says
Aw thanks Jill! We’re thinking darker (to hide the knots) since we think a lighter one might just look whitewashed with knots coming through, which is a bit more country than I think we want (plus we worry our rustic light wood table, which is right next to the peninsula, might not fit in as well with that look). We’re definitely considering a ton of stain options though, and will keep you posted. And as for our paint sprayer, it’s a Graco True Coat II. Love that thing!
xo
s
Jill says
Word. Thanks $her-dog!
YoungHouseLove says
Anytime, boo!
xo
s
Erika says
Hi! In recent kitchen posts you’ve mentioned lots of dings and such on the kitchen cabinets. Did you do anything other than the light sanding to deal with these? Or did you just paint over them? When you shift gears to staining, what will you do to disguise the dings on the lower cabinets?
It looks so fresh, modern, and beautiful! Well done!
YoungHouseLove says
I wish we had taken photos of that, but we used some wood putty on some of those gouges. Most of them are on the bottom (not the uppers, it looks like a dog gnawed on them), so we’ll be doing it again when we stain the lowers, so I’ll try to take a photo and explain that process. You use it just like caulk (push it into dents, let it dry, sand it smooth, and then paint or stain over it).
xo
s
Erika says
Oooh, thanks Sherry! Good to know! I didn’t realize you could stain over wood putty!
Cool!
Julia says
Love the white! It makes the kitchen so bright and cheery!
I was wondering what you are planning to do with the counter top. Are you keeping the original or getting something new?
We also have white cabinets in our kitchen as well but we are not sure what counter tops to get. I am in love with the IKEA butcher block because of the look and the price but the maintenance scares me. Thoughts? You guys inspire my family!
YoungHouseLove says
We’re debating either coating them in concrete or refinishing them somehow for this phase (down the road we’re going to move these cabinets into the garage to make a workshop and gut the kitchen, so when we reconfigure and get new cabinets we’ll get new counters then too – but that’s years away and we have a lot of pennies to save…). We hear butcher block is awesome though (and very well priced at Ikea). Would love that for an island in Phase 2!
xo
s
Krissy says
Well, I bought Nathan a desk chair for Christmas and he bought me a big Adirondack style bench… so we swapped around a bunch of furniture and reorganized… We have more to do, but we’re saving it for Wednesday night when we recover from celebrations :) Have a happy New Year!
YoungHouseLove says
Love that! Happy New Year to you too!
xo
s
Taylor says
Question about your primer choice. I know in the past you’ve used Zinsser. How’d you feel about Kilz this time? Have a preference? I cannot even tell you how much I’m loving what you’ve done so far!
YoungHouseLove says
Kilz has always been an nice trusted brand, they just never had a stainblocking primer that was no-VOC, so when it came out about a year ago we tried it and really liked it (it actually worked) so we have been using it since! Brands just keep getting better (and less fumey) so it’s nice to try new products when they come out just to see how they work.
xo
s
Helena Dias says
One word – amazing.
Stacey says
Like a breath of fresh air – the kitchen looks fantastic.
I have many unfinished projects around the house. Unfortunately, all DIY has had to be put on hold in the interest of a significant career move. I’m hoping that in the next few months I will be able to get back to showing my little house some love.
Wishing you and your family a very happy new year.
YoungHouseLove says
Thanks Stacey! Happy New Year to you too!
xo
s
Natalie Ramello says
What are the concrete countertop options you are considering. We are looking to do something similar?
YoungHouseLove says
If you check out Jenny at Little Green Notebook and Katie at Bower Power (and search concrete counters) they have both tried methods that look intriguing to us, although we’re not 100% sure which way we’ll go. Will keep you posted when we do more research and make the call!
xo
s
Eri says
See, this feels oddly familiar… and now I know what! Do you, Sherry? The overall atmosphere/mood of that kitchen is quite similar to your first house’s kitchen (although the layouts etc differ and the lower cabs here will get a little different twist, which I’m looking forward to seeing!). Along with the living room which is a reincarnation of the first house’s cozy den — this one is your “forever house,” but there is good reason why you call your first one your heart’s “forever house.” :)
Wish ya all (inc. the bean) a great new year!
YoungHouseLove says
So funny! We definitely feel like this house is sort of the older cousin of our first house. It’s funny because the style is so different (colonial vs. ranch), so I think we like the idea of doing certain things differently (extra chunky molding, not just doing white curtains, adding wainscoting, classic furnishings, black & white contrast, rustic touches like our Restoration Hardware table, bold colored doors like on the front of the house and in Clara’s room, etc) but it’s funny how when we toured this house we thought “this living room brings us back to our first one!” thanks to that brick wall with the mantel and fireplace. We always loved that room. So cozy.
xo
s
xo
s
Vanessa says
Ahhhh just love this kitchen! You guys inspired my own white kitchen!
Mary DePalma says
I’ve been following you guys for a while but I never comment. Love your new cabinets. I will be painting my 70s dark particleboard with laminate cabinets white soon. It has been my “after the holidays” goal. I saw you were thinking about painting the countertops. I used the Rustoleum countertop paint recently on my 70s orange (what is someone thinking, honestly) countertops. I painted them black. The product is extremely stinky. I did it before we actually moved in, I would never consider using it again unless I was planning to completely vacate the premises for at least a week. I was nearly hallucinating from the fumes. However at the expense of a few hundred brain cells I am pleased with the results for the price. It is definitely a temporary solution to an eyesore but it has held up well so far.
YoungHouseLove says
Thanks so much Mary! We hear it’s really fumey so I think we’re definitely leaning towards some other low-voc method. Will keep you posted!
xo
s
Megan says
Did you guys see your book being used on the Anthropologie site to advertise these awesome book ends? Amazing! http://www.anthropologie.com/anthro/product/home-room/27210285.jsp?cm_sp=Fluid-_-27210285-_-Regular_3
YoungHouseLove says
Isn’t that amazing?! Every time I see it my heart skips a beat!
xo
s
Jeff says
After all the times I’ve seen it, I still can’t believe what a difference painted cabinets can make! Great job guys! As a real estate agent, I am always trying to talk homeowners into updating their kitchen. This is a perfect example of why!
Bree says
It looks absolutely awesome!!! We moved in out hour in January 2011 and that summer I painted our cabinets white, which were originally the same dark wood as yours. I have since been puzzled about what to do with out counters and backsplash though…we have speckled off white with brown specks, laminate countertops and a tiled brown/beige/off-white backsplash. My husband unfortunately has limited DIY skills (poor guy!) and I am pretty good, but have never done backsplash or countertops. I have thought about painting the countertops – they sell those paint kits…what are your thoughts? Thanks!
YoungHouseLove says
We have definitely googled around for tutorials on cabinet painting (sounds like you can do it without a kit, which we hear are extra fumey, so we might pursue a non-kit route). Will keep you posted!
xo
s
libby says
wow, what a transformation!!!
Pat says
You guys are such hard workers and do such beautiful and thorough work! I just bought a new (old) home and have been debating painting the cabinets also. Mine are the inexpensive type though, not real wood so I’m wondering how they will take to being sanded. Any thoughts? thanks!
YoungHouseLove says
Has anyone painted not real wood cabinets? Ours have always been solid wood, so I don’t know what to recommend. Good luck Pat!
xo
s
Mattie says
WOW, such an amazing change!! I love the white-plus the pops of green and yellow are fun too!
Anja says
New follower – love your blog! I took your advice on painting/cutting in and bought the brush from Sherwin Williams and skipped the taping step to paint our master bedroom over the holiday weekend! It worked like a charm!
YoungHouseLove says
So glad!
xo
s
Sue VanParys says
Once Again, you guys ROCK !! I have Oak Cabinets and I have wanted to paint them for years !! This just might be the inspiration I needed !! Have a great New Year !!! Keep inspiring us !!!
Teresa says
Starting Christmas Day, I removed flimsy wire shelves and two cabinets from our laundry room, and spackled. Day 2 – primed spackled areas and painted – reaching into awkward areas beside washer/dryer & water heater as best I could. Day 3 – Assembled and installed Ikea Billy cabinet (15″ wide) and a more sturdy wire shelf setup (the one with horizontal hanging bar and screwed in vertical bracket supports), and moved stuff back into room. Now hanging pictures and calendar, and waiting for next trip to Ikea for a small shelf and/or items from this line (http://www.ikea.com/us/en/catalog/categories/departments/kitchen/20676/). Like your project, the before and after images are striking. The walls were Decatur Buff; they are now a soft sea glass green (Crystalline) from Ben Moore’s affinity line…just like the adjacent mudroom which we also painted and spruced up with a built in storage & bench setup. Nothing as satisfying as coaxing luminosity from a cave :) Love your site – I aim to use the crown molding tutorial soon.
YoungHouseLove says
Oh man, that sounds awesome Teresa! Happy New Year and happy DIYing!
xo
s
Kim says
You read my mind! I’ve been busy working on the trim in my kitchen and had been planning on painting the upper cabinets white and the lower cabinets dark gray, but over the holiday week, I started to think about staining the lower cabinets, using the steel wool and vinegar technique for a grayish look. I need to test it on some of the decorative and dated scap pieces that we are taking down to make sure the color comes out right. I’m excited to see what you guys do and I can’t wait to hear what you have in store for the countertops!
Jill says
It’s awesome! Exciting to see what you’re doing as we are in the middle of the exact same process! Up through Christmas Eve we were laying the new baseboards on the walls in our kitchen/hall/main floor bath over the new floor we installed. Post Christmas we finished the plumbing and hung the mirror and a few other odds and ends in the bathroom. I just picked up floating shelves for the kitchen at IKEA yesterday and hope to start sanding and painting cupboards later this week! It gets a little exhausting when working around our jobs, 3 kiddos and the holidays, but you’re post has me re-energized and excited to get going again! We also purchased the Benjamin Moore Advance paint, but in pure white. Good luck with the staining!
Sandy says
This all looks so awesome. Are you guys still planning on new appliances for Phase 2? If so, a chalkboard fridge could be an adventurous Phase 1 step to try out!
YoungHouseLove says
Yes, I’m leaning that way too! Just gotta get John on board!
xo
s
Donnamarie says
I heart this kitchen!! Where did you get the shelves you used?
YoungHouseLove says
They’re Ikea! Called Lack shelves.
xo
s
Lindsay says
Your kitchen is looking way better! I love the new house! When you shared the wall of fun in Clara’s room there was a cart holding her play food right next to her kitchen. Where did you get that? I found some on a few different websites but all ha bad reviews.
YoungHouseLove says
That was a thrift store find for $4!
xo
s
Katy says
I have had the Ikea butcher block counters for 10 years now and they have held up amazing. I think we spent $200 on them. Have you considered this option and then you could get rid of the backsplash.
It would look great if you painted the bottoms dove gray and then finished the butcher block with a gray wash (like your table) or a driftwood stain.
YoungHouseLove says
Love that!
xo
s
Elizabeth says
I have to admit I’m a little sad to see the white, but it really looks clean and miles from where you started. We have to wait a while but definitely doing different color upper and lower cabinets. Was hoping to see a color up top but guess I can always rely on Pinterest! Your hard work really paid off, beautiful kitchen guys.
Laura says
Okay, so just this weekend we painted the cabinets in our master bath black. Using the same steps as you have but different brand on final paint and its been two days and its kinda sticky??? Does it just need more time to dry because of moister in the air or do we need to do a coat of polyurethane. Thanks so much for our advice!
YoungHouseLove says
Hmm, I would give it more time to dry. Poly can yellow/crack so most folks don’t recommend it for cabinet anymore (and it can make things more tacky, so it might not fix the sticky problem). Good luck!
xo
s
Lara says
I’m always amazed how much a little paint can change things— It looks awesome!
One thing I truly appreciate about your “before/afters” is that you shoot the same angle for both. So many times magazines etc dont and it’s frustrating to get the true feeling for the project.
You guys are phenomenal!
bean says
I vote for wooden countertops. Lighter colored butcher block colored wood countertops all over.
YoungHouseLove says
That would be pretty too!
xo
s
jenn says
whoa your island looks so weird! its almost animated looking? is it just because the way the light is hitting and the clarity was turned up in photoshop? looks fake/floating haha
YoungHouseLove says
Yes, that was the light! Isn’t it weird! It’s like a halo or something. I looked at it after John put the post together and said “what the heck is that?” Maybe the kitchen is inhabited by an angel in those lower cabs?
xo
s
Tori H says
Here’s an interesting question. Do you guys put rugs inside of your kitchen, like under the sink/stove areas? What do you suggest for colors, textures, etc? Thanks!
YoungHouseLove says
We have had rugs in our previous two kitchens, so if you click our House Tour page you can see those! In both cases they have had a pattern (tan and white stripes on a jute rug in the first house and gray and white scallops in our second house) so I think we like a neutral palette with some pattern for interest.
xo
s
brett says
Wow – what a difference. Not sure I would have gone for an ORB on the hinges, though – when you look at the pictures your eye is drawn right to them instead of to the knobs, but I recognize that is more of a personal choice. Regardless, you guys rocked this one – and for a tiny fraction of even the cheapest pre-fab cabinets! Way to go! We went with a tuxedo kitchen ourselves (dark wood on the bottom, bright white on the top) and love it!
Dee says
The kitchen looks light, airy and big in the after photos. Lovely.
Gina says
Looks fantastic! I have been thinking about painting our cabinets at our beach house, but have hesitated because some people have told me that the paint won’t last because of the humidity being so close to the water. Do you think that is true?
YoungHouseLove says
Hmm, anyone have any experience with this? I would think that good paint and primer would be better (good brand, applied well, prepped well, etc).
xo
s
Sonja says
I used Benjamin Moore Advance for our trim and love it. I want to use it again in the spring for some other trim. So, I have a question….can I reuse the same brush if I didn’t rinse it in mineral spirits this past fall. From what I was told, I can’t use that brush with latex paint. But I wasn’t sure if I could still use it with Advance again in the future. Thanks…you guys inspire me to do more!!
YoungHouseLove says
Oh yes, Advance is not oil based (it’s low-VOC and alkyd based) so I just wash our brushes with water, not mineral spirits, and we can use them again!
xo
s
Wendy says
Great transformation! We spent the week transforming our 80’s orange-y oak kitchen at our lake cabin. Went with white cabinets and added some beadboard panels and crown molding. Haven’t picked out hardware yet or completed the backsplash, but it already looks a million times better! Makes me smile!
YoungHouseLove says
Sounds awesome Wendy!
xo
s
kylha says
Hey, love the kitchen updating! It really looks great.
I thought I’d throw an idea out to you three, and a bit, lol. As you treated the desk area of the kitchen as one piece and painted it all white, have you thought about making that area look more like a free standing furniture piece? Bun feet, brackets under the upper cabinets, and maybe some bead board ‘back splash’ would make it look like it’s a piece of furniture, and not just cabinets.
Just a thought. I plan on doing something similar in our renovation, but thought it might work for you guys too.
Anyways, thanks for all the great posts.
Kylha
YoungHouseLove says
That’s a really fun idea! Love that!
xo
s
Lil says
Wow. Just…wow! What a difference!
Sarah says
I like where your head’s at when you say “concrete coating” on the counters. ;) It’s such an easy way to update, especially if it’s just a Phase One improvement (fast and cheap). We went with Ardex in our kitchen, and for the price, it’s kind of hard to go wrong!
Can’t wait to see the stained lower cabinets!
YoungHouseLove says
Wahoo! I love hearing that! Your tutorial is awesome, Sarah! Thanks so much for sharing the link! Yours came out so gorgeously! Are you happy with the sealer too? We hear some can be frustrating (stay tacky, not seal well enough so there are grease stains, etc) so we’d love any and all reviews after living with that sealer choice!
xo
s
Sarah says
I am completely happy with the sealer. We used this sealer, topped off with two coats of Formula 1 car wax; we did the research and they passed our health/VOC/toxin standards, although yours are probably higher. ;) Either way, I think the wax is what keeps grease and water stains off, and it has to be reapplied every month or two.
As far as I can tell, the only downside so far is that they scratch really easy. I don’t mind — I kind of like the lived-in look — but if you prefer perfection, concrete of any kind is not the way to go.
YoungHouseLove says
Thanks so much Sarah!
xo
s
Kathy Hartzell says
You have hit the proverbial nail on the head with the sharp contrasts of white paint and the dark metal hardware and the stain”y” idea for your bases. I can’t wait to see how you change that out, as stain is so hard to remove from the pores of wood unless you can really remove some material (harder on doors with relief).
Here’s a suggestion for your countertops: do a veneer of laminate on top – they look to be laminate already, with a right angle face (as opposed to the bullnose) and that would make it really easy for you – with the proper fitting on your router. Just wait til Sherry is OUT of the house for a day, as the glue is nasty, but the process it pretty cheap and the materials available are very, very broad and effective.
YoungHouseLove says
That’s another fun idea! Thanks Kathy!
xo
s
Janet says
Is the color of a countertop using “Concrete” by Corian different from the concrete counter coating you would use? Have you considered any colors in the Corian line? My friend used Corian because she felt it was safe for her children to eat snacks off the countertops.
Janet
YoungHouseLove says
Oh yes, we did corian in our last kitchen and loved it! Down the line when we replace the counters and fully renovate (new flooring, new appliances, an island instead of a peninsula, etc) we’re planning to get stone or would consider things like corian again as well- but for now it’s not in the budget to get new counters, so we’ll work with what we have using inexpensive options like refinishing or concrete coating (that’s around $50 or less to do the entire thing vs. a few grand for new counters).
xo
s
Kristin F says
That is an amazing transformation! It looks much more like you guys than the room did before, obviously! I can’t wait to see what tone stain you decide on.
Our year-long kitchen renovation picked up some steam over the holidays, but not after I had to cook for Christmas without a cooktop (hint: gas grill burner came in handy!). But now we have our counters, new gas cook top, and I painted our thrift shop hack pantry. Next up, the backsplash!
Jamie says
I love it! I love the white cabinets, the beautiful blue color on the walls, and I cannot wait to see what you guys choose for the bottom cabinets!
Your blog is what got me hooked on having a white kitchen! We are having a house built, and I knew right away what color cabinets I wanted! :)
Stephanie Watanabe | The Girl Who Knows says
Looks great! We just painted our entire new home (all walls + trim) Benjamin Moore Simply White and it’s made such a difference. The house feels airy, light and the white is perfect (not too yellow, not too cold).
Your cabinets look great – it’s making me wonder what cool things we can do to our kitchen . . . hmm… :)
Megan says
Looks great, guys! If you get a chance, could you please show us a photo of a few cabinets open with the doors on? I’m intrigued by the contrast between the light outer & dark inner areas and would love to see the final-final look. And sorry if someone else has mentioned this already. Hope you’re having a very happy new year (I spent my NYE at The National in Richmond!)
YoungHouseLove says
Will try to remember to snap some of those for you! We did the same thing in our last kitchen (and I believe there are some shots of that for you in the post we linked to from this one) if that helps!
xo
s
Colleen Pastoor says
Oh La La! That makes the world of difference. I’ve been working on my husband that painting cabinets is the way to go and your progress is slowly winning him over (*I think*).
Sarah says
I have been redoing my kitchen step by step so I have been watching all your posts and inspiration posts for ideas and tips. I have replaced all my drawer and cabinet knobs with oil rubbed bronze ones that I love, and I replaced my furnace grates with oil rubbed bronze ones too, but i tried to buy numerous types of new hinges but since the builder who built our house scrimped and cut corners every where he could, we have bizarre types and I can’t find ones to replace them with. I debated on painting them but I want them to match the knobs. How did you do the painting on the hinges other than the primer to get that look?
YoungHouseLove says
We just sprayed a few thin and light coats of primer on them in a few different positions (giving them drying time between each one) and then did the same with Rustoleum Oil-rubbed-bronze Universal All-Surface spray paint. So far they’re holding up really well!
xo
s
Brenna says
Hey Guys!
Such a cute Christmas posting with Clara =)
Quick question – when ORB-ing things like hinges and knobs, what type of paint do you use to do that (I couldn’t find your door knob post)? I am hoping to buy a cast iron bed on craigslist that needs some love and would love to make it look rustic. Also, for a full-size iron bar headboard and footboard to spraypaint, how much ORB paint do you think I’d need? 2 cans can do the job?
Let me know what you think if you can, and thanks!
<3, Brenna
YoungHouseLove says
I would just buy Universal All-Surface spray paint by Rustoleum in Oil-rubbed bronze (it has a built-in primer). For hinges we added a clean metal primer under it just because there are moving parts, but for stagnant things like a bed frame or hardware that should be awesome. Hope it helps!
xo
s