We’re soaking up a white Christmas over here! Nope, we didn’t wake up to any snow on the lawn, but there was a dusting of white elsewhere on the premises…
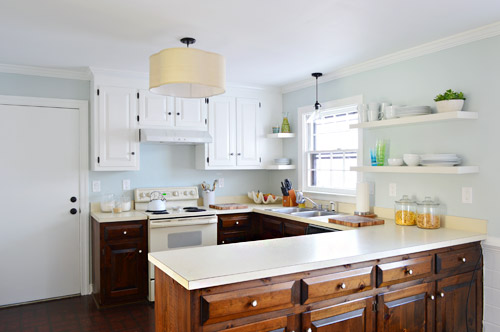
We used last week to sand, prime, and paint all of our upper kitchen cabinets and – shocker – we ended up going with white. So yeah, it’s a little bit different from our original plan to paint them a light gray-tan on top… and a little more like what we did in our last kitchen – but just for those uppers. We have a completely different plan in store for the lowers – and it actually involves wood stain and no paint at all – so maybe as we move into 2014 we’re getting progressively less predictable? Or more woodsy? We also have some ideas for those countertops which we’ve never done before (either a refinishing/paint technique or a concrete coating one – both of which are budget friendly, so they should be great for Phase 1).
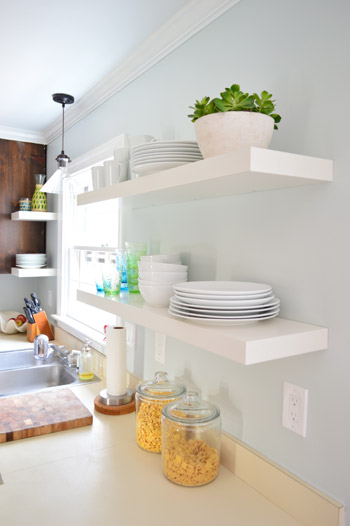
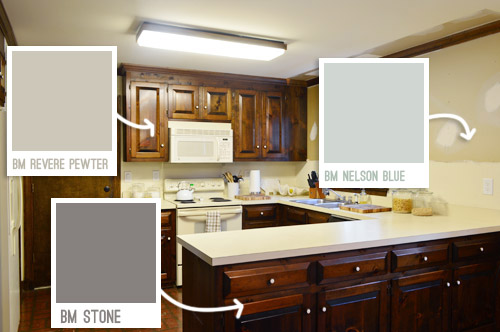
The tides shifted from Revere Pewter to Simply White (which is one of the top white paint colors out there)for those upper cabinets around the time that we installed the range hood and put up the floating shelves. While we liked the idea of the white shelves & hood contrasting with putty colored upper cabinets, we started to worry that also having the darker lower cabinets might just be too much going on (white and putty on top with a third darker color for cabinetry on the bottom).
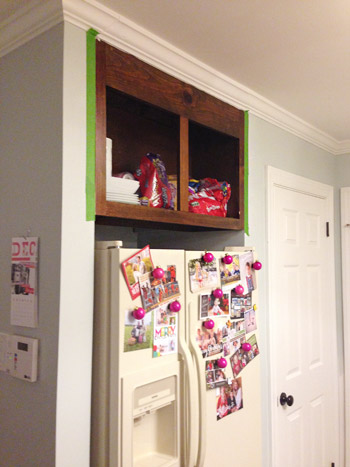
But the main thing we couldn’t wrap our heads around was a way to make crown situations like this one make sense with colored upper cabinetry. Usually crown matches the color of the cabinet, but wouldn’t it be weird to paint just a section of this crown to match the cabinets since there’s no indent where the cabinets end (it’s just one long piece along that entire area)? We already didn’t like the look of the mismatched cabinet and crown that we had going on, so continuing that theme with a new color on those uppers just didn’t seem like the right way for us to go.
So we went with white. As much as we wanted to do something new, we never like to do something different just for the sake of being different. And at least this way we can still stick with our plan to do the lower cabinets in a deep tone for that “tuxedo” look that we’ve always loved but never had the guts to try.
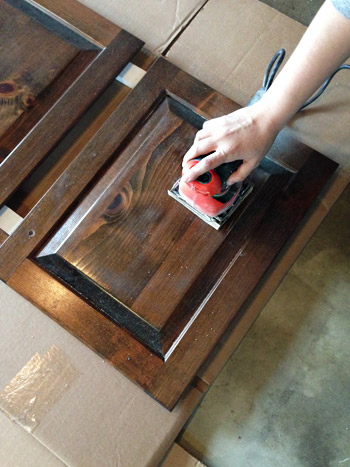
Now that we got through the why of what we did, let’s get a little into the how. Clocking in at nearly 2,000 words, this post is hardly short, but is gonna be quick and dirty compared to the picture-and-video-tastic tutorial that we did last time around since we used the same technique. So we’ll just share some broad details here, and you can reference that post for the nitty gritty. First up we removed the cabinet doors and gave every surface a light sanding, just to get rid of any glossiness and rough things up for better paint adhesion. Sherry used a hand sander on the doors in the garage with 150 grit paper, and I used an 150 grit sanding block on the frames inside.
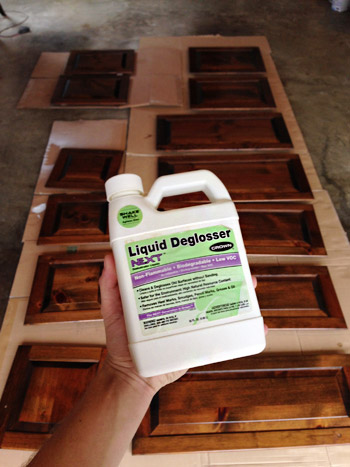
Next we wiped everything down with a liquid deglosser. This is a low-VOC brand called Next that we had leftover from last time (originally found at Home Depot, although we hear it’s not there anymore). It’s an optional step, but we figure it never hurts to prepare the surface – especially when it just takes a bit of wiping. Plus after you sand it’s a nice way to get the sawdust off.
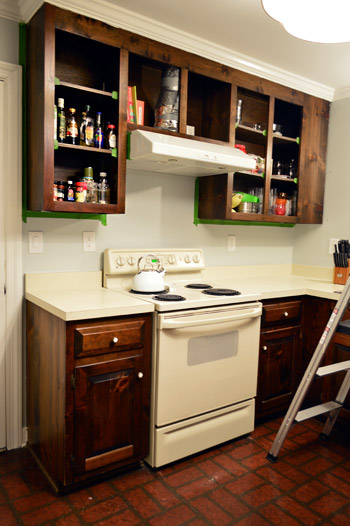
We then taped off the walls and other obstacles around the cabinets (like our newly installed hood) with painters tape to protect them and to make each of our sure-to-be-many coats go on as fast as possible.
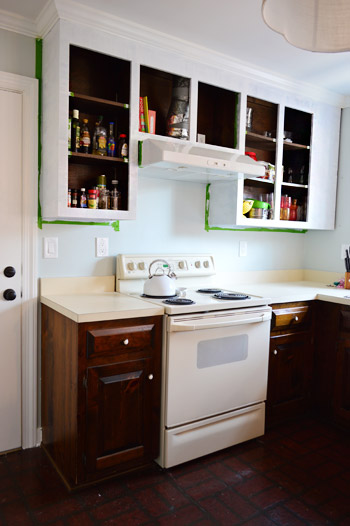
With everything taped, we primed the frames with a brush and a small foam roller. We used a Kilz Premium primer because it’s stain-blocking but still no-VOC. This picture is after two coats of primer. Sherry’s the cutter-inner of the family, so she did the brushwork with a short handled 2″ angled brush, and I did the foam rollering, following right behind her around the room so I could roll over the edges that she brushed for the smoothest finish.
We considered using our paint sprayer for those interior frames, but ultimately decided to do the indoor stuff by hand. The amount of taping and drop-clothing that would’ve been required to protect the kitchen (and the three adjoining rooms) from paint over-spray just didn’t seem worth it – especially when weighing the need for a functional kitchen (and not subjecting a pregnant lady and three year old to the fine paint mist that seems to linger afterwards).
But we did use the paint sprayer outside to prime and paint our cabinet doors. And by outside, I mean the garage (since we had quite a bit of rain last week that ruined any chances we had of spraying outdoors). I set up a little station where I could coat one door at a time and then lay them out to dry.
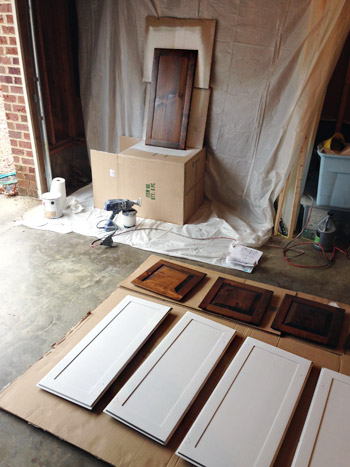
For anyone out there thinking about using a sprayer on doors during cabinet painting, it’s a great way to get a nice smooth coat with less effort than doing the whole thing by hand. But you’ll probably want to get your bearings by practicing on a few other things first (you might not want your first spray job to be cabinets since it can take a little while to master the whole not-too-thick-and-drippy thing).
Back to the spraying process. After 24 hours of drying time, I flipped them over and did the other side. The actual spraying was pretty fast, but the waiting for the thick coverage to dry (and cleaning the sprayer in between daily coats) didn’t make it the breeziest process in the world. Although it certainly required less time than all the coats the frames inside took.
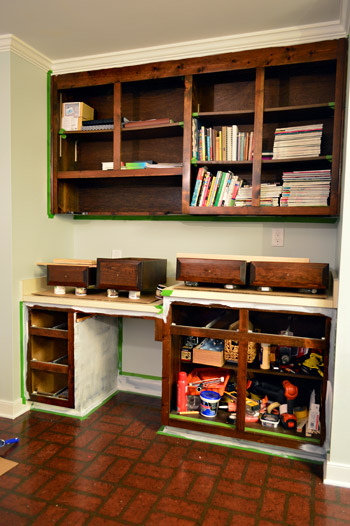
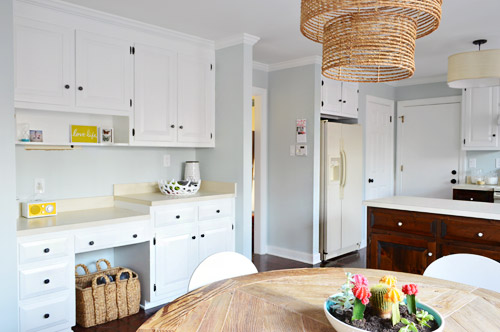
This is the desk area, where we also opted to paint the lowers. Both Sherry and I felt like this was all one unit (like a hutch in the eat-in area) unlike the peninsula-ed part of the kitchen, which we thought would look awesome with those dark lower cabinets. So over here we also painted the six drawer fronts by hand – since they didn’t detach from the drawers themselves. A lot of this cabinetry was surprisingly non-removable, for example the shelves inside don’t pop out (you’d literally need to demo out the frames to remove them). The picture below is after one coat of primer.
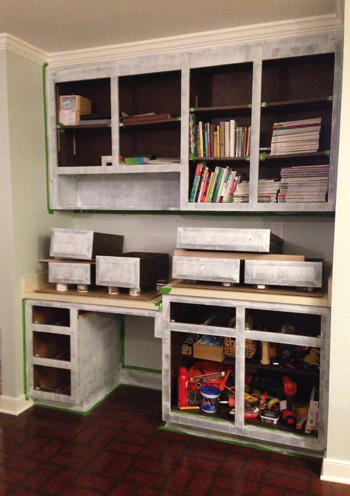
Note: much like our last kitchen, we opted to paint both sides of the doors, but to leave the inside of the cabinets unpainted (we think the contrast of wood inside + painted doors can actually be a nice combo when it’s done cleanly).
We opted to do two coats of primer based on what we learned when we painted the trim in this room. But you can see here that even that was still pretty spotty. You can also see where we used small pieces of painters tape to block paint from getting on the shelves for a nice clean look.
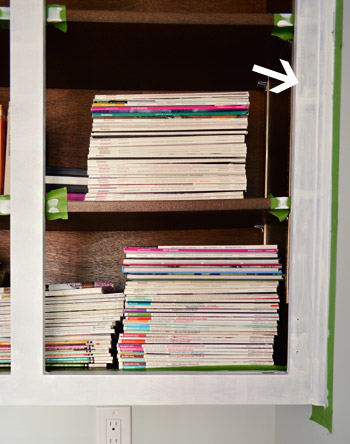
In the end, it took 2 coats of primer and 3 coats of paint in the areas that we did by hand (we used Benjamin Moore Advance in Simply White, which we love for the durability, the fact that it’s made for cabinets, the low-VOC non-oil formula, and the fact that it’s self leveling). Just for comparison, the doors that I sprayed in the garage only took one coat of primer on each side, and one coat of paint on each one (the coverage is a lot thicker, and you go through more paint, but it leaves you with a nice factory-like finish if you’re careful to avoid drips).
In short: spraying (even with that “cleaning the sprayer between coats” factor) is definitely faster – but I’m still not convinced it would’ve been a good choice for the frames since the entire room would have needed to be taped off for the entire process and a fine mist of paint and primer would have lingered in the air for a while.
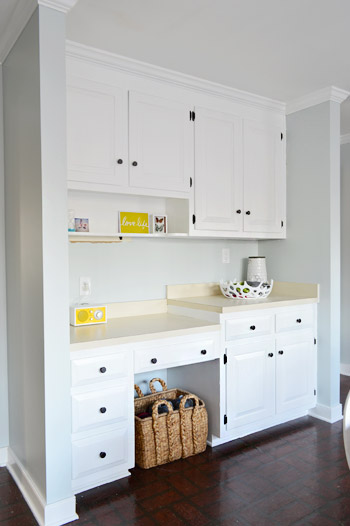
All told this was a week-long update for us, which can roughly be summarized like this – day 1: sanding, deglossing, primer coat #1, day 2: primer coat #2, day 3: paint coat #1, day 4: paint coat #2, day 5: paint coat #3, day 6: another full day of drying, day 7: re-hanging doors and adding the new hardware).
We also updated the hinges and the hardware. The hinges were a worn brass color, so we went oil-brubbed bronze with them since we liked the idea of doing contrasting hardware this time around (we’ve done brushed nickel in our past two kitchens). To help the paint job hold up on the hinges, we sprayed them with some “clean metal primer” first too, since we’ve heard such good things about this particular product (we’ve seen others use it specifically on moving parts like hinges, with luck – so we’ll keep you posted about how it wears).
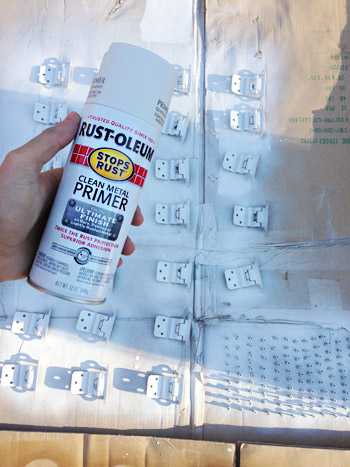
The ORB went on nice and smoothly when that coat of primer dried, and so far the hinges look great and have worked well (there’s no gumminess or grinding/peeling) so for about $11 it was well worth the update so far. Ultimately we’d like to have hidden hinges, but it’s not easy or cheap with these cabinets (these doors are half-sunk, and they don’t sell off-the-shelf hidden hinges for those type of doors) so we’ll save that dream for Phase 2.
We weren’t crazy about the shape and detail on the original brass and white knobs, so instead of spraying those we picked up a few boxes of the same Target octagon knobs that we used in our master bathroom, since they come in at under $2 each.
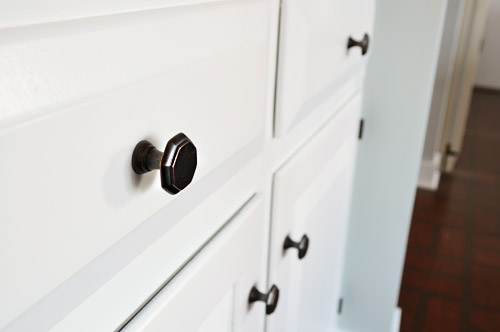
We like how high contrast they are against the white, which seems to be something we’re gravitating towards lately (think stair runner, our stenciled bathroom floor & dark vanity, etc).
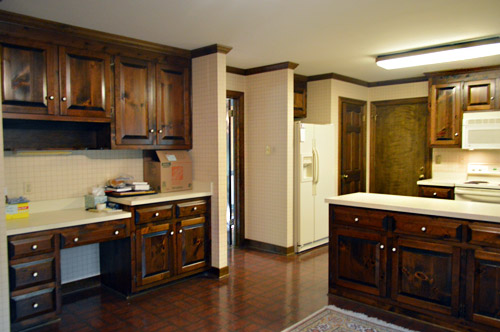
Ahhhhh, this feels a lot more like home. Just ignore the faux brick floor, those old counters, and those off-white appliances – we’ll get there eventually.
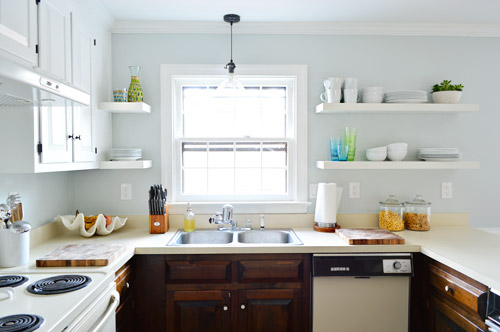
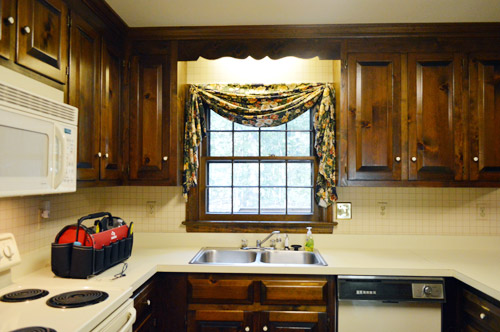
I think the before and afters from this POV really show the difference. This is what the sink area looked like on inspection day…
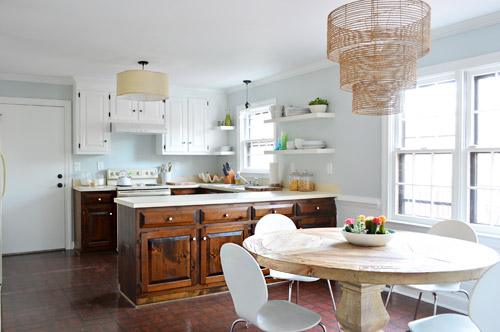
And here’s the same angle now.

We’re gonna tackle those lower cabinets this week – which is a place we’re again veering off course from the original plan. You’ll remember we said we liked the idea of a deep stone colored paint on them here, but then near the top of this post we mentioned stain. Now that the uppers are painted, we actually like how the wood tone is playing off of them, so we’re feeling less paint-y and more stain-y. Ah yes – THE PLOT THICKENS!
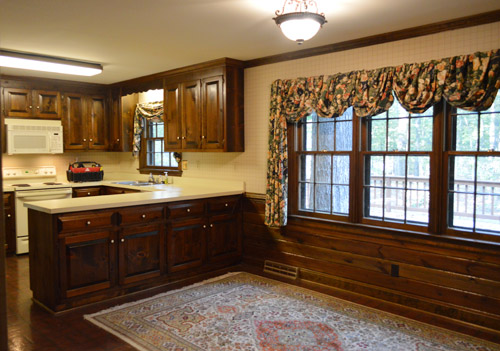
And just for fun, here’s one more throwback shot of our kitchen before we moved in. It’s pretty amazing what a series of affordable updates – like stripping wallpaper, removing a few cabinets, hanging shelves, and priming and painting the cabinets – can do.
Did anybody else tackle some big-ish projects over Christmas week? Or are you just gonna make us jealous and say you spent the week stuffing your face with cookies and watching Elf on repeat?
Psst- Sherry’s over on Young House Life chatting about New Kids On The Block and teacher gifts.

Angela-Rose says
You may have already answered this but with over 500 comments, I’m not sure I’d ever find the answer! We’re in the midst of a major kitchen reno and are at the painting cabinet doors stage. We used BM fresh start primer and had no issues with the sprayer but, for the life of us, we cannot get the sprayer to spray the Advance! Could you please advise on what sized sprayer nozzle you used? The sprayer will spray water but loses suction or something when we have the Advance in the cup…I know it’s thin paint but I’d have thought it’s thicker than the water! I REALLY don’t want to have to roll all the doors/drawers…Please help! Thank you!!
YoungHouseLove says
Hmm, which we have a Graco TrueCoat II. It seems to do well with the Advance paint (our sprayer doesn’t necessitate watering it down or anything). We just use the stock nozzle that came with our sprayer. Good luck!
xo
s
Angela-Rose says
Thank you for the response Sherry! We have the same sprayer as you guys & since you hadn’t mentioned watering it down or having to purchase a special nozzle I figured it hadn’t been an issue for you…no idea what’s the problem with our sprayer. Time to give Graco a call & see if they can enlighten us! Again thanks so much for your help & happy new year!
YoungHouseLove says
Yes, I wonder if it’s a bad nozzle or something?
xo
s
Angela-Rose says
I wish that were the case but I’m thinking not as we’ve tried a couple different sized nozzles – the one that came with it and we purchased a smaller one too. No luck. So, unfortunately, I think it may be the sprayer itself…very sad because we’ve only had it a few months & have followed the cleaning/care instructions to the T.
YoungHouseLove says
Oh no! So sorry Angela-Rose!
xo
s
Amanda says
Did you paint the underside of the upper cabinets?
YoungHouseLove says
Yes, we did those just so when you’re sitting at the table you see white under there instead of a big dark box!
xo
s
Angela-Rose says
Thanks Sherry…I’ll get these cabinets painted one of these days! ;)
aimee says
What paint sprayer did you use?
YoungHouseLove says
We have a Graco TrueCoat II. More on that here: https://www.younghouselove.com/2013/05/buh-bye-blue-trim/
xo
s
Kendwy Valdez says
I LOVE your kitchen and the way it’s turning out!! I was inspired by you and I will be adding floating shelves in my kitchen! Love the lightin you chose and your willingness to take risks! Thanks for sharing!
YoungHouseLove says
Aw, thanks Kendwy! Good luck with everything!
xo
s
Liz Hamrick says
Could you help with taking wallpaper down? My granddaughter and husband has just bought their first house…the den has outdated wallpaper, they have been using a steam machine, but it is very hard to come off. Any suggestions that would make it easier. They have almost decided to leave it and paint over…don’t think that is a good idea! Any help would be nice to pass along. They are young and excited to get it ready to move in. Thanks, Liz Hamrick
YoungHouseLove says
We have tried a bunch of options (and blogged about them as we’ve gone) so there are four posts in our archives if you search remove wallpaper in our search bar. Unfortunately no methods we’ve tried have been super easy or simple (almost all of them have taken us 6-8 hours each room (depending on the size), so there’s not really a front runner method other than the steamer working slightly faster for us than doing it by hand without one (with a sprayer full of boiling water or vinegar for example). Good luck!
xo
s
Magali@TheLittleWhiteHouse says
What an inspiration! The kitchen is my project for 2014 in my octtage!
Victoria says
Wow! I love how paint can transform something old to new again. I painted my kitchen recently, it was a similar colour to yours but laminate, it already had black benchtops so I too went with classic white. It’s a phase 1 for us also with new kitchen to come later when we extend but I’m so glad I did it, it just brightened up the whole house as here in Oz we love open plan living & it’s visible from most parts of our home. Can’t wait to see the finished product, love your work & check in regularly.
YoungHouseLove says
That sounds awesome! So lucky to have black counters already!
xo
s
JC says
Changing the lights and paint have made all the difference. I am so impressed!
YoungHouseLove says
Thanks JC!
xo
s
Sara w says
So,light and bright! I love the floating shelves and am copying for my eat in area. You always have such great instincts. The orb hardware looks fantastic.
YoungHouseLove says
Thanks so much Sara!
xo
s
Lola says
OMG It looks amazing!!!
Are you going to be leaving the kitchen with the painted cabinets (I think you should because it looks so good). Such a fabulous idea for keeping things economical and showing people you don’t have to do a total gut show to make things look as good as this! Love it!
YoungHouseLove says
Aw thanks Lola! We plan to live with this for a year or two as we save up for a full redo – but we’ll reuse the cabinets in the garage as a workroom and plan to keep them this way!
xo,
s
Megan says
How did you do your trim and doors white? What were your steps? What colors and products did you use? Did you see the grain after finished? Love it! Looks beautiful
YoungHouseLove says
We used a paint sprayer for the doors and the trim upstairs (if you search Graco on our sidebar search that post will come up). For the trim downstairs, we did it by hand with a primer + semi-gloss paint. Took tons of coats (two of primer and three of paint) but you can’t see much grain!
xo
s
Susan says
You have inspired us to move forward with painting our cabinets. I was curious as to what finish you selected for your paint…semigloss, eggshell, flat? Thanks!!
YoungHouseLove says
We used the Advance paint by Ben Moore (it’s self leveling and made for cabinets) in their satin finish.
xo
s
Susan says
Oh, and how do you determine the quantity of paint needed for your cabinets? How much did it take to paint the cabinets you’ve shown in this post? Sorry for all the questions.
YoungHouseLove says
We only needed less than half a gallon. We did uppers and lowers in a large kitchen in our last house in under a gallon.
xo
s
Kim says
SO..this question was probably already answered somewhere in the comments but I didn’t see it in the pages I scrolled down…but comparing painting (foam rolling) the white cabinets in your last kitchen, to spraying them in this one…which gave you the better finish? And is the sprayer the Wagner one for around $119 (Canadian) at HD?
Thanks in advance…we’re working on a Phase 1 in our kitchen as well.
YoungHouseLove says
Our sprayed is a Graco True Coat II. We got slightly smoother and thicker results with the sprayer but rolling came out really well too (we rolled the frames and drawers this time anyway, and they blended right in).
amy says
What paint finish for kitchens do you tend to use? Semi gloss? Gloss? Flat?
YoungHouseLove says
On cabinets with the Advance paint we have used their satin finish three times now. Very happy with it!
xo
s
Jacob says
About to follow I your footsteps an repaint our cabinets that were painted very poorly by the original owners and replacing our hardware. Any tips for rehanging the doors to avoid damage to the paint? Did you attach the hinges to the door or cabinet first? I did a trial run with the new hardware to see if our existing holes work (good news is they do) but found I did some major damage to the existing paint during the process. Appreciate the advice and love the blog!
YoungHouseLove says
Yes, on a blanket we attach the hinges to the cabinet doors, and then gently put the hinged doors onto the cabinets. Hope it helps!
xo
s
Deanne says
Hello…you guys are so inspiring!! Thank you for all you do…cabinets look amazing! I’m hoping you can help with a question on my end…primer. I looked up the kilz premium that you mentioned but can’t find anything stating that it’s no-voc. I can find low-voc in a description but nothing on the can. I respect the way you go about your projects and am like minded in minimizing the yuck factor of all of the chemicals. Could you enlighten me on your kilz primer before I tackle my super old oak cabinets? Thanks so much!
YoungHouseLove says
Ours is from Home Depot and it literally says “no-VOC” in big letters on the front of the can. Maybe the image is older that you’re seeing online, or it’s just a different one (Kilz makes a ton of them). It’s called “Kilz Premium and it’s a stainblocking water-based primer if that helps (they also sell oil-based ones, etc).
xo
s
katie says
hi! can’t read thru 534 comments…wondering what you did w/ your microwave… do you still have one? if not, why. we are thinking of doing a hood when we re-do total kitchen..one of those industrial ones from ikea! i’m not sure how i’ll know what you respond. maybe i’ll get an email?
LOVE your place! we might do two-tone in new kitchen like you have done in your phase 1. do you think when you remodel, you’ll do 2 tone … and will you still have open shelving?
=) kt
YoungHouseLove says
We moved it into the pantry (all you need is an outlet in there and to keep the door open for ventilation when you use it).
xo
s
Melissa says
You guys are amazing! Thank you for sharing so much helpful information with all of us. In your previous kitchen, I think you used Zinsser’s Smart Primer, and this time you used Kilz Premium Primer. Was there a reason for the switch, and having used both, do you recommend one over the other? Thanks so much!
YoungHouseLove says
Yes, the Kilz is so much better! It’s no-VOC instead of low-VOC and had better coverage in our experience!
xo
s
John Bumgarner says
Quick question…When spraying the cabinet doors upright how were you able to cover the very bottom of the cabinet doors? Did you sit the door up on a block or something?
YoungHouseLove says
Yes, we used small wood blocks to rest the doors on (four of them, near each corner on the underside) so they acted like lifts which allowed us to get the edges.
xo
s
Corrin says
So if you were going to paint the interior frames with the sprayer, how would you tape these off? Would you cover the insides of the cabinets or paint all of it white? I am going to spray mine and was wondering if you would spray the insides also? Thanks!
YoungHouseLove says
I think I’d be tempted to just spray the insides since taping them off would be such a pain. But some sprayers don’t work well on certain angles, so getting your arm in there to spray the whole inside might be rough. I would give it a try on one of them and then regroup if it’s too much trouble. Might literally be faster to roll by hand in some areas (and leave the insides unpainted).
xo
s
Jason says
I love this post and have read it over quite a few times. My wife and I are in the process of repainting our kitchen cabinets and have turned to this blog a few times. We are also in the process of starting our own blog but we can’t quite pick a name yet. We are using the same sprayer and I am trying to wrap my head around how you painted the cabinet doors. I am ready to pull the trigger (literally) but not sure how to go about the setup. I’m worried that when I spray the bottom of the door isn’t going to get any paint. Would you be able to go into a little more detail as to how your station was set up and how it worked out for you?
YoungHouseLove says
We set them each up on scrap blocks of wood to get the bottoms and waited until they were dry to flip them. Hope it helps!
xo
s
Jason says
Did you paint it while it was standing up on the cardboard or as it was sitting flat on the wood? I plan on painting tonight and just and trying to wrap my head around this. I think that exhaustion is starting to set in.
YoungHouseLove says
I made a little makeshift leaning station where they leaned up to be sprayed, and then I laid them down (on those blocks) to dry.
-John
Theresa says
Hey!
I am a behind the times here, but I have been researching hinges for our oak kitchen that is getting painted next month. I would love to install Blum hinges, but to keep it on budget we are sticking with the partially exposed hinges…We’re painting it white, what do you think of getting white hinges? Or do you recommend they match the hardware (We’re going with brushed nickel).
Thanks so much! I love following all your projects!
YoungHouseLove says
White hinges can be great to blend in with darker hardware. We have seen it mixed and it definitely can work if that’s your preference :)
xo
s
kristin says
what type of paint sprayer did you use? I am trying to use a paint sprayer to spray my cabinets and am having issues.
YoungHouseLove says
Here’s a post with more info on ours. We’re not in love with it, but it really made the cabinets go faster!
xo
s
Kat says
Question. Did you sand the frames with the sander as well? I have dark cabinets (on the inside) that were pickled over at one point and now I would like to paint them. Would I use the same process you did here?
YoungHouseLove says
Yes I’d sand those. Good luck!
xo
s
Danielle says
Hey guys! Love the kitchen and the recent garage door update! I am planning on painting our kitchen cabinets and have looked everywhere for the NEXT Liquid Deglosser. I even emailed the manufacturer only to find out they discontinued it =( Can you recommend another low VOC liquid deglosser?
YoungHouseLove says
So sorry, we haven’t found another one we love yet. Anyone have a recommendation for Danielle?
xo
s
Danielle says
Hey guys, thanks for asking your readers about the liquid deglosser. I ended up going with the Klean-Strip liquid sander and also used their green mineral spirits. Worked great and low odor.
http://www.homedepot.com/p/Klean-Strip-1-qt-Easy-Liquid-Sander-QWN285/100112667
YoungHouseLove says
So glad to hear it! Thanks for checking back with that info Danielle!
xo
s
Jill says
Are you still happy with your primed and painted hinges? We can’t find exact replacements for our 30 year old dirty brass hinges. We’d like to paint the ones we have rather than redrilling all new holes for new ones. Thanks!
YoungHouseLove says
Yes, they still look great! Try using exactly the same primer and spray paint if you can since they have held up so well!
xo
s
Natty Dee says
Kitchen looks great!
I am wondering how the hinges, painted, have held up? We are remodeling a kitchen and it is not in our budget to buy new hinges, but worried about them flaking etc.
Thank you!
Natty Dee
Natty Dee says
Oh! And then I see the comment above mine is same question!