It’s been a busy but productive week in the nursery built-in department, so I’m going to cover a lot in this post. Hang on to your hats, crank up your favorite Swedish electropop, and be prepared for some nitty-gritty detail on how we began the transformation from free-standing Ikea dresser to built-in dresser/bookshelf combo (that’s not a finished result on the right, by the way, it’s just photoshop).
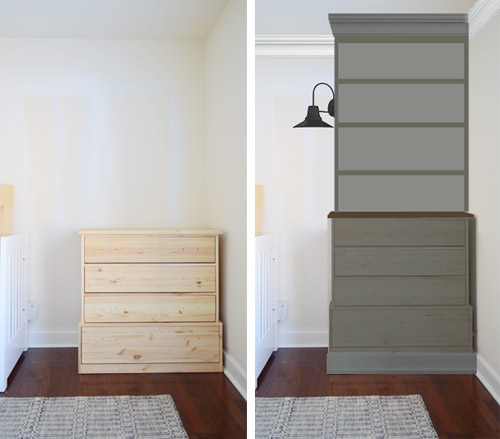
As you might recall, we bought two FJELL dressers because they were the size we needed and they were made of solid wood. But they did need a little additional help when it came to giving them a built-in look:
- The indented side profile meant it couldn’t sit flush to the wall, leaving a pretty glaring gap that needed filling
- The nursery’s baseboards on both the side and the back also prevented it from hugging the walls tightly
- The bottom drawer wasn’t built up enough from the floor to accommodate wrap-around baseboards, which we wanted to add to complete the built-in look
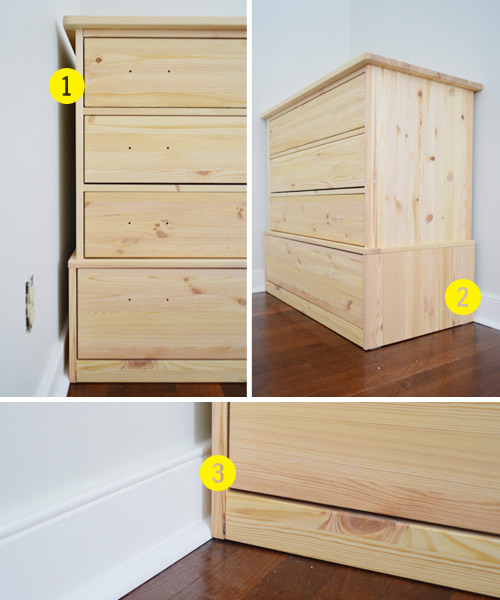
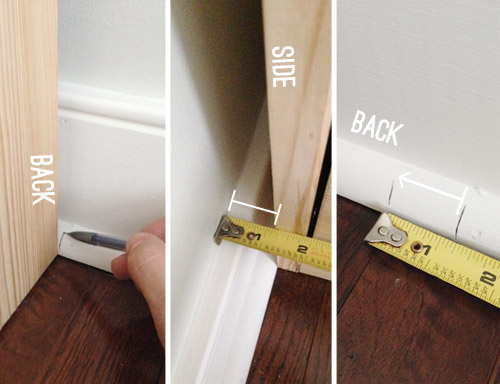
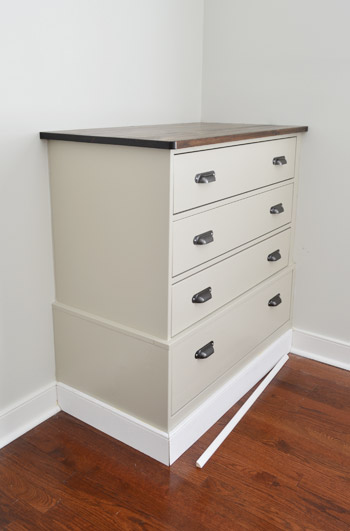
None of these issues were insurmountable, but it did take a some extra work to get them taken care of before we could move on to the fun stuff. Let’s start with problem #2: the existing baseboard, since it’s an issue that anyone would run into with any piece of furniture they’re trying to build-in. The solution? Cut it out. I just had to mark where to make my cuts. I marked where it sat originally, but kept in mind that when I removed the side baseboard, the whole piece would shift to the left against the wall. Same goes for marking the side cut (when I remove the back baseboard, it would sit further back).
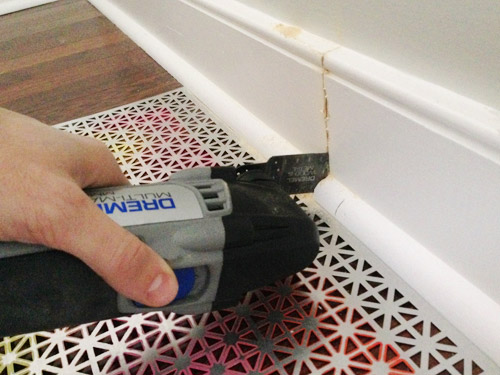
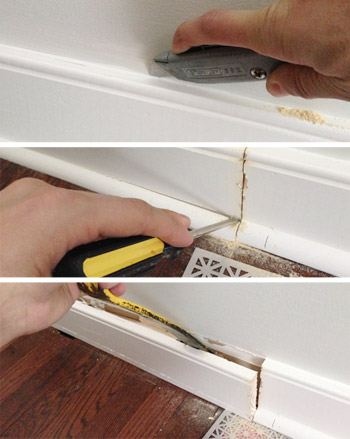
To cut it out I used my Dremel Multimax. The metal radiator cover (leftover from this project) is just there to help protect the floor. You don’t technically need a metal grate, but I figured this way it would make a pretty distinct noise when my blade got too close, which was a nice warning to keep me from damaging the floor underneath it.
Once I had cut all the way through, I scored the seam between the wall and the baseboard with a utility knife (to make sure no wall paint peeled off with the baseboard). Then I just pried off the quarter-round and the baseboard.
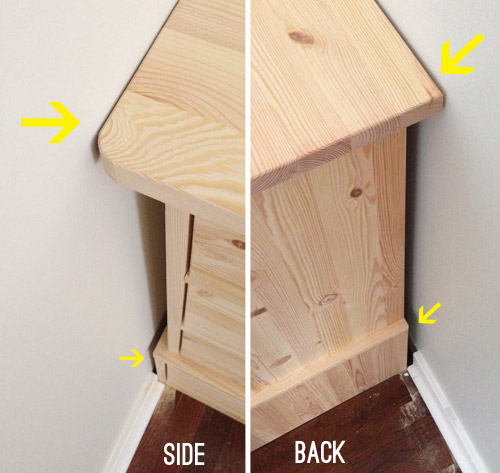
With both the back and side baseboard removed, I excitedly pushed the piece back into the corner… only to realize that the top piece was now the problem. It was bigger than the bottom of the dresser, so the overhang was preventing me from getting the piece completely flush. Bummer.
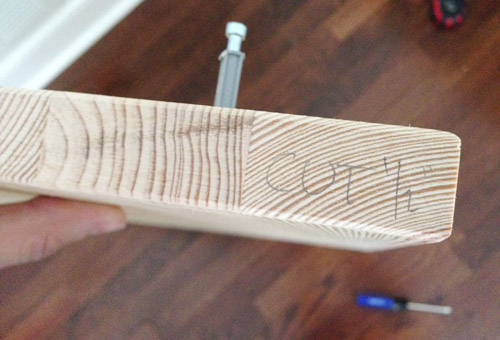
So Sherry and I had a little “meeting of the minds” and decided to trim the top a smidge to remedy the situation. Luckily, being an IKEA product, it was easy enough to remove the top (after I marked how much would need to come off). I was sure to write my cut measurements on the side that needed a trim so that once I got downstairs to my saw I didn’t accidentally slice the wrong end.
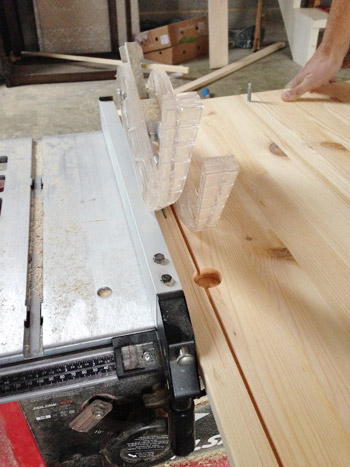
I set the guide on my table saw to the correct measurement and just sliced the two sides accordingly. This is a moment we were particularly thankful that we went with a nice sturdy dresser made of solid wood (and not particle board, which can be tougher to cut cleanly).
With the top cut and reattached, the dresser now sat nice and flush against the wall on the back… but I was still dealing with a gap-on-the-side (problem #1, if you remember).
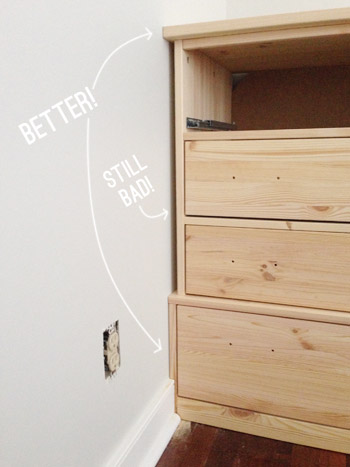
This was an easy solution because the gap just happened to be 3/4″, which meant I just had to slip a 1 x 2″ piece of scrap wood in there (after I cut it to the right length with my miter saw). It was actually a tight enough fit that it might’ve stayed on its own, but I put a couple of nails through the dresser into it, just to be safe.
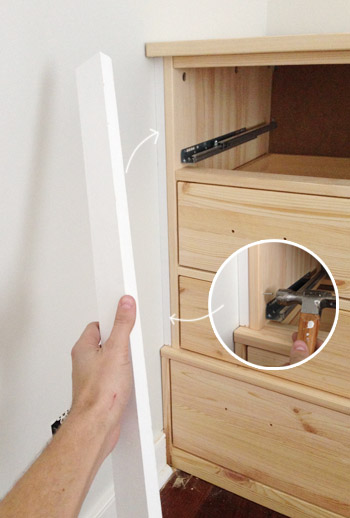
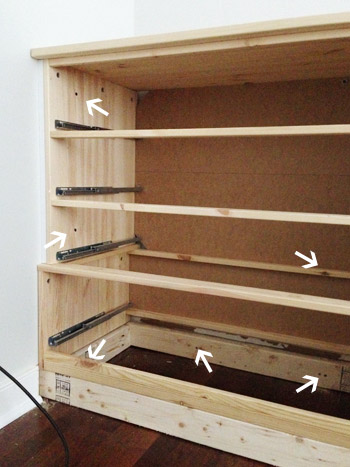
The last and final issue (#3) was building up the entire piece so that the bottom drawer wouldn’t be blocked by the new baseboard that we wanted to wrap around the base of each dresser. We decided a simple base/platform for the dresser to sit on would be nice and simple, and would buy us the extra height that we needed. Since it wouldn’t be visible, we just chose some 2 x 4″ framing lumber (since we needed it raised about 3.5″ off the ground). I cut the pieces and then attached them to each other in place, using my Kreg jig and some nice heavy duty screws.
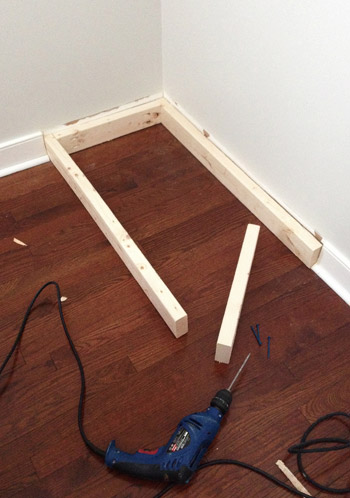
Here you can see how the dresser (sans drawers at the moment, for easier moving) sits right on top of this base. I didn’t actually attach the dresser to the base, which leads me to my next point…
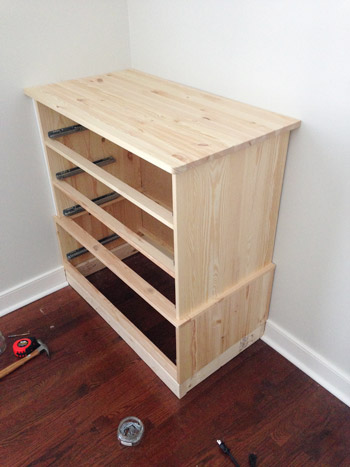
Securing everything in place was really important. We didn’t want this thing to move an inch – especially movement of the tip-over variety (dressers can be especially wobbly if someone pulls all the drawers out at once). So using my stud-finder I found as many places as I could to drill through nice solid wood (i.e. not the thinner backing piece) into studs – along both the side and the back. Not only did that help make things super flush against the wall, but both the base and the dresser became rock solid in their placement. Phew.
I know all of that didn’t seem terribly complicated (or exciting), but there was enough careful measuring, cutting, and screwing together, that it took me a good day-ish to complete… especially since I had to do it twice over.
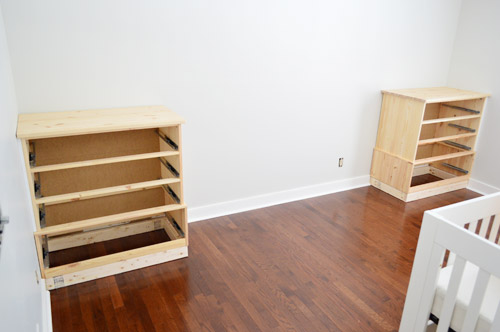
I was deep into building mode at this point, but logic told me that I should pause construction and Sherry and I should do some of our painting and staining before going further. Taking time for these steps while everything was still apart would mean less edging and taping, so it would hopefully save us time in the long (and result in a really clean look).
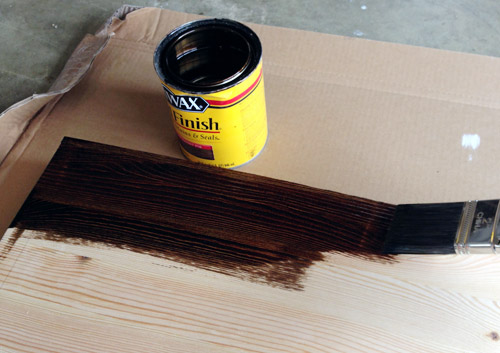
First up was staining the top, since we decided we wanted to take advantage of its wood grain texture and make it contrast a bit from the rest of it. We had two stains on hand that we’ve always liked, so it was just a matter of choosing which one worked for this application.
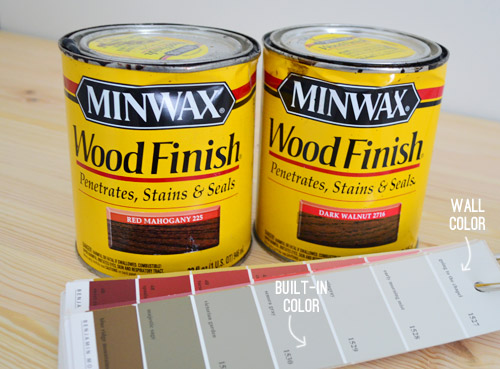
We were having a hard time judging based on the cans, so we decided to just look at real projects that were already sporting those colors. Clara’s dresser was Red Mahogany and my bike frames were Dark Walnut.
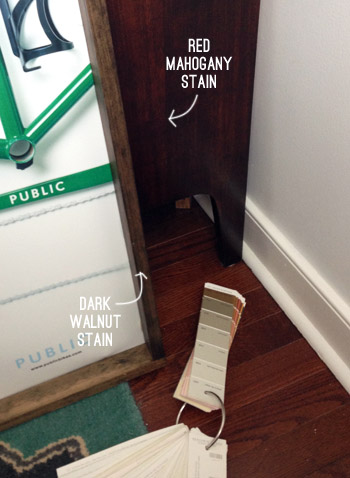
It’s hard to tell from that picture above, but in person the Dark Walnut color was closer to the floors (Red Mahogany was darker) and was also the exact tone that we’d used on the bike frames that would go in the room, so that made the decision pretty easy.
I removed the tops, took them out to the garage, and got to staining. They each took two coats of stain followed by two coats of Acrylacq sealer, which Sherry brushed on (it’s non-toxic and awesome for sealing in any off-gasing from non-eco products like the stain). Including drying time, this step stretched over about four days, but each coat went on pretty quickly, so a lot of that was just drying time.
But we didn’t sit idly by, we had two whole dressers to paint. Except one thing we worried about – which some of you explicitly warned us about – was the potential bleed-through. Strong knots like these have a tendency to make stains seep right through a paint job over time, even through layers of primer and paint in some cases.
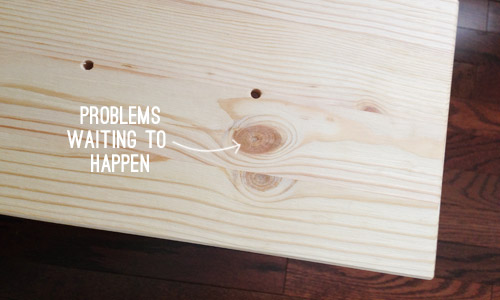
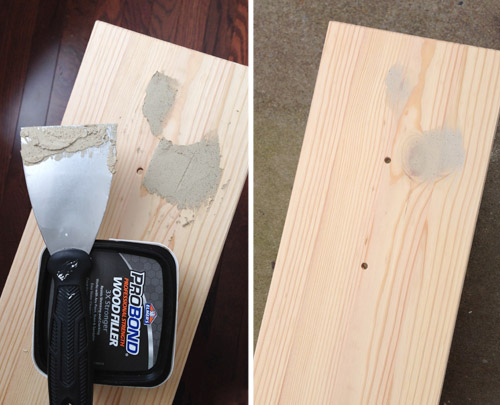
So thanks to some of your warnings and a little bit of research on Sherry’s part, we decided to take a couple of knot-busting tricks for a spin. The first was to cover them in wood putty, since it’s supposed to seal the knots and keep them from bleeding. I’ll admit I wasn’t crazy about this technique, mostly because it was time consuming (this piece has LOTS of knots) and when it came to sanding down the dried wood putty (which I did with a palm sander) it was a thin line to walk between getting it smooth again and sanding all the putty off completely. In the end I think we got a nice thin glaze of putty over most of the knots though, which did feel like added protection.
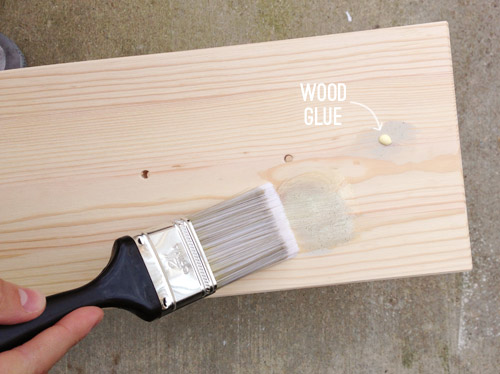
Sherry also had another trick up her sleeve (thanks Internet!), which was painting a thin layer of wood glue over each of those puttied knot areas. This technique was considerably faster (glue is surprisingly easy to paint with) and it didn’t result in any sanding dust getting everywhere.
We could’ve avoided the putty and glue by using a shellac-based primer, but since we try to keep things as fume-free as possible (especially in a nursery where a newborn will soon reside), we prefer to use Kilz Premium as our primer (it’s VOC-free). We used that on our kitchen cabinets a month ago, which were darker and had their fair share of knots, and nothing has come through their crisp white finish, so it does seem to do the trick in most cases – and the wood putty and glue that we used on the dresser feels like nice added insurance.
Not to skip ahead or anything, but it has been a few days since priming and painting, and so far not even a hint of bleed has occurred (sometimes things bleed right through the primer before you even get to the painting step, so it has been really comforting). Only time will tell if these techniques really work for the long run, but you know we’ll keep you posted either way.
Speaking of the priming step, we already had some Kilz Premium leftover from when we painted our bedroom dark blue, which is why it’s tinted.
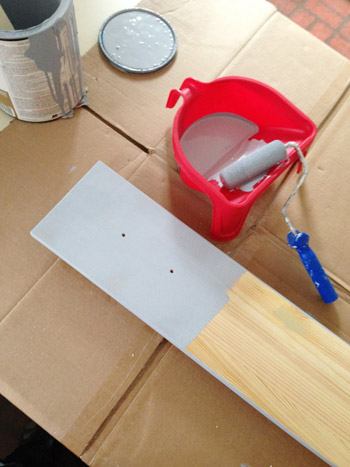
We probably didn’t need tinted primer, but we appreciated the chance to use up this can. Sherry detached and rolled all of the drawer fronts downstairs in the kitchen (it was too cold in the garage) and upstairs I rolled the bases in place, along with a few pieces that I had already cut for the top part of the build.
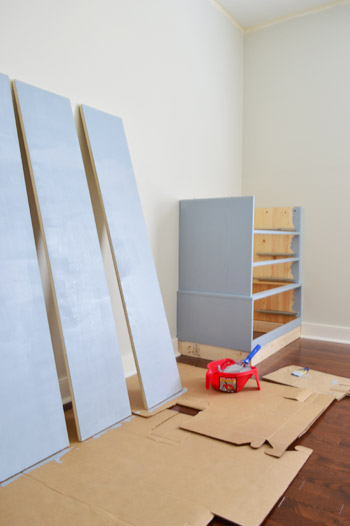
With the primer dry, we could move on to our first coat of paint (we went with Senora Gray in Advance paint, which is made for furniture and cabinetry, and has some nice self-leveling and low-VOC perks). It’s the same paint we used on our office cabinets in our last house, along with our last two kitchens. Those office cabinets were beat on by Clara with wooden trains when she was younger, so we love how durable it was.
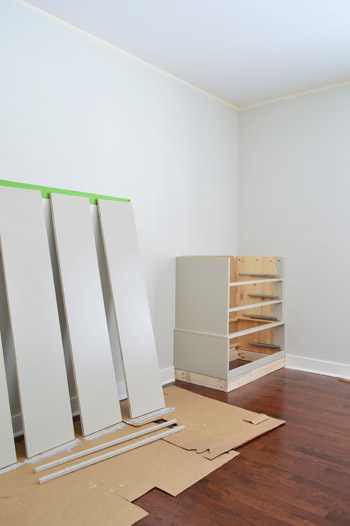
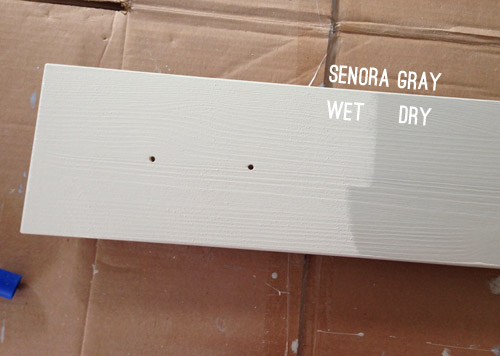
The color nearly gave us heart palpitations when it first went on. It was so light and so, I dunno, beige. We actually triple checked the swatch and can to make sure they had mixed it right. Fortunately it dried considerably darker and much closer to what we were envisioning. Phew.
Although I’ll admit we did second-guess the color a bit. It’s not nearly as dark as our photoshopped rendering, but that was on purpose. After doing that mock up, Sherry found this inspiration picture (it’s originally from Ballard Designs) and that’s how we picked Senora Gray for the built-ins and Going To The Chapel for the walls (more on that process in this post).
Still, I think Senora Gray turned out a bit lighter than we expected – namely in that it doesn’t contrast with the walls as much as we thought it would (even though it’s four squares below the wall color on the swatch card). We considering picking a new color before applying our second coat, but we decided it was a blessing in disguise, because it makes the stained wood top and the hardware pop really nicely thanks to more contrast, and as much as Sherry and I might chose moodier built-ins for ourselves, we keep trying to remind ourselves that this is a room for a little boy (and it only has one window) – so keeping things lighter isn’t a bad thing.
We finished both coats and put everything back together – including the stained top, the hardware (which came with the FJELL originally), and even started attaching some of the molding on the floor. That baseboard and shoe molding will be painted Senora Gray too – we just have some caulking to do first.
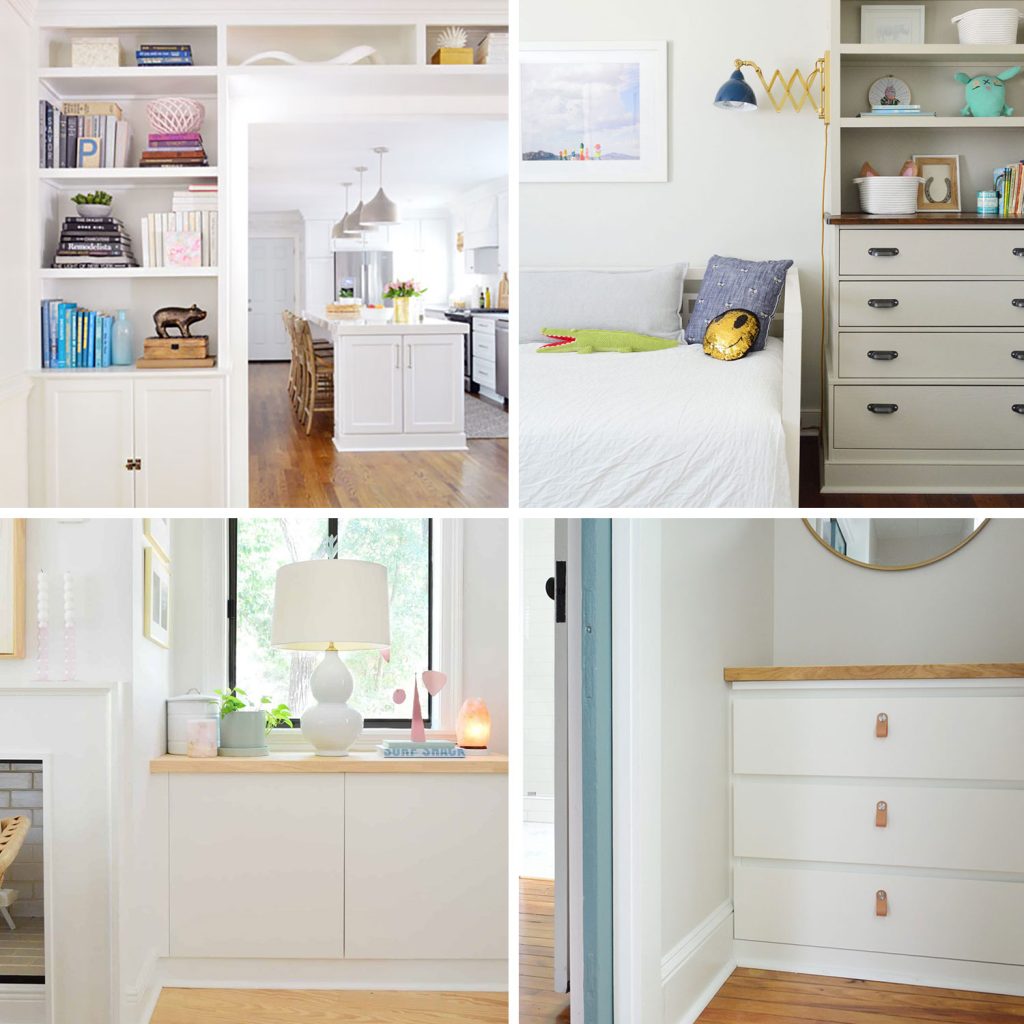
Update #1: People are wondering how we decided to paint the baseboard (and the crown we’ll be adding) to match the built-ins instead of keeping them white. We think it could look good either way, but we just prefer the look of an entire piece from floor to ceiling being the same tone (as opposed to accenting something like baseboard or crown by choosing to make it a contrasting color – especially since we already have the stained wood top as an accent). Here’s an example of a painted built-in with the baseboard and the crown in the same color, which we really like.
We’re super psyched with how they’re turning out. I know they’re a bit anticlimactic without having their bookcase tops on yet, but after all the time it took to get this far we relished in them at least looking partially complete.
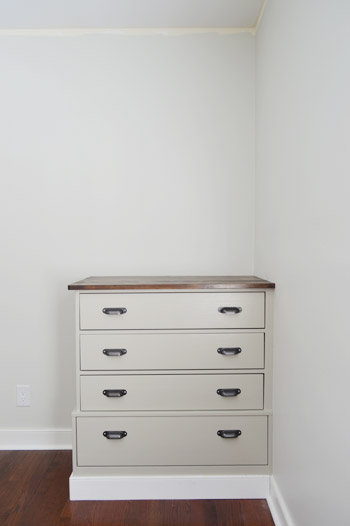
Update #2: A few others have asked if we’ve thought about filling that indentation on the inside edge of each dresser for more balance. In person we actually really love that added detail (we feel like it gives them some special architecture, and once the crib is between them it’ll be a nice little accent). Of course we could always change our minds and add something to fill that down the road, so we’ll keep you posted!
Assuming things stay on course the next couple of days, we should have these completely finished – built to the ceiling and primed/painted – by Wednesday or Thursday. Which is a huge relief because when I first started planning these guys I felt like I’d be lucky to have them done before baby boy arrives. Guess I kinda overestimated the task!
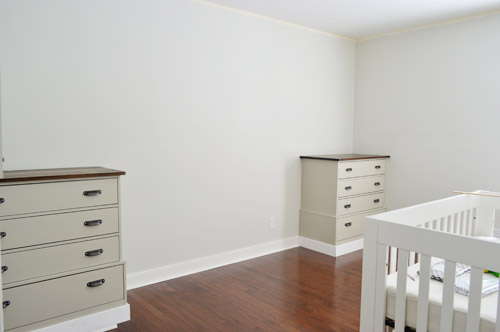
We’re definitely looking forward to crossing off the biggest project on our to-do list with ten weeks left for the fun stuff (Sherry can’t wait to tackle things like bedding, mobile-making, art, curtains, a bold green closet door, adding sconces and a light fixture, and doing something exciting to the wall between the built-ins where the crib will go).
More Built-In Storage Projects
We’ve done similar cabinet built-in projects in several spaces, so if you’d get more ideas and inspiration, be sure to check out some of the posts below:

Victoria says
Love the detailed instructions on how to work around the existing cabinet profile. Can’t wait to see the finished product!
Vanessa says
These look awesome. One question about the “box” the dresser is sitting on – with the weight of the dresser, plus drawers, plus whatever goes in the drawers, plus bookcases on top – with the weight eventually damage the floor by sinking or chipping? I guess it doesn’t really matter since the will be permanent but just wondering if you had concerns about that.
Awesome job! I am excited to see the room come together.
YoungHouseLove says
We think it should all be good since a freestanding bookcase or wardrobe would probably be the same weight, but our floors are solid hardwoods, so they should be able to handle that. Things like stone dressers (like a marble topped cabinet or island) are probably a lot heavier but they seem to be ok except on really delicate surfaces (like carpets or cork, which tend to dent). Anyone else have experience with this? I also think since the dresser is secured to the wall studs in many places (as the bookcases will be as well), a lot of the weight won’t be on the bases and will be displaced :)
xo
s
Sandra says
I really enjoyed the step-by-step for turning a purchased dresser into a built-in. They look great!
Did you do any prep on the the top prior to staining? I have pine trim and doors to stain and have not been able to get the stain to take on the test piece of trim.
Also, did you need to use putty on the filler piece along the wall?
Love them, love them. I just need to get my husband on board to commit to built-ins.
-Sandra
YoungHouseLove says
We just removed that, stained and sealed it, and reinstalled it. It fits pretty tightly to the wall so we didn’t caulk or putty that area.
xo
s
Janice says
Loving the look. I noticed in your mockup, you have a light on the side of the upper cabinet. Don’t forget about allowing for the wiring it will require (or they, if you are doing one on each side), before you get too far down the road of attaching everything to the walls.
YoungHouseLove says
Great tip! We are actually considering putting the sconces on the wall now (just so when there’s a bed there down the road they can be like reading sconces). Will keep you posted!
xo
s
Sarah says
You guys have to give yourselves more credit! Reading this through, this IS super complicated to me and you guys completed it flawlessly. I think that’s very impressive and you should too. My favorite part is the stained top, it gives the whole unit a very rich look in my opinion. I love it, I can’t wait to see how it all turns out in the end (I’m also really excited about the sconces, I hope those become a reality, I think it’ll look awesome!). Now go give yourselves mad pats on the back, please. :)
Lauren says
It looks so good! I love how secure they are to the wall too. The anti-tip hardware never feels that safe to me. You will have no issue with that!
I wish my husband was that handy with tools!
brittanyMakes says
my goodness, these look SOOO good. I like the option you chose with the base of the dressers to match the base boards. Can’t wait to see the full bookcase reveal :)
SarahB says
Just wanted to drop by and let you know how much I look forward to reading your blog every morning Monday – Friday. It starts my work day off on a good note. (don’t tell my boss!) I appreciate the detail you go into in your posts and your consistency. just out of curiosity, what happened to your blogroll? I always go to a few blogs regularly through your links after I read your post (ana white and bower power especially). But lately the tab is gone…
thanks!
YoungHouseLove says
So sorry, we clicked a button to turn the blogroll off last week (we’ve received a few complaints about it not being updated, linking to blogs that were inactive or that people didn’t like, etc). It has always been a challenge to keep that current, so we just disabled it for the time being. We noticed a lot of other blogs seem to have been phasing them out as well, so we’ll have to see where we end up :)
Katie says
Wow! These look great you guys. I love the colors and handles that you used. Baby Barnacle is going to have an awesome space with great storage. (kinda jealous! Ha)
Megan says
That looks fantastic!
kate says
I apologize if you’ve already answered this, but where did you purchase the Acrylacq? Did you order it online or is it available at Home Depot/Lowe’s?
YoungHouseLove says
We have to get it online since the eco store near us that had it went out of business.
xo
s
Michelle says
My parents gave me my childhood dresser. I put it in my guest room and really want to paint it. Over the weekend, I decided I want to paint it. Just nervous about the whole process…sanding, painting, etc. I’m afraid to pick the wrong color paint!!
YoungHouseLove says
Good luck Michelle!
xo
s
Jenny@EvolutionofStyle says
Wow! I’m a smitten kitten! They look fantastic – you’d never guess where you started with how they look now. Great tips on how to achieve the built-in look, and the color is perfection! Don’t even get me started on those pulls – I think those are my favorite.
Caitlin Wallace Rowland says
My husband and I were also finishing up a building project this weekend! We built a 12 ft long double desk (similar to the one in your last house): http://www.icingonthecakeblog.com/office-for-two/. We LOVE it!!
-Caitlin
YoungHouseLove says
Congrats! That’s awesome!
xo
s
Shannon Fox says
Absolutely love everything about it! The paint colors are awesome! Definitely happy accent in my humble opinion!
MelanieL says
I love watching your visions come to life especially for your little guy’s room…it’s very sweet and really shows your love for him and his surroundings:) He’s one lucky dude to have built-ins!!
nic says
Wow – gorgeous! They look like very expensive pieces…..so well done and I love how creative you are to really make them look built in!
Hey – what happened to your blogroll – I can’t seem to find it for the past week or so!?!?! I check in on 5 other blogs thru yours daily and I am really missing the blogroll!
YoungHouseLove says
So sorry, we clicked a button to turn that off last week (we’ve received a few complaints about it not being updated, linking to blogs that were inactive or that people didn’t like, etc). It has always been a challenge to keep that current, so we just disabled it for the time being. We noticed a lot of other blogs seem to have been phasing them out as well, so we’ll have to see where we end up :)
xo
s
Leah says
They look great! I can’t wait to see the finished nursery! Our nursery is small and needed to be gutted anyways so my husband built a dresser into one wall. There was an empty, unaccessible attic space behind the wall so the drawer fronts are actually flush with the wall. It frees up so much floor space! Similar to this picture: http://www.pinterest.com/pin/93590498477377040/
YoungHouseLove says
Sounds really cool!
xo
s
Karlie says
These look PHENOM! Your attention to detail in putting these together is incredible. Very impressed.
YoungHouseLove says
Thanks so much, Karlie!
-John
Shereen says
I painted our main bathroom this weekend with inspiration from you guys. In the end I went with good old Moonshine, and I even hunted down that brush that Sherry always talks about! I think I’m pretty good at painting, it’s never been something I’ve thought of as difficult. But I ran into a snag that took me the entire weekend to figure out! I didn’t realize that there was a very thin coat of clear caulking on the wall that meets our vanity. After 2 coats of paint and a hi-5 to myself, I noticed that the paint was bubbly and peeling in those areas. ROAR.
YoungHouseLove says
Oh man! So sorry about that!
xo
s
Caitlin says
WOW! You did such a great job. Ikea should hire you for a “how-to make out furniture look even better” section of the store. Seriously impressed! It looks so expensive!
YoungHouseLove says
Thanks Caitlin!
xo
s
Jo @ Let's Face the Music says
Love built ins. I agree with Sherry that the indented sides are interesting. I’m viewing this wall as a symmetrical “whole” instead of each piece balancing itself. Once the entire area is put together the little niches created will be both balanced and symmetrical on the larger scale. (You don’t know how many times I could have used the word “whole” in this comment.)Jo @ Let’s Face the Music
YoungHouseLove says
Haha!
xo
s
Ashlee says
How exciting!! They look amazing! Heat a blessed baby boy :)
Ashlee says
Oops! Not heat, that should say “what” :)
YoungHouseLove says
Haha, I knew what you meant ;)
xo
s
Sarah says
WOW. This is gorgeous! I’m in love. We put up all new 6 inch painted simply white poplar boards for baseboards & since they’re so thick to cover the gap from the floor to the wall, it makes the fridge not sit flush. Not sure if this technique would work for our fridge though since I can’t calk… :(
It may always bug me I guess!
Also, been looking for “built-in” ideas to frame our front window in our living room & I just LOVE this idea. Do you think there are any cheaper solid wood cabinets/drawer units to use than these? I didn’t realize how pricey they could be!
YoungHouseLove says
Anyone have tips for cheaper solid wood dressers? Lots of the less expensive ones seem to be particle board or laminate, but maybe secondhand (thrift stores or craigslist) could turn up something awesome!
xo
s
Sharon Bird says
I miss your blogroll–what happened??
YoungHouseLove says
So sorry, we clicked a button to turn that off last week (we’ve received a few complaints about it not being updated, linking to blogs that were inactive or that people didn’t like, etc). It has always been a challenge to keep that current, so we just disabled it for the time being. We noticed a lot of other blogs seem to have been phasing them out as well, so we’ll have to see where we end up :)
xo
s
Mikelove says
Have you guys ran into the problems where your walls are not perfect 90 degrees? What was your solution, if you do have these issues?
After using sticky vinyl tiles to line my pantry shelves I noticed this was the case for me, so I’ve been sort of cautious about making these types of built ins.
YoungHouseLove says
One way to solve that would be to set your rectangular base as as square as possible, and then trim to the and fill the side to make everything look flush (paintable caulk helps too!).
xo
s
Debbie C says
Ok, I love this! I can’t wait to see what happens with the rest of the room. I wasn’t sure how a stained top with gray paint would look but it turned out great, esp with the lighter gray.
Virginia says
Wow!!! I’ve been anxious to see how y’all would build them in without leaving a gap, and you made it look so easy! They really look custom. I love the idea of combining drawers and shelves – hide some mess, but display prized/attractive items. It’s perfect to grow with the little guy. Think of the trophies that will fill the shelves! So fun
YoungHouseLove says
Aw, thanks so much!
xo
s
Sarah @ The Simple Home says
Gah, love that. The hardware is ah-mazing. Keep up the good progress, guys! The little man will love it!
Sarah
http://www.thesimplehomeblog.blogspot.com
Jennifer says
It looks great! We’re doing something in my son’s room. He’s 11 so no crib though! We have tiny bedrooms and there’s just not enough room for a dresser across from it, so we’re putting them on the sides as built-ins. It’s similar to the PB Teen look, but with Ikea furniture. His bed will also be in between with a bridge connecting the two bookcases. That might work for you as your little guy gets older, too.
YoungHouseLove says
Sounds really sweet!
xo
s
Virginia says
Oh definitely don’t fill in that indentation! That’s my favorite part! It gives them a little interesting architectural detail, so they look custom, not like Ikea dressers.
YoungHouseLove says
Thanks Virginia!
xo
s
Melissa says
Amazing! I love it. I have a set of built-ins that desperately need a new color (and fresh coat of paint), I feel like I should check out senora gray.
Nice work.
Jessica says
Wow great work! They are looking a tad like file cabinets but I can’t wait to see the room finished with some color brought in! Have you thought of adding a fun or subtle painted pattern on the drawer fronts (herringbone, stripes, etc)??
YoungHouseLove says
Actually I thought about that for the backs of the bookcase (bold paint, fabric, wallpaper, etc) but want to load them up with stuff first, just to make sure it doesn’t get too busy :)
xo
s
Beth says
Seriously? That looks AMAZING!!! Green with envy. :)
Kelly says
I have never done anything like this, though I had better DIY skills it is tempting since built ins are SO expensive. I really wanted some for my living room but the $5,000 price tag more than scared me off. Doing these ikea hacks seems smart, but I’m curious – is the wood soft? I only ask because an ex-bf had some all wood bookshelves and they seemed to dent if you so much as looked at them wrong. So while I find the idea of an ikea hack tempting, I’m nervous about whether they would really last.
Kelly says
I meant to say wood bookshelves from IKEA. Sorry if that wasn’t clear.
YoungHouseLove says
Good question! I think this wouldn’t be worth it with certain pieces (some are less sturdy, not solid wood, or made of super light woods like balsa, etc). These Fjell dressers are really hard and sturdy, but we had to see them in person to be sure (we knocked on them and leaned on them and slid out all the drawers, etc) so I would recommend seeing things in person and looking for nice solid real wood and sturdy joints.
xo
s
Lo says
Kelly, the dressers they used are solid wood, but they are pine. Pine is a soft wood, so yes, it will dent and mark easily. Hopefully they hold up ok for them, but it’s definitely not the best way to go unless you don’t mind the nicks and dents (or are going for that kind of look). MDF is probably a better bet. Good luck!
Dawn says
Just one word: gorgeous. That is all!
jill says
what the…? how…? Seriously, the work you two complete just amazes me.
YoungHouseLove says
Aw shucks Jill, you’re so sweet. I was just telling John how awesome his handiwork has gotten. It’s so funny to look back in our archives to see how little we knew (didn’t even have a caulk gun!) when we started.
xo
s
Sarah says
I LOVE the color… and you make it look so easy! This week is going to be full throttle house prep for photographing and listing our house. AH! First time listers, hope we’re as lucky as you have been.
YoungHouseLove says
Ack, that’s so exciting! Good luck Sarah!
xo
s
Stefanie says
I LOVE THEM!!!!! Even more so than the photoshop version of base dresser awesomeness. WOW, theyre that good looking.
Laura & the Shell says
Wow, guys! They are looking Great! Seriously – you nailed the colors in there and the care you are taking to make them builtin is really worth it. Awesome!! Can’t wait to see the finished product!
YoungHouseLove says
Thanks Laura!
xo
s
Lo says
You guys have mentioned adding in a third dresser as well (John’s dad’s dresser?) – I’m just wondering what the need for so many dressers is? Plus there’s a closet. Most adults don’t need three dressers plus a closet (and it’s not even a tiny closet), never mind a child…
Wouldn’t the best built-ins for a kid be more like shelving and cubbyholes for books and toys? With baskets and bins for toy storage and easy access for a kid? I dunno, large drawers don’t seem all that practical for the things a kid would need to store, not to mention they’re quite high and look like they’d be quite cumbersome for a little kid to manage (even just to get his clothes out when young). With shelving/cubbyholes, it can still grow with him, or you could even add some cabinet doors on the bottom part to allow him to keep his stuff more private.
Do you guys not like bedside tables? It seems you either don’t use them or put dressers beside your beds… This seems awkward. Especially for a kid?
Would love to hear more on your thought process of why you thought drawers would be the best route to go versus shelving/cubbyholes as I mentioned.
YoungHouseLove says
John and I were just chatting about how the dresser might be overkill, so we may leave that in our closet where we’re currently using it, although we typically love storage (don’t really ever remember complaining about having too much, haha!). We tend to store clothing, cloth diapers, sheets, burp cloths, blankets, and all that in drawers as opposed to using the closet or open cubbies (in fact we typically find that closets make great spots for play nooks) so we think the built-in drawers will be great for that. Since Clara was born we’ve had the same large six-drawer dresser in her room that we love, so eight drawers in here feels similar (now we can use the bottom drawers for toy/puzzle/game storage – should be nice and flexible). As for bedside tables I think those are just not a natural thought with a crib (we have them in our master though). We still have three other nursery walls for more open toy storage (cubbies, baskets, etc) as well as the closet – but I’m sure other families would make different calls in their own spaces :)
xo
s
Jenni says
I love love LOVE this build! I think this may just be my favorite project to date :) Those dressers went from ikea drab to ikea fab! Great job you guys!
YoungHouseLove says
Thanks Jenni!
-John
Janet says
Wow, guys – these look awesome! I love the happy accident of the color. It actually fits perfectly in a nursery. This baby boy is coming home to an awesome family and a fab room! I can’t wait to see it continue to come together.
Meagan {green motherhood} says
That picture inside the picture depicting where you put the nails?
Awesomesauce.
Very impressed, John!
YoungHouseLove says
Thanks Meagan! You know me and my love of graphics…
-John
HeatherM says
My FIL works for a large cabinet-making company, so we get kitchen and bath cabinets at cost or sometimes for free (when they are looking to clear out inventory). We of course use these cabinets in our kitchens and bathrooms, but we build them into other projects as well. We hung an overjohn cabinet in our laundry room for a good place to store chemicals up high (and in a cabinet easily amenable to a child safety lock ). We made a built-in closet organizer and used 3-drawer kitchen cabinets on the bottom and shelves above for a pretty and professional look. We’ve made sideboard cabinets, desks and work stations, and even a combo microwave cart, cabinet, and bar table for the miniature kitchen in our very first city apartment. I love using unusual items to make built- ins!
YoungHouseLove says
So cool!
xo
s
Koen @ TownHouseHome says
Wow, that looks really amazing, such a difference with what you guys started from.
Also a good tip about the knots, pretty sure I’ll put it to good use some day!
karen says
john, you are turning into a real pro!! bravo!!
i would totally paint the white trim at the base the same gray.
Alexandra says
looks great sherry and john!! always excited to see what you guys come up with!
just a suggestion- maybe a nice, thick piece of solid wood would add some chunkiness and balance to the top of the dressers? I think that would “lift” it even more!
YoungHouseLove says
Thanks Alexandra! We’re in the process of building the top half of them and really love how things look. Can’t wait to share our progress. On Wednesday hopefully if all goes well!
xo
s
Meredith says
I have cabinets at the ready to tackle a similar project flanking my dining room window – caninets and shelving above. I’m dealing with wood floor too. I’ve debated this in my head…Do i just go right on top of the wood floor? Kitchen cabinets are installed then the flooring bumps into it, not running over it. That’s what has my brain in knots. Did you wrestle this issue?
Meredith says
And by running over it I meant running UNDER it. But you knew that right?
YoungHouseLove says
Oh yes, I’d do them right over the flooring as we did in here and then if you add baseboard and shoe molding it should make it all nice and seamless. You can even redo the baseboard and shoe around the cabinet to match if it doesn’t look the same, for a super seamless look!
xo
s