It’s been a busy but productive week in the nursery built-in department, so I’m going to cover a lot in this post. Hang on to your hats, crank up your favorite Swedish electropop, and be prepared for some nitty-gritty detail on how we began the transformation from free-standing Ikea dresser to built-in dresser/bookshelf combo (that’s not a finished result on the right, by the way, it’s just photoshop).
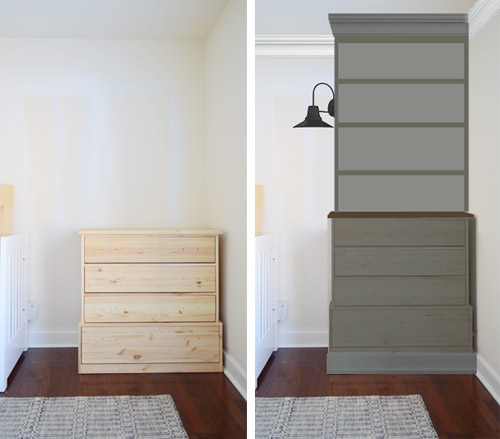
As you might recall, we bought two FJELL dressers because they were the size we needed and they were made of solid wood. But they did need a little additional help when it came to giving them a built-in look:
- The indented side profile meant it couldn’t sit flush to the wall, leaving a pretty glaring gap that needed filling
- The nursery’s baseboards on both the side and the back also prevented it from hugging the walls tightly
- The bottom drawer wasn’t built up enough from the floor to accommodate wrap-around baseboards, which we wanted to add to complete the built-in look
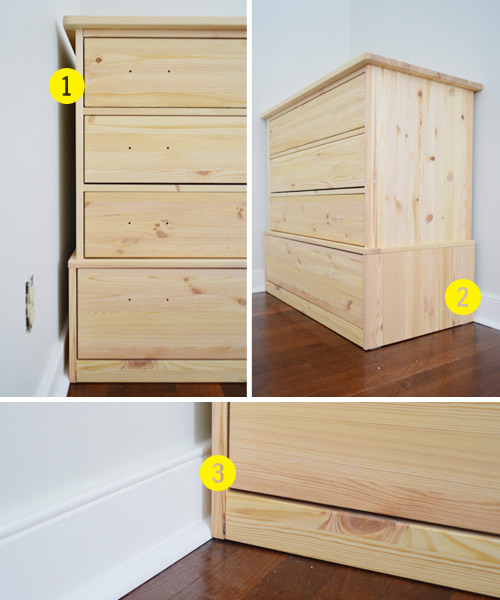
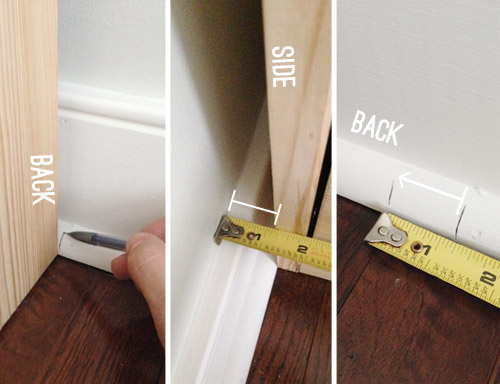
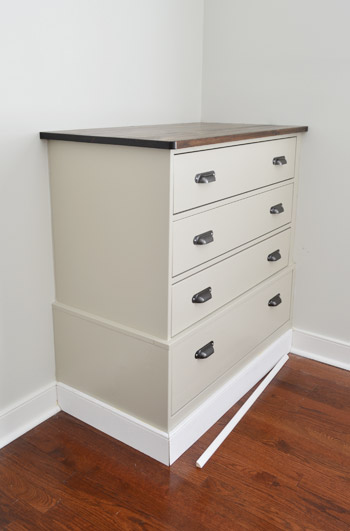
None of these issues were insurmountable, but it did take a some extra work to get them taken care of before we could move on to the fun stuff. Let’s start with problem #2: the existing baseboard, since it’s an issue that anyone would run into with any piece of furniture they’re trying to build-in. The solution? Cut it out. I just had to mark where to make my cuts. I marked where it sat originally, but kept in mind that when I removed the side baseboard, the whole piece would shift to the left against the wall. Same goes for marking the side cut (when I remove the back baseboard, it would sit further back).
To cut it out I used my Dremel Multimax. The metal radiator cover (leftover from this project) is just there to help protect the floor. You don’t technically need a metal grate, but I figured this way it would make a pretty distinct noise when my blade got too close, which was a nice warning to keep me from damaging the floor underneath it.
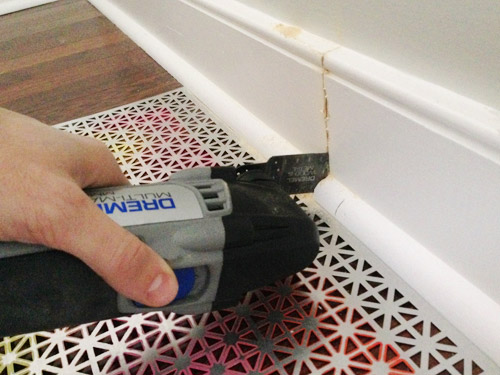
Once I had cut all the way through, I scored the seam between the wall and the baseboard with a utility knife (to make sure no wall paint peeled off with the baseboard). Then I just pried off the quarter-round and the baseboard.
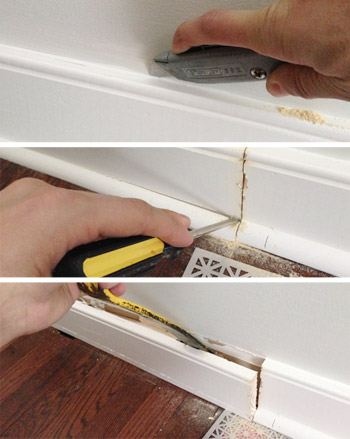
With both the back and side baseboard removed, I excitedly pushed the piece back into the corner… only to realize that the top piece was now the problem. It was bigger than the bottom of the dresser, so the overhang was preventing me from getting the piece completely flush. Bummer.
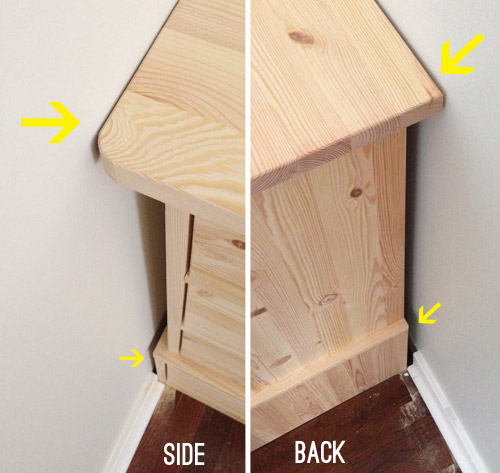
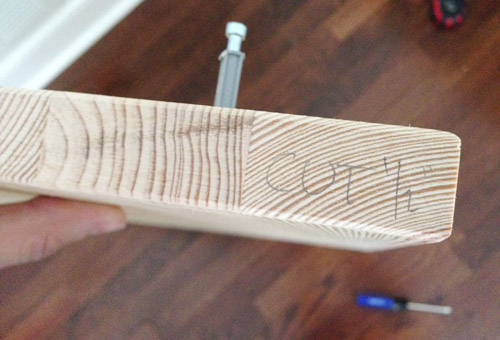
So Sherry and I had a little “meeting of the minds” and decided to trim the top a smidge to remedy the situation. Luckily, being an IKEA product, it was easy enough to remove the top (after I marked how much would need to come off). I was sure to write my cut measurements on the side that needed a trim so that once I got downstairs to my saw I didn’t accidentally slice the wrong end.
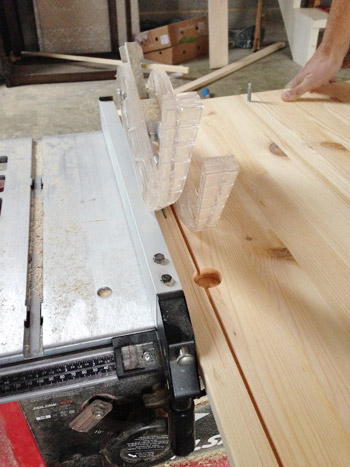
I set the guide on my table saw to the correct measurement and just sliced the two sides accordingly. This is a moment we were particularly thankful that we went with a nice sturdy dresser made of solid wood (and not particle board, which can be tougher to cut cleanly).
With the top cut and reattached, the dresser now sat nice and flush against the wall on the back… but I was still dealing with a gap-on-the-side (problem #1, if you remember).
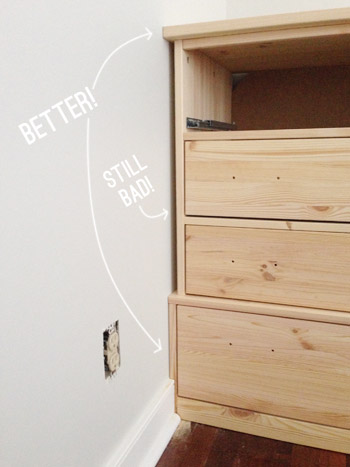
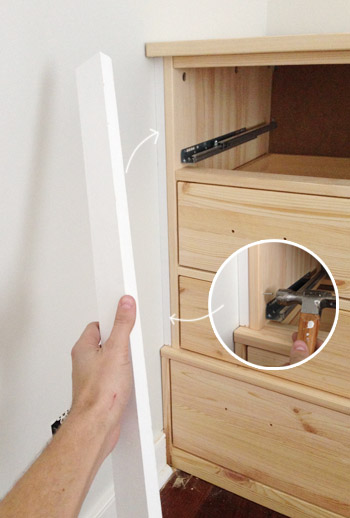
This was an easy solution because the gap just happened to be 3/4″, which meant I just had to slip a 1 x 2″ piece of scrap wood in there (after I cut it to the right length with my miter saw). It was actually a tight enough fit that it might’ve stayed on its own, but I put a couple of nails through the dresser into it, just to be safe.
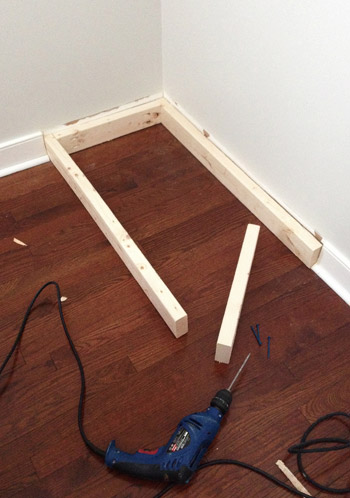
The last and final issue (#3) was building up the entire piece so that the bottom drawer wouldn’t be blocked by the new baseboard that we wanted to wrap around the base of each dresser. We decided a simple base/platform for the dresser to sit on would be nice and simple, and would buy us the extra height that we needed. Since it wouldn’t be visible, we just chose some 2 x 4″ framing lumber (since we needed it raised about 3.5″ off the ground). I cut the pieces and then attached them to each other in place, using my Kreg jig and some nice heavy duty screws.
Here you can see how the dresser (sans drawers at the moment, for easier moving) sits right on top of this base. I didn’t actually attach the dresser to the base, which leads me to my next point…
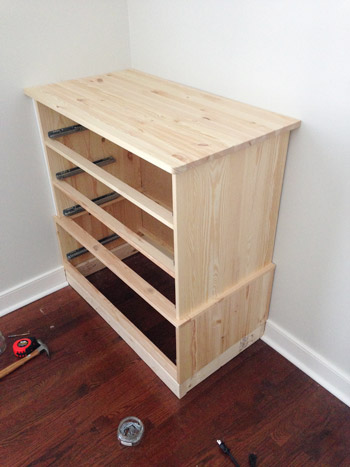
Securing everything in place was really important. We didn’t want this thing to move an inch – especially movement of the tip-over variety (dressers can be especially wobbly if someone pulls all the drawers out at once). So using my stud-finder I found as many places as I could to drill through nice solid wood (i.e. not the thinner backing piece) into studs – along both the side and the back. Not only did that help make things super flush against the wall, but both the base and the dresser became rock solid in their placement. Phew.
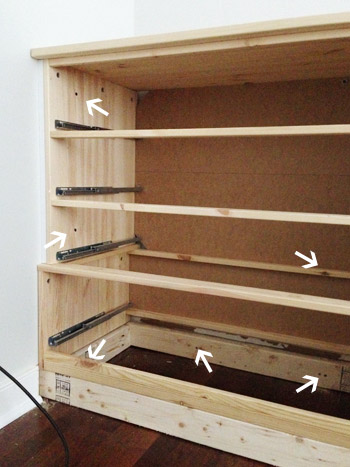
I know all of that didn’t seem terribly complicated (or exciting), but there was enough careful measuring, cutting, and screwing together, that it took me a good day-ish to complete… especially since I had to do it twice over.
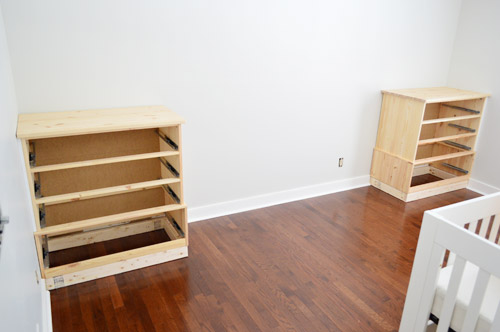
I was deep into building mode at this point, but logic told me that I should pause construction and Sherry and I should do some of our painting and staining before going further. Taking time for these steps while everything was still apart would mean less edging and taping, so it would hopefully save us time in the long (and result in a really clean look).
First up was staining the top, since we decided we wanted to take advantage of its wood grain texture and make it contrast a bit from the rest of it. We had two stains on hand that we’ve always liked, so it was just a matter of choosing which one worked for this application.
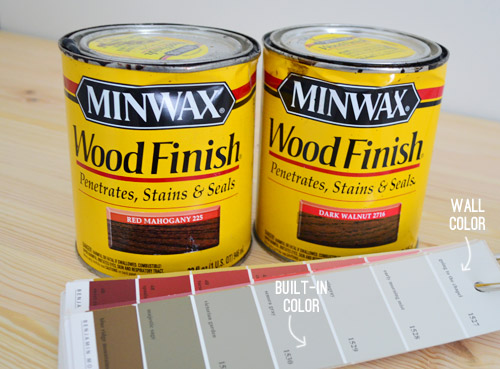
We were having a hard time judging based on the cans, so we decided to just look at real projects that were already sporting those colors. Clara’s dresser was Red Mahogany and my bike frames were Dark Walnut.
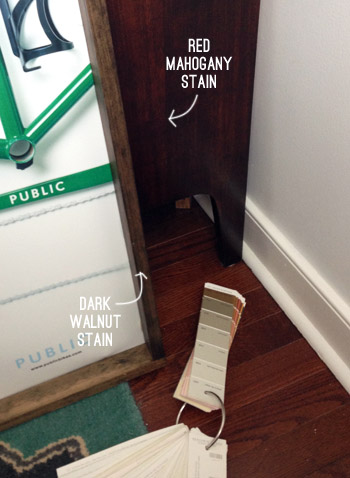
It’s hard to tell from that picture above, but in person the Dark Walnut color was closer to the floors (Red Mahogany was darker) and was also the exact tone that we’d used on the bike frames that would go in the room, so that made the decision pretty easy.
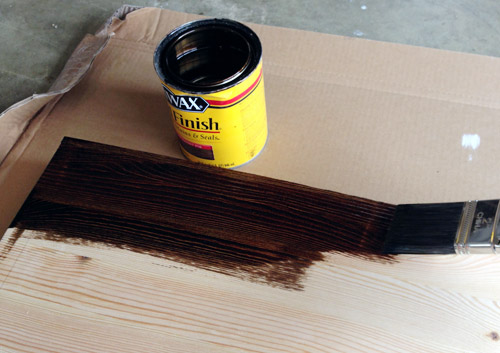
I removed the tops, took them out to the garage, and got to staining. They each took two coats of stain followed by two coats of Acrylacq sealer, which Sherry brushed on (it’s non-toxic and awesome for sealing in any off-gasing from non-eco products like the stain). Including drying time, this step stretched over about four days, but each coat went on pretty quickly, so a lot of that was just drying time.
But we didn’t sit idly by, we had two whole dressers to paint. Except one thing we worried about – which some of you explicitly warned us about – was the potential bleed-through. Strong knots like these have a tendency to make stains seep right through a paint job over time, even through layers of primer and paint in some cases.
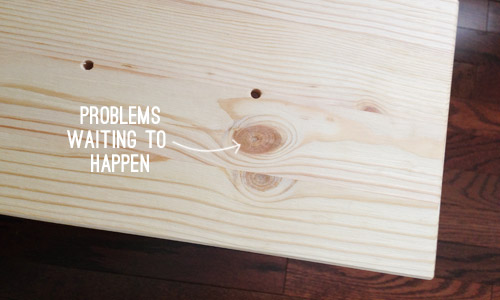
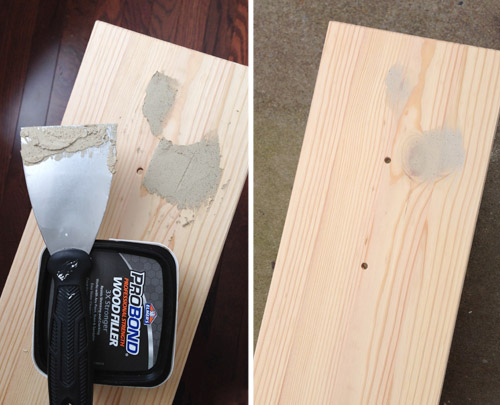
So thanks to some of your warnings and a little bit of research on Sherry’s part, we decided to take a couple of knot-busting tricks for a spin. The first was to cover them in wood putty, since it’s supposed to seal the knots and keep them from bleeding. I’ll admit I wasn’t crazy about this technique, mostly because it was time consuming (this piece has LOTS of knots) and when it came to sanding down the dried wood putty (which I did with a palm sander) it was a thin line to walk between getting it smooth again and sanding all the putty off completely. In the end I think we got a nice thin glaze of putty over most of the knots though, which did feel like added protection.
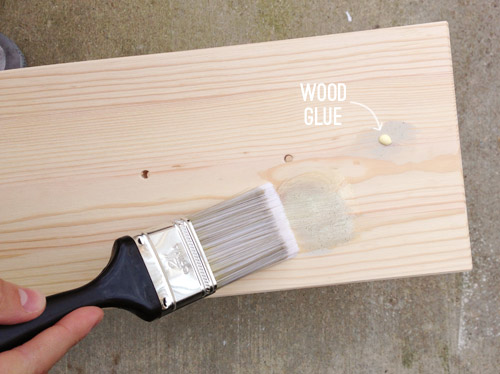
Sherry also had another trick up her sleeve (thanks Internet!), which was painting a thin layer of wood glue over each of those puttied knot areas. This technique was considerably faster (glue is surprisingly easy to paint with) and it didn’t result in any sanding dust getting everywhere.
We could’ve avoided the putty and glue by using a shellac-based primer, but since we try to keep things as fume-free as possible (especially in a nursery where a newborn will soon reside), we prefer to use Kilz Premium as our primer (it’s VOC-free). We used that on our kitchen cabinets a month ago, which were darker and had their fair share of knots, and nothing has come through their crisp white finish, so it does seem to do the trick in most cases – and the wood putty and glue that we used on the dresser feels like nice added insurance.
Not to skip ahead or anything, but it has been a few days since priming and painting, and so far not even a hint of bleed has occurred (sometimes things bleed right through the primer before you even get to the painting step, so it has been really comforting). Only time will tell if these techniques really work for the long run, but you know we’ll keep you posted either way.
Speaking of the priming step, we already had some Kilz Premium leftover from when we painted our bedroom dark blue, which is why it’s tinted.
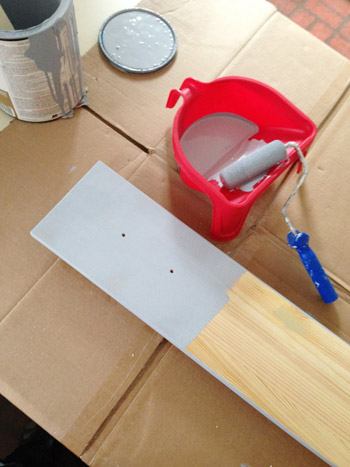
We probably didn’t need tinted primer, but we appreciated the chance to use up this can. Sherry detached and rolled all of the drawer fronts downstairs in the kitchen (it was too cold in the garage) and upstairs I rolled the bases in place, along with a few pieces that I had already cut for the top part of the build.
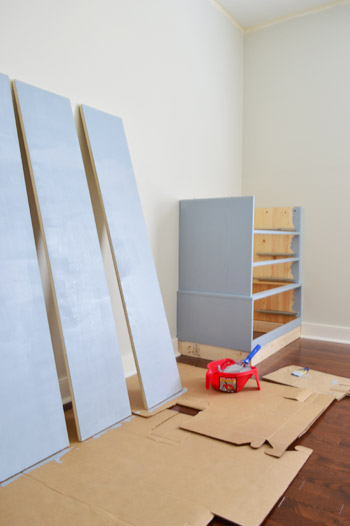
With the primer dry, we could move on to our first coat of paint (we went with Senora Gray in Advance paint, which is made for furniture and cabinetry, and has some nice self-leveling and low-VOC perks). It’s the same paint we used on our office cabinets in our last house, along with our last two kitchens. Those office cabinets were beat on by Clara with wooden trains when she was younger, so we love how durable it was.
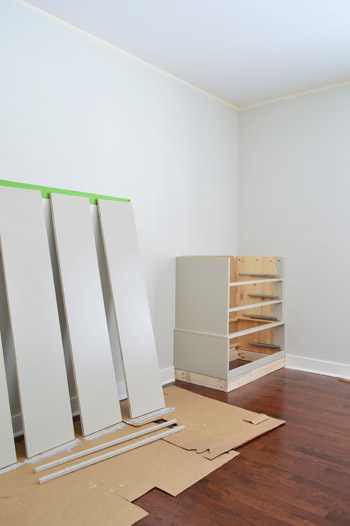
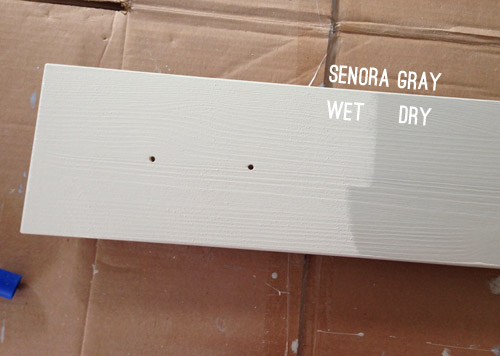
The color nearly gave us heart palpitations when it first went on. It was so light and so, I dunno, beige. We actually triple checked the swatch and can to make sure they had mixed it right. Fortunately it dried considerably darker and much closer to what we were envisioning. Phew.
Although I’ll admit we did second-guess the color a bit. It’s not nearly as dark as our photoshopped rendering, but that was on purpose. After doing that mock up, Sherry found this inspiration picture (it’s originally from Ballard Designs) and that’s how we picked Senora Gray for the built-ins and Going To The Chapel for the walls (more on that process in this post).
Still, I think Senora Gray turned out a bit lighter than we expected – namely in that it doesn’t contrast with the walls as much as we thought it would (even though it’s four squares below the wall color on the swatch card). We considering picking a new color before applying our second coat, but we decided it was a blessing in disguise, because it makes the stained wood top and the hardware pop really nicely thanks to more contrast, and as much as Sherry and I might chose moodier built-ins for ourselves, we keep trying to remind ourselves that this is a room for a little boy (and it only has one window) – so keeping things lighter isn’t a bad thing.
We finished both coats and put everything back together – including the stained top, the hardware (which came with the FJELL originally), and even started attaching some of the molding on the floor. That baseboard and shoe molding will be painted Senora Gray too – we just have some caulking to do first.
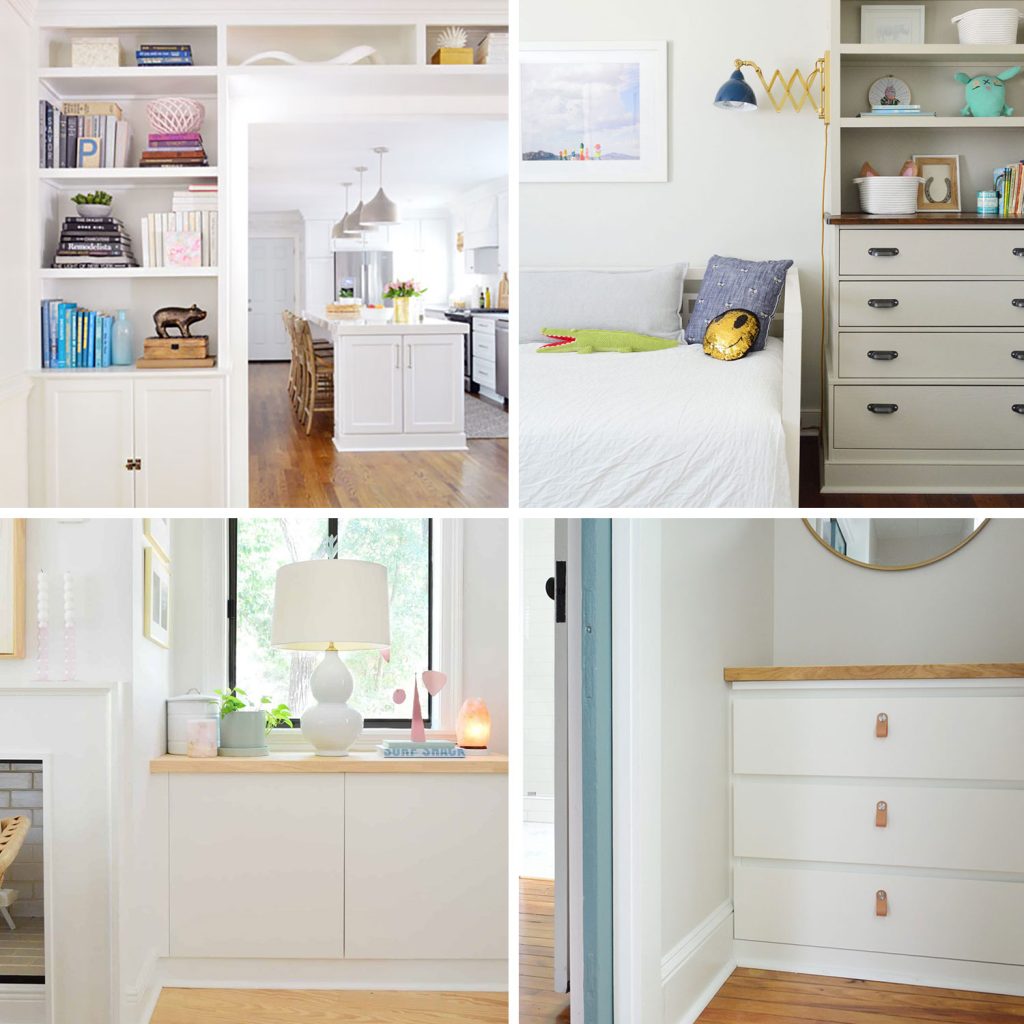
Update #1: People are wondering how we decided to paint the baseboard (and the crown we’ll be adding) to match the built-ins instead of keeping them white. We think it could look good either way, but we just prefer the look of an entire piece from floor to ceiling being the same tone (as opposed to accenting something like baseboard or crown by choosing to make it a contrasting color – especially since we already have the stained wood top as an accent). Here’s an example of a painted built-in with the baseboard and the crown in the same color, which we really like.
We’re super psyched with how they’re turning out. I know they’re a bit anticlimactic without having their bookcase tops on yet, but after all the time it took to get this far we relished in them at least looking partially complete.
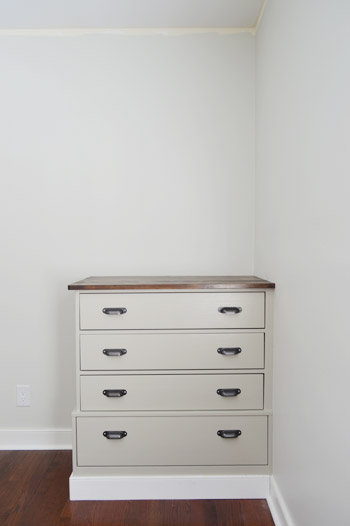
Update #2: A few others have asked if we’ve thought about filling that indentation on the inside edge of each dresser for more balance. In person we actually really love that added detail (we feel like it gives them some special architecture, and once the crib is between them it’ll be a nice little accent). Of course we could always change our minds and add something to fill that down the road, so we’ll keep you posted!
Assuming things stay on course the next couple of days, we should have these completely finished – built to the ceiling and primed/painted – by Wednesday or Thursday. Which is a huge relief because when I first started planning these guys I felt like I’d be lucky to have them done before baby boy arrives. Guess I kinda overestimated the task!
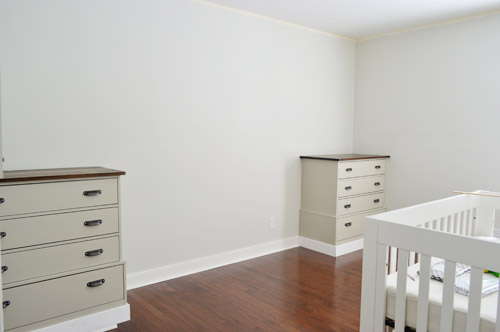
We’re definitely looking forward to crossing off the biggest project on our to-do list with ten weeks left for the fun stuff (Sherry can’t wait to tackle things like bedding, mobile-making, art, curtains, a bold green closet door, adding sconces and a light fixture, and doing something exciting to the wall between the built-ins where the crib will go).
More Built-In Storage Projects
We’ve done similar cabinet built-in projects in several spaces, so if you’d get more ideas and inspiration, be sure to check out some of the posts below:

Meg says
I love how these look! We just muscled a flat file to our second floor and what you did with these dressers has that “engineer” look to them. We started a project of building in existing furniture this weekend – with the same obstacles (need to raise to wrap baseboard, fill in next to wall) I’m hoping we’ll have some time to share it on our blog soon!
YoungHouseLove says
Sounds awesome Meg! Best of luck with everything!
xo
s
Trish says
They look wonderful! Have you thought of putting a desk/worktable built-in between the 2 dressers at a later time? (just one long surface) I had one between my 2 built-ins as a kid and I did all of my homework there. Mine was right in front of a window though so I got in more day dreaming than studying!! Love the stained top. Lot’s of good inspiration!
YoungHouseLove says
That’s a fun idea too! We definitely could do that down the line, so we like keeping that area between the built-ins flexible for decisions like “bed or desk?” down the line :)
xo
s
Leslie says
Hi guys,
This looks amazing so far! I have a question (and please forgive me if this has been answered already), but would you consider painting the top crown molding of the book case in white also (to match the bottom of the dresser)?
YoungHouseLove says
We have debated leaving the baseboard white along with the crown, or doing them both in the same color as the built-ins, and we like the idea of a solid color from floor to ceiling to draw the eye up and unify them. There’s more on that in an update in the post for ya (with a link to a similar built-in with painted crown and baseboard). Hope it helps :)
xo
s
Emily @ Life on Food says
I love how the built in are coming along. The colors look great. This weekend we painted the formal living room that came in bright pink. We used Sparrow from BM. It turned out way better than expected. The space was big but I was nervous about the darker color. Now we just need a new name because the “pink room” doesn’t work anymore.
YoungHouseLove says
I love that color! It’s on our paint-color-thoughts post about this house, so I’d love to use it somewhere. I think maybe in the guest room!
xo
s
Carla says
I’m really not a fan of those dressers with the narrower top section. It’s distracting and awkward. I also wish people would design their nurseries months before their babies are due to allow for some outgassing to occur.
These paints have cancer warnings for a reason, and low VOC is not enough for developing brains. The stain in particular would be concerning.
Theresa says
Your vision is really coming together… beautiful. I often refer to Restoration Hardware for inspiration. “wine taste on a beer budget” is how the saying goes.
I had a little gasp moment when I saw painters tape used on your newly painted wall to protect it. I have a love hate relationship with that stuff. I’ve started using frog tape and it adheres… a little too well. I am so careful when removing and it still pulls up paint.
I’m crossing my fingers for you when the time comes to remove it. My Dad gave me gave me a little tip to use a hair dryer when slooowly removing.
YoungHouseLove says
Thanks Theresa! I always hold my breath during that part too!
xo
s
Mercy says
So Exciting! Can’t wait to see the finished project, but LOVING the play-by-play!
Kim B. says
These are turning out so nicely!
Roeshel says
Looking great! Love the color, love the beautiful stained top and can’t wait to see more!
Kate says
Wow, those look amazing! Nice work!!
Arianna says
Out of curiosity, when you used the advance paint did you use any special brushes or techniques to prevent paint lines and give a smooth finish? I’m about to use it for the first time on a dresser I’m refinishing.
YoungHouseLove says
We like applying it with a small foam roller and a short handled 2″ angled brush. Hope it helps!
xo
s
Kelly says
Are you sure you aren’t secretly having twins?
They look great, though!
YoungHouseLove says
Haha! No way, I could never keep a secret like that!
xo
s
Jen says
Oh wow! This is definitely one instance where the photoshop rendering did not do the project justice. I was actually a little…concerned?…but the real thing turned out beautifully. I like that you left the tiered look on the sides, and although I’m usually rooting for you guys to go bolder with color, this time I actually like the more subtle shade. It looks very sophisticated with the hardware and stained top. I also agree on painting the baseboard (the drawers look like they’re floating as is). I can’t wait to see the finished product!
YoungHouseLove says
Thanks so much Jen!
xo
s
Erin says
Love the progress! These built ins are looking great. As a way to amplify the muted mushroom color, have you thought about painting the rest of the trim/baseboards/crown molding in the room the color of the built-ins? It would depend whether you’re planning to go all the way to the ceiling with the book cases. It might give the whole room a more cohesive feeling. Also, (depending on what ends up on the shelves) painting the back the same as the door could be a neat way to play up the colors.
YoungHouseLove says
Never even thought about that! Something to think about for sure!
xo
s
Isabel says
Yay for step-by-step updates — always makes the final reveal that much more fun! Just thought I’d chime in to say I’m loving how this is turning out, and I’m really digging the lighter color you guys ended up with. I find it kind of funny that John thought this would be such a monumental task considering the entire deck project in house 2 (among many others!). ;)
YoungHouseLove says
I know right?! We were just talking about that project. That deck was a bear!
xo
s
Dianne K says
I’m a new follower of your blog.I enjoy reading about the projects you currently work on.This nursery is looking great.You are an inspiration for new diy’ers(like myself).
YoungHouseLove says
Thanks so much Dianne!
xo
s
kelly from Stylish Patina says
LOVE the color they look so custom!
Stephanie Ayer says
Amazing! I love it and it looks beautiful. Nice work and I can’t wait to see the bookshelves on top!
Laura says
You guys are constantly impressing me…you both definitely have an eye for this stuff! I am loving the direction you have gone with this room! I cannot wait to see the finished project!
Monica says
When I was doing my daughter’s nursery I took two old hand-me-down dressers and sprayed them glossy black and was able to find white ceramic knobs at our local habitat restore for 25 cents each! What a transformation paint and new knobs can give!! Check it out…
http://sixmillionminusone.blogspot.com/2012/09/sanais-room.html
YoungHouseLove says
Such an awesome project!
xo
s
Amanda ~NoDak Nest says
We (and by we I mean the Hubster) will be using old windows we found out in the garage of an old house to build a custom built-in cabinet in our bathroom. We also scored an old solid oak corner fireplace dealio that will be gettin some TLC to make it look original to our house!
YoungHouseLove says
Sounds awesome!
xo
s
Michelle | Birds of Berwick says
I love the way these look and think the color is great! The dark walnut tops really stand out now and class them up big-time.
We tackled installing a wood plank wall in our master bedroom this weekend to elongate the room and give it a cozy feeling. It was a lot of work, but fun!
http://www.birdsofberwick.com/2014/02/04/plank-wall-completed/
YoungHouseLove says
Such an awesome project Michelle!
xo
s
Charlotte says
Gray is an awesome color for a chest of drawers. For my adult son’s Christmas present last year, I painted an old hand-me-down family chest of drawers, not antique, just beat up vintage. I used a Benjamin Moore high gloss enamel gray (can’t remember name) and the wooden knobs of front trim were painted a high gloss enamel black. It’s very masculine but contemporary style on a well built sturdy utilitarian chest of drawers. In addition, I had a piece of glass cut to fit the top so it will protect the painted top.
YoungHouseLove says
Sounds really nice!
xo
s
Kristin says
Great work you guys (as usual). I love reading your blog posts at lunchtime. John, love the graphic stuff and the tech pieces and Sherry, love the crafts and the enthusiasm!
Altering IKEA furniture is one of my favorite things to do to make it more personalized and tailored to my space! When I bought my first home, the side tables that attach to the edge of my bed from IKEA were way too big for the new space so I cut them in half and haven’t looked back since.
Also, in the painting department, I painted the kitchen walls this weekend and the trim is next I think. I know that’s a little backwards but I get anxiety about painting the untouched trim in my house (you guys always seem so confident about making changes to your home and not worrying about what others think!). It all matched when I moved in and now my back hallway has white trim (and I love it so much more). Slowly, room by room I have been evaluating whether to paint or leave as is the trim and it’s been a little agonizing. I also wrestle with the fact that the colors I choose are too “bright” but I really love them and I think that when I finally get everything done, they won’t seem so bright…more like a pop of color on the walls (which I know is different from most who do the pop with the accessories).
Thanks and keep it up!
YoungHouseLove says
Thanks so much Kristin! Sounds like you’ve been busy!
xo
s
Nicole says
I love the new look. It’s perfect for a little boy! Can’t wait to see how it will look like when it’s all done! You guys always do such an amazing job!
Erika Dotson says
We are working on staining the stairs we added to our home. I had the little circle pieces of wood to fill in the screw holes but we still had some spots that needed wood filler. I chose a stainable/paintable version and applied it on my steps. I then stained them and was so excited to see what they would look like. I awoke in the morning to notice each spot I applied wood filler the stain was lighter. I wanted to cry. Have you experienced this?
YoungHouseLove says
Oh no! Maybe try taking a small brush to dab more of the stain on those light parts to see if you can tint them darker so they blend in?
xo
s
Anna says
These are awesome! I can’t wait to see the finished product. What lucky kids you have to have parents who put so much time and effort into making things for them that are unique, interesting, high quality and safe :) Kudos to you.
JJ says
Great job! I actually like the base of the dressers as white as it looks like the baseboards are continuously connected to the dressers, giving more of a built-in look. Either way I love the look; I’m definitely seeing the vision coming to fruition.
Allie says
You mentioned in the post that you used kilz premium for primer because it is zero voc. I am 21 weeks pregnant and have been researching primers to use for our nursery and when I go to the kilz website, they actually say that it is low-voc not zero voc. Is it still safe enough to use when pregnant? I know you guys use it. Do you wear a respirator when Sherry does the priming? Only no-voc primer I found is the kilz clean start but both Home Depot and lowes no longer carry it (at least in my area). Just wanted to get some help on the decision on whether to just go for the premium and if I needed to take any precautions. Don’t want to hurt my baby boy! :)
YoungHouseLove says
Congrats on your little one on the way Allie! There are many types of Kilz primers (like 10+) but the Kilz Premium that we buy says “low odor, zero VOC” right on the label. It’s from Home Depot and I have used it without noticing any smell at all, although I always open windows and run a fan and usually slip on the respirator, because, why not :)
xo
s
Ally says
When you all paint a door in the bedroom, do you only paint the closet door? Do you only paint one side? I have my bedroom door and closet door and was contemplating painting but was hoping you could pass along any tips/tricks?
Thanks!
YoungHouseLove says
In Clara’s room we just painted the closet door (front and back) since her room door is near about four other doors in a hallway so we thought going pink with that one would be odd next to three white ones. But we have seen homes where all the doors are painted soft gray or charcoal or chocolate or even light blue and it’s an awesome look to do to all of them in those cases!
xo
s
Lisa says
Nice work! From the pictures it appears you did not worry about painting the inside of the dressers. Did you paint the insides of the drawers or the side panels? Will you leave them the unfinished wood? Do you plan on lining the drawers with shelf paper or something else? Thanks!
YoungHouseLove says
They were solid wood inside with pretty pinstriped liner paper (cream with black stripes, and nice and wipeable) so I was happy to leave them. Didn’t even notice that added detail until we were home assembling everything!
xo
s
Kate says
Have you ever done built-ins over carpet? We are considering a similar project in our home office, but I don’t really want to rip up the carpet. Wonder if it would fit tight enough? Any thoughts? we are seriously beginner DIY-ers
YoungHouseLove says
We have never done that. Anyone have tips for Kate?! Maybe try googling it to see if others have notes about how they did theirs?
xo
s
Instants de Louise says
Wow ! Those looks quite good ! I can’t wait to see them finished and all the rest of the room as you work it…
This week-end, we didn’t build anything, but, hey ! we welcomed our baby boy ! I guess we can’t do it all !
YoungHouseLove says
CONGRATS! That’s so exciting!!
xo
s
Zach Taylor1 says
Great, great job. FWIW on the light fixtures..not sure if you’ve settled yet but the black ones you have in the mockups (and maybe they were just that..placeholders) looked like something from a railroad platform ;-). I have used these from PB twice..once with nickel and once with antique white:
http://ab.pbimgs.com/pbimgs/ab/images/dp/wcm/201348/0058/img78o.jpg
They are the plug in “ADAIR” sconce. The white ones would look PERFECT for you. And, no wiring required on the inside your cabinet. GOOD LUCK! Also these are quality pieces from PB…on the slightly expensive side but worth it.
YoungHouseLove says
Thanks so much for the tip!
xo
s
Kevie says
Love this look! I plan to mimic it with an entryway table. Where can you buy the Acrylacq Safecoat? Is it sold anywhere in stores or only online?
YoungHouseLove says
It used to be sold at a local eco store in Richmond but they closed, so we get ours online now. Thankfully a container of it lasts forever so we don’t have to buy it very often :)
xo
s
Liz says
Hi!
I’m referring to this awesome project of yours as we are working on putting some built ins in our family room. We also decided to go with stained tops- love that look!
Question- when you used the Acrylacq, did you use the high gloss or satin version? I’m thinking high gloss might be a bit much…
Thanks for the input! :)
YoungHouseLove says
We went with satin.
xo
s