All aboard! (Can I get a choo choo?)
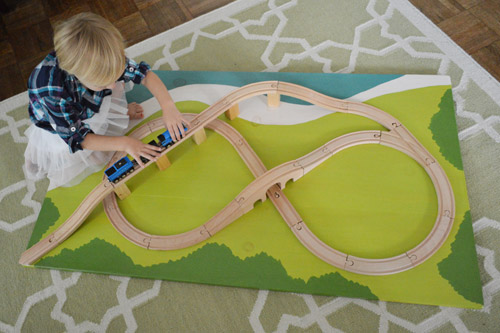
As promised via our little Instagram/Facebook sneak peek yesterday, here’s the story of how we made a little train board for Clara. Why a train board? Well, Clara is nothing short of obsessed with the one at Barnes & Noble (a nice big track is screwed into place on a little pedestal board and kids flock from all sides of the book store to play with it). In fact if we pull into the parking lot (which also leads to a ton of other stores) before we even turn off the car Clara is shouting “we’re getting to play with the trains!”
So when John suggested that we make our own version of one with a train set that we got for Clara’s second birthday from a few relatives of ours, I remembered seeing this one over on Aubrey and Lindsey’s blog so I googled around for a few others to gaze at (like this one). As for our specific objectives, we had a few goals in mind:
- to use all of the Melissa & Doug train pieces that we already had and make a nice big track
- to use solid wood if we could for the board part (just to avoid the off-gassing issue of MDF/plywood since solid whitewood is nice and light – and cheap)
- to paint something fun on the surface to give Clara more play ideas (ex: the train is going to the beach, the train is going to the forest, the train is going over the water)
- to paint it with low-VOC paint, seal it with low-VOC sealer, and attach the tracks with screws from beneath to avoid fumey glue (just in the same eco vein as the wood choice)
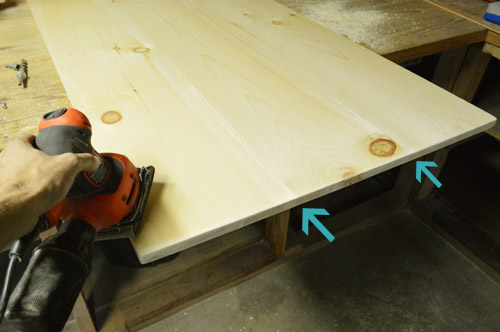
So here’s how we got ‘er done using nine dollar’s worth of sample paint from Home Depot and one plank of 12″ whitewood for $19 (also from Home Depot) – for a total of $28 spent. First John got a twelve foot long 10″ x 1″ board of whitewood and had them cut it down to make three equal 10″ x 1″ x 47″ boards right in the store. Then he joined them together with his Kreg Jig (you could also use flat bracing pieces of wood or metal along the back to connect them and add some felt pads to make sure nothing scratches the floor). Then he sanded everything to keep the board from feeling rough or splintery. See how the seams are barely visible (these arrows point them out for ya).
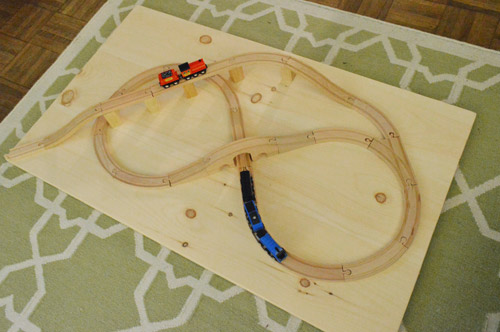
Next we pieced the train tracks together in about a million different configurations before finally deciding to go with this one (it has hills, an elevated part, a bridge, a tunnel, and even an area where the train will shoot down an incline and off the board – which we thought would be Clara’s favorite part):
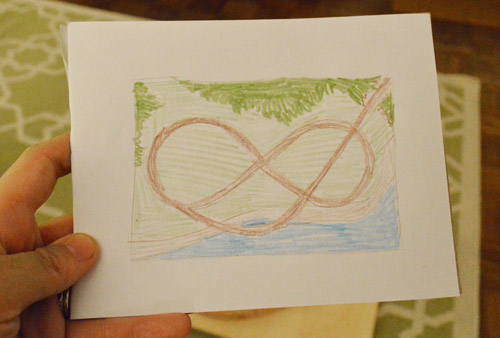
Then we brainstormed what we thought the background should look like on a piece of paper and came up with this (the light green is grass, the blue is the ocean, the stripe next to the blue is sand, and the dark green is the forest):
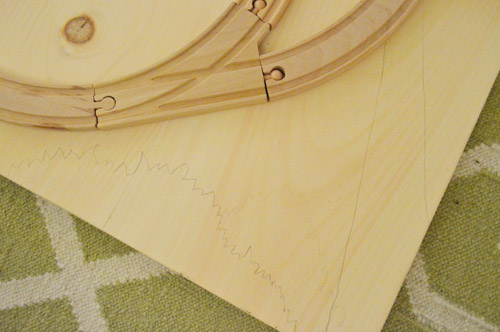
Then I sketched that layout onto the board with a pencil – just marking the lines of delineation between the water, the beach, the forest, etc.
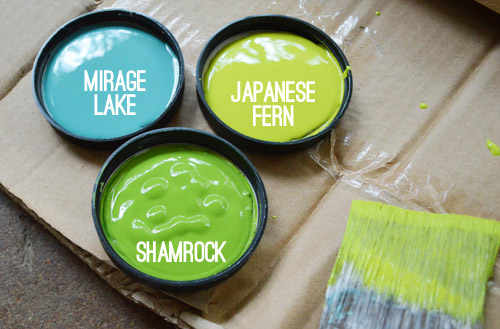
Then we ran to Home Depot and grabbed three $2.95 sample pots in Japanese Fern, Mirage Lake, and Shamrock all by Behr Ultra (which is low-VOC).
After we brought them home it was time to take the whole track apart so we could paint the background (tip: take a photo of the track configuration that you’ve landed on before dismantling it so you remember how to recreate it when you’ve painted your background). I started with the water and then I added the grass (these two don’t touch, so I didn’t have to worry about if the blue paint was still wet when I applied the green):
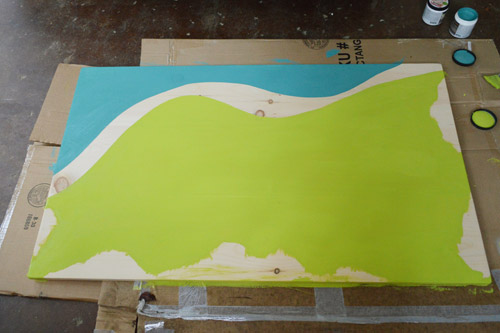
Oh and I didn’t prime anything because we didn’t mind this looking like painted wood (we thought a few knots showing through could be authentic and charming). But if you don’t want them to show through, a coat or two of stain-blocking primer should do the trick before you paint your design.
Then I gave that stuff a while to dry since I would be going up against the edges of those for the sand and the trees (and didn’t want things to smear) and came back a few hours later to paint the forest. That was the most fun because there’s that sort-of-bushy shape.
Then I added the sand, which was just leftover no-VOC white paint (we loved the idea of a white-sand beach between the ocean and the grassy plains, haha).
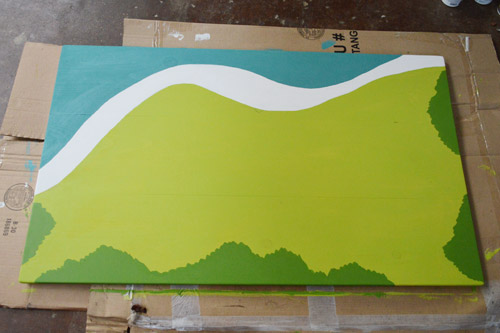
Then we let the whole board dry and I applied a few thin and even coats of my favorite eco poly (Acrylacq by Safecoat). We’ve had the same quart of it since before Clara was born and it’s still going strong (seriously, I can’t recommend it enough- not only is it low-VOC it’s actually non-toxic). I just brushed it on in thin and even coats, being careful not to belabor certain areas (if you brush things over and over they can get gummy, so I moved quickly across the board, let it dry, applied another coat, left that dry, and applied one last thin application).
As for why we decided to temporarily attach the tracks to the board:
- at this age for Clara, putting the tracks together herself just led to frustration (crying/throwing stuff) so it wasn’t really a good time for her when things weren’t attached.
- yet, we noticed how much fun she had at B&N when things were nailed down (it still led to a lot of creative, independent play with talks about trains stopping under tunnels, trains crashing, trains running out of fuel, people stopping at specific destinations, etc).
- if she ever has a hankering to build her own track down the line, we can always free up this track by just removing the small screws on the underside of the board – so it’ll still be really functional and flexible for spur-of-the-moment-building if it’s detached later.
We just saw how much more fun she had at B&N with the fixed track (no tantrums or frustration of trying to make things go together, etc) so we thought a fixed track made the most sense for now. So after we gave the poly lots of drying time (48 full hours) we laid out the track on top of the newly sealed board and attached the whole thing with screws from underneath the train board. In other words, John removed the tracks one by one, drilled a pilot hole from the top of the board through to the bottom…
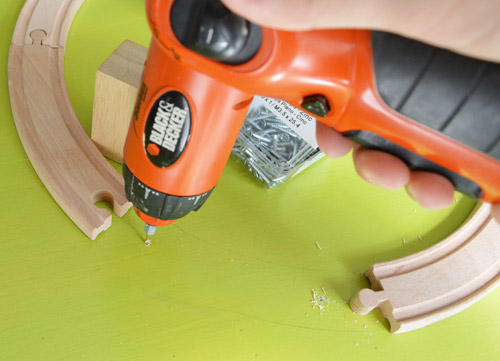
… and then held the track in place on top of it and screwed up to attach the track to the board from underneath).
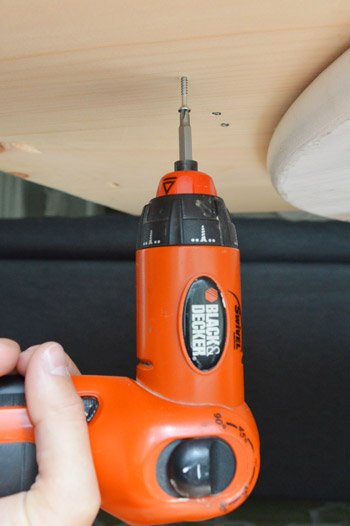
That’s how he got the track to stay in place without looking like it’s covered in screws (using counter-sinking screws meant they sunk into the back of the board and didn’t stick out and scratch the floor). We also added felt furniture pads to keep the board from rubbing on the floor/table/ottoman if it gets lots of use.
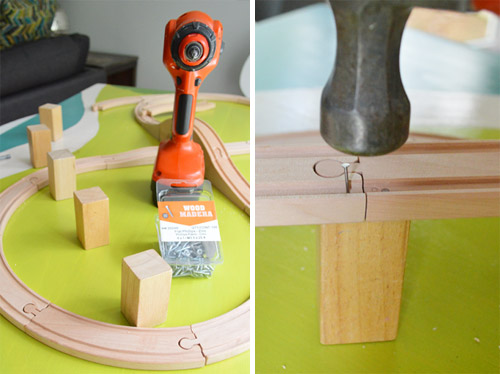
As for the elevated part of the train, we attached those blocks to hold the track up the same way we did the rest of the track (a pilot hole through the board from above followed by a screw driven from the back of the board up into the block to hold it in place without seeing any hardware). Then to hold the track in place on top of each of those blocks, we drove a small finish nail into the groove of the track and into the block, which actually proved to be really sturdy without being super obvious (you have to get pretty close to even notice them at all).
When it came to making that one piece of track look like it led off the corner of the board, John just traced the shape of the board onto the bottom of the track, and cut it along that line that he drew (and then sanded it to make it nice and smooth). Then he just drilled that track in from below like the rest of them (he actually had already attached it, which you can see in the pic on the right, so he removed it, cut it, and drilled it back in).
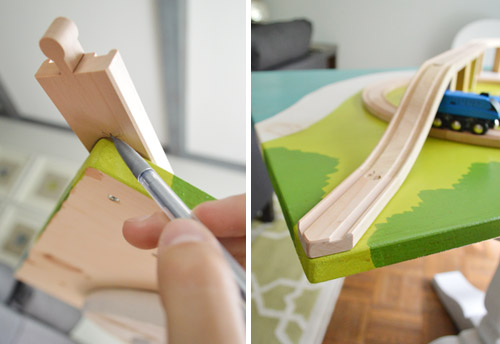
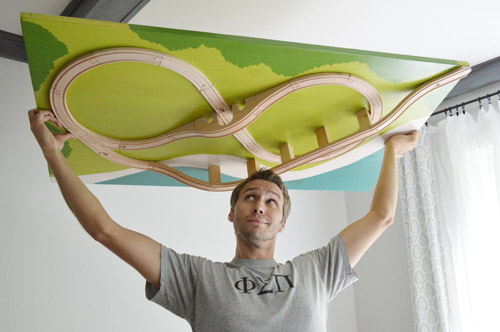
Next came the big test. Holding everything upside down to make sure it was all attached. Thankfully it’s all nice and sturdy. As in, Clara has taken great joy in kicking the elevated part and it’s all holding strong.
Choo-choo, baby. Here’s the whole shebang in action:
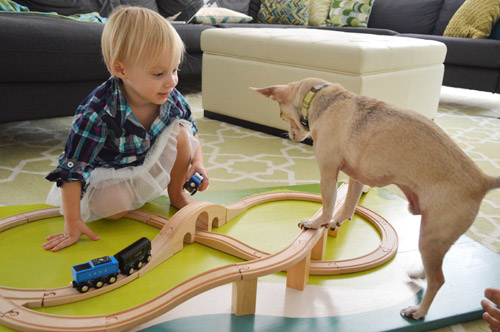
Clara loves it. As expected, there’s lots of chatter about people going to the beach, the forest, and over the hills and valleys, and contrary to our guess – her favorite feature is actually rolling them down the middle hill and into a big pile-up. Sometimes she even lets us get in on the chugga-chugga action.
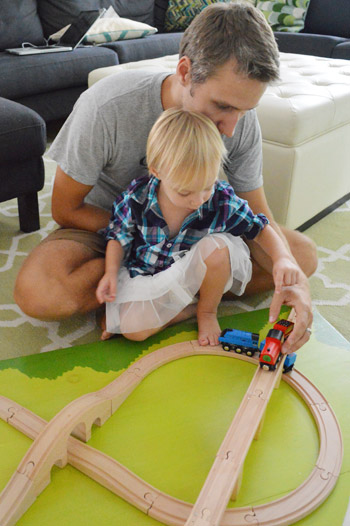
Are there any other train board fans out there? At first I thought making new tracks would be part of the fun, but seeing how much Clara loves the fixed one at B&N, I’m glad we made her a souped up board with a fun little background to make playing with it even more exciting. Things like adding an environment behind it and having trains shoot off the board have certainly upped the train-playing ante around here. And John may or may not have played with it a little himself after Clara went to bed last night. Not kidding.
And perhaps the best thing about it is that it’s nice and flat, so it can slide completely under the sofa for storage when it’s not in use. Here it is halfway in:
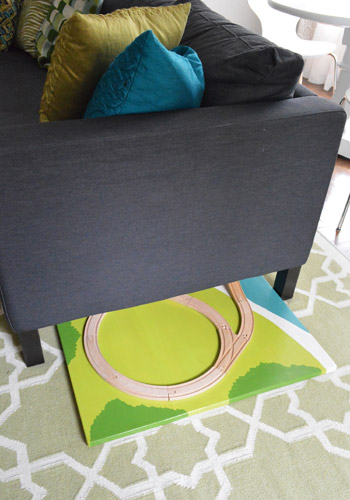
That’s actually one of the reasons we thought a board would work better for us than a table, since we used all the tracks and trains that we had to build this, so we didn’t need additional storage or anything). It’s nice that we can stash it away in a second and that seems to make it even more special for Clara (she loves things that we bring out and tuck away, like markers and Play-Doh a bit more than things that are always out at her disposal). Maybe it’s like those special “limited edition” holiday Oreos? They always feel more special than the regular kind to me. Haha.
So that’s the full $28 train board rundown. What have you guys been building/painting/sanding lately? Any fun kids stuff in the works?

Julie says
It might also be cool to use a bulletin board or chalk board as the backing for older kids who might want to design their own landscapes. But your idea looks so fresh and modern — just perfect for Clara’s amazing stage of development. I love that you figured out the best way for her to enjoy her toy. What good parents you are!
YoungHouseLove says
That’s a fun idea about the bulletin board/chalk board!
xo
s
Sydney says
Totally cracked up at John playing with the board after Clara went to bed…that would be my husband! He’s really looking forward to our baby being big enough to break out the legos together…and we may have already played with them a little bit already : ) You know, just to reminisce our childhood.
Carla says
Really cute project. I thought the Safecoat sealant was zero-VOC. The board would be interesting hung on a wall. :)
YoungHouseLove says
It’s actually just low-VOC (I think everyone’s scrambling to come up with a truly durable poly that’s no-VOC). Fingers crossed!
xo,
s
Julie says
P.S. I preordered your book yesterday.
YoungHouseLove says
Aw thanks Julie!
xo
s
AnnieM says
I think it was awesome that:
1. You adapted the train table/tracks for her age by securing them to the board. As someone who has worked in a preschool class with typical and special needs children, getting frustrated with a toy too old for their development is difficult for everyone. It reminded me of a marble maze we had in preschool that would break apart and caused many tears and frustrations until we glued that marble run together and then they played with it for hours!
2. You thought ahead to when Clara is older and will WANT to build tracks, and made them adaptable. I love that they are secured now, yet can be unsecured later! Something to ponder: Even when she CAN and WANTS to build track designs on her own, a day will come when Petersik baby #2 comes along and wrecks her elaborate design :) lol
3. Please don’t worry that it isn’t creative simply because the tracks are secured. It’s FABULOUS and wonderfully creative the way it is!
YoungHouseLove says
Aw thanks Annie! So interesting about gluing the marble maze together to help kids play with it!
xo,
s
Sayward says
I love this so much. Parents of the year! If you want to make another one for a 31 year old girl and mail it to PA I wouldn’t say no.
I saw your comments about a little farm or something and when I saw the first picture of the board, my first thought was IKEA’s little fabric barn/farm sets. I think there’s a main one and one or two expansion packs. I don’t know if the scale would be the same, but who cares? I can’t wait till my niece is old enough for me to buy her that barn (which is code for me playing with it on my own. I need a stash of toys for “when she comes over” right??)
YoungHouseLove says
That’s so cute! Thanks for the tip!
xo
s
Antonella @ Pretty House Things says
It’s pretty cool! I like how the colours all blend together and it’s important for a child’s imagination to have some sort of board instead of setting up the track on carpet or something like that!
Amanda says
This is so awesome! Screwing down the tracks was a good call. Kids at that age just want to drive the trains around without having to worry about the track madness. Heck, I don’t even like worrying about the track! It’s nice to know that everything won’t go flying around if you accidentally knock into it or step on it ;)
Sherry from BC says
So much fun! We did something similar for my grandchildren when they were smaller but we just used a left over piece of plywood and in retrospect, it was too big. Took up a lot of space and I really should have painted it to make it more interesting. Oh well. I was able to recycle the plywood. Better planning like yours would have been better but believe me a lot of time was spent playing with it. They have now progressed to setting up the track themselves so we have removed the track and they build a new layout every time they come over. My grandchildren’s two favourite trains are James who has a light and sound and a caboose that plays a song. I highly recommend you get those as the light and sound add to the fun.
YoungHouseLove says
Fun!
xo
s
Kourtney says
I needed this inspiration…. my little guy turns 3 in a couple weeks and I have been trying to decide the best option for a train table…. this is IT! thanks guys for such great work!
Jess B. says
The hubby and I made a similar board for our boy when he was younger. We attached eye hooks to one side to be able to hang it on the basement wall. Such a space (and clutter) saver!
Job well done!
Jess
YoungHouseLove says
That’s fun!
xo
s
Alyssa says
I think this is wonderful. My dad made me doll houses and wooden cars when I was little. I am so thankful for those times together and how much it cemented his love for me even more. Clara will continue to appreciate this!!! I hope :)
Christine says
I love how you guys *make* Clara these awesome toys, desks, etc… so special for her! Also, plaid + tulle = rad!
Callie says
Clara’s “I’m sorry” is waaaaay cute! Not to mention that plaid shirt and tulle skirt combo… Trendsetter!! :)
Brenna Y. says
This is such a great idea! Kudos on the creative thinking!
Monica B says
Love the train board especially since it will tuck away under the couch when not in use! I made a train table for my son and was given a tip to use silicone to ‘glue’ the pieces down. I was told that the pieces would come off later on if he wanted to start building his own track. Now we haven’t actually come to that yet, but the other day a play date friend came over and pulled a couple pieces off and it didn’t damage the track or the table. Just be sure to use a new tube of silicone. I learned the hard way that old silicone will not set properly and it was a gooey mess at first!
YoungHouseLove says
So smart! I love that tip! I think they might make low-VOC silicone too, which is awesome!
xo,
s
Chelsea says
That is fantastic!! I’ll be copying this when my daughter is old enough! I already copied your no-sew light blocking curtain liner technique in her nursery and Clara’s cheery yellow spray-painted high chair inspired me to paint a little corner table in my house the same color!
YoungHouseLove says
Aw, I love that!
xo
s
Dorothy says
After first encountering a train set and eventually being dragged away sobbbing, my son uttered his first sentence, “Baby want train”. After 5 minutes of wailing, he upped it to “Baby NEED train”.
I’m imagining Clara’s delight in a year when she wakes up one morning to find the track is MOVEABLE. Her world will shift!
YoungHouseLove says
Hahah, that’s so cute!!
xo
s
Ally says
On my last Amtrak trip, the engineer was wearing the exact same outfit as Clara…not that there’s anything wrong with that… :)
xox
YoungHouseLove says
Haha- that’s hilarious!
xo,
s
Zoë says
Such a great idea. I have many happy memories of weekly dates at B&N and Books-A-Million with my son when I was a SAHM. He loved those train tables, and it got us out of the house. We had a set at home, but it just wasn’t as fun, so I packed it up and sent it to my in-laws’ house. Guess whose younger sisters played with it for hours when it was ignored at home?
YoungHouseLove says
Haha, so funny!
xo
s
Suzy says
So darling….love the paint colors too. I think you were smart to screw in the tracks. My daughter at that age would get so frustrated with toys that came apart and if
they did not go back together perfectly would stop playing with them. So good job on knowing what Clara would like & Burger too. He seemed to want to play trains with her!!
So clever and she will get so much playtime just like the dollhouse & kitchen set you built. Sherry, she looked so much like you in the video!!
YoungHouseLove says
Aw thanks Suzy! We still hear that she looks like John the most often, so I smile like crazy when someone says me. Haha.
xo
s
Melanie says
You do such great children’s furniture and toys. They are always thoughtful, vibrant, and fun. That is your true calling!
YoungHouseLove says
Aw thanks Melanie!
xo,
s
Sammy says
This is too cute! I am so keeping this in mind for my future kids!!
And when it comes to DIY-ing this week, we’re in process of making some sort of mail station for the entry, the corners still need to be sanded down, though. So, here’s a question: it’s made out of wood, so would it be better to spray paint or use a brush? We’re thinking perhaps light blue.
xx
YoungHouseLove says
I would use a brush, just a short handled one. That way you don’t worry about drips (brushes seem to work really well on wood when it has lots of angles and stuff).
xo,
s
Sammy says
Thank you!!! And yes, this has quite a few angles!
xx
Donna says
Dang,
Where were you when my kids were this age? That train table took up so much room, LOL.
Austin says
Brilliant!
Kelly says
I’ve been wanting to do this for so long! My plan was to add a handle to the side and wheels on the bottom to slide under my son’s bed.
YoungHouseLove says
Love that!
xo,
s
Megan says
I love that Burger is getting in on the action too. Like a smaller, furrier Godzilla. Super cute project! I just used the magic of paint to repurpose a Christmas popcorn tin into food storage for my kitties.
ash says
wow
that thing is cool enough to hangup as really cool/weird/nerdy art on the wall. I would have just hung it up on a blank wall as a feature for storage.
maybe when u take the tracks apart. the background cud become a nostalgic-y art piece in the playroom.
YoungHouseLove says
I love that idea too!
xo
s
Cherie says
My 2 and a half year-old son was looking at this post with me and you definitely got his approval. When we watched the video he kept repeating “I want to play with that train”. I guess I know what Daddy will be building for Christmas. :)
YoungHouseLove says
Haha, that’s so cute!
xo
s
John says
Way cool! Perhaps adding some colored tape for roads and holes for trees. She can use branches from the yard.
YoungHouseLove says
Love that!!
xo,
s
Laura says
Come on, guys! I haven’t even finished our basket ball hoop, and you’re making my to-do list longer!!! Haha. Seriously though, great idea. Our 3 year old is in the same boat in that the building part, which she actually likes, but it can be very time consuming and frustrating. It’s almost like a separate activity from playing with the trains. But the big kicker, and you’ll discover this when you have another kid, is those delicate train tracks are easily messed up by a crawling baby brother! This would end a lot of big sister frustration, as it wouldn’t be “Messed up” by Baby B. :) Thanks for the inspiration!
YoungHouseLove says
Aw, so glad! Good luck with all those projects :)
xo
s
Leigh says
I love this! We will definitely have to do something like this for our son. Right now we are working on plans to build him a tool set and work bench. We may be in over our heads, but we will see!
Page says
Love that it’s small enough to slide under furniture. A friend of mine did something similar, but she added casters for easy mobility. I’m storing that away on the project list for sure!
Erin @ WriteTasty says
That video is the cutest. I looove the “I’m sorry” to the train. Also that table is great and I love how it would be much simpler to store a train board in limited space rather than a train table. :)
Sharon says
So glad you made the track permanent with SCREWS! The screws will allow you to remove and have a flexi track when she is older. My kids are older and half the fun for them now is designing their own! We started with a train board as well, but finally succumbed to the the table. (Don’t worry we got it a garage sale for cheap!) Fabulous as always YHL!
Jessica says
Clara is the cutest little girl. I just love her short blonde hair haha. I’m so ready for a little girl!
Danielle says
My boys go nuts for the B&N train also! I feel like I can only spend so much time in their children’s section! I think they should put one in every section of the store! Then I could spend as much time as I want looking at books. I like to dream big :)
YoungHouseLove says
Hahah- I agree! How about getting one by the home mags?!
xo,
s
gemma@thesweetestdigs says
Wow – love this!! I’m sure this will be a treasured toy for a long time to come. And I love that it actually looks attractive (not a cheap-o plastic toy that clutters the living room). Great work!
Caitlin @ Desert Domicile says
So awesome! I love the colors you chose and the fact that John played with the board himself haha
Rebecca says
We’re in the process of fixing up our basement as a playroom. It will be a gift for our daughter’s 2nd birthday in October. It will include a kitchen area, a spot for taking care of her dolls including a high-chair and cradle, an art area and a dress-up area. Now, it may also have to include a train board.
Janis Covington Stufflebean says
Wow!! That is such an awesome train track!! We also had the “problem” of the bookstore dilema. This was ok if we were going to the bookstore, but if we were just making a quick in and out to the store closeby there were many tears. Great idea to attach the track to the board.
maribel says
forget the train table….Clara’s outfit is adoable, totally Clara…did she have her crocs on at any point in the day…LOL
Susan says
Fantastic! This would be a great homemade Christmas gift for my youngest. Although, it wouldn’t be $28 for us because we don’t have any train tracks yet. Maybe I can score some in a yard sale.
Lesley says
Gurl, your first lines always get me. “….can I get a beep, beep”. Best. Song. Ever.
Erin {Home Everyday} says
This is a great idea. My kids get frustrated re-setting up different configurations, and really they ask for the same set-up every time. Maybe Santa will have to get busy in his workshop and maybe get a few new trains :)
katalina says
I want to hear about the new camera!!!! NOW!!!! I have been researching for over a year!
love the burger butt photo bomb–you finally had to move him out of the video!
YoungHouseLove says
Haha, we’ll have to write something up asap! We’re trying to use it a bit to get some tips/pointers so we can talk about it a bit more knowledgeably. Deets to come soon!
xo,
s
Holymotherofgod says
Love the train board but Clara Talk is waaay more fun :)
Oooh! Crass! I sorry…
Brooke @ sweats & sweets says
“I like peanuts” she is the sweetest thing! Y’all should film a day in the life of Clara! The train track project is genius. Love that it has some sentimental value as well, something to keep in the family.
keri says
I want to build things for her train set! Our friends have a 6 month old son, so maybe I’ll make this for them next Christmas :)
I LOVE how Clara says “I’m sorry, I’m sorry” and “I have a dust. Peanut dust. I like peanuts. I like peanuts” AHHH CUTE. I watched that part like….4 times. really. at work.
YoungHouseLove says
Haha, I love you for getting as much of a kick out of Clara as we do. Haha. We totally watched that part four times too.
xo,
s
Trey says
John needs a new power tool, a router! Some nice rounded over edges would give the base a great finished look. Plus it can be used for a ton of other furniture projects. Can we get some pics of John doing a Kreg-Jig jig (i.e. hidden screw happy dance)?
YoungHouseLove says
Haha- pics to come! And thanks for the router tip!
xo,
s