All aboard! (Can I get a choo choo?)
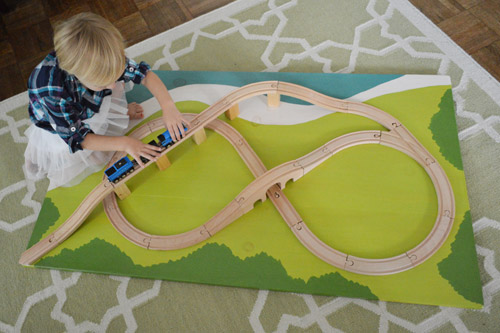
As promised via our little Instagram/Facebook sneak peek yesterday, here’s the story of how we made a little train board for Clara. Why a train board? Well, Clara is nothing short of obsessed with the one at Barnes & Noble (a nice big track is screwed into place on a little pedestal board and kids flock from all sides of the book store to play with it). In fact if we pull into the parking lot (which also leads to a ton of other stores) before we even turn off the car Clara is shouting “we’re getting to play with the trains!”
So when John suggested that we make our own version of one with a train set that we got for Clara’s second birthday from a few relatives of ours, I remembered seeing this one over on Aubrey and Lindsey’s blog so I googled around for a few others to gaze at (like this one). As for our specific objectives, we had a few goals in mind:
- to use all of the Melissa & Doug train pieces that we already had and make a nice big track
- to use solid wood if we could for the board part (just to avoid the off-gassing issue of MDF/plywood since solid whitewood is nice and light – and cheap)
- to paint something fun on the surface to give Clara more play ideas (ex: the train is going to the beach, the train is going to the forest, the train is going over the water)
- to paint it with low-VOC paint, seal it with low-VOC sealer, and attach the tracks with screws from beneath to avoid fumey glue (just in the same eco vein as the wood choice)
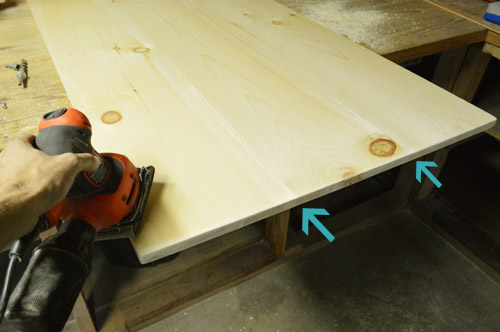
So here’s how we got ‘er done using nine dollar’s worth of sample paint from Home Depot and one plank of 12″ whitewood for $19 (also from Home Depot) – for a total of $28 spent. First John got a twelve foot long 10″ x 1″ board of whitewood and had them cut it down to make three equal 10″ x 1″ x 47″ boards right in the store. Then he joined them together with his Kreg Jig (you could also use flat bracing pieces of wood or metal along the back to connect them and add some felt pads to make sure nothing scratches the floor). Then he sanded everything to keep the board from feeling rough or splintery. See how the seams are barely visible (these arrows point them out for ya).
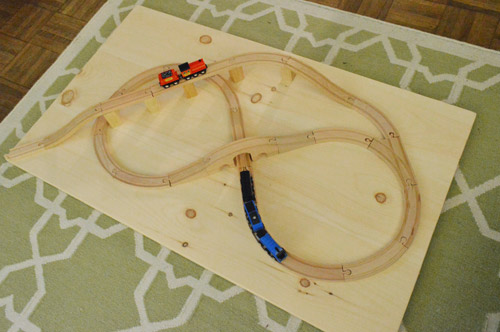
Next we pieced the train tracks together in about a million different configurations before finally deciding to go with this one (it has hills, an elevated part, a bridge, a tunnel, and even an area where the train will shoot down an incline and off the board – which we thought would be Clara’s favorite part):
Then we brainstormed what we thought the background should look like on a piece of paper and came up with this (the light green is grass, the blue is the ocean, the stripe next to the blue is sand, and the dark green is the forest):
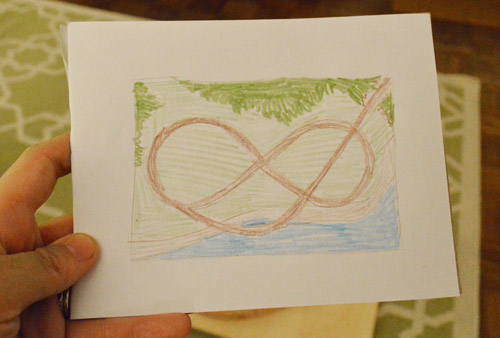
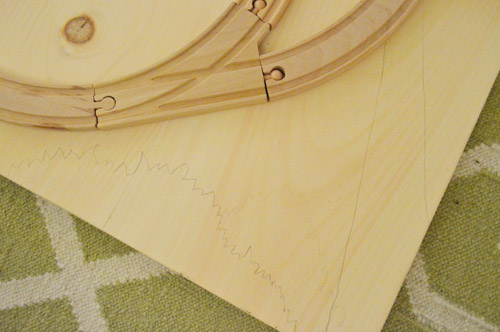
Then I sketched that layout onto the board with a pencil – just marking the lines of delineation between the water, the beach, the forest, etc.
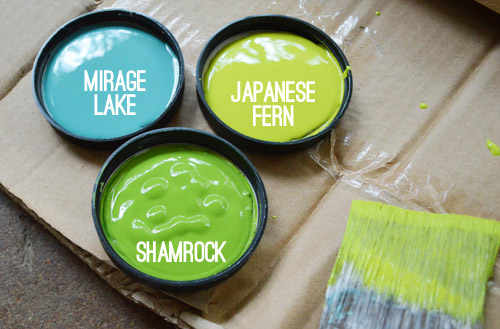
Then we ran to Home Depot and grabbed three $2.95 sample pots in Japanese Fern, Mirage Lake, and Shamrock all by Behr Ultra (which is low-VOC).
After we brought them home it was time to take the whole track apart so we could paint the background (tip: take a photo of the track configuration that you’ve landed on before dismantling it so you remember how to recreate it when you’ve painted your background). I started with the water and then I added the grass (these two don’t touch, so I didn’t have to worry about if the blue paint was still wet when I applied the green):
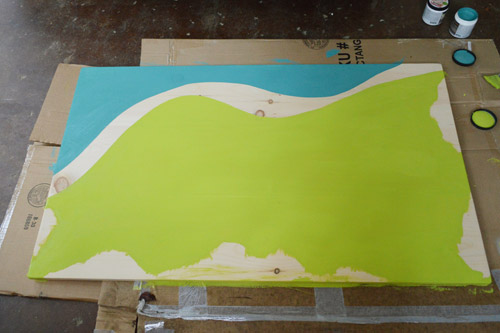
Oh and I didn’t prime anything because we didn’t mind this looking like painted wood (we thought a few knots showing through could be authentic and charming). But if you don’t want them to show through, a coat or two of stain-blocking primer should do the trick before you paint your design.
Then I gave that stuff a while to dry since I would be going up against the edges of those for the sand and the trees (and didn’t want things to smear) and came back a few hours later to paint the forest. That was the most fun because there’s that sort-of-bushy shape.
Then I added the sand, which was just leftover no-VOC white paint (we loved the idea of a white-sand beach between the ocean and the grassy plains, haha).
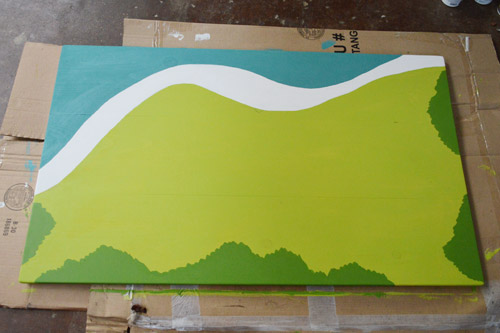
Then we let the whole board dry and I applied a few thin and even coats of my favorite eco poly (Acrylacq by Safecoat). We’ve had the same quart of it since before Clara was born and it’s still going strong (seriously, I can’t recommend it enough- not only is it low-VOC it’s actually non-toxic). I just brushed it on in thin and even coats, being careful not to belabor certain areas (if you brush things over and over they can get gummy, so I moved quickly across the board, let it dry, applied another coat, left that dry, and applied one last thin application).
As for why we decided to temporarily attach the tracks to the board:
- at this age for Clara, putting the tracks together herself just led to frustration (crying/throwing stuff) so it wasn’t really a good time for her when things weren’t attached.
- yet, we noticed how much fun she had at B&N when things were nailed down (it still led to a lot of creative, independent play with talks about trains stopping under tunnels, trains crashing, trains running out of fuel, people stopping at specific destinations, etc).
- if she ever has a hankering to build her own track down the line, we can always free up this track by just removing the small screws on the underside of the board – so it’ll still be really functional and flexible for spur-of-the-moment-building if it’s detached later.
We just saw how much more fun she had at B&N with the fixed track (no tantrums or frustration of trying to make things go together, etc) so we thought a fixed track made the most sense for now. So after we gave the poly lots of drying time (48 full hours) we laid out the track on top of the newly sealed board and attached the whole thing with screws from underneath the train board. In other words, John removed the tracks one by one, drilled a pilot hole from the top of the board through to the bottom…
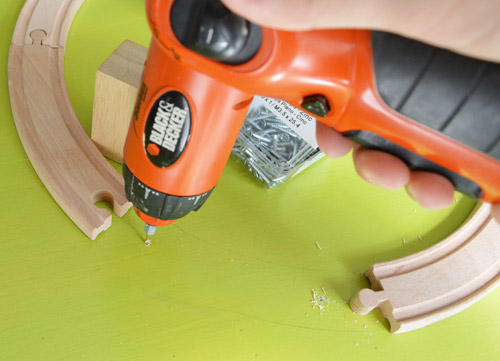
… and then held the track in place on top of it and screwed up to attach the track to the board from underneath).
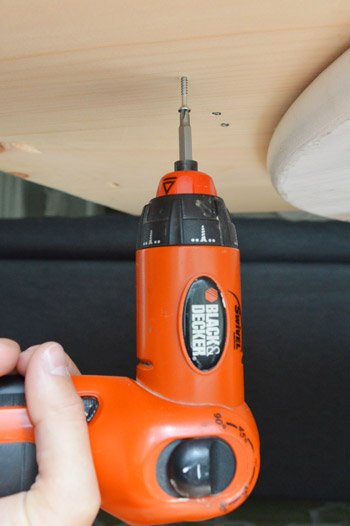
That’s how he got the track to stay in place without looking like it’s covered in screws (using counter-sinking screws meant they sunk into the back of the board and didn’t stick out and scratch the floor). We also added felt furniture pads to keep the board from rubbing on the floor/table/ottoman if it gets lots of use.
As for the elevated part of the train, we attached those blocks to hold the track up the same way we did the rest of the track (a pilot hole through the board from above followed by a screw driven from the back of the board up into the block to hold it in place without seeing any hardware). Then to hold the track in place on top of each of those blocks, we drove a small finish nail into the groove of the track and into the block, which actually proved to be really sturdy without being super obvious (you have to get pretty close to even notice them at all).
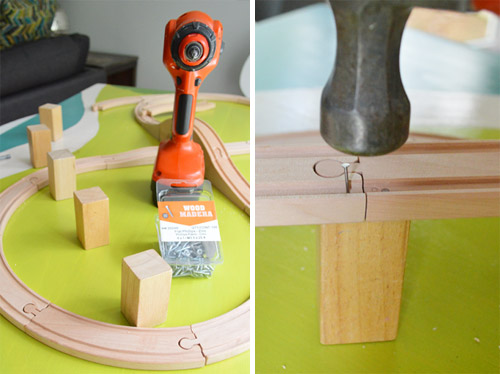
When it came to making that one piece of track look like it led off the corner of the board, John just traced the shape of the board onto the bottom of the track, and cut it along that line that he drew (and then sanded it to make it nice and smooth). Then he just drilled that track in from below like the rest of them (he actually had already attached it, which you can see in the pic on the right, so he removed it, cut it, and drilled it back in).
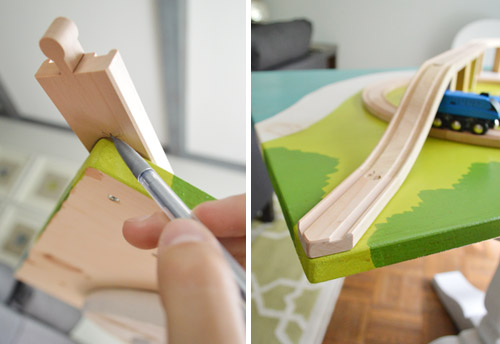
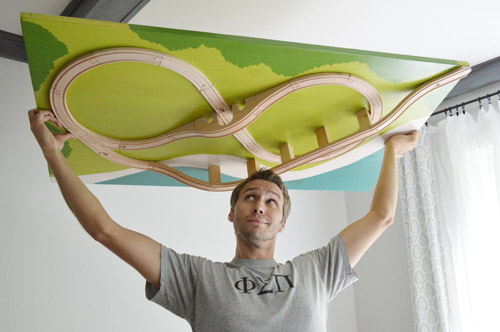
Next came the big test. Holding everything upside down to make sure it was all attached. Thankfully it’s all nice and sturdy. As in, Clara has taken great joy in kicking the elevated part and it’s all holding strong.
Choo-choo, baby. Here’s the whole shebang in action:
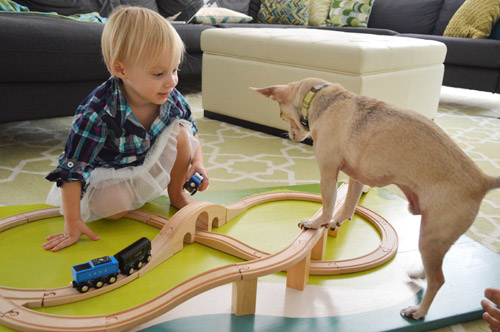
Clara loves it. As expected, there’s lots of chatter about people going to the beach, the forest, and over the hills and valleys, and contrary to our guess – her favorite feature is actually rolling them down the middle hill and into a big pile-up. Sometimes she even lets us get in on the chugga-chugga action.
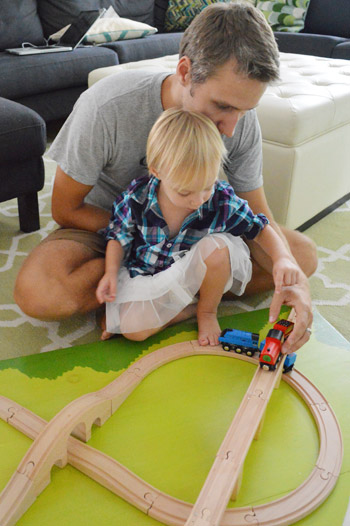
Are there any other train board fans out there? At first I thought making new tracks would be part of the fun, but seeing how much Clara loves the fixed one at B&N, I’m glad we made her a souped up board with a fun little background to make playing with it even more exciting. Things like adding an environment behind it and having trains shoot off the board have certainly upped the train-playing ante around here. And John may or may not have played with it a little himself after Clara went to bed last night. Not kidding.
And perhaps the best thing about it is that it’s nice and flat, so it can slide completely under the sofa for storage when it’s not in use. Here it is halfway in:
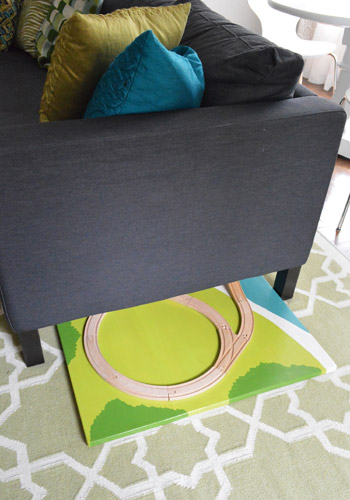
That’s actually one of the reasons we thought a board would work better for us than a table, since we used all the tracks and trains that we had to build this, so we didn’t need additional storage or anything). It’s nice that we can stash it away in a second and that seems to make it even more special for Clara (she loves things that we bring out and tuck away, like markers and Play-Doh a bit more than things that are always out at her disposal). Maybe it’s like those special “limited edition” holiday Oreos? They always feel more special than the regular kind to me. Haha.
So that’s the full $28 train board rundown. What have you guys been building/painting/sanding lately? Any fun kids stuff in the works?

Joanna says
I LOVE IT!! This has really inspired me. We got a terrific set several years ago from toysrus with a vinyl map of the US, the train set has a city, a mountain, bridges and great accessories that teach about our nation’s geography… Unfortunately is has always lived in a box and rarely gets played with. My oldest who received it will probably not be interested in it anymore, but with 3 younger siblings, the youngest just a baby, we could get a lot more use out of it if it were permanently set up and ready to go. I’m trying to figure out the best way to still utilize the vinyl map and securely attach it to a platform. Any ideas? If most of the process could involve a hot glue gun I might be more successful, haha!
YoungHouseLove says
How about trying that glue gun, then? Haha. Anyone have ideas for Joanna?
xo,
s
Joanna says
My 3 year old has been playing with it and I’ve been staring at it… wondering what to do… I think I’ll wrap the vinyl around a board and use my heavy duty stapler, like covering a seat… then use the glue gun! I’ll test to make sure it doesn’t put holes in the vinyl first! We’re on the southside, maybe you could come see the result one day. :)
YoungHouseLove says
Smart! I hope it works! Keep me posted :)
xo,
s
Jessica says
We did almost the same thing. I got a great wooden train set on clearance from Target a while back. It came with a bridge, buildings, people, trees – the works! We didn’t have room for a train table either so I had my handy step-father-in-law put it on a piece of wood. Unfortunately the little tiny nails he used started pulling out so I pulled the tracks up, painted the bottom board (just plain green, I had plans for a river but never got around to it) and tried hot gluing. Well, that didn’t work either, especially when my daughter started pulling up the buildings and trees on purpose.
I’m so glad for the tips to keep it assembled and making it small enough to slide under the couch is genius! (We had to store ours vertically in the guest room closet and I think that’s part of why pieces are falling off.) I’m totally going to have the hubs cut the board a bit smaller when I get home.
YoungHouseLove says
Aw that’s sweet! Hope it works out :)
xo,
s
how2home says
This is such a great project for Clara! Looks like shes having a lot of fun! We adore aubrey and lindsay’s blog as well!
Luke says
I’m not sure why, but Clara’s ballerina skirt with flannel shirt combo made my day, so cute. We still have some of the handmade toys built by my great-grandfather and grandfather, and they’re treasures to my family. Someday, your play kitchen and train board may be the same.
Emily says
Did you ever stop to think that the frustration Clara was having with putting the train tracks together is a good thing?
You are both smart enough to know that children Clara’s age learn thru play. Train track building (and the frustrations that go along with it) help develop the following:
spacial concepts – pre math experience – size/shape sorting. Developing fine and gross motor control, eye/hand coordination, and lastly helping her to sustain longer periods of concentration and building confidence (when she is able to successfully put the pieces together) self control (talking with her when she does get frustrated), mimicking/role modeling (when you show her how the pieces go together and she copies your actions).
By making the track fixed, you’ve essentially taken away all of the above learning aspects of playing trains.
YoungHouseLove says
Thankfully, Clara has lots of other toys to teach her the skills that you mention without frustrating her (blocks, puzzles, etc). She didn’t like her train tracks before we did this (she played with them for maybe a minute before crying and throwing things) and now she plays with them for probably an hour a day. We’re so happy we were able to put the fun back into a toy that she didn’t like. And when she’s ready for the tracks to be freed, we’ll be the first to do that! She can’t tie her shoes yet either, so we do that for her – but we’re not taking anything away from her – just helping her do tasks that she can’t handle yet and encouraging her to do the ones that she can :)
xo,
s
Noelle says
We did something like this for our son. I used craft paint on it so he could help with the painting. We kept it pretty basic- mostly green, with a sandy beach in one corner. We also put wheels on the bottom that we picked up from Harbor Freight for $2 each so its easy to roll under the bed.
Becky says
Thank you thank you for this post!! I have been wanting to do something like this forever and you guys showed me how! We finished last night and gave it to our kids as an early birthday present. They LOVED it!
http://underaredroof.blogspot.com/2012/10/early-birthday.html
YoungHouseLove says
So CUTE!!
xo
s
McKenzie says
Does she still play with this? It is almost exactly what I am going to build my son for Christmas. I was thinking of setting it on top of a pull out draw and putting wheels on the bottom. The draw would pull out and I could store all of the train bits and pieces. Think trundle bed style. Im probably not explaining it very well! haha… :)
YoungHouseLove says
She plays with it every day! I love the trundle idea too :)
xo
s
Carla says
Hey guys! What size screws did you use to screw down the tracks??
YoungHouseLove says
We used 1 1/4″ screws I think (from the bottom of course). Just measure your wood and the tracks and make sure they’re not too long to go through all the way but not too short to not catch the tracks through the wood. Hope it helps!
xo
s
Rachel says
I am hoping to do this for our son for Christmas. Can you share what sets you bought of M&D tracks? We don’t have any tracks currently, so I don’t know where to start for that (or a similar) configuration.
Thanks!
YoungHouseLove says
We got the figure-8 set as a gift for her and then added one add on set to make the other tracks around the eight (from a local book shop). Hope it helps!
xo,
s
Alison Weeks says
I posted on my blog about an infant train table I made and referenced your blog/this post for future train “table”. Check it out! http://craftyweeks.blogspot.com/2012/11/infant-train-table.html
YoungHouseLove says
You’ve got a cutie on your hands!
xo,
s
Lindsey D says
Love, love, love this idea for my 2 yo. Any idea which Melissa and Doug sets you had to make that big one? I’ve been looking at them all online, trying to make them “add up” to the track configuration you have there…
YoungHouseLove says
We have the figure 8 track and one add-on kit. Hope it helps!
xo
s
Andrea says
So my husband decided to buy our 15 month old a train set for Christmas because he loves taking her to play with the one at the library. I explained that I love the idea, but that she wouldn’t be able to build it herself yet, and would probably get frustrated. Then, I remembered this post and showed it to him. He thought it was such a great idea that he is now at Home Depot picking up stuff so we can work on it tonight, haha. Thanks, guys!
YoungHouseLove says
That’s so cute! Good luck to you guys!
xo
s
Becky says
Thanks again for the tips…the counter-sinking is really really perfect for this project. Ours turned out great and I can’t wait to give it to our little man in a couple days for Christmas!
Laura & the Shell says
Hey! I’ve been eyeing this train table for a while and thinking about making one for my kids. How’s it working out for you guys? Does Clara still like it? Have the attached tracks gotten boring for her yet? Thanks!
YoungHouseLove says
Still loves it! And it’s a hit with her cousins too (they’re all a year older). Doesn’t seem to matter that the tracks are attached (I think it might keep arguments at bay when they all play with it together, actually).
xo
s
Laura & the Shell says
That’s great to hear! Thanks for the response!
Painting Sunny, Dani P. says
This was so great, and was just in time for me to plan my own! However, Indiana is freezing in winter and I just was able to seal the paint the past week. (I used acrylic paints that needed sealor, especially considering the too-smooth surface I was working on) I linked to you all, as the inspiration for it right here: http://paintingsunny.com/2013/04/22/diy-train-board/
Keep being awesome :)
Painting Sunny, Dani P. says
Or, sealer… as I always misspell it “sealor”. Weird.
Melissa W says
Hey, thinking about making a car version for my 22 month old boys and was wondering if ya’ll put anything on the bottom of this to protect your floor. I was thinking felt stickers.
YoungHouseLove says
Oh yes those would be great! We generally use it on the rug so we didn’t add those but they would stick right on :)
xo
s
Laura says
Love the train board and I’m using your technique for our library’s train table. One quick question, how did you get your finish nails flush with the tracks?
Thanks!
YoungHouseLove says
We went in from the bottom, so they catch the bottom of the tracks from underneath.
xo
s
Jeff says
I’m not sure how I feel about this. Would you give your kids a set of legos but glue all the pieces together before letting them play with it?
amanda says
Thinking about Christmas gifts for my 2.5yo and I remembered this train table you did for Clara. Does she still use it? Have you added any accessories (trees, buildings, etc) since this post? Where do you store it at your new house?
YoungHouseLove says
Yes, she still uses it and it’s out on the floor in our office 24/7! We haven’t added anything to it (sometimes Clara sits on the board itself and we worried she’s break off trees) but I think you can see it here: https://www.younghouselove.com/2013/06/this-is-where-the-magic-happens/
xo
s
Catherine says
My daughter is 5 and has never really liked putting the tracks together. She’ll do all sorts of other things that take forever/require creativity, but trains are not one of them! Now that we have 12 month old twins, we never get the tracks out because they will just get knocked over after I set them up for her. I have a leftover bit of plywood from the kitchen project that is the perfect size already. I think I’m going to bite the bullet and do it! We can always undo it like you say. We used to have a train table that I hated because it was enormous but we definitely have two large couches to stash this under when not in use. (yes I am a YHL die-hard because I apparently remember every one of your old posts haha)