Some aspects of this kitchen remodel are certainly less exciting than others – especially when compared to having just opened the wall up. But alas, these things must be done. Including a few that we wanted to accomplish before the countertop guy came to template for our new counters (that’s something we want done accurately, after all).
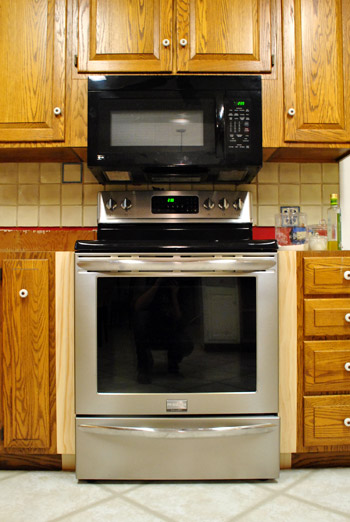
First on our list of little things was filling the gaps next to our stove.
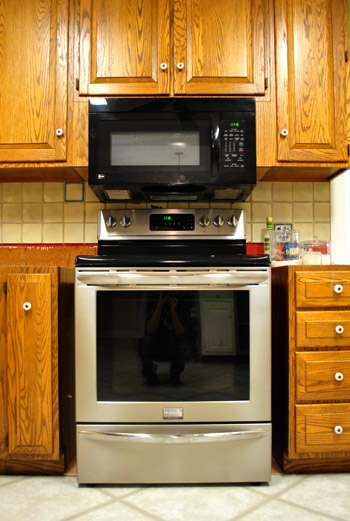
The base cabinet that we removed was 36″ wide, but the stove is only about 30″ leaving a little under 3″ of nothingness on either side. Since you can’t squeeze much function into two and 3/4ths inches (almost every pull-out drawer was 3″ or more), we decided just to put in filler pieces of wood. Oh and for anyone wondering why we didn’t scoot the stove to one side and add a wider pull out drawer, if we didn’t leave the stove centered the hood would be off-center, which would mean widening the ceiling hole (= drama). Plus none of the thin slide out drawers had doors that looked like our existing ones anyway, so it was just not worth the money/trouble. And although we thought about some sort of ornate leg or braided detail, we ultimately decided that we wanted other things like the wall of penny tile backsplash to be the star (along with items on our floating shelves), so two thin and basic filler pieces of wood were our final pick.
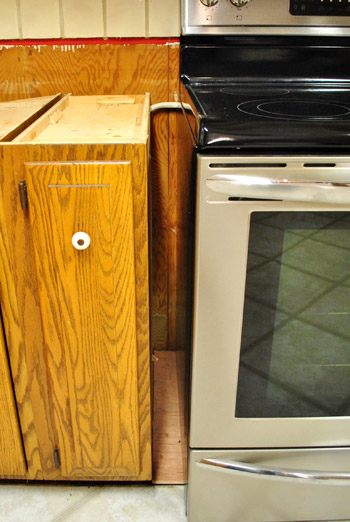
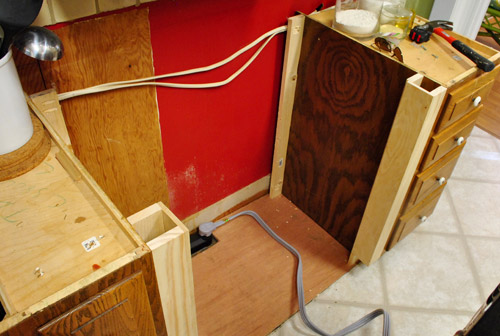
I grabbed a few pine “project boards” at Lowe’s, cut them to size, and drilled some pilot holes with my Kreg jig before screwing them carefully into place.
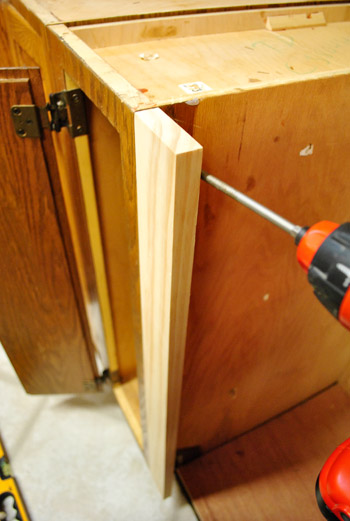
Obviously we needed the fillers at the front to visually fill the gap, but we also decided to put one at the back in case the counter guy needed it for support:
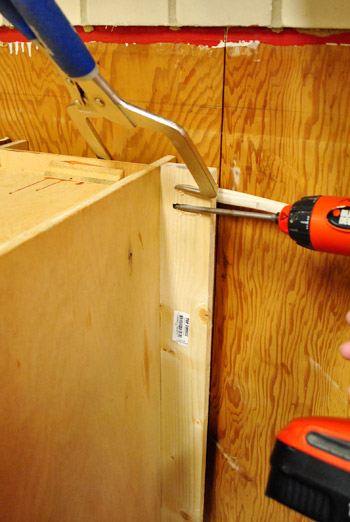
In total, each side had three separate filler pieces. We probably could’ve gotten away with two, but it’s not like the boards were breaking the bank (I spent about $11 total on this entire project – which is at least $100 cheaper than some sort of pull out dealie).
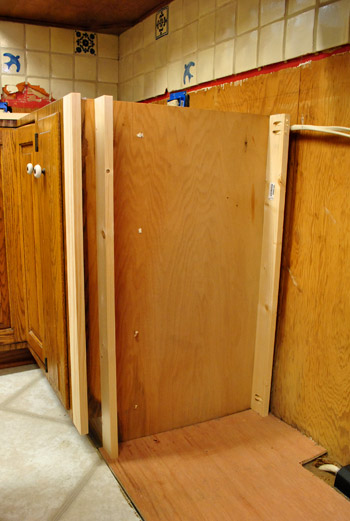
Here are both sides done (ready for the stove to slide back into place):
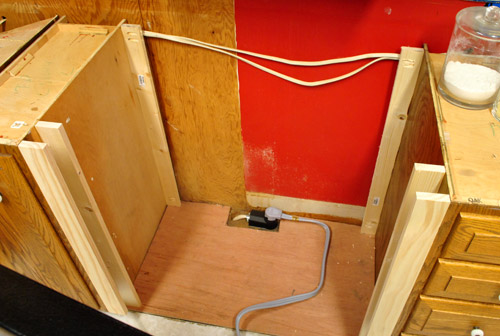
Not bad, eh? Once the counters are on and the cabinets are primed and painted no one will even notice them. Especially since many of the other base cabinets in our kitchen already have fillers in the 2.5″ range.
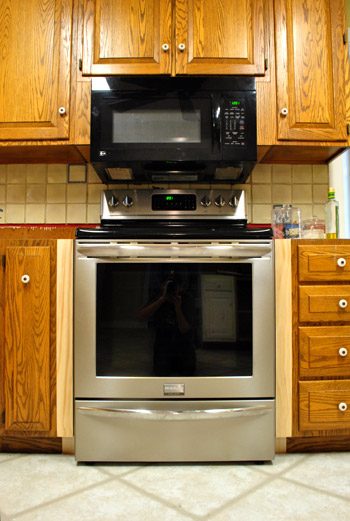
Then we stepped a little closer and put on our Picky Pants and we saw that there was still a noticeable gap. Guess we’ve gotta go buy a bigger stove…
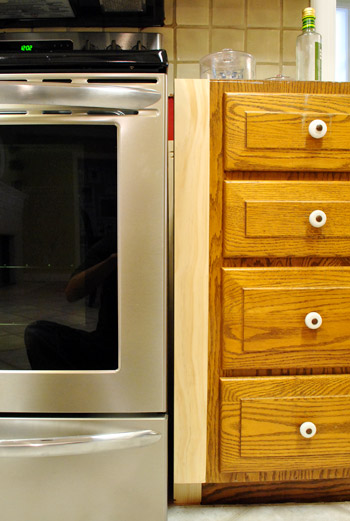
Kidding. Obviously I just needed to add one more sliver of filler wood. The gap was just over 1/4 of an inch, and I knew we could do better. So I headed back out to Lowe’s a grabbed a couple of these.
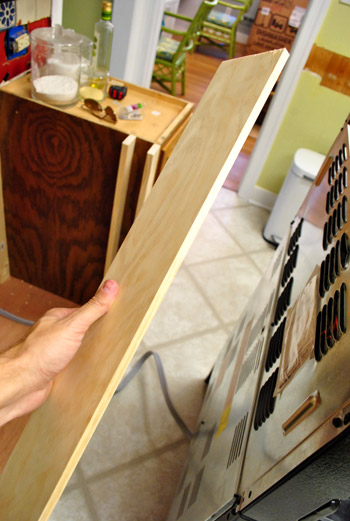
It’s a 3/8″ thick project board that fit perfectly into my slightly-too-big gap, thank goodness (though they added $4 to my total budget, now breaking the bank at $15). So I nailed those two suckers in place, being super sensitive to keeping them flush with my other filler piece along the front.
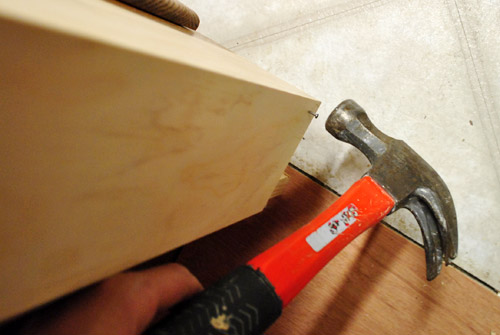
Here’s what they looked like on both sides. I didn’t bother putting them any further than the first two panels since they were strictly aesthetic.
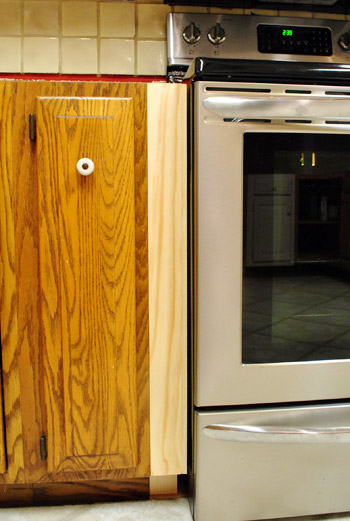
Then we just slid the stove back in. MUCH better. I know it’s hard to tell in the pic below, but trust us that it’s just about as snug as we’d ever want it (any closer it would be hard to get the stove in and out). Oh and once we demo the tile from behind the stove it’ll be able to push back against the wall a bit more for a more flush look. And once we add the toe kick across the front of all the cabinets the bottom will be seamless too.
So with that done…
… our next little task was over on the peninsula.
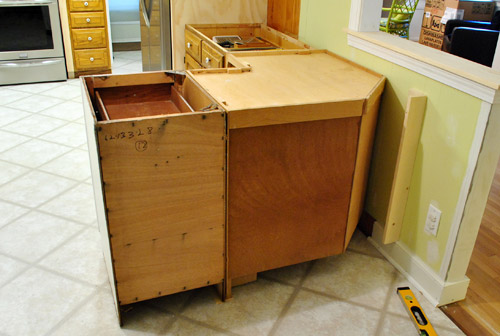
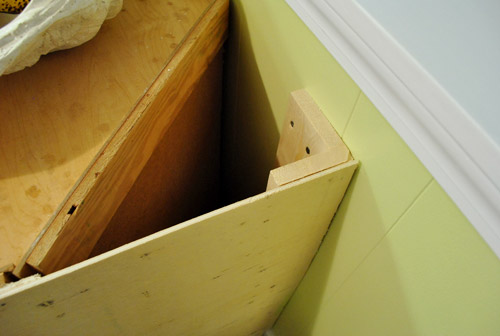
Since we don’t want the guy templating the counters to think we want an angled corner or anything, we wanted to attach a flat panel on the back of the entire peninsula. It’s something we’d have to do eventually, so why not tackle it while we wait for counters? You can see in the photo above that I had already attached a little corner piece to anchor the panel against the half wall. Here it is a little closer:
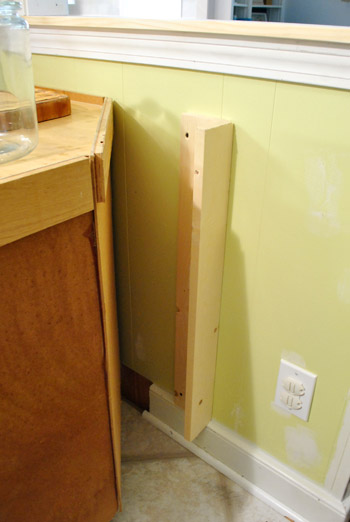
It’s basically just two scrap pieces of wood that I screwed together at a 90-degree angle using my jig. Then I screwed it into the wall so that the flat edge would be flush with the back of the cabinets. Then I was ready to attach my plywood panel.
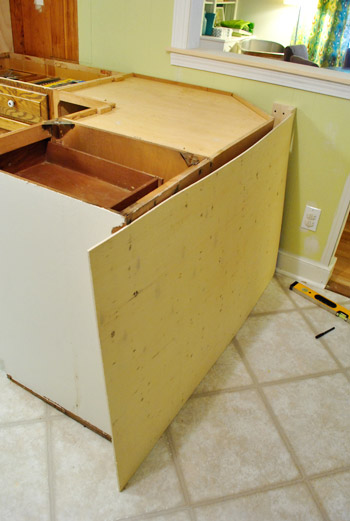
I actually bought this piece of wood back when I got the plywood for our refrigerator built-in so I could transport it in my rented Lowe’s truck (how’s that for thinking ahead!). It’s just a thin piece of “utility plywood” that the Lowe’s guy recommended. It was a whopping $9. They had cut it to size for me in the wood cutting area, but because we had later switched from a 21″ end cabinet to an 18″ end cabinet I had 3″ of overhang that I had to cut off with my jigsaw.
So here it is all cut and nailed into place:
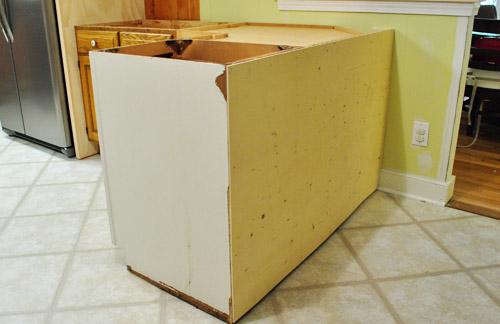
Not very exciting looking, we know. Eventually we’ll be adding trim – baseboards, corner pieces and maybe even a three paneled board and batten look. Not sure yet. Oh, and it will of course get painted to match the cabinets. But for now it accomplishes the goal of squaring off that corner for the countertop measuring festivities (it’ll have a 12″ overhang of Corian on two sides to accommodate four stools).
Can you sort of start to see how it’s coming together? Of course the chairs are placeholder and we hope to get some lighter looking stools (maybe made of acrylic for a nice airy feeling).
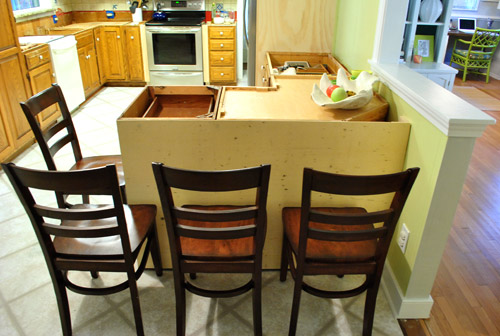
Oh, and do you notice the other thing that we did in the picture above? I’ll give you a hint. It starts with a “p” and ends with “aint touch ups.”
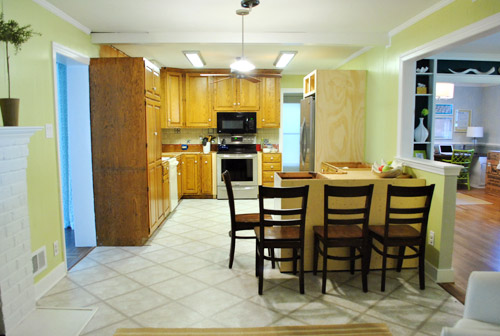
Obviously paint was not a critical step for the counter templating process, but it was more for our sanity (and we had it all on hand so it was free). There’s still lots to be painted (um, hello cabinets – but those have to wait until we get our counters in to avoid dings). So we got busy painting the raw trim, drywall, and paneling leftover from the pantry/fridge shuffle and wall opening. It really does make our exceedingly unfinished kitchen look a smidge less unfinished.
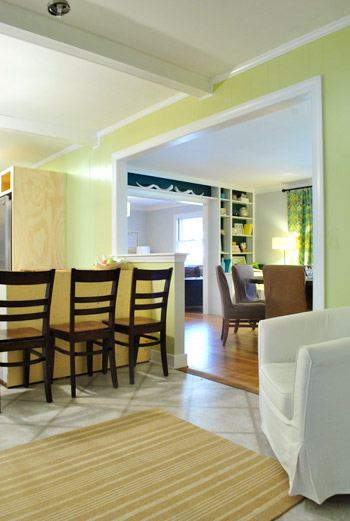
You’ll notice that we opted to paint the inside edge of the half wall light grey like the dining room. We figured it’d be weird to carry the grellow that’s on the kitchen paneling over since the side of the half-wall is drywall (like the light gray dining room). The soft grey is much more subtle and almost looks white like the rest of the door jamb, so it works nicely.
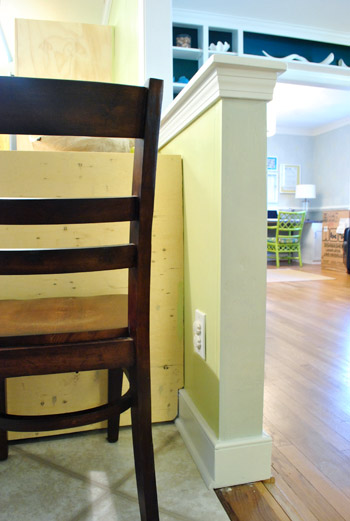
Oh and don’t mind the drip on the “temporary threshold.” That’s actually just a piece of paneling that we had leftover from the wall opening project that we cut down, flipped painted-side-down, and nailed in to bridge the gap that was created by removing the wall. It’ll eventually get covered with cork and we’ll add a very small threshold to join the cork to the original hardwood (just like we did in our first house where the original hardwoods met the new ones that we added to half of the house).
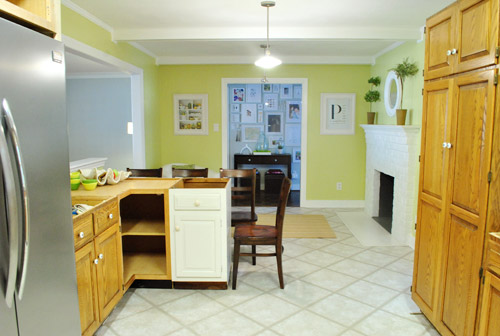
Now here are a bunch of “after painting” pictures of the kitchen and dining room (since it’s the closest thing we’ll have to a polished after for at least a few months). But ignore the two oddly placed floor lamps in the dining room (we can’t wait to get a big chandelier for over the dining table) along with the new microwave box sitting near the built ins (the new dishwasher box is hanging out in the office until install time).
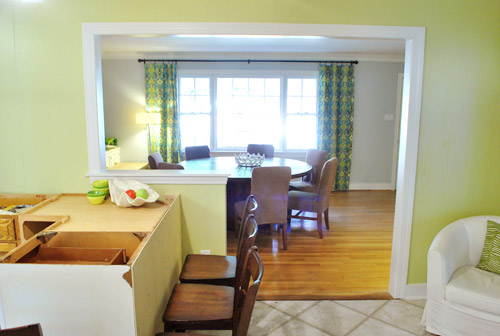
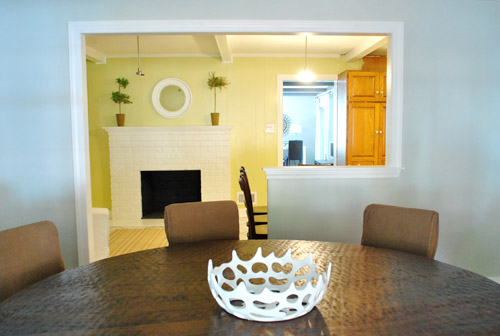
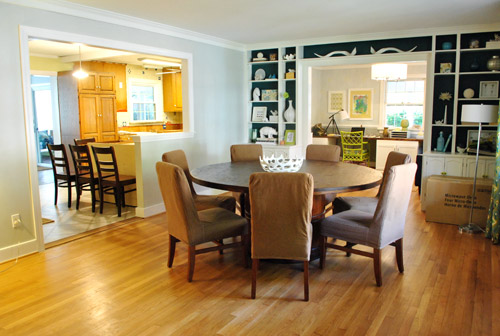
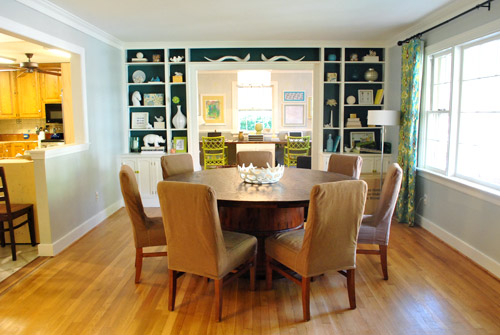
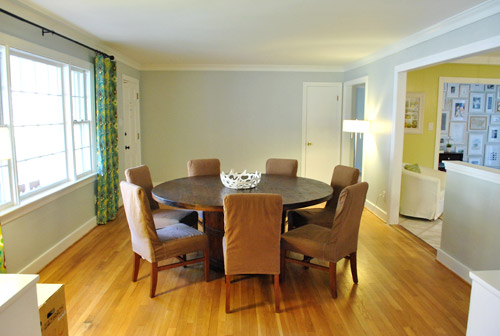
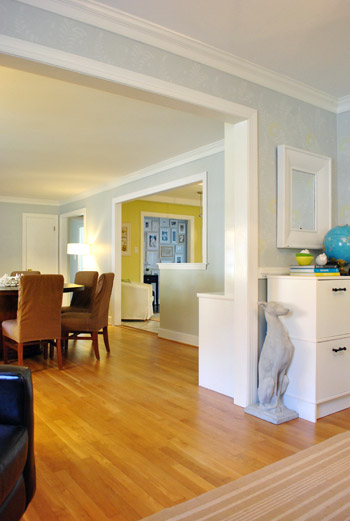
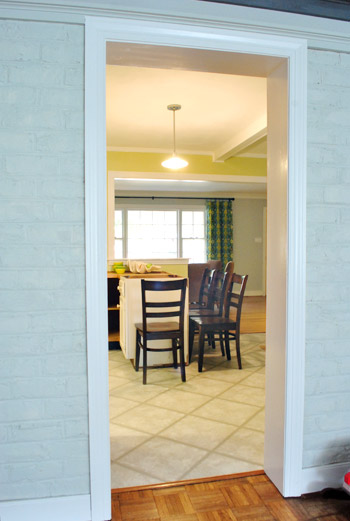
Oh, and although it’s not the most glamorous angle, a few folks requested a view from the living room, so here it is. We love that we can see the giant picture window from the back of the house. Widening this doorway would definitely be a nice change, but having widened a former-exterior brick wall in our first house we know it’s a messy and not necessarily easy job (this used to be the back of our house before they added an addition, which means it’s hugely load bearing and could be a big ol’ can of worms). So for now it’s on our “maybe someday list.” Although sometimes we think we’ll appreciate the privacy in the living room since it’s not a big wide-open straight shot from the front window to the back of the house.
Wow, that was a lot of pictures for a post about little things like filling gaps around the stove, nailing a panel to the peninsula, and doing some paint touch ups. I counted an even 30 photos. Guess we’ve been a bit trigger happy with the camera lately. Must have something to do with that glorious new doorway of ours. And yes, we still walk into the kitchen and grin at it like fools.
What little updates or small progress have you made on projects around your house? Any last minute tasks that you’re trying to bang out before this weekend or Thanksgiving?
Psst- We announced this week’s giveaway winner. Click here to see if it’s you.

Ashley @ Lewis in Love says
The kitchen is really looking good! I love the trim around the kitchen/dining room entrance. Really polishes the whole thing off.
Allyn says
Oh wow, the dining room looks SO good! Seriously!
Also, as a former babysitter in some really big crazy open houses, I’d vote no on the widening of the living room doorway. It seriously used to freak me out to know that someone could be watching me through a window across the house.
Maybe I felt a little too Leelee Sobieski in The Glass House.
All that to say, a little privacy can be nice.
Oh, and thos epics of Will and Clara on Bower Power are AMAZING. MFEO!
Elizabeth says
Love how the opening kind of looks like a “P” from the office angle…
YoungHouseLove says
Haha- it’s our secret family monogram.
xo,
s
Lizzy says
I love your attention to detail! Everything is looking great!
Oh…and thats a lot of chair action going on in those last few shots! Looks like your ready for lots of company! ;)
marianne says
you two are so inspirational. i can’t believe how quickly you are progressing through this project. thanks for bringing us along on your adventure!
Virginia says
Do you have a post where you talked about the headaches involved in opening up that exterior brick wall in your old house? I am DYING to do an archway between our kitchen and dining room much like what you’ve done here — but the kitchen is a newer addition built onto our brick Victorian, so I know we’re going to be dealing with all kinds of structural integrity issues. Oy… would love any tips!
YoungHouseLove says
We hired a mason. It was in the beginning of blogging but I think we posted about it (and you can see the insane mess and dust). Maybe search “mason bubble” in our side and it’ll come up?
xo,
s
Lila says
I’m impressed at how you know which steps come in what order. But why didn’t you have to do the floors earlier? Do you not need to put the cork floors under the new peninsula cabinets?
YoungHouseLove says
Feel free to scroll down in the comments a bit for that answer (it’s a common one that keeps coming up!). Hope it helps!
xo,
s
Meg@Keeping up with the Jenks' says
All the “little things” really make such a difference! And ya’ll are so good at the details.
I’m a little surpirsed ya’ll aren’t painting cabinets before the counters- atleast priming them. It seems like it would be so much easier, but I totally understand the dinging. I’m more about “easy” than “what’s best” sometimes. hence why I probably don’t have a DIY blog….I would give bad information.
YoungHouseLove says
Haha- the priming first idea isn’t bad at all, except that primer is only “open” for a short amount of time (less than a week usually) so if it’s not followed by paint within that time it loses its gripping powers and is sort of useless. So I’m nervous that some unforeseen delay will make all of my priming a moot point if time passes and it’s no longer open before I get a chance to paint!
xo,
s
Meg@Keeping up with the Jenks' says
Ha! Yet again, something I totally didn’t know. I would prime a room, and then get around to painting it months later. So glad I have you now for all this wonderful information. :)
Ever - The red house by the lake says
Just a note if you haven’t thought about it already… make sure that there are chairs that will fit the heighth of the peninsula.
I recently did a similar project with a half-wall at home, but ended up making it too high in relation to common bar stools. I am now debating whether to lover the wall some more or order custom made chairs.
But seriously, give it a thought. Maybe it is better to raise it just a little bit, depending on what chairs you are planning on.
YoungHouseLove says
Oh yes, we have learned that we need counter-height stools and not bar-height ones. Here’s hoping we can track down the perfect ones!
xo,
s
josiedelaney says
it’s looking so nice! One thought… have you considered a bench for the peninsula, instead of stools?
YoungHouseLove says
We thought about that but wondered if it would be more functional to have individual seats so John could get up while I remained seated and fed Clara, for example.
xo,
s
Meredith says
We used to have benches with our old (OLD) kitchen table when I was little—wouldn’t recommend it. Even when you have 2 people, when 1 wants to get up you both wind up being disturbed. Especially with a baby, although aesthetically it would be pretty. :)
Kathi says
Sherry – have you considered those Ikea transparent chairs for the pennisula – I think they are called TOBIAS… I know they aren’t stools (so maybe they’re too low)…but they have full backs and are see-thru….
YoungHouseLove says
I love those but they’re sadly not counter height (just table height, which is too short).
xo,
s
Reenie says
Lookin’ good :)
yellowRose says
just my thought … i thought the peninsula was spposed to have that corner – looked quite good in my opinion …any particular reason you wanted it to be plain against the wall? looks fine that way as well just saying….
YoungHouseLove says
The person sitting there at the peninsula would definitely have an issue eating if the counter didn’t go straight across and meet at the wall, so for functional reasons we like keeping it simple and clean with a traditional rectangular shaped peninsula.
xo,
s
Penny says
The overall look of your home is just falling into place. So fun to see the progress. You guys have amazing vision and talent.
Robin @ Our Semi Organic Life says
Love the little updates!
Allison @ Quite Simply Home says
Good work on doing the touchup painting already. You guys are impressive and it’s coming together bit by bit! Looks great so far!
Stefanie D. says
is that the ceramic dog in the office??
YoungHouseLove says
That’s my concrete greyhound. Have had him for about three years. Just don’t have his ceramic friend anymore. So sad.
xo,
s
Amanda S. says
Everything is looking more and more put together. I’m very curious though- why didn’t you put trim and door jamb on the half wall (that you opted to paint gray) to match the trim on the other side? Why leave it as drywall?
YoungHouseLove says
Since it’s a half wall (a wall that wraps) and not a doorway that gets trimmed out we opted to leave it alone (we thought trim down the side under the ledge and molding under it would be too much). We just googled a lot of other half walls and looked at how our neighbors treated theirs!
xo,
s
Chelsea says
Do I spy a new doggie waiting to be painted white in the office?? I hope so!
YoungHouseLove says
Oh he’s my concrete greyhound. Have had him for years (he just used to have a ceramic friend, sniffle).
xo
s
Louisa T. says
Love, love, love the changes you are making! Cannot wait for mine to get started! What an amazing amount of light y’all are adding to this house. Really look forward to your posts each day to see what progress you have made.
Have you considered a sort of matching short (in length) half-wall to separate out the front door? Something similar to this: http://chriskauffman.blogspot.com/2010/10/mudroom-evolves-before-and-after-photos.html (scroll down to the fourth picture). Just an idea.
YoungHouseLove says
We’ve definitely talked about it. Not sure where we’ll end up!
xo,
s
Esther says
We redid our toy/TV room,but still need to do some little things like hang pictures and add decor to our shelves. Your post has given me motivation to go and complete our project!
http://the6wolfeden.blogspot.com/2011/11/toytv-room.html
I love how opening up the wall in your kitchen/dining room has brightened everything up!
heather s. says
I really hope you find acrylic stools since all the wood in one area is too heavy-looking. I want an acrylic console table badly but haven’t found anything in my price range. The kitchen is looking great – especially with the paint touched up!
YoungHouseLove says
Oh yes, the wood chairs look crazy, they’re just place holders. They have some acrylic stools at CB2 right now and we’ve also been eying some light and airy white stools on overstock for a nice price! We’ll keep ya posted!
xo,
s
Firesparx says
We went with the Ingolf counter-height stools in white from Ikea for our kitchen and they work great. They were a fraction of the price of anything else we liked.
YoungHouseLove says
Thanks for the tip! Katie B is a fan of those too!
xo,
s
Sarah says
Hey Guys! The pics look lovely. I particularly like all the many views from the different rooms. Quick question, I noticed that you opted for the flat top electric stove over the coils. My parents’ top broke and was super expensive to fix, so I’ve always steered away from that type. How do you like it and have you had any problems with it? Oh and I know that you love Lowes. I’ve read that the box store appliances are frequently made of inferior materials…what do you think about the quality?
Love this blog and we are moving from one 1950’s ranch in NC to another (bigger and way cooler one, yippeeee!!!) and I’m on your blog dreaming about projects when I should be helping my husband run our business.
sarah
YoungHouseLove says
All of the appliances in our first kitchen came from Lowe’s and we didn’t have any issues with them in the five years that we lived there! So we love Frigidaire and were happy to go with them again (seriously, not even one service call for any of the appliances in half of a decade!). We had a flat top electric stove in the first house and loved it so we just went with it again. So far so good!
xo,
s
Lizzy says
I was wondering about this as well. We’ll have to replace our appliances in the near future and, unfortunately, we don’t have a gas line so need an electric stove. Our current (very old!) stove has coils and mostly all new stoves are flat top. I use a large, heavy cast iron pan fairly regularly so do you know if that would scratch/damage a flat top?
(There’s oodles of pros/cons out there on the web but I’d prefer the opinion of someone that actually owns a flat top! :) )
YoungHouseLove says
Oh yes I’m not sure you can use cast iron on a glass top. We haven’t. Anyone know?
xo,
s
Missy G. says
I have a flat top (can’t remember if it’s glass or ceramic) and still use a cast iron pot on it, BUT I’m reeeeeallllly careful when placing it on the cooking surface and taking it off so that I don’t scratch the top. I’m actually planning to ask for enamel-covered cast iron for Christmas. I’ve heard that it’s better for the flat stove tops.
Charity says
It’s all coming together so well. Getting all the little stuff done just means your getting closer to all the fun stuff. Can’t wait!
Diana @ Boy + Girl Design says
I’m so happy to see this post! We are moving into our new house this weekend and it has solid wood cabinets that I’m going to try to reconfigure. I’ll probably be referring to this when the time comes! Thank You!
Margaret says
Baby steps, but still exciting stuff! I appreciate the paint touch ups, that would have driven me crazy too. Separately, I guess I never noticed that expanse of wall space between your front door and the coat closet – it’s such a big wall! Maybe a place for those public bike prints?
YoungHouseLove says
Yes! We’d love to hang some giant art and put a big buffet/console table there along with a rug to define the entryway. Someday…
xo,
s
Bboss says
It looks great, but I thought you would be carrying the counter over the 1/2 wall into the dining room space.
YoungHouseLove says
We decided we liked the idea of adding that wooden ledge and a very subtle separation (so the peninsula wouldn’t look like it was between two rooms, it would clearly be attached to the kitchen side and grounded by the half wall).
xo,
s
Ellen says
It all looks so good! Ever seen the hidden small storage custom spice racks? Your spaces by the stove reminded me of them.
http://www.housebeautiful.com/kitchens/small-kitchen-ideas?click=main_sr
I think its picture 5 of 8 in the slideshow. Course, next to an oven could get hot ;)
YoungHouseLove says
Yeah, we thought storing spices next to the stove was probably not the best idea for keeping them fresh. But they’re cool little cabinets!
xo,
s
bridget b. says
love it! you guys are so creative. i love the way you make tasks that i would think are too scary/complicated for me to take on look so easy.
i get so much inspiration from your site. i never would have thought to square off a corner with plywood, or that it was that easy to fill in spaces beside appliances. also seeing your half wall tutorial helped me identify some issues that i need to fix with the diy counter that was installed in front of our wetbar area. now if i could just get hubby as excited as i am to make these changes….
keep up the great work!
Ariane says
The same way little drops of water make big rivers, little details tackeled around the house make it more beautiful — and closer to the word “finished” !! I sure did a lot of little things last week-end, and I’m planning on doing a few more the next one (even though I have choir rehersal saturday pm+night+sunday am). I love it when you take care of little things (sometimes annoying) and then with a coat of paint or a change of floor, it all comes together !
Good job, John ! (I will tell you more about that phrase later…)
Take care !
windylou says
So nice! I couldn’t quite imagine how things were going to look from the drawings, but y’all hit another one out of the park!
Cindy says
Are you going to do a lazy-susan in that corner cabinet in the pennisula? I can’t recommend one highly enough, and I imagine with your woodworking skills, you’d be able to fashion the appropriate cabinet door.
We love our lazy susan. Can’t live without it, and it adds a bit of charm to an older house.
YoungHouseLove says
Yes, we’d love to! It’s definitely the plan…
xo,
s
Melanie @ MailboxJourney.Com says
I can’t wait to see the end result of all of your hard work!
Tracie @ Gurtler + Home says
Did you guys ever think about putting in, oh for lack of a better word, it looks like a balister or spindle between the cabinet and the stove. I think that would have been the perfect place. I wish I had a place for that, but sadly no gaps.
YoungHouseLove says
We did think about some sort of leg-ish or braided or balistered effect but like the idea of something seamless so other things (like the full wall of backsplash and some items on the open shelving) can be the stars!
xo,
s
Christine says
It seems we are always in a rush to get a bunch of projects finished before a holiday! My husband spent every waking moment of last weekend sanding, stripping, then staining and painting our staircase to the second floor – it looks amazing. Plus – we are trying the get the kitchen backsplash finished by next week too! A travertine in a herringbone pattern.
Wom-mom Ethne says
Of the 30 pics, my fave is the angle into the kitchen from your front door. My imagination isn’t super detailed, but I can at least envision the white cupboards. And it’s great.
leah says
Wow. You make it look so easy! Almost inspiring me to rearrange my kitchen. Hmmm. Also, I think you need turquoise stools, just sayin.
YoungHouseLove says
Haha, that could be super fun…
xo,
s
Lisa says
Sorry if someone’s already commented on this, or if I misunderstood your explanation about the threshold flooring. IMHO, I think the cork floor (and the transition strip you will need between the cork and wood floor) should stop at the kitchen side of the opening, not extend across the threshold area to the dining room side. Two reasons: that’s where the cork will stop at all the other kitchen doorways, and the grey paint on the end of the halfwall further defines that area as part of the dining room. Can you find some wood flooring that matches that in your dining room, to place in that 4″ of threshold area? Even if it’s not a perfect match for now, later when you re-stain the floors it would blend. Just a thought.
YoungHouseLove says
Always another possibility! Just have to see where we end up!
xo,
s
Pamela says
Glad I took the time to read all the comments. This was exactly my thought when I saw that bit of wood (paneling) butting up against the kitchen floor.
Karen T. says
The progress y’all are making looks amazing! I can’t wait to see the finished product! Oh, and I think it’s pretty cool that from the office the opening into the kitchen looks like a “P” (second to last picture)! Keep up the great work!
Lani @ Diapers and Divas says
WOW it looks GREAT! I totally feel you on the paint touch ups…it was driving me nuts looking at it in pics and I can only imagine what it would be like living with it! When we were doing our board and batten treatment I could not wait long enough to break out the paintbrush to make it stop looking so unfinished! Even though you don’t have countertops, it’s almost like the room is DONE because you did that little step! LOVING IT! Great job guys! Oh…and I am a fan of the acrylic stool suggestion! Not that my opinion matters…but you know…just throwing it out there!
Allison says
Any chance you will paint the beams like the living room, or is the kitchen ceiling lower? Do they run the opposite direction?
YoungHouseLove says
They run in the opposite direction so we thought it would look a little odd. We like leaving them white and letting things like the wall of backsplash tile and some items on the open shelves be the star.
xo,
a
Lani @ Diapers and Divas says
Oh side note…where is that bowl from on your dining room table?? I am dying over it!
YoungHouseLove says
That’s from Joss and Main a little while ago. Hope it helps!
xo,
s
Thais Bessa says
I don’t remember if you guys have already mentioned it before, but what are you going to do about the kitchen cabinets’ knobs? Are you going to change them? I know you guys love that they create funny faces, but I am hoping for a “no”, they are not much my cup of tea! :)
Thais Bessa says
Ops, I am hoping for a “no, we won’t keep them!”
YoungHouseLove says
No way! Those peepers are gone as soon as we paint the cabs!
xo,
s
Erin @ The Impatient Gardener says
I think what amazes me most about your projects is how patient you guys are. I’d be all “well as long as everything’s ripped apart, let’s rip more stuff apart,” but you guys seems to have the ability to tackle bits of projects at a time so that you don’t (well, maybe anyway) get that horrible feeling of an overwhelming project constantly looming.
But I am kind of curious about the floors. I know you’re replacing them with that swanky cork, but why didn’t you pull up the floors before you did the peninsula, etc.? Or can you put the cork right over the top of the existing floor?
YoungHouseLove says
The cork will float on top of the existing floor because there’s an asbestos liner under the vinyl so we can’t disturb it for safety reasons.
xo,
s
Erin @ The Impatient Gardener says
(Reply to your reply): Oh that is fantastic. That’s even better because pulling out vinyl flooring is a wretched job! I can’t wait to see the floors. I love cork.
Abbie says
I admit it. I was totally skeptical and now I’m eating crow. It looks amazing!
Wizzer says
Looks fab! You both are so talented. Q for John: What 5 power tools do you use the most? I thinking of asking Santa to fill in my tool roster a bit…
YoungHouseLove says
Miter saw, jigsaw, power drill/screwdriver, kreg jig (not really a power tool but really helpful) and mouse sander I think! Oh and a wet saw. Hope it helps.
-John
emily @ thirtyeight20 says
The opening looks great — completely different space now. Much airier. Love that.
We’re trying to have our kitchen functioning by the end of the year… after 3 years and 2 months of kitchenlessness!We have a million and one things we’re working on, but we’re ALMOST to the easy stuff now — painting the walls, etc.
We have a 12 week old baby though so my contribution to the work has drastically reduced lately!
Karen L. says
Great seeing it all start to look like it will later on. One thing I just noticed is that, looking from the dining room into the kitchen, the opening shape is a “P”, for Petersik! Ha! Know you totally planned that one! :)
YoungHouseLove says
It’s our secret family monogram. Haha.
xo,
s
Laura says
WOW you guys it really looks spectacular, you really have an eye for design! The kitchen looks gorgeous and I really appreciate all of the pictures lately! In what order will you install the flooring/countertops/wall shelving/backsplash?
YoungHouseLove says
Probably counters then backsplash the shelves then floor. Just taking it one step at a time though, so it could change!
xo,
s
angel says
I didn’t read all the comments to see if someone said this. But, instead of wood to fill the gaps around the stove..one of those slidy herb racks wood have been nice.
YoungHouseLove says
We have heard that storing herbs next to a hot stove isn’t good for them, but they’re such fun ideas for another spot in the kitchen!
xo,
s
Emily says
I am seriously *loving* the changes to your kitchen. It already looks so good with that wall opened. Even from the pictures, it makes the whole house seem so bright and more open. Can’t wait to see the rest come together!