Some aspects of this kitchen remodel are certainly less exciting than others – especially when compared to having just opened the wall up. But alas, these things must be done. Including a few that we wanted to accomplish before the countertop guy came to template for our new counters (that’s something we want done accurately, after all).
First on our list of little things was filling the gaps next to our stove.
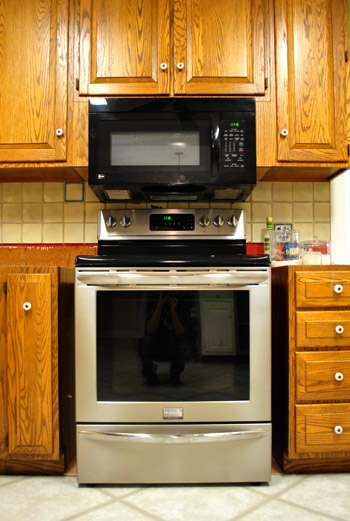
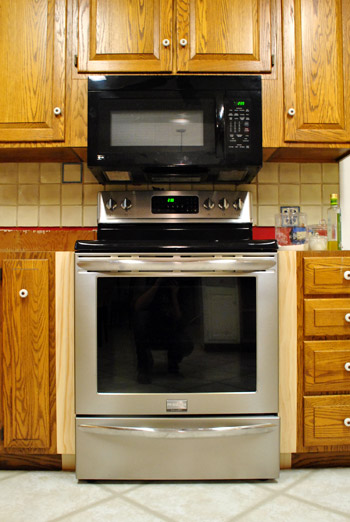
The base cabinet that we removed was 36″ wide, but the stove is only about 30″ leaving a little under 3″ of nothingness on either side. Since you can’t squeeze much function into two and 3/4ths inches (almost every pull-out drawer was 3″ or more), we decided just to put in filler pieces of wood. Oh and for anyone wondering why we didn’t scoot the stove to one side and add a wider pull out drawer, if we didn’t leave the stove centered the hood would be off-center, which would mean widening the ceiling hole (= drama). Plus none of the thin slide out drawers had doors that looked like our existing ones anyway, so it was just not worth the money/trouble. And although we thought about some sort of ornate leg or braided detail, we ultimately decided that we wanted other things like the wall of penny tile backsplash to be the star (along with items on our floating shelves), so two thin and basic filler pieces of wood were our final pick.
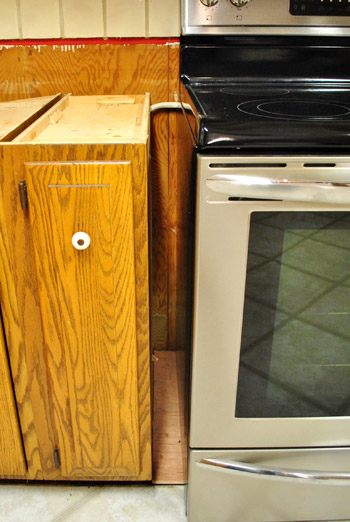
I grabbed a few pine “project boards” at Lowe’s, cut them to size, and drilled some pilot holes with my Kreg jig before screwing them carefully into place.
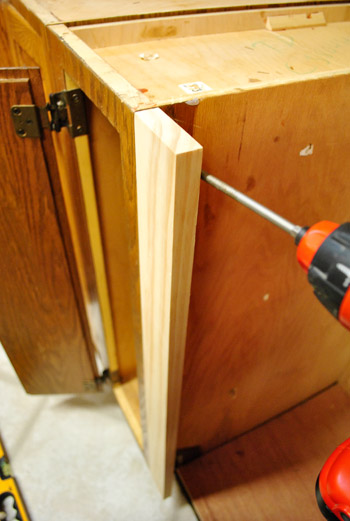
Obviously we needed the fillers at the front to visually fill the gap, but we also decided to put one at the back in case the counter guy needed it for support:
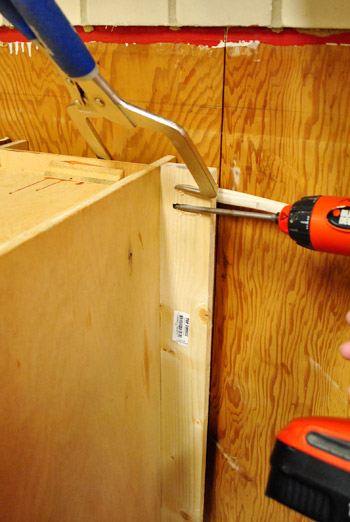
In total, each side had three separate filler pieces. We probably could’ve gotten away with two, but it’s not like the boards were breaking the bank (I spent about $11 total on this entire project – which is at least $100 cheaper than some sort of pull out dealie).
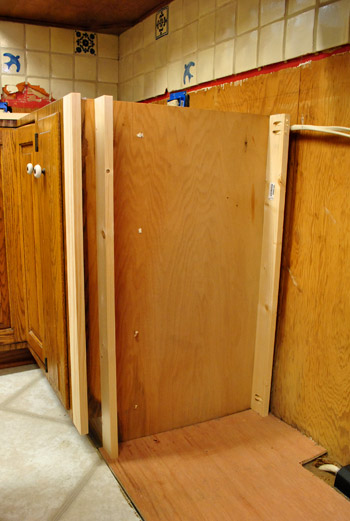
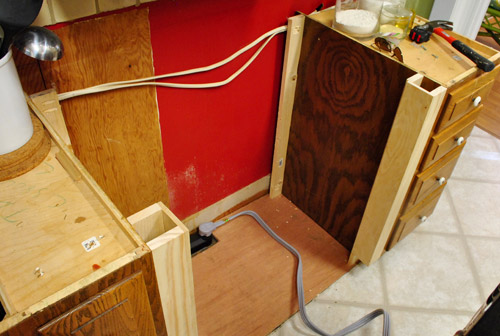
Here are both sides done (ready for the stove to slide back into place):
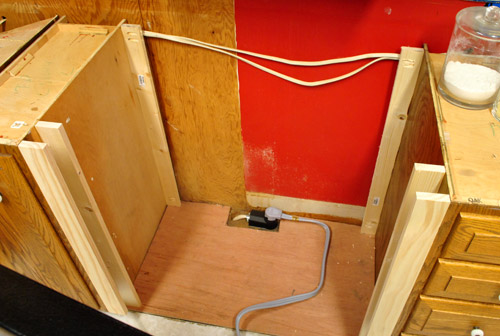
Not bad, eh? Once the counters are on and the cabinets are primed and painted no one will even notice them. Especially since many of the other base cabinets in our kitchen already have fillers in the 2.5″ range.
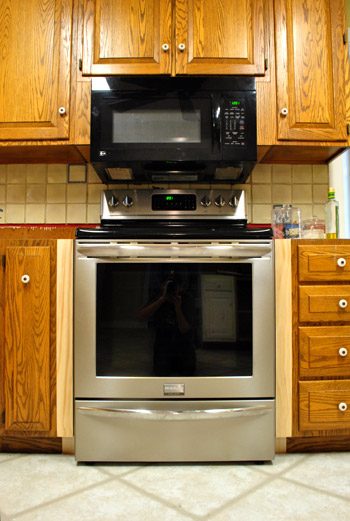
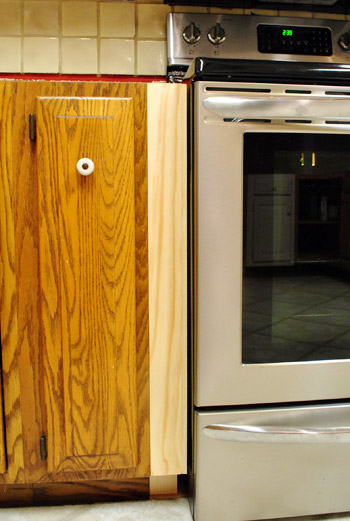
Then we stepped a little closer and put on our Picky Pants and we saw that there was still a noticeable gap. Guess we’ve gotta go buy a bigger stove…
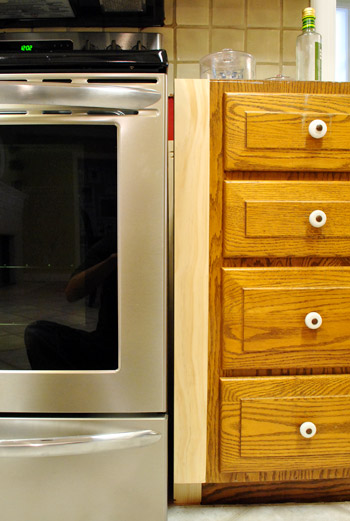
Kidding. Obviously I just needed to add one more sliver of filler wood. The gap was just over 1/4 of an inch, and I knew we could do better. So I headed back out to Lowe’s a grabbed a couple of these.
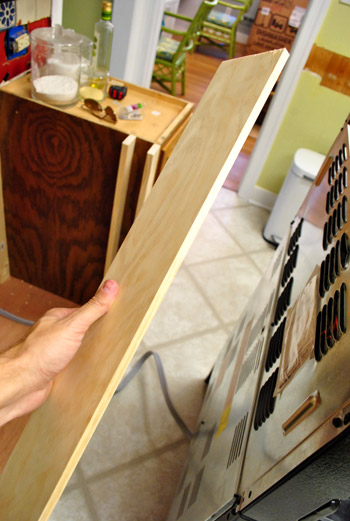
It’s a 3/8″ thick project board that fit perfectly into my slightly-too-big gap, thank goodness (though they added $4 to my total budget, now breaking the bank at $15). So I nailed those two suckers in place, being super sensitive to keeping them flush with my other filler piece along the front.
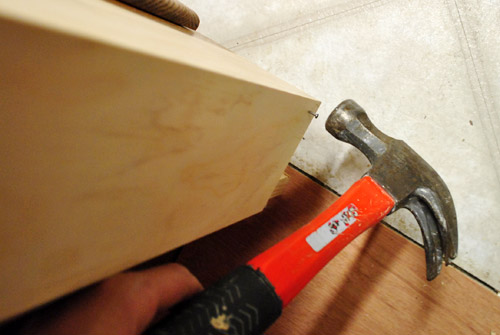
Here’s what they looked like on both sides. I didn’t bother putting them any further than the first two panels since they were strictly aesthetic.
Then we just slid the stove back in. MUCH better. I know it’s hard to tell in the pic below, but trust us that it’s just about as snug as we’d ever want it (any closer it would be hard to get the stove in and out). Oh and once we demo the tile from behind the stove it’ll be able to push back against the wall a bit more for a more flush look. And once we add the toe kick across the front of all the cabinets the bottom will be seamless too.
So with that done…
… our next little task was over on the peninsula.
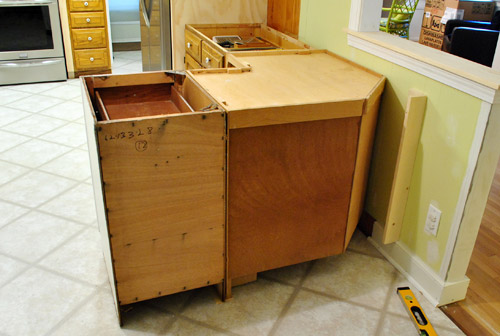
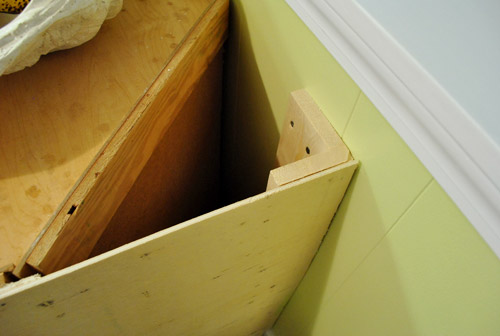
Since we don’t want the guy templating the counters to think we want an angled corner or anything, we wanted to attach a flat panel on the back of the entire peninsula. It’s something we’d have to do eventually, so why not tackle it while we wait for counters? You can see in the photo above that I had already attached a little corner piece to anchor the panel against the half wall. Here it is a little closer:
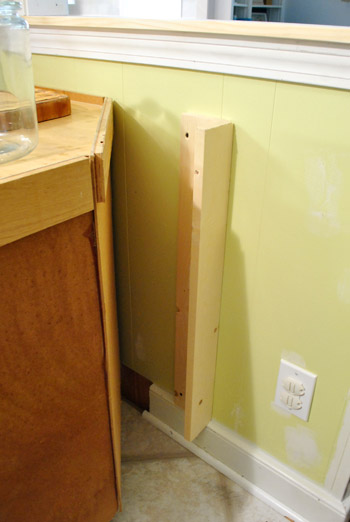
It’s basically just two scrap pieces of wood that I screwed together at a 90-degree angle using my jig. Then I screwed it into the wall so that the flat edge would be flush with the back of the cabinets. Then I was ready to attach my plywood panel.
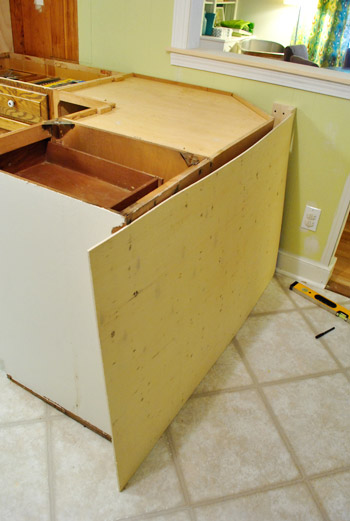
I actually bought this piece of wood back when I got the plywood for our refrigerator built-in so I could transport it in my rented Lowe’s truck (how’s that for thinking ahead!). It’s just a thin piece of “utility plywood” that the Lowe’s guy recommended. It was a whopping $9. They had cut it to size for me in the wood cutting area, but because we had later switched from a 21″ end cabinet to an 18″ end cabinet I had 3″ of overhang that I had to cut off with my jigsaw.
So here it is all cut and nailed into place:
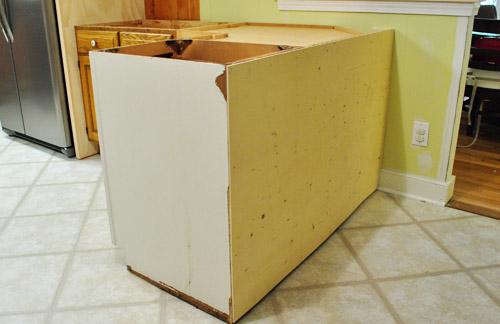
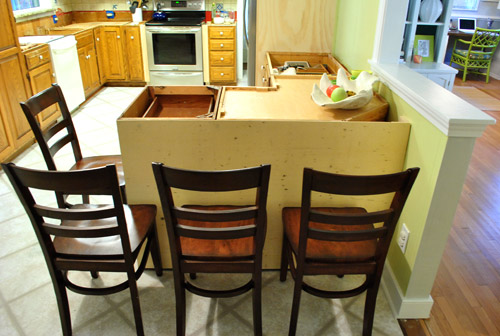
Not very exciting looking, we know. Eventually we’ll be adding trim – baseboards, corner pieces and maybe even a three paneled board and batten look. Not sure yet. Oh, and it will of course get painted to match the cabinets. But for now it accomplishes the goal of squaring off that corner for the countertop measuring festivities (it’ll have a 12″ overhang of Corian on two sides to accommodate four stools).
Can you sort of start to see how it’s coming together? Of course the chairs are placeholder and we hope to get some lighter looking stools (maybe made of acrylic for a nice airy feeling).
Oh, and do you notice the other thing that we did in the picture above? I’ll give you a hint. It starts with a “p” and ends with “aint touch ups.”
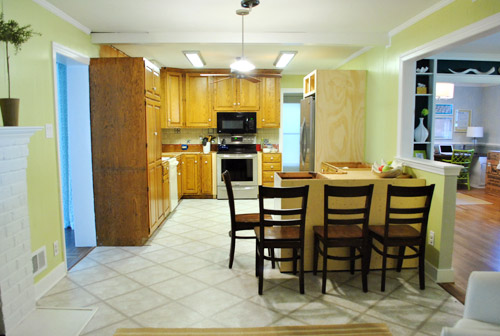
Obviously paint was not a critical step for the counter templating process, but it was more for our sanity (and we had it all on hand so it was free). There’s still lots to be painted (um, hello cabinets – but those have to wait until we get our counters in to avoid dings). So we got busy painting the raw trim, drywall, and paneling leftover from the pantry/fridge shuffle and wall opening. It really does make our exceedingly unfinished kitchen look a smidge less unfinished.
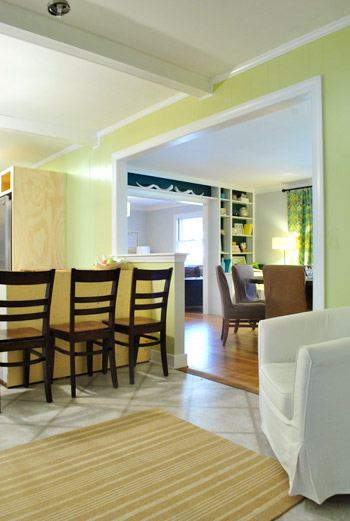
You’ll notice that we opted to paint the inside edge of the half wall light grey like the dining room. We figured it’d be weird to carry the grellow that’s on the kitchen paneling over since the side of the half-wall is drywall (like the light gray dining room). The soft grey is much more subtle and almost looks white like the rest of the door jamb, so it works nicely.
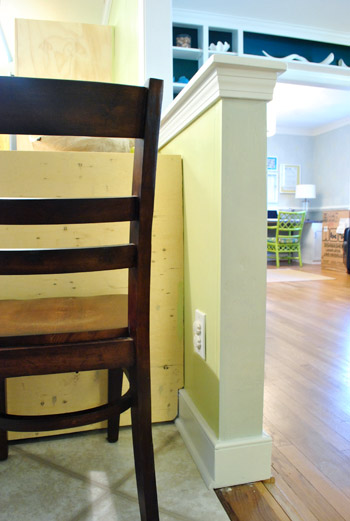
Oh and don’t mind the drip on the “temporary threshold.” That’s actually just a piece of paneling that we had leftover from the wall opening project that we cut down, flipped painted-side-down, and nailed in to bridge the gap that was created by removing the wall. It’ll eventually get covered with cork and we’ll add a very small threshold to join the cork to the original hardwood (just like we did in our first house where the original hardwoods met the new ones that we added to half of the house).
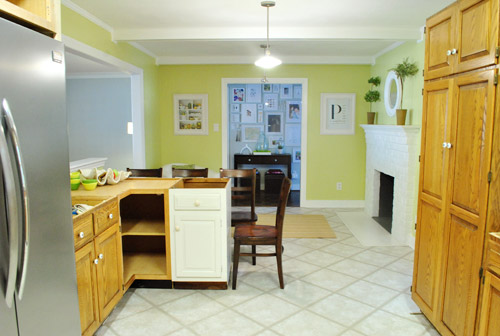
Now here are a bunch of “after painting” pictures of the kitchen and dining room (since it’s the closest thing we’ll have to a polished after for at least a few months). But ignore the two oddly placed floor lamps in the dining room (we can’t wait to get a big chandelier for over the dining table) along with the new microwave box sitting near the built ins (the new dishwasher box is hanging out in the office until install time).
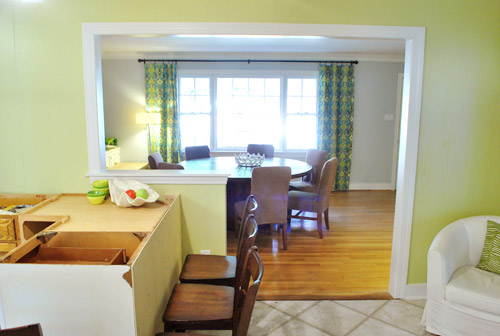
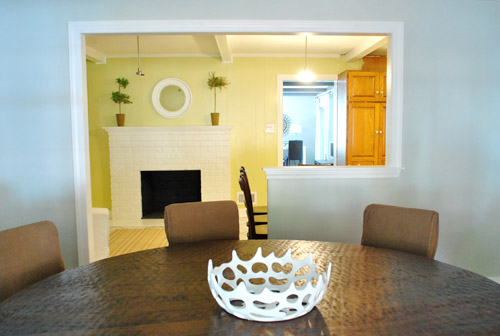
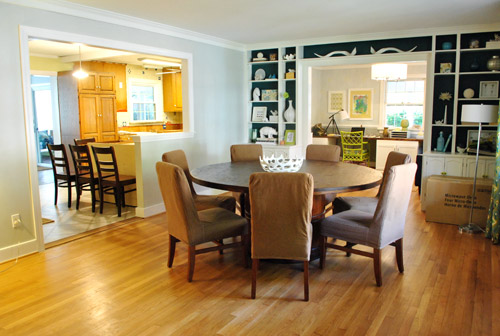
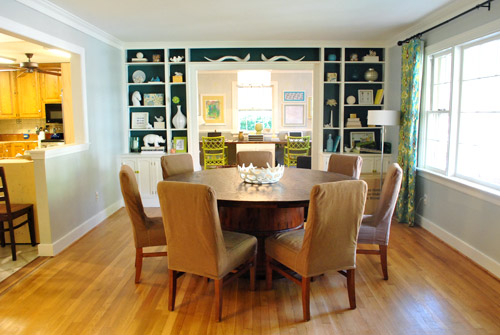
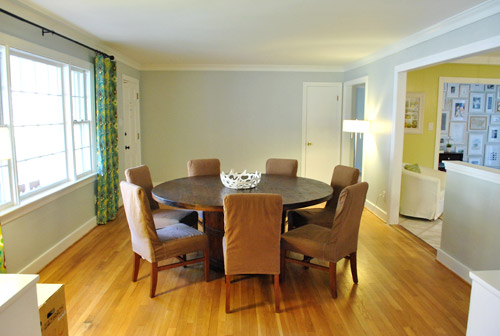
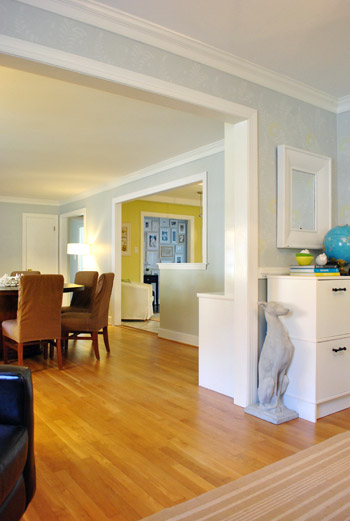
Oh, and although it’s not the most glamorous angle, a few folks requested a view from the living room, so here it is. We love that we can see the giant picture window from the back of the house. Widening this doorway would definitely be a nice change, but having widened a former-exterior brick wall in our first house we know it’s a messy and not necessarily easy job (this used to be the back of our house before they added an addition, which means it’s hugely load bearing and could be a big ol’ can of worms). So for now it’s on our “maybe someday list.” Although sometimes we think we’ll appreciate the privacy in the living room since it’s not a big wide-open straight shot from the front window to the back of the house.
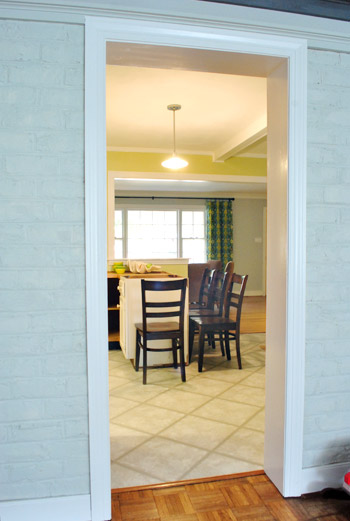
Wow, that was a lot of pictures for a post about little things like filling gaps around the stove, nailing a panel to the peninsula, and doing some paint touch ups. I counted an even 30 photos. Guess we’ve been a bit trigger happy with the camera lately. Must have something to do with that glorious new doorway of ours. And yes, we still walk into the kitchen and grin at it like fools.
What little updates or small progress have you made on projects around your house? Any last minute tasks that you’re trying to bang out before this weekend or Thanksgiving?
Psst- We announced this week’s giveaway winner. Click here to see if it’s you.

Emily says
I think you should’ve named this post “all the small things” unless that’s a copyright infringement. :)
I love acrylic chairs! You’ll have to keep us posted if you find a decent buy. Your existing chairs would also look great in a glossy white. . . . .
YoungHouseLove says
Haha, how did John miss that? Great title idea. As for our chairs, they’re too short (we need counter height).
xo,
s
Tami Foster says
Tell the truth? You decided to go with the half wall because it looks like a fat (although slightly mis-shapened) ‘P’. We know how you like your mongrams.
YoungHouseLove says
Haha, totally! And it’s a 7 from the other direction!
xo,
s
Maureen @ The Parkland Project says
Got to love all the small, tedious things that need to get added to any project. Looking great!
Becky C says
I completely understand the grinning like fools…My husband and I removed a kitchen cabinet to repair it and loved the openness of our kitchen without it so it stayed off the wall and we put up 3 open shelves instead. That was last July. Just last night he was in the kitchen staring at that wall and said “I still like it”. I chuckled and thought of the two of you doing the same thing.
Amanda says
I would have turned that area into verticle storage for sheetpans and cookie trays. I never have enough baking storage!
deborah says
It is amazing how much you both accomplish (even though it may not seem that way to you) The opening looks great!
I was wondering – what picture do you have hanging in the kitchen on the opposite wall of your “P” picture?
YoungHouseLove says
That’s a print from allposters.com a while back. It’s a photo of shelves with lemons and oil and other kitchen items on them.
xo,
s
Lara says
Oh, looks SO good, guys!
I think keeping up with the “little things” is one of your strong points. It’s a great model for those of us who are new to diy. I look around my house & see lots of “little things” that could be done to improve things, but the tasks either feel mundane or not worth the time by themselves.
Thanks for showing us ALL the steps it takes to “git ‘er done.”
Firesparx says
You should put a time capsule in the space between the angled cabinet and the new panel on the peninsula!
Last fall when the staircase in our new house was being finished the stairguy asked if we wanted to put anything in the newel post before he glued the cap on (it was hollow). Like deer caught in headlights we couldn’t make a decision. Didn’t help that we had exactly 5 minutes to decide before he was done for the day. Looking back, I really wish we had put a copy of our house plans in there. Or maybe a bogus treasure map to mess with people!
YoungHouseLove says
We’re planning to do that now that so many people are saying that! Can’t wait!
xo,
s
Laura says
Looks awesome! I can’t wait to see it when it’s all finished. Did you guys ever notice that your new opening looks like a big “P” (when looking in from your dining room)? I think it’s very fitting for you guys!!!
YoungHouseLove says
Haha, everyone is saying that. We love our secret monogram.
xo,
s
Michelle says
It is looking good. I just stumbled upon your blog earlier in the week and perused around. You have done amazing things to both houses! We have done some remodeling, not near to the extent that you two have. 7 years ago we built a house. Hubby didn’t want to work on houses anymore, plus this is a better school system for the kids. Sadly, builder used cheap windows. A few weeks ago, we went to Lowe’s, grabbed a Pella patio door and had a friend come over and help us replace it. It’s cold here, so I was only able to varnish stationary half. The slider will have to come out in the spring. Hubby installed the extension jams in my basement scrap room window. I got them all varnished and came back and caulked where the vinyl window and jams meet. The extent of our house projects for awhile.
YoungHouseLove says
Wow! Sounds like a big job! Congrats!
xo,
s
Candi Rodgers says
I’m just going to be super-weird and point this out. From the Dining Room view, the opening looks like a “P” for Petersik. And from the Kitchen/Living Room view, it kinda looks like a “7” which is Jon’s favorite number. I think that is pretty cool!
Candi Rodgers says
Oh, haaa…somebody already said that. Great minds! It looks awesome ya’ll!
Amanda says
You know one thing that I love about reading decor and home related blogs (at only 22) is that when I do buy a house (give me a couple of years!) I’ll have all these ideas of what could possibly be done with my house. And it IS SO EXCITING!
I’ll enjoy life right now though, finishing school and collecting small pieces of furniture and decor related odds & ends for now.
I love the small door in the living room, because you’re right, it will give major privacy. Wanna pretend your not home? Go to the living room! A living space should be private. And plus you have amazing openness (yes, it’s a word, haha!) between the hallway/living/dining room!
Also on another note, That corner piece in the peninsula would be a great spot to hid some fun things for new owners to find if you do ever sell your house. I’m just saying.
YoungHouseLove says
Haha, we’re definitely planning to do a little time capsule there, now that so many people have suggested it!
xo,
s
Andrea says
Loving the new opening! Loving it even more because it looks like an uppercase “P” with the halfwall. ;)
Mandy says
I’m looooving the kitchen redo.
When you guys moved to your house the kitchen was the most awfull thing I’ve ever seen!!!
Its unfineshed but so bright, beautiful, looks another entirely different house in such a short time (a year)
Congratulations!!! :D
Clare says
not sure if you noticed…or if someone has already pointed out…but when you look at your new widened downway from the dining room, it forms the letter P! See the 25th and 26th pictures in this post. Love this!
Clare says
I see I’m late to the party on this one. Is it weird that we all know the P/7 thing about y’all??
YoungHouseLove says
Haha, nah. I love it!
xo,
s
YoungHouseLove says
Haha- yes, it’s our funny little subliminal monogram!
xo,
s
Lori says
Wow! You two are amazing! The kitchen is looking great!
I’m just curious about why you didn’t tackle the flooring before working on built-ins like your peninsula? Do you plan on installing the cork on top of the linoleum tiles?
Lori
YoungHouseLove says
Yup, gotta float the cork over the existing tile since there’s an asbestos liner under it that we can’t disturb for safety reasons.
xo,
s
[email protected] says
sherry, is it possible to install cork (or any other type of floating floor) directly over ceramic tiling? or does it all need to be smashed and ripped out first?
YoungHouseLove says
Hmm, not sure. Maybe call Lumber Liquidators and see what they recommend?
xo,
s
Kelly says
Just wondering if you’ve decided on what paint colors your cabinets will be? For some reason I think a charcoal base cabinet and a lighter color on top would be awesome. :)
YoungHouseLove says
Since we have a few upper+lower built-ins (like the tall pantry and cabinet around the fridge) we don’t think it’s as easy to do uppers one color and lowers another color (might look too chaotic with the tall cabinets in white and only a few uppers in white with darker lowers in certain areas. Not sure where we’ll end up though!
xo,
s
Seriously Sassy Mama says
It is like the opening was always supposed to be there. I am giddy, and it is not my home!
Donna says
Wow, John! Nice work. You deserve a pizza or something, that’s a big job! Just curious, have they given you guys an idea when the counters will arrive?
YoungHouseLove says
They have said sometime within the next 3-4 weeks (since Thanksgiving might slow things down).
xo,
s
Lora Kearns says
Looks wonderful! When you said you are still grinning like fools, I can totally relate. All we have done is paint our living room, but we love it. We both can’t stop smiling and I literally tried to hug the wall yesterday. Next up, we are creating and hanging some art on our walls that have been bare since we moved in 3 years ago! You two are definitely inspiring us. Our home is actually starting to feel like our space now. Our kitchen will be one of our projects eventually and I just love seeing how you are transforming yours. Awesome work!
[email protected] says
you guys are doing such an amazing job! and sticking to your budget seems to be working out really well. super proud of you two!
[email protected] says
also, listen. i’m amazed by how clean your kitchen is. it’s incredible. even during a makeover for heaven’s sake.
Lesley says
in the picture that is head on from the dining room to the kitchen the new wall opening almost loks like a P
YoungHouseLove says
So funny how many folks are noticing that today! It’s our subliminal monogram!
xo,
s
Carla says
Things are certainly coming along in your kitchen. So many little details to tackle! The one thing I’m noticing is that when you’re standing in the front room it looks like a sea of chairs. Lots and lots of chairs and they’re all relatively the same in terms of standard chair design with seat backs. I’m glad you’re planning on changing up the kitchen seating. With such a dark and heavy look of the front room with the table and chairs and the busy look of those spray painted green chairs in the office, something more calming and different would help things blend together better. Softness of some kind would create balance, which is why I’ve suggested before that you use larger chairs in the office with padded backs covered in a less bold fabric. Anyway, I’m loving the cutout and am looking forward to seeing how the white quartz works with the heavy floors and everything else you’re pulling together for your kitchen remodel. Lots of fun ideas!
Meghan Hochgesang says
so i work for the country’s (if not the world’s) biggest cabinet manufacturer (MasterBrand Cabinets) and i feel it’s my duty to tell you about something. i’m not sure if it’s code now or not (i can certainly find out) but we’ve been forced to start supplying consumers with “heat shields” on all cabinets surrounding stoves/ovens. it’s literally this strip of metal that is installed to the cabinet (if this truly interests you, i can email a photo of what they look like) to help with heat that inevitably escapes from the oven while cooking and can damage the finish/wood of your cabinets. i tell you this as i would think it would be incredibly easy to fabricate for yourself.
i love what you do and this happened to catch my eye. please let me know if i can provide you more information.
YoungHouseLove says
Thanks so much for the tip! We chatted without kitchen designer and here in VA you need a heat shield if you’re using Thermofoil but if you’re doing wood or painted wood there’s apparently no heat shield necessary (when Home Depot and Lowe’s build new kitchens they don’t add them unless the owners are doing Thermofoil). Thanks again for the tip though!
xo,
s
Tanda says
The title of this post totally made me think of the song “All the Small Things” by Blink 182 and now it’s stuck in my head. Everyone in the office probably thinks I’m crazy because I’m singing to myself now. :) Also, things look great; I can’t wait to see it all come together!
Meg says
Your kitchen is going to look fabulous! The opening was a giant leap in the right direction! My boyfriend and I tackled a mini project this weekend. Our closet needed some TLC so we drew up plans and went to work! Check out photos here:
http://oh-my-garden.blogspot.com/2011/11/skeletons.html
Y’all are my inspiration. My boyfriend and I bought our first house this past April and I started blogging to keep family and friends updated. (Sound familiar? And I found your blog after I started my own!) Anyhow, we’ve been popping out the projects lately and I definitely think reading your blog has been influential in us tackling so many projects at once. Keep up the great work!
YoungHouseLove says
Wow- such an awesome closet update! And thanks for the kind words! Happy blogging…
xo,
s
Paige says
We had to do the same thing when we installed our dishwasher. Nice job!
Elizabeth says
I’m sure you’ve seen this, but thought I’d pass it along just in case!
http://www.refinery29.com/the-best-home-decor-blogs-to-book-now-part-ii/slideshow#slide-17
YoungHouseLove says
Wahoo! It was such an honor to be mentioned!
xo,
s
Alanna says
the kitchen is really starting to look great! we added a peninsula in our recently remodeled kitchen too. we trimmed out the knee wall that our peninsula rested against with plywood and moldings and it turned out great (http://alanna-wendt-to-tennessee.blogspot.com/2011/08/trimming-out-peninsula.html)! you can see a 100% finished picture of the peninsula at the end of this post (http://alanna-wendt-to-tennessee.blogspot.com/2011/09/kitchen-renovation-update.html). can’t wait to see how y’all choose to trim your peninsula out.
YoungHouseLove says
Wow- that looks so gorgeous!
xo,
s
Tracy says
It’s looking so good! I can’t believe how quickly you guys are making progress…we’ve been renovating our kitchen for three. whole. years. Yeah, let that number wash over you for a minute like the scalding hot mess that it is. Sigh. maybe some day it will be finished.
Anyway, I have a question. Can you post a picture of the office looking into the kitchen and vice versa? For some reason I’ve forgotten what that looks like. Or direct me to where that picture already exists? Thanks!
YoungHouseLove says
We’ll have to snap a few pics from that angle soon! Here’s an old post looking into the office from the kitch for ya (the one with the brown chair on the right): https://www.younghouselove.com/2011/11/seven-up/
xo,
s
Izabela says
It all looks so fabolous! My hubby and I are in the process of re-trimming windows and adding window sills and it seems to be taking forever, but we can only work when we’re both done with our 9 to 5’s. We’re getting there though.
Liz says
Looks good, guys!
Jen says
Wow – the stove does look better! You guys have such a great eye for detail. The first post I ever read was about an Ikea bookshelf. I was floored that you filled in the unneeded shelf bracket-holes, and that it made such a difference.
When we moved into our house last year, I was surprised to find that the previous owners had caulked the stove in place. I have come to love it – I can clean underneath well enough with a vacuum attachment, and nothing can drip down from the sides. It’s been a good thing. (We were less enamored of the windows they’d caulked shut. ;) )
heather says
I know you guys are a little more on the modern side, and I saw these on overstock. Not acrylic and not backs but still cheap for a pair of two (considering they have 2.95 shipping) and interesting.
http://www.overstock.com/Home-Garden/Tabouret-24-inch-Metal-Counter-Stools-Set-of-2/3879160/product.html?rcmndsrc=6
Also, knowing how much you love white and green I had to show you these, even though it might be too much crazy.
http://www.overstock.com/Home-Garden/Mojito-Green-White-Bar-Stool/4835352/product.html
This however might be a super fun alternative for you guys. It has a back to it – but might get pricy when added up and not really flow into with the dining room table. I’m not really a modern person so I don’t know persay.
http://www.overstock.com/Home-Garden/Swizzle-White-Bar-Stool/4835206/product.html
YoungHouseLove says
Ooh fun! I love the first ones the most but we think we want a back (so kiddos can more easily sit up there when they outgrow the highchair). I have found one set of white stools with an x-back that’s pretty low on overstock that we like! And CB2 has acrylic ones that are sleek and lovely too!
xo,
s
Janelle D says
Love how everything is coming along. Thanks for sharing all the little, but still important, steps with us! There’s so much build-up it’s going to feel so cathartic once it’s all revealed. Dream kitchen!
Kim says
We are on project hiatus until the holiday. The next step is to demo the backsplash in the kitchen, so that needs to wait until after I serve 30 people dinner in this kitchen/dining room.
How do you guys plan to get rid of your tile backsplash? Do you think it will come off easily or do you think you’ll have to smash the heck out of it?
YoungHouseLove says
We’re not sure what to expect (of course we hope it’s easy to remove). We’ll keep you posted!
xo,
s
sarah says
It was me who bugged you to update the List before, and now I’m bugging you to update it again :) I figure it’d be a good thing to post while waiting for kitchen stuff to come together? (or you might want to wait until kitchen stuff is all done–up to you). You guys are doing such a great job!
YoungHouseLove says
Haha- maybe after we’re done with the kitchen we’ll cross off a ton of the stuff on the list and add all the new projects we’ve thought of since. Haha. It’s a never-ending cycle, but we definitely plan to post an updated to-do list in a few months to lay out all the plans that we have beyond the kitchen!
xo,
s
Missy G. says
Oh, yes, I second the motion!! Haha, I had this thought, too. I would love to see Listy updated. Maybe since y’all are coming up on the one year anniversary of living in the new house??
Jill says
Just love it! The paint and everything looks great. It really looks like the opening was always there… fantastic! I find the dining room table/peninsula to be a very functional setup for our fam. It’s so easy to feed the kids right in the kitchen… and even easier to clean up. I also love the half wall you put in… you’ll be able to “hide” stuff on the counter from view of the dining room!
Mary Lou says
Love the progress! And I may have missed an update but did you get a new porcelain dog in the office?
YoungHouseLove says
That’s a concrete greyhound I’ve had for years! He just doesn’t have his ceramic buddy anymore. So sad…
xo,
s
Matt says
How much space do you between the cooking surface on the stove and the bottom of the microwave? It doesnt look like a whole lot, which is a similar situation to what we have. Our house just has a hood for exhaust and we have to keep the microwave in the pantry. Do you feel like you have enough cook top clearance?
YoungHouseLove says
Oh it’s completely not to code! Maybe 18″? Can’t wait to rip that down and put in a properly hung range hood.
xo,
s
Ginny P says
Hey kids – I love that you fixed the gaps around the stove. I must admit that I noticed the gaps when checking out your earlier posts. It looks good.
As for me – weekend project?? I think it’s chandelier painting weekend. I was inspired by your indigo blue chandelier in your office are and I’m going to attempt the same…except without the big drum shade. I’ll probably go with individual shades.
I’m a little scared, but I’m adopting an “I can do it!” attitude!
YoungHouseLove says
Wahoo! You can totally do it!
xo,
s
Allen says
Disclaimer first; I hate it when people don’t read the comments before asking a question and end up asking it for the kajillionth time; BUT I’m at work and 300+ seemed like a reasonable pass ;)
The grellow is looking a lot lighter with all the extra sunlight. Is the addition of white counter tops AND white cabinets going to wash it out further? The dark flooring will def help but I remember the penny tile being pretty light too.
It seems like every other room has a significant pop of color and I wonder how the light walls in the dining room + the white makeover in the kitchen will come out.
So I guess I have two questions;
is repainting the kitchen on the possible list?
what will catch my eye in the finished kitchen?
No matter what I think you guys are ridiculously talented and I LOVE LOVE LOVE being a part of it <3 <3 <3
YoungHouseLove says
We think once we add stuff to the open shelves and the counters we’ll have lots of pops of colors just like other rooms in the house! I think the first thing to catch your eye will be the range hood with floating shelves on either side of it (and the texture of the tile up to the ceiling behind it). We can always paint the ceiling later if we’d like, but for now we’re loving the whole palette as it comes together!
xo,
s
Emily says
How do you cook anything on that stove!?! The microwave is crazy low! I’m sure you are looking forward to a new hood and some room to make a nice big pot of soup :)
YoungHouseLove says
Yup- totally annoying and not at all to code! Haha. Can’t wait to fix it!
xo,
s
Sarah says
Are you planning to remove all of the upper cabinets on the stove and sink wall to do backsplash and open shelving? Also, any lighting upgrades on the to-do list?
Everything is looking so great! I seriously could NOT STOP STARING at all of the gorgeous photos of the opening reveal. I must have have gone back to your blog like four times throughout the day to marvel all over again at the amazing change!
YoungHouseLove says
Yup, many lighting updates are on the list, and we’ll be removing all the cabinets on the stove wall but hanging one upper next to the pantry (with a microwave built in under it like in our first house). Should be moving on to those things soon!
xo,
s
emmarose says
I love your get-it-done mentality. Probably helps that you have so many followers waiting for an update! Were in the process of doing pretty much the sam thing and its taking so much longer than expected because we just cant get things going.
Im off to paint a bathroom! Good luck :) I can already see the finished product in my head and it is going to be glorious, you’ll be giddy every time you walk into the kitchen.
elle C. says
Lovin’ it! We’re at a financial halt on the big projects in our house – but I was able to make-over our pantry for free from stuff we had left over. What a difference a pretty pantry makes in my desire to cook!
http://memoirsofawannabegypsy.com/2011/11/who-said-theres-no-such-thing-as-a-sexy-pantry/
YoungHouseLove says
That’s one sexy pantry!
xo,
s
elle C. says
Thanks! I think it must have been inspired from your old bathroom. I realized after it was all finished that I’d seen something super similar before, and realized it was from your old bathroom. Funny how ideas can linger in your head for so long without you realizing it.
YoungHouseLove says
Too funny!
xo,
s
Gabbi says
All the little things are starting to fall into place! These small details will add up to big impact in your kitchen.
I actually just posted about us purchasing our counters and our template guy coming! Woohoo!
http://retroranchrenovation.blogspot.com/2011/11/big-purchases.html
YoungHouseLove says
So exciting, right?!
xo,
s
sara @ it's good to be queen says
love it…it’s really starting to come together!
i also love your use of very technical terms, like “pull out dealie.”
that right there is why i read your blog. :)