Q: You’re putting time and energy into this “temporary” job for your bathroom (not to mention some money), so why not just go ahead and do the full gut job? I know you guys watch money really well, but isn’t this not the most cost-effective in the long-run? :) – Karen
A: This is a great question, and we thought it would be fun to elaborate on the subject. Because it’s safe to say that we love saving a buck, but we also like showing an old house some love and making it feel like home, so here’s our take. First of all, I think a lot of people think like Karen does – in fact we had that same exact instinct when we moved into our first house. It was so tempting to just to freeze a room until we had the budget to completely redo it.
But we slowly learned that sometimes a small “sweat investment” in the form of a few upgrades to tide you over for a year or two until you can save up the loot to fully redo a room (and really think it through) is completely worth the Phase 1 effort and the small amount of money you might sink into that interim upgrade. And sometimes doing a few small things to improve a space before diving into a bigger redo can actually save you money because they give you a chance to (inexpensively!) figure out what you like and what you don’t like as you go. It can definitely cost you more if you don’t discover those things until the middle of a big gut job when time is money and the stakes are a lot higher.
Let’s take our current bathroom makeover, where we’re aiming to spend around $100-200 on a Phase 1 makeover.
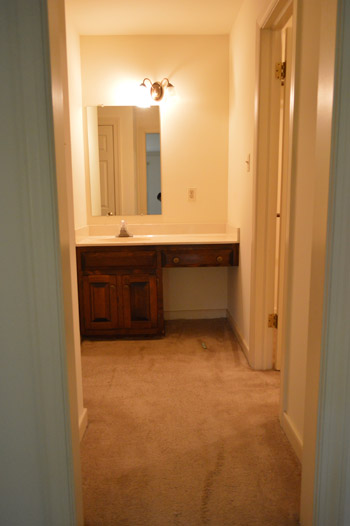
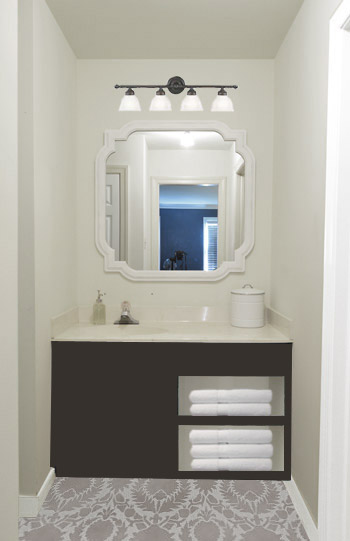
We got to the point where we just couldn’t live with the old carpet in there for another day, so to us, showing the room some interim love just made a lot more sense than living with things that made us groan for a few more years. Especially since inexpensive updates like a few cans of paint and a new mirror (which can always be used in another room down the line) can easily make it a lot more pleasant in there. Note: this is just a photoshopped rendering of our plans, but next week we hope to have the floors stenciled!
Why not just get to gutting things right away? Well, we learned all the way back in our first house (even before we started blogging) that doing a full renovation when you only live somewhere a few months means you might not have time to think everything through. For example, it took us over a year of living with our first kitchen to realize that if we closed off a door we’d gain 70% more counter space. Had we rushed into a renovation, we never would have come up with that plan – so we’d have new counters and cabinets – but the same cramped layout that we started with.
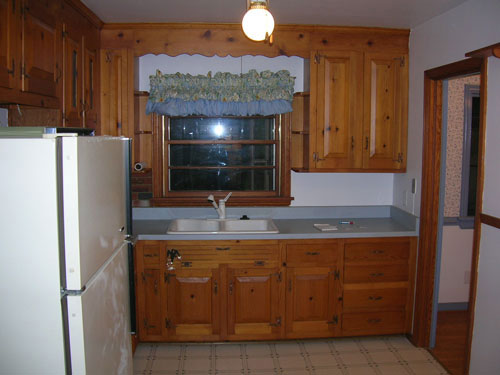
Soon after moving in we did a Phase 1 makeover while we saved up for a more major reno down the line. Just some paint on the cabinets and peel and stick tile on the floors (along with updating a few appliances that we reused when we fully redid the room). Let me just tell you, it was so worth enjoying a somewhat updated kitchen for that time (during which we got married in the backyard and had 75 of our friends and family over). Sure, we spent a weekend painting the cabinets, another weekend updating the floor, and dug into our savings for about $150 just for Phase 1 (that’s a guess at the total cost for the primer, paint, and the peel & stick tile) but the “return” on that money & time investment was that for over a year we got to walk into a room that felt fresher, cleaner, and more like us, instead of feeling stuck or frozen in the before shot for over a year.
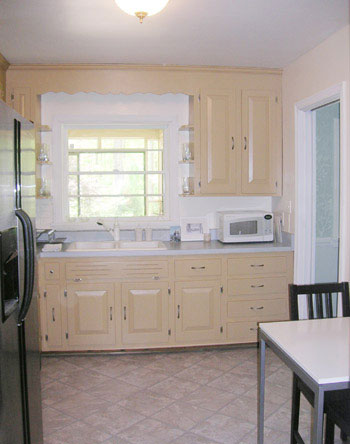
When we had finally saved up the money – and had fully thought it through – we got to renovate that kitchen and ended up loving the outcome. It was completely worth the small time/effort up front for a Phase 1 update while we saved our pennies, and the fact that we ended up with a completely redone space that we adored (with a lot more function than anything we could have slapped together right away after moving in) definitely confirmed that this phase-by-phase, over-time method just seems to work for us.
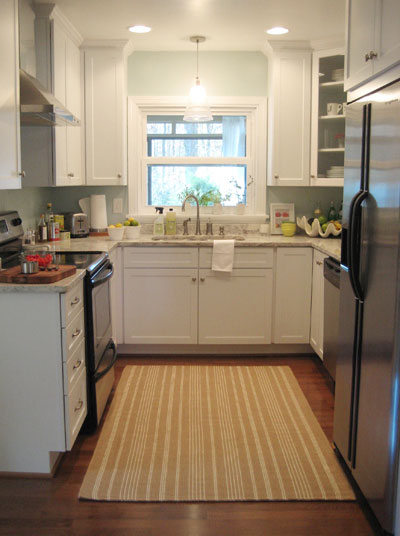
The same thing happened in our full bathroom at that first house of ours. We started with this carpeted and crocheted space…
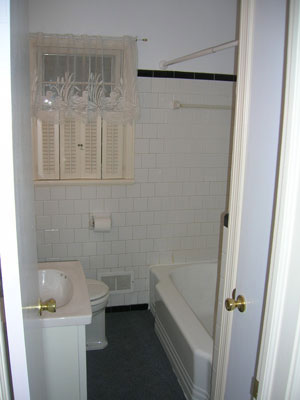
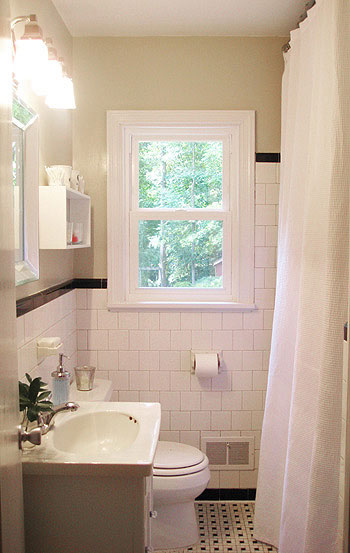
… and we did some simple updates like pulling up the carpeting, re-caulking things, adding some paint, and bringing in some sweet art, new lighting, and accessories to tide us over for a few years.
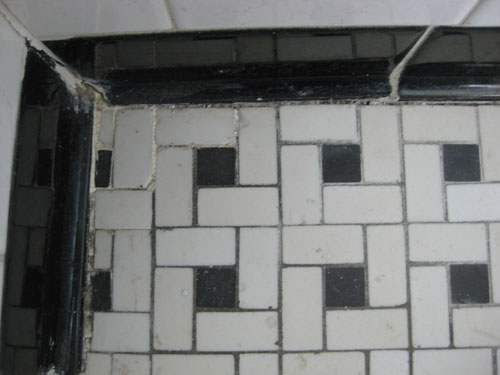
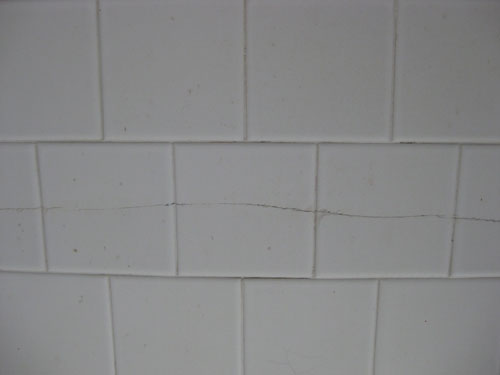
But up close both the floor and wall tile was cracked and damaged, so although we loved it, we sadly couldn’t salvage it.
So when we finally had the money and time to tackle a full gut-job a few years later, we were excited to dive in. And thanks to spending a lot of time planning every step, we only spent around $1800 on a full bathroom renovation, including rebuilding this room from the studs (new walls, new trim) along with a new marble tile floor, new fixtures, a tub/shower that we tiled to the ceiling, a new custom vanity, etc.
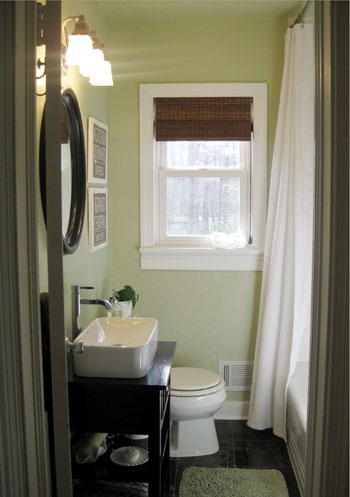
But it was certainly nice not to spend years living with this carpeted bathroom with a duck curtain, and do that Phase 1 update – even though we couldn’t fly out of the gate with a full renovation immediately.

So this method has been serving us well for a while now (holy cow, over seven years!) and we expect that nearly every room of our current house will have a multi-phase progression since we’re planning to be in this house for a nice long time. We don’t want to rush into anything without fully thinking it through and we’d like to save up for things that we truly will love for the long haul. But that doesn’t mean we have to live with old carpeting and wallpaper – and that we can’t toss up a little paint up, hang some art, update some light fixtures or faucets, and generally make the place feel fresher and more like us as we plan those larger scale undertakings and squirrel away some money.
In fact I think moving forward and experimenting within a certain space (not just in your head or while staring at a picture in a magazine) is a really helpful step when it comes to getting it right down the road with your major renovation. This was our first attempt at our first house’s bathroom. Scary, eh? But it turns out we had to paint the windowsill black and toss up a blue pashmina to learn that it was NOT what we liked (I thought it would be “so Domino magazine” and it was so… bad).
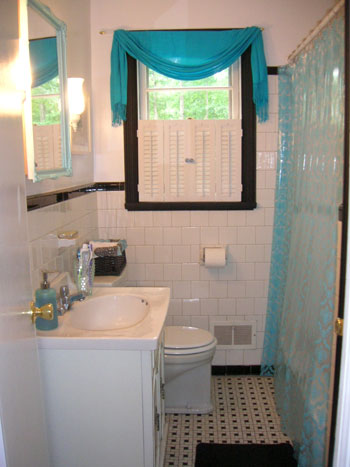
So we course corrected as we went, and ended up with a room that we could really enjoy in the interim, which then led to a brand new bathroom that we loved even more down the road. I guess one way to look at it would be that those small updates over time are like stairs. They build to a better result, and they bridge the gap between your before to your after. Without Phase 1 in here, we might never have arrived at that “love it” Phase 2 result, which might now have led us to a “love it even more!” Phase 3 outcome. So expecting to freeze at “before” and then skip right to “after” might not happen for everyone. But for us, that step-by-step approach over time just seems to get us from point A to point C without as much stress as attempting to skip right from what we hate to what we love in one fell swoop.
And sometimes it’s amazing to see how a few updates like paint, art, a window treatment, and a few accessories can bring an old room back from the brink without a major makeover down the line. Yes, in some cases a Phase 1 update can help you see that you don’t need to gut something at all (hello, money savings!) – and realizing that you can actually work with what you have can be the equivalent of finding a thousand dollar bill in your couch cushion. Take our $51 guest bathroom mini makeover, for example. We had pretty much planned to work with this tile from the start (it was in great shape and we thought the vintage yellow tone was charming) so we hoped this bathroom just needed a few cosmetic fixes… but others who came over couldn’t see how it would ever work without bringing in the sledgehammer.
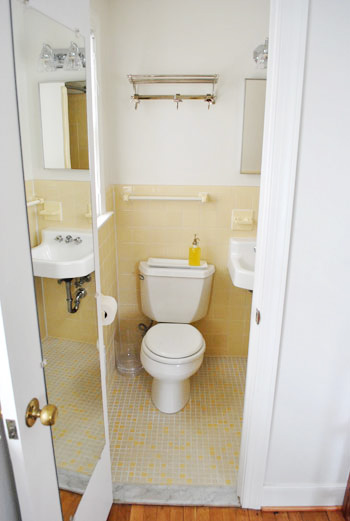
All we did was paint, add a window treatment, hang some art, and remove some bad elements (like the mirror that reflected every guest’s full body while they sat on the toilet) but when the decorating dust cleared, even my mom was saying “you’ve made a believer out of me.”
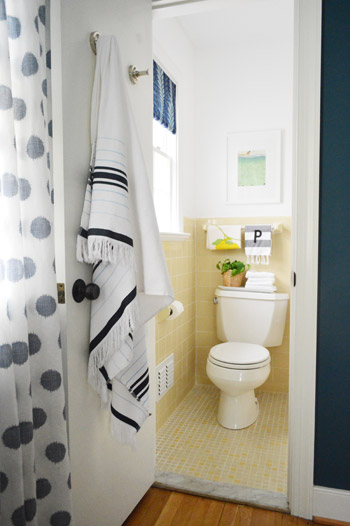
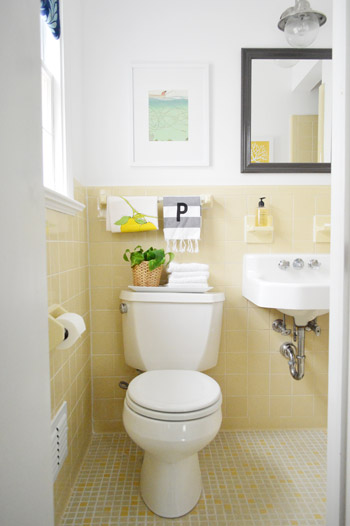
So you might think a room needs a full gut job, but experimenting with some affordable for-now fixes might just prove otherwise and save you a whole lot of money and effort down the line. And the only way to find that out sometimes is by diving into Phase 1. So if you wait and skip right to Gut Job, you might never know how charming a room can be with just a few wallet-saving fixes. Our hall bathroom was a slightly more involved update than our guest room (we framed out the mirror and added a built-in shelf), but the tile was still in great shape, so we got to work with almost everything that was there already. Note: pardon the yellow cast on this picture, it was move-in day and I was rushing around shooting in the wrong mode.
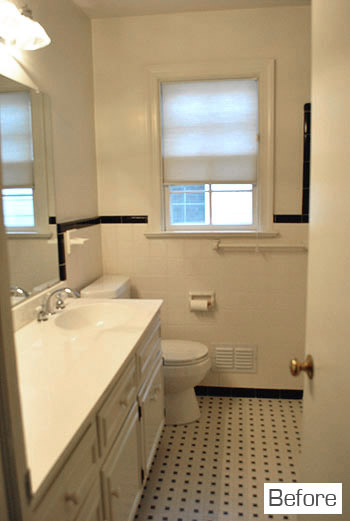
After spending just $168, we had a completely fresh looking room.
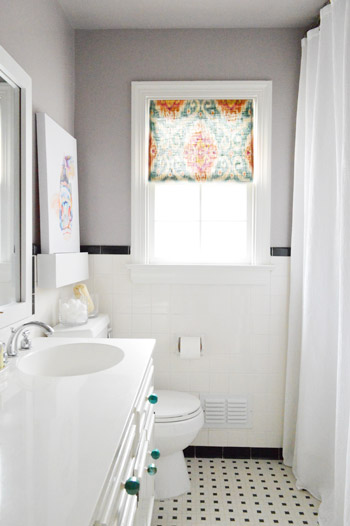
The cool thing about this method is that if Phase 1 does the trick, you’re done! And you’re probably thanking your lucky stars you didn’t go straight to full-reno mode. And if Phase 1 only serves to “tide you over” instead of majorly saving you from a bigger renovation, it’s still a win because you get to smile more as you save up and percolate on Phase 2 plans down the line. Plus going through the thought process of Phase 1 can better help you pinpoint what you still don’t love about a room (the layout, damaged tile, missing counter space, etc) and you get this bonus “learning experience” before jumping into any major construction down the road.
What about you guys. How do you balance your desire for a space that feels fresh and homey without blowing a bunch of cash you don’t quite have? I’m sure it’s different for everyone, so I’d love to hear what works for you. Do you do the ol’ freeze thing and just try not to think about all the things that bug you? Or do you sprinkle in some inexpensive updates along the way? Don’t get me wrong, we still have a bunch of rooms that we’ve been ignoring for months (can’t do ’em all at once!) but I like to think that those “we just can’t take this anymore” moments are what help us decide what needs a Phase 1 intervention most of all, and then we can dive right into that with some gusto.
Update – Wanna know where we got something in our house or what paint colors we used? Just click on this button:


Jenb says
I have used the “phase 1” approach in the past when we just did not have enough money to do what I really wanted to do. It does improve the room and make it more livable while we save. And I guess I have this fear of going stagnent- if I don’t keep moving it may never get done. So as long as forward movement is taking place- the house continues to get better.
Melissa says
I think choosing to do a “phase one or phase two” change depends mostly upon the “phase of life” you are in. For example, my boyfriend and I own our 1940s fixer upper house but recently finished school. I’m okay with spending $300 on updating the 1970″s kitchen cause we won’t be redoing the kitchen for possibly another 10 years… Who knows, maybe we will move and leave the kitchen as is! It’s worth it to me to spend time in a kitchen I can tolerate and feels clean!
Hilary says
What I want to know is how cooking his way through the Jaime Oliver book is going for John!! Have you found any keepers that way? Have the meals been yummy and healthy? And is it extra work trying new recipes on such a daily basis? And how do you keep up with the shopping list to make sure ypu have all the ingredients on hand? Im feeling bored with our current meal plans and I’d like to try new recipes but the ingredient lists are so intimidating if you dont want food.to go bad.
YoungHouseLove says
He made it about 70% through the book and then they all sort of tasted the same (there’s the same few types of vegetables he uses a lot so I think we got all Jamie’d out! Haha!). We did learn a few recipes that John regularly makes now and it felt really healthy! It was a fun challenge, although it was a lot of prep work (John went shopping specifically for a few recipes at a time, so it felt like a lot of trips to the store).
xo
s
Marissa coon says
We have the exact same black and white bathroom tile, in the same condition. I love the character it adds though!
Karlie says
I loved this post! One of my favorites, seriously. I love the idea of finding ways to enjoy the space you’re in, and not just “dealing with” bad paint or flooring or hardware until that long, distant day when your Pinterest dreams can become a reality. And I’m so glad you posted that photo of the horrible blue/black bathroom (complete with pashmina scarf). It’s reassuring to learn you guys aren’t totally perfect in all your design decisions- makes us far from perfect folks feel better about ourselves :) ha. Thanks again!
Jill says
My husband and I are nearly done with a whole-house reno of a 1957 rambler. The biggest mistake we made was at the very beginning, when we hired contractors to help with removing 2 walls… and “since the dumpster was here” and “since we are going to redo the kitchen anyway”… they completely gutted the kitchen before I had any plan for how to redo. We jumped into Phase 2 and had to make fast decisions on everything. One year later, my husband and I (DIY this time), changed the brand new floor, changed the brand new cabinet doors, refinished the brand new cabinet boxes, repainted the brand new walls, and changed the brand new light fixture. Thank goodness I still liked the countertop! Do whatever you need to avoid Phase 2 + Phase 2.1, like we did :)
Stef says
Anyone who doesn’t understand Phase 1 projects has not lived with carpet in the bathroom. Carpet in the bathroom is THE WORST and DISGUSTING and has to be ripped out asap, even if it’s not the final fix.
From one carpeted bathroom to another – I get you.
Shelly says
You CAN NOT imagine how much I needed this today. I’ve been stressed to the max about the ugly guest bath that I “accidentally” started demo on and how I must fully remodel it for it to be worthwhile. I’m going to need to think outside the box a little and draw some inspiration from your beautiful pictures. And chant repeatedly,”it CAN be beautiful….. it CAN be beautiful…. it CAN be beautiful….”
ajira says
This makes complete sense to me but I can also understand the perspective of those who would rather wait and do everything at once, as I’m related to someone like that. I don’t get it but I understand their reasoning. I would, however, MUCH rather live with something that makes it a little less groanworthy for a while than have to bear a space that makes me roll my eyes every time I see it!
sarah @makingitmyhome.blogspot.com says
LOVE this post! I’m trying to convince mmy boyfrined we should do a quick update on our ugly master bathroom-like remove wallpaper and paint (very simple things) but he wants to wait until we can renovate the whole things-somethjing that we don’t plan on doing for YEARS!
Anna, Sydney says
We’re house hunting currently and I’m determined this time to not allow it to take as long to freshen things up as it did the unit we’re currently in.
Unfortunately hardly any of the furniture we have is anything I love so that’ll take a while to exchange, but the one thing I’ll do in the first few weeks is get wooden floorboards (if not already existing) and paint all walls white. That way it’ll at least look clean and fresh while I ponder more creative and personal touches.
From what I can see on Pinterest is that with that fresh slate (wooden floorboards and white walls) any furniture (just about) can be acceptable for a while. Throw in a couple of plants, art and cushions.
Would you by any chance know if there is a “perfect” white (paint)?
Great post. And I love how you can even make a Phase 1 for around $150 in such an expensive area such as a bathroom. Any plans to attack your laundry any time soon? I find that such an odd space for a laundry so I’d be tickled to see what you do with it.
YoungHouseLove says
I love that assessment! Wood floors and white walls are a great foundation for sure! As for a perfect white, we love Decorators White in our first and second house and then switched to loving Simply White in this house (both by BM), just because the lighting was different so it read more pure (Decorators White looked yellow-ish here). As for the laundry area, I can’t wait to get to that! Maybe early next year? I’d love to at least do phase one before the baby comes since there’s so much laundry when there’s a newborn around!
xo
s
Anna, Sydney says
Thank you Sherry, much appreciated.
Karla@{TheClassyWoman} says
I love that you take things phase by phase. We do the same thing in our own home. Since we’re not willing to put renovations and updates on a credit card and we don’t have the cash saved up for it, we just continue to make bite-sized updates as we have the moolah.
I think a lot of readers like myself appreciate your blog for the very reason that you do things in phases and show us creative and inexpensive updates. A lot of the suggestions are great for those in apartments so it feels more like their own and as a home owner, it lets you experiment. While I love a good reno, who doesn’t? There is something really satisfying about making small changes and stepping back to admire your work. A new pair of window panels in a great print and drapery rod updated our eat-in kitchen and paint alone has changed the feel of several of our rooms. We too have the old 60’s bathrooms in yellow and we just work with them. We’ll likely move into a new home before we’d ever update them.
The great thing is you get content for your blog and book too by doing it this way, which I’m sure you’ve already thought of. :)
Christina V says
I love the idea of “Phase 1” projects. While I really enjoy walking into a space and brainstorming, I am definitely the type of person gets paralyzed by the idea of changing an entire room.
On a related note, how do you guys keep track of your ideas when you are brainstorming for each phase? I’ve seen you post lists (love me some lists) but I imagine you would have some type of visual aspect to your planning, too.
YoungHouseLove says
It really is one big to-do list that we update from time to time and post right on the blog. Otherwise it’s just leaving things around to visually remind ourselves (shelves on the kitchen table if we want to hang them up this week, etc) and we write some things in my planner or my notebook to jog our memories about things we want to accomplish.
xo
s
Kate in New Zealand says
Hey is there any possibility of adding a ‘like’ button to your comments section?
Often times I find myself reading comments and agreeing with the sentiment but don’t want to just write another of the same type of comment.
It could save time for you guys as well, fewer multiples of the same idea to manually approve and respond to?
Totally freaked me out with your star jumping on Facebook btw, so didn’t know that was a thing! :)
YoungHouseLove says
Haha, I didn’t know it was a thing either until today! And as for the like button, we’d love that for the comments! We’ll have to see if our comment plug-in offers that option or if we can hack it somehow to add it!
xo
s
BornInaZoo says
My kitchen/dining room has been in Phase 1 for about 3 years after I made my 2-bedroom house a 1-bedroom with a HUGE kitchen/dining. That’s what is important to me…. even though I’m not a cook but most of family is.
The house is 864 square feet. Kitchen/Dining area is 18×22. I live 3 blocks from the lake shore … 6 blocks from the park & marina. My family often gathers here for holidays or “whenever!”
The thing about my kitchen is that it also has to make me happy for a single person with 3 dogs. It took 3 years of Phase 1 and second-hand cabinets to know that THIS is what works!
Kelley says
So we’ve lived with our weird yellowy-beige (seriously, the worst color ever) kitchen for 18 months now and are finally ready to semi-inexpensively makeover our kitchen. Fortunately, it was updated not long before we moved in with nice, Kraft Maid-brand solid wood cabinets (that we can paint!) and you can tell the previous owners of our house were aiming for “neutral”.. and just went overboard.
The kitchen is pretty small, but plenty functional. If we saw ourselves *definitely* staying in our house for more than another 5 years, we’d consider a major renovation involving bumping out the back wall of the house (where the kitchen is) over our back patio. But until we know for sure what our future plans are, we’ll stick to a $1,000 budget makeover. We’re pretty sure that with that amount of money, we can get ourselves a kitchen we really love until we know for sure if a much costlier renovation is a necessity or not.
Chantelle says
LOVE your thinking with making rooms more “you” while saving up for the funds to do what you really want. Such a good reminder for me:)
Heather W says
Great Post! Did you know that the blog House Tweaked has a post today titled This is for you $herdog??? She installed some awesome Jonathan Adler sconces. Just thought you might want to know…..
YoungHouseLove says
Haha, yes! I love it! Just commented last night :)
xo
s
Vel says
Hey…this is a bit off topic, but I noticed in your 1st house kitchen photos that you had stained wood trim around the doorway that you painted white in the Phase 1 update. Was the whole house filled with stained wood trim? Did you slowly paint over all of it? My house has all oak trim that I’d love to paint, but it seems so overwhelming, and once I start, I’ll have to commit to the entire house.
YoungHouseLove says
Yes, most of the house was wood trim and we just slowly worked our way around painting it white. Just go one room at a time and pace yourself. It’ll be momentous when you’re finally done!
xo
s
Melissa @ HOUSEography says
I completely agree it’s worth investing a little time and money to limp your space along to a place where you can really tear it up. We learned so much about what we wanted from our house while fixing it up – and later we totally tore it up and doubled the size. The interim projects were worth it and the final was SOOOOO worth it. But, it may be hard for people to understand who struggle with making design decisions and everything seems like an internal battle. I just take the “it’s only paint” attitude and if it doesn’t work, then maybe I’m out $50 and I learned a lesson :)
Ada-Marie (spark!) says
I love this post. I wish I had written it! ;) I recently told a non-blogger, full-time designer that I was participating in the One Room Challenge and my budget was $850. She literally laughed in my face and said, that will get you two throw pillows. Not the way we DIY! :) Thanks for reading my mind today!
Christine says
I am so with you!
I had a fire in Dec ’05 and have been rebuilding by myself. Given my indigent status, no help and only self-taught skills, it’s been slow going. However, I’ve had time to change my mind 1000 times on just about everything. I even, last week, took down the kitchen cabinets I built because I found beaded inset cabinets at H4H. My SIL is extremely happy.
It’s a DIYer’s perrogative to change his/her mind! :) After all. We’re paying for it.
Donna says
So smart, loved this post.
Kay says
Aww, that little yellow bathroom from your last house is still such an inspiration to me (and my rental apartment :D)
Great post!
Julia | alivingspace says
As a renter with not much cash to spare, “phase 1” is all we really get to do! Now that we’re finally in an apartment where we’re allowed to paint the walls (except for the wood panelling, which is what I really want to paint. womp womp), we’re excited to do some little upgrades! I want to live in a space I like, so though I’m not going to spend much money on fixing up my rented apartment (where we only plan to live for a couple years tops), I feel like putting in the effort to make a few “phase 1” type changes makes our apartment feel like home for now.
Carol says
Totally agree with your process! When we bought our house the kitchen was COVERED in avocado green paneling (even the cabinets! Talk about your bad ’70s remodel.). We couldn’t afford a kitchen remodel at that point, so we painted everything white (discovered the joy of KILZ) and took out the dropped ceiling to discover a beautiful coved ceiling. Then a couple of years later I was bored one Saturday morning and started chipping at the white paint on the tile counters (painted when they installed the avocado paneling) and discovered the original beautiful ’30s tile, and Phase 2 started. That held us another 5 years, until we had money and a vision, and now we have a kitchen we just love.
Gwen says
Thanks for covering this topic! I like that you work in phases because it gives your blog more variety! It allows readers like me who don’t feel ready for a gut job to see ways we can still get to work and accomplish something instead of just dreaming.
This approach goes contrary to my nature. I tend to end up living 2 years with gross old curtains that I hate because I haven’t made a full plan for that whole room yet. But you guys have helped me to start making progress in small bits.
Jen says
I’m with you on this one. Sometimes, the small amount of money spent, really makes you feel better about a space in the meantime. There have been times where I thought I would like something a lot, and thought it was a great, “phase 1” and I ended up hating it. I still don’t always get mad about the money, because I have at least learned something about my style, and how I like things to function.
BTW, I havent commented to say congrats on the bun yet. We just had our second, a little boy, and our thrilled. (and tired)
Selma Harris says
I just wanted to say Thank you for this post. It really inspired me to do some minor updates to rooms in our home of almost 5 years. Finances are not where I feel comfortable in taking a huge plunge in renovations. I want to make some major updates to the majority of the house and your post has inspired me to take it in phases and save for the “big” changes” we want to make. We have a toddler and an infant, so they are our priorities but I DO WANT to change the look of different areas in our home. Again, Thank you!!! I really love to read your blog and hope to one day create my own detailing the changes made in our home and lives with young ones!!!
YoungHouseLove says
Aw, I’m so glad Selma!
xo
s
Erica says
I totally think the Phase approach works, at least most of the time! Sometimes, as you know, there are projects that have to be done right away, while others you can kind of wait out. I had to gut my kitchen pretty much immediately (it was beyond disgusting and I couldn’t cook in it at all!) and put up new cabinets, a new tile floor, new appliances, a kitchen island, etc… However, I have lived in my house for 4 years and haven’t hardly touched my bathroom. I did some “phase 1 updates” in there, such as painting the walls blue, adding some small shelves and art to the walls, a shower curtain, and updating the inside of the closet with shelves so that it was usable. They make the room feel so much better, and I can overlook the dirty, cracked tiles on the floor so much easier when the walls aren’t a dingy off white! I totally understand what it feels like to just make some small improvements while making decisions on the big stuff and saving up some money. Plus, you never know what project will have to be done first, and 4 years later, you’ll still have cracked tile in the bathroom! One of these days, I hope to tear it out and come up with something better! But with the small updates I did already, I think I can wait. :-)
Gracie says
Thank you sooooo much for this “phase 1” plan! In the need for immediate gratification I want to gut and beautify! But that is not cheap! I had to do the same thing with our master bath. It’s 90’s dated that has the weird triangle tub for “two” (why 3 corners for only two people?). Also, the frosty glass was put up backwards so the person on the outside of the shower can see you in the shower perfectly.
Sidebar: how do you know how to budget for a big Reno project? Once you decide that 8 gajillion dollars sounds reasonable, how do you save? Set a monthly savings amount or a project start date? I am a saver anyway but I was just curious how you guys did it.
YoungHouseLove says
We usually always have as much going into savings as we can spare each month and as it grows we’ll say “what do we want to tackle next” and once we have more of a definitive plan and know what we want we’ll start pricing things out to come up with a vague budget and then we keep saving until we hit that point (we usually try to go over by 10% since that seems to be nice wiggle room in case we break the budget a little).
xo
s
Heather Wingate says
I have always loved and supported you guys, but I think I love you even more for the simple fact that you have somehow managed to use the word “percolate” in several of your past posts. Lol!!!!!!
YoungHouseLove says
Haha, gotta get that in there.
xo
s
Krystal Lee says
I am completely on the ‘phase 1’ bandwagon! Living in a space that has been slightly tweaked and updated can be sooo much better than living with the original. I’ve also had a little bit of fun with our phase 1-ing – we painted our kitchen cupboards a deep turquoise colour with the idea that we are never going to have a kitchen that colour ever again, and why not have some fun with it! haha, it turned out very, shall we say ‘eclectic’ (!?) but it was nice to be bold and bright for a little while at least :)
KarenH. says
I’m definitely a fan of a phased approach to renovation. My bathroom is in Phase 1 (I had to caulk the mad heck out of the tiles closest to the tub surround because they were failing and that was the quickest/easiest way to prevent water damage behind the walls without pulling off all the tile to the studs.
My sewing room in the basement is also in a Phase 1 status. I really needed to get a sewing room set up, but creating a truly finished space in the basement has to wait for the bathroom reno AND a kitchen reno. In the mean time, the space already had heat and I just needed to put up some kind of ceiling to keep dirt and schmutz from the floors overhead from falling onto sewing tables and projects. Plus putting in a ceiling would make the space brighter and reflect more light all around the room. So it’s not a particularly *pretty* ceiling down there, but yellow masonry paint throughout and beadboard panels cut (mostly) to fit and it’s much better and completely functional.
Here’s a before:
http://i29.photobucket.com/albums/c290/jzygail/Basement%20Project/75ec2f2b-24b4-4e9a-acab-b068ebdcf8a0_zpse0dcdaeb.jpg
and here’s the after:
http://i29.photobucket.com/albums/c290/jzygail/Basement%20Project/9c9046ed-4f29-4d57-b672-5d9ef988fe33_zps35c744ee.jpg
And more of the process here,
http://jzygail.livejournal.com/14802.html
YoungHouseLove says
Love that!
xo
s
Ruth @ eightsandsevens says
I totally agree with this approach, if only we didn’t buy total wrecks. We have to go to full renovation mode but then we reset back to phase 1 and let the house evolve as we live in it. But we just can’t live with the house as is – http://eightsandsevens.wordpress.com/2013/10/17/bathroom-nightmares/
YoungHouseLove says
Oh yes, in that instance it totally makes sense!
xo
s
Ian says
Agree totally that it’s fine to send a little to see what you like. We rushed into a couple of spaces in our house that we now realise, (three years in) was a mistake as we now use the space differently.
It takes at least a year (full set of seasons!) to ‘bed’ into a new house I recon, and much longer than that for me. I blame growing up, till I was 27 (I was a late starter lol!) in the one home…..
Ian says
shoulda been sPend…..
Lori says
I’ve been living with a terrible bathroom for 10 years. I keep wanting to make a few updates like paint, but it has wallpaper, and I hear it’s hard to take down after it’s been painted. Of course, the whole thing might need to be gutted to the studs, so maybe I should just paint over the wallpaper. :-)
Lori says
I should note that I’ve been living with it as I updated all the other rooms in the house. It’s also the only bathroom so it will be a pain to be without it, hence the delay.
Brianne E. says
We’re doing something in the vein of an interim project this weekend. We’re living with my MIL for three more years while we finish up college and save for a house, so pouring much (any?) money into this house seems like a terrible idea. That said, she hates decorating, just cares if she has a roof over her head, and has given us free run to do what we want, and three years…is a while. Plus, wouldn’t it be nice to leave her with a better house than she started with, since she’s let us live with her all these years? (This is a purely self-serving rationalization. She doesn’t care. Will never care.) It’s an ocean of beige right now with weird hodge-podge semi-Grecian furniture and some odd cottage-painting things on the wall. Old, awful beige carpet, beige paint with roll marks on the white ceiling. So this weekend, we’re ripping up the carpet, prepping the concrete, staining it with concrete stain, sealing it, putting down peel and stick in the kitchen and entry way, and painting…even accent walls and new baseboards. We hauled out an eight foot long monstrosity of an entertainment center that blocked a cute indent in the wall and was longer than the wall it was in front of (ugh), hauled out the tube tv, got a cute, cheap entertainment center and a majorly discounted flat screen. Next up will be a cheap refacing of the awful orangey-wood kitchen cabinets and a Rustoleum countertop update. The whole endeavor’s coming out to around $1,000, but she’s going halfsies and it’s a whole house makeover, yo! So our contribution is about $13 a month for the next few years for a house we’re happy to come home to, before we can buy a house and dig into our own renovations. Sounds worth it to me.
Christine says
I love this post! We just bought our first house several months ago, and I originally thought we would move in and want to completely gut some of the things we hated (master bath being the main guy), but after we moved in, we realized we really needed to live in the house before making any big decisions like that. Luckily, the people that owned the house before us did some “Phase 1” updates themselves, and ended up having to abruptly move before getting to Phase 2, but their updates, along with small things we’ve added since moving in, have made the space completely liveable and homey until we figure out what we really want. It’s really tempting to just walk in and want to make everything fresh and new, but aside from it being costly, it’s important to understand what you really want, and see if there’s anything you can keep to retain the character. New is wonderful, but there is something so charming and respectful about restoring old, even if only for a short period of time. Thanks for the post, and I love the floor stencil idea, I can’t wait to see how it comes out!
Nicol says
Phase 1s are completely worth it! Like you, we found the perfect home for us — minus the original 1977 decor. Gold lame wallpapered 1/2 bath (with carpet)transformed for $100. The kitchen update was much pricier at $1400 (flooring, countertops, backsplash, paint); but WELL worth it until we can stash enough cash to do it right. Still need to tackle the floor-to-ceiling fire engine orange floral (curtain print to match) paper in the full bath. But we are waiting on a gut job there and hoping to keep that one <$100 too. Did I mention how awesome the house is?
Emily says
This post gave me hope! I end up doing a lot of Phase 1 type stuff because we live in a home that was built in 1899. Sometimes I get concerned that doing full-gut type of work is not the right use of $. Sometimes big decisions just need time! :o)
CrayolaJW says
As someone who rents Phase 1 is really interesting because there’s more ideas that are transferable as large-scale changes aren’t realistic/allowed.
Vicki Cornelius says
We bought vacation house in FL last year. Both bathrooms still have vintage builtins…Master had been repainted and probably had the sink faucets updated with new towel rods/hooks..but we had to repaint, add a light in the shower and vent fan. There were neither there originally.
Those two things (not that cheap and we had electricians do them) made such a BIG difference to the comfort of taking a shower.
Eventually we hope to redo both bathrooms and the master will entail moving the shower to where the Roman tub is now so will require more than cosmetic work.
The guest/front bath is pure vintage 70s–with original metallic foil wallpaper, green tub, toilet, and sink. Our daughter said we had to “respect the vintage” (which was in excellent shape), and we are doing that for the moment…
Laura says
I agree with the phase 1 approach, although it took awhile to get there, too. I didn’t even want to hang art because it felt like the final step, but after 3 years in our house and not having art in our bedroom, I mean really, it is only nail holes! I am slowly getting over the perfectionism and trying to enjoy it for now.
Lynn @ Our Useful Hands says
Well since I’ve been going to YHLU since many moons ago our mantra for our newly bought house (a year and a half now!) was “Just let it steep…” and then the true colors and the true meaning of each room would show itself to us. You guys taught us to slow our roll, stand back, and see what takes shape. I feel like having wide eyed wonderment over the house is great but that if we had a quick hand on everything that needed fixing right now we would definitely doing ourselves a disservice. And even if someone has the money to go in and completely gut a house down to the studs it doesn’t mean that later down the road they don’t have some regret and want to redo it again or are unhappy that they jumped the gun. I whole heartedly believe in and live by your method. Thanks for all your words of wisdom.
My best, Lynn
Andrea W says
We have definitely done the Phase 1 and later Phase 2. In fact, “Phase 1” is a funny catch phrase in our house when discussing what we are going to tackle and how. When we first moved in 6 years ago, we immediately took down all the wallpaper and painted. But, I am so glad we waited for major updates because I had planned and thought would work, would not have been beneficial in the long run. After living here a bit, we came up with some creative ideas and I am so much happier with the results. Thanks for posting!
Ashley says
I have been strangely and uncharacteristically obsessed with Dave Ramsey and his whole “You’re crazy if you live your whole life in debt” tirade. But your commitment to affordability and really thinking decisions through, in a society that is very Varuka Salt “I WANT IT NOW” is so completely refreshing and inspiring!!!
I think crazy old Dave Ramsey would be proud! Your projects excite me, but they also encourage me to make decisions with my brain and not just splurge and do things because I want to.
So thank you! You guys help me to think more responsibly and outside of the box.
Rebecca says
This is an excellent way to make your space enjoyable. I learned this growing up from my Mom who was super handy and alone the majority of the time with three kids. My dad was away working or sleeping for the night shift and yes, our outdated bathrooms always looked fresh, and the half-finished basement still looked cozy and functioned as a playroom, hockey equipment storage, laundry room, and my bedroom. (on top of the regular basement-y functions). I learned from her that 1) area rugs can go ANYWHERE, and soften even concrete, 2) Just putting a few robin’s egg blue things on your counter (or any other like things, she liked blue) suddenly makes it feel like spring in the dead of winter, 3) always have fresh fruit on the table + light shining in your windows. Only now that her kids are all moved out on their own is she starting to renovate properly. So while you “lived with it” for a year or two, she lived with it for closer to 10! She’s got a new lifetime roof, gorgeous new windows, hardwood… and guess what? No kids to mess these projects up!
Good job on your projects, and I have utter respect for you living with it, until you have the means and the time and the drive to complete it.
haverwench says
I think you have to take a middle ground on this. On one level, it makes no sense to invest a lot of time or money in a temporary fix for a room that you know is going to end up getting a major overhaul down the line. But on the other hand, it makes no sense either to live every day with something you absolutely hate because you can’t afford that major redo yet, when a few cosmetic fixes–requiring just a weekend of work and maybe $100 out of savings–could make the space tolerable.
I also agree with what Sherry says about how doing a mini-makeover can sometimes make a big enough difference that you realize that major remodel isn’t needed after all. But just as a warning, sometimes it can go the other way. For instance, my sister and her husband recently redid their kitchen, to the tune of…well, I don’t know the exact number, but let’s just say she was calling me up and asking, “How much do you think it’s absolutely necessary to keep in savings?” They started out planning to replace just the floor, which was peeling up and posing a physical danger (they tried just nailing it back down, but it didn’t stay put). But then, since they knew they wanted to rearrange the cabinets eventually, it made no sense to replace the whole floor if they knew they were just going to have to tear it out again when they did that remodel…and then it turned out that the best way to rearrange the cabinets would be to close off the door to the adjacent powder room and use that wall, so they had to move that door, which meant rearranging the powder room as well…and there was a window and a door that needed replacement, and it really made most sense to do these jobs while they were ripping the kitchen up anyway…and it was all just a case of one thing leading to another. Oh, and did I mention they have a baby and a toddler and two full-time jobs? Yeah, madness. But on the plus side, it’s now DONE and it doesn’t have to be done again later.
YoungHouseLove says
Haha, oh yes! There’s definitely a strategy to thinking “is this just something I should wait to tackle, or can I just not even stand it another day and $100 will make it better for the next few years?” I think it’s all about picking your DIY battles.
xo
s