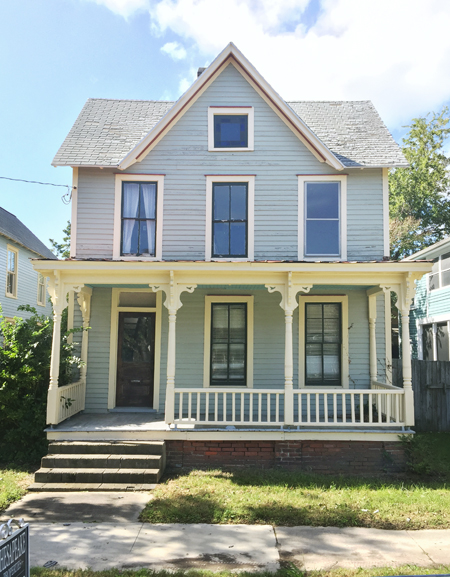
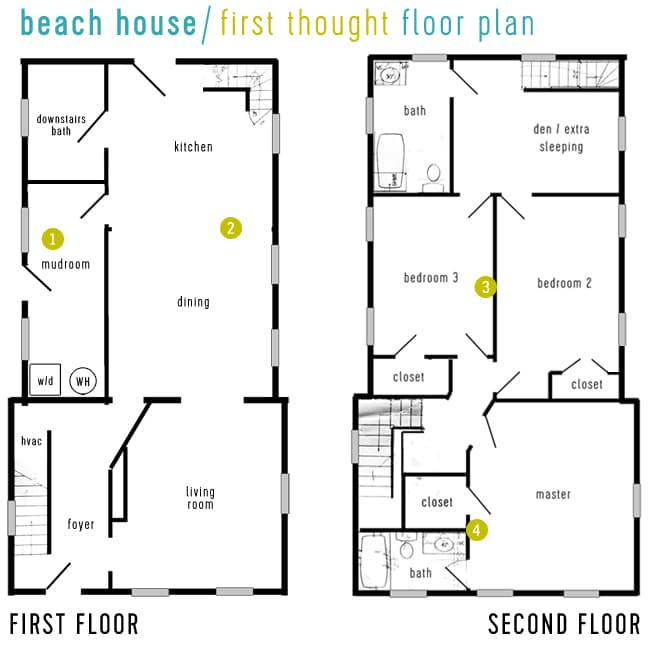
But don’t worry – we’re not moving into this one. As we shared on this week’s podcast, we recently purchased a beach house (!!!). But it’s not the fancy, high roller version that the term “beach house” tends to evoke. Nope, this one’s nearly 100 years old and can best be described as the roughest, most in-need-of-help house that we’ve ever purchased, and it’s already proving to be one of our most challenging projects. (If you’d rather hear us gush about it informally, you can just press play below – and you can click here to learn how to subscribe for free.) We’re in love with the potential and charm of this old home and its awesome
5 Kitchen Remodel Mistakes We Made (So You Don’t Have To!)
There are tons of decisions, measurements, plans (and change of plans!) that go into a kitchen remodel. So it’s usually unrealistic to assume that you’ll be able to navigate the entire thing without hitting a few speed bumps or having to course correct along the way (ten points for two driving related metaphors in one sentence!). And our journey was no exception – perhaps you already heard about our GIANT tile miscalculation on our podcast – so today we’re recapping five other mistakes that we made, noticed, and then fixed (some riiiight in the nick of time). You know, before they ate away at us for years on end as we stood in there giving them the stink eye. So if you’re
Kitchen Organizing Tips
The kitchen post train is pulling into the station once again, this time with a look behind the scenes doors & drawers to show you what we put where. Where’s the trash? Where are the knives? What about that blender for my morning smoothies? Where’s all the dang food? Well, all is about to be revealed. We even recorded a quick video tour since we loved this kitchen organization tour that Chris & Julia shared last year. But first, if you haven’t read the full kitchen reveal post from last week, I’d recommend hopping over there first. As happy as we are to have a better looking kitchen, a better functioning kitchen is really where its at. So even after deciding on a totally
Our Kitchen Remodel Progress: Gutting & Rebuilding
Hopefully, by now you heard that we redid our kitchen. We shared how we landed on a completely new layout last week. But moving things around on paper is one thing, so today we’re taking you through how things happened in real life – including how a certain wall came down to get that open view into our living room. This kitchen was our biggest renovation project to date, and it fell somewhere in the middle of the DIY spectrum. It wasn’t entirely hired out (like our first kitchen mostly was) and it wasn’t completely DIYed (like our second kitchen mostly was). For some tasks, we decided that minimizing time was more important, so hiring professionals was the best choice.
Kitchen Remodel Planning: A Totally New Layout
As many of you have already heard (either on our podcast or via the pic below that we posted on Instagram), we’ve renovated our kitchen in what turned out to be the biggest, most comprehensive renovation project that we’ve ever undertaken. It was long, it was fun, and – much like planning a wedding – we’re thrilled with the outcome, but very grateful to have it behind us. (Unlike a wedding, there was not nearly enough cake involved). Like our living room and dining room makeovers (which we detailed in our second book), we decided to bring this renovation fully to completion before sharing it. We learned from redoing those rooms that letting go of the whole blogging-in-real-time thing keeps
A DIY Cork Wall For Kid Art
When your kid reaches the stage where they beg you to hang up nearly every painting, drawing, and stickered creation that comes out of her school bag, you may find yourself needing some more display space. Here’s how we hooked up our daughter with a giant cork board wall with a nice framed-in look and lots of room for art galore. The “bell-etin board” that she used to be referring to was this smaller fabric-covered cork board that hung in our office for the last eight months or so (it was originally made by Sherry for our old closet) – but it had been getting pretty crowded. Sherry had the idea to turn things up a
Choosing A Backyard Storage Shed
There’s a joke I have with my running buddies that somehow our conversations always seem to turn to sheds. We’re either admiring the ones that we pass by on our neighborhood runs, commiserating about how we all wish we had more storage, or scheming about how to convince our wives that we need one before whatever home update they think should be next on the list. Obviously you can tell that we are really exciting people who live really exciting lives. Well, thanks to the recent arrival of this puppy, I’m officially the envy of my running crew (probably fleetingly, but still). And guess what? I didn’t even have to bust out any of my wife-convincing schemes. So why a
Blogging For Business
Since we’ve heard from so many of you who are enjoying the peek behind the scenes of the blogging business in this week’s podcast episode (so glad!) we thought we’d point you guys to another resource on that subject: our 3-part series on how to start a blog, grow your audience, and earn money. It’s something we actually wrote a few months ago, mostly to have a single spot to send anyone who asked about it (it’s one of the most frequent questions we get asked, even to this day). But since we never published it to everyone’s feeds as an actual blog post, it’s admittedly not the easiest thing to find, and we realized most of
How To Install Hardwood Flooring
At this point you’ve probably seen our finished and furnished bonus room above our garage, but let’s take a quick joyride back in the DeLorean to talk about how we installed the oak hardwood flooring in there. When we mentioned it oh-so-briefly in our first post about the space, we also promised to share more how-to details, since it was our first time doing a traditional nail-in installation (we previously did a floating hardwood installation). It wasn’t terribly difficult, but it did have its challenges. So for anyone else who might be taking on the task, here’s a rundown of what we did and how we did it. Choosing Our Floors First off, why hardwoods? Originally we had planned to do wall-to-wall
Holy Cats, We Have A Podcast!
Well, we’re upping the nerd factor around here and giving podcasting a go. The name? Young House Love Has A Podcast. I’ll give everyone a moment to let that process. I know it’s a tricky one. So much nuance. Listen on iTunes | Google Play | TuneIn Radio | Pocket Casts | Stitcher You can check out our latest episode (a new one pops up every Monday) and all of the previous episodes that we have released (we’ve officially released over 50!). If you’re already a podcast listener, just head over to iTunes, Google Play, TuneIn Radio, Pocket Casts, or Stitcher to subscribe and download all of our episodes. And if you’re new to podcasts, here’s how to listen in (it might sound complicated but it’s completely free and just takes a
Our Bonus Room Makeover
Hallelujah – the sun is back on the East Coast! So when it finally reappeared after weeks of rain, we broke out the camera and took some photos of our finally finished bonus room (well, “finished” is a loose term, since I don’t think we’re ever actually done tweaking things). We’re happy to report that we crammed in a decent amount of fun, function, and a big ol’ spot to sit down and never get back up again. The couch in here is truly a vortex that’s impossible to resist. But I digress… If you missed what got us to this point (and are wondering where the heck this room is), you can catch up on
How To Hide TV Wires In The Wall
While our recently-finished bonus room upstairs was never intended to be a dedicated “media room” or “theater room,” we always knew it’d make a great spot for special family movie nights. But in adding a television, we didn’t want to create Cordfest 2016, and have always wanted to try mounting a TV on the wall. So we thought we’d break down the 4 steps that we took to hang our TV, eliminate every visible cord, and hide the cable box. All-in-all, these four steps cost us less than $75 and none took more than an hour to execute (a couple only took a few minutes). They were: Mounting the TV to the wall (we used this $18 mounting hardware from Amazon) Installing an in-wall cord system
- « Previous Page
- 1
- …
- 25
- 26
- 27
- 28
- 29
- …
- 112
- Next Page »