Someone asked me the other day for details on how we organized the beach house kitchen, which is something we photographed and filmed this summer to share with you guys, and when I went to send them the link to this post, I realized that we never actually wrote it! So yes, these pictures sat on the camera for months as my tan faded, along with memories of warm days spent with my toes in the sand (current status: toes in my Ugg slippers because it’s freezing!).
Years ago you guys liked having a look inside of our Richmond kitchen cabinets, so John and I had some fun snapping lots of organizing photos for this post last August (and filming what is perhaps the WEIRDEST video of our lives – please watch it if you can because I can’t even really explain what came over me, but John finds it highly amusing). Last summer was the first time we really put this kitchen to the test for more than just a long weekend, so it was our chance to make sure it was efficient and organized in a way that actually works. When the pantry is fully stocked and the dishes & appliances are getting daily use – that’s a good time to evaluate that sort of thing. And then we realized we could make some changes to make it work better, and those tips might be helpful for you (& your kitchen), so we’re sharing them all right here.
If you want to snoop inside literally EVERY drawer in this kitchen, you can catch it all in the video below. In full disclosure, this took us like 3 attempts to film because it kept taking me 20+ minutes to get through and then the camera would shut off because it was so long. And we just got loopier and loopier as we went. So this is a little “$herdog, Unfiltered” cabinet tour (or Untethered, you decide). Also it could be a drinking game if you chug something every time I make John gasp/yell/interject.
Note: If the video player is not showing above, you can watch it here on YouTube.
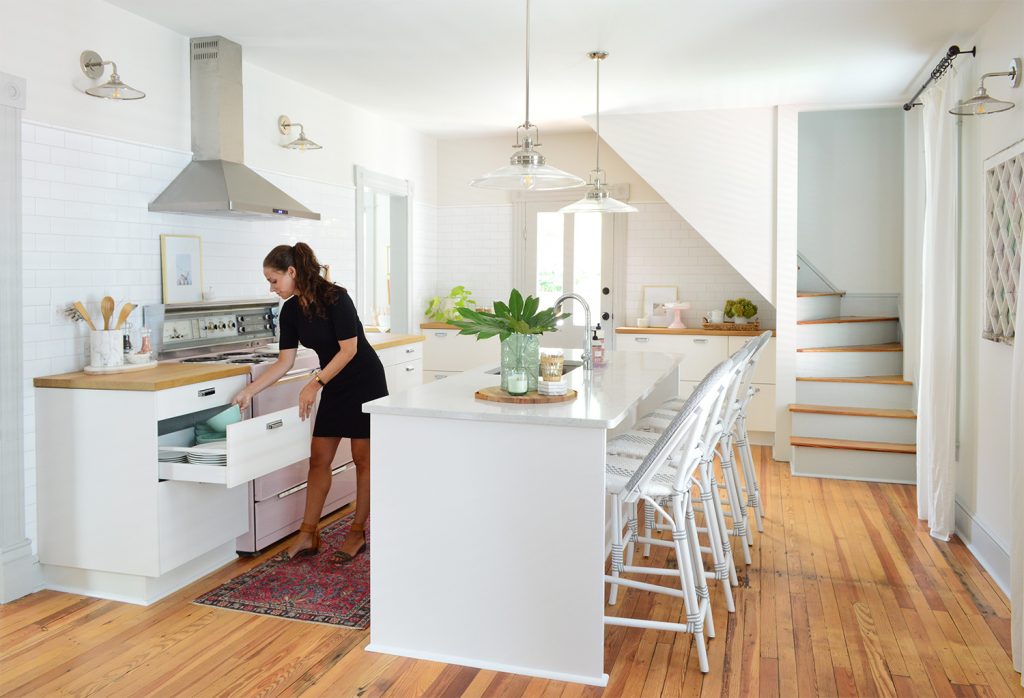
For those who can’t watch the video right now, let me give you some highlights – but really, go back & watch it because tips that you can see in motion along with “live” commentary = much more helpful generally than just one still shot with words trying to describe what’s going on. All of the cabinets in the main part of the kitchen have three drawers in them (apart from the sink cabinet) and our hardest-working one is to the left of the stove. In the top drawer we’ve got our flatware and knives, in the next drawer down are our plates and bowls, and the bottom/deepest drawer houses our pots & pans (more on that in a moment).
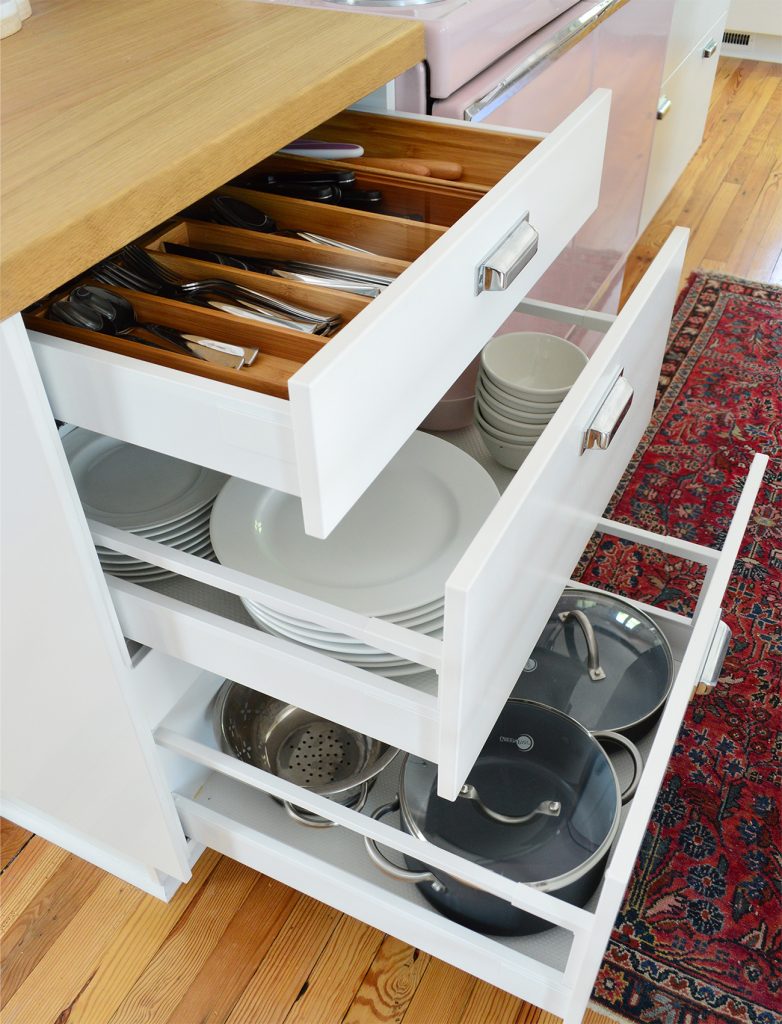
Storing our flatware and dishware here was a strategy based on dishwasher unloading. When the dishwasher is fully opened, one of us can plant our feet in one spot and unload virtually everything – no trekking back and forth across the room or bending up and down to load a wall cabinet. The fact that the dishwasher door cuts into the walking aisle? A non-issue! Because the ol’ feet are planted and we don’t have to walk anywhere.
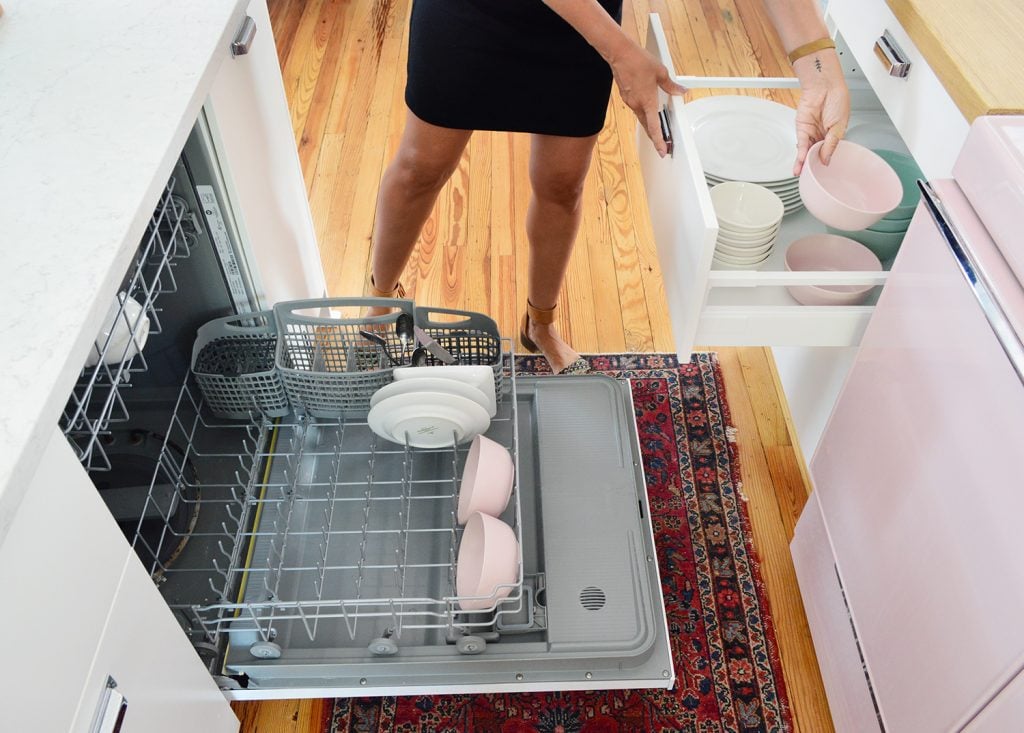
I know some people think the idea of stacking dishes or bowls in a drawer is weird, but we’ve been doing it for years and love it (we got the idea from John’s sister who has been doing it over a decade without a single issue). A nice deep soft close drawer full of dishes = perfection. We did it at our Richmond house, here at the beach house, and in both duplex kitchens. Sometimes it helps to put a grippy drawer liner in if you worry about things slipping around or into one another. We’ve never had a single broken dish or chipped bowl. Not a one.
The thing I wanted you to see about the pots & pans in that bottom drawer is that we took advantage of the “hidden” drawer that Ikea offers as part of their standard kitchen system. It’s a shallow 5″ drawer (just as deep as the flatware drawer above) that can tuck inside a larger drawer – sort of nesting inside on the top quadrant of the drawer space.
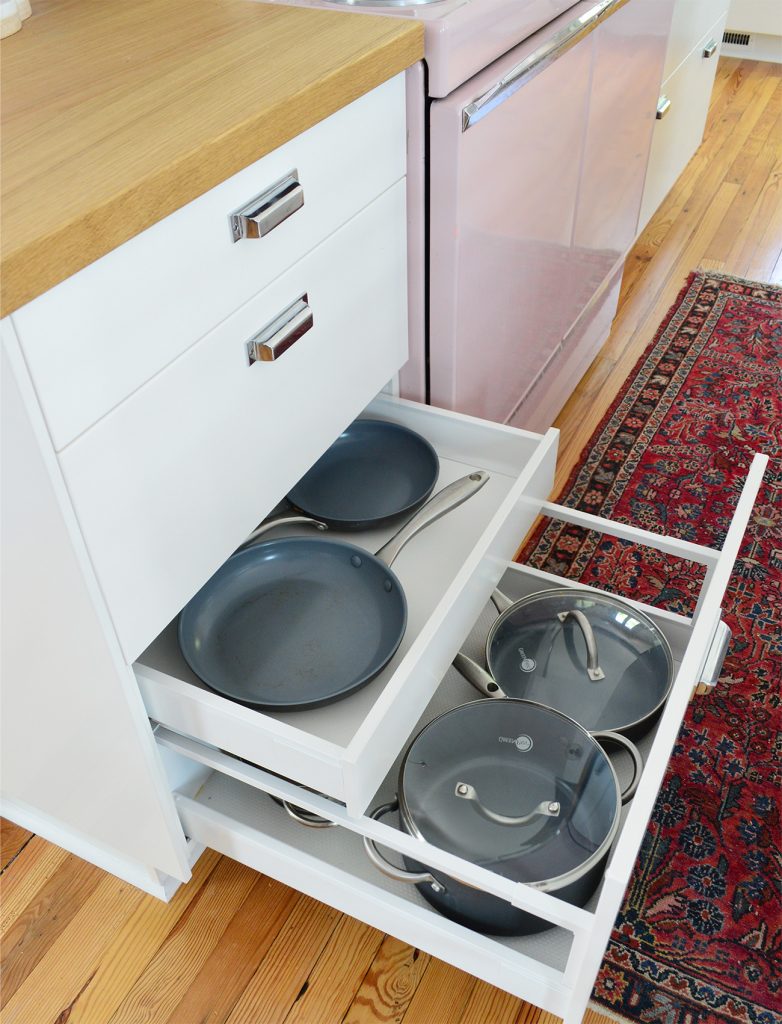
You can see two of them in action in the video so watch that for a much better idea of how they work. We use a second one to store cutting boards in the same way in another zone of the kitchen (also shown in the video). They’re such a great way to earn extra storage and save you from having to dig something out from under something else (imagine how much more annoying that bottom drawer full of pots would be with these two pans on top of them – you’d have to dig out so many things to get to the stuff on the bottom).
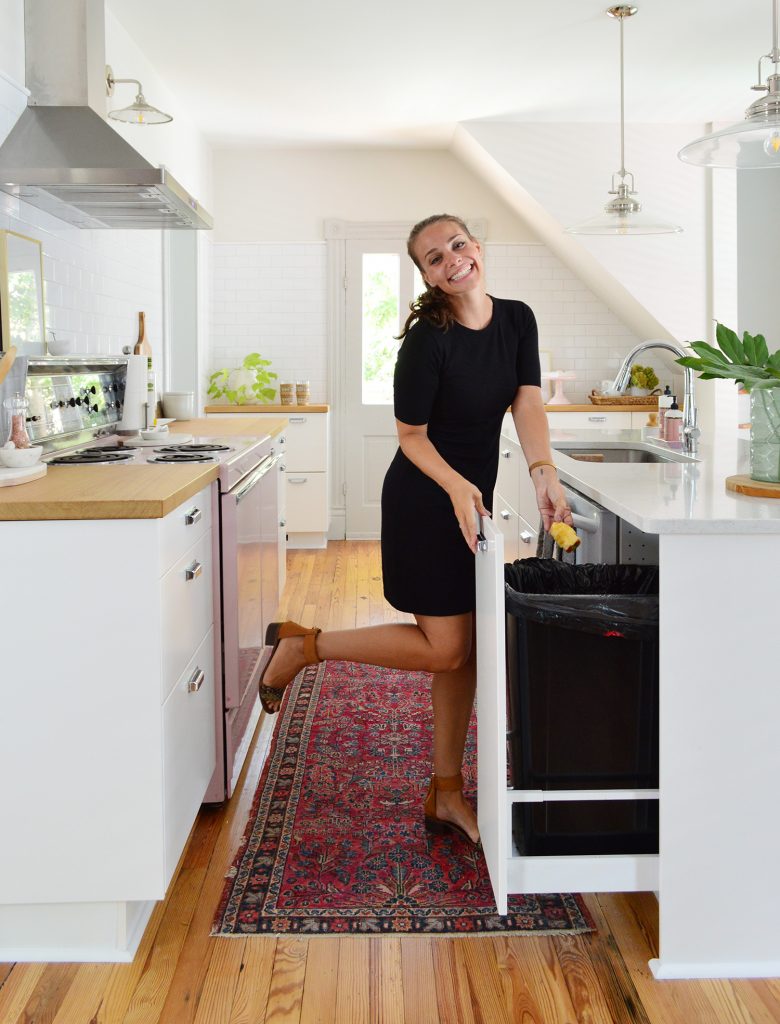
Across from that drawer, the island has another hard-working drawer: the pullout trash can. We didn’t have a spot for one of Ikea’s standard trash can pull-outs (they require a wider base cabinet and we only had 15 inches here) so we kind of hacked our own. It’s just a single tall drawer-front that conceals a tall trash can that we found at the local hardware store. We screwed the bottom of the can into the drawer so that it doesn’t wiggle or bang around, but it still can be easily unscrewed if it needs to be removed (I can clean it in place, so in the last 2.5 years we haven’t taken it out yet). Also, please hold while I add “trash can model” to my resume.
One of my favorite drawers is the little “drink station” we made next to the sink in the island. Not only does it store our cups and mugs (some were in the dishwasher when we shot this, but all eight mugs and glasses fit in here just fine when they’re stacked two high). And we also use the space to wrangle tea and other drink mixes like my beloved dehydrated lemon packets.
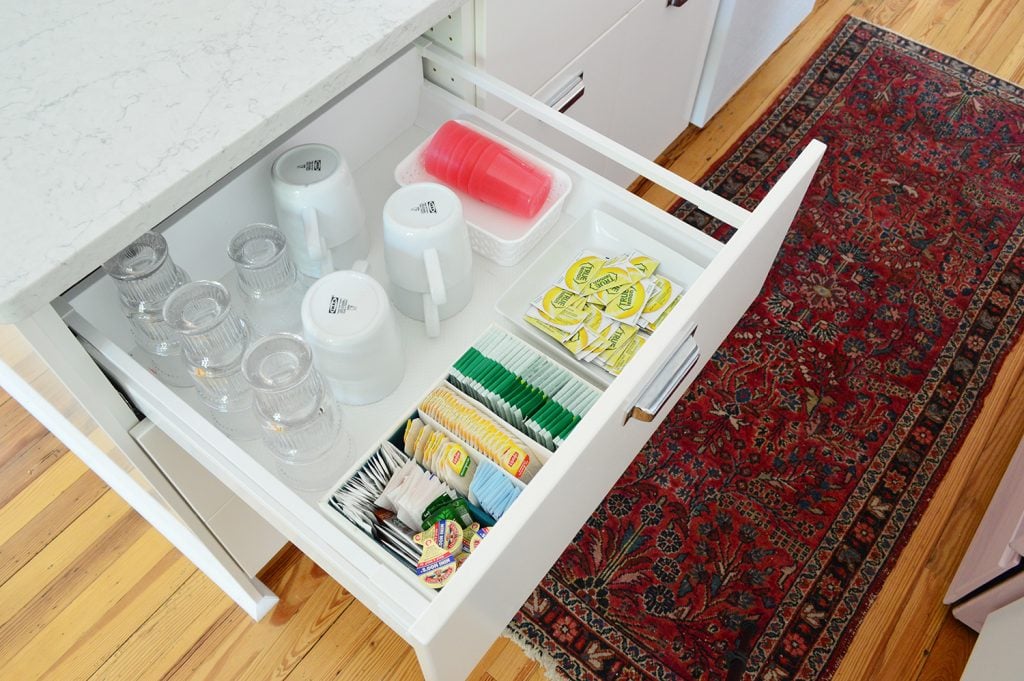
As a sidenote, I’m not crazy about making all of my bins and boxes and trays match when they’re hidden inside a drawer, so this is quite a mish-mash: a leftover plastic bin from Target, a rectangular dish that worked for containing my lemon packets, and an old velvet jewelry organizer for my tea stuff. The main tip here = containers can up your cabinet game for sure, but don’t run to the container store and spend your life savings – look around and try to use whatever leftover things you have on hand if you can.
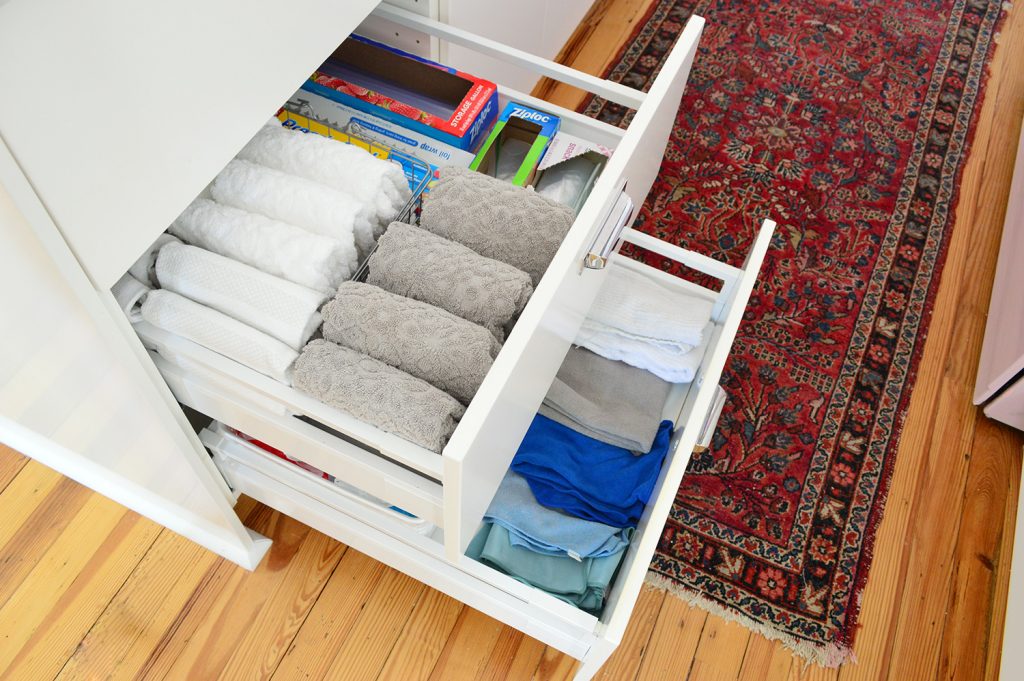
Underneath that drawer is what now appears to be an absurd amount of cloths and towels, but basically the ones on top are both kitchen and bath hand towels for the entire house, and down below are our microfiber cleaning cloths to go with the cleaning supplies that are housed under the sink. We’ve also got Ziploc baggies and to-be-reused plastic shopping bags in here too. Watch the video for a helpful (unhinged?) demonstration of that drawer’s organizational method.
Sidenote: Learn how easy it is to clean a stainless steel sink!
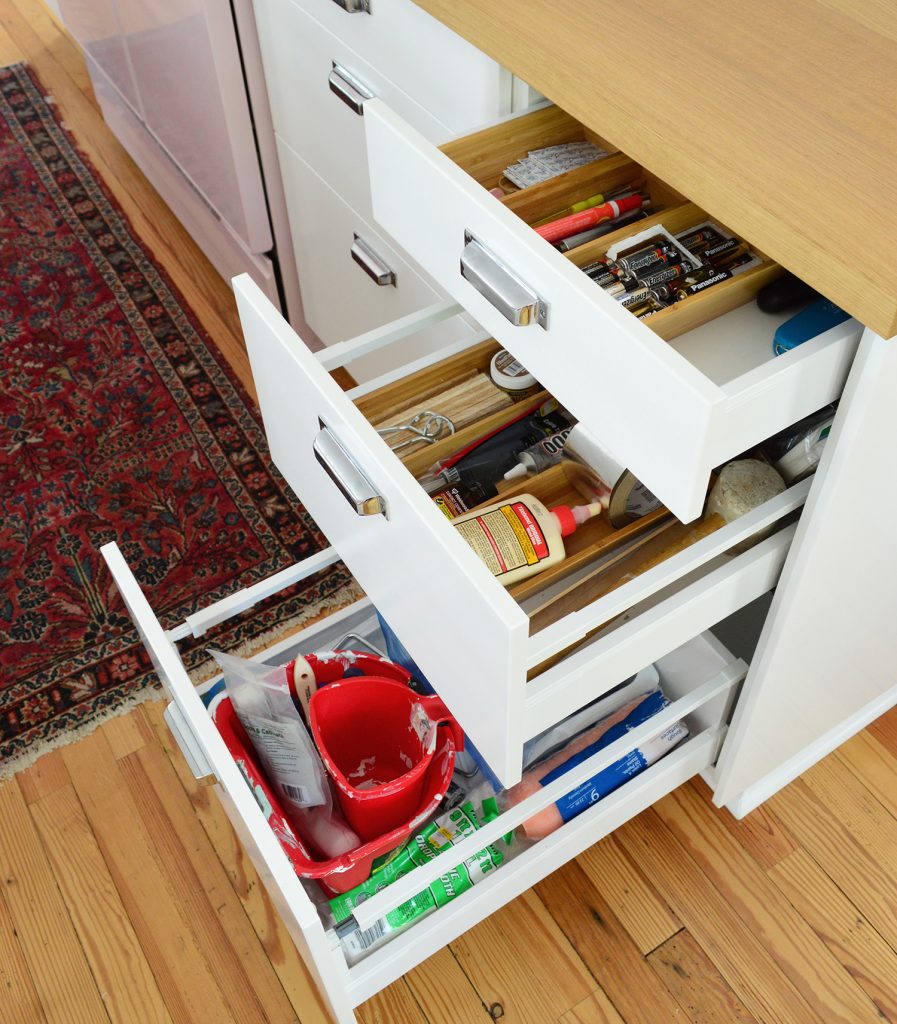
Across from that drawer, back on the stove side of things, is one of our weirder drawers – but we’ve consistently created this type of drawer storage in every kitchen we’ve ever owned: tool storage. Up top we’ve got our junk drawer with pens, batteries, bandaids, etc – but below that are various tools and DIY supplies that we’re frequently grabbing (or that belong at the beach house, but felt like they’d get misplaced out in the shed). The middle drawer is kind of miscellaneous stuff (shims, wood glue, weather stripping) while the bottom is all of our painting stuff: brushes, rollers, trays, etc.
That takes care of most of the “main” part of the kitchen (aka, the stove area and the island) although the video shows you each drawer & system (and my whole thought process on why we put something in a certain spot) so if you want more details or have a question definitely try to watch that for what I hope will be some extra clarity (also you can see me go crazy and make two drawers devolve into chaos in about 3 seconds on film just to make a point – BECAUSE I’M PASSIONATE ABOUT DRAWER ORGANIZATION).
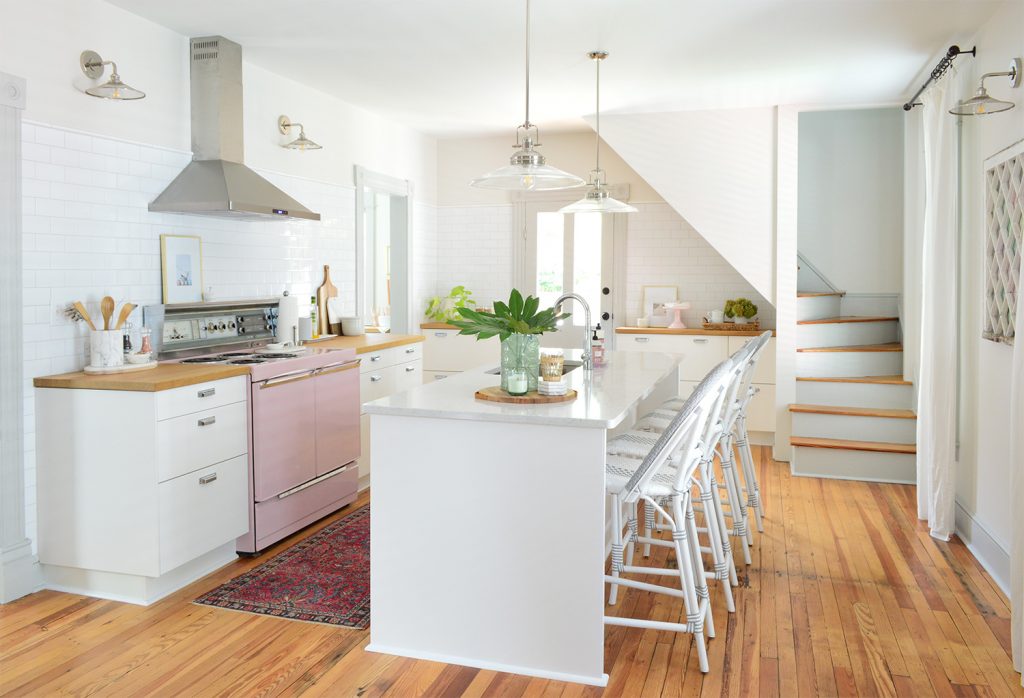
Ok, now onto the back wall of cabinetry by that back door that leads outside (it’s in the back of the photo above). This area was originally supposed to be our pantry because we purchased all of our cabinets before we decided that a little room off to the side of the kitchen would be a MUCH BETTER walk-in pantry than a breakfast nook (which was what we had originally planned). Each cabinet back here is 15″ deep instead of the standard 24″ and has just two 2 drawers (instead of 3) because we pictured things like big boxes of food or bags of chips going in here when the purpose in our heads had been: pantry.
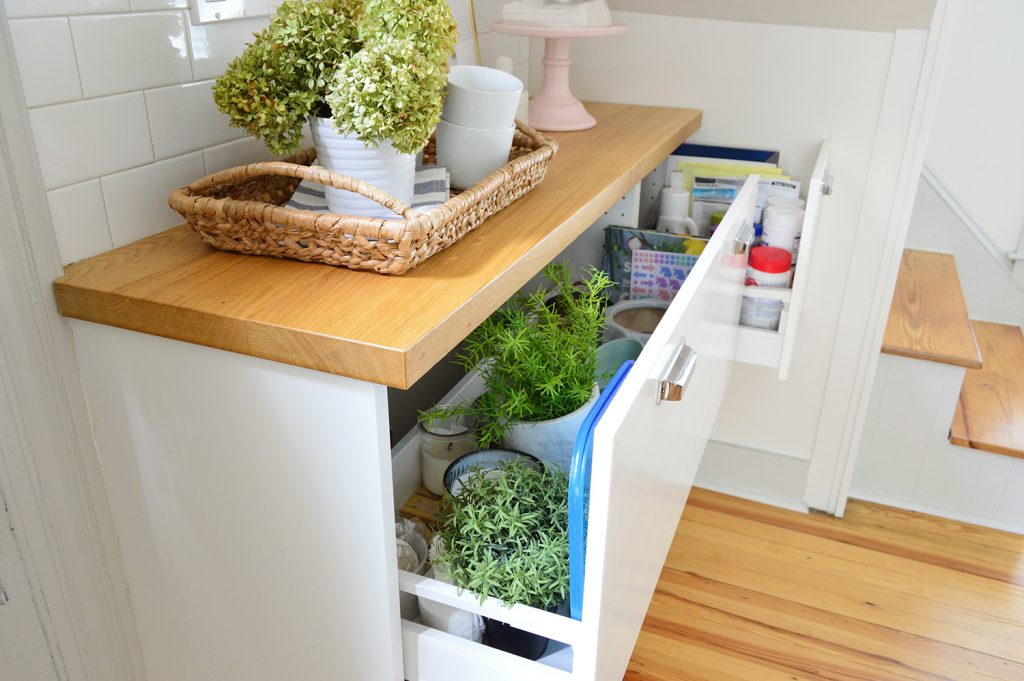
But instead, they’ve become really useful for other general storage for the house, and they’re nicely disguised as kitchen cabinetry which is a win-win. We’ve stashed everything from extra vases & candles to dog food and even hot tub supplies over here. Also please watch the video to see what I keep in the candle/vase drawer that is INCREDIBLY RANDOM but clearly brings me so much joy as I hold it and swish it through the air.
It’s kinda the same story for the cabinets on the other side of the back door, although I wanted to make sure everyone was reassured that these are functional drawers. I guess in some pictures and videos people have worried they don’t open because of the door molding to the left of them, but you can see from the photo below that it fully opens just fine. There’s a filler piece on the side so that doorway trim doesn’t catch it at all.
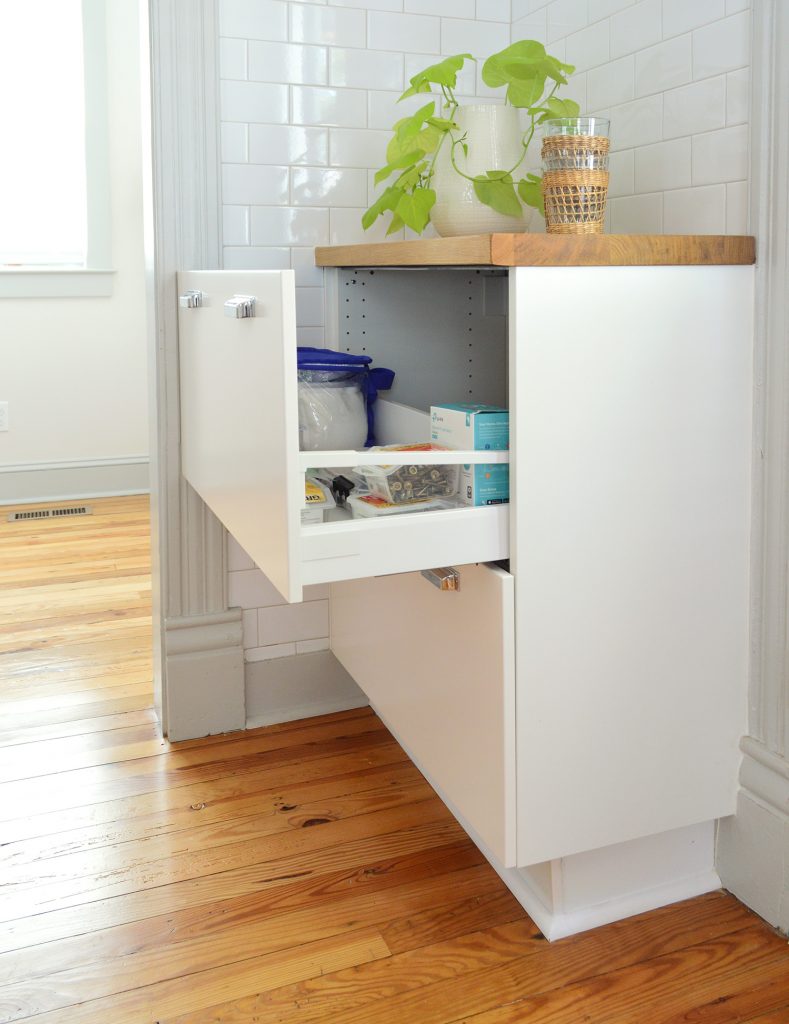
The bottom drawer does hit the thicker plinth block on the doorframe before it’s 100% pulled out, but it’s just a few inches shy of being all the wsy open when it bumps that. So it hasn’t made the drawer any less functional for us (as I demonstrate so gracefully in the video – OMG you guys, insert the monkey covering his eyes emoji here please).
We knew this corner cabinet would be tight, but Ikea only has a certain number of stock drawer sizes. This is a 30″ base and the next size down would’ve been a 24″ and we wanted to avoid having to do some 6″ filler piece or something instead, so the fact that I can still pull this out to the plinth block and easily reach all the way to the back of the drawer is a-ok with us! Remember these drawers are shallow so you’re seeing basically the entire bottom drawer exposed here even with it hitting that plinth block.
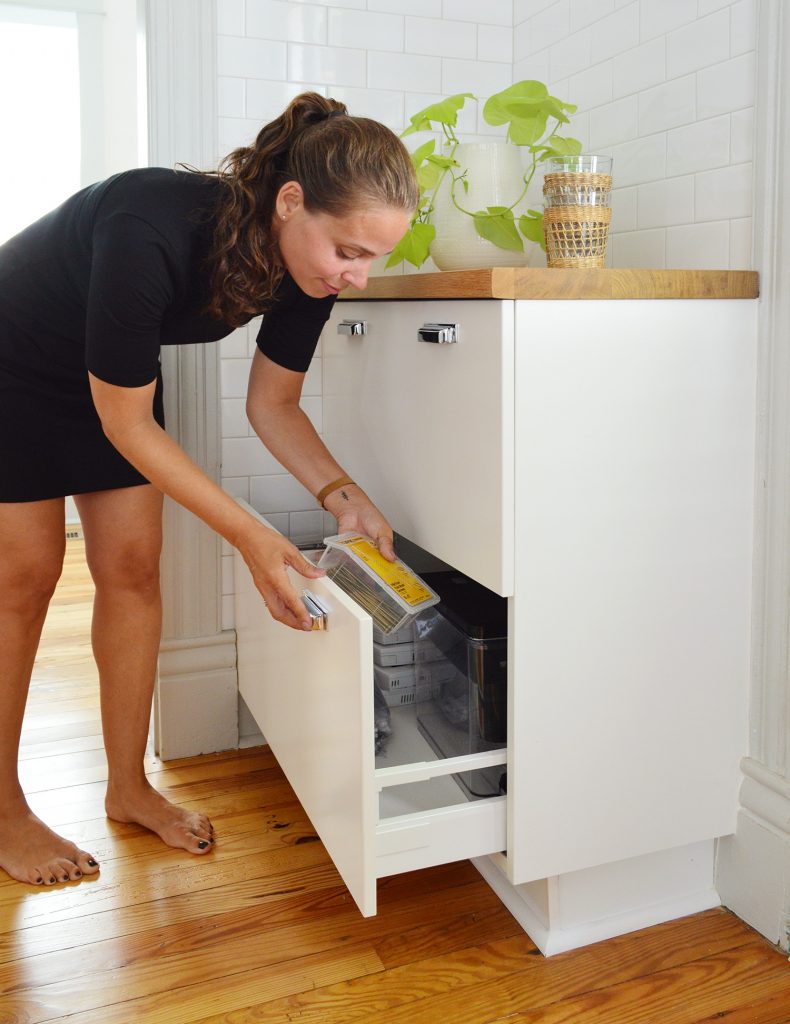
Now let’s move into the pantry, where we’ve continued the same shallow wall of cabinets along the back wall. As you might guess, the drawers primarily store food items and the counter acts as a nice prep space for simple stuff like sandwich-making, cereal pouring, or grocery unpacking.
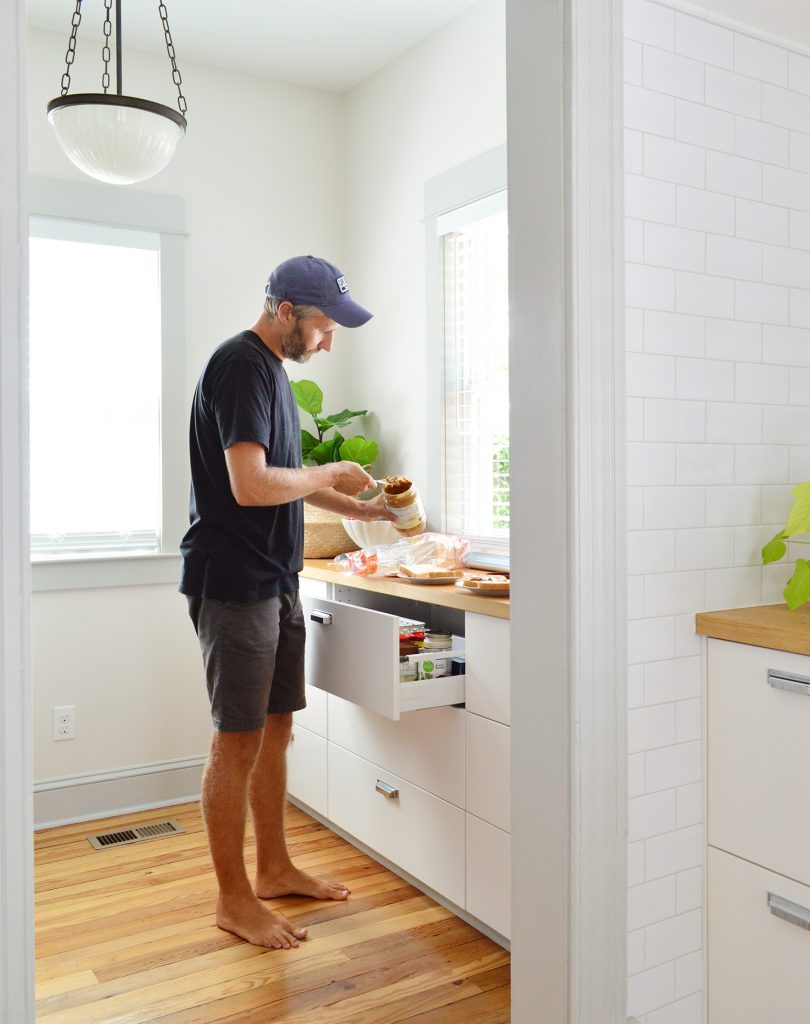
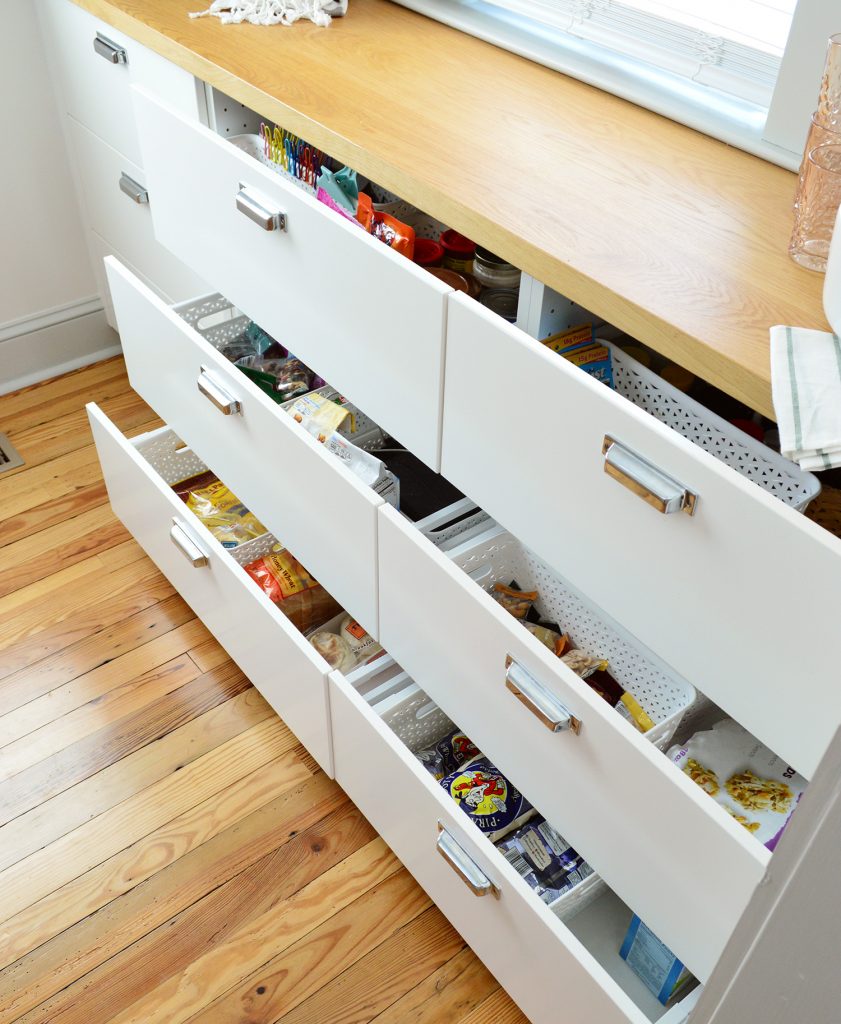
You can see these drawers a little more in the video, but once again it’s a hodge-podge of baskets and bins that we use to wrangle various snacks, breads, and other dry goods. We generally like to “unbox” foods like snack packs of peanuts or granola bars because it’s a lot faster to grab them out of an open bin. I also keep one drawer as my “Mommy Drawer” that has some of my vitamins, coconut oil, and other morning routine items all in one place. You know I’ve got an upper cabinet in our Richmond kitchen like this, so of course I had to make one at the beach too! I love grouping things that you use together in one spot for an autopilot morning routine that’s a lot easier to remember and follow.
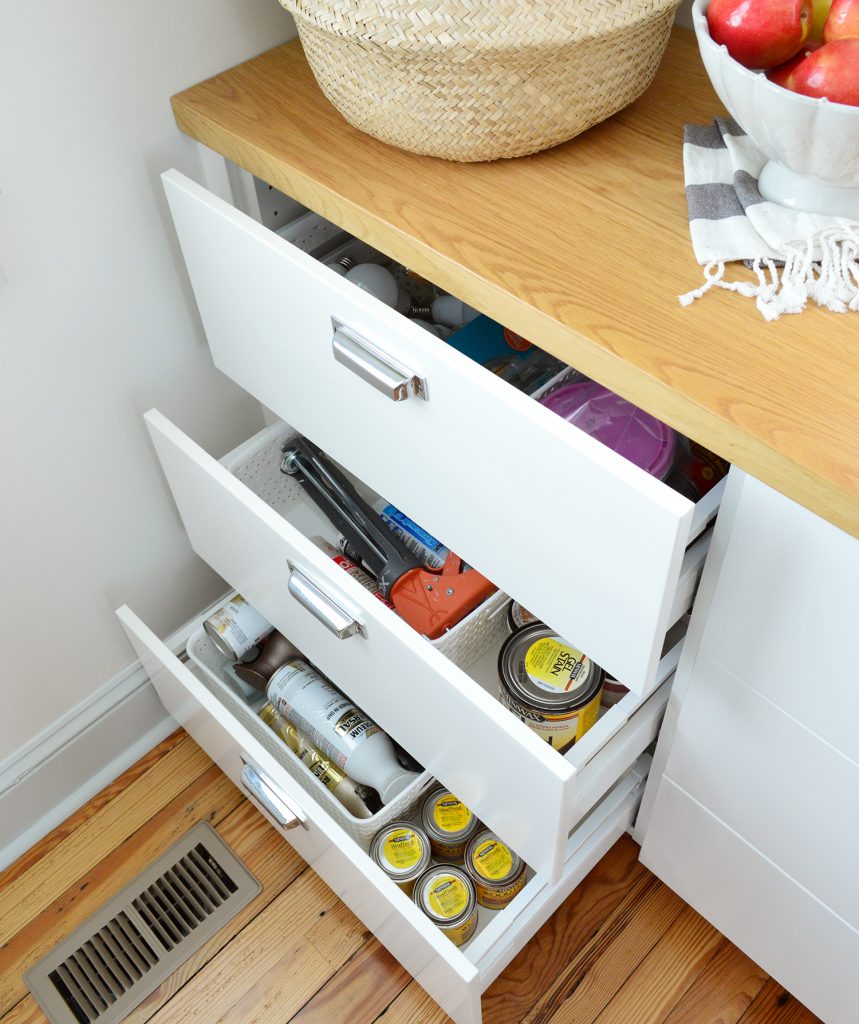
The stack of drawers on the far side of the pantry isn’t food, it’s actually more DIY stuff – like light bulbs, spackle, caulk, and small paint and stains. Again, it might seem like a weird spot to store this stuff but even at our most full points in the summer (with guests and tons of food), we didn’t have enough food overflow to need these three drawers.
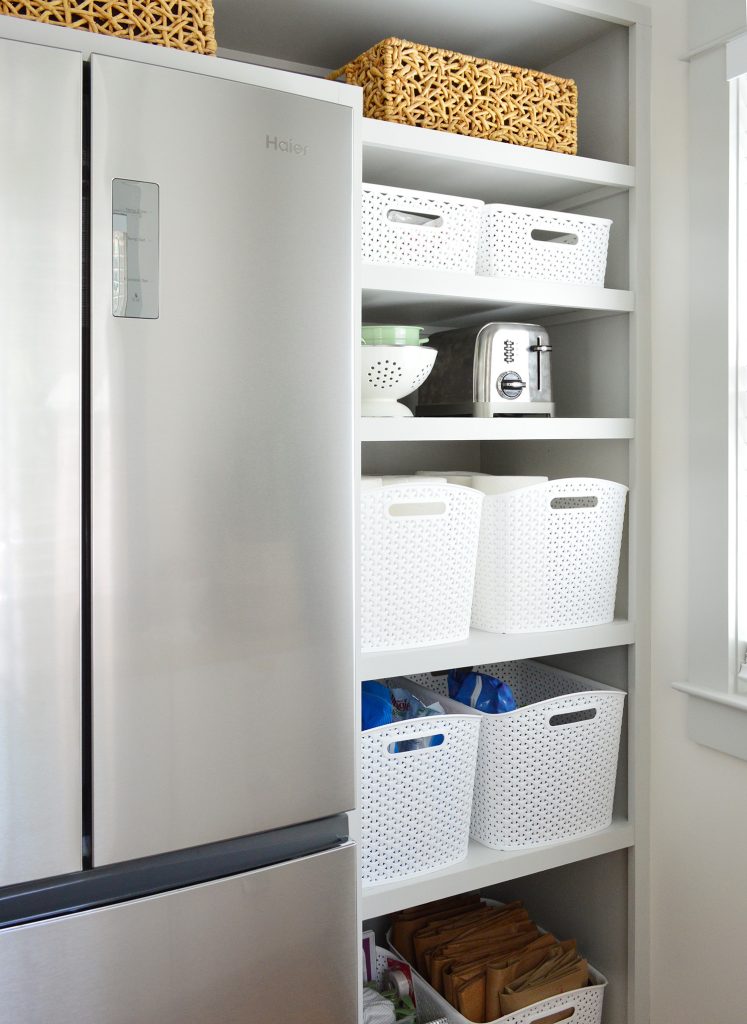
That’s partly because we still have the whole other side of the pantry to store more stuff. We DIYed these pantry shelves around our fridge and over the summer we bought a few more bins to make the most of each shelf – especially the lower ones that we were using every day.
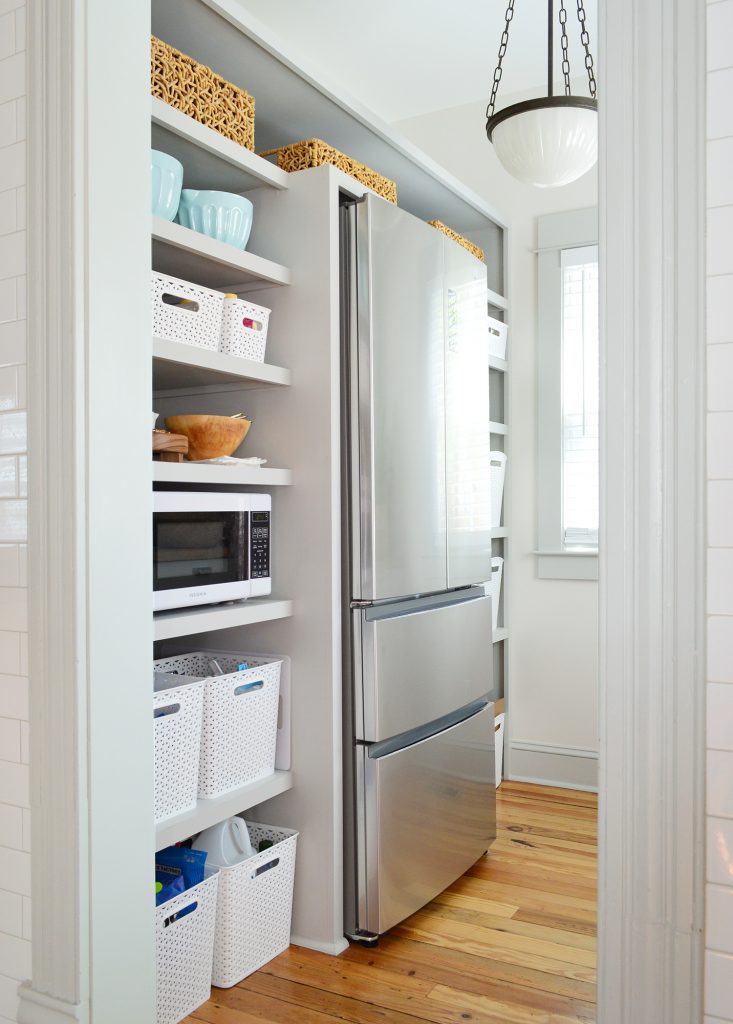
We originally only had one white bin per shelf, but we realized that if we turned them 90-degrees, we could take full advantage of the depth of the shelves – thereby squeezing in a second bin on each shelf. DOUBLE THE STORAGE WITH ONE SPIN MOVE! These bins mostly house larger items that won’t fit in the drawers, like paper towels, big chip bags, cereal boxes, our big bottle of white vinegar for cleaning, etc.
If you want to see more of what’s in the kitchen (and even in the fridge – I open it Cribs-style) that’s all in the video at the top of this post. But hopefully that gives you an idea of how we made this space work for us!
Now if you’ll excuse me I’m off to look at what other photos and videos are living in purgatory on our camera that I thought we already shared….
P.S. To see how we created this kitchen, this post covers a lot of the progress and this one is all about brainstorming the backsplash, and this podcast covers what we got wrong in the beach house kitchen (and how we fixed it). Oh and here’s how we saved $1350 on kitchen appliances!
*This post contains affiliate links, so we may earn a small commission when you make a purchase through links on our site at no additional cost to you.
