Long story short, instead of having 8 doors that lead outside in our bedroom (yes, we really had that many), we now have 6. And spoiler alert: it’s still plenty. We really just use the middle set along this huge wall of doors to go in and out, but the view and the light that the other doors let in is truly a room-making detail. We love the view in here and all of the brightness that shines in, and the addition of the fence for our own little private courtyard out there has been so nice. It not only makes the yard feel more private, it makes the bedroom feel more nestled and private too (more on that fence/courtyard area here).
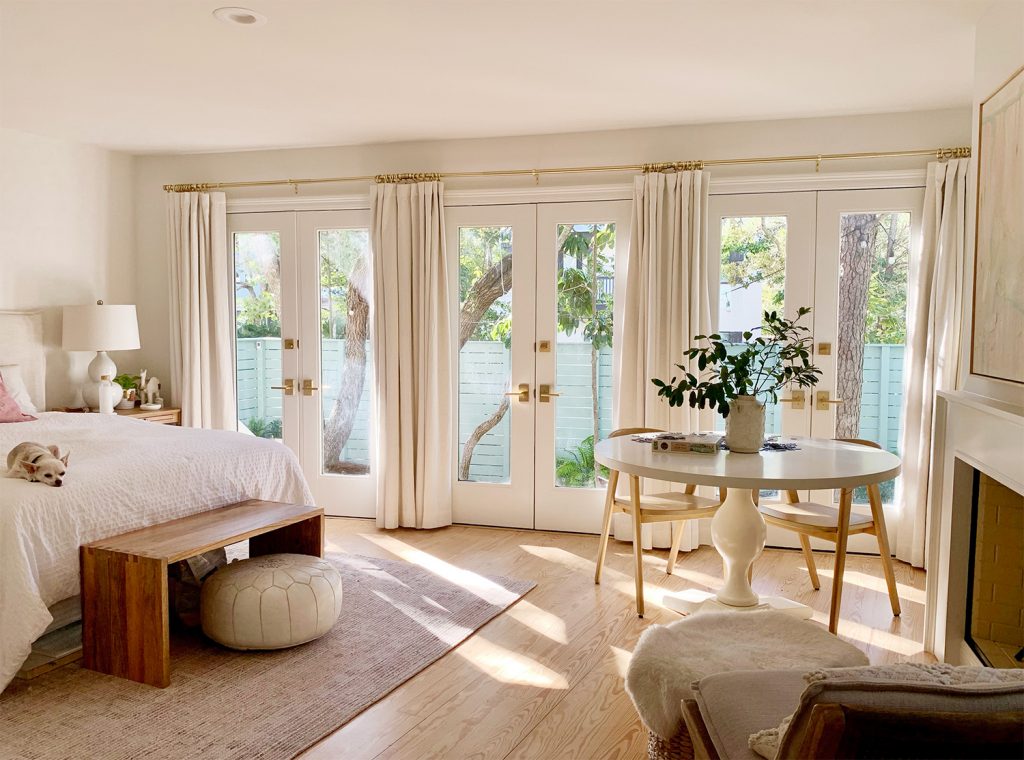
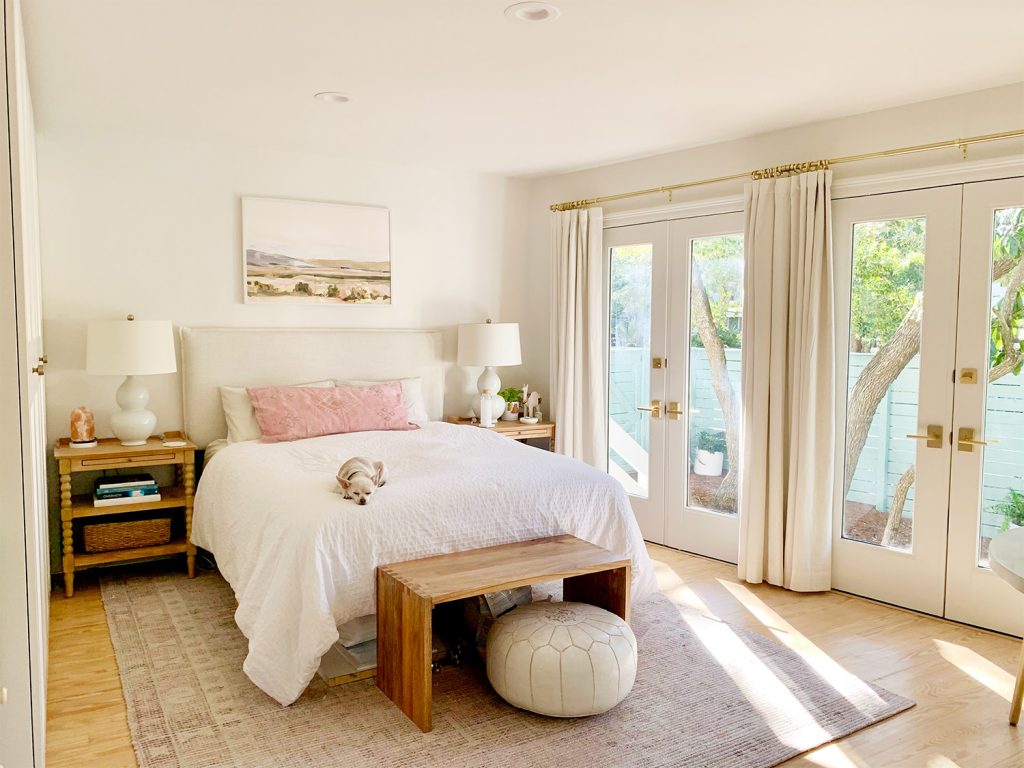
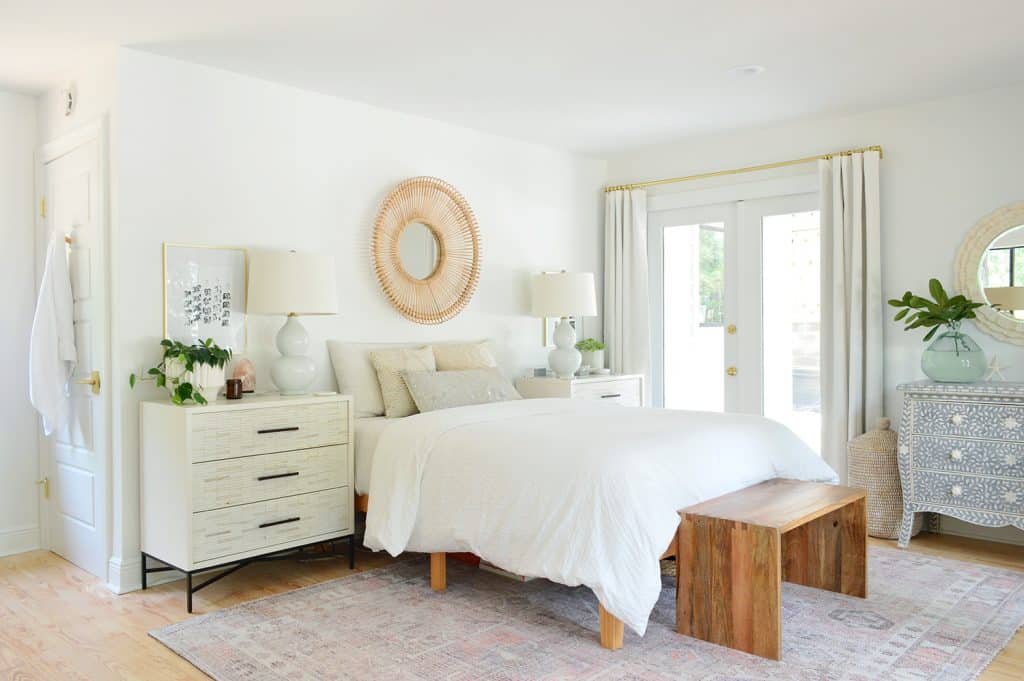
The exciting thing about eliminating that last set of double doors (which used to be where our left nightstand and the left half of our bed are in the photo below), is that we could then move our bed into that cozy nook that was created:
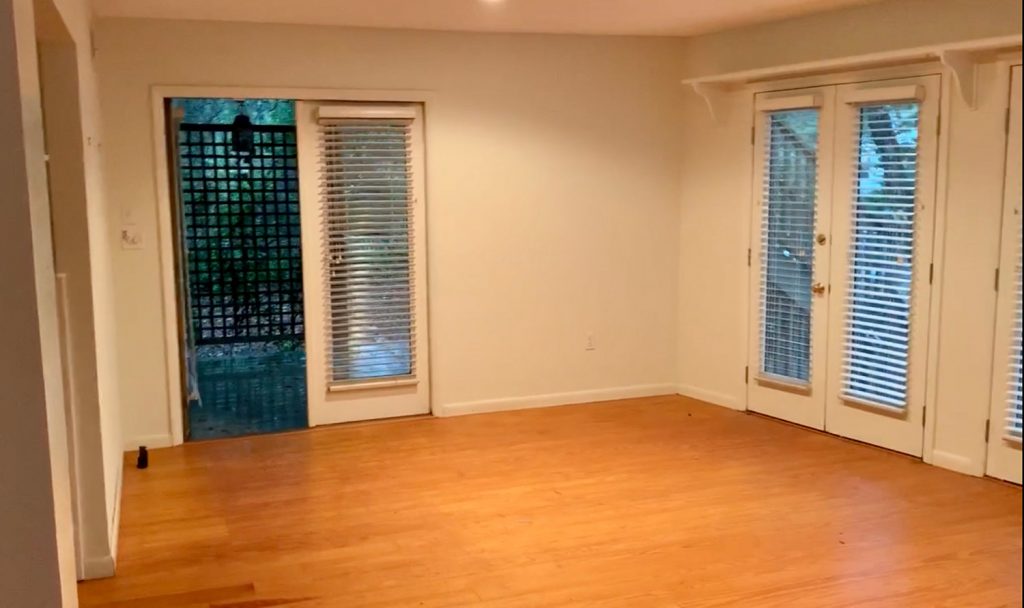
As a reminder, this is what the room looked like when we bought our house (and the two-door area that’s half open in the photo below is what we drywalled over and we now have our bed along that wall).
The picture below is how the room used to be arranged (before we drywalled over those two doors). The bed just rotated one wall to the right after we closed off those doors to rest right on the wall where they used to be:
So not only do we have a brand new bed wall with a view of the fireplace and our pretty wall of doors, that shift also allowed us to add a huge closet full of more storage than our house has ever known! Right along that wall where the bed used to be. VERY EXCITING TIMES. (I mean, look how excited Burger is). We still have to build in the top of the closets, but you get the idea ;)
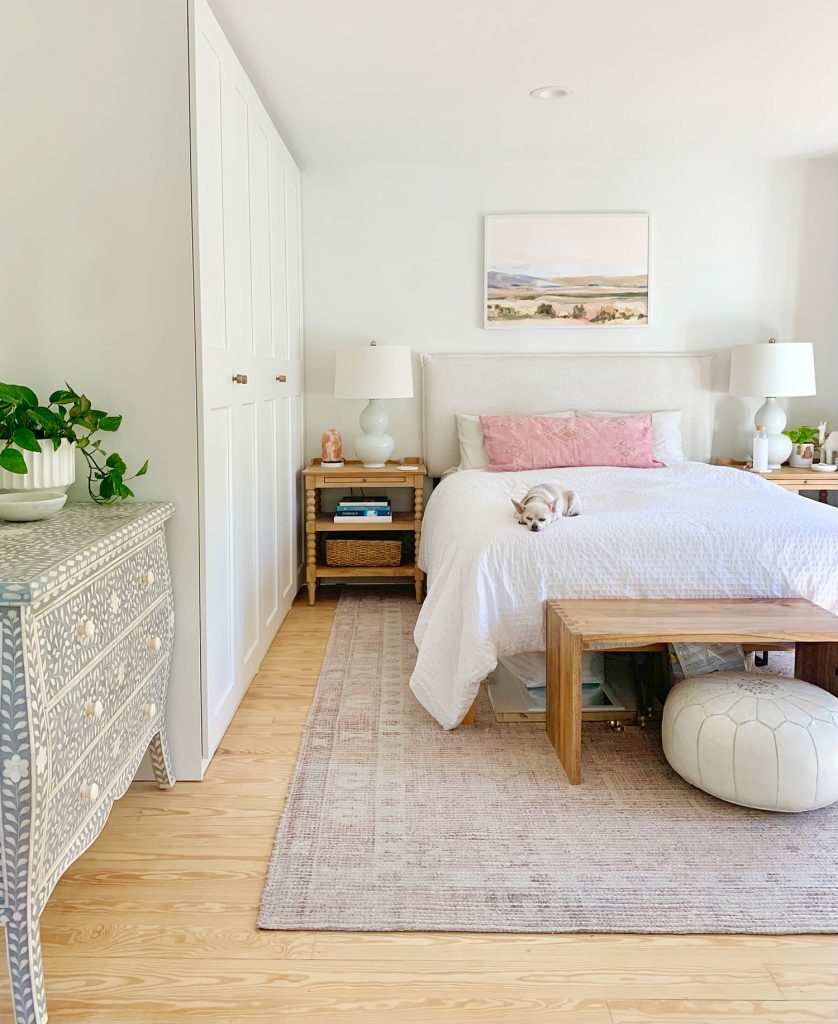
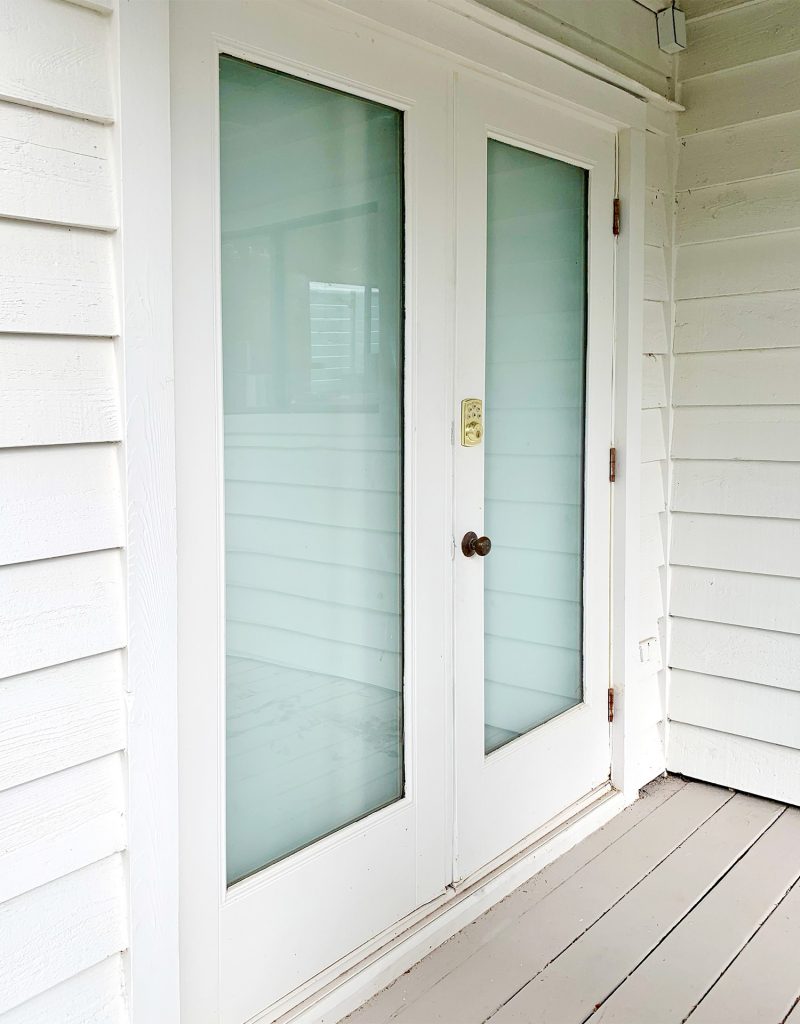
As for how we removed that extra set of doors – they’re actually still there on the exterior of our house, we just drywalled in front of them on the inside (the doors were inset in our bedroom wall, so we could fully hide them with drywall that was flush to the existing wall – even while keeping the doorknob on! It was truly amazing).
Here’s a shot of them from the outside (we never upgraded the hinges or knob because we originally planned to turn these into a single interior door that led to an ensuite bathroom, but more on that in a second). We just spray-frosted the inside of the glass doors (using this), so it’s a nice clean look from the exterior POV for now. And after the world opens back up and we feel more comfortable having pros in our house, we’ll have them fully removed from the outside and get the siding patched. John even has big dreams of adding two small windows over each night table on this side of the room (yes, for even more light) like this, so that could happen at the same time! We also have a few other exterior doors in this house that we’re considering swapping out for a window (two are mentioned here in this post), so we could get that done at the same time too.
Back to the inside of the bedroom – you can see that we now have some Pax wardrobes from Ikea along what used to be the bed wall. They’re our favorite closet solutions – we used them in our first house (back in 2008!), our last house, and dang it feels good to have them again. They’re highly customizable, extremely functional, affordable, easy to build-in for a custom look, and we love all the door options they offer. We even added some brass hardware to tie into our brass doorknobs & curtain rods.
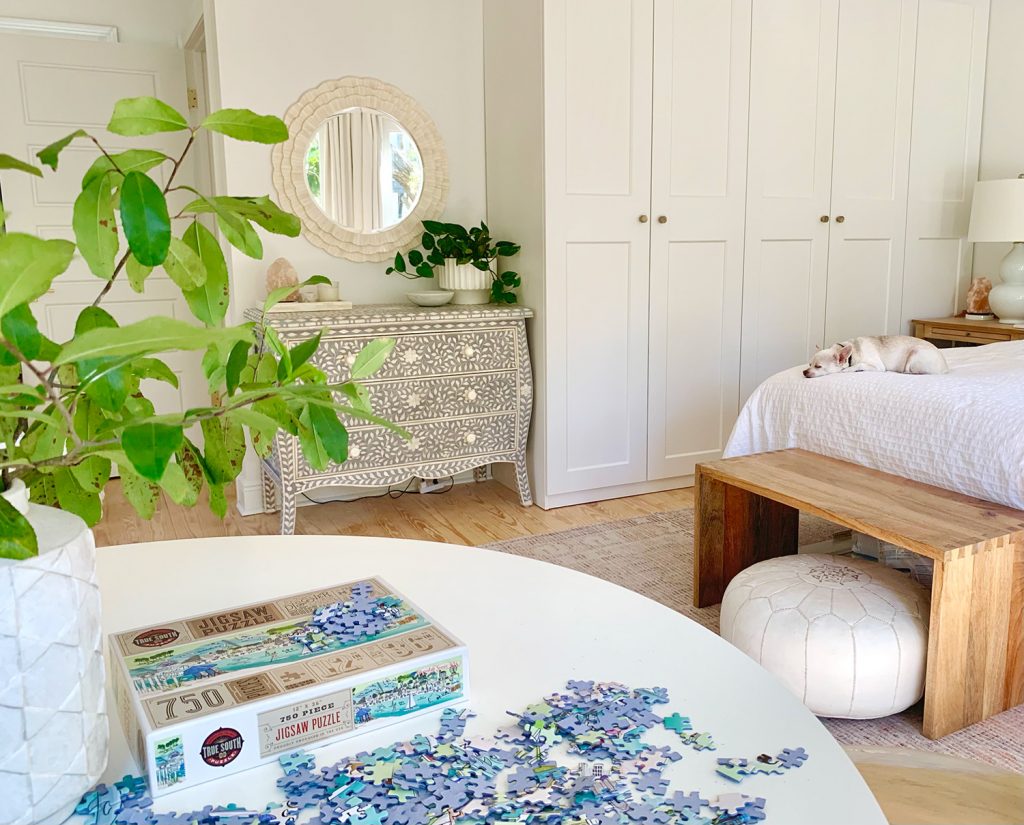
Two of the three Pax wardrobes we got are super wide with double doors (8′ tall and 39″ inches wide each!). So John and I each have one of those for our clothes, shoes, bed linens, travel bags, everything – and then we have that smaller 19″ one in the corner, which you can see (in the photo above) has no hardware, since it’s behind the side table most of the time.
We’re using it to store our Christmas tree and holiday decor, since it’s not too big of a deal to just pull the side table out to gain access to that last door very occasionally (you can open it without hardware – so it’s just a decorative choice to leave it off of that door). Without hardware on that one door, it just sort of reads like a paneled wall detail that stays consistent with the other doors; so it blends in nicely without screaming “I’m the last closet door that’s blocked by the night table most of the time” (even though that’s 100% what it is). We’ll take not-often-accessed-storage-space over dead-air-fulla-nothing any day!
That dresser with the mirror is just there for now, though – because we have big plans for that spot down the line. More on that in a second.
UPDATE: We actually added an additional Pax wardrobe in the space a few months later. You can read why, along with how we made them look built-in. We’ve also since adding a video tour of how we organized our Ikea closets.
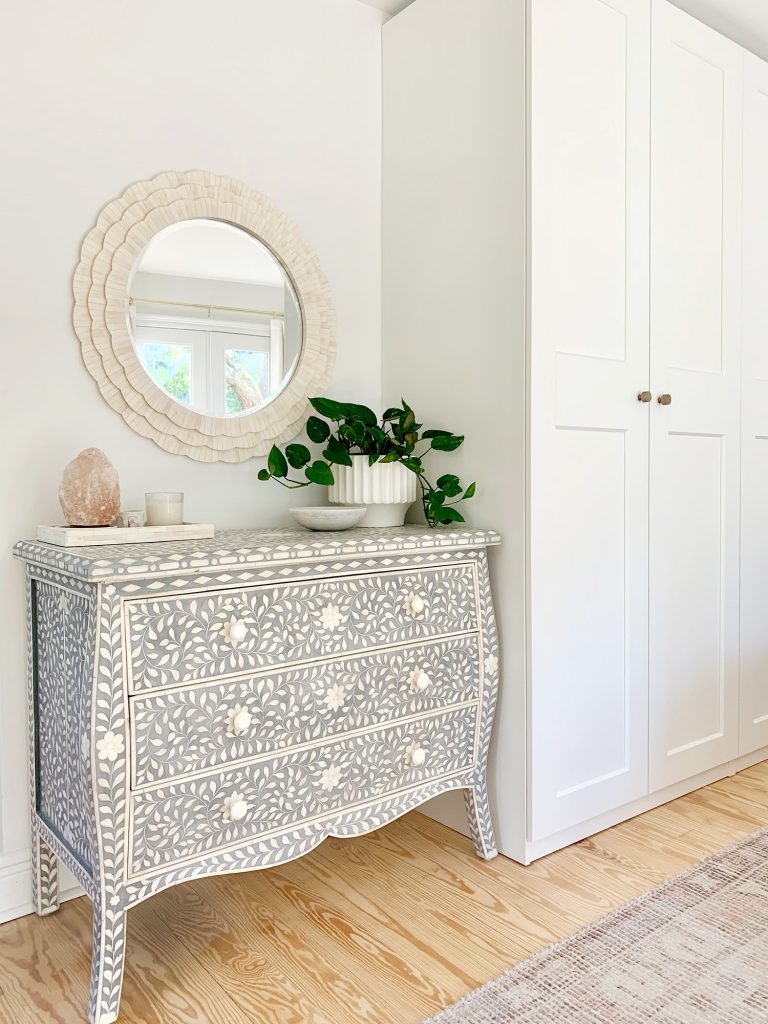
Actually, I realize the wider shot of the closet wall above this one makes everything looks closer together than it really is – so here’s a shot from this angle again to show just how much space is between that table and the bed and this dresser/wall of wardrobes.

Now please allow me to gush for a minute about how good it feels to have this much storage space after living here without a bedroom closet. IT FEELS EUPHORIC. I joke that smart storage is my love language but it’s really not a joke. It’s the truth. Living smaller, having a house we can clean in half an hour, having cheap utilities and less clutter, not having grass to mow ever – these things about downsizing are all amazing, and when you can find the right spot for everything and add efficient concealed storage, it honestly feels like you cheated the system. You beat the game! You get all the pros of smaller living and yet you still have a spot for everything, you feel organized, you can find anything you need. It’s just the best feeling. I can’t really explain it more than that.
Up until this point, we each used a 3-drawer dresser/nightstand for our clothes and our hanging items hung in our son’s closet (since he doesn’t exactly have a lot of formal hanging clothes) – but this upgrade means that now his closet is all his! Which also feels like a big upgrade! We even added some custom shelves in there for him and painted it a fun color. And as for those 3-drawer dressers that we used as nightstands/clothing storage (which you can see in this older photo of the bedroom below)…

… now that our wardrobes have us covered, they’ve moved into our daughter’s room, flanking her bed & giving her tons more storage than the spindly smaller open nightstands that she used to have in there. We took the metal legs off so they’re a better height for her bed.
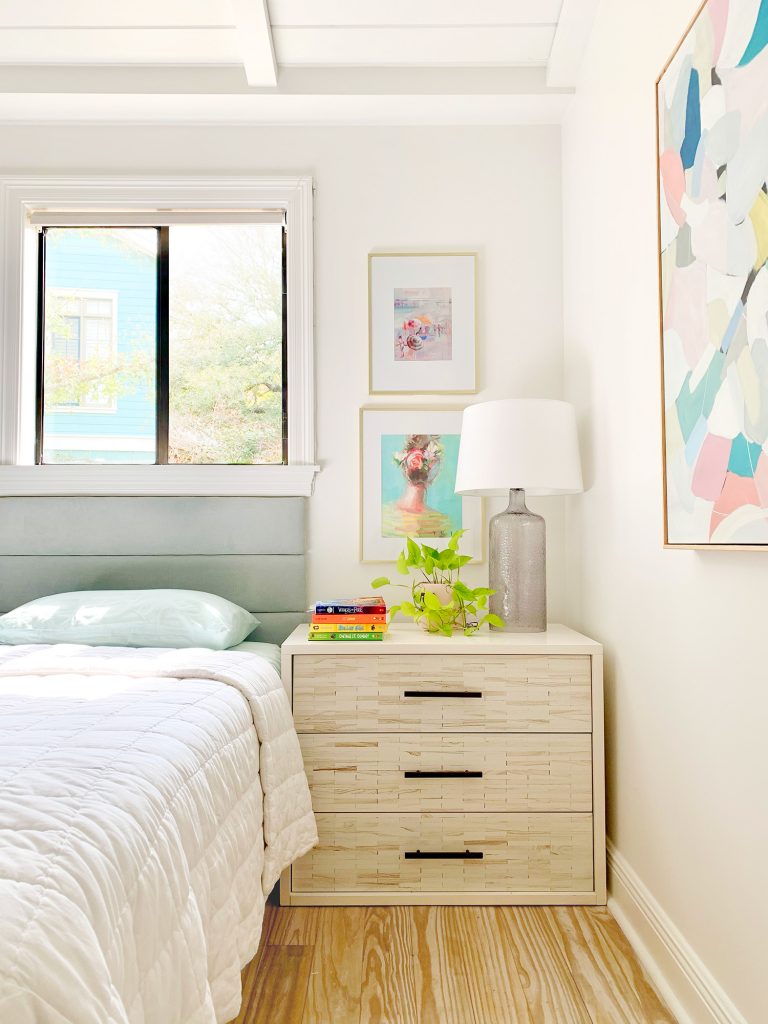
Adding six large large dresser drawers to that side of her room meant the large dresser across from her bed was no longer needed, so she now has a desk for drawing & making comic books over there, which we also think will come in handy for the middle school homework that’s in her future (the big shared desk upstairs is great for now, but we figure as she grows she’ll like a quiet homework spot in her own room like we both had growing up). You can see our daughter’s room as it looked a while back here & here.
During this rousing round of musical-furniture, we also moved her old nightstands into our room to serve as ours, and we love how they tie into the wood bench at the foot of the bed, which, as you may have guessed is our version of “doggy steps” for Burger. He bounces up onto that white ottoman first, then up to the bench, then up to the bed, and instantly falls asleep, as seen here.
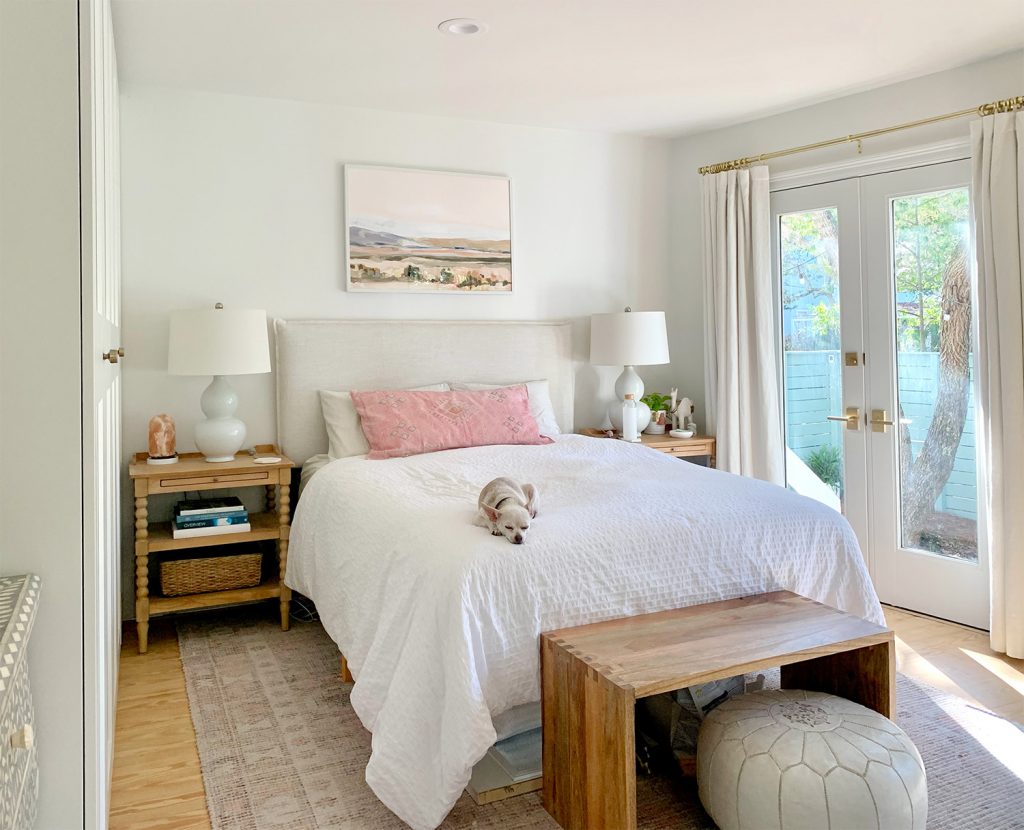
It’s nothing short of miraculous that her old nightstands fit right into our room (and our old nighstands slip right into hers). And yes that is a door under our bed in the photo above. We’re going to use it in the guest house eventually, so it wont be down there forever.
Our momentous bedroom closets also sparked another upgrade – this time for our son. We already mentioned that by freeing up our clothes from his closet, it is now entirely his (we even added some custom shelves in there for him and painted it a fun color). And he also made the call that he wanted a desk as well, so we moved his clothing into his closet thanks to those bins/shelves we added (instead of his former dresser-in-the-room situation). So he now has a built-in bookcase on one side of his room (you’ve seen his room here & here) and a brand new desk & chair all of his own on the other side (where his dresser used to be). So both kids earned an additional functional spot in their room that didn’t exist before, which is a really nice side-effect of the closets we got.
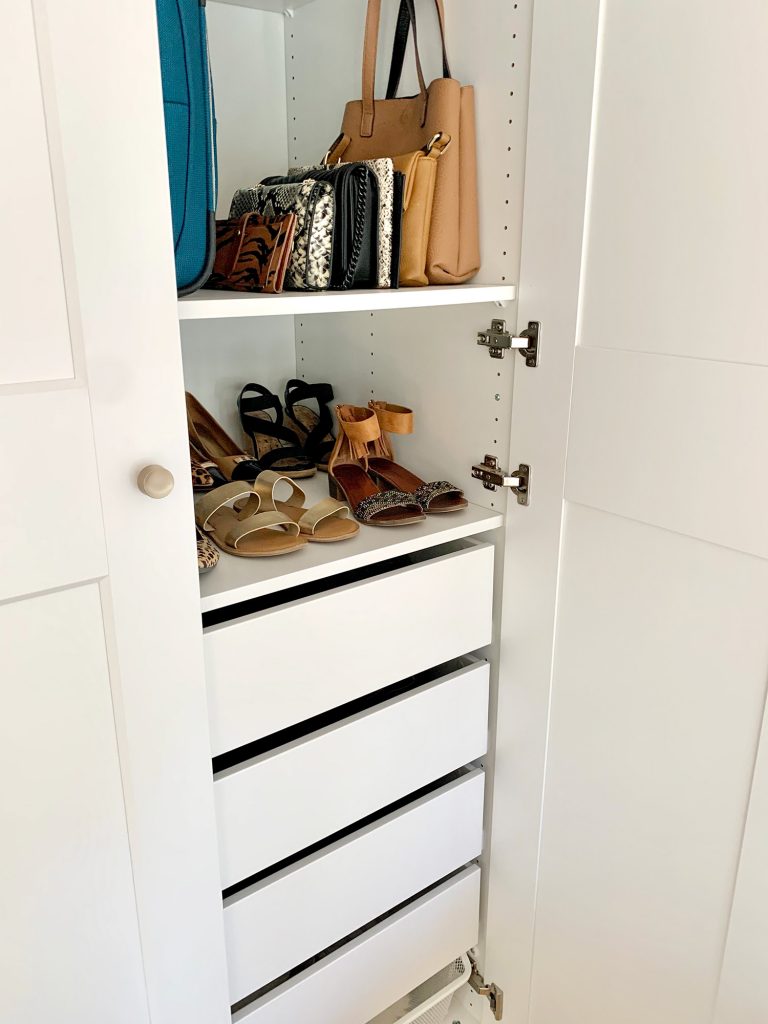
As for what’s in our closets, we did a combination of all of our favorite Ikea fittings. Pull out drawers, shelves, hanging bars, pullout baskets on the bottom for linens, etc (you can see a huge breakdown of things they offer in our last house’s closet here). We can even fit all of our luggage in them (it also fits under the bed so we go back & forth on which spot we prefer but HOLY COW TO HAVE TWO OPTIONS FOR LUGGAGE REALLY FEELS DECADENT! PUT ME ON REAL HOUSEWIVES IMMEDIATELY!
I mentioned that the inlay dresser is just a placeholder there for now (it’ll likely end up in our guest house) because the big plan now, after 10 months of living here, has changed! Yes, it’s possible that two days of walking through a house last February & making an offer (and coordinating plans from many states away with a contractor during a pandemic) might not lead to a lifelong plan that you still think works best after 10 months of living somewhere. And the best thing about slowly updating a house while you live in it is that you have that wiggle room to course correct as you go.
We very intentionally didn’t immediately add an ensuite bathroom and walk-in closet where we thought we’d want them from afar (or majorly renovate the kitchen) before we moved in. We’re firm believers that a lot is illuminated after you live somewhere for a while, and 10 months later we have a lot better idea of how we’d like to use those spaces. In short: trial & error + course correcting as you go can be extremely helpful and effective, since the longer you live somewhere, the more you learn about how your family uses the space (what you miss, what you love, what might not feel as good as you thought it would in your head a year ago, etc).
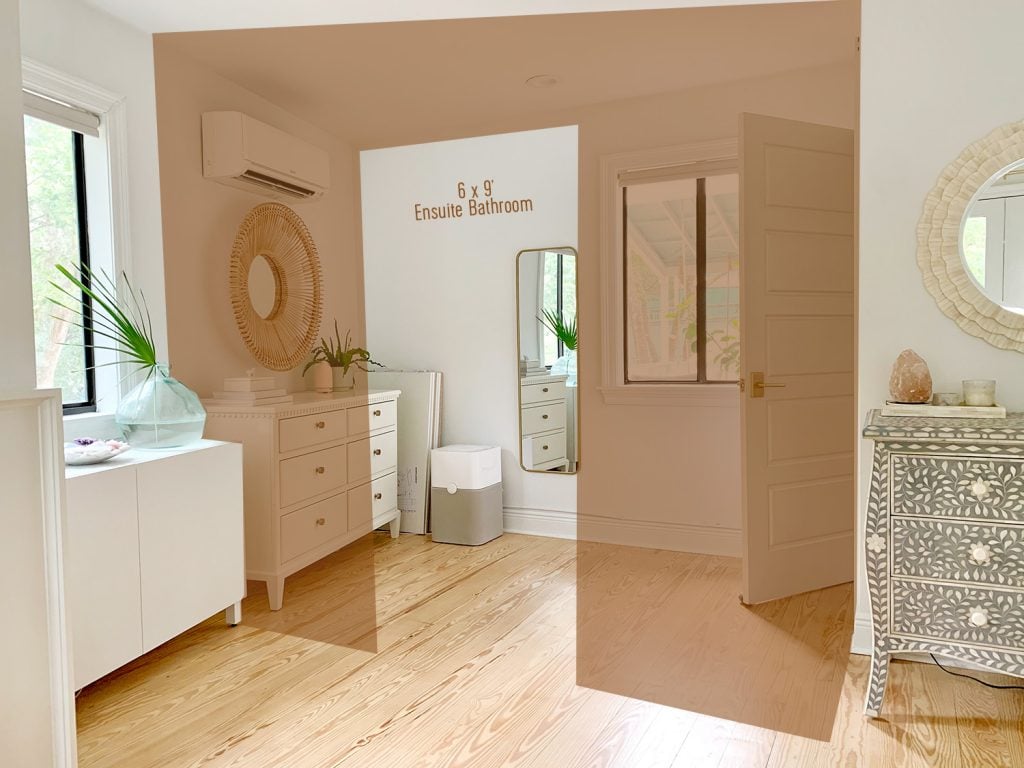
So here’s the pivot: that dresser will eventually be where the door to our bedroom goes. And the area next to it will be our future ensuite bathroom. Please enjoy this amazing rendering by yours truly:
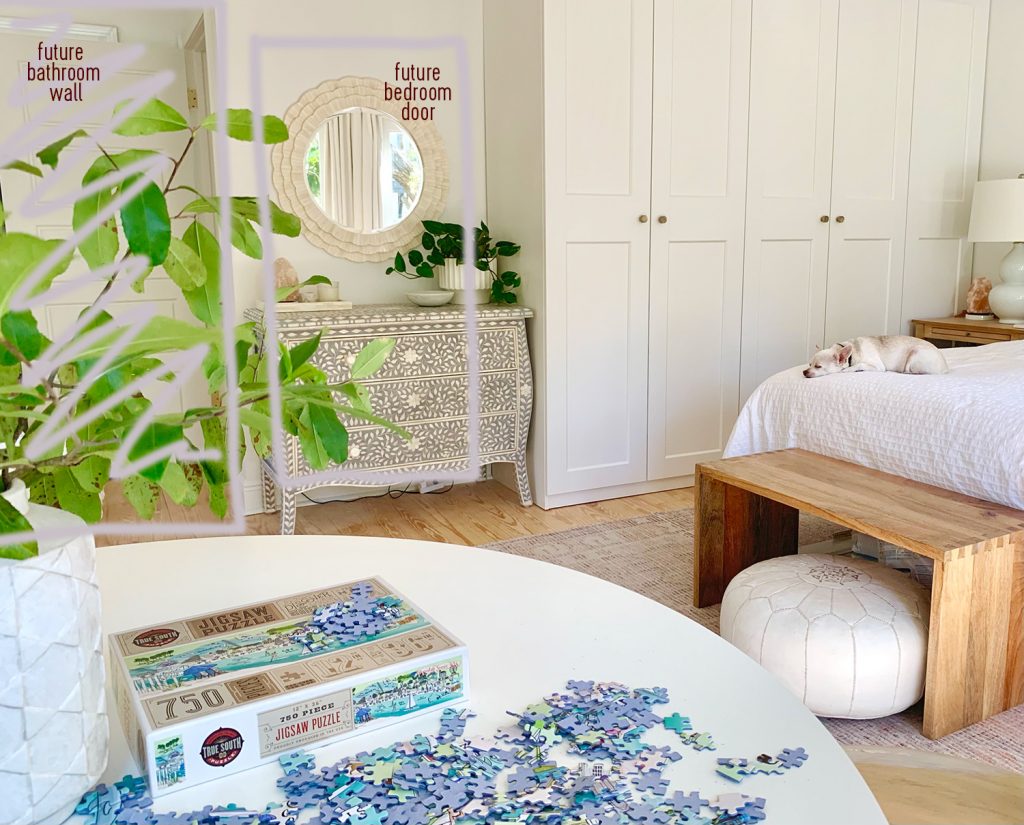
The irony of this new plan is that there was originally a door to our bedroom right where we want to add one again (albiet a much wider one that we want now). But that’s also good news because we know nothing important runs through that wall (like major plumbing or electrical) and even the floors run uninterrupted under it, which is a huge win!
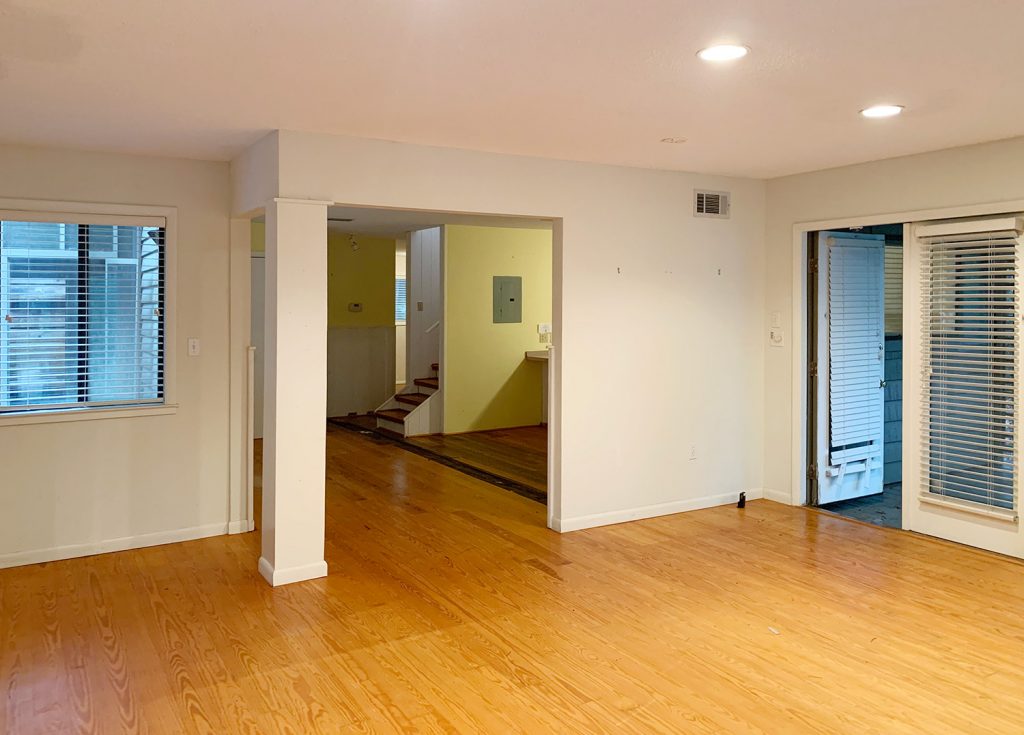
In fact, I think someone many months ago asked “but what if you want to move your bedroom upstairs and turn this room back into a family room?!” and we said something like “we’d open that doorway up again. It’s not load-bearing, it’s just drywall. And then we’d carry our bed upstairs and our couch down here.” Clearly that’s oversimplifying it, but removing drywall to uncover a doorway that already exists behind it + moving furniture is a weekend-or-two project (not like months of work and suitcases full of money). Sometimes you don’t know what you like best until you just give it a whirl and live with it for a while – and so much of it can be done, and undone, and reconfigured. Sometimes you guess wrong, and that’s ok. Paint can be repainted. Furniture can be moved. Drywalled doorways can even be un-drywalled.
Sidenote: As for moving our bedroom upstairs (since we still get asked about that), we all really like having our bedrooms on the same level, so that’s not something we’re considering. It would also mean that we’d be taking the largest room in our house for ourselves + a huge second-floor deck that we all love to share, which seems like a very odd choice in a house of this size (it would literally be bigger than our last house’s very large bedroom and this house is 1400 square feet instead of 3150). I could go on for many more paragraphs about what we’ve learned about how smaller spaces can “live larger” – and how certain layouts seem to make all the difference, but I’ll save that post for another day.
The point is that things like drywall can be undone. And that’s a glorious thing! One of the main ways that we’ve trial & errored our way to spaces that work much harder for us over time is that we’re not afraid to keep trying new things, and so many of these alterations can be extremely cheap, or even free. We swapped nightstands from two bedrooms, bought less than $100 of drywall & supplies to close off that door from the inside of the room, and that was it! Other than the Ikea wardrobe costs of course, which we’d have either way – because the plan was always to create a closet for this room using their fittings (please bury me in Pax, because nothing is better).
Ok, back to the bedroom updates we’ve made & our future plans. We want to move the entrance to the bedroom to that spot where the inlay dresser is (here’s my very bad drawing again), because we have a new ensuite bathroom plan for this room, which allows us to use the entire original footprint of the room instead of adding on.

By not building an attached bathroom for our bedroom out on that side porch, it means we get to keep these two windows in the kitchen that we have loved having (seen below) – and the entire bathroom reno will be much more affordable and less complicated.
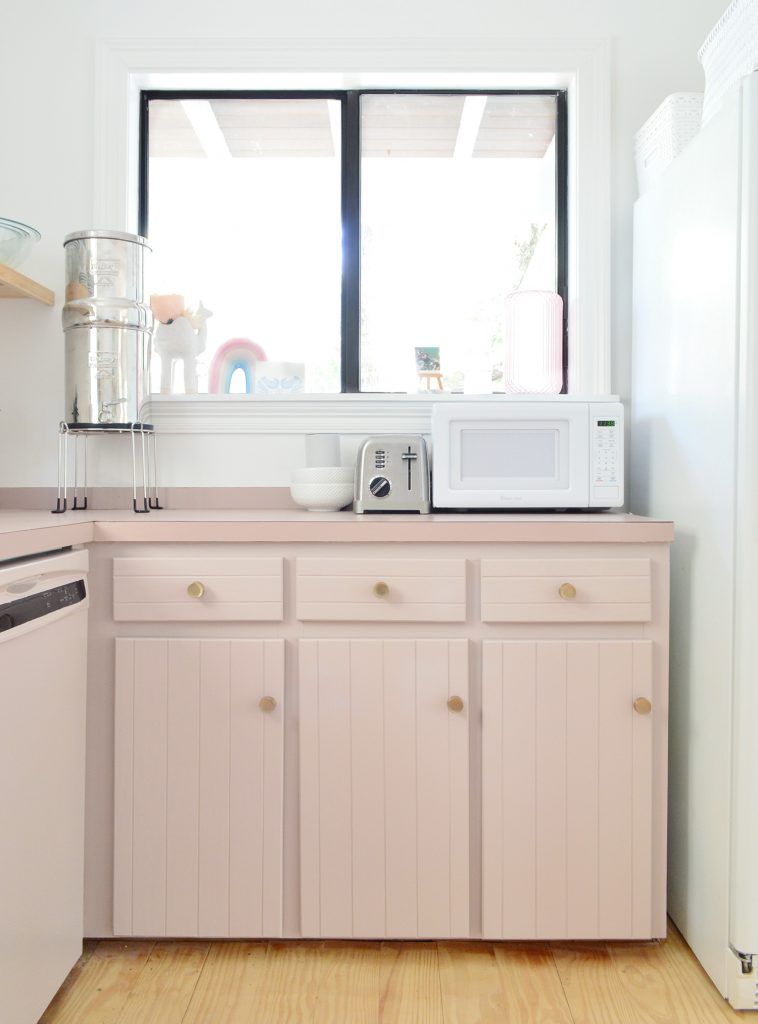
Plus we can keep that side porch beyond those windows as a porch, which gets used a lot by the kids. But back to the bedroom. Again. Because this room has always had excess space in one very strange spot. Sort of like an extra rectangle that was patched onto the larger rectangle of the room. Behold, this entire area below:
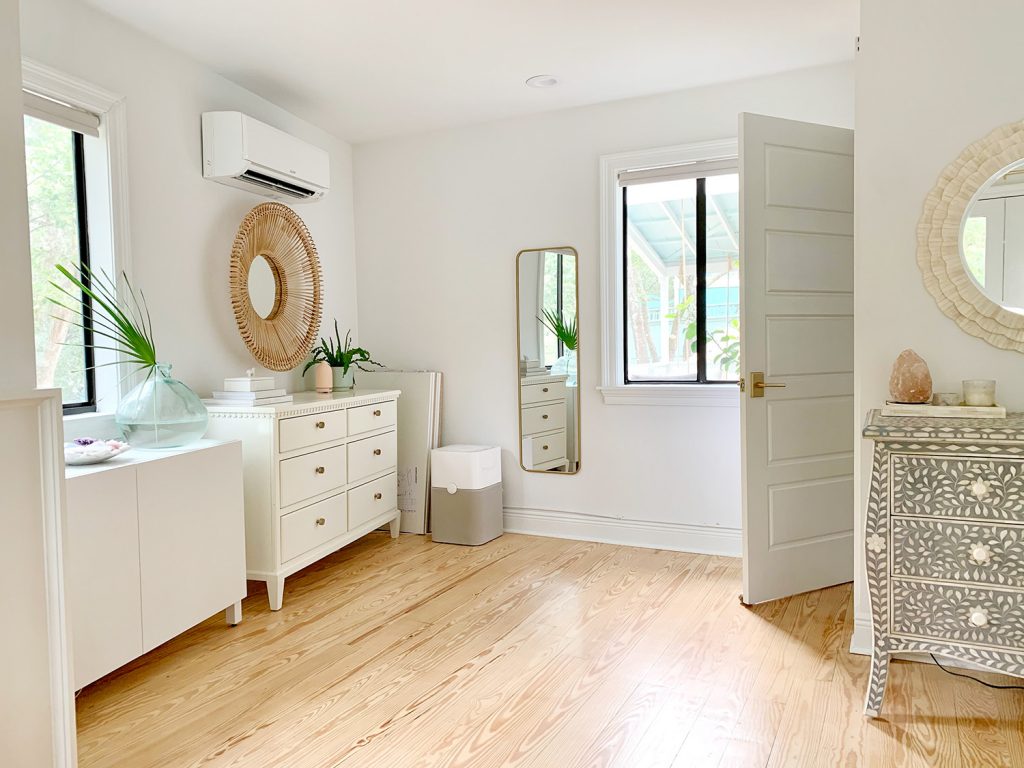
The bathroom wall will align with the front of our built-in closets, with a doorway between them, which earns us a nicely sized ensuite bathroom right off the bedroom with a nice big window in it (that space is 9′ long by 6′ wide, which is a great size for a house of this size). The mini-split will move above our future bedroom door (right into the recessed area, which our HVAC guy says will be really efficient – and a good covert spot for it), and it means we don’t have to take on a more complicated and expensive reno, or lose those two aforementioned kitchen windows. Win-win-win!
The bedroom still won’t feel small to us without that area, because look at all of the room we have over here!

Plus adding a bathroom wall will center the fireplace on the remaining bedroom wall (which you see below). So the new bathroom wall will go right to the right of that storage cabinet under the right window below (and we plan to build-in the two cabinets that flank the fireplace too – maybe top them with a nice counter material).
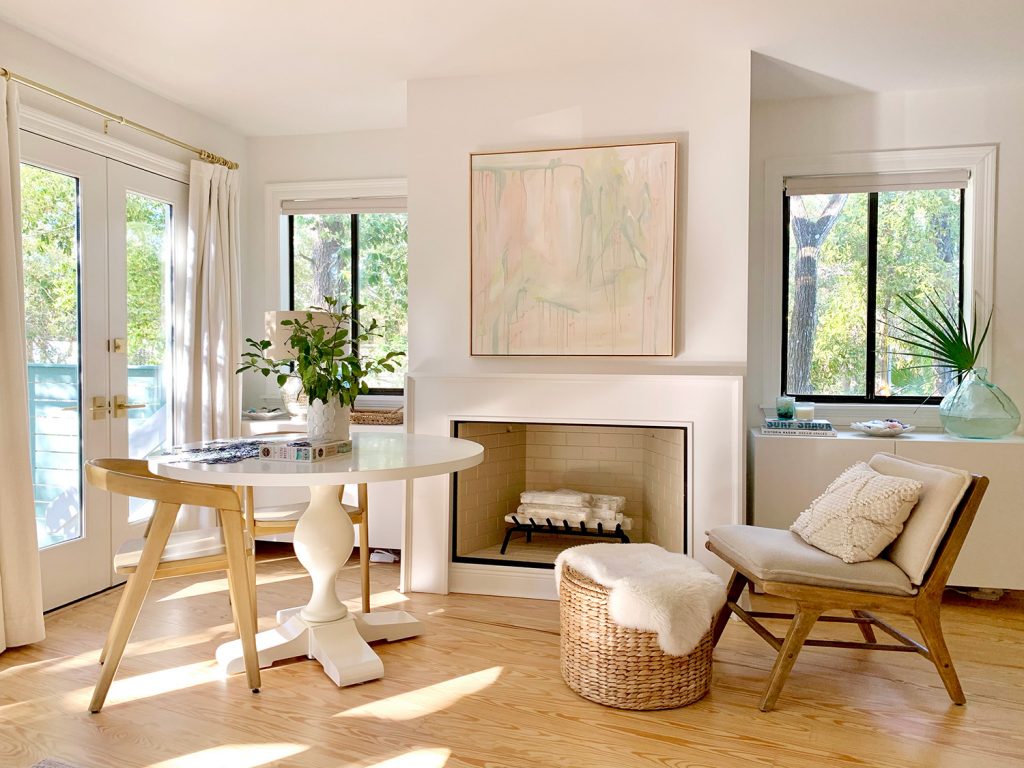
The area you see above has sort of evolved into a puzzle/laptop zone (I do zoom calls for work from that table a lot, John works on his laptop if he wants a quieter spot than the shared office upstairs, and we all slowly putter away on puzzles here too). The chair and ottoman are kind of weird, but imagine a cozy upholstered chaise in their place, or even a chair and ottoman combo like this.
This room is just so full of light and it has the space for some added function so why not – and weirdly enough we’ve learned that when your bedroom is on the main floor you go into it SO MUCH MORE than when it’s upstairs and you basically retire to that room at the end of the day. So that might account for our change of heart from our “you just need a bed in a bedroom” credo of yore. I mean if there’s room for more, and it’s full of light, seize the day!
Here’s one more shot from the side, so you can see that we can still easily open those two doors in the center and get out to that area of the yard.
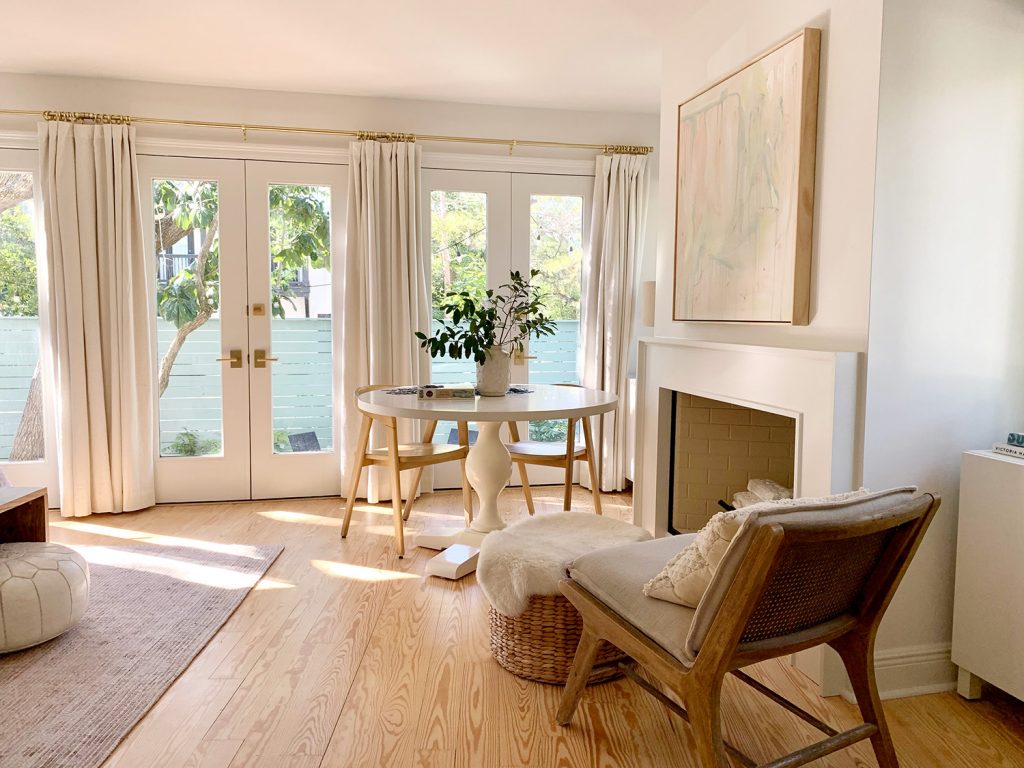
Is it unusual to have a table in the bedroom? Sure! Would someone else have done a huge walk-in closet instead of a wall of these wardrobes? Absolutely. Do we love how this room feels and deeply appreciate how it works for our family? Yes and yes.
And since we all know a video is worth 1,000 words, here’s a quick spin around this room so you can get a better feel for it all (note: I had a pile of laundry on the floor in the future bathroom area, so I didn’t swing the camera over to that spot, but there are photos of that area 4 pictures up in this post).
Note: You can also view the video here on YouTube.
I’ve done this long enough to know I’m going to get questions like “but can you not get into that storage cabinet in the back corner now that the table is there?” – so you can see from the video above that I slip into that corner to film for ya (it’s easy enough to pass through and get stuff). And I made a quick boomerang of the doors opening and closing in real-time that I’ll put on my Instagram Stories for ya (still can’t figure out how to code a boomerang in a post without crashing the whole thing). But trust me when I say that no table is gonna keep me from my vases & candles & baskets ;)
So that’s our bedroom ten months in. With a glorious amount of closet storage, a plan for a bathroom and a door, and a table for puzzles in the sun. Feels good to be here. We are grateful.
P.S. To see everything we have done in the last 10 months to upgrade this house & make it feel like home, you can check out this archive (we cover a lot of ground!)
*This post contains affiliate links, so we may earn a small commission when you make a purchase through links on our site at no additional cost to you.
