The evening after posting our plans for a mini-update to our master bathroom last Monday, Sherry had us in the car and off to hunt down the blue light fixture in her mood board.
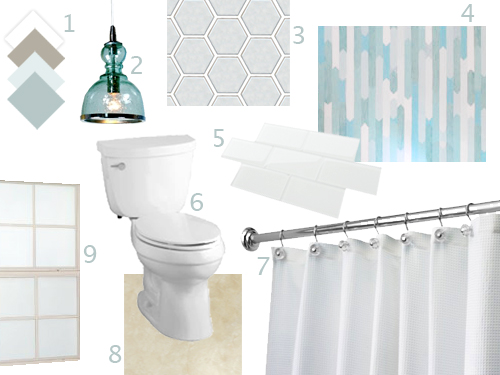
It’s a Shades of Light fixture that we hoped to find at a local lighting outlet called The Decorating Outlet (which is also where we bought the glass pendants over our peninsula, Clara’s capiz chandelier, and the shade that we added around the chandelier in our office).
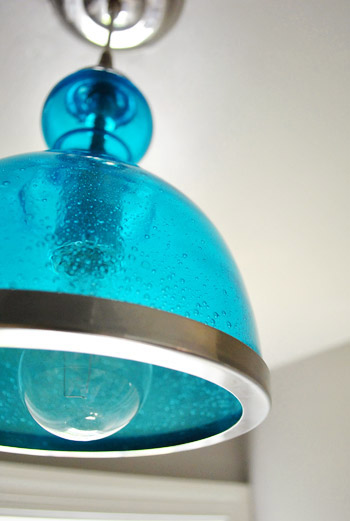
Sherry was nervous that our luck would run out and they wouldn’t have any in stock – but they actually had not one, but two to choose from. They were half off the original price of $159, so for $80 we were soon headed home with a blue light to take the place of our formerly unglorious boob light (Ballard also sells a similar version for $189, so we were excited about our little outlet find). Still, at 80 beans it’s definitely not the cheapest pendant light we’ve ever bought, but for such an uncommon and cool effect (the seeded blue glass is really amazing in person) we were happy to shell out the dough to make it ours.
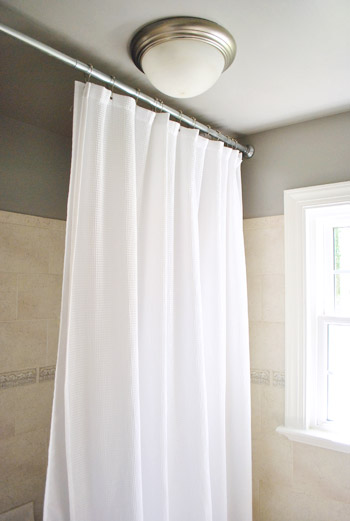
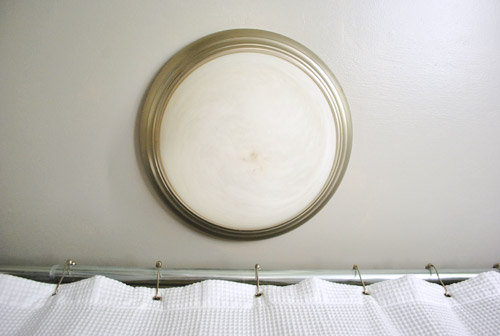
Part of the reason that we wanted to replace this flush mount guy with a pendant was so it’d hopefully look less crowded to the shower bar. Have we mentioned this room is tiny? Well it is, which means a fixture that’s centered in the space is pretty close to the shower curtain. Especially since this fixture was extra wide. We knew something with a smaller footprint against the ceiling would help, and that something with translucent glass and a much smaller diameter would lighten things up as well.
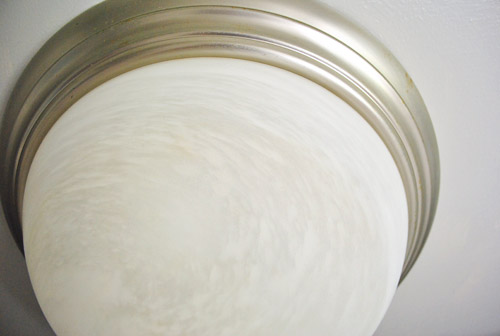
Plus, as much as I was determined to discover a new solar system in the light’s swirly glass, we figured bringing in the blue pendant would be a nice shot of color in the formerly “builder basic” room.
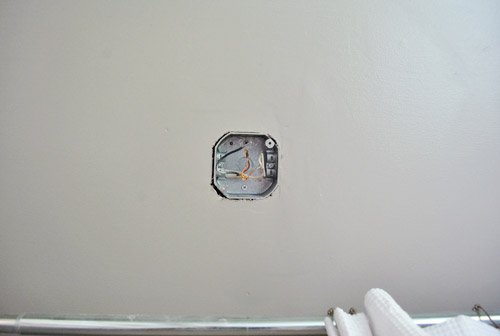
Installing new light fixtures is old hat for us by now (we just did three in the kitchen) so we figured we’d have this project knocked out within a few hours. But since clearly we failed to knock on wood or something, we uncovered this mess:
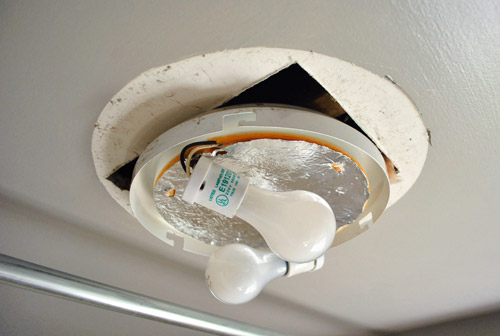
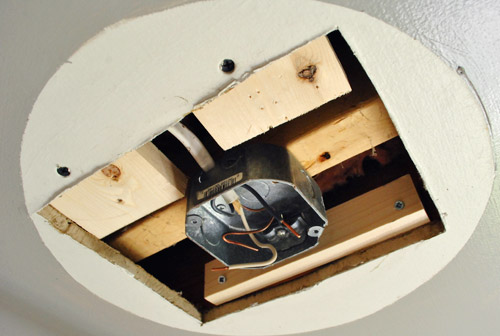
Don’t see it? How ’bout we turn off the power and remove the old fixture so the giant hole in the ceiling can’t be missed?
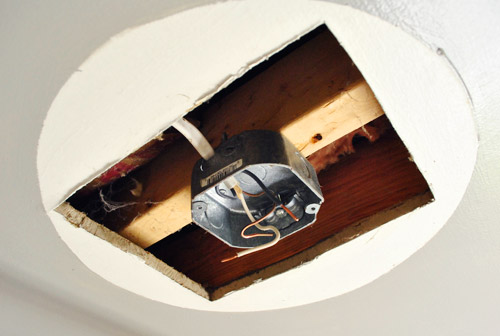
This obviously wouldn’t jive with the new fixture’s smaller base. Unless of course we were going for that exposed rafters look. So just like that our “install new light fixture” task go bumped below “patch ceiling” on our to-do list. Ah the joys of DIY, right?
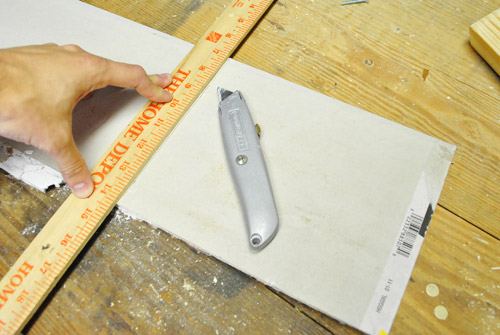
On the bright side, we had some leftover drywall in the basement from patching the new opening in the kitchen which meant we didn’t have to run out to the store to get started. So I used a box cutter to slice a piece down to size.
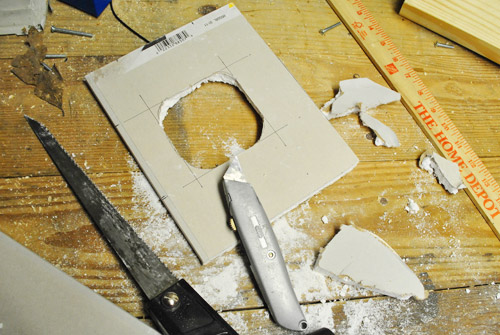
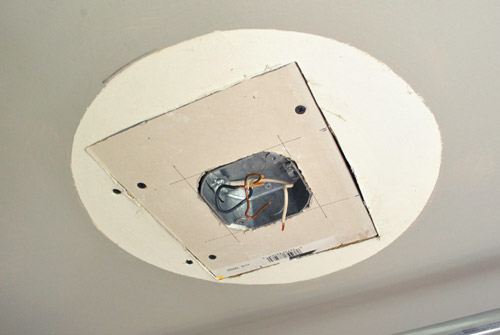
And then broke out a drywall saw to cut out a hole for the fixture box that I measured. It wasn’t the prettiest cut, but it’d do the trick, and the top of the pendant light would cover the hole for the fixture box, hopefully resulting in a nice seamless look.
To secure the patch to the ceiling, first I screwed some scrap wood into the ceiling that would provide a nice firm surface to screw into. One piece of wood went against the beam, while the other got screwed into the existing drywall.
Here’s the new piece of drywall attached and looking all flush and fantastic-like. Except for all the cracks and sunk screw heads (be sure to sink your screw heads when it comes to drywalling!) that we needed to sand, spackle, sand, spackle, sand, prime, and paint.
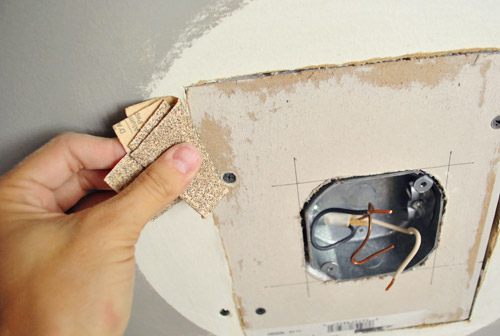
So I sanded the edges a bit to make sure everything was smooth and there weren’t any weird lumps or bumps in the way of Sherry’s spackle job.
I don’t know how certain tasks got divided in our house to become “mine” or “Sherry’s” (like how I always roll and she cuts in when we paint, and I usually sand but she spackles). I think some of it comes down to skill (Sherry’s has a steadier hand for cutting in and spackling so we have learned she gets better results). And some it just comes down to things we enjoy more than the other (I love using my Kreg Jig while Sherry’s getting on pretty ok terms with her sewing machine). But I wouldn’t put it past her to build something (perhaps a dollhouse for Clara) and who knows, I might just sew something someday.
Anyway, here’s Sherry’s first round of spackle drying:
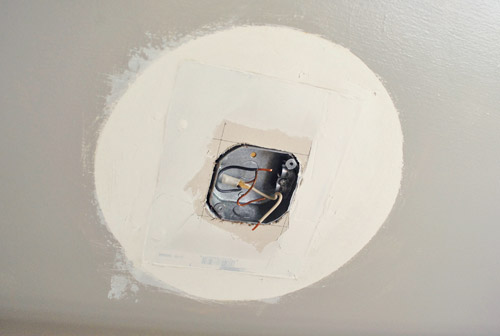
She did two rounds total (a round being spackling + letting it dry + sanding it with a sanding block) both of which were applied in consecutive evenings after we got the bean to bed. The idea of doing two rounds is that you can build things up with spackle to bridge gaps, sand things flush again, and do one more round to make sure you don’t miss anything (which could result in cavities where spackle was missing or raised portions that weren’t sanded down enough). And using a sanding block is nice because it’s flat like the wall, so it doesn’t flop around like a loose piece of sandpaper can.
So after a night of spackling and sanding, followed by another night of spackling and sanding, we just had to set aside some time to prime and paint. Oh yeah and install the fixture that we originally thought was going to be a ten minute job. So the next night after priming our patch job (any raw drywall should be primed after it’s installed before painting commences) we applied two quick coats of paint (Rockport Gray, as you may recall in this post). We used a roller to get it up there and rolled far beyond the area we had patched, just to feather things out for a nice seamless patch job. By then it was way too late to get any decent pictures since we didn’t have a working light in there, but here’s what it looked like by morning. See how much further the fixture box looks from the shower bar now that there’s not an extra wide light up there encroaching on the shower?
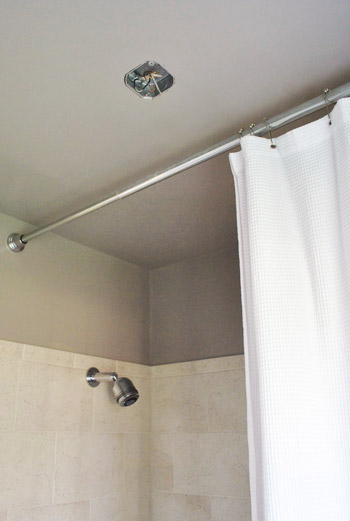
It was finally ready for a new light fixture (the slightly rough area right around the fixture box will be covered by the top of the light for a nice clean look).
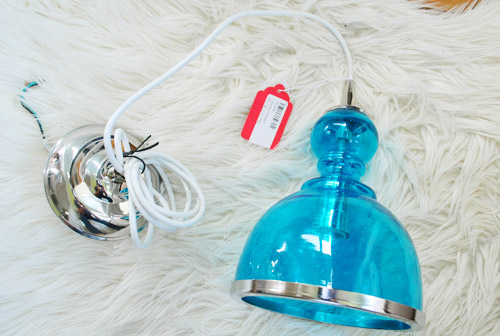
Since it was nearly four days since we started, we were more than ready to, in the words of Sherry, get on that already. Oh and here’s the fixture in all of it’s blue glass-y glory. It’s reading as sort of a very bright blue here in these pics, but in real life it looks more like the photo in our mood board above (it’s a soft sea-glass-ish blue that looks great with the white, gray, and sand colors that we have going on in there).
The cord is obviously waaaaay too long for our bathroom, so we had to cut it down before installing it. I used my scissors to put some slices in the outer white cord where I wanted the wires to end – I didn’t cut all of the way through since I wanted the inner wires to stick out a bit further. Then I folded it back and forth until the plastic-y white cord tore completely and I could pull the excess off. Update: We just heard that a better approach is to use a wire stripper (which is nice and cheap) since bending the wires back and forth until the casing tears can put unnecessary stress on the wires inside. Good to know!
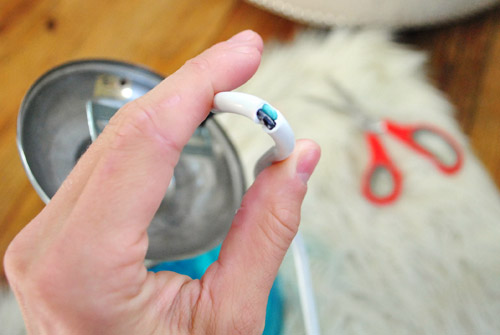
This exposed the inner wires (which I cut to a length just a bit longer than the white cord).
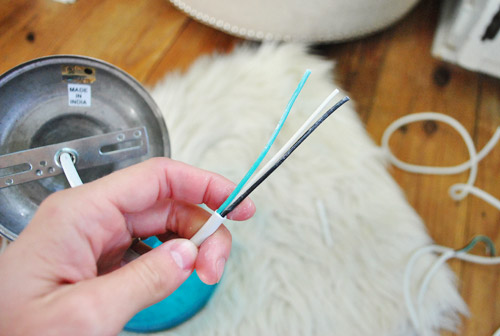
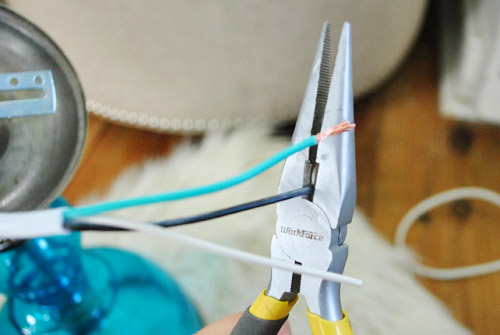
Then I used my pliers to gently cut the rubber coating off the tip of each of the wires without cutting the wires themselves (that way I’d have something to connect to the wires in the fixture). When it comes to connecting wires and covering them with a wire nut inside the fixture box, there are probably some great instructional videos on youtube to check out (we can never manage to take photos since it’s a two-person job in our house).
As for why it’s a two-person job, Sherry usually holds it up (supporting the weight of it so it’s not tugging down while I connect the wires). One person can definitely hang a fixture on their own, but we find the two-person method to be really helpful (and much faster). Thankfully it was a nice quick job now that the ceiling was patched. Which is a good thing since this process had already dragged out a bit more than either of us expected.
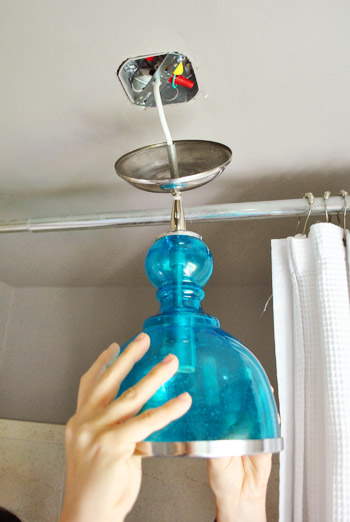
Speaking of dragging out, let’s get to the goods. Here it is all hung up, and we’re digging it. It definitely looks a lot less on-top-of-the-shower-bar than our past fixture did, and it’s still hung high enough not to interfere with a tall guy like me (code in our area requires that it be hung over 6’8″ from the bottom of the fixture to the ground and ours is 6’10”). Oh and speaking of code, in our area there aren’t any issues with hanging a pendant at this height outside of a shower, but it’s not allowed to be hung over a tub/in a shower (you know those fancy giant-chandelier-over-tub-bathrooms on HGTV and in glossy mags? they’re usually not to code). So this is just a general reminder to check out what’s to code in your area if you tackle anything similar.
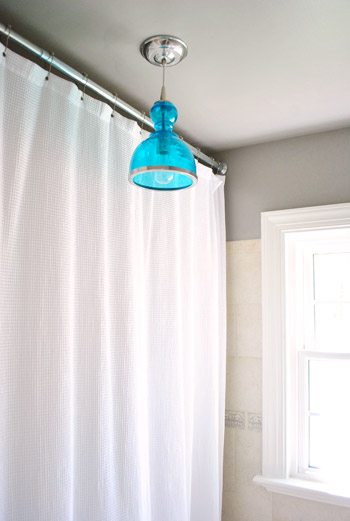
Of course the blue is looking more intense here than it does in real life, but in person it’s soft and awesome against the grey paint and the white curtain – so we feel like it’s a big check mark next to our goal of cheering-up our tiny neutral box of a bathroom. It definitely adds some not-builder-basic personality. And the chrome trim and ceiling cover on the light work with all of our bathroom hardware (the shower fixtures and doorknob are chrome) so it fits right in.
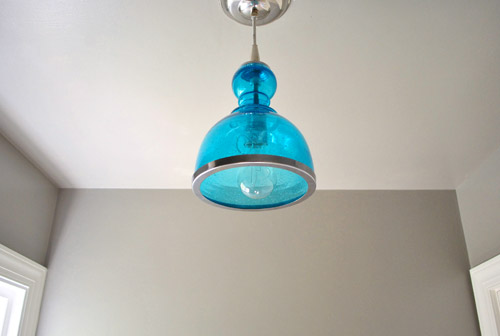
In a perfect world the fixture would be centered in the toilet half of the bathroom, in front of the window. But since this is a pretty quick-and-dirty makeover plan we’re trying not to get into anything too heavy duty at this point (after renovating the kitchen for months on end we’re happy to lighten up with a few easy bathroom updates for now). Perhaps we’ll move it over a bit later in Phase Two, when we’d love to redo the floor tile as well.
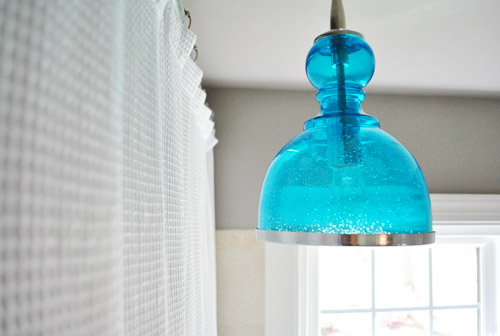
Oh and we did briefly worry about two things: 1) one 60 watt bulb wouldn’t be enough light for the room and 2) it would make the whole room look crazy like a big blue smurf. But happily, it casts more than enough light to keep our tiny box of a room illuminated and there’s no weird blue tint (we even asked in the showroom if that was an issue because we were so worried). Apparently since the bulb is clear, the light that it casts down and around the room is clear too. And the ceiling gets this cool soft seeded glass reflection that looks like a subtle starburst (we’ll have to try to shoot a picture of that). So it’s very flattering indeed. And not at all smurfy. Whew.
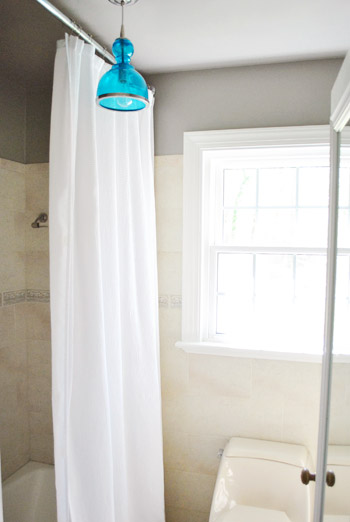
So despite the unexpected trouble it gave us (well, the trouble the ceiling gave us) we’re really happy with the update. And it’s making us pumped to keep the changes (and touches of color) coming into this room. We think some blue, green, white, and gray art will definitely tie it in really well. And Sherry can’t wait to hit the off-white trim with some bright white paint (it’s hard to see in the photos, but the door trim next to the bright white light switch looks dingy and mismatched).
So now our bathroom to-do list looks a little something like this:
paint the walls so they have some contrastreplace the boob light- paint the cream trim white <– it looks white in the pics, but the bright white light switch next to the cream door trim makes it painfully obvious in person
- hang some bathroom-friendly art
- craigslist the toilet and replace it with a classic white one
- do something to add privacy to the window
- remove the door so we can shave the bottom to allow for a rug/bathmat (and so it actually opens past the floor heating register instead of catching on it)
- replace the border tile around the room (maybe in phase 2?)
- replace the floor tile down the road (just to break things up since there’s so much of it)
What did you guys do this weekend? Did anyone add any new color to your bathroom or another place in your home? Or discover some type of hidden ceiling hole that was being obscured by a light fixture?
Psst- To follow our quick little bathroom reno from the start, check out this planning post, and this painting post. There, now you’re all caught up.
Pssst- Apparently we have great completely accidental timing, and today is “Light It Up Blue” day for Autism Awareness, so here’s more on that. Spread the word!

Brenda says
What a pretty light! It looks so much better than the old light.
Krystle @ ColorTransformedFamily says
I like the touch of blue the light added to the bathroom. Definitely better than the “boob” light. Does it provide enough light in the shower? I’m guessing that it’s probably not a problem since you have so much natural daylight coming in.
YoungHouseLove says
Yes, thankfully between the window and the light (it’s such a small room that 60 watts does the trick) it’s good! The white curtain lets a lot of light through, so it actually feels brighter in the shower sometimes!
xo,
s
Carli says
Love what you’re doing in that bathroom guys! I love modest, attainable makeovers. Like big kitchen overhauls are SO fun to watch come together, but a little mini makeover every now and then really makes renos in everyday busy life seem possible too :) Thanks for the continued inspiration!
YoungHouseLove says
Aw thanks Carli!
xo,
s
Courtney says
I’ve heard that repainting small sections of semi-gloss paint frequently looks terrible – that it really highlights the small area that you repainted. Your ceiling doesn’t look that way at all. Do you think that’s just because you painted it so recently? I need to repaint small sections of my bathroom and I’m worried that the repainted parts will stand out.
YoungHouseLove says
Yes, I think it helps that we had just painted and also that we used a roller and went extra wide with the touch up paint to feather it out. Sometimes touch ups on semi-gloss with a brush are really obvious, especially if it’s not feathered out a ways. I would definitely try a roller and feather out the paint and you should be just fine. Hope it helps!
xo,
s
Diana says
Hi Guys – Love the light and maybe it’s just me, but I’m having a hard time seeing how this light doesn’t hit John’s head! Maybe you could add photo from the inside of your closet to show your bathroom floor as well as the ceiling?
YoungHouseLove says
Haha, it’s an 8′ room and he’s 6′ tall, so there are two full feet of space above his head. We hung it 6’10” above the floor, so there are ten whole inches above his head! We’ll have to try to take pics for the next post.
xo,
s
SM says
Absolutely lovely. A shot with the light on would have been cool too! Amazing job with the drywall patch up also!
Amanda Wells says
Love, love, love it! I’m on such a blue kick lately.
BTW, have you guys done any projects with Annie Sloan Chalk Paint yet? I was interested to see what the buzz was all about. Just curious if you’ve tackled anything with it yet.
My brush with the paint – http://www.amandadovewells.com/?p=1515
YoungHouseLove says
We haven’t but we heard it’s amazing since you don’t have to sand or prime. Would love to try it out sometime!
xo,
s
Claudia says
It looks awesome – I love the little details that make a standard place yours, ya know?
YoungHouseLove says
Totally! I think tackling things like this are when rooms that never really felt like ours yet start feeling more personal!
xo,
s
Emily says
Love the fixture! I know you mentioned you moved your shower curtain to ceiling height, what’s your reasoning for doing that?
YoungHouseLove says
We just like how it seems to add a lot of height to a small room. If you can’t go out, go up!
xo,
s
Pat E. says
As a single gal, I do a lot of projects around the house by myself, so I understand the pain of needing two to hang a light fixture. Once, however, I figured out a way to do it solo. I got one of those big Ikea tote bags (the big blue ones that you can buy at the store) and I put the fixture in it. I then put the handle loops around my neck (like the world’s ugliest necklace) and was able to support the fixture while I wired it up. I tried to just put it (bag straps) on my shoulder, but it slipped when I raised my arms to do the wiring. Just make sure that you put it in so it won’t get caught in the loops once it is hung (tho cutting a loop woudn’t be the worst thing in the world).
YoungHouseLove says
Genius! Love the tip, and that you were industrious enough to figure it out!
xo,
s
molly stillman says
LOVE IT! where’s that shower curtain from? i think i have the same one! we’re samesies.
YoungHouseLove says
Haha, it’s from amazon.com. Extra long waffle one. Twinsies!
xo,
s
tracy a says
I checked out the Shades of Light website and only see 3 colours. Yours looks much more blue than their “aqua” version. Is it by Shades of Light, or just a similar version?
YoungHouseLove says
Yes, it’s the same one, it just looks super bright in our pics for some reason (it’s more subdued in person but most definitely still blue).
xo,
s
Bri says
I’ve got half a mind to just send you some wire strippers! :) They make the job so much easier…
I love the new light, it injects a ton of personality into that little space.
Lindsey says
My Dad helped my fiance and I give our bathroom a much needed lift – the new color, “Vintage Gray” makes the bathroom look so crisp! We still have a ways to go with the space, but it looks a million times better already!
Ps. LOVE that light!
YoungHouseLove says
Sounds so pretty Lindsey!
xo,
s
Kristen says
Wow, looks great!
Question about patching drywall– does your ceiling have any texture? Or, have you done any drywall patches with textured wall? Just wondering how that works after the sanding stage– because then it’s smooth and is obvious that it’s a patch… is it best to use the spray on texture?
YoungHouseLove says
Our walls and ceilings don’t have texture so we have never tackled that. Anyone have tips for Kristen?
xo,
s
Kathy says
Yep, spray on texture is great stuff. Practice just a bit on a scrap something to get the feel, but you’ll be amazed at how it will blend back in. Good Luck
Melissa says
I think the fixture is fun, but is there a reason you didn’t center it in the whitespace of your ceiling right off the bat? Rather than move it later?
I know you have pretty high ceilings and aren’t a giant like I am (ha ha) but in my house, when I’m reaching high over my head to put a shirt on, or wrapping a towel on top of my head, I inevitably hit my light fixture (which is flush mount). I can only imagine doing that even more so here.
Anyway, the fixture is pretty, but I wonder about those two things.
YoungHouseLove says
We just didn’t want to get into cutting into the drywalled ceiling in the bathroom (it just adds up to a huge dusty mess – and we could cut the patch piece in the basement to avoid that). That part of the attic is also really hard to get to (it’s floorless) so we thought better to wait and just tackle it down the line. Thankfully tall John (6′) has used the shower at least three times since it was installed and doesn’t seem to have any issues. I think it might be because we quickly bend over to dry our legs and feet and then wrap a towel around ourselves and change outside of the room (it’s such a small space we literally would struggle to put on a shirt or pants in there – so we move into the bedroom to do that). Hope it helps!
xo,
s
Linda says
Love the light fixture! Your bathroom is very pretty. I just had a comment about your instructions. It’s probably not a good idea to worry (folded it back and forth until the plastic-y white cord tore completely) wiring that isn’t going to be cut at that point. That could break some of the inner wiring.If you don’t have the tool to strip it (it’s actually pretty cheap) it would be better to cut the length you need and carefully use scissors to cut open the outer part pull it back and trim it. Not trying to be snarky, just seems risky to give instructions for electrical work that might cause shorts or worse. I didn’t think you would post this, just a heads up.
YoungHouseLove says
So smart! Thanks for the tip! We’re definitely not experts and still learn new things every day. We’ll update the post to point that out!
xo,
s
Mary says
Cute! To my (untalented) eye, the room is screaming for some more blue, but I know you’ll bring it in with art. But I’d be thinking of a shower curtain with blue in it, to tie in the color from the angles where the art won’t be visible. And the actual blue is probably a lot less bright than it appears here.
Stacy says
We worked on lighting/electrical projects in our house this weekend (and last weekend) too. We spray painted some of the 1980’s brassy gold light fixtures with Rustoleum Hammered Brown spray paint (big imrpovement!)
We also installed a light fixture from IKEA which was a struggle and a two day process because the holes in the fixture didn’t fit the holes in the electrical box in our ceiling.
My husband and I use the two-person method when installing light fixtures too! Last but not least I learned how to replace electrical outlets and switches. :)
YoungHouseLove says
Wow, you were busy! Congrats Stacy!
xo,
s
Jess @ Crunchy Hot Mama says
Love the new light & the April Fool’s post…you almost had me ;) I instantly thought there’s no way they’d give up their dual flush. Ha!
And dang you John for getting ‘Red Light Special’ stuck in my now! Thanks a lot :P
Jenny says
I love the colorful touches you make with simpler small changes! If you ever have a need to use up those boob lights, I found this on Pinterest: http://www.homestoriesatoz.com/2012/03/diy-garden-planter-birds-bath.html
YoungHouseLove says
CUTE!
xo,
s
Courtney Rutledge says
Love it! Do you feel like you really have enough light when it’s dark? We were thinking of a fixture that only had a 60W bulb for a full bath but weren’t sure if it would work. If I remember correctly though, your sink is not in there?
YoungHouseLove says
Thankfully we do! It’s a tiny room though, so anything bigger (like a dining room or bedroom) would probably need a lot more wattage. We don’t have a sink in there actually (it’s out in our bedroom, but we have grown to love that quirky setup- you can see the sink on our House Tour page if that helps!
xo,
s
Amber Wallace says
Man that store must be awesome! It’s gorgeous!
Cindy B. says
I read the whole first page of comments to make sure you haven’t answered this already. I’m just wondering…while you were doing all the drywall patching, etc. Why didn’t you just go ahead and move the light receptacle over to where you want it? It wouldn’t have been that much more work considering you already needed to patch the drywall.
YoungHouseLove says
We just didn’t want to get into cutting into the drywalled ceiling in the bathroom with a big hole cutter (it adds up to a huge dusty mess – and we could cut the patch piece in the basement to avoid that). That part of the attic is also really hard to get to (it’s floorless) so we thought better to wait and just tackle it down the line!
xo,
s
LaMadre says
We’re working on our upstairs bathroom. We needed to do quite a bit of sanding because the walls were rough and we removed a section wall. We have another round of light sanding to do but we’ll soon have it behind us. Oh how I hate the drywall dust -it’s everywhere. Even though we closed the bedroom doors and sealed around the bathroom door – that stuff still gets everywhere. Do you have any strategies for dealing with it?
YoungHouseLove says
Ugh, it does get everywhere! We like to tape off vents with plastic so it doesn’t get in them and use plastic tarps from the home improvement store to tape off rooms we’re working on (tape it to the floor, walls, and ceiling so it’s all sealed behind the bubble!).
xo,
s
Keisha says
I love the blue light!
Just wondering, since your light is now outside of the shower curtain, doesn’t it get kinda dark in the shower even with the light on??
YoungHouseLove says
Nope – granted we take most of our showers just in daylight – but our last bathroom only had the lights over the vanity and we never had an issue with it being too dark in the shower. Probably because the white curtain doesn’t really block as much light as a dark one might.
-John
Heather says
We are actually starting a complete bathroom gut renovation today. We are so excited to get rid of our 70s blue bathroom!
Lauren says
Okay, so I have to say that John’s comment about him sewing had me intrigued. YHL Challenge perhaps? John takes on a sewing project and Sherry builds something with the Kreg? :)
Love the new light, crazy how a few small changes can make such a big difference!
YoungHouseLove says
Haha, I think that could be a hilarious disaster. Will have to see if I can coerce John… don’t want him to break my machine! Haha.
xo,
s
Ty Lee says
At first I thought it looked a bit odd that it was hanging soooooo high, but then again I’m 5’3, so hitting my head on light fixtures has never been an issue! And I didn’t realize that there was code that dictated height of light fixtures! Definitely something to keep in mind when I move into my house and start doing all sorts of DIY projects.
HGTV is teaching me all sorts of wrongness! And here I thought it was no big deal to just put a chandelier or two in a bathroom… next to the fireplace…
Gabbi says
Ahhhh, I love those lights. They are the ones we used for our kitchen reno!
http://retroranchrenovation.blogspot.com/2012/01/shes-ready-for-her-close-up.html
Looks great!
YoungHouseLove says
Oh Gabbi, I love your kitchen more every time I see it! LOOOVE the pops of blue!
xo,
s
Kylie McCoy says
I want this light. It doesn’t match anything in our farmhouse, so I’ll have to repaint everything, but I LOVE IT!
Ashley @ Life Begins at 23 says
I closed on my house at 2 pm on Friday.
By 2 pm on Saturday I was also doing some work on my bathroom…
You can read all about it here: http://lifebeginsat23.blogspot.com/2012/04/great-casa-1014-plumbing-fiasco.html
Let’s just say I have been re-thinking the homeownership thing! A little too late. Haha.
YoungHouseLove says
Oh no! So crazy! But so glad your realtor could figure it out. So smart! I never would have known to check that!
xo,
s
Katie says
As Clara would say “sah pretty”!!! Love the upgrade. One question (and it’s quite possible my eyes are seeing things weird) but it’s hanging so close to the shower curtain, do you have to duck when you get out of the shower?
YoungHouseLove says
Nope! I’ve got about 9 inches of clearance (and I’m 6 foot even).
-John
Miranda says
Thanks to you talking about how you only really get a chance to work on stuff when Clara is taking a nap or in bed for the evening, on Friday I painted. While my husband was at the firehouse and after my son went down for the night, I put the first coat of paint on my builder white bathroom walls. This coming Friday, the walls are getting a second coat of paint and will end up a pretty sea glass blue color.
:)
YoungHouseLove says
Wahoo! Go Miranda!
xo,
s
kim says
I know you said it some where I just can’t find it. what white are you painting the trim?
YoungHouseLove says
We have some Olympic Premium off-the-shelf white (it’s actually a really great white color) in a semi-gloss finish. Hope it helps!
xo,
s
kim says
huh…I thought you said you were using oxford white semi gloss. Must have been another blog….now to figure out what one!!
Denny says
That blue is FAB! And we, too, were busy this weekend putting the finishing touches on our uber girly (and very un-Denny) guest bedroom redo! Take a look here: http://www.dennfinn.com/?p=4465
YoungHouseLove says
So sweet! Love that room!
xo,
s
Melissa says
Very cool! Can I just say that I seriously have no idea how you guys do this?! My husband and I have a son around your daughter’s age and we literally cannot get anything done around the house. After coming off of a weekend where we tried to hang some pictures (um, completely easy task) and that was challenging, I am in awe that you do such amazing things while keeping up with a toddler! Toddlers are crazy!
YoungHouseLove says
Aw thanks Melissa! We do most things when Clara’s in bed for the night! We’re DIY night owls. Haha.
xo,
s
Shara says
Ok, this is off-topic but lighting-related so I figure it’s okay to post here…. I looove the lamps you have in your living room on the console table John made. I know you got them from Marshall’s once upon a time, which means I will probably never find them. Do you have any idea what brand they are or anything? Or have you ever run across any similar lamps? My searches have been fruitless so far, and I have an empty end table begging for one of those lamps….
YoungHouseLove says
I wish! They have no clues (no tag under the base or on the shade). So sorry Shara! I have seen similar ones at TJ Maxx, Marshall’s and HomeGoods though, so maybe they’ll find you someday!
xo,
s
jessica says
um…I’m so jealous – in a good way! That light is beeeeeauuuutiful! I might go out and buy one…
YoungHouseLove says
Aw, I hope you get one! It makes me smile every time I go in there.
xo,
s
Heidi P. says
Yay for finding the light you wanted a lot cheaper! Looks great :).
This weekend the grandparents had the kid (yay!!!) so I had time to visit with old friends, put up a floating shelf, hang a curtain rod, and strip more paint off my poor-attempt-to-paint-my-laminate-counters. :)
YoungHouseLove says
Sounds like you were productive!
xo,
s
mp says
Beautiful!
Tamsen says
I love the light! Have you guys considered framing out the top of the shower to hide the shower rod and make the curtain look more seamless from the ceiling? Just a thought :)
YoungHouseLove says
That could be pretty cool actually! We don’t mind the rod (it’s sleek and stailess and ties into the other hardware) but framing it out could be a fun built-in look too.
xo,
s
alg at rental house rules says
Thank you so much for mentioning the “Light It Up Blue” campaign — and for lighting it up blue in your bathroom every day!!
As a family affected by autism, Dan, Sonia & I appreciate your support more than we could ever express.
Much love — Amy
YoungHouseLove says
Aw, lots of love right back Amy!
xo,
s
maribel says
I recently caught the spray paint/painting bug. This weekend I started to paint a dresser that’s been sitting begging for a makeover. I was watching Nate the other day, and was inspired by a dresser he has on set( it’s brown with white drawers) Next are some frames I scored all for less then 3 dollars at a local thrift store. (they are black or that really old oak look) I’ve noticed you use a gray primer or white(including primer). What’s the rule?
Kara says
Completely unrelated question for Sherry, the Spraypaint Queen: what grit of sandpaper do you use to sand down drips in between coats? (I learned the folly of spraypainting in the desert on a windy day yesterday, sigh.)
YoungHouseLove says
Hmm, probably something around 100 grit would do the trick?
xo,
s
Bethany says
Nice light! I have a question about the drywall patch – when you screwed the wood to hold the patch into the existing drywall, did you just sort of reach up into the hole to press down on the wood while you screwed it in?
There’s some serious drywalling in my future (bathroom and basement re-dos) so I’m just curious about the logistics. Clearly I need to go stalk your archives for drywall info!
YoungHouseLove says
Yep, that’s exactly what I did – just reached up and held it in place while I screwed it. I guess I couldn’t clamped it, but my hand worked just fine in this case.
-John
Margee says
After becoming addicted to your blog, this weekend was my “go to Ikea (etc.) and get all new window treatments for my entire house” trip! Thanks to you, I’ve transformed my dark, depressing den and am well on my way to transforming my dining room and one of my son’s rooms. You guys are so creative and inspiring! Thanks for all the pragmatic advice (like how to deal with a big hole in the ceiling drywall), too! Love the blue light.
YoungHouseLove says
You’re very welcome. Sounds like you’re on a roll!
-John
MelissaG says
Love it! My husband never goes for pendant because of his height though….he actually bought a NEW boob light for our powder room (not even sure what to call this bathroom, 1/2 bath??) Ugh, would love this blue light! If only our ceilings were higher.
snosie says
You people are SPEAKING TO ME!! Not only was two weeks ago ‘new light time’, yesterday, today and tomorrow are paint time. Which in between was hole filling and spackle time (which I’m not the hugest fan of, but then it was the parents old stuff, so perhaps that’s my issue. Anyhow, the grand sum total of yesterday’s work by pro painter was hole filling (the smaller ones…) and he’s pretty good at it. Can’t wait to get home today, surely more ‘boom’ with a total colour change in my loft.
Reason for outsourcing (is not that I’m rich, I’m not!) but I have double height ceilings… Even the painter had to buy a new ladder last night (which I watched TV with last night… rather than climbing!) And it would have taken forever for me to paint it top to bottom (even with the Easter long weekend) And I’m not 100% in love with the heights after doing my 160 flower press ones for my pendant just like yours in your bedroom (could you NOT have used that…. people are SO going to think I’m copying you! Or the rest of the world that’s into ikea!)
YoungHouseLove says
Oh wow, those ceiling do sound like a challenge when it comes to painting and Maskros assembly. :) But so glad to hear you’re rocking and rolling on getting it done anyways!
-John
Amanda says
Ooo la la! It is already looking awesome!!!
On an unrelated subject, I thought you all would appreciate this totally kick fanny light fixture made from a globe!
http://decorhacks.com/2012/03/globe-pendant-light/
YoungHouseLove says
Um, yes – awesome!
-John