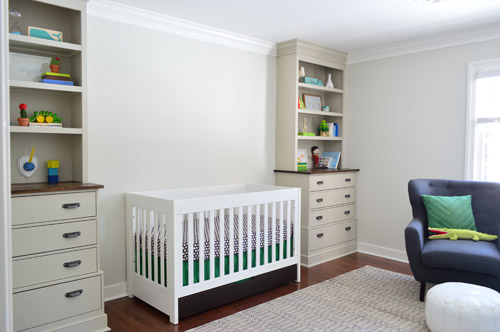
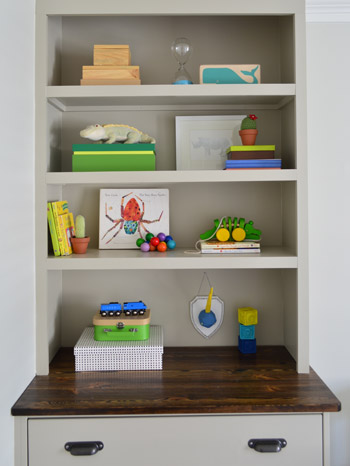
The built-in bookcases in the nursery have officially been filled with board books, toys, stuffed animals, framed prints, and a few other random bobs and bits that I hope our little man will love feasting his eyes (and mouth?) upon. We even created an easy paper mache craft there on the bottom left shelf. Can you spot him?
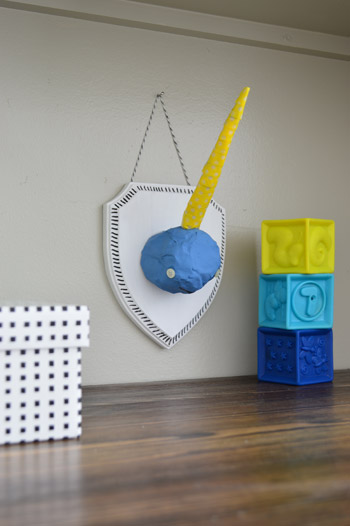
Ladies and gentlemen, allow me to introduce Norman The Narwhal. He’s FAR from a perfect specimen, but it was the sweetest project to do with soon-to-be big sister Clara. I think I love him more for his handmade wonkiness than anything else. Dude has some serious character going on. So let’s file this under “made by a kid with a little help from mom for her baby brother.”
Plus, it’s an easy craft to customize to make whatever animal you want to capture as a cheeky, faux bust display.
How We Made A Paper Mache Narwal Bust
Here was our inspiration (which is nowhere near as wonky, and very charming indeed), and here’s how Clara and I had fun subbing in paper mache for a styrofoam ball, made the horn a different way, used buttons for eyes, etc.
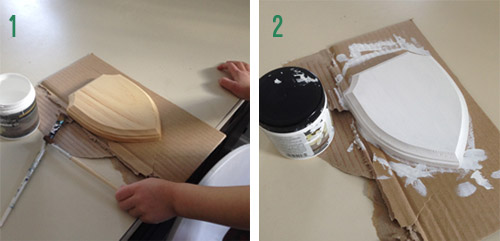
Step 1: Buy or Make Your Wood Plaque
We picked up a small wooden craft plaque from JoAnn for around $3 with a coupon, but you could also cut your own shape out of a piece of wood if you’d prefer.
Step 2: Paint Or Stain Your Plaque
We decided to paint our plaque white using a leftover sample container we had around. This was an easy step for a 3-year-old to help with. Plus, you could choose any color or choose to stain it for a wood grain look.
Step 3: Add Your Paper Mache Ingredients
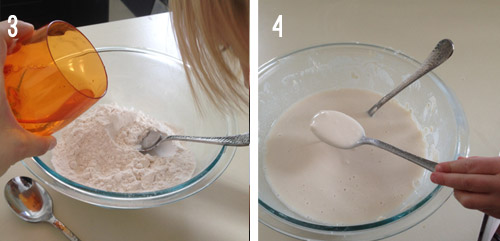
Admittedly it had been a while since we paper-mached anything, but luckily you probably already have the ingredients around the house: it’s just flour and water. Here’s another great paper-mache tutorial if you’d like to see this process on video!
Step 4: Mix Until Smooth
Mix your flour and water in a bowl until you get the consistency of thick soup. We made waaaay too much). Clara LOVED this part, hence the comically large batch. She kept wanting to add more water and more flour and “stir, stir, stir” things up.
Step 5: Build Your Animal Head
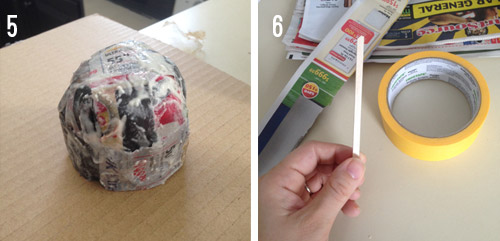
Next, we used some small strips of newspaper dipped in our “soup” to make our narwhal head. Most paper mache crafts have you layer these soggy paper strips over a balloon. You can easily customize the size of your project with a balloon. Plus, it removes easily (just pop it!) when your paper has dried.
We didn’t have a balloon handy so we sort of just crumbled up a ball of paper to build around. It didn’t make for the smoothest finished project, but having a lightweight base that we could leave under the shell did help constructing the narwall head in the following steps. So maybe not having a balloon was a happy accident!
Step 6: Built Your Narwal Tusk
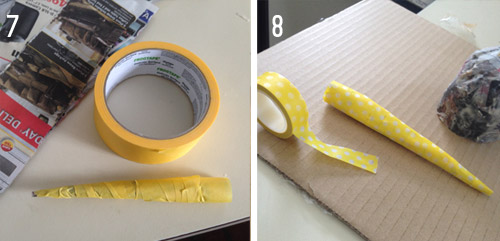
While our paper mache dried, we turnd our attention to the narwal’s tusk. For ours, we found a small wood dowel and trimmed it to about 5″. But a pencil or firm straw would also work!
Step 7: Wrap Tape To Create Your Shape
To create the tapered horn shape of the tusk, we gently coiled some painters tape from the top to the bottom of the dowel, wrapping larger loops as we went. We could’ve used more paper to form a cone under the tape, but we were going for a lightweight tusk so it wouldn’t sag.
Step 8: Wrap Decorative Tape On The Last Layer
For the final layer of the tusk, we switched to a yellow polka dot washi tape that I had on hand. It’s hard to see in the pictures, but it was a nice way to introduce a little bit of fun pattern. We also coated the tusk in a layer of matte Mod Podge just to lock everything in place.
Step 9: Paint Your Paper Mache Head
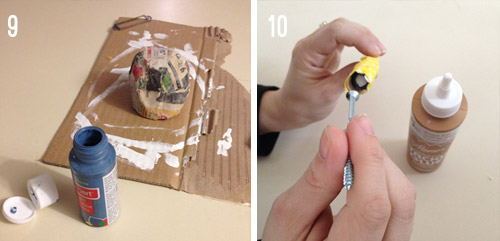
While our Mod Podge dried, we paintd our narwal head using some blue craft paint. But again, this is a great chance to customize yours with whatever color suits you!
Step 10: Glue A Screw
In order to put the the tusk to the head, we first used Aileen’s Tacky Glue to glue a long screw to the inside of the dowel of our horn, which we let dry for a nice long time.
Step 11: Attach The Tusk
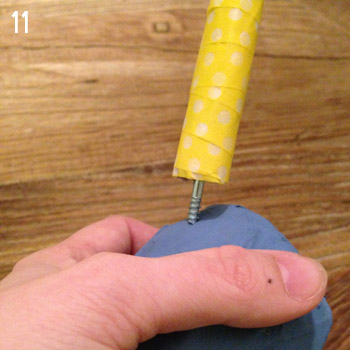
Once our narwhal face was dry and the glue for our screw had cured up, we screwws it right in to the paper mache for that horned look. I even made a small pilot hole with our drill to get things started (Clara LOVES anything drill related, so this was a thrilling step for her as well).
Step 12: Add Personality
We glued on some buttons to give our narwal eyes and drew a small smile on with Sharpie, but really anything goes at this point. Give it a bow! Draw freckles! Add a hat! Have fun!
Step 13: Glue To Your Plaque
With the narwal fully constructed, we used more glue to attach the head to our painted plaque from the first step. We also added some dash marks around the border with a paint pen, and added string to the back so it would hang.

This was such a project to involve our daughter with, and we think the final creation is so filled with personality (plus really screams “a 3-year-old helped make this!”).
Over the years I’ve been asked if I think obviously fake creations like these (or a ceramic ram head, or a cardboard deer head) might glorify the act of mounting an actual animal head. I’m sure everyone has different opinions about this (it’s such a highly personal thing) but I’ve thought about it for a while, and I don’t believe faux taxidermy makes any sort of pro-real-taxidermy statement. To me, it’s just like using faux sheepskins in our house instead of real ones, or how people might buy faux fur coats. Another example would be how animal rights activists like Stella McCartney will design things with faux leather (real leather = against her beliefs, but she’ll use the imitation to make a statement that there are great alternatives to the real thing).

Now I’m excited to start in on some other personality-adding details, like a pair of colorful curtains, and a large-scale mobile for over the crib. This is just some bad photoshop below, but I have an old manzanita branch that I think could be fun with lots of colorful shapes hanging off of it at a ton of different lengths and depths.
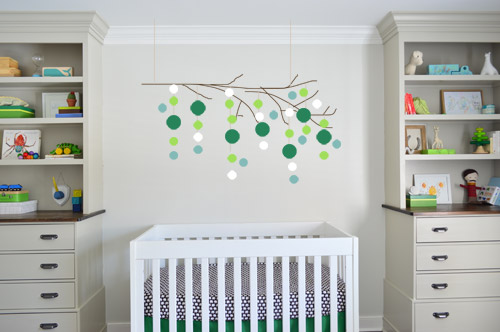
So those are next on the list. What are you guys up to when it comes to bookcase-filling and art-making? Anyone else breaking out the paper mache? Clara kept trying to eat it, which was both comical and surprisingly ok (it is made from flour and water).
Psst- To see our nursery progress from the very beginning, here’s the planning and rug-buying post, the dresser-sourcing post, the wall and ceiling painting rundown, the first half of built-in building, the second half of the built-in project, and how we added crown molding and a homemade crib skirt.

Sean dees says
LOVE this entire post. Wonky norwhal and all ;). I am definitely going to find/buy some crocheted cacti now. I Love plants that I can’t kill. I love the mobile idea. I don’t know if you already had a crafted our plan. But I’ve totally seen people sew paper/cardstock circles like that. Which could be cool. And mostly selfishly I think you shoul try it so I could read your tutorial instead of having to figure it out myself ;). Can’t wait to see however you do it though!
YoungHouseLove says
Haha! Thanks for the suggestions Sean dees!
xo
s
Megan says
Oh this looks so cute! You guys always get the mix of sentimental and stylish just right in your home. I think that’s why we all love you guys so much. (At least me anyway).
I did some faux taxidermy for my little man–who’s not so little anymore–19 months now! He showed up a month early so I never got a chance to decorate his room how I would have liked. Once he was here, well…Let’s just say it’s been a long year and a half and very little decorating!
http://thingsthatfloatmyboat.blogspot.com/2013/12/faux-and-mini.html
YoungHouseLove says
Really cute Megan! Thanks for sharing the link!
xo
s
Kaetlyn says
Oh, what a sweet room! My youngest son’s favorite snuggly friend is a narwhal, pronounced “warwhal”. So I have extra happy associations with Norman;)
YoungHouseLove says
Adorable!
xo
s
Erin says
Aw, everything is coming together sweetly! The nursery posts are my favorites lately! You do such a good job displaying your loved decor items. I’ll need to keep this for reference. Thanks!
YoungHouseLove says
Thanks so much Erin!
xo
s
Tara says
Did you dispense with the sconces on the side of the built ins idea? Or are you just planning to add those after the crib phase? Love how it’s all tuning out! Our baby boy (due in July) is in serious need of some nursery prep too. I need to get on that! If only this nausea would ever go away… ;)
YoungHouseLove says
I think we have moved on to the idea of sconces above a bed (on the wall) once we have a bed there down the line (on either side like reading lamps you might see above a bed). But we’d love an overhead light in the room before we bring the bun home, preferably on a dimmer.
xo
s
Terhi says
Awwww, this post almost made me cry. Clara is so precious :)
I love the mobile idea. I’m actually thinking about doing something similar (not for a baby, just for myself) with some origami hanging from a branch, for example like this: http://collegelifediy.com/wp-content/uploads/2011/07/cranebranch.jpg
I think some origamis would look really fun from Clara’s baby’s perspective. Just a thought.
YoungHouseLove says
That’s such a fun idea Terhi! Thanks for sharing!
xo
s
Natalie says
So funny that you posted this today as just yesterday I was goggling ideas for how to arrange my 2 year olds bookcase. I didn’t find much inspiration and might have another try today after seeing your effort.
Here is hers from yesterday.
https://www.facebook.com/photo.php?fbid=1880798665394192&set=a.1753355414805185.1073741828.1752918728182187&type=1&theater
YoungHouseLove says
So funny! Best of luck with it Natalie. It’s looking good already!
xo
s
Gina says
Love how the nursery is coming together! I really love your photoshopped piece between the bed too! Curious how long your narwhal took to dry….the last time I attempted that it took weeks to dry and have hysterical memories of a project for high school with my best friend that NEVER dried. Need to call her and see if she remembers that from 37 years ago! You’re creating great memories with Clara. Does she still call “her baby” The Barnacle? Love that nickname.
YoungHouseLove says
That’s so funny! It did take a while to dry (I think there was a full day between making the head and letting it dry and painting it). As for the baby, she pretty exclusively calls him “my baby” these days (ex: “is my baby coming out today?!”) but she calls her little boy baby doll that we gave her when we found out we were having a boy Captain Barnacles. Meanwhile John calls my bump The Barnacle all the time, and I usually say “the bun” or “the baby” but sometimes “baby Barnacle” gets worked in there too ;)
xo
s
Tina says
For the mobile – you might like to check out this tutorial on the Shutterstock blog on making geometric paper sculptures: http://www.shutterstock.com/blog/holiday-papercraft-tutorial-with-mohawk-paper
I made a mobile for my nephew based on these and it turned out great!
YoungHouseLove says
Love that too! Thanks so much for all the mobile links and ideas guys!
xo
s
Shavonda says
The bookcases look great guys. Also Im kinda sorta totally in lust with that chair….just a little;)
YoungHouseLove says
Haha! Thanks Shavonda!
xo
s
Mike Love says
Complete left field question:
What happened to your blog roll?
YoungHouseLove says
So sorry, we clicked a button to turn the blogroll off a few weeks ago (we’ve received a few complaints about it not being updated, linking to blogs that were inactive or that people didn’t like, etc). It has always been a challenge to keep that current, so we just disabled it for the time being. We noticed a lot of other blogs seem to have been phasing them out as well, so we’ll have to see where we end up :)
xo
s
Leah says
Nursery is coming along fantastic. I still look at the built-ins and wish the molding was white, I think they actually look more like furniture and less like built-ins the way you have it. Of course, they look amazing. Just a thought. Also, how do you find your inspiration? Do you follow a bazillion design blogs? Do you spend hours searching the internet…or have someone on payroll (Clara perhaps!) to do so? You find the coolest stuff.
YoungHouseLove says
Aw thanks Leah! We do have some fun places we get inspired (we follow like 300 people in Instagram, and a bunch of folks on Pinterest, and I read a ton of other DIY/design blogs as well as reading home magazines and books), but a lot of things just come from what we have a need for functionally (ex: it would be cool to add more storage here, what about built-ins?) or what we have around that we want to work with (ex: we have cool bike art with pops of green in it, maybe we should use green in the nursery?). We definitely use a lot of trial-and-error as we go! It’s nice to just course correct over time and hopefully end up with something we love that way :)
xo
s
Traci says
I’m obsessed with the idea of that mobile as shown in the last picture! I’m pinning it for future reference.
YoungHouseLove says
Thanks so much Traci!
xo
s
Kelly says
I have a children’s book suggestion for you. The title of the book is “Commotion in the Ocean” and we got it via Scholastic. It is a great book to read to children because the language just flows wonderfully. It features many animals from the sea including barnacles! I think both your children would love it. My two enjoyed it. Also, your baby’s room looks wonderful!
YoungHouseLove says
Sounds awesome. Thanks Kelly!
xo
s
Sophie says
Two thumbs up from this teacher for that Eric Carle book. LOVE HIM!!! :)
You remember how you made those predictions before Clara was born? Are you planning on doing the same thing with your little guy? I was browsing old posts the other day and came across it – it was so fun seeing which of the ones you made for Clara are already true!
YoungHouseLove says
That was so much fun! Thanks for the reminder. We’ll have to do that!
xo
s
Tracey says
This is totally off topic, but have you done a winter pinterest challenge yet? I know you and Katie have bigger better things on your mind at the moment, so I understand if it’s not a priority right now.
YoungHouseLove says
Oh man, we have fallen off (the last one we did was almost a year ago last spring!). We’ll have to see if we can get them going again!
xo
s
Sue says
Love Norman! I went to a wedding that had a pair of narwhals on the wedding cake.
And the manzanita branch mobile is gorgeous too.
I’m a devoted omnivore, so I prefer to use the real thing when it comes to sheepskins and leather (I also prefer butter to margarine, and real milk, especially when my goats are milking). I don’t like all the chemicals in the fakes.
YoungHouseLove says
Ahh, that wedding cake sounds adorable!
xo
s
Dawn says
I’m late commenting, but seriously sweet and adorable and perfect bookshelves. Love them! And I’m glad you kept the board books around for baby. They make great books for new readers, which Clara will be soon if she isn’t already, and then she can read books to her baby brother! Commence verklemtedness.
YoungHouseLove says
Ahh, I can’t wait for her to read them to him. She memorized so many of them, it’s going to be so cute!
xo
s
Natalie says
Do you ever outgrow board books? I still find “Blue Hat, Green Hat” to be hilarious. Sandra Boynton is kind of a genius.
YoungHouseLove says
Haha, it’s true! Clara will scream “OOPS!” whenever we read that. Such a favorite.
xo
s
Rebecca says
Sherry, this room is turning out so adorable! I also had to smile–and comment–at Clara calling her little bro “my baby.” That’s what I called my little sister (my mom started it to alleviate any potential jealousy) and 22 years later, much to her chagrin, my sister is still “my baby.”
YoungHouseLove says
So cute!
xo
s
Emily @ Life on Food says
Those built ins look so perfect. It is hard to believe they weren’t always there.
YoungHouseLove says
Thanks so much Emily!
xo
s
Katie K says
I love all the things Clara helped contribute to the room! Our first was only 19 months when our second was born so didn’t really understand what was going on let alone get excited and involved in getting his room ready. Maybe next time.
rachel says
I’m so confused. Last year you bought a new dresser for Clara’s big-girl room so you could use her original nursery dresser for a potential second child.
https://www.younghouselove.com/2013/01/a-dove-and-a-moose-walk-into-a-bar/
Then a few weeks ago you said you were pretty sure you were going to use the dresser from John’s dad (currently in your closet) for a changing table.
https://www.younghouselove.com/2014/01/goin-to-the-chapel/
Now you tell us that you’re planning to use a cubby system for a changing table and storage. Why didn’t you just use the dresser(s) you already had? I’m sure you have good reasons, and of course you have every right to change your mind along the way, but maybe you could help me/us understand why you keep buying/building more furniture. I’m genuinely confused.
YoungHouseLove says
Sure thing! We’re actually planning to repurpose something else that we already have for our cubby system, so we’ll share those details as soon as we get started. Sometimes things change as we go, for example, we blogged about planning to buy a nursery armchair and then realized the one in our office worked perfectly. We also planned to use John’s dad’s dresser but after adding built-ins (with eight drawers of storage) we thought four more drawers might be overkill, so repurposing another item we already have to house toys/puzzles/games sounds more functional. Plus it means we can keep using that dresser in our closet where it’s currently living :)
xo
s
rachel says
Lemme guess… starts with S, ends with Ofa Table? ;)
YoungHouseLove says
Close, but no cigar ;)
xo
s
Irfan says
Bye buddy. Hope you find your daaaad.
YoungHouseLove says
Haha! Love a good Elf quote!
xo
s
Kat says
It’s exciting to live vicariously through your experience as you prepare for a new baby! I miss being able to decorate my kids’ rooms…they’re growing up and are now in charge of their own room decor. Have fun!
http://www.junktogem.com
YoungHouseLove says
Aw, thanks Kat!
xo
s
caitlin says
Just had to show you our little guy’s mobile. https://www.facebook.com/photo.php?fbid=10202431755417438&set=pb.1300389925.-2207520000.1392781368.&type=3&theater
YoungHouseLove says
Aw man, I’d love to see it but I think it’s set to private.
xo
s
caitlin says
http://instagram.com/p/gwZXlSiqhU/
Maybe this will work. It took my husband hours to fold these little animals!!
YoungHouseLove says
Adorable! I love it!
xo
s
oh Holland says
Clara’s generous spirit toward “her baby” is most touching. Barnacle’s room looks marvelous!
I commend you on your thoughtfulness about the distinction between real and very obviously faux taxidermy. The real thing is so disturbing to me — how people can call dead animals decor is, honestly, depraved. But being kind and compassionate about animals doesn’t mean we have to be constipated about playful take-offs, as you have so aptly shown. Big time kudos to you from a big time animal advocate here …
Stephanie says
Love it; you two have excellent taste.
And a custom piece from Little Cord Art might be a nice addition :) http://www.littlecordart.com
Stephanie S. says
I love following the nursery progress! I am due in April too, and we are in the midst of putting ours together as well. I love what you’ve done with the built ins. The storage boxes are a genius idea. I have them all around my house and it couldn’t be easier to manage clutter. Can’t wait to see the mobile. Question for you, how do you plan on attaching it to the ceiling? I would like to do something similar, but my husband isn’t keen on drilling into ours. We have an older textured, plastered, ceiling. Trying to figure out a way to make it work. I love the idea of it hanging from the ceiling as opposed to attaching it to the crib.
YoungHouseLove says
We’ll definitely keep you posted when we make it and figure out how to hang it. We have had luck with heavy duty plant hooks (they’re meant to support the weight of a pot full of dirt with a plant in it, so hanging a light mobile with a few of them should be nice and secure).
xo
s
Julia@Cuckoo4Design says
I love Norman The Narwhal! So fun! I want him!
YoungHouseLove says
Aw thanks Julia!
xo
s
Karen @ PaperFancy says
I love this!! I had never heard of Narwals until I started reading children’s book to my kids.
The branch mobile is such a fun idea…
Kelly says
I love how personal the nursery is and how much influence Clara had on decorating. It will be the perfect home for “the barnacle”. One word of caution though, from a professional infant care provider: use caution in choosing what to hang over the crib. Anything that could potentially drop pieces (like small twigs) into the crib would be a major choking hazard. I look forward to seeing what your creative minds come up with!
YoungHouseLove says
Thanks Kelly! I’m the most paranoid momma around so you can bet I’ll be checking every last branch to be sure it’s nice and strong. It won’t be a stick from the yard that flakes or anything, it’s a dried manzanita branch that West Elm sold a while back, so it’s cured and bark-less and everything ;)
xo
s
Laura says
Hi Petersiks! The room looks absolutely beautiful! I can’t wait to see the next phase!
A quick question on those FJELL IKEA dressers — are they COMPLETELY made out of wood? That is, no particle board at all? What about the bottom of the drawer? The back of the dresser? I ask because I’ve had some bad luck with IKEA dressers; I must stuff them with too many heavy clothes, and they always seem to fall apart after a few years. It’s completely my fault for abusing the dresser, but through this experience I’ve learned that only 100% wood dressers are for me. If you could confirm that this dresser is completely made out of wood, I think I’ll be on my way to IKEA this weekend!
Thanks for the tips!
YoungHouseLove says
Everything is thick and solid wood (including the drawer sides and backs) except for the drawer bases and the back of the dresser, both of which are super dense and hard plywood (we think). It’s not that cardboard or particleboard stuff that’s flimsy – it’s very rigid and hard – but about a fourth as thick as the chunky wood on the top, drawer fronts and sides, etc. Hope it helps!
xo
s
Jenn says
I know you say its bad Photoshop but I’m really liking the mobile idea you posted and especially the colors of the circle..I say go for it just like that!!!!
YoungHouseLove says
Thanks Jenn!
xo
s
Jenny says
Love how the room is coming along! I think your branch idea is perfect and love that it covers so much space over the crib, but I saw this on pinterest and thought of you guys because of your awesome bike prints so I thought i’d share…
http://www.apartmenttherapy.com/bike-wheel-mobile-141383
I made paper planes out of old tea soaked book pages and then covered them in bees wax and hung them like bunting in my sons room, but i thought this was really cool with the old bike wheel.
YoungHouseLove says
So much fun! Love that too Jenny!
xo
s
Megan says
I have that Quinby Oyster can – it is one of my prized possessions. No, really it is. I found it in a junktique store in Leesburg. My husband thinks I am crazy, but I love it! I put a glass sleeve into it and use it as a vase. I get so many compliments. I love it with your shelves!
YoungHouseLove says
That’s so sweet! What a small world that you have the same one. Love the idea to use it as a vase!
xo
s
Tina says
Love the room, especially the built ins, once again you “youngsters” have inspired me to redo my 8 year olds room, if a prego lady can get all that accomplished, I’ve got no excuse! Lol oh and by the way how is the all day sickness thing going? I could really relate to that I was so shocked when I had my first child to find out morning sickness could last all day! :)
YoungHouseLove says
Oh man, it’s the worst! It seems to be getting more intense, but my eye is on the prize. Eight more weeks, baby! Wahooo!
xo
s
Sara says
You might have covered this already… But do you happen to remember where you got those gummy blocks from? Or what brand they are? I think they would be a hit with my little one who is teething like crazy :)
YoungHouseLove says
They’re a brand called B Toys from Target. They have them on diapers.com I think too!
xo
s
Melissa says
oh my goodness. LOVE that blue chair. Did I miss the post where it debuted? Where is it from?
YoungHouseLove says
Thanks so much! It was from Joss & Main a while back. It used to be in our last house’s kitchen across from the fireplace. So comfy!
xo
s
Sarah says
Hi Sherry and John, I’m a new reader and love you guys. I just couldn’t resist passing this on to you after I saw the narwhal. Check out this narwhal pillow. http://www.etsy.com/listing/168886454/plush-narwhal-pillow-hand-woodblock?ref=shop_home_active_16
YoungHouseLove says
Really cute!
xo
s
Bailey says
I love the things you’ve added to these shelves. I am horrrrrible at creating little vignettes around my apartment, but you made like 15 of them on two shelves! I’m going to have to study yours to pick up on the things that work. I don’t know why I’m so bad at it!!
YoungHouseLove says
It used to be really hard for me too! Takes a while but I just mess around and step back and take breaks and it hopefully works in the end ;)
xo
s
Lindsey says
I LOVE the way this room is coming together! He’s going to love it! I just saw this cute mobile. It’s probably not the theme you’re going for but it’s just so adorable. Maybe it could play off the elephant crib sheet and be a nod to a bit of circus theme. http://creaturecomfortsblog.com/home/2014/02/19/diy-circus-pals-mobile-room-decor.html
Lindsey says
I just saw this too… gosh, too many possibilities! :) http://www.pinterest.com/pin/131941464056979942/
YoungHouseLove says
That’s fun too!
xo
s
YoungHouseLove says
Cute!
xo
s
Megan says
It’s coming together so well. Enjoying the clean and simple design. We always struggle with filling up the shelves to much. It’s a fine balance and you guys have done a great job. The fun part with kids’ stuff is you can use toys for decorations! When function meets art, love it!
Susan says
Have you thought of big scale wallpaper or tone on tone stenciling on the big blank wall behind the crib?
Even with wall art, it’s such a focal point area.
That green paint you have in mind for the door would really look smashing,too, IMHO.
These are fun-love the first with the apple-lime-ish green walls…http://fleachic.blogspot.com/2012_04_01_archive.html
YoungHouseLove says
Thanks for the link! Lots of fun rooms there! We both have really loved the idea of a large scale wallpaper somewhere, and have thought about between the crib, but when we held the bike art up there it was so busy that we worried wallpaper would be even worse with all the items on the built-ins. We’re definitely excited to add some more color and pattern though, so we can’t wait to address all those bare walls!
xo
s
mary says
beautiful! also adding a mirror on the wall above the crib will make the mobile 2X the fun! babies LOVE mirrors
YoungHouseLove says
That’s a fun idea too!
xo
s
Nikki says
I love how all of the pops of green are coming together! It looks so good!
Michelle says
I totally agree with you about the faux vs. real taxidermy. Real taxidermy creeps me out, but putting up a fake head feels more like hanging a picture of your favorite animal on the wall!
I used a free printable I found over at Madame Citron to make a folded paper fox head to hang on our Christmas tree this year (http://rustsunshine.blogspot.com/2013/12/12-days-of-christmas-day-8-blue-fox.html). I love it so much, but now I want to make a big one. Your narwhal is adorable!
YoungHouseLove says
So cute! Thanks for sharing the link!
xo
s
April says
Do you know where you got the three tinged stacking tree?
YoungHouseLove says
That was from amazon and it’s made by Plan Toys.
xo
s
Jenn says
The nursery is gorgeous! I came across this post this morning and immediately thought of your mobile idea.
http://www.mysparkle.blogspot.com/2014/02/felt-ball-mobile.html
YoungHouseLove says
Really pretty! Thanks for the link!
xo
s
Em says
Fun narwhal project for Clara! That “horn” is actually a tooth, though.
YoungHouseLove says
Someone else taught me that! Love that factiod! And now Clara wants an extra long tooth… haha!
xo
s