We learned with our first kitchen that building in your fridge is a huge help in making a kitchen look fancy schmancy. And at the moment our floating fridge was looking pretty much the exact opposite.
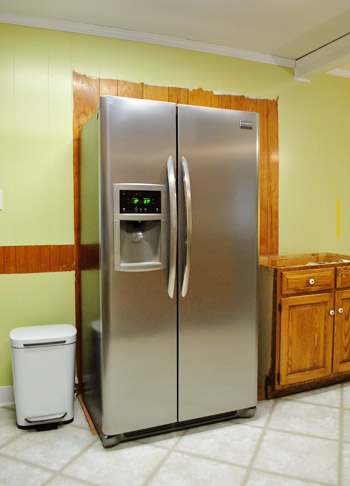
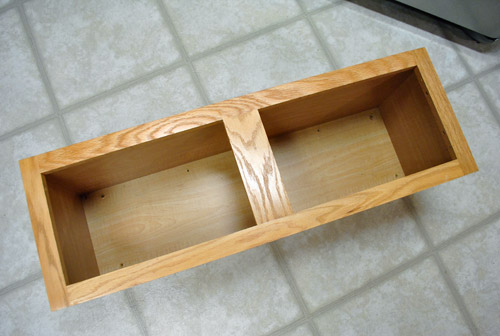
That’s where an also less than schmancy $19 cabinet from the Habitat For Humanity ReStore (mentioned yesterday) came in handy. It’s 12″ tall and 36″ wide, the exact width of our fridge. And when you take off the don’t-match doors (we’re hoping to retrofit extra existing doors to make it seamlessly match the other cabinets later), it starts to look more like a workable piece of cabinetry to sit atop our refrigerator.
For the sides of our built-in fridge, I picked up two 4′ x 8′ pieces of plywood that the Lowe’s guy recommended for cabinet work (he said it’s the same stuff they sell folks who get theirs built-in by pros as part of their kitchen installation process). They even cut it to size for me right in the wood cutting area, which was a huge help. The planks were still too big for our Altima so I rented the $19 Lowe’s truck to get it home. The truck rental, fridge planks, plus a few 1 x 2″ pieces of pine trim brought my grand total to about $90. Good thing that ReStore cabinet was cheap ($19).
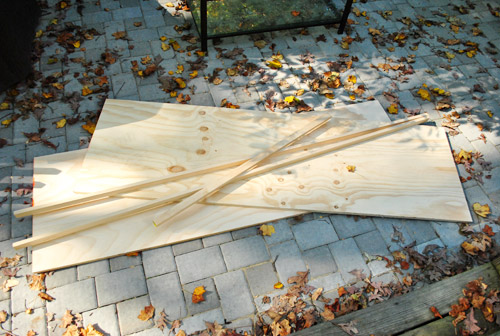
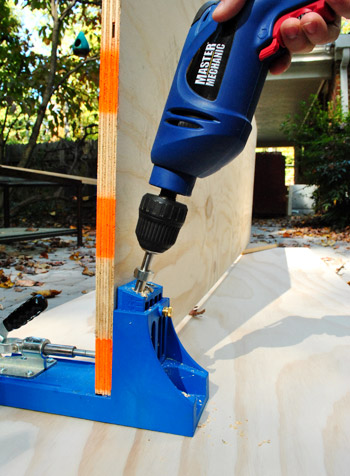
The point of the trim pine was to make the front edge look more finished and a bit more substantial looking. So I broke out my trusty Kreg jig and drilled a bunch of holes down one edge of both plywood pieces.
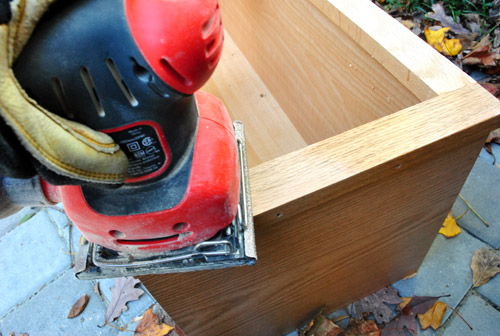
With my holes drilled, I sanded both sides of the plywood to make sure they were smooth. And while I was at it I sanded the finish off the front of the cabinet so it’s primer/paint ready (we’ll tackle it when we tackle the rest of our existing cabinets after the counters get installed so nothing gets chipped or scratched off during that stage).
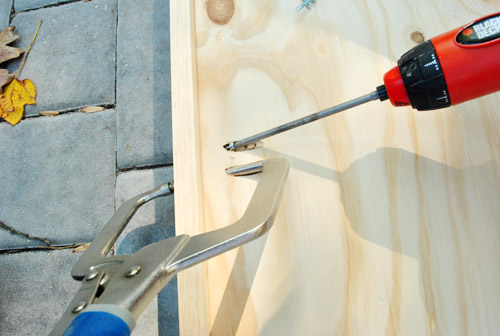
Then I carefully clamped and screwed the pine trim to the plywood piece so that the edges were flush. Having been around block with my Kreg by now, I’ve learned that it’s sometimes helpful to drill a second hole just to put the special Kreg clamp into. This is me trying to think ahead.
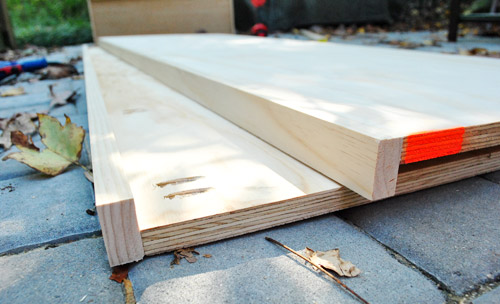
Eventually (note that I didn’t say “soon” – this part took me about an hour) I had the trim attached just the way I wanted on both pieces of plywood.
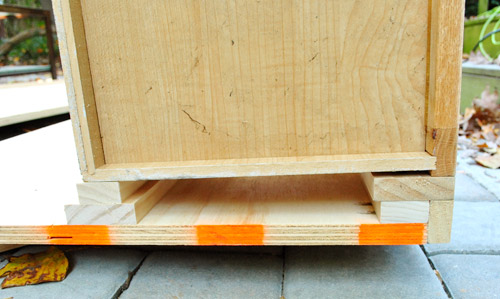
Attaching the cabinet took some thinking ahead too. Since we wanted the cabinet to sit flush with the trim (not behind it) and needed the opening to be slightly wider than our fridge (which was the same width as the cabinet) – I had to add some filler pieces (aka, leftover scraps). One stack of scrap wood went up at the front of the cabinet and the other was located at the back (neither of which would be seen at all once it was all installed).
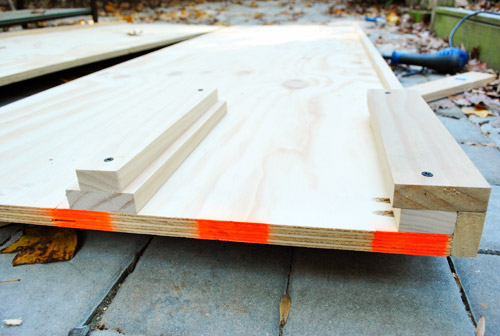
Here’s the same view with the cabinet sitting on it, to give you a better idea of why the filler was needed (I ended up adding a wooden shim to make sure the cabinet sat 100% straight).
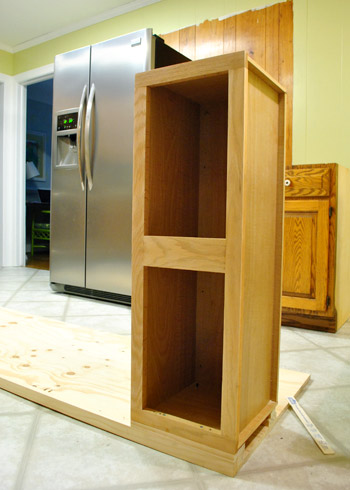
We didn’t actually attach the cabinet until we got everything back inside, since I wasn’t about to try to maneuver this whole thing from my patio-workspace through a few doors and into the kitchen. So here we are in the kitchen, with the cabinet screwed to one of the plywood sides. Here’s where Sherry put Clara down for a nap and came in to help.
We brought in the second side and used our camera tripod as makeshift jack to hold it in place while we screwed it all together, checking and double checking that everything was square and level.
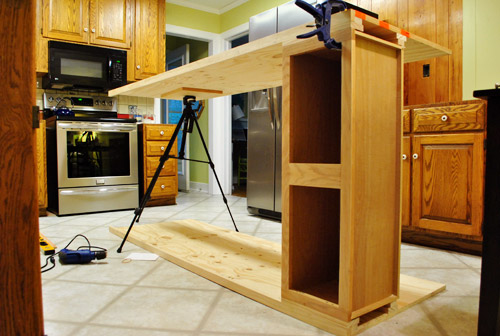
Before standing it up we added a spare board across the back to help keep everything straight and supported from front to back. It’s also the board we later drilled through to screw the whole thing into the wall (didn’t want it falling over on anyone!). We also put a similar plank of wood across the bottom (again to keep things square and to allow us to screw the whole piece into the wall).
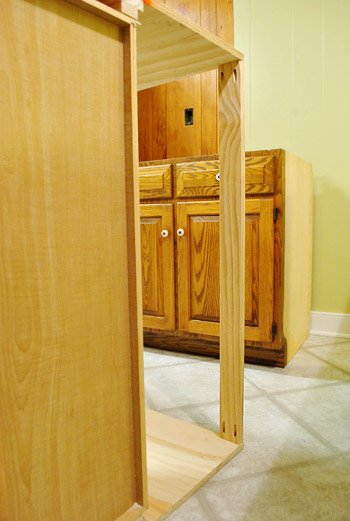
Then we heave-ho’d it up to a nice standing position…
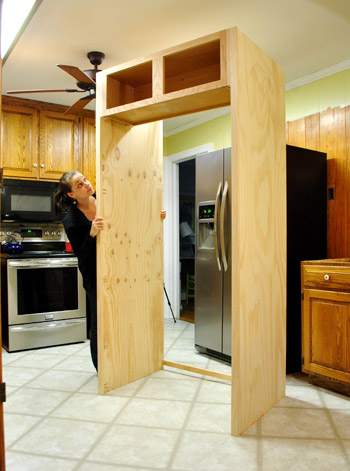
… and slid it into place (after temporarily removing the bottom support slat so we could slide it over the fridge like a slipcover).
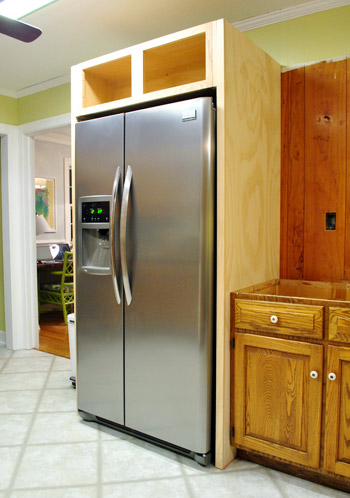
We’re not saying “ta-da!” quite yet, since there’s still lots to be done to it. Like priming and painting it, priming and painting the paneling behind it, adding matching doors, adding molding around the top, adding trim around the bottom, etc. But for now, we’re enjoying one pretty noticeable step towards making the kitchen look a lot more pulled together.
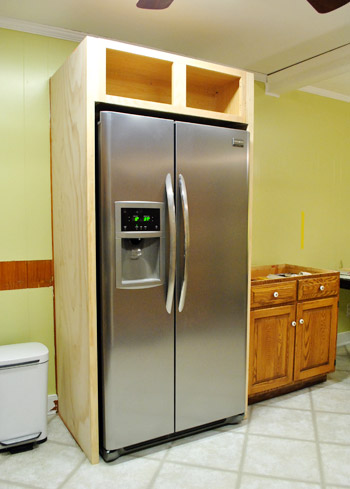
It’s definitely an upgrade from the un-built-in version, right?

Oh and if you scroll back up to the built-in pic above this one, you’ll notice that the fridge sticks out just a smidge from the wooden sides. That’s just a functional thing (it can slide a bit farther in, but the doors wouldn’t open as wide as we needed them to in order to access certain slide-out fridge drawers without hitting the wood frame). But it’s nice because the new built-in sides block all of the black coloring on both sides of the fridge – so all that’s visible is the stainless front (and a smidge of the sides of the doors – which are still stainless). It’s definitely going to be a huge upgrade to have a custom looking fridge setup along with the flush front cabinet up top (our old above-fridge cabinet was set about 6″ back, so it was a lot harder to access).
So that’s the latest slow but steady kitchen progress. Next on the agenda is attempting to finalize the placement of the peninsula (we still need one more cabinet to complete that area) by the end of this week so that we can finalize the placement of the giant eight foot doorway to the dining room that we’ll be adding with the help of a pro (which we hope to begin sometime next week!). Is it next week yet? Should be interesting/scary/exciting/dusty. As always, we’ll keep you posted!
Psst- We’re over on BabyCenter sharing an update on how we organize and store Clara’s outgrown clothes. And we’d love to hear your storage secrets on the subject.

Seriously Sassy Mama says
I love love love the built in fridge look.
Andrea says
Wow! That looks amazing. I’m always impressed by your know-how when you tackle a building project. My brain just doesn’t think like that!!
Britny W says
You guys never cease to amaze me with your handiwork! I can totally envision how nice it’s all going to look at the end! On a side note, knowing how much you guys like to save money I wanted to share something I found with you guys. I joined this site called swagbucks around this time last year. It’s essentially a search engine like google, but you can earn swagbucks randomly just for searching like normal. I was hesitant at first, but in about a year I have earned at least $60 in amazon.com giftcards from it. I know that isn’t a lot for a year, but it’s free money! Here is my link if you want to sign up. http://www.swagbucks.com/refer/britbrat2489
YoungHouseLove says
Thanks for the tip Britny!
xo,
s
Holiday says
Just a note that you should read your fridge manual – you may need that large gap at the top. Our fridge requires 2″ at the top. Failure to leave that much space stresses it in some way that could lead it to break down. (you can tell I have the technical deets, right? hah!)
YoungHouseLove says
Thanks for the tip Holiday! We have an opening at the top of the built-in until (behind the cabinet is a huge gap between that and the back wall) so John and I were talking about covering most of it up with a thin piece of veneer to keep dust from getting back there – but leaving a 2″ gap back there for ventilation right from the back.
xo,
s
Allyn says
I don’t know, I kind of liked the whole unpainted paneling look. Very ghetto chic.
You keep inspiring us to build things for ourselves. Up next? Hopefully a bookshelf for all of my dear friends, my books.
Jaye says
Impressive! Great job!
Lindsay says
Great work guys! We just finished building in our fridge but used Ikea panels and one of their over-the-fridge cabinets. And we figured out how to work around the ceiling beam! I just wish we worked as fast as you do!! :)
Sally says
Coming along great! Have you decided if you’re painting them white or a color? I think white would be better than grey, since you already have gray tones in a couple of other rooms.
YoungHouseLove says
We’re leaning towards not white and not gray. Maybe a soft taupe color that’s not too yellow (more of a cool taupe- but so light it looks almost white except that the counters will be whiter by comparison). More swatches and example rooms when we actually make a decision!
xo,
s
Donita says
The kitchen is looking great!! OK I really need one of those Kreg Jig’s, like John has. I’m asking for one for Christmas. I don’t have a project in mind, just want one. :-) John makes things look so professional. Does he fill the holes?
YoungHouseLove says
Nah, since they’re hidden (made from the back) he leaves them. That way he can access the screws and remove them if need be!
xo,
s
holly@LoveofLifeblog says
Wow! Great job. Definitely adds some class!
Megan says
Looks fab-u-lous! And now, thanks to you, I will be singing “plug it it – plug it in” all day.
Patti says
Impressive John! Very nice work indeed.
Emma says
Wow! You’re a pro now John. That is one lovely fridge hidey thing. Excellent job. Since you guys are such big time DIY pros maybe you need to get a used pick-up truck to haul all of your Loews things and CL/ReStore finds. (I’m just projecting because I want a fab&cheap used pick-up).
YoungHouseLove says
Haha, we love our little car but it would be awesome if we could blink our eyes and have a truck every once in a while!
xo,
s
Amanda says
Hi Guys! Your kitchen is looking great! I notice that you use the Kreg Jig a bunch and just wanted to mention a tip that for those without a jig (or for you when you don’t want to drag it out). For things like adding trim pieces you can always skip the screwing and use wood glue and clamps instead. A glue joint is stronger than the wood itself once its cured so you can trust that its going to hold for a very long time (even under some crazy stress/pressure).
YoungHouseLove says
So smart!
xo,
s
Susan M. says
You guys are so handy! It looks great so far. I can’t wait to see the finished product!
Betsy B says
Hey! Just a head’s up – we recently replaced our kitchen doors at the Home Depot off of Midlothian Turnpike in Richmond. They seemed to be the only place that you could order custom sizes of JUST doors, and they had a bunch of different finishing options (real wood, laminate, stained or painted, etc.). It took about a month to deliver, but it really made a difference switching out the old “apartment” style ones we had before (white laminate with that strip of wood at the bottom). **shudder**
Happy DIY-ing – LOVE your site, I get so much motivation & ideas from you guys :)
YoungHouseLove says
Thanks for the tip Betsy! We looked into those for our kitchen but it was going to be about 2K so we’re a little gunshy spending that much when we have solid oak doors for most of the cabinets already. Just comes down to trying to get them to match! We’ll keep ya posted!
xo,
s
Paige @ Final Clothes-Out says
Holy moly! It looks great already.
Very smart of you to put the cabinet flush with the top of the fridge. We have one above ours, but it’s set back really far and I can’t reach it unless I stand on a chair. And I’m tall! (Bad design, I tell ya.)
Robin says
holy cow! that’s awesome. i want so badly to redo our 1970s kitchen, you give me hope! :)
Joanne F says
You two are so talented!
I love the way you divide things up into small easily accomplished steps. I have a few partially done projects and find it so hard to start another because it will take so many days to finish it!
Great job, again!
Kelly says
This whole project makes me want to gut my whole kitchen and get crazy creative! Boxing in the fridge DOES make a difference! I looked back at your 1st house’s finished kitchen. I swear the ideas you guys come up with, you would think you both are interior designers. Tres Chic YHL!
Gabbi says
Having your fridge built in makes such a difference! I can’t wait to see the demo for the 8 foot doorway!! {You know me and my hubby loveee us some demo, considering we demo’ed our entire first floor, and then we just finished our garage ceiling this weekend haha.} Keep up the good work! :)
rachael says
As Candace Olsen would say “You’re not doing a renovation, you’re nourishing” :)Way to reuse as much as possible!
YoungHouseLove says
Aw, that’s cute! I’ve never heard her say that but I love it!
xo,
s
rachael says
Its from her new show Candice tells all! I just saw her do a kitchen makeover, reused as much as possible and she called it that. We’re in Canada, and its on the W Network, maybe that doesn’t air in the states?
YoungHouseLove says
We have Candice Tells All too! Yay. Some are sitting in my DVR so maybe I’ll get to watch that one soon!
xo,
s
julianna says
Wow, you’re really making progress. If you’re not too desperate for storage, you could just skip the doors and have the open cabinet above the fridge for display space. I’ve seen quite a few pictures of kitchens that have done that, and it looks lovely.
Katrina says
Yay!! Loove this post so much! We in the the talking it our stage of our kitchen makeover and our fridge is all by its self and we plan on building ours in too for a custom look, so thank you for your how to! :) This will make it much easy on us!
Melanie @ Mailbox Journey says
Do you guys go thru your “Blogs We Love” often? I’ve noticed that some of them haven’t updated in quite a while, and I was wondering if you’ve discovered any really great blogs lately?
YoungHouseLove says
Yeah, we’ve been meaning to update that for a while now! It’s definitely on the (admittedly kinda long) to-do list. We did add some newer favs though (just haven’t removed old ones that don’t seem to update) – for example Little Green Notebook is a newer favorite of mine (just found it around 6 months ago- where have I been?!).
xo,
s
Samma says
Little Green Notebook and Pearl Street Interiors are the same blog …
YoungHouseLove says
Hmm, thanks for the tip! Maybe it’s a code glitch?
xo,
s
Eileen says
It. Looks. Mahvelous.
Speaking of the BM Decorators white.. I was wondering if you could go back in time, would you do the trim in that shade, color matched to Olympic? Or do you still like the Olympic base as your trim?
YoungHouseLove says
Benjamin Moore is amazing paint. The coverage, the scrubability. If money were no object it would be BM every time!
xo,
s
Eileen says
I really like BM too, but like you, can’t afford it on a regular basis.
Your cabinet painting post said that you thought that Decorator’s White was as close to a perfect white as possible. I was thinking of color matching it to Olympic for my trim. Since you’ve seen them both IRL, do you still like the regular white semi-gloss Olympic for your trim, or do you think color matched to Decorator’s White would be better?
YoungHouseLove says
I really can’t tell much of a difference (in color) – and I’ve tried! In coverage there’s definitely a difference, but the Olympic whether it’s matched or off the shelf seems the same!
xo,
s
jess says
Looks great yall! Congrats on the progress!
Katie says
Looks awesome, you guys! As I was reading, I looked up and realized our fridge is surrounded w/ a built in piece that looks just like the one you built. But ours was (luckily for us) already done when we moved in. I’m always endlessly impressed w/ your handiwork. Can’t wait to see the finished product (and i bet you can’t, either!)
Karen says
Looks great! You have me thinking about closing in my fridge, now. LOL
Have y’all thought about putting glass doors on those cabinets. With some lighting they would be great for display cabinets… since they are so high up and kind of impractical for daily use, anyway.
Another thing I was wondering…. are you going to put the floors in before or after you install cabinets? It seems logical to me that it would be done beforehand… but I really don’t know the process.
YoungHouseLove says
Glass cabinets are a touch that we loved in our last kitchen! Not sure if we’ll bring them into this kitchen (or where) but we’ll keep ya posted! As for the floors, those go in at the end. Since we’re using existing cabinets (and not demoing them out) the floors have to go in after the newer peninsula cabinets are set into place (so everything stays the same level).
xo
s
Karen says
Ahh… that makes sense.
I always learn something here. ;)
Stacey says
Looking good!
I hope you share your process of hiring a contractor when it’s all done. We (and other people we know) seem to have a terrible time getting a contractor call us back or even showing up to do the work after giving us a quote. It’d be nice to learn your tricks!
YoungHouseLove says
For sure! We love sharing all that stuff!
xo,
s
Nicole says
WOW! What an incredible difference that made! It looks great and is giving me ideas of what we can do in our stupidly designed builder grade kitchen. You guys rock my socks today :)
Chris says
I was wondering what Clara thinks of these changes? Does she notice that the fridge is in a different spot, or the walls are a different color when she wakes up from a nap, or the next morning? I would love to know what shes thinking.
YoungHouseLove says
She’s so funny! She woke up the next morning after we switched the pantry and the fridge and ran up to the pantry for milk and then realized that it was the pantry and not the fridge so she ran over to the fridge and pointed and giggled. I think she must think it’s normal for mommy and daddy to move stuff around at night. She thinks it’s a game! Haha.
xo,
s
casey says
Saw the reference to adding new doors and I totally think hiring a craftsman is the way to go to match up, but I wanted to share this swank site that I’ve used to change out doors on a budget: http://www.nakedkitchencabinetdoors.com/
Great options, low cost – doors starting at $9.95 ea!
YoungHouseLove says
Thanks for the tip! We’ll have to look into it as another option!
xo,
s
may says
just curious– is there a reason you don’t have the above fridge cabinets going all the way to the ceiling? when we did our kitchen having all cabinets go all the way to the ceiling was on of the things the interior designer highly recommended to make it look more “high end.”
YoungHouseLove says
We have a few beams that run through the kitchen and we love them for the architecture they provide (it’s a 25′ long room, so they break things up and make it feel less like a bowling alley) so we decided to keep the beams and not have the cabinets go to the ceiling. But we’ll be adding pretty molding around the top for a nice high-end look. More on that (with an example pic) here.
xo,
s
Laura says
This has nothing to do with this post, but I found this online and thought with your love for white ceramics and Clara’s love for giraffes, this seemed appropriate for your household!
http://www.wayfair.com/Robert-Abbey-Jonathan-Adler-Right-Facing-Giraffe-Wall-Sconce-in-White-Glaze-730R-RAB2496.html?refid=GPA49-RAB2496&gclid=CMS_m6zkxasCFY1S7AodiWeR2w&SSAID=314743&refid=SS314743
YoungHouseLove says
So cute!
xo,
s
Yevette says
With all y’alls DIYing, have you considered getting a Yukon XL? With all the seats removed, mine has a flatbed, insulated no less, of about 8 feet. It really came in handy on a recent rainy day trip to IKEA to bring home 2 39*93*23 Pax wardrobes. Plus with three kids, its helpful on long trips (read diaper changing station in the back).
YoungHouseLove says
Wow! We’re weird small car people (we love our little Altima and the cost to fill the tank every few weeks) but there are definitely times when a bigger car would come in handy. We’re happy to borrow from the fam or rent a $19 truck here or there for now though- just because that method is still a lot less expensive than buying a new vehicle!
xo,
s
candace @ thecandace.com says
So impressive, you guys! The built-in really finishes it off and I am utterly amazed that you scored cabinetry from the Habitat Restore and can reuse it. Yay for recycling! :)
Jessica F. says
Question – I know when you knock down a wall you need to get permits and sometimes have inspectors check out your work. Do you need that for building and retro fitting new cabinets?
YoungHouseLove says
Nope, but we do need pros and had to do some permit research for the 8 foot wall opening! But for working with cabinets you’re good since it’s not structural or anything.
xo,
s
Charlotte says
This is so impressive. But I am stumped by one thing. How on earth did you get the stabilizing piece of wood at the back of the cabinet back on after you’d slipped it over the fridge?!
YoungHouseLove says
We slid the fridge out (it’s on wheels) and screwed it in while standing in the fridge hole. Haha. Fridge hole is not a technical term.
xo,
s
Laura says
How did you figure out the best order to do everything. I read above why you are holding off on doing the floors, but what buying the appliances first, when will you paint the old paneling, why are you waiting until after the cabinets to make the wall hole, and when do you expect to figure out the new faces for some/all? of the cabinets? Is some of this preference or is there a protocol you’re referring to? This would make a good post, btw. :)
YoungHouseLove says
We just try to do things in an order that makes sense as we go. We knew it would be hard to find a better deal for appliances so we jumped on it (saving almost 1400 bucks meant we had to act fast). As for painting the old paneling, we have to prime/paint the area around the wall opening once it happens, so we’re waiting to paint all at once (after the opening is made we’ll slide out the fridge and easily paint behind it). We’re waiting for the cabinets to be set down in the space so we know where we want the doorway to be (we want it to line up with the peninsula in a way that looks intentional and aligned so it’s not off by an inch or two in one direction). We just try to think about what we have to tackle next and what order makes the most sense as we go- but things definitely change so we try to stay flexible!
xo,
s
Erin says
Love it! Our contractors did this during a renovation at our old farmhouse- looked pretty much just like yours. Although our floors were 100 yrs old and pitched and bowed to so many directions that there was no way to level the floor- so they leveled and put down a board to be the platform of the built in fridge cabinet. It came out the depth of the fridge so our fridge would actually sit level on it. Then small trim around the front of the board- it made it look like a very built in fridge nook. Just in case anyone else is reading comments and needs a way to straighten out their flooring/fridge area, it worked great!
Then we just went over the floor with a floating click floor and we just learned to love the slopes instead of hating them! Job well done you two!
YoungHouseLove says
So smart! Love that tip for anyone without level floors!
xo,
s
Erin says
Love this so much! Your progress is making me dream about re-doing our kitchen… some day. I read in other comments that you’re doing the flooring last – installed around the cabinets. How much will the cork lift the fridge off the floor and close in the gap under the built-in cabinet? Can’t wait to see it all come together!
YoungHouseLove says
Oh yes, that’s a great point! We’re actually thinking it might lift the fridge up about an inch, so it might not be necessary to add that trim after all! We decided to wait on all that tweaking stuff til the very end (after floors and backsplash tile and everything) so we’re sure to think that stuff through!
xo,
s
kalibrooke says
Awesome! I’m curious, though, why you wouldn’t paint it beforehand (or at least prime)…won’t it be a pain in the — to do in place? Sorry if you’ve answered this already!
YoungHouseLove says
We’ll have to break out the paint and primer when we open the wall next week, so we’d rather just do that once (which is why we waited). We can easily slide the fridge out and get back there to paint so it shouldn’t be an issue!
xo,
s
kalibrooke says
Makes sense… obvs you two are on it. If it were me, it would probably be back in place unpainted because I’m too impatient! (Must. finish. this. project. before. starting. another.)
Georgia says
Fan-bleeding-tactic! Looks so amazing. The previous owners of our house built there own fridge surround into a corner with cupboards at right angles. They biltong the thing to fit exactly- not taking into account that you need to be able to open the doors to be able to pull the drawers out! The freezer door bangs into the cupboards, and we can’t even use the cupboards. If only they had seen and learned from your handy work first!!!!!
AarthiD says
Ha! I, like many others, love the tripod-as-a-jack setup you have going. Me, I used a box full of books plus some library books (overdue! eek!) as a makeshift fulcrum when I built my IKEA furniture not too long ago. It’s all about making do with what you got! *laughs*
Seriously, though, the fridge looks super classy with the built-in all around it. I have to wonder, though — are you at all worried that the frige motor will overheat from being in, well, a cabinet all the time?
YoungHouseLove says
Nah, it was built in very snugly at our last house and worked really well for years! We do have an opening behind the cabinet (between the back of the cabinet and the back wall) for things to vent- so that helps!
xo,
s
Jess says
I’m curious… How do you intend to avoid seeing the wood grain differences once you paint?
YoungHouseLove says
All of the wood is oak, so once we sand, prime, and paint it we should have a seamless finish. They all should have the same amount of grain, and using a self-leveling paint (Ben Moore’s Advance paint, which we used to paint our office cabinets) should take care of it!
xo,
s
Jess says
OH! I thought the extra cabinets were different wood. See how much I pay attention! :)
YoungHouseLove says
Haha- no worries! We got lucky but oak seems to be the most common so it worked out!
xo,
s
emily @ the happy home says
i am literally bookmarking this so that (in 2-3 years when we buy our first place) i know what to do to our kitchen. so damn inspiring!
Sabrina says
Looks great! Do you guys have a list of all the tools you use? We are looking into buying a few but don’t want to spend to much. What tools are a must for you guys to have?
YoungHouseLove says
We probably use the Kreg Jig and our hand sander and our power screwdriver the most. Sometimes we break out things like a reciprocating saw (sawzall) or the miter saw or the jigsaw. Hope it helps!
xo,
s
Mollie says
Looks awesome, and it’s totally great to see all the re-purposing you guys are doing! I’m a fellow Richmonder, and an avid follower of your blog, and I can’t wait to the finished product – whenever that may be, no rush :)
Jenny says
When I first saw this post, I thought, “But what happens when you need a new fridge?” It seems like your project is pretty adaptable to a future new refrigerator, though, am I right? My inlaws, however, built cabinets around their fridge 10 years ago, but used their small-ish fridge. And now they can never have a side-by-side or freezer-on-the-bottom appliance. Boo, hiss.
And also – we’re doing some kitchen renovations (much smaller scale) and we have similar colored cabinets. My husband, however, HATES to paint wood. It is a crime in his eyes (le sigh). I’d love to stain them darker. Do you have any projects where you’ve done something like that? Am I crazy to think we can do it?
Thanks!
YoungHouseLove says
Oh yeah, it was simple enough and affordable enough that we can tweak it (probably still using the side pieces) if we need a new fridge in a decade or two. As for how to stain wood- here’s a post about that for ya. Good luck!
xo,
s