We learned with our first kitchen that building in your fridge is a huge help in making a kitchen look fancy schmancy. And at the moment our floating fridge was looking pretty much the exact opposite.
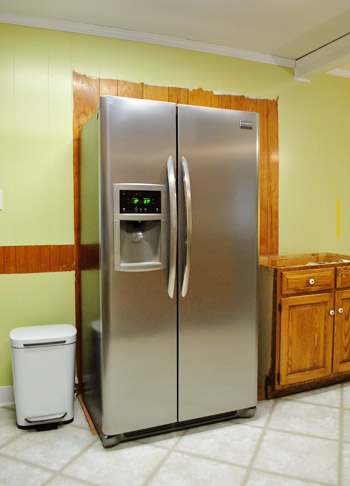
That’s where an also less than schmancy $19 cabinet from the Habitat For Humanity ReStore (mentioned yesterday) came in handy. It’s 12″ tall and 36″ wide, the exact width of our fridge. And when you take off the don’t-match doors (we’re hoping to retrofit extra existing doors to make it seamlessly match the other cabinets later), it starts to look more like a workable piece of cabinetry to sit atop our refrigerator.
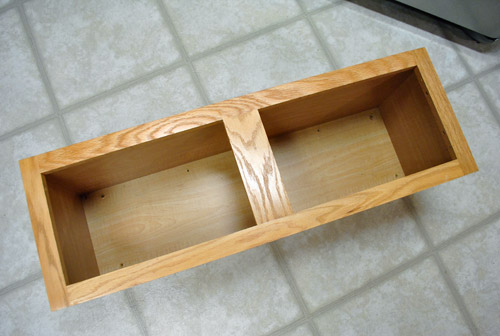
For the sides of our built-in fridge, I picked up two 4′ x 8′ pieces of plywood that the Lowe’s guy recommended for cabinet work (he said it’s the same stuff they sell folks who get theirs built-in by pros as part of their kitchen installation process). They even cut it to size for me right in the wood cutting area, which was a huge help. The planks were still too big for our Altima so I rented the $19 Lowe’s truck to get it home. The truck rental, fridge planks, plus a few 1 x 2″ pieces of pine trim brought my grand total to about $90. Good thing that ReStore cabinet was cheap ($19).
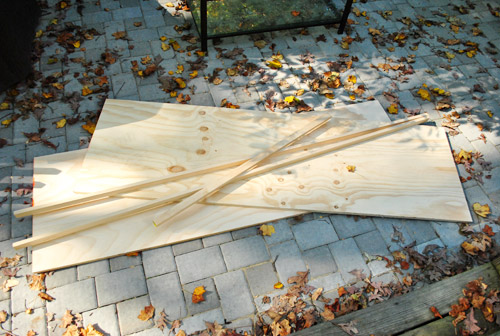
The point of the trim pine was to make the front edge look more finished and a bit more substantial looking. So I broke out my trusty Kreg jig and drilled a bunch of holes down one edge of both plywood pieces.
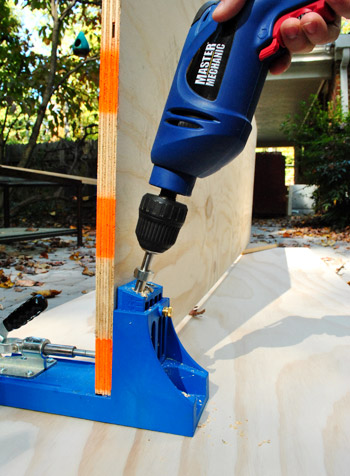
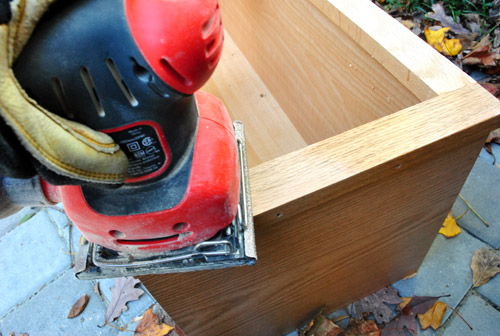
With my holes drilled, I sanded both sides of the plywood to make sure they were smooth. And while I was at it I sanded the finish off the front of the cabinet so it’s primer/paint ready (we’ll tackle it when we tackle the rest of our existing cabinets after the counters get installed so nothing gets chipped or scratched off during that stage).
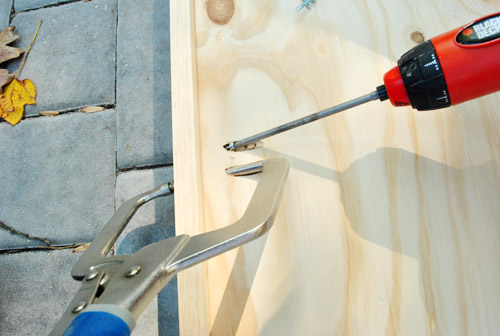
Then I carefully clamped and screwed the pine trim to the plywood piece so that the edges were flush. Having been around block with my Kreg by now, I’ve learned that it’s sometimes helpful to drill a second hole just to put the special Kreg clamp into. This is me trying to think ahead.
Eventually (note that I didn’t say “soon” – this part took me about an hour) I had the trim attached just the way I wanted on both pieces of plywood.
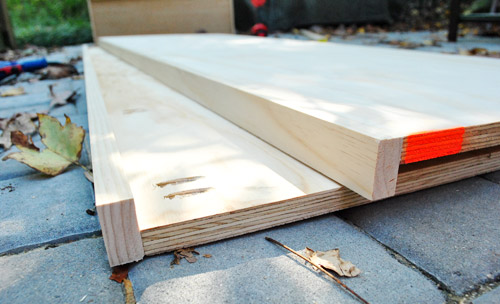
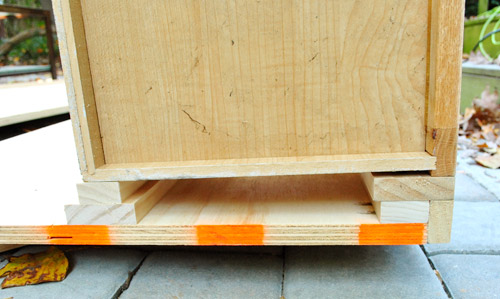
Attaching the cabinet took some thinking ahead too. Since we wanted the cabinet to sit flush with the trim (not behind it) and needed the opening to be slightly wider than our fridge (which was the same width as the cabinet) – I had to add some filler pieces (aka, leftover scraps). One stack of scrap wood went up at the front of the cabinet and the other was located at the back (neither of which would be seen at all once it was all installed).
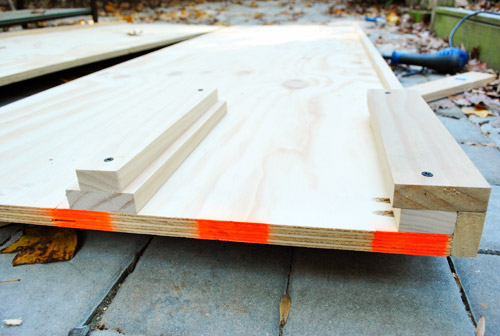
Here’s the same view with the cabinet sitting on it, to give you a better idea of why the filler was needed (I ended up adding a wooden shim to make sure the cabinet sat 100% straight).
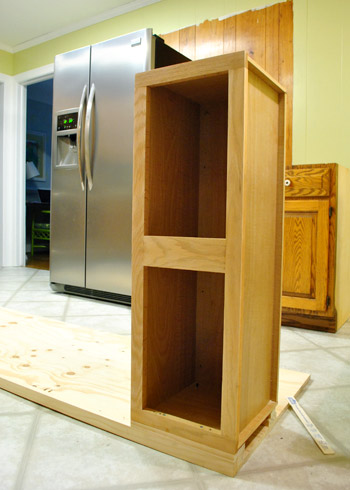
We didn’t actually attach the cabinet until we got everything back inside, since I wasn’t about to try to maneuver this whole thing from my patio-workspace through a few doors and into the kitchen. So here we are in the kitchen, with the cabinet screwed to one of the plywood sides. Here’s where Sherry put Clara down for a nap and came in to help.
We brought in the second side and used our camera tripod as makeshift jack to hold it in place while we screwed it all together, checking and double checking that everything was square and level.
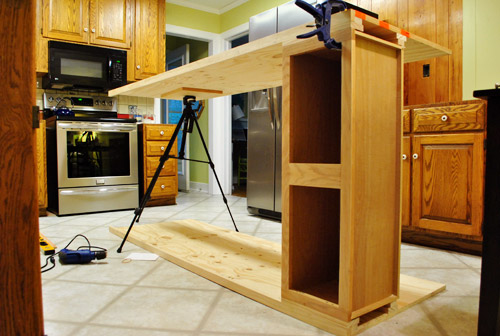
Before standing it up we added a spare board across the back to help keep everything straight and supported from front to back. It’s also the board we later drilled through to screw the whole thing into the wall (didn’t want it falling over on anyone!). We also put a similar plank of wood across the bottom (again to keep things square and to allow us to screw the whole piece into the wall).
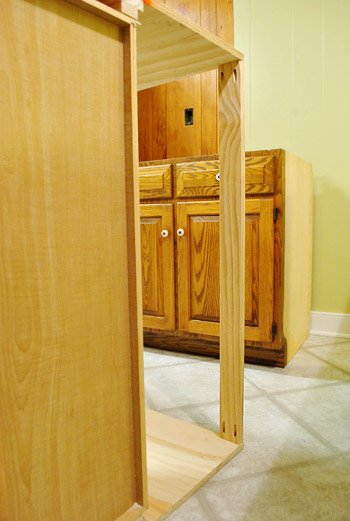
Then we heave-ho’d it up to a nice standing position…
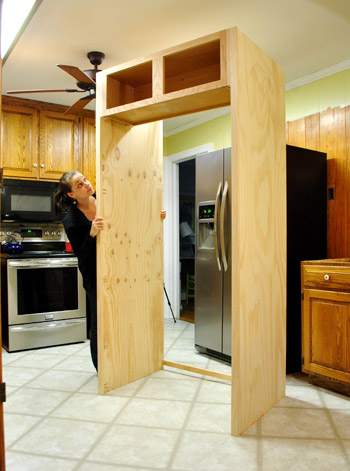
… and slid it into place (after temporarily removing the bottom support slat so we could slide it over the fridge like a slipcover).
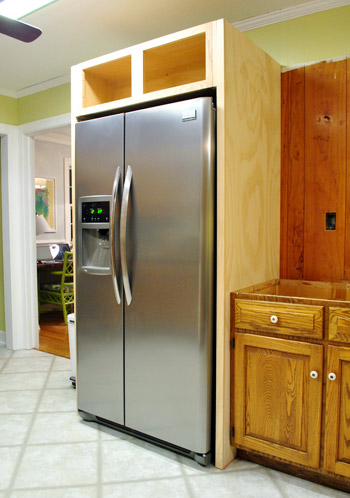
We’re not saying “ta-da!” quite yet, since there’s still lots to be done to it. Like priming and painting it, priming and painting the paneling behind it, adding matching doors, adding molding around the top, adding trim around the bottom, etc. But for now, we’re enjoying one pretty noticeable step towards making the kitchen look a lot more pulled together.
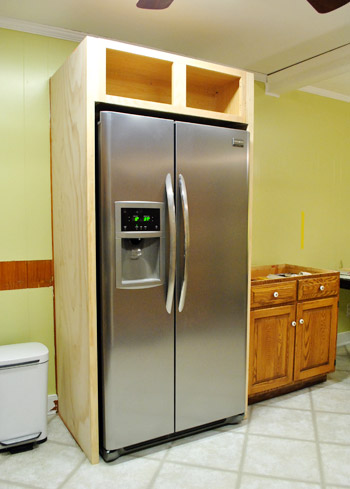
It’s definitely an upgrade from the un-built-in version, right?

Oh and if you scroll back up to the built-in pic above this one, you’ll notice that the fridge sticks out just a smidge from the wooden sides. That’s just a functional thing (it can slide a bit farther in, but the doors wouldn’t open as wide as we needed them to in order to access certain slide-out fridge drawers without hitting the wood frame). But it’s nice because the new built-in sides block all of the black coloring on both sides of the fridge – so all that’s visible is the stainless front (and a smidge of the sides of the doors – which are still stainless). It’s definitely going to be a huge upgrade to have a custom looking fridge setup along with the flush front cabinet up top (our old above-fridge cabinet was set about 6″ back, so it was a lot harder to access).
So that’s the latest slow but steady kitchen progress. Next on the agenda is attempting to finalize the placement of the peninsula (we still need one more cabinet to complete that area) by the end of this week so that we can finalize the placement of the giant eight foot doorway to the dining room that we’ll be adding with the help of a pro (which we hope to begin sometime next week!). Is it next week yet? Should be interesting/scary/exciting/dusty. As always, we’ll keep you posted!
Psst- We’re over on BabyCenter sharing an update on how we organize and store Clara’s outgrown clothes. And we’d love to hear your storage secrets on the subject.

Kathy says
Gosh, I am so impressed. I wish my husband was handy…
dj sherry says
Fun watching your progress. The mess is at your house not mine :)
Just a thought, bring the bottom cabinet next to the fridg out flush to the new side piece for a truly built in look. This counter top would then be only a couple of inches deeper, but you’d have a more seamless, custom look in your cabinetry. Just hate the look of appliances jutting out. I know that’ my personal preference, but its a cleaner look.
Love your material choices, good design can be had with a real budget.
YoungHouseLove says
Always another possibility! Thanks for the suggestion. We’ll have to see how much more loot that would be when it comes to extending the counters up through the peninsula.
xo,
s
Amanda says
Just a funny anecdote – in Germany, they are so serious about building in their fridges that they often actually make them look like cabinets! Form-fitting shelving on all sides, and even a cabinet door attached to the fridge door. The refrigerators in stores look so weird because they sell ones that are meant to be built-in like that that look totally unfinished on the front. Of course, their refrigerators tend to be much smaller than ours, more along the size of what one might think of as a “pantry.” That means that to an American eye, they look like pantries! I was so confused when I moved in with a German family and thought they had no refrigerator…
YoungHouseLove says
I love hearing about how they do things in other places! Fascinating!
xo,
s
Meghan says
Already looking awesome!!! I’m excited to see it all coming together—I can’t imagine how you guys are feeling!
Erin says
John has skillz yo!
I saw a DIY project in Handyman magazine that you guys might like. If you’re willing to move your garbage can you could add a secret side to your fridge cabinet. In the article they made the cabinet only a few inches deep and the door was the entire side of the fridge built-in. They added hooks to hang dog leashes and added a shelf for phone chargers and mail. I would also hang a calendar on the inside of the door, add a cork board/dry erase board, and add a shelf for coupons and grocery lists. I know you also have your laundry room and your office but I thought this was cool for someone with limited space… or someone who wants to hide the clutter. Heck you could even make it a broom closet and add an outlet to charge the dust buster.
YoungHouseLove says
That’s fun! Love it.
xo,
s
statia says
We have a built in fridge. It’s just a space in the wall for the fridge to fit into. The only thing I don’t like about it is that I rarely get in there to dust (I mean, come on, who has time for THAT), and it’s such a dust magnet. It skeeves me out. Also, since our fridge is stainless, I can’t use the sides for the kids pictures. Or anything else I need hung up to remind me of stuff.
YoungHouseLove says
Maybe you can use white magnetic paint on the side of the built in fridge? Hope it helps!
xo,
s
Heather S says
It looks great! I love how much of a change that makes to kitchens! I don’t know why they always put that cabinet above the fridge back flush with the other cabinets….Who can use that without pulling out the step stool (okay, I need a foot stool to reach my top cabinets either way…but still)! I love watching the progress, keep up the great work! I can’t wait to tackle more prjects in my kitchen!
Kelly says
wow…honestly, i learn so much from you guys….love it…can’t wait to see finished product!
LMG says
omg this reminds me of my recent fridge experiment. We bought the house with the fridge, and it’s made this weird rattling/groaning noise since we moved in. We slid it out over and over, cleaned everything possible each time–no dice. Asked Sears (it’s a Kenmore) and they wanted to charge $159 to check it out, so we figured we’d live with it until it caused problems.
Then recently the bottom front grill came off and we did a lot of fridge-shuffling in a major cleaning, and I finally found the culprit. The previous owners had let an IKEA cookie pan slip underneath the fridge, and our sliding was just taking the cookie pan with it. Didn’t they miss it?!? Anyway, no more noise, thank god.
Question: what’s your take on water lines to the fridge? Ours had an icemaker, but no water line, so we filter with a Brita and get ice only for parties (or use trays). Do you think it’s worth it on a future kitchen remodel to have a water line installed and/or fridge moved closer to the sink for that purpose?
YoungHouseLove says
Oh my gosh! No way. That’s such a weird and funny discovery! As for water lines, they’re easy to DIY! They sell kits so as long as you have access to a crawl space under your house it can be a piece of cake. We added one in our last kitchen and plan to tackle it again in this kitchen. Hope it helps!
xo,
s
LMG says
oh, awesome!! had no clue! thanks for the tip!
andrea worley says
wow, what a difference it makes! that’s so cool! great job, i can’t wait to see what else you do with it to make it more “finished.”
Jen says
Love the built in look of the fridge. I have been wondering how we could achieve the same look so THANK YOU for the tutorial. I can’t wait to show the hubs!
xoxo!
Jen
Ami says
That looks REALLY fantastic John! Great job. My only concern (and you’re free to tell me that I’m wrong) is if you add that extra piece of trim there on top to close the gap that you might interfere with the air circulation. I know when I bought my fridge last year they were rather emphatic in the paper work bout making sure you had so many inches of space all around the thing in order to allow air circulation. Just something to check before adding that last piece of trim. I’d hate for your beautiful new fridge to die before its time. :)
YoungHouseLove says
Thanks for the tip Ami! We have tons of venting room up top (there’s a bunch of space behind the back of the cabinet and the back wall so it can vent!).
xo,
s
Stephanie says
Did you intend the title to be sung to the “rub it in, rub it in” BenGay commercial jingle? If so, points for noticing? : ) Enjoy your blog so much. Thanks guys!
Stephanie says
oops, re-reading comments I realized it is indeed “plug it in, plug it in.” Don’t know how I confused the two when the Ben Gay slogan is clearly, “rub it in, rub it in good.” Mommy brain. : )
YoungHouseLove says
Haha- both could work!
xo,
s
April Anderson says
Love how your new fridge looks taller and slimmer with it’s new fitting. Can’t beat the slimming effects of a proper fitted outfit!
YoungHouseLove says
Haha- true!
xo,
s
CaraL says
I’m liking the kitchen reno but on another note….over at The Pioneer Woman blog, she had some professionals in to redo a room for her two girls. They built in a desk and used the same style wood plank top as you did on your desk and your sofa table. Even the pros like your ideas!
YoungHouseLove says
Love it! Off to check it out.
xo,
s
Priscilla says
Fantastic job and looks so custom! One thing we did with ours was cut in a small vent space on the bottom of your big sidepanel. Then we put a 4 inch by 6 inch metal vent there near the bottom. That let the fridge breathe since the appliance manual said we must allow it to vent.. Voila! It worked great and several contractors have told us that is what they do when they do professional kitchen installations.
YoungHouseLove says
So smart! Our last one vented around the sides (it was done by our HD kitchen designer) but this one vents out the top (there’s space behind the cabinet and the back wall on top where heat can escape). Love the idea of adding pretty metal vents for people who don’t have vent room up top (in to-ceiling-cabinetry for example).
xo,
s
Elise says
So jealous! We loved the kitchen that was in our house when we moved in with one giant exception, they didn’t build in the fridge! I always feel like it’s a bit of an eyesore in our otherwise lovely room. You’re right, it does make the kitchen look fancy schmancy to have it covered on three sides!
Tae says
It looks great so far!! Have you thought about making one of your drawers a pull-out trash and recycling drawer? We have one in our new apartment and it’s so nice not to have a separate trash can!
YoungHouseLove says
Yes, we would love that!
xo,
s
Chelsea says
It looks amazing! Nice work!
sally says
You’ve mentioned before that you don’t use all the available space in your kitchen at the moment. Have you considered not putting doors on this cabinet and putting something decorative in the openings? Thus avoiding the matching door problem? Great job – lookin’ forward to seeing the finished kitchen.
YoungHouseLove says
We just have other doors that we’ll have to match so we’ll have to deal with that issue someday (all the doors in the peninsula that we’re adding will need to be matched). I also think because we’re adding open shelving over the stove that we’ll like to have some concealed upper storage too!
xo,
s
Harinee says
You could use glass fronted doors for some of the cabinets so that you don’t need to match the other door-fronts exactly..
Kathi says
Between you and our Humble A(bowe)d, I’m itching to redo our kitchen! We just had both of our bathrooms gutted and redone this summer and I’m looking to do a less expensive reno in our kitchen. We have great wood cabinets already so I’m planning on using the Rustoleum kit to refinish ours…then we’ll replace our counters and add a tile backsplash and new appliances…thanks for the inspiration!
YoungHouseLove says
You’re welcome! Good luck with everything!
xo,
s
Kevin says
Looks great, John. Nice work.
Jennifer says
Looking good you guys!! I think we are all on pins and needles waiting for all the updates!!
Katie says
We built in our fridge during our kitchen remodel as well. It’s amazing how much better it looks. You’re on your way, guys! The place already looks so much better!
DKL says
Thanks for providing step-by-step pictures and instructions when you are building things. It differentiates your blog from the usual “before and after” eye candy to practical advice on how to truely and thriftly do it yourself and have it look professional. Totally inspiring.
eileen marie says
Very impressive, John! (It really frosts my muffin that our new fridge sticks out so much from its built-in -we couldn’t find one that didn’t, but we got it on super-sale at Sears.) I know everyone is clamboring for kitchen updates, but I think you guys are moving at warp speed! As we look at houses, you guys have definitely inspired me not to walk away from houses that need a little “updating.”
mp says
Looks great!
heyruthie says
love it!!! i want to try, but i don’t know if i have enough space!
question:
although your fridge is a “counter depth” model, i notice it’s still not really counter depth. is that normal? how much farther out do most “counter depth” fridges jut out? (is that a word?) or are some more flush with the cabs than others? i was considering splurging on one, but it doesn’t look a lot less obtrusive than the one i’ve already got!
YoungHouseLove says
Most non counter depth ones stick out 8″-12″ inches while counter depth ones are usually within 3″. Ours is 26.5″ deep and our counters are 25″ – so it’s pretty low profile.
xo,
s
Meredith says
they need to stick out an inch or two so the door and hinge still has clearance to close.
BethanyB says
The built in looks great! How are you guys holding up with no counters now? I but its a little more easy since you’ve done something like this before right?
YoungHouseLove says
We actually still have the sink counters! So they’re just missing next to the stove, which isn’t much of an issue. Thank goodness!
xo,
s
Heidi P. says
exCIIItiiiing! :)(high, sing-song-y voice)
Kathy says
Wow! I’ve been talking to my husband about building one of these for our fridge for about a year. Now I can show him your tutorial post AND maybe bribe him with new power tools (Kreg jig)! Thank you!!
Mike Grant says
Nice job on the built in. I’m jealous, you have the super duper kreg jig. I bought the cheap one. If you click on my blog you will see my most recent post which I use the single pocket kreg jig. If you work at this pace the kitchen will be done by Sunday.
YoungHouseLove says
Looks awesome! Can’t wait to see how it all turns out! As for our kitchen, we’re thinking we’ll be on it until January. Haha. We wish we could finish by this Saturday but these things tend to take their time. Haha.
xo,
s
Christine says
wow– I love how you guys put this together from spare parts and “found” parts! You are disproving that notion that kitchen remodels have to cost tens of thousands of dollars.
Diane says
We refaced our own cabinets and installed new maple doors a few years ago – a LOT of work after agonizing research, but well worth the time and cost of material. I think you could easily order doors with a similar frame size, but instead of that unusual insert piece, you could use glass or metal. The doors would look like your others, only with a different “center”? (We didn’t have nice oak doors that were paint-worthy, so replacement was the way to go, but we did buy a few doors with just the frames and used a decorative metal.) We bought everything on line – and the web sites, which you probably have already found, offer so many options. I was beyond happy to say goodbye to my 80’s almond laminate with oak trim doors …
YoungHouseLove says
The odd thing about our current doors is that they’re half-sunk (meaning half of the frame is routed out from the back so they slip into the frame of the cabinets and half sit forward. So any other doors would either appear thicker (because they wouldn’t sink half-way into the door like our oddly routed out ones) or too thin (if they sunk all the way in to be completely flush with the cabinet fronts. Such a weird debacle, but it means we either have to replace every single door or try to retrofit the extra upper doors that we’ll have when we make open shelving (or hire a local woodworker to try to recreate our extremely intricate half-routed doors). Here’s hoping we can figure out the best move and share those details soon!
xo,
s
Cris of At No. 64 says
Totally random – Glade’s “Plug it in, plug it in” jingle (the presumed source of your title) was sung by an old friend of mine. She was also Marty in the original cast of “Grease” on Broadway.
Told you – random.
YoungHouseLove says
No way- love it. Best random facts I’ve heard all day!
xo,
s
Amanda Lutke says
This is remarkable. It’s the best example of a little work for such a giant impact I’ve seen! Truly impressive! Was it difficult to learn how to do the carpentry stuff you two do? Have a good place to start? Also, I’ve been stalking your site for months now and this is my first time commenting; Holla RVA from Norfolk!
YoungHouseLove says
I wouldn’t say it’s necessarily difficult, it just takes some patience and persistence. We started small and have been building our way up, which is nice because we’ve been gradually acquiring tools (the Kreg jig, clamps, a jigsaw) that make each project easier than the last. A great site for some basic woodworking tips is Ana White’s if you’re looking to get started yourself. Have fun!
-John
Laura says
It looks great. I’m looking forward to seeing the progress! As usual, you guys are very inspiring.
Kat says
Nice job! My husband just made a built-in for ours as we our remodeling our kitchen. We are using your painting technique for our cabinets, too. Thank you so much!!!
YoungHouseLove says
Good luck!
xo,
s
Meredith says
I adore this!! I just had my cabinets installed in my (Pulte built) home. To my surprise, they upgraded our cabinets for our model when we bought the house and they upgraded to a built-in refrigerator surround. Just like this! yay!
OK, but this has been weighing on my for a while – the staring at a microwave from the bar notion…did you see Edie’s Life in Grace kitchen post? Her built in microwave next to her built in fridge is a thing of beauty. Nothing crappy to stare at from the bar. and makes so much sense next to fridge.
http://www.lifeingraceblog.com/2011/10/31-daysday-29-the-kitchen-her-highness.html
YoungHouseLove says
It also makes sense for us next to the pantry! We make oatmeal and soup all the time (pull it out of the pantry, dump it in a bowl which is stored on that side of the room and add water from the sink on that side of the room if it’s oatmeal, and microwave it). We just thought about what we wanted to see at the peninsula and how we’d use the room! But we definitely agree that wherever the microwave is, it can be a thing of beauty when it’s built in! Can’t wait to tackle ours!
xo,
s
Blythe says
Someone may have said this already…but what about leaving the doors off the upper cabinet and adding some puck or rope lighting?
YoungHouseLove says
Always another option! For now since we’re going to have open shelving along the wall above the stove we’re looking forward to come concealed storage in other places! Especially since we’ll have to deal with door matching for the whole peninsula we’re adding (here’s hoping we can figure it out!).
xo,
s
JaneS says
Hi. I love your blog and this project looks great! Although you would lose some deep storage, you could eliminate the need for doors completely by making it into a wine rack with some crisscrossed cubbies. I can’t wait to see the job finished!
Paula says
Our ginormous frig stands out in no mans land all by itself. There are no cabinets on either side, it’s what you first walk into/ see when you come in the door. I hate the look of it there, but eventually we will redo our kitchen and add cabinets, but for now it is what it is.
A question for you guys. Would you try to keep a good work triangle over having better placement of all appliances? It’s one dilemma I have when I rework our kitchen in my head over and over again! HAHA!
You guys are doing a great job, can’t wait to see it finished!
YoungHouseLove says
Hmm, I think it comes down to function the most for us (even over form) – so if the placement makes the most functional sense I would leave it- but if it would make more sense in another arrangement I would toss that work triangle thing out the window and do what works for your kitchen!
xo,
s
Cheryl says
Loving the updates. The kitchen is looking amazing. Just wondering if you had ever thought of using one of the solar tube skylights for natural light in your kitchen. From checking them out in the store they look fairly straight forward to install. The only thing preventing us from doing one is our house is two stories. :( It seems with your ranch style it would be a great fit.
YoungHouseLove says
We have someday dreams of installing a few big skylights! Maybe worth checking those out though too! We’re hoping that once the wall comes down to the dining room (and the dark cabinets get painted) that the kitchen will be a whole lot brighter!
xo
s
rita says
You guys make DIY look so easy!
How do you use Kreg Jig on plywood without the plywood splitting all over the place? My first try was a disaster and my Kreg has been sitting ever since. And I was just trying to make a small box!
YoungHouseLove says
Hmm, I’ve never had that issue. Maybe mine has just been thick enough not to split? It does help to have it clamped into the jig, so maybe that provides stability if it’s thick enough? I bought a slightly more expensive plywood for this project since the guy recommended it as “cabinet grade.” Good luck!
-John
christine b says
Kudos! My hubby actalually built a cabinet above our fridge. On move in day our new appliances were delivered. Yay! However the fridge was too big to fit in the old omes spot. Nay! So my handy a cut out the existing cabinet quickly so the nee fridge would have a home. He later built a open cabinet and installed it xto come the ugly hole. He even recently did the same for some friends above their stove so they could install their microwave. I love handy men! You can see before and afters on my blog but beware our kitchen was super 80s
Amanda @ Our Humble A{Bowe}d says
We just framed out fridge in, too. Here’s a link if you want to take a peek: http://ourhumbleabowed.wordpress.com/2011/11/03/manormous-cabinet/
YoungHouseLove says
Looking awesome!
xo,
s
Erin says
About how much are you saving by repurposing cabinetry and building the extra pieces yourself? I LOVE the eclectic, green approach. You guys are so “can-do.”
How do you stay focused and centered when you’re living amidst a major work in progress? I know that you guys do home improvement for a living, but a kitchen redo plus a little one must be pretty challenging.
YoungHouseLove says
I think it would cost around 10K to buy new cabinetry, so it’s definitely a nice “bonus” to be able to reuse the cabinetry. As for staying focused and not get overwhelmed, we just try to break things down into bite sized pieces and tackle them one day at a time (when Clara’s sleeping- haha). If we thought of all the things we have to do for the kitchen makeover we’d start to hyperventilate, but choosing one small thing to accomplish at a time (ex: choose the counter material, frame in the fridge, etc) keeps us stable and excited!
xo,
s
jocelyn says
I love how you pulled the cabinet to the front. I hate my recessed cabinet over the fridge. I recently pulled off the doors, cut the center stile and now I have an cookbook cabinet. A bit better than the dead space before.
I would love to buy a Kreg jig. Would you recommend buying the master kit for $150 or can I go smaller? Thanks for all you share!
YoungHouseLove says
John has the basic $99 kit but added a few more clamps to it. So if it’s cheaper to get them a la cart I’d go that route. Good luck!
xo,
s
Kim S says
Love the built-in look of the fridge! Is there anything special you have to take into account as far as ventilation or space behind/around the fridge? I feel like I heard somewhere that you should have space between the back of the fridge and the wall. Figured you guys would know how much space to leave and could save me the research time. :o)
YoungHouseLove says
You should follow the directions on the fridge guide (one of the more common recommendations seems to be leaving 2″ above the fridge below the cabinet). We also have a few inches between the back of the cabinet and the wall (we just added walls to the sides of the cabinet, which doesn’t go all the way back to the wall so there’s ventilation back there too). Hope it helps!
xo,
s