We could not be more thrilled to introduce Ana from Ana-White.com who’s swinging by with an amazing build-it-yourself project for anyone who’s ever wanted to DIY floating shelves. For those who don’t already know about Knock-Off Wood, it’s a site full of amazing designer-lookalike furniture plans that will save you hundreds- even thousands- if you’re willing to break a sweat and put in a little elbow grease to whip things up on your own.
And you know we love that Ana proves that woodworking isn’t only about guys in overalls. Ladies can totally make the sawdust fly just as well. So without further ado, let’s get down to business with the first project that Ana is exclusively bringing to all of our lovely readers. And don’t worry, she promises it’s a super easy and affordable undertaking, which is why we thought it would be right up your alley. Let the fun begin…
Sidenote: If you’re looking for additional shelving projects and ideas, this post is one big roundup of easy shelving ideas.
YHL: Hey Ana, so happy to have you dropping in to share a project with us. What are we building today?
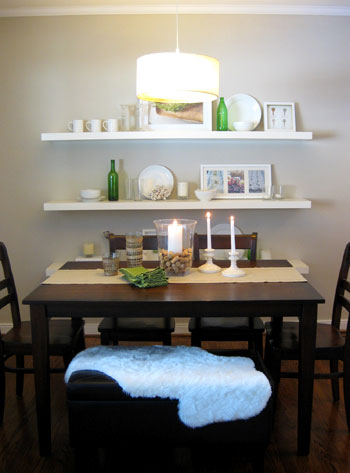
Ana: Youngsters, I want to hack your entire house. Everything. From Burger’s closet to the bean’s crib. If I could, I would write a blog called Young House Love HACKED. So the stalking starts today with my favorite feature in your home, those floating shelves in your dining area.
YHL: Sounds like fun. What level of difficulty would you say this project is?
Ana: Beginner. You, yes YOU, can do this project! No, not the Youngsters, they already have shelves. YOU at home.
YHL: And how much money should someone expect to spend to build all three 72″ long shelves?
Ana: For three 6′ long shelves, it will cost about $50-$60, less if you have some basic supplies like paint, screws, sandpaper and wood filler. In fact, the lumber is only going to run you about $30 (which means you’ll save around $60 as opposed to buying them). Bonus: You’ll have enough leftover scraps to make three 24″ shelves for free!
YHL: And about how long should this project take?
Ana: It will take a couple of hours to construct all three shelves, and then you’ll need to paint ’em. If you start in the morning, you can have these hung by night. I did!
YHL: Nice. What would our shopping list look like?
Ana: Here’s all you’d need to get ‘er done:
- 1 sheet of 1/4 plywood, sanded on one side or lauan ($15)
- 10 1×2 pine boards ($1 Each)
- 1″ brad nails (think the little tack nails that you use to put the back on an IKEA bookcase)
- 2″ screws
- 3″ screws (for mounting to the wall, you will only need about 10 of these)
- wood filler
- sand paper
- paint (I used high gloss white)
YHL: And what tools would we need?
Ana: Nothing too complicated. Here’s the list:
- measuring tape
- drill with countersink and drill bits
- saw (or get the hardware store to cut your boards for you)
- hammer
- sander
- paint brushes
- stud finder
- level
YHL: Sounds simple enough. What would our cut list look like?
Ana: When you buy your plywood, have Blue or Orange cut it into strips that are 7 3/4″ wide, and 8′ long. I will refer to these as “plywood strips.” By having the store cut your plywood into strips, you can haul it in just about any car and it will be easier to work with to create the exact cut list below when you get home. And you may even be able to get the store to make the exact cuts in the list below, which will save you from any at-home sawing! Here’s that exact cut list for ya:
6 – Plywood strips @ 72″ (tops and bottoms of shelves)
3 – 1×2 @ 72″ (fronts of shelves)
6 – 1×2 @ 69″ (shelf frame)
12 – 1×2 @ 7″ (ends of shelf frame and shelf)
21 – 1×2 @ 5 1/2″ (shelf frame studs)
YHL: Ok, we’re ready. Hit us with your plans.
Ana: Alright. Let’s get down to business.
1. General Instructions. Work on a clean level surface. Have your plywood cut into 7 3/4″ strips by the hardware store. Then make all of your cuts as directed in the cut list. Always use glue and countersink your screws. Keep outside edges flush unless otherwise directed. Use proper safety precautions and equipment. Click plan to enlarge.
2. Frame. Set aside the frame, now let’s drill the sleeve. Predrill with a countersink bit pilot holes for your screws in the frame sides. Then use glue and the 2″ screws to fasten the frame supports to the frame sides. Keep edges flush. Click plan to enlarge.
3. Shelf Trim. Build the trim for the shelf by screwing the trim ends to the trim face. Click plan to enlarge.
4. Shelf Surfaces. Just like you would add a back to an IKEA bookcase, tack the plywood to the tops and bottoms of the shelf. Keep your outside edges flush. The better job you do, the less sanding later!
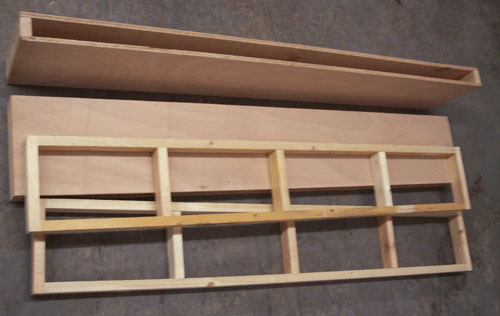
5. Test Fit. Your DIY floating shelves should look like the above photo (except I made two that are 48″ long, and you’ll probably be making three that are 72″). Dryfit your frames with the sleeves to ensure the frame fits into the sleeve. You may need to sand the frame in areas to get a better fit. You do want the sleeve to fit tightly on the frame to keep it in place.
6. Wood Filler. Fill all holes on the sides and face with wood filler. Fill any and every hole if you want that shiny finish! Overfill your holes and let dry.
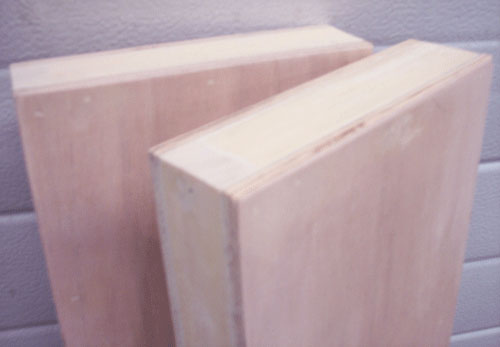
7. Sand. Sand extremely well, making all edges flush and even. If you need to, add more wood filler, let dry and sand again. The better you do at sanding, the shinier & smoother your finish will be.
8. Painting. Vacuum your shelves with a soft bristled brush. If you are using paint with primer, you can skip the primer. Otherwise, apply a coat of primer first. Let dry, and begin adding coats of high gloss white paint. I used three coats.
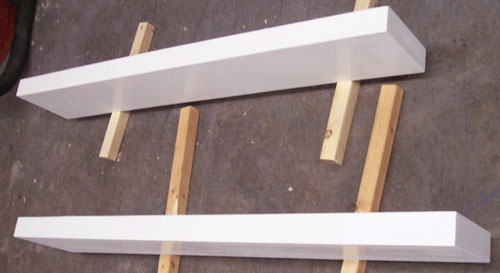
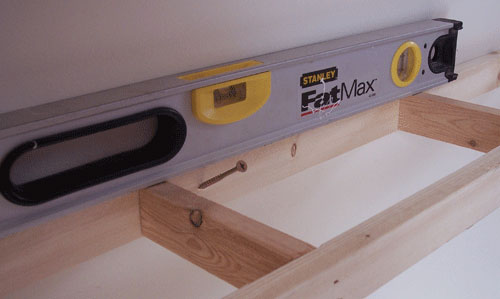
9. Hanging On The Wall. Locate the studs in your wall and mark where your shelf will be placed. If you cannot locate a stud, then you will need to use drywall anchors to hang your shelves. Then fasten with 3″ screws as shown above into the stud or anchor in the wall. Screw in a downward direction, as shown above. This will not just give you room for your drill, but it will also create a hook, or a stronger joint. Use at least 6 screws, in at least 3 different locations or studs. Use a level as shown below to keep things looking straight.
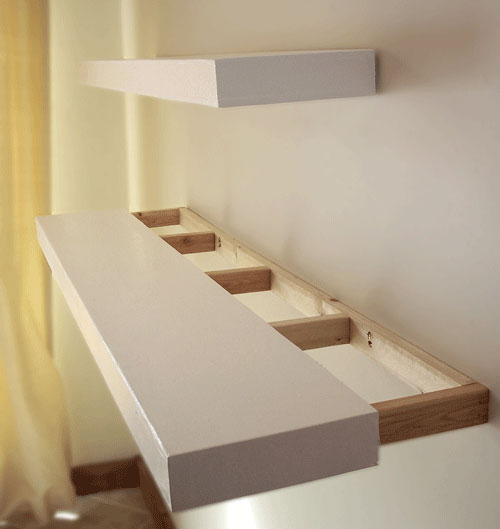
10. Shelf Sleeve. Slide the shelf sleeve over the frame, as shown below. The sleeve will fit snugly. If it’s too snug, you can sand down the frame a little – just a bit will make a big difference. You want the sleeve to fit tightly, as we will not be screwing the sleeve to the frame.
*And now for the Ana-White.com disclaimer: This plan has not been tested for weight or safety. Build at your own risk. Ana-White.com (or Young House Love) are in no way responsible for any loss, damages or injury resulting from this post.
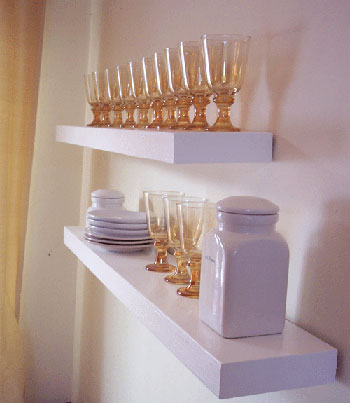
Onward to the after picture. Check out Ana’s amazing shelves. We can’t believe that she actually whipped up a pair for herself (she wanted to be sure that the plans that she provided were as accurate and detailed as possible). And we also can’t believe how great they look in her home.
So a big thank you to the amazing Ana for whipping up such a fantastic make-it-yourself shelf tutorial. What do you guys think? Will any of you be creating some sleek DIY floating shelves anytime soon? Let’s shower Ana with praise for stopping in. And of course, we’d love to see photos from anyone and everyone who decides to take these babies on. Happy building to one and all!
Update – Wanna know where we got something in our house or what paint colors we used? Just click on this button:


Kristen says
Help!!
I made these shelves a couple of years ago– and I love, love, love them. My question is that over the years they are sagging to the point where I can’t put anything on them anymore. They’re so flimsy. What can I do to reinforce them? I don’t want o lose them-they’re so pretty!
~Kristen
YoungHouseLove says
Oh no! Maybe hop over to Ana’s site and see what she recommends? Good luck!
xo
s
Gabe says
Hi.
Thanks for the plans, they were exactly what I was looking for. I had some time trying to plan an area for my cats to play and when I saw this picture – http://cdn.trendhunterstatic.com/thumbs/cat-friendly-living-room.jpeg – I knew I wanted to make something similar but not as fancy.
So I did the shelves following your plans and added an additional cat post and here’s what I ended up with – http://www.instructables.com/files/orig/FXL/B2GL/HP8PLNKU/FXLB2GLHP8PLNKU.jpg –
Great instructions and easy to follow.
Thanks again!!!
YoungHouseLove says
So awesome!
xo
s
Judy says
I’ve been wanting some shelves like this with hidden hardware and pretty sturdy as these look to use in my catio and as steps for my two cats to reach their favorite high spaces. These definitely fit the bill and I’ll be making a trip to my local lumber store ASAP . Thanks for the plans. They will get me started with just a little tweeting.
Joyce Sarah says
Wow, this design is incredible, a new way on how to make floating shelves. I like this idea on how to put the shelf sleeve and the frame together. Ana’s work always fascinates me.
Rilane says
Best Technical DIY how to make a shelf :) In Which software you doing these drawings?
YoungHouseLove says
Not sure what Ana uses, maybe pop over to her site and see if she has more info?
xo
s
Janey says
I am in the middle of making these fabulous shelves and everything is clear except for where to place the 2″ screws exactly. In STEP 3- it says to screw the trim ends to the trim face. Where would the screws go? UNDERNEATH and they get filled? I only see brad nail fills and I cannot see where screws go. Can anyone help? Thanks!
YoungHouseLove says
Maybe click through to Ana’s site for advice?
xo
s
Marion Olguin says
Yeah..thank you for the great tutorial! I was lumber shopping the other day to make a very simple shelf, with just brackets for holding. When I saw a floating shelf on display. Right away I thought how I could build it myself if I only knew how and then I found your blog post :)…I’m so excited.
Molly B says
I’m in the midst of building two shelves right now based on these plans. I have one frame completed and excited to finish them. I’m new to building. Did I buy the wrong kind of plywood? The plywood is VERY HEAVY and I am concerned about hanging these. Are yours heavy?
YoungHouseLove says
Cabinets are heavy but if you drill into studs they can be very secure (even full of dishes). Maybe click over to Ana’s site to ask? Good luck!
xo
s
Brenlee @ Simply Put Sincerely Us says
I have been following your blog for quite some time and when I saw the floating shelves I loved them, PLUS then Ana White came on for a guest feature and I was sold!
Like you and Ana said, the great thing about these plans is that they are easily modified…so that’s what we did! My husband and I have been fixing up our house for the past three years and it was finally time to redo the kitchen. We bumped up our kitchen cabinets and made room for your floating shelves underneath. Thanks for the inspiration! You are welcome to stop by the website and check them out ;)
YoungHouseLove says
LOVE that!
xo
s
Crystal says
These look really nice. I love that you can customize the size and color, unlike premade at the store.
My only concern is weight. I want/need to do a floating shelf in my kitchen over my bay window. (it has a soffit.
I want to put some porcelain cookie jars on it and I am concerned about weight. I don’t want my collector’s items falling off and breaking and also causing damage to my table and windows below!
I am afraid I will have to conform to store bought ones that have weight limits posted on them. :(
Ashley says
I have not read all 209 comments, so someone may have already asked this: how much weight can these hold? Could they hold a full shelf of books? Thanks!
silicatestudio says
Hey, more super sweet DIY floating shelves and hardware kits over at http://www.etsy.com/shop/silicatestudio thought ya’ll might like to see them!