We were humming along on our way to updating our $6 cabinets with some primer and glossy white paint until the whole hurricane thing took out our power (update: miracle of all miracles, it’s back on, and we’ve never loved electricity more). So the three day outage robbed us of our cabinet mojo since John has some building to do (which necessitates the use of a few electric tools like drills and saws) before we paint and reassemble everything in the office.
Thankfully we did get to tackle all of the prepping and priming before the outage, and took about a million photos of the process (who’s surprised?). So we figured that part of the makeover is worth a big ol’ wordy explanation for anyone at home who might want to follow along in detail, whether you’re also refinishing wood cabinets to make a wall to wall built-in desk or you’re just interested in refinishing your wood kitchen cabinets (which we also did back in the day). Note: this method sadly won’t work on laminate cabs – so it’s just for solid wood.
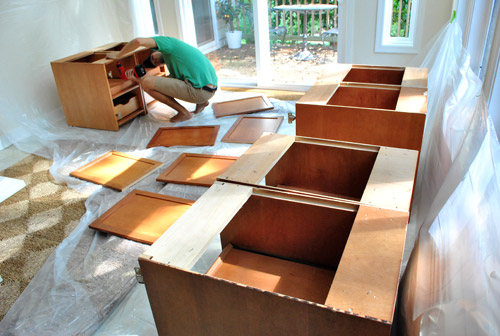
First, we removed all of the hardware on the doors along with the doors themselves (and the door hinges). Oh and we used two plastic drop cloths to create a Dexter-ish setup to protect the floor/walls from primer drips, paint splatter, and sanding dust – just so we wouldn’t have to worry as much about keeping the sunroom pristine.
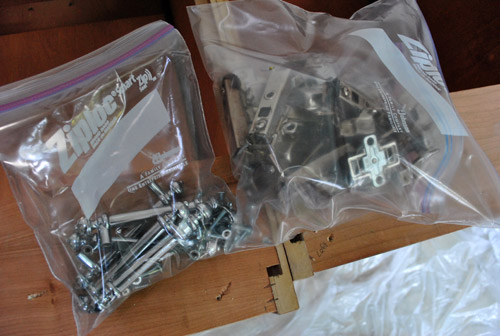
Then we put the door handles and accompanying screws into a plastic bag and all the hinge parts from each of the six cabinets into another bag. Two bags are key so you know which screws go with what (no mixing up handle screws with hinge screws), and can put everything back together in the end and hopefully not have an extra screw or part that you have no idea about (which is pretty much the story of our life whenever we assemble Ikea furniture for some reason- do they toss extra things into each box just to freak you out?).
Then I got ready to sand each door down by hand with some low grit paper (50) followed by higher grit sandpaper (200), just to cut the glossiness so the primer and paint would grab on and hold for the long haul.
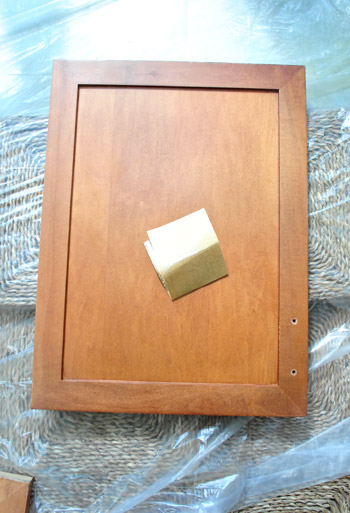
After one good round of low grit stuff, I myself experienced a makeover. I went from a dorky but normal-ish gal to a sweaty heavy-breathing mess. Seriously, I wasn’t ready for that jelly. Speaking of which, who else is freakishly excited about Beyonce being prego?
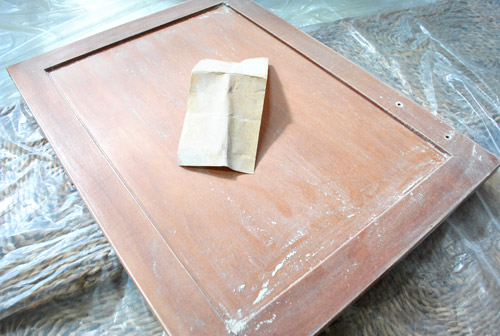
So then I opted to break out the big guns (aka: our little Black & Decker electric sander). Thank goodness this was back before we lost power.
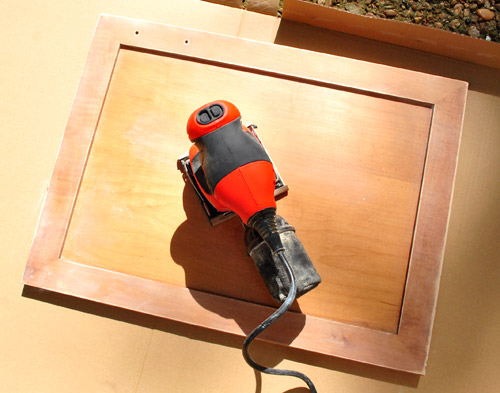
Little man got it done for me. It still took a while to sand down each door with low grit and then higher grit paper, and I did end up with a weird numb right hand from all the vibration, but I was happy to have help (as opposed to the grass roots manpowered method that I started out with). The entire door-sanding step probably took me a good hour to do each of the six doors twice (with low and then high grit paper).
As for the backs of the doors and the cabinet interiors, from day one we decided that we wanted a nice clean glossy front for our wall to wall built-ins, but to keep the backs and the interiors (and slide out interior fittings) of the cabinets the same natural wood tone that they were to begin with. I bet you’re wondering why, or doubting this’ll look good, am I right? Well, we certainly know that not everyone would go that route, but the new KraftMaid drawers that we installed in our first house’s kitchen renovation had wood interiors and we really liked them (you can actually see some of them here full of tools:
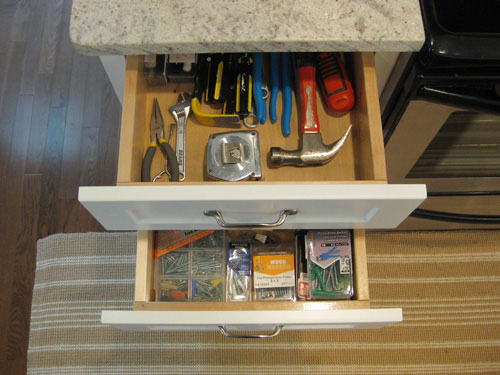
They had glossy white drawer fronts, but inside they held up a lot better to natural wear and tear than anything painted (since we’re weirdos who will stash hammers and screwdrivers almost anywhere). And we actually don’t mind the whole wood + white look (sort of like the dresser we refinished for Clara). Although in this case we decided from the outside that the cabinets would look entirely crisp and white (no contrasting top color), and only when you swing them open will you see the wood tone.
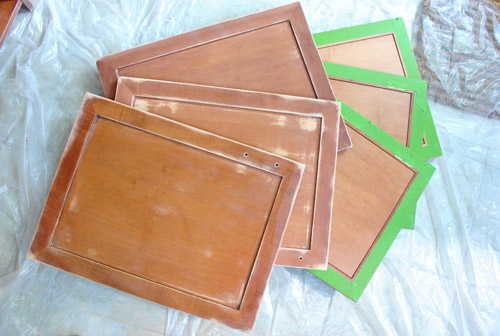
So here’s a shot of three doors face up (all sanded and ready for primer) and three face down (with Frog Tape carefully applied around the edges so we’d end up with a nice clean line between the painted fronts/sides and the natural wood finish on the back). We also considered doing both sides of the door white and just leaving the cabinet interiors wood, but decided that durable unpainted backs-of-doors was a better decision for us – but some folks might opt to paint the front & back of the cabinet doors a color and leave only the cabinet interiors unpainted, and that works too. It just comes down to personal preference.
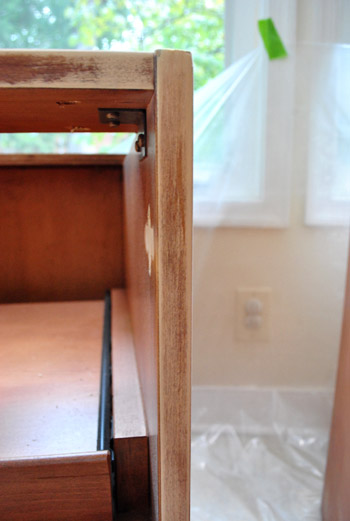
But back to the whole prep process. Next I took Señor Sander to the fronts and sides of the cabinets (which would also be getting a coat of primer followed by some glossy white paint so the entire exterior of the cabinets would look seamless and white). In contrast to the door-sanding part, this was a sanding step that I couldn’t do outside. Well, I guess I could have carried all six cabinets outside, but instead I just relied on our Dexter-tastic dropcloth setup (and the suction bag thingie on the back of my sander). It actually wasn’t too dusty. See, no smoke cloud (which I totally expected to see):
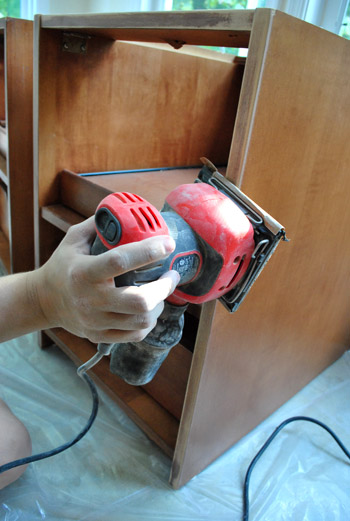
It was important to me that I got a nice roughed up edge around the cabinet frame, since the door would constantly be banging against it, and I wanted my paint-job to stick like glue for a nice long time (we had really great luck painting the original cabinets in our first house’s kitchen about two years before taking on a full kitchen renovation, and they looked mint for that entire time – which definitely gives us some confidence in this method).
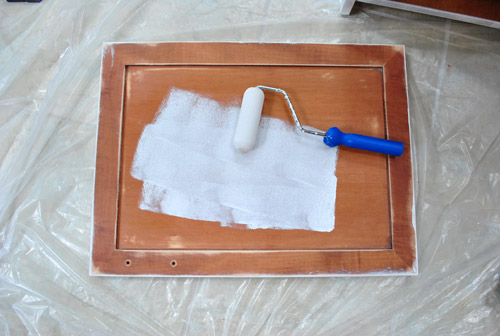
Then it was primer time. We opted to go with Kilz Clean Start, which was the same No-VOC primer that we used on our kitchen paneling with success (after trying two other low/no VOC options without much at all). I applied it with a small foam roller for a nice paper-thin coat without having to worry about brushstrokes.
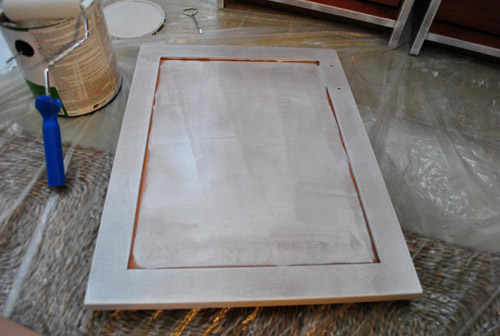
Primer always looks pretty rough when it goes on (since it’s just one thin coat, and isn’t meant to sit smoothly, it’s meant to be kind of roughed up so it can grab paint and hold it tight). I thought sharing this photo might help anyone who applies primer and then wonders if they did it wrong if it looks uneven and imperfect. Chances are you did it perfectly, that’s just how it looks.
Of course I had to use a brush to get into the frame around the edge that my roller couldn’t quite squeeze into. But notice how my brush isn’t dripping with paint in this pic. I wiped it firmly along the edge of the paint can on both sides, so there wasn’t any gunky drippy issue. Just a thin coat of paint applied around that frame. And then I picked up my foam roller again and rolled the door one last time to smooth everything out so there weren’t any rogue brush strokes around the front of the frame.
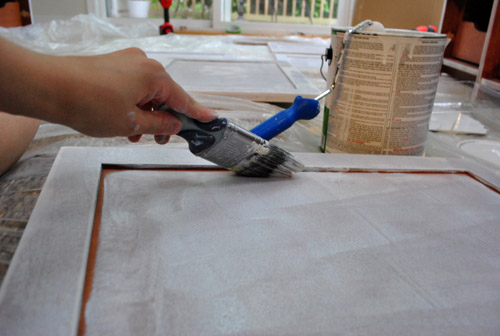
Oh but do each door one at a time (roll the sides, the front, brush the cracks, and reroll the front one last time). Because if you roll all of your doors and then go in with a brush on each frame and then try to reroll everything after that it’ll be a lot of time between those steps and it might not look as smooth (the roller could even pull up half-dry paint, so doing one door at a time keeps the paint wet enough to be “worked with” for a little bit).
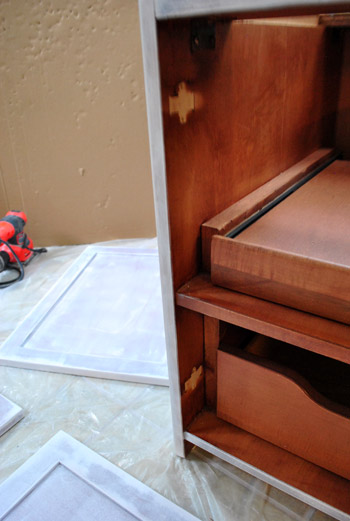
Next it was on to the sides and frames of the cabinets that I sanded down about an hour before. John was going to tape off the entire interior frame of the cabinets so we’d have a nice clean line between the white paint and the wood finish just like the doors, but being ever so cocky confident in my rolling ability, I knew I could lightly roll the frames (without too much paint on the roller- this is key!) to achieve just as clean of a line as tape, and it would save us time (and Frog Tape, which is like currency at our house).
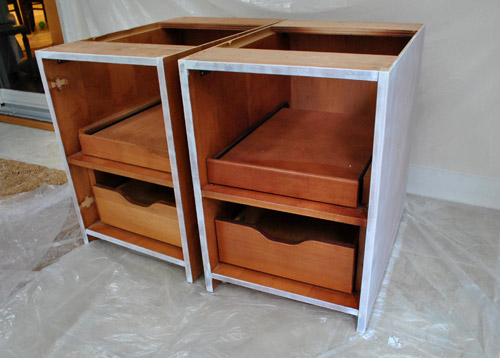
Thank goodness I was right. It looked nice and smooth. Well, as smooth as one coat of primer can look (remember, primer is meant to look uneven and kind of disastrous by nature – so fret not if your priming step doesn’t look perfectly even and smooth since a few thin and even layers of paint on top of it should get you there).
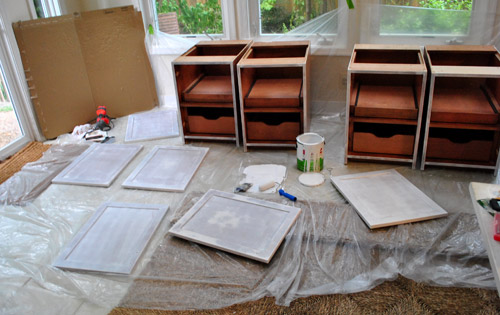
So here’s what the room was left looking like after all that hardware & hinge removal followed by door and frame sanding, and door and frame priming. Oh and see how some of the doors look whiter in certain areas? Some of them had little scratches or imperfections in certain spots, so I sanded them down slightly longer in those areas. This means the primer reads a bit more white on those spots just because the darker wood finish was removed and then primer was layered on. The good news is that doesn’t matter in the end because once a few thin and even coats of paint are applied it’ll all look seamless and bright white. At least that’s always been our experience. Probably shouldn’t count my chickens just yet though…
Now we just have to fire up the saw and build up the cabinets about three inches. Then we’re planning to assemble them in the office (they’ll be way too heavy/awkward to carry into the office after we screw them together to create three double cabinet bases) and I’ll apply those last 2-3 thin and even coats of paint when they’re in place (since painting them before assembling/moving them makes us fear scratches and dings that could occur when we move/assemble them). But by assemble them I just mean screwing them together to create those three pairs of double cabinets (not putting the doors and hardware back on – which we’ll definitely do after painting them, as usual).
Then it’s onto the counter. We’re still completely undecided on what we’re going to use (assembled planks of wood, one giant piece of wood or even some other material like an Ikea countertop, etc), but we’re planning to do some legwork so we can hurry up and work at our new built-in desk. We’ll keep you posted. If one things for sure it’s that we take great pleasure in over-sharing.
Psst- Speaking of over-sharing, we’re spilling all of the names that we considered when I was pregnant with Clara (including the boy ones we debated, and all of the other girl ones we tossed out) over on BabyCenter. And of course we’d love to hear any naming faves on your list. Or stories of epic naming disagreements. Those are fun too.

Rachel says
Looking good so far! Can’t wait to see the finished product!! (And yay for having your power back on!)
carolinaheartstrings says
So glad your power is back up. There is nothing like the “lack of something” to exponentially increase your appreciation. I do not like doing without electricity. Too much like camping. ICK! Thanks for the DIY. I would love to redo my cabinets in both bathrooms and this was a great how to.
AarthiD says
We reprimed our cabinets a few years ago, back home, and wow did the primer look uneven at first. My mother just about flipped out ’cause she saw them in-progress and thought they were the finished product. Whoops!
Numb-arm problems from vibrations are such a weird feeling. Any tips for bringing back the normal-hand sensations?
YoungHouseLove says
I try to take a break every once in a while (thankfully with six doors and some sandpaper switching that was a given). Other than that I just washed my hands to get rid of the dust and waited to feel normal again. Still don’t think I’m 100% normal but that’s another subject. Haha.
xo,
s
AarthiD says
Pssh, normalcy is totally overrated. Take it from me; my job pretty much requires me to be weird, hahaha!
PS: Y’all didn’t know Clara’s gender before she was born, I take it?
So I was flashing your site around ours a little bit and our grizzled vets love all your pictures and commentary. They were all ~impressed~ and whatnot. Thought I’d pass that along. :D
YoungHouseLove says
Aw thanks! As for Clara, we did find out at 20 weeks (but considered names pretty much from the day I got prego on). Just couldn’t wait to find out though. Haha, I have zero patience. It was a nice little mid-point-high of the whole pregnancy (after 100 straight days of morning sickness, it tided us over until the big day that we actually got to meet her).
xo,
s
AarthiD says
I bet! My mom grumbled all through her pregnancy with my sibling. She had morning sickness, he kicked hard, etc etc. She said learning he was a boy helped her, too.
I’m pretty excited to see this project through, not gonna lie. As someone who’s debating how to cheaply pseudo-upholster her walls, Real Reno Projects are way fun for me. ;)
John@OurHomefromScratch says
This is an exciting project… I’m taking notes. We’ll be doing a built-in in our office eventually.
My suggestion for your countertop would be either two to three MDF layers with solid wood edgebanding, which you can then paint or two layers of plywood also with edgebanding. The thicker, the better when it comes to countertops. I’d use more than a few layers of spray can lacquer for the top to give it that Ikea-gloss look. Good luck!
YoungHouseLove says
Thanks for the tips John! Definitely a possibility!
xo,
s
Sabrina says
Wow they look great already. I am trying to figure out what to do about my own cabinets. They are 2 tone and horrible. The cabinet themselves are dark cherry and kind of nice and then some of the cabinet doors are cherry also. But then they mixed those cheap white doors in with it. I think they are coated in melamine or something? They are so ugly! I am trying to decide whether or not to change them out since we plan on selling this house in the next 5 years.
PS My husband got a job offer for around you guys but it just isn’t the right time for us to move right now. We love the houses there and are researching the area for next time. We briefly looked there when we were relocating but weren’t sure about the area. Kicking ourselves now lol
Kristen @ Popcorn on the Stove says
Ah! Can’t wait to see this when it’s all done. I love white cabinets with the natural color inside. Are you guys going to replace the hardware with something more fun or keep it professional?
By the way, I bought Frog tape for my parents when my dad was painting their kitchen & living room. He’s a big blue-paint-tape kind of guy and was amazed at how well the Frog Tape worked! When we paint our apartment, we’ll be using the same stuff! It’s amazing!
YoungHouseLove says
Not sure about the hardware. On one hand we really like it since it’s classic and actually kind of mimics the shape of the black glass handles that we added to the file cabinet. We’ll have to see where we end up!
xo,
s
Jill says
We ended up using butcher block from lumber liquidators for our kitchen remodel and they look great! In case you’re considering other non-Ikea countertop options… We initially wanted Ikea ones, but when our local stores were out of stock (and shipping was going to be like $100), we investigated other options. The LL ones were more expensive, but we had more to choose from (like cherry!) and the prices were still very good. It took us a while to find a food-safe finish for them, but we got there in the end!
YoungHouseLove says
Thanks for the suggestion Jill! I literally mentioned LL last night in bed when we were brainstorming options!
xo,
s
Danielle says
What food safe finish did you end up going with? Im looking at this option for my kitchen and would love some advice.
Thanks!
Julie W says
I’m building a desk for my office/kitchen corner right now, sans Anna White. It’s not going to well either which is why I am here. lol But this is the wood top that I plan on building. Cheap too. I think I figured it would cost $8.59 for the length I need. Cheaper than any laminate or IKEA product.
http://aubreyandlindsay.blogspot.com/2009/08/making-new-desk.html
Side note: Not my blog so I hope she doesn’t mind me posting her beautiful desk here.
YoungHouseLove says
Oh yeah, I love that project! Pinned it a few weeks back! Amazing.
xo,
s
Lindsay says
Thanks for sweet and complimentary note about our desk Julie! It is such an easy project, and great fun to do as well. xo Lindsay
Katie says
can’t wait to see the cabinet results!! what a deal! AND every time i think about Beyonce being preggers i get weirdly excited!
Heather W says
Looking good. Can’t wait to see where you end up. Will you be painting the walls too before putting the cabinets in place? It seems it would be easier to do before installing your newly painted cabinets.
YoungHouseLove says
Ugh, I wish we could get it together and settle on a wall color but we’re still undecided. That would definitely be easier, but we could also just tape of the top of the desk and probably be just fine. Might check out a bunch of swatches just to see if anything grabs us though. Don’t want to rush into something we’re not crazy about, but if it’s true love we’ll go for it for sure!
xo,
s
Shawna says
LOL…..Dexter-ish…Too freakin hilarious..I love that show! Looking goog so far.
annabelvita says
Woo hoo, happy to hear the Petersiks are back in power. Wait, that means something else… haha. I think this is probably the project I’m most excited about at the new house.
SingleMama says
Can’t wait to see the cabinets all finished!
Shawna says
oops I meant Good
Rebecca @ the lil house that could says
5 weeks until Dexter. That is all I will say… :)
YoungHouseLove says
Ahhhh- so exciiiiited!
xo,
s
Christa M says
I am going through withdrawals…ITCHING!!!
Stefani says
Glad your power came back on!
I am just so excited about your $6 cabinets! Can’t wait to see more!!
Erin says
Glad you guys are okay. Geesh – I cannot imagine living without power for a day, let alone a couple days. And without the internet. I heard on NPR this morning that residents are flocking to restaurants and coffee shops who have free wifi and that their monthly sales have already doubled. It is not hard to believe because I would have done the same.
We painted our kitchen cabinets black a couple years ago and after some sweat and hard work, we found out that the prep work and painting thin coats are the best way to get an even, non-clumpy & scratch resistant look. Looks like you learned the same lesson your first time around. Wish I would have found your blog a couple years ago. It would have saved us a couple of starting the process over. Still super jealous about the $1 cabinets.
Caity says
“Little man got it done for me.”
That’s what she said :)
On a more mature note…so glad you guys have power again and that you were safe during the storm! You never realize how dependent you are on it until it’s gone! Or how much of a habit flipping on a light switch is…
YoungHouseLove says
Oh man, I walked right into that one. Ha.
xo
s
alexis says
we’ve named our daughter milena dixie (aka – mila)…dixie coming from my husband’s grandmother. pretty cute and southern, although she was born & raised in detroit! tee hee…
it was pretty difficult finding a nice name to go with our surname – Radonicich! a lot of the “good names” were already taken!
Robin @ Our Semi Organic Life says
Thanks for all the photos! Its great to see things go down step by step – I’ve used primer before and wondered if I’m doing it right. When would you need more than 1 coat of primer and when is just 1 fine?
YoungHouseLove says
I always go with one thin and even coat of primer. You’re not looking for consistent color or density with primer, just one thin coat to grab paint. I always worry that things are more prone to chipping or peeking if things are too thick and globby, so paper-thin is always the goal!
xo,
s
alexis says
oops – meant to comment on your baby center blog, not here! oh well!
YoungHouseLove says
No worries!
xo,
s
Allyn says
Still can’t believe how cheap those cabinets were. Seriously. You’ve put all of my thrift store boasts to shame.
Meagan says
So glad you guys are back up and running! I was worried what I’d do without you for a week!
Just a thought for the countertop, have you considered DIY concrete? I’m still trying to convince my partner that it’s the way to go in our kitchen!
YoungHouseLove says
I definitely tossed that idea out there a few times to John. Not sure where we’ll end up though!
xo,
s
Kelly T says
I would LOVE! to see you paint the cabinets something other than white! Maybe white with a tint of blue??
YoungHouseLove says
We definitely considered a few other options but since these built ins will be easily visible from the kitchen and the dining room (both of which also have cabinetry/built-ins) we wanted to go with classic white to work with both of those areas so it didn’t look like a different colored cabinet convention. Haha. We love when rooms that open to each other feel cohesive so we get to play around with color and texture when it comes to the accessories (like the dark teal on the back of the built-ins and the office chairs we can’t wait to paint and reupholster).
xo,
s
Diane Clayton says
So glad to hear that your power is back on- such a pain without it, especially with a baby. You guys rock.
Elizabeth says
Goodness I love how detailed you are in your descriptions. i think you have finally given me the confidence (and knowledge) to tackle painting my kitchen cabinets. Thank you for that!
Courtney says
Love your Dexter references and how you were able to sneak it in there in a totally non-serial killer way!
Jen says
You mentioned that you ran the paintbrush against the edge of the paint can to get rid of excess paint/drips.
I saw a cool idea on pinterest the other day (I can’t link to it because it’s blocked at work), but you wrap a heavy duty rubber band around the can (top to bottom, not around the sides), and then you can push the brush against that and prevent drips down the side of your can (or drips into that little groove around the edge that dries shut). I suppose you just have to be careful not to push too hard and fling paint everywhere!
YoungHouseLove says
Oh yes, I love that tip! Wish I took time to do those cute little things. So smart and in the end I always regret that I didn’t.
xo,
s
Cindy says
Ooo. The rubber band idea is a great new tip for me!
Also, Jen, if you use a hammer and nail some holes into that little groove, the paint will flow back into the can and the lid will shut tightly later. :)
Erin says
Instead of sanding have you ever tried the liquid sand? I know you usually try to avoid chemicals but I don’t think it is that bad.
When I painted my kitchen cabinets I started off sanding. Then I realized it was a lot of work, a lot of dust and not fun. I used liquid sand and it was a lifesaver. 3 years later and my painted cabinets still look great.
YoungHouseLove says
We haven’t tried that, just because I guess I’m generally weary of anything easy. Haha. I like to see the dust fly so I know my cabinets are all roughed up and ready to suck up some paint/primer. Hah. But I love hearing that it worked so well for ya!
xo,
s
Deborah says
Erin –
Does the liquid sander strip the cabinets down to the bare wood? I briefly tried using the liquid sander but it seemed to take a long time with continuous rubbing to remove just a bit of paint.
Anyone else with any experience with liquid sander ( or recommendations on brands)
Sherri says
Are the cabinets solid wood?
YoungHouseLove says
Yup, we got insanely lucky. I’ll add that to the post. Probably good to know, huh? Haha.
xo,
s
Charles says
“build up the cabinets about three inches”. If you add it at the top, 3″ might be enough room to build in one of those slide-out flat-surface/drawer-type thingies. (you know, the kind people are always taping a calendar or the super-secret password list to in movies, then they slide it back into the desk? a few 1×2’s for rails, and a 1×12 (or whatever) for the flat-surface/drawer-type thingy. Options, right? (I love adding to other people’s TODO list.. hehehe!)
I’m anxious to see the cabinet results. our kitchen could use a de-70’s-efying paint job. -good luck! taking notes over here!
YoungHouseLove says
Ooh those would be so much fun! We definitely have considered a bunch of options and can’t wait to share whatever we end up with (it’ll definitely come down to considering budget and difficulty and all that jazz).
xo,
s
heather says
I have to agree that BM paint is the shiz. We use SW in our house only because we both are in construction (i.e. I do marketing, my husband is actually IN construction) and one of our subs can get us a deep discount on paint. It’s awesome, but I love how BM coats. :) They’re low-voc paint gets awesome reviews!
YoungHouseLove says
Man, you’re a lucky lady! You know we love a deal. But we might have to check it out anyway for the cabinets, just because low VOC self-leveling BM paint sounds like the good stuff- and we want these cabs to last!
xo,
s
heather says
Haha it is pretty awesome. I also have no idea how my post ended up on this thread versus the one below it, but so be it. Up here SW is running a 30% off for a gallon of paint right now, ending labor day. I would call BM and see if they can match the discount – often times they will, you just need to ask. Also if anyone else in YHL land wants to try BM they have a $5.00 per gallon coupon of certain paints. They also have a “free pint of chalkboard paint with a gallon of Natura” right now through tomorrow (august 31st)
http://www.benjaminmoore.com/en-us/for-your-home/5-off-benjamin-moore-paints
YoungHouseLove says
Ooh you’re so wiley. Thanks for the tips!
xo,
s
Julia @ Chris loves Julia says
My life now falls into 1 of 2 categories: before beyonce was pregnant and after. So if I need to reference something chronologically, those are my points of reference. ;)
In other news, we recently painted our kitchen cabinets using Benjamin Moore Advance paint in Mountain Peak White and the paint was a dreaaammm!!! It leveled out on its own and was odor free. Like an oil based alkyd, but it was water based. I totally recommend it, and I wasn’t even paid to say that!
the details : http://chrislovesjulia.blogspot.com/2011/07/how-to-paint-your-kitchen-cabinets.html
YoungHouseLove says
Thanks so much for that recommendation! I’d love to check it out. Do you know if it was low or no VOC? I can find out from them either way when I go there to sniff things out. Haha. Oh and I love your BB and AB (before Beyonce’s pregnancy and after it) thing. Hilarious.
xo,
s
Julia @ Chris loves Julia says
Here’s what it says on their site regarding VOC: Advance cleans up with soap and water and is as green as they come, with a low-VOC content of less than 50 grams per liter, well below the 250 to 500 count for most other alkyds, and with significantly reduced odor.
Advance reflects Benjamin Moore’s advance on technology in so many ways. The plant-based alkyd formulation of Advance is specially engineered to incorporate Benjamin Moore’s waterborne Gennex tints. One of the tremendous advantages of these proprietary colorants is that they are totally VOC-free, so Advance is authentically low-VOC even after the tint is added, and regardless of the color choice, which numbers more than 3,300. Custom color matching also is available.
YoungHouseLove says
LOVE IT! Thanks so much for sharing the info. We’ll definitely be looking into it!
xo,
s
Amanda says
I can’t wait to see the finished project! I think the Ikea wooden counter – maybe in the birch finish – would look fabulous. I know it would be a little pricier than MDF or even laminate – but you definitely want a solid surface to work on.
Jennifer Ahnquist says
We just added built-ins to our den with the prefab unfinished cabinets at Home Depot. For our countertops we just bought plywood with oak veneer on the tops and stained and polyed it. Then added those little glue on finishing pieces for the edges. The cabinets are white and the counters are dark wood and it looks super shnazzy. Plus, it was a really easy countertop project. Our countertops were 28″ deep but if yours were 24 you could get two lengths out of one piece of plywood so the whole thing would only be about 50$. Deal!
YoungHouseLove says
Thanks for the suggestion! Definitely a possibility!
xo,
s
Jen R. says
you guys are the only bloggers i “know” who would go through a hurricane, lose power, and not miss any posts. major props to you guys! thanks for always thinking of us:) so glad you all made it safe and sound!
YoungHouseLove says
Aw thanks Jen R! We were nervous for a second, because a week without power definitely would have interrupted our progress! Haha.
xo,
s
Laura says
You know you’re going to get a million comments on your babycenter post with baby names, hahaha. I know I went right over and commented! ;)
YoungHouseLove says
I could talk about baby names all day! Haha. Love it.
xo,
s
Laura says
What woman doesn’t? ;) I told my husband I wanted to be a professional baby namer. Do you think Beyonce and Jay-Z will commission me on that project? Haha.
YoungHouseLove says
Seriously! I could help too!
xo,
s
Laura says
Sounds like we’re in business! ;)
Claire says
I’m sure you guys have answered this 1,000 times, but how do you handle a piece of (cheap) furniture with a thin veneer finish? I have a target bookcase I’m dyying to repaint.
YoungHouseLove says
Here’s a post about how we stained/painted something veneer: https://www.younghouselove.com/nursery-progress-refinishing-a-veneer-dresser/
xo,
s
Claire says
Saved the day again, thanks so much!
Abby says
Where did you buy the Kilz No-VOC primer? I can’t find it anywhere in Northern Virginia…the paint departments at Lowes and Home Depot had never even heard of it!
YoungHouseLove says
We got the Kilz no-VOC primer at Home Depot. It’s called Kilz Clear Start if that helps. Maybe you can order it online if they don’t have it in your area?
xo,
s
Melissa @ HOUSEography says
Glad to hear you survived the storm. You got it much worse than we did in Arlington. So true what they say about the calm after the storm though – Sunday was such a perfect weather day. Good luck with the painting! May be a butcher block counter from Ikea? I love that look with white cabinets and it’s indestructible. We have a painted desktop and I wouldn’t do it again.
YoungHouseLove says
Yeah, we’ve tossed around the idea of butcher block but don’t know if that’ll look weird since the white built-ins in the dining room have a white top and the desk built-ins will be visible through that opening (so we fear a butcher block top on one and a white top on the other won’t be as cohesive as we’d like). We’ll have to see where we end up!
xo,
s
annabelvita says
I think it would look great through from the dining room if you stained the wood top some sort of dark mocha tone, especially if you’re planning to go the darker hardwoods finish in the future. Or if you tried to get it in a wood tone that would tie in the dining table.
YoungHouseLove says
It’s definitely something we’ve considered because we both know we’d like a stained surface more than a painted one (just because it hides wear and tear a bit more). Hmm. Something to think about for sure!
xo,
s
Melissa @ HOUSEography says
Since they aren’t right next to each other (like butting up to each other), I think it would be fine. What if the top was stained to match the dining room table finish?
YoungHouseLove says
That’s definitely a possibility! We go back and forth about if that will look too busy once we layer a bunch of other stuff in there (we have some kind of crazy plans for bringing in some pattern in the chair upholstery and window treatments and even talk about stenciling the walls or adding board and batten under the chair rail). Should be fun to see where we end up!
xo,
s
Laura says
even though I already knew the ‘news’ I totally teared up yesterday morning when I watched the youtube video of Beyonce singing at the VMAs!
YoungHouseLove says
I know right? Why are we so excited for her? I think it’s just that she’s such a proud momma and JZ is such a proud poppa.
xo,
s
Elizabeth says
I completely agree about Ikea throwing in extra parts! Sometimes I think they just go down the line and throw in whatever looks good, there always seems to be something left over!
Glad your power is back on!
Tee Bland says
Your cool IKEA chandy in your bedroom was just on Regis & Kelly’s Dream home giveaway!
YoungHouseLove says
Wahoo! That’s so much fun. Off to try to google for pics. Haha.
xo,
s
Jess says
So glad yall are doing ok after Irene! I live in the tri-cities and am still waiting on power (luckily my mom’s house has power, so I’m staying with her). :)
Stacey says
I’m still jealous of your ability to score awesome thrift store stuff!
It’s hard to tell in the photos, but did you forget to prime the front of the cabinets along the bottom? It would be the only wood tone left exposed since you painted the sides, right? Just curious.
YoungHouseLove says
We’re planning to add some molding along the bottom of them so they look more built in (as opposed to toddling on those little legs) so that unpainted part will be covered.
xo,
s
Rebecca @This Nest is Best says
I seriously cannot wait to see this project completed! So excited for your new office :D
Colleen P. says
LOL-is it so wrong that I’m relieved that you didn’t do the interiors of the cabinets? I remember thinking “life is too short to paint inside cabinets, surely they won’t do that!” Thanks for not pointing out how lazy the rest of us are!
Pip says
Ugh I don’t envy you with all that sanding – makes my hand cramp up just thinking about it. Well done on a sticky job! I think the woodgrain interior will look great with the white gloss outer. So many cabinet inners are ply or chipboard – so if you’ve got the real thing flaunt it I say!
Carolyn says
I thought you guys used to opt for the non-foam rollers because foam makes your paint bubble up … or at least I thought I read that somewhere. Why the switch? I’m curious because I’m planning on painting my kitchen cabinets soon. Can’t wait to see the built-in desk take shape!
YoungHouseLove says
We’re all about trying stuff and learning as we go and although we read from a few Home Depot books that foam rollers can rile up paint and cause bubbles, some readers a few years backed kept urging us to try them since they spread paint so evenly and thinly without brush strokes… so we did. And we loved them! No issues with bubbles at all. Just nice and smooth results. Hope it helps!
xo,
s
Crystal says
I’m so curious to know what you do for the counter top. We are doing something similar in our home office for two now that we are both working from home. We want something that spans the length of the room (135″) without having to use two table tops. Even the Ikea countertops are only 96″ (that I saw online anyway). I thought about checking Lowes for a paintable option. Can’t wait to see the finished office!
YoungHouseLove says
We learned that anything over 12′ will have to be two different pieces since even kitchen cabinet fabricators cut granite and butcher block and other solid surface tops down in 12′ increments to fit it in the truck. Sadly our room is 13′ wide, so it’ll most likely have to be two different tops seamed in the middle somehow. Still no earthly idea where we’ll end up. Haha.
xo,
s
Kelly says
Love that you snuck a Dexter reference in this update! :)
Glad your power is back on.