We were humming along on our way to updating our $6 cabinets with some primer and glossy white paint until the whole hurricane thing took out our power (update: miracle of all miracles, it’s back on, and we’ve never loved electricity more). So the three day outage robbed us of our cabinet mojo since John has some building to do (which necessitates the use of a few electric tools like drills and saws) before we paint and reassemble everything in the office.
Thankfully we did get to tackle all of the prepping and priming before the outage, and took about a million photos of the process (who’s surprised?). So we figured that part of the makeover is worth a big ol’ wordy explanation for anyone at home who might want to follow along in detail, whether you’re also refinishing wood cabinets to make a wall to wall built-in desk or you’re just interested in refinishing your wood kitchen cabinets (which we also did back in the day). Note: this method sadly won’t work on laminate cabs – so it’s just for solid wood.
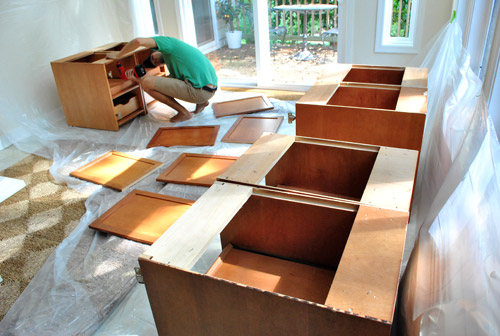
First, we removed all of the hardware on the doors along with the doors themselves (and the door hinges). Oh and we used two plastic drop cloths to create a Dexter-ish setup to protect the floor/walls from primer drips, paint splatter, and sanding dust – just so we wouldn’t have to worry as much about keeping the sunroom pristine.
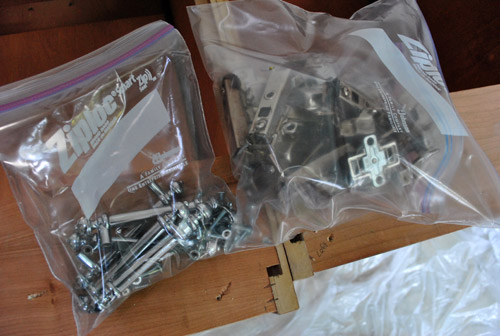
Then we put the door handles and accompanying screws into a plastic bag and all the hinge parts from each of the six cabinets into another bag. Two bags are key so you know which screws go with what (no mixing up handle screws with hinge screws), and can put everything back together in the end and hopefully not have an extra screw or part that you have no idea about (which is pretty much the story of our life whenever we assemble Ikea furniture for some reason- do they toss extra things into each box just to freak you out?).
Then I got ready to sand each door down by hand with some low grit paper (50) followed by higher grit sandpaper (200), just to cut the glossiness so the primer and paint would grab on and hold for the long haul.
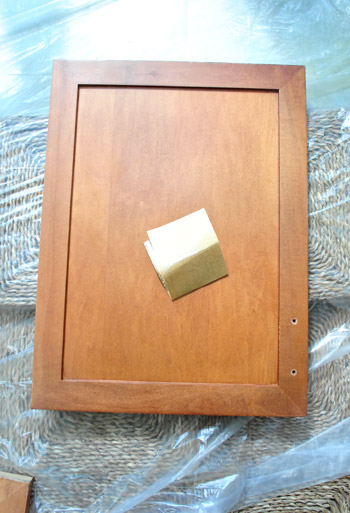
After one good round of low grit stuff, I myself experienced a makeover. I went from a dorky but normal-ish gal to a sweaty heavy-breathing mess. Seriously, I wasn’t ready for that jelly. Speaking of which, who else is freakishly excited about Beyonce being prego?
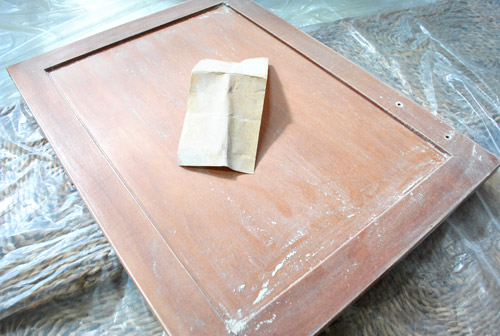
So then I opted to break out the big guns (aka: our little Black & Decker electric sander). Thank goodness this was back before we lost power.
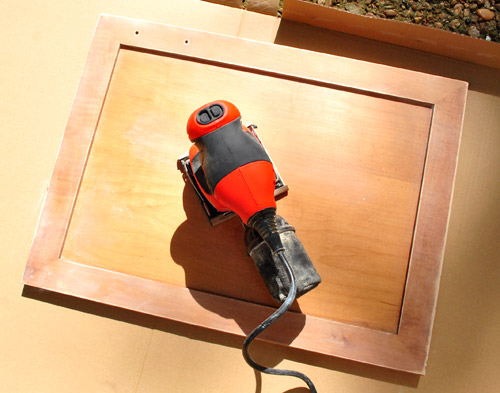
Little man got it done for me. It still took a while to sand down each door with low grit and then higher grit paper, and I did end up with a weird numb right hand from all the vibration, but I was happy to have help (as opposed to the grass roots manpowered method that I started out with). The entire door-sanding step probably took me a good hour to do each of the six doors twice (with low and then high grit paper).
As for the backs of the doors and the cabinet interiors, from day one we decided that we wanted a nice clean glossy front for our wall to wall built-ins, but to keep the backs and the interiors (and slide out interior fittings) of the cabinets the same natural wood tone that they were to begin with. I bet you’re wondering why, or doubting this’ll look good, am I right? Well, we certainly know that not everyone would go that route, but the new KraftMaid drawers that we installed in our first house’s kitchen renovation had wood interiors and we really liked them (you can actually see some of them here full of tools:
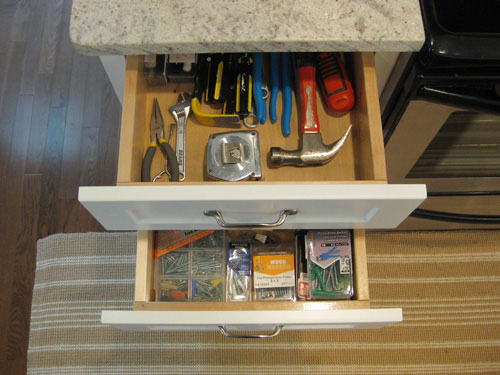
They had glossy white drawer fronts, but inside they held up a lot better to natural wear and tear than anything painted (since we’re weirdos who will stash hammers and screwdrivers almost anywhere). And we actually don’t mind the whole wood + white look (sort of like the dresser we refinished for Clara). Although in this case we decided from the outside that the cabinets would look entirely crisp and white (no contrasting top color), and only when you swing them open will you see the wood tone.
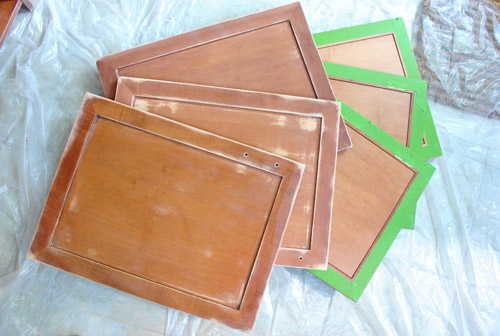
So here’s a shot of three doors face up (all sanded and ready for primer) and three face down (with Frog Tape carefully applied around the edges so we’d end up with a nice clean line between the painted fronts/sides and the natural wood finish on the back). We also considered doing both sides of the door white and just leaving the cabinet interiors wood, but decided that durable unpainted backs-of-doors was a better decision for us – but some folks might opt to paint the front & back of the cabinet doors a color and leave only the cabinet interiors unpainted, and that works too. It just comes down to personal preference.
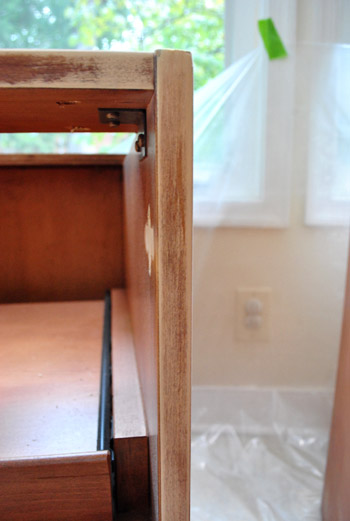
But back to the whole prep process. Next I took Señor Sander to the fronts and sides of the cabinets (which would also be getting a coat of primer followed by some glossy white paint so the entire exterior of the cabinets would look seamless and white). In contrast to the door-sanding part, this was a sanding step that I couldn’t do outside. Well, I guess I could have carried all six cabinets outside, but instead I just relied on our Dexter-tastic dropcloth setup (and the suction bag thingie on the back of my sander). It actually wasn’t too dusty. See, no smoke cloud (which I totally expected to see):
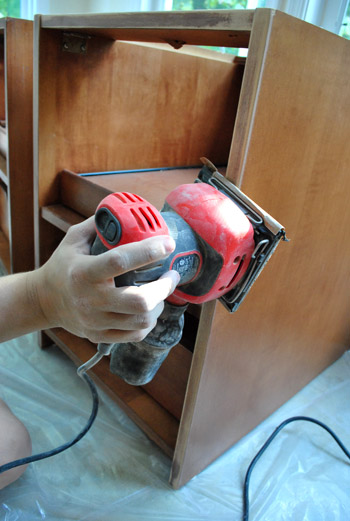
It was important to me that I got a nice roughed up edge around the cabinet frame, since the door would constantly be banging against it, and I wanted my paint-job to stick like glue for a nice long time (we had really great luck painting the original cabinets in our first house’s kitchen about two years before taking on a full kitchen renovation, and they looked mint for that entire time – which definitely gives us some confidence in this method).
Then it was primer time. We opted to go with Kilz Clean Start, which was the same No-VOC primer that we used on our kitchen paneling with success (after trying two other low/no VOC options without much at all). I applied it with a small foam roller for a nice paper-thin coat without having to worry about brushstrokes.
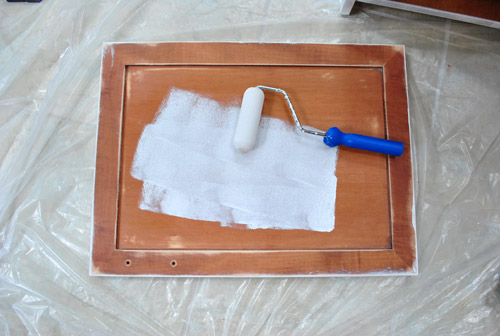
Primer always looks pretty rough when it goes on (since it’s just one thin coat, and isn’t meant to sit smoothly, it’s meant to be kind of roughed up so it can grab paint and hold it tight). I thought sharing this photo might help anyone who applies primer and then wonders if they did it wrong if it looks uneven and imperfect. Chances are you did it perfectly, that’s just how it looks.
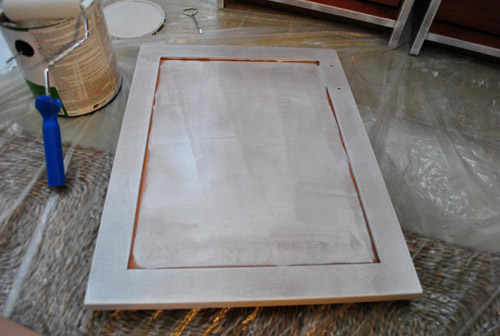
Of course I had to use a brush to get into the frame around the edge that my roller couldn’t quite squeeze into. But notice how my brush isn’t dripping with paint in this pic. I wiped it firmly along the edge of the paint can on both sides, so there wasn’t any gunky drippy issue. Just a thin coat of paint applied around that frame. And then I picked up my foam roller again and rolled the door one last time to smooth everything out so there weren’t any rogue brush strokes around the front of the frame.
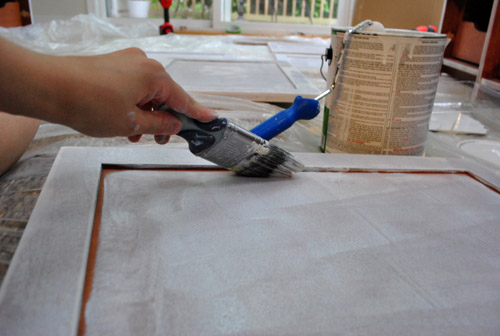
Oh but do each door one at a time (roll the sides, the front, brush the cracks, and reroll the front one last time). Because if you roll all of your doors and then go in with a brush on each frame and then try to reroll everything after that it’ll be a lot of time between those steps and it might not look as smooth (the roller could even pull up half-dry paint, so doing one door at a time keeps the paint wet enough to be “worked with” for a little bit).
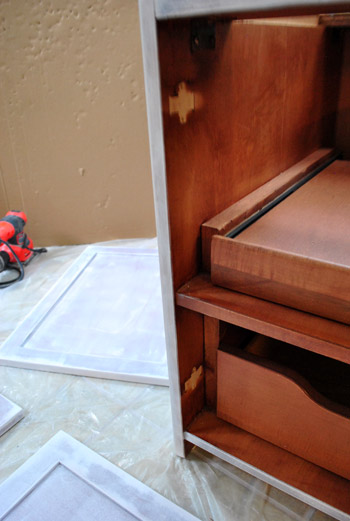
Next it was on to the sides and frames of the cabinets that I sanded down about an hour before. John was going to tape off the entire interior frame of the cabinets so we’d have a nice clean line between the white paint and the wood finish just like the doors, but being ever so cocky confident in my rolling ability, I knew I could lightly roll the frames (without too much paint on the roller- this is key!) to achieve just as clean of a line as tape, and it would save us time (and Frog Tape, which is like currency at our house).
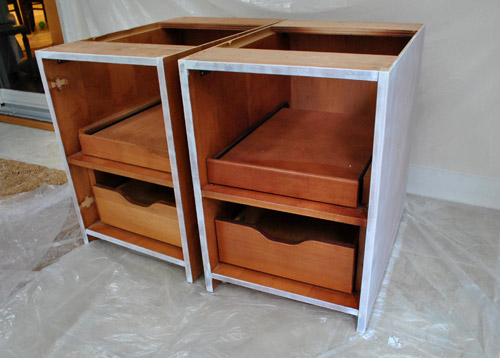
Thank goodness I was right. It looked nice and smooth. Well, as smooth as one coat of primer can look (remember, primer is meant to look uneven and kind of disastrous by nature – so fret not if your priming step doesn’t look perfectly even and smooth since a few thin and even layers of paint on top of it should get you there).
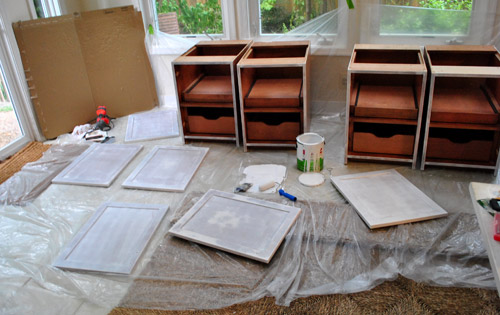
So here’s what the room was left looking like after all that hardware & hinge removal followed by door and frame sanding, and door and frame priming. Oh and see how some of the doors look whiter in certain areas? Some of them had little scratches or imperfections in certain spots, so I sanded them down slightly longer in those areas. This means the primer reads a bit more white on those spots just because the darker wood finish was removed and then primer was layered on. The good news is that doesn’t matter in the end because once a few thin and even coats of paint are applied it’ll all look seamless and bright white. At least that’s always been our experience. Probably shouldn’t count my chickens just yet though…
Now we just have to fire up the saw and build up the cabinets about three inches. Then we’re planning to assemble them in the office (they’ll be way too heavy/awkward to carry into the office after we screw them together to create three double cabinet bases) and I’ll apply those last 2-3 thin and even coats of paint when they’re in place (since painting them before assembling/moving them makes us fear scratches and dings that could occur when we move/assemble them). But by assemble them I just mean screwing them together to create those three pairs of double cabinets (not putting the doors and hardware back on – which we’ll definitely do after painting them, as usual).
Then it’s onto the counter. We’re still completely undecided on what we’re going to use (assembled planks of wood, one giant piece of wood or even some other material like an Ikea countertop, etc), but we’re planning to do some legwork so we can hurry up and work at our new built-in desk. We’ll keep you posted. If one things for sure it’s that we take great pleasure in over-sharing.
Psst- Speaking of over-sharing, we’re spilling all of the names that we considered when I was pregnant with Clara (including the boy ones we debated, and all of the other girl ones we tossed out) over on BabyCenter. And of course we’d love to hear any naming faves on your list. Or stories of epic naming disagreements. Those are fun too.

Jennifer says
Seriously- you said “I wasn’t ready for that jelly” and that made my laugh out loud in the middle of class. (no professor I’m not reading design blogs during class). And I, too, am FREAKISHLY excited about Beyonce’s news!
Jasmine says
I like your new banner, with the yellow frontdoor! Maybe you should add some more yellow, like the pots next to the door or some cushions.
YoungHouseLove says
Amen! We’re itching to do a lot more outdoor updating. And love the idea of pops of yellow in the pillows, planters, and even maybe in the flowers themselves (we’d love to plant a bunch of tulips or daffodils to pop up every spring).
xo,
s
Wom-mom Ethne says
Dexter – love it.
PJ says
“I did end up with a weird numb right hand from all the vibration, but I was happy to have help (as opposed to the grass roots manpowered method that I started out with).”
That’s what she said :) Sorry!
YoungHouseLove says
Bwahahahahahhahaah. Good one.
xo,
s
kristen says
50 billion comment points to PJ! good one…
heather says
aaaaaaaahahahaha.Best “that’s what she said” remark ever.
Leigh Anne says
My husband and I are going to be painting kitchen cabinets soon and were planning on following your process, especially since you’ve done it with success before. However, I recently saw this product and wanted to get your take on it. http://cabinets.rustoleumtransformations.com/. I trust your opinion and don’t want to take any shortcuts to less-than-stellar results! Thanks for any input!
YoungHouseLove says
I’ve heard lots of other bloggers use it and love it! We just wish it were low or no-VOC (our method can be completely VOC free, and a good deal less expensive than that kit, which is why we’re fans). Hope it helps!
xo,
s
Alice says
I love that you were considering Alice as a name for Clara (although I think Clara is the perfect name for your little bean!). I am named after my father’s favorite Great Aunt and my mother’s best friend from high school. If you have another girl, you should definitely reconsider Alice– I’ve never met another Alice in my generation (mid 20s) or younger and I’ve always felt that my name was very special because of that!
Also, I love this cabinet post! I’m starting to think about buying a house in the next year or two and one thing that is on my list– a kitchen with a lot of potential that needs fixing up so I can do a cabinet project/kitchen makeover like you did!
Meredith says
Hi! I’m a relatively new reader from just up the road (in Charlottesville) and I absolutely love your blog! My boyfriend and I are fixing up a 50’s era house that is pretty similar to yours and we are thinking about painting our kitchen cabinets until we can have them replaced. The issue is that they are already painted, would you suggest that we sand down the current paint job, then prime and paint? Do you think primer would be necessary? We are also considering painting the tile in our shower with this special tile primer and high-gloss paint… would definitely appreciate your thoughts on that, thanks!!
YoungHouseLove says
Oh yes, sand and definitely prime for better durability/stick-age. Good luck! As for tile painting, haven’t tried that except for getting our bathtub professionally reglazed at the old house (which held up really well).
xo,
s
Sandra says
Tub reglazers can also reglaze your tile. We had it done about two years ago in a bathroom the same size as the Youngster Mark I house, along with the tub AND the floor for about $700.
I have since used “Homax Tough-as-Tile” paint on the tile backsplash in my kitchen and it looks just as good as the professional job in the bathroom. Just make sure you have all windows open – this stuff is NOT low VOC.
Kristina says
I’m also voting for the DIY concrete counter – maybe they have an ORB concrete stain :) But a 3-plank wood top will contrast beautifully with glossy white cabinets and might be easier to assemble/move/secure. Can’t wait to see what you decide!
Kiran @ KiranTarun.com says
Glad your power is back and everything is good :)
I got two beautiful wood panels and I was wondering to make a table out of it. Crossing my fingers for our first DIY project :)
YoungHouseLove says
We made a table out of a door here, so maybe that tutorial will help? Good luck!
xo,
s
Amanda says
I am super excited for Beyonce and Jay Z- my husband thinks I’m crazy because I kept saying it over and over again “she’s finally preganant” he was like “you make it sound like they are friends of ours” sadly in my crazy brain they are. I feel like i know Beyonce because we’ve both grown up together. I remember seeing her in Destiny’s Child as the opening act at a Boys to Men Concert.
Jess @ Little House. Big Heart. says
Those slide out drawers are going to come in so handy! We’re turning our unused former-but-now-walled-in back porch into an office/library… I wish it wasn’t so narrow so we could do built-ins like these!
I can’t wait to see the final result! What color are you painting them?
YoungHouseLove says
Glossy whiiiite! Yay. We think they’ll look nice if they mimic the white built-ins in the dining room since they’re both visible from each space.
xo,
s
heather says
Not with oil paint. I had to use thinner to get it off. Latex is all soap and water which I love because I have tons of soap scraps laying around in a box haha.
nic says
Is that Kilz Clean Start an oil or latex primer? Did you do your previous kitchen cabinets with oil or latex based primer?
They seem to say that latex is “just as durable” as oil nowdays but I really have trouble believing it…..
YoungHouseLove says
It’s latex based in order to be no-VOC (oil = fumey). We used oil-based primer for our last cabinet painting project five years ago (before no-VOC primer was available) but we did get to try the Clean Start out on our wood kitchen paneling and it solved our bleed through issues and held on really well. Hope it helps!
xo,
s
heather says
I used Kilz Clean Start Oil which has almost zero smell to it on part of our living room. Pros: It didn’t smell much at all and it coated awesome. Cons: Cleaning. Sweet baby Hay-suess that was a frustrating pain in the butt, and the cleaner certainly isn’t low-VOC (at least what we had). Defeated the purpose. I was like where do I dump this?! Since we have well water. No way Jose.
I like my latex prime-a-tron – even if it means a few more coats to stop bleed through (or use a thin coat of BIN to stop bleed on small spots).
YoungHouseLove says
You couldn’t clean up with water and a little bit of soap? That’s what we did- seemed to be ok. But maybe I’m missing something?
xo,
s
heather says
Ahh lies. I just looked it up. I used the Kilz Odorless Oil primer. Not the Clean Start. My bad. Either way, it covered like a gem but was a pain to clean off the brush (the odorless). I’d definitely try the clean start if we didn’t just get a 5G bucket of SW Masterhide haha. Good Lord, that better be enough for our entire interior of the house.
YoungHouseLove says
Haha- oh yeah- that stuff is still oil-based so cleaning it up is super tough! We have found that mineral spirits seem to help though!
xo,
s
Christine says
Your psst was perfectly timed – I was just looking into baby names!!! :)
traci says
I have a feeling these are gonna look awesome once complete! Can’t wait to see :)
Bob says
$herdog,
When I use primer, the first coat never goes on smooth. What am I doing wrong? It looks like a mess!
YoungHouseLove says
Such a jokester you are Bob.
xo,
s
Cindy says
Bob thanks for making me laugh today instead of making me frustrated. What power you hold over me… ;)
Bethany says
My body’s too bootilicious for ya :P Loved that reference!
Sandra says
Here’s my unsolicited advice:
Go BOLD in that room. A color somewhere between your kitchen walls and the peacock built-ins in the dining room for the walls. And do it before you add the desk. And then paint the desk before you move assemble it and just touch it up if you get dings.
I’m not bossy er nuthin’!
YoungHouseLove says
Haha- if only we could land on a wall color we love enough to not feel like we’re rushing into it. We’ll have to see where we end up. We’re actually thinking a deeper tone might be the way to go. Not necessarily a bright color to complete with the teal built-in area, but maybe something more enveloping than the soft gray on the walls in the dining room. Who knows…
xo,
s
KathyG says
Now $herdog, you tell people all the time, it’s only paint, if you dont’ like it you can redo it. Go.For.It.and paint first!
I personally vote a shade or two darker than the dining room. But if it’s wrong, change it after the desk goes in. It will give us little people confidence to ‘go for it’! No unsolicited advice intended, jmo.
YoungHouseLove says
Haha, just don’t want to waste time on a project that we’ll have to redo when we have so many other things on our list, ya know? Of course it’s just paint so it wouldn’t kill us to paint twice, but we also love trying to do something we love instead of rushing and settling on something “meh.” Haha.
xo
s
angel p says
Thanks for all the tips. I bought a side table at a garage sale and kept it in the garage for more than a year and then resold it because I wasn’t sure I could refinish it. You are giving me the confidence since you make it look so easy. I actually got a mouse sander as my Valentines gift this year from the hubby so I am now set for the next time I find something at a yard sale. I’ve done lots of things but refinishing is one that always scares me.
Bboss says
Taking notes. I’m about to tackle a bathroom honey oak cabinet in my boys bathroom. It’s a piece of crap to begin with so I decided it could only be improved on.
Lisa in Seattle says
We’ve got three of those in our bathrooms as well, so I’ve been thinking along the same lines. Would love to see how it turns out for you, if you feel comfortable coming back to share (and our gracious hosts don’t mind…).
YoungHouseLove says
Of course! We’d love to see/hear how it turns out!
xo,
s
Kristen says
I’m a novice, could you tell me why you do two sandings? I’m dying to paint a kitchen table but I’m nervous!
YoungHouseLove says
The low grit one roughs things up a lot and the higher grit one smooths them out again (just doing low grit means it could be a little rough looking once painted, and just doing high grit might not get a deep enough sanding job in). Hope it helps!
xo,
s
Amy says
You make it look so easy!! Over sharing is what makes it clear for those of us in noviceland. :)
So glad you got power. Dominion is working hard! They had a nice full page ad in our paper today with a grubby pair of work boots and the copy said something to the effect of “We’re not taking these off until every customer has power restored.” For some reason it gave me great comfort. I guess that was the point…
YoungHouseLove says
Yes- they are awesome!!! They hired people all the way from Georgia to work on our lines. So amazing of them to bring so many people in from all over to come to our rescue! So grateful.
xo,
s
Jenb says
I had to laugh, I’m refinishing a table and spent last night sanding with a palm sander. I also ended up with a weirdly tingling hand! :)
Melissa says
Sign Me Up
I recently signed up for a mosiac class. Very excited to get started.
annabelvita says
Oh my word…apropos of nothing in this post but I had to share this with y’all. I don’t know if it’s the best or worst thing I’ve ever seen, but I did know I had to share with the only cloth-diapering family with a dog called burger that I know!
Behold! http://hyenacart.com/bunzuke/mt/3608/49999/Black-Hamburger-AI2-Pocket-Diaper
YoungHouseLove says
OH MY GOSH. John might kill me but Clara might need that. Haha.
xo,
s
Ashley says
I love your detailed posts! I can’t wait to see the finished result. I have to sand and paint our Bilco doors…not quite as exciting as cabinets! But at least I get to use Marine paint, something new :)
Heather says
I can’t wait to see the end result. I’m working on my own plans to put an “office” across the end of my dining room (which is open to the kitchen)…I can’t wait to see your end results. :)
Did you know that you can attach your B&D sander to your shop-vac? It will vacuumm up the dust as you go. My husband taught me that trick when I was sanding our counter height table (I was repainting it since our kids had paint, nail polish etc splilled onto the table top…thankfully it was the “extra” table). You just remove the little dust catching bag and insert the shop vac hose on the end. It’s a little noisy, but it cuts down on the dust clean up! :)
I love Dexter too! :)
YoungHouseLove says
Oh my gosh- never knew that! So smart!
xo,
s
Meredith says
Thanks for the suggestions! I forgot to mention that painting the tile is going to be a temporary fix until we have enough pennies saved up to rip out everything and expand that bathroom, probably within a year, so I would feel guilty about spending so much money/effort on reglazing. I just can’t stand the GROSS banged-up tile/grout any longer! I will look into that Tough-as-Tile paint you suggested Sandra, thanks!
YoungHouseLove says
Good luck!
xo,
s
Susan H. says
It’s exciting to see your house coming along.
I also appreciated the post about your neighbor’s houses. Can you continue to show updates about them as they have their homes fixed?
Maybe house crash your own neighborhood?
YoungHouseLove says
Sadly there’s still a tree on their house. I think these things take some time for insurance to deal with (and it’s probably hard to book a tree guy since so many are out doing jobs right now). They’re currently staying with a relative but we’ve told them to let us know if they need anything! Hope they get back into their home soon!
xo,
s
Skye @ Neathering Our Fest says
Have you considered constructing another tabletop like your console table in the living room? It might add a nice “tying-together” element to the house and some character to those crisp white cabinets! :)
YoungHouseLove says
I mentioned that to John but he was a bit resistant to not having a smooth easy-to-wipe down surface (I reminded John that we rest glasses and books and stuff on the console, but for some reason he’s still gun shy – so we’ll have to see where we end up).
xo,
s
Felicity says
I love that you worked a Dexter reference into this post. :)
Bryn says
For your countertop, if the dimensions work out, you might try a pre-finished (or not…if you are in the mood for more painting!) interior door, sans hardware. It’s nice for a desk, because the door handle hole, placed at the back against the wall, is a pre-made cord holder! We did this at our last place, and it worked out marvelously.
YoungHouseLove says
Love that! We actually built a desk from an old door in our last office (it’s the desk we still work at) and we love that doorknob hole for all of our cords!
xo,
s
Lauren says
Full circle – you guys convinced me to paint our kitchen cabinets white, and here’s the process further improved. Power sander and primer with a roller… could I have the month of my life back where I did it with paper & a brush??
Three cheers to an organized operation!
YoungHouseLove says
Haha- we definitely feel the same way! Leaning as you go can be a drag because it takes a while to figure out the best method! But it’s fun, right? Wait, don’t answer that.
xo,
s
Dawn says
Okay…you’re entirely TOO comfortable using that “Dexter-ish” reference for the plastic drop cloth…lol.
I wish I had a dedicated space for an office like you have…or at LEAST somewhere for me to do my creative stuff. But no…I have to have a zillion plastic tubs in the garage and drag stuff in to the diningroom table to do anything…*sigh*. Oh well,…at least I can live vicariously thru you right? :)
I seriously think you should bring in the same idea you did for the “ginormous” console table. LOVE that look!
Danielle D. says
Ya’ll inspired me to paint our kitchen cabinets back in January and I’m stiiill painting! haha, sanding has taken forever and I just plain hate it. But anyhoo, the framework is all done, painted and ready to go. I just need to sand a few more doors and drawers. It will feel soooo good once it’s finished.
Sherry, I was SO freaking excited to hear about Beyonce! My s/o knows she’s my idol so he called down the hall “Babe, Beyonce is pregnant”, to which I responsed, mid sprint down the hall “WHAAAAAAA???” hahaha
Amanda says
I made a wall to wall desk in my office a while back. We did an assembled wood plank type desk top. I don’t recommend doing that, though. I really wish we had spring for the more expensive solid piece. It was a pain to assemble the boards and make them look nice. Even with lots of prep in an effort to make it look seamless, it still looks like a bunch of boards stuck together.
Krystle @ ColorTransformedFamily says
Thanks for showing what the primer should like. It would be tough for me not to want to make it pretty and white but it’s nice to know that’s all you need. I think these are going to turn out grrrrreat!
Susan says
Love the Dexter reference. I painted my son’s room this past weekend and said practically the same thing – I was laying more plastic around than Dexter! :-)
Syreena says
so glad your power is back on. my bestie lives in henrico co and they are still hooked up to a generator and hookin din din up on the grill. these good good so far. you guys are so awesome for taking on these projects. every third wednesday i like to flash your blog by my hubs to see if he’ll wanna take on a project or two one of these days…lol. cant wait to see the finished tada :)
katie says
So jelous of you for finding those, can’t wait to see them finished.
Glad you’re all ok and no major damage to the house, we were thinking of everyone there over the last few days from here in England!
Ashley says
Still can’t believe you got all those cabinets for so cheap! That’s unreal.
The post of your tool drawers made me think– how in the world do you organize all of your pictures so that you can find them quickly for future posts?? By room/blog post/date/etc?
YoungHouseLove says
I have a pretty good memory where pictures are for the site (it’s hard to explain, but I get them from past posts, instead of storing them on the desktop – so I just search the site for “tool drawer” and go into that post and copy the pic). When it comes to personal pics (which we do keep on our computers as well as backed up on Flickr), I just score things in folders that are labeled by month. Sometimes it takes a while to find something, but it seems to work better to store things by month instead of occasion since I never remember what I name the occasions and then can’t remember the order of things occurring. Hope it helps!
xo,
s
heather says
I’m going to stop commenting today after this one. I found the easiest way (for me) to keep things organized is to have a blog folder. In that folder are subfolders for each project and then another “blogged” folder. As I blog about them I put the subfolder into the “blogged” folder. That way I know exactly what pictures are for what project, and which ones I’ve blogged about, and which are outstanding. If I ever need a photo I can just go look it up in the “Livingroom Painting” or “Spicy Kale Soup” folder. It works fabulously.
YoungHouseLove says
So smart!
xo,
s
Emily D. says
not sure if anyone has posted this or not yet, but they sell anti-vibration gloves that have a padded palm. they absolutely cut down on the hand numbness. we built a log home and I went nuts and decided to sand my walls (yes, all of them) because I wasn’t happy with how rough they still were. and not just sand them, but use both a belt and orbital sander. (and as a TMI aside, despite wearing a mask, I also could have blown my nose and eventually created a new board with the sawdust boogers….) anywhooo, got a pair of those halfway through and saw an improvement. I just looked and they have them on Amazon for less than Home Depot (where they’re also online only) and eligible for Amazon Prime (which you should be able to enroll in for free if they’re still doing the Amazon Mom Prime promo). HTH — happy sanding!
YoungHouseLove says
That might have changed my life. I know what I’m asking for this Christmas! Haha.
xo
s
cassie {hi sugarplum} says
These are going to look great. Now my mind is on Dexter…we just finished Season 5 (in record time, had to sacrifice a decent bedtime…but so worth it!) I think I wanted him to stay with Lumen. I liked bossy/open Dexter…not loner Dexter. But whew it was a good season!
YoungHouseLove says
Yeah, I’m sad about Lumen too. I like Dexter in love. Haha.
xo,
s
Jess says
Ditto- we watched the entire season in less than 5 days (just finished last night). I also was sad to see Lumen go! My life now feels a bit empty without a Dexter episode to look forward to. I’m strongly considering adding Showtime to my cable package so I can fulfill this emptiness… I don’t think that’s healthy…
YoungHouseLove says
Haha- us too. We’re used to waiting for Netflix but it’s such a long wait!
xo,
s
Suzanne says
My husband has a permanent but retractable Dexter-style set up in our garage. He took 4 old broom handles (broom removed) and taped plastic sheeting on them. Then he hung cheap bike hooks on the ceiling two for each broom handle in a square shape. When he doesn’t need his “paint booth” he pulls the handles down from the hooks, rolls the plastic around the handles and puts them back up on the ceiling.
(Does this make sense to anyone else? I can see it clearly in my head!)
YoungHouseLove says
Holy cow, that’s genius and I’m super jealous. Hope there are no murders going on after hours.
xo,
s
Laura says
I didn’t read all the comments so forgive me if I am suggesting something already mentioned above… but what about John making you a butcher block counter? We are building our own island, and we have a furniture building friend that is making us a butcher block. He isn’t doing the typical squares on top, but longer pieces of wood. I think it will mimic stripes almost because he is going to mix and match different shades of the wood (does that make sense?? haha). Anyways, just thought I would mention that. It also is going to cost us A LOT less than butcher block from any store.
YoungHouseLove says
We’ve thought about that but aren’t sure if the idea of a wood toned top would conflict with other things that are visible from that room (like the built-ins in the adjoined dining room, which are white with a white top. Don’t want to make things too busy or compete-y, you know? But who knows where we’ll end up – it’s not completely off the table!
xo,
s
Nan says
We have three hardrock maple counter tops 60″ x 30″ x 1 3/4″. We live in Lake Anna and will sell all three for $75.
Contact me if you want to see pix.
YoungHouseLove says
Thanks for the tip!
xo,
s
Laci Waner says
You guys probable already have addressed this, but I was wondering if the cabinet doors will open once the cabinets are placed side-by-side. Does that make sense? Maybe it’s a hinge thing, but I have cabinets in my casa (hinges inside/cabinets open out) that we tried to put side-by-side only to find out the dang doors needed space to open. ??
Laci
As always, LOVE this post, LOVE the Dexter reference, LOVE Beyonce prego (wish I was her doc! That would be awesome,) LOVE the two-tone, and LOVE that ya’ll are ok/got your power back.
YoungHouseLove says
Such a great question! We’ll be placing the hinges on the far sides of each cabinet that face each other. Meaning they’ll both pull open and out away from each other, so nothing should touch/conflict. Before I painted them we opened the doors a few times in this configuration and it all seemed to work so here’s hoping…
xo,
s
Laci Waner says
You guys are so good!! I can switch the hinges on my cabinet doors to the “middle,” and that would probably work! Thanks!
Brittany says
We used Benjamin Moore Advance on our kitchen cabinets. It’s latex and self leveling so it comes out super strong and almost like an oil based. It worked SO well, in fact we painted laminate boxes and added new wood doors and the way the paint levels made them look the same. We even painted the hood vent! We also attached the tiny little felt sticky circles in the corners to keep the cabinets from banging and sticking paint on paint.
YoungHouseLove says
Love it! Thanks for the suggestions!
xo,
s
Nicole says
This was a great one to read since I am about to start painting ours in the kitchen…also I love the dexter reference.
-N
Tracy says
Hi Sherry,
Do you think it would be doable to re-stain cabinets instead of painting? Is it possible or is the only way with paint? Our house is only 2 years old, and we decided against an upgraded cabinet and went with the reg oak, but opted for a darker stain thinking it might hide the grain more.. it didn’t turn out as I expected and I’m dying to paint, but hubby is fearful something will go arie and we will be stuck with an even uglier cabinet.
love you guys, and thanks for any tips you might have
YoungHouseLove says
Oh yes, you can definitely sand and restain cabinets, especially new ones like you describe! Katie Bower over at bowerpowerblog.com did that a while back so maybe try to find her tutorial or google around for other tips? Good luck!
xo,
s
Elle says
Always working on something! I have a few pieces of furniture to refinish. I’m glad I saw this… I was debating whether or not to sand before painting. I will be sanding first for sure!