It has been nearly a month since we talked about stenciling the floor in our sink nook (we’re all over the place lately – Clara’s room, outdoor tiling, installing our stair runner, landscaping adventures, starting in on the kitchen, etc) but that doesn’t mean we were done in there. We had a few more bullets to check off:
- sealing those stenciled floors
- loading in the closet after the floors dried (hopefully with more function/storage instead of the stuff we thoughtlessly shoved in there when we moved)
- updating the vanity with more function as well as a fresh finish (up close it was in pretty rough shape, and we thought we could gain more function from that empty cubby on the right side if we added some inexpensive shelves)
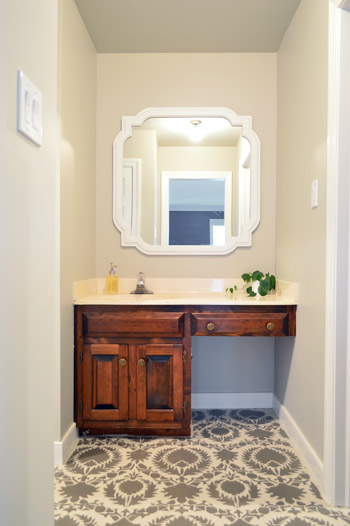
So to knock that first bullet off the list, Sherry used a small foam roller to apply two thin and even coats of SafeCoat Acrylaq to the floor (that’s our favorite non-toxic eco poly). She rolled those on about 24 hours apart, and wore a respirator just because it wasn’t fully odorless. It went on pretty fast, and she started in the furthest corner of the closet and just rolled her way out of the room. Then we blocked it off while it dried so we didn’t end up with puppy paw prints in it.
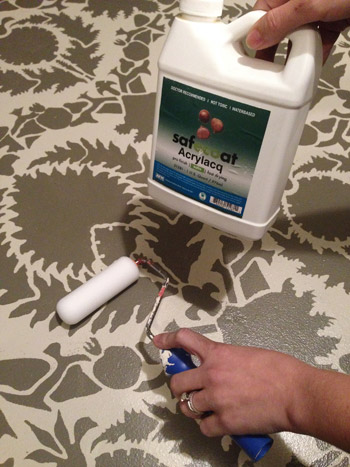
It has been a nice protective final step that has made us less worried about any chips or drips (heck, I was even able to scrape off a dried staining splatter later without damaging the stencil).
Once the floor sealer was fully cured (we waited around 72 hours) we could load in the closet, and this time we tried to be more thoughtful about what went where, and what would be the most functional. Bringing in a dresser and a mirror as well as a laundry room basket to use as a hamper really helped to make it a lot more storage-friendly than a bunch of random bins and piles. Although this dresser will probably end up in the nursery and our new West Elm dresser will most likely make its way in here after we add that wall of built-ins around our bed down the line.
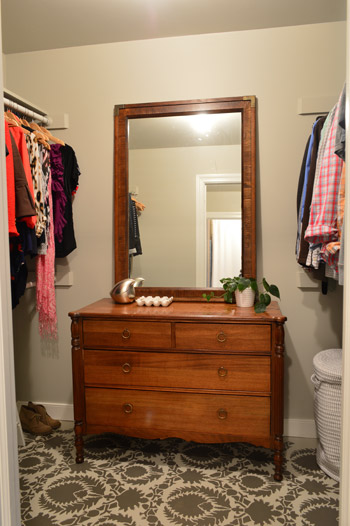
Here’s a shot of Sherry’s side:
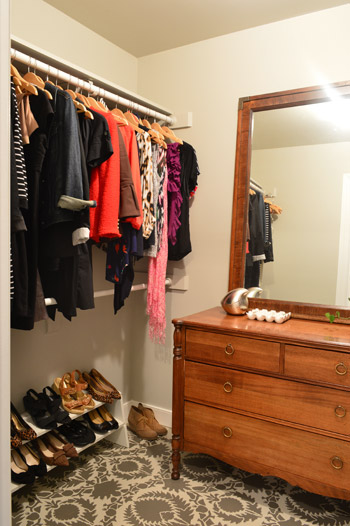
And my side (note the difference in shoe quantities):
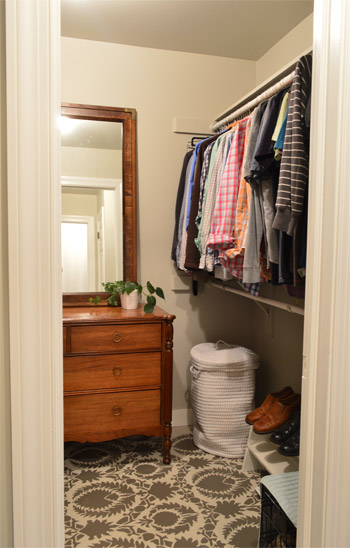
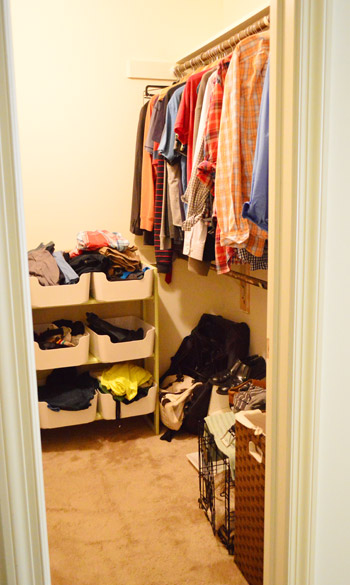
Just as a refresher, here’s what the closet looked like when we moved in and threw everything down. It’s amazing what some fresh paint on the walls, trim, floor, and ceiling along with some much needed organization and some old furniture (the dresser’s a hand-me-down and the mirror was a $5 yard sale find) can do.
So with those first two bullets checked off, it was shelf o’ clock. They were actually a pretty easy build. We just had to keep two things in mind as we planned them out on paper:
- how to build supports for two shelves (function!)
- where to create places to attach the front-facing boards to make it look pretty (form!)
So here’s what we came up with (we like to map things out on paper together, and then we usually divide and conquer, so in this case Sherry did the polying and most of the closet organization, and I was happy to do the shelf building and staining, especially since the stain isn’t without VOCs). Then Sherry swooped back in and tackled the hinges and reattached the doors while I switched out the drawer and door hardware.
As for the building step, I started from the floor and worked my way up.
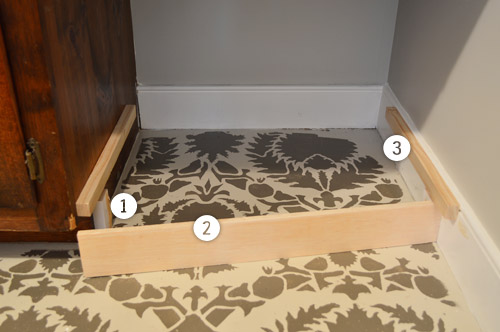
Step 1: I nailed a small piece of scrap wood into the side of the vanity (and another just like it into the baseboard on the opposite side) with one side resting on the floor and the other set back 3/4″ from the front of the vanity’s toe kick.
Step 2: This created a spot for me to attach a strip of plywood that would effectively extended the toe kick all the way across.
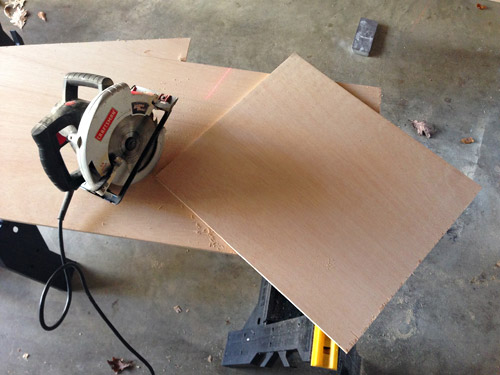
Step 3: Right above this, I nailed in matching strips of 1 x 2″ board (that I ripped in half on my table saw) that the bottom shelf could rest on. You’ll see in Step #10 why I didn’t line it up with the bottom of the vanity.
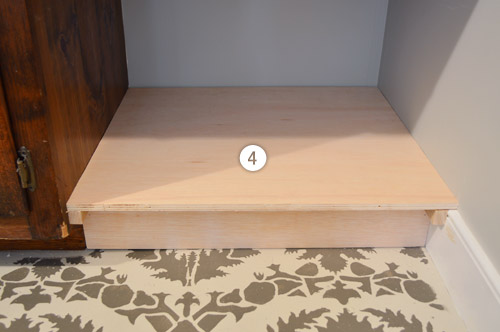
Step 4: I placed my first shelf, which I cut out of a piece of plywood I had leftover from the sunroom ceiling. It was such a tight fit I didn’t bother nailing it into place.
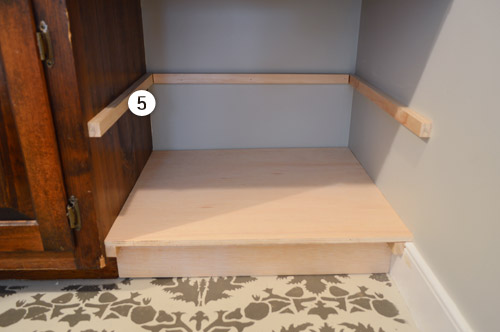
Step 5: After carefully measuring for the middle of the space, I nail-gunned another set of small strips on all 3 sides. I hadn’t done a back strip on the last shelf because it (coincidentally) rested perfectly on the top of the baseboard. Note: in this photo you can see how the vanity is a little dinged up in a few places, hence our desire to refinish it, which would also help us match the new wood with the old wood.
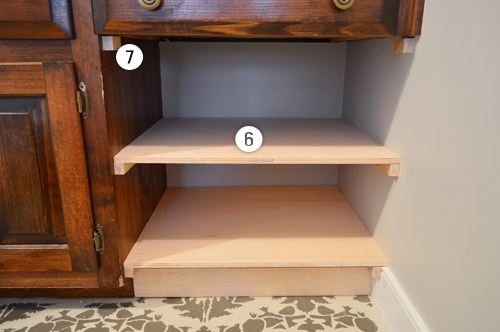
Step 6: I added my second shelf, cut from the same piece of plywood scrap.
Step 7: We wanted to add a face board at the top of the opening too, since we were trying to mimic the spacing and the look of the existing vanity. So by putting a face board here, it’d continue the strip of wood between the drawer face and cabinet doors that’s already on the left side. So, just like I did for the toe kick, I nailed small pieces of scrap wood here, set slightly back from the front of the cabinet.
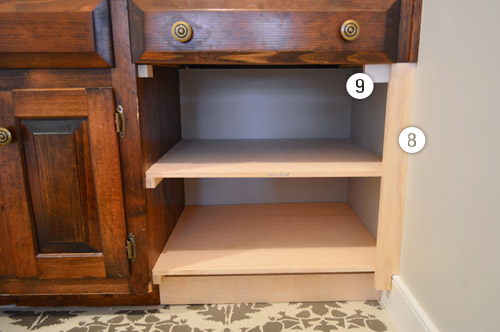
Step 8: Time to start adding face boards. I started with a vertical one against the wall, which was a 1 x 3″ board (which really measured 1 x 2.5″) that I ripped on the table saw to be 1 x 2″ to match the width of the existing face boards. I glued and nailed it into place against the supports and shelves.
Step 9: Since that vertical face board got nailed into the small piece of scrap that I had placed at the top, I no longer had a place for the horizontal face board to attach. So I screwed another piece of scrap into the back of the vertical board to create one again.
Step 10: Now to put in all of the horizontal face boards, which were from the same 1 x 3″ board that I ripped to be 2″ wide. I was able to glue and nail these into the supports and the front edge of the shelves too. I wanted the bottom edge to match up with the existing vanity, which is why in Step 3 I had to account for the 2″ face board when placing my shelf support strips.
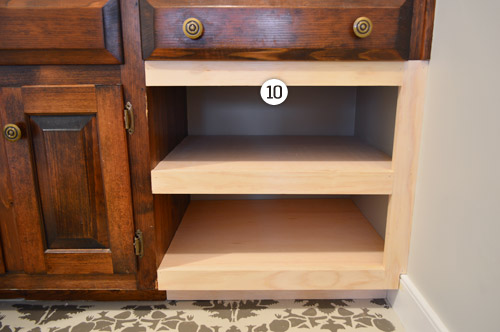
Here’s a pulled back shot of the whole thing once it was constructed. Putting it together was pretty fast (maybe an hour?). It was triple-checking all of my measurements and cutting my pieces that took the longest. I was certain I was going to mess something up along the way – like forgetting to account for the thickness of the plywood shelf when placing my support strips – so I tried to do the whole measure twice (and think twice) before cutting once thing.
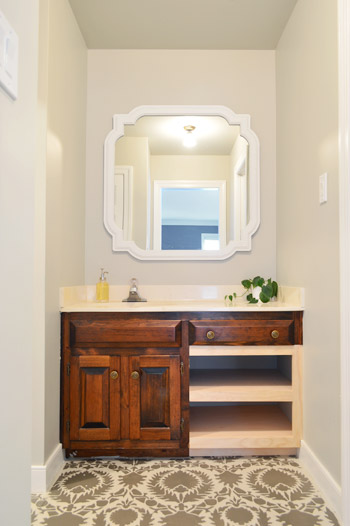
Obviously the next challenge was getting the new shelves and the old vanity to be the same color. We wanted to maintain some semblance of wood grain texture, but also had some darker toned wood items in our bedroom (like a big leaning wall mirror near the doorway to this sink nook) that inspired us to go a little richer/darker with our new stain choice. We also learned from painting the vanity in our half bathroom that a deeper, less-orange shade can tone down the yellow in the sink top. So after having such a good experience with PolyShades on our stair railing (and having half a can leftover) we decided to go that route with the vanity.
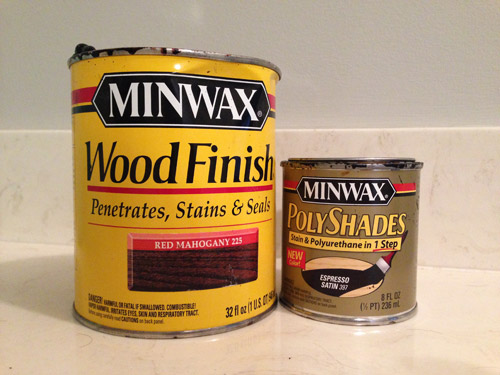
The other can pictured above is some stain that we had leftover from Clara’s dresser makeover, which we first brushed onto the new shelves (to get them closer to the existing color on the left side of the vanity before PolyShading the whole thing to be uniform). I stupidly forgot to take a picture of that step, so unfortunately we’ll just have to skip ahead, but the color wasn’t a perfect match at all – just sort of within a tone or two instead of one side being bleach blonde. Apparently it was enough of a similarity that one coat of Espresso PolyShades (applied with a brush) did the trick in fully bridging the gap. Oh and before I brushed on the PolyShades, Sherry lightly sanded the existing vanity side so it was stain-ready just like the fresh wood was.
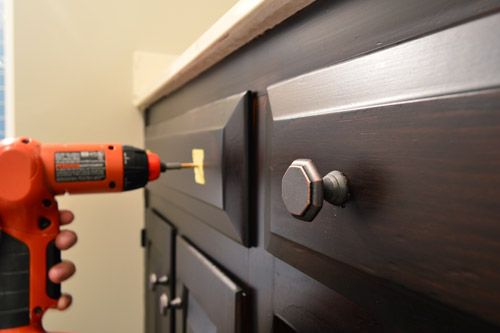
Before Sherry reattached the doors and put the drawer back in (all of which I had removed to make staining easier) we updated the knobs with some cheap ones (under $2 each!) that we found at Target. We thought that the octagon shape was a nice step-up from completely basic but the color would blend in nicely with our dark stain, so the knobs won’t compete with the patterned floor. In addition to using four of them to replace the existing knobs, I also drilled holes to add two more in the dummy drawer face that sits under the sink for a more balanced look.
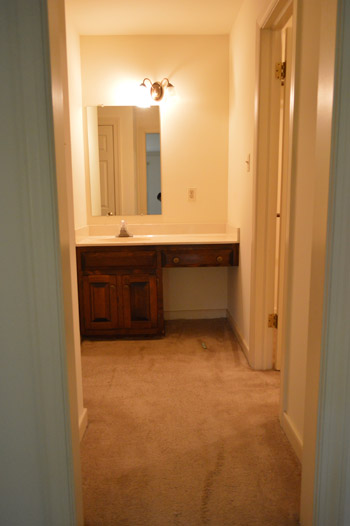
And with that folks, we have a completed vanity. Wait, but let’s reminisce about what we started with:
And where we ended up:
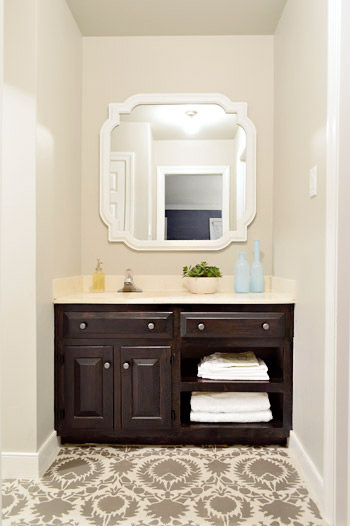
I realize the dark stain color makes it a bit hard to see some of the detail in photos (in person it’s more wood-grain-ish without looking quite as goth-dark), but I’m happy to report that the new shelves look like they’ve always been there. We only did one coat of the PolyShades because we didn’t want it getting any darker, so there’s a little variation in the wood tone throughout the vanity. A second coat might’ve evened that out, but we both decided we like how the variation maintains the wood grain (although if you’re going for consistent overall coverage, we’d probably recommend two coats).
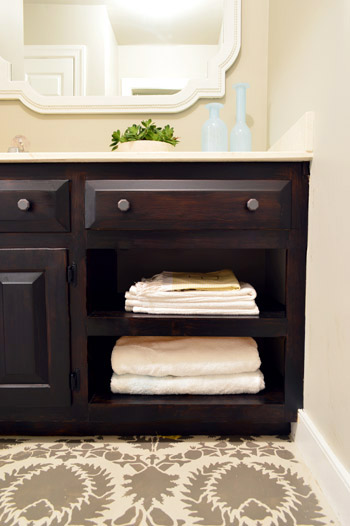
The best part is that the project was super cheap for us. Thanks to having the plywood and both types of stain on hand, our only costs were a 1 x 2″ board and a 1 x 3″ board ($12 total), along with the knobs ($12) and two pairs of new ORB hinges for the cabinet doors ($6). So this entire vanity update came to a grand total of $30. Note: if you don’t have plywood and stain on hand, you might want to add $30 to the budget.
Between this, our half bathroom, and our stair makeover, we’re starting to notice that we’re really gravitating towards high-contrast, almost monochromatic color schemes in the smaller nooks and crannies of this house. I don’t think it’s an indication that we’re ditching color (our adjoining bedroom has blue walls, a green rug, bright yellow pillows, and a patterned headboard – and we can’t forget Clara’s recent wall & door makeover) but I do think we’re appreciating the impact of some dark accents in the mix.
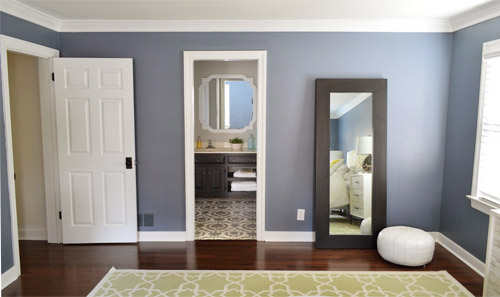
And just for fun, here’s a before shot from that angle from before we moved in:
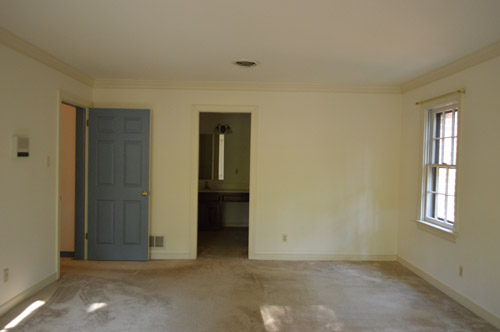
So I’d say we’re getting pretty darn close to calling Phase 1 of the sink nook complete. Which is probably a good thing since we’re halfway through stripping wallpaper in the dining room and ready to start rolling on some kitchen updates before the chaos of the holidays (along with the showhouse kicking into high gear). What did you guys do this weekend? Any building? Sealing? Staining? New hardware? Closet organization? As boring as the closet organization part sounds, it’s pretty nice to finally have a real spot for all of our stuff after feeling like we were living out of bins and sorting through random piles since June.

Trista says
I cannot believe how fantastic that vanity looks. Great job!
Callie says
Isn’t it time for another video tour? The reflection of the bedroom in the mirror is killing me! I wanna see! : )
YoungHouseLove says
Yes! Well overdue! I have that on the “before Thanksgiving hopefully” list!
xo
s
Sammy says
Wow! It really does look as though the shelves have always been there. And I’m loving the dark stain
MG says
That is so beautiful. What a difference.
Holly says
Best blog title ever!
Lauren says
I am so impressed with this Poly Shades product! What a great way to update wood furniture without resorting to paint. Thanks for sharing your wonderful results with us! Looking forward to your dining room and kitchen updates too.
Ginger says
Oh Man! I think the sink area is incredible! So much so that I wouldn’t think that a phase two would be necessary! Nice work.
maddy says
you guys are geniuses! it looks so polished, i would never have bothered doing all that work for the interim, but im glad you did. things are looking amazing xo
Rachael says
You guys are so creative! Sherry… What are those booties you had in your closet next to the wall??? They look so cute!
YoungHouseLove says
Thanks Rachael! They’re from the JCrew Outlet last year! So warm and comfy in the winter (I used them on the book tour a good amount).
xo
s
Caitlin says
Y’all just amaze me with your creativity. What a brilliant idea for that un-used space!
Amy says
What a great update! it totally transforms the space. I ove the last picture to really look at all the work you two have done and the huge improvement. I did notice though the outlet cover isn’t quite straight in the last photo. I think i’m going to do my bedroom color the same as yours, I love it!!
YoungHouseLove says
Yes, that outlet cover bugs me too!
xo
s
JoniB says
Both of these updates look so fantastic. I am always so inspired by you guys. This weekend I painted the inside of my new front door, took 3 coats ugh. My next project will be new flooring in my bathroom and inspired by you, staining the vanity a darker/richer color to make everything else pop. Did you use a foam roller or brush when you stained the vanity?
YoungHouseLove says
Just a 2″ angled brush! Thin and even coats brushed on was the recommendation on the can and it seemed to work for us.
xo
s
SJ says
I love how much more balanced the sink looks, very nice. Won’t you be sad to see the West Elm dresser get “hidden” in the bathroom if you do in fact move it there down the line? I remember you were super excited to get it & it was an expensive purchase!
YoungHouseLove says
The plan is to make that a Beverly Hills Housewives closet (read: faaaabulous, except with clothes from Old Navy in it, haha) so the dresser could be the crowning jewel with built ins and a chandelier and a big mirror…. at least that’s the plan today. Who knows, it could end up on the wall across from the bed too and we could just do built-ins in the closet!
xo
s
Hillary says
Hi guys, I am currently redoing my kitchen table and building a larger top. After I stain it I know I need to cover it in a clear poly. Would you use that safecoat acrylacq on a kitchen table top knowing that we have small children that might eat food off the table surface (as opposed to a plate). I want to make sure the surface is food safe.
YoungHouseLove says
Yes! I can’t recommend it enough! It would be great for that.
xo
s
Nicole B. says
Ack! I got lost. What was the Minwax used for?
Nicole B. says
Nvm – just re-read. Haha whoops
YoungHouseLove says
No worries!
xo
s
YoungHouseLove says
That was on the new wood shelves John made, just to take them to a medium toned brown color like the existing cabinets and drawers that were there. Then when John applied the PolyShades it was all close enough in color to look nice and seamless.
xo
s
Becky Horst says
I Love this lil post. The closet looks great with a dresser. I just love that look. I also appreciate an edited closet which I’m attempting to do myself. I also love the updated vanity. I’m always so inspired with what you two come up with in order to work with what ya got. Have you ever considered (maybe it isn’t your jam) rolling your towels? With your open shelves I think it would take it up a notch! When I bought my first house I had a client that was an interior decorator offer me 2 hours of her time for free (I think she just wanted to snoop) but rolling the towels is the only suggestion I took and still keep 8 years later.
YoungHouseLove says
Love the rolled towel idea! Will have to try that for sure!
xo
s
Roya says
A silly question. Where do you keep your pants and skirts? We use the lower in bar in the closet. But yours looks so much better with the shelves for shoes. Do you just hang them on the upper bar?
YoungHouseLove says
My jeans are in the dresser in our bedroom but my dress pants and skirts are just hung on the top bar.
xo
s
Lynn says
Would you use the same sealer to seal walls after stenciling? Inspired by you guys, I just used a fabulous stencil from Royal Designs to turn a small boxy guestroom into a serene and glowing space for yoga. I’m so excited! But it occurred to me that I should probably seal the work now, since I will want to put my feet up the wall for certain poses. Is Acrylaq Safe Coat still the ticket? I was also considering using Liquitex, based on your post about the house painting Sherry just posted. The walls are latex and the stenciling is done in a martha stewart acrylic craft paint.
btw, I’m 56 (def not Young), and you can see how inspired (obsessed) I am with you guys!
YoungHouseLove says
Yes, I’d use the SafeCoat for that (test a small area to make sure it doesn’t smudge, but I don’t imagine it would). Oh and get the satin finish (not the glossy) and just do one thin and even coat and see how that does (two coats is more protection, but one might be good enough).
xo
s
Michelle Kersey says
Woo hoo!! Definitely something you’d be able to live with for a while longer while you wait for more moolah for a full reno! This looks GREAT!!!!
Brittney Saffell says
Wow! That looks awesome. The poly shades seems to work really well! I am going to have to check it out. Good job John!!
I am (not so) secretly hoping you attached the kitchen with poly shades for phase 1…..
Brittney Saffell says
Oops! attack** not attach :)
YoungHouseLove says
Haha, I knew what you meant!
xo
s
Lauren says
I love your minimalistic closet. I work full-time and feel like I need 8 pairs of slacks and 100 different tops to go with my 50 pairs of shoes. All the STUFF is so overwhelming sometimes. I hate how packed-out my generous-size closet is. I am so envious of your easy wardrobe. I wish I could ditch half of my stuff – so scary!
Great job on the vanity too! brilliant!
YoungHouseLove says
When I worked full time in NYC in advertising I still had a really tiny closet (about half the size of a normal one, since it was a tiny NYC studio) so I’d say… “you can do it!” I noticed a big change in how much I needed when I stopped looking at certain pairings as “outfits” and started realizing that I could mix and match 9 tops and 8 bottoms (two skirts, three dress pants, and three pairs of jeans) to get nearly 100 different combinations with just a few other staples (dark blazer, light blazer, some accessories like necklaces/earrings for variety, etc). Something about the mixing/layering approach made me realize I don’t just have to pair my brown cords with that one argyle sweater, so by trying lots of combinations, it could really stretch a small wardrobe.
xo
s
Kristy says
Wow, wow. Stunning, really. It is truly amazing what visualizing a space can do. I remember seeing your Photoshop ideas and I had to do a second look to see that the end result, was truly the real thing because it looked so close to your visualization.
Kristy
http://www.journeyintomotherhood.ca
jeannette says
the care with which the shelves were matched to the vanity, and the stain to the fab floor, and the nice light catching mirror, really adds some visual coherence to the space which just emanates peace. one thing about your lovely house — visual coherence of the POs’ decor is really, really disturbing. still shaking my head over the 24/7 blue trim — like black lip liner with beige lipstick. yikes.
Cara says
That looks so nice. Honestly, if we did that for a Phase 1 over here, I’d never talk him in to a Phase 2. Even I am having trouble imagining covering up that stenciled floor.
Our updates this weekend were hanging a TV on our deck (which gets used more than our living room and dining room combined) and getting it off the counter. Woo Hoo! And then I cleaned out our 3 year olds clothes, packing away everything outgrown or no longer seasonal. Not the most exciting project, but its so nice to open her drawers now.
YoungHouseLove says
I know what you mean! Organization sounds so boring when you talk about it, but it feels SO GOOD!
xo
s
CT says
The shelves look great!
After taking some sliding doors off my daughter’s closet last month, my husband and dad added some french-style doors this weekend. I am painting them pink today after your post about Clara’s door. Can’t wait!
YoungHouseLove says
LOVE that! Send pics!
xo
s
Laurie says
Yes send pictures!! I am doing a built in desk and bench seat in my daughter’s closet and still want doors to close on it all. Never thought of French doors. Do tell!
Monica says
WOW!! Exactly what we’re wanting to do with our hall bathroom over Thanksgiving weekend! I picked out that exact color of Poly-shades and everything so thanks for this post! Glad to get a rough idea of how it’ll look and I agree, the one coat was great. It leaves just enough wood grain and variations too.
Love the pull back into the bedroom too, haven’t seen that angle in a long time. The colors are great!
Sarah Jane says
So…that room is awesome. Just, wow. Really impressed with the results in this house, you guys are on a roll.
YoungHouseLove says
Thanks Sarah Jane!
xo
s
Jane B. says
You guys are amazing! You make e.v.e.r.y.t.h.i.n.g seem SOOOOO easy. I wish you could come over to my house in Charlottesville and just finish all those unfinished things that are hanging over my head, so I could stop thinking about them. Your “to do list” check offs are epic. Thanks for sharing all the DIY goodness you guys do.
YoungHouseLove says
You’re so sweet Jane! I am such a fan of the to-do list approach! Just break projects into small steps and try to do one thing each day (or even each week or month). You really can chip away at a ton over time like that!
xo
s
Laurie says
We had a successful garage sale and a successful donation to Goodwill for the items that didn’t sell. Just need to unload an old bed and dining room set (Craigslist?) and we will be in good shape. It was an action packed weekend. Finally getting my shabby chic cottage guestroom done. Got the bed set up and dressed. Hung curtains etc….now trying to decide if I should paint an old pine armoire or ditch it and get something new. Leaning towards paint though. (Which I suspect is what you would do!). I painted some past their prime nightstands and replaced the hardware and they look rejuvenated. We even managed to squeeze in an evening of fun going to see “Thor” and going out to dinner and watched some football. I could use a nap.
YoungHouseLove says
Sounds like you need a nap! Wow! Congrats on getting all of that stuff done! I bet it feels so goof to have the garage sale (and donation) all done!
xo
s
Julie says
Look amazing!! Love what you did in the bathroom, and I love the idea of the dresser in the closet (I used to have the Ikea Billy shelves with basket on it for all the underwear on top and shoes at the bottom). And wow the difference between before and after of the view from outside of the bathroom! So inspiring!!
YoungHouseLove says
Thanks Julie!
-John
Dawn says
Oh my gosh – WHAT an improvement! That looks great!
Taylor says
I love this! You’ve inspired me to look at my outdated cabinets to see how they can be retrofitted until the future complete gut. Thanks!
Jess says
It looks great! I love the finish, especially the variation in the wood. Do you have any plans to hang your capiz frames in this nook like you did in your last master bathroom?
YoungHouseLove says
I’d love to! They’re all in a pile and I can’t wait to get them hanging somewhere in our bedroom (either in this sink nook or somewhere else in the main bedroom area).
xo
s
Darcy says
Looks SOOOO GREAT, guys!! I am super impressed…and I love that picture from your bedroom looking into that so cute little area now!! :-)
I have a question…I was thinking about using that PolyShades on my dining room table — it needs a re-finishing badly…what do you think? Would you recommend using it, or think that stain and poly individually would be better?
YoungHouseLove says
I think it could be great! Maybe test it in a small spot underneath to be sure you like it?
xo
s
Natalie @ Wipes Are Not Weapons says
Wow, guys, that looks amazing! I love the contrast of the dark wood with the blue, white and gray!
Eilene says
Looks great! I thought about you guys this weekend and the post about why you sometimes do smaller fixes before doing a full reno. I turned a closet into a pantry! I would say that this should have been a full gut but I do not have the time/space for a drawn out project. Anyway, I decided to slap up some gray paint, throw down some vinyl wood-like stick on tiles, a new light fixture, and shelves… and it no longer pains me to go in there. Very much worth the $100 ($350 with Joss and Main shelf) to get it done! Thanks, YHL team!
YoungHouseLove says
LOVE hearing that! Three cheers for Phase 1 projects!
xo
s
Teresa @ wherelovemeetslife says
I love the new look! It is seriously night and day difference. I was really surprised out how much adding the extra knobs helped.
BTW – have you guys ever considered adding a barn door to that room? I know it’s a fad right now, but I don’t know, seems they have been around for a while already. I’m sure you guys have lots of ideas rolling around.. just an observation I had when I saw your after photo. :)
YoungHouseLove says
John is a little anti-barn door right now, just for functional reasons (Clara has pinched her hands on a few that we’ve seen in showhouses). I think between the door to the bedroom and the leaning mirror we have a few other tall door-like shapes going on already on that wall, but I think when we renovate the bathroom down the line it would be really pretty to add a frosted glass door (or even two of them, french door style) and move that leaning mirror to another spot. We’ll have to see where we end up I think!
xo
s
Bonnie Morscher says
So, John, can you use Polyshades right over stained woodwork? I’m in an old bungalow with old woodwork that has not been touched since its original stain and shellac. Would Polyshades go right over that without me having to strip or sand?
YoungHouseLove says
You do need to lightly sand everything to rough it up before applying PolyShades according to their instructions (Sherry sanded the vanity before I applied it in the bathroom, and I sanded the railings before using it there on the staircase as well).
xo
s
E-Bezza says
I think Sherry just got busted commenting on John’s behalf! hahaha
YoungHouseLove says
Sorry, we have auto key commands to fill in “xo, S” and “-John” just to make us a little faster as we do comments, and my finger just hit the wrong command. Sherry leaves the comments directed at me (or the ones that I can better answer), but admittedly I’m not as savvy with the key commands since she answers comments more often.
-John
michelle says
I love love love what you did with the vanity in today’s post! I mean night and day with the shot from the bedroom before and after! fabulous!
As for the lighting- my thoughts are go back to lowe’s or HD and get another light… once the pergola is up you should put the lights on the outside of each garage door. I know, probably need an electrician for that, but i think it will be well worth it! And while he is there you should get landscape lighting!
And thank you for not posting comments that distract from what you guys are doing! I really hated reading the mean stuff that was said about you guys and felt an urge i needed to “come to the rescue” or it put it a bad taste in my mouth. I think you made the right decision, and those commenters can go elsewhere!
Beth Wold says
I love the new vanity look. The whole bathroom update looks fantastic. Well chosen and well done.
Bonnie Morscher says
Cool! Thanks for the speedy response.
SuperCutePetContest says
Once again, I’m blown away!
Adriane says
It looks great, so much brighter!!
I’m trying to figure it out what to do with my own vanity, while I don’t renovate the bathroom… Hope I find a nice solution as you guys did!
Jessica says
Sorry if you’ve already answered this question, but what did you use to apply the stain? Brush? Foam Roller? Good old fashioned rag? The finish looks great!
I know y’all don’t want to be TV stars, but I would love a YHL YouTube Channel! Tutorials galore!
YoungHouseLove says
Aw thanks Jessica. We just used a regular old 2″ angled brush.
xo
s
mitchypoo says
Wow, what a great job! It looks fantastic! You are very talented in updating any room and making it look so easy. I have a new “yarn closet” and need shelving and may try the plywood method you used. I can maybe do that all by myself! Thank you for the inspiration and motivation.
Katherine says
Wow! This may sound silly considering how many awesome things you’ve done, but the transformation of that one small, seemingly overlooked space just totally wows me – who would have thought it could look that fantastic! My new favorite :)
YoungHouseLove says
Thanks Katherine!
-John
Erin @ One Project at a Time says
Love it! With this fantastic update, you’ll be able to live with “Phase 1” for a long time.
But I have to say, am I the only one that thought- “You’re going to hide that amazing West Elm Dresser in the closet?” I’m sure you guys have a great ultimate plan (you always do), I was just surprised because I thought you’d mentioned that you bought that piece to be a more high-end show piece. I’m having a little “No one puts Baby in the corner…” moment. :)
YoungHouseLove says
Haha! It might end up on the wall across from our bed, so we’ll have to see where we land! The way I envision the closet it’s going to be one of those Beverly Hills Housewives closets (except with Old Navy clothes instead of designer duds) so I thought the dresser could be the crowning jewel with a giant mirror and chandelier and built-ins all around it. But nothing’s definite, so it might just stay in the bedroom. Either way, it’s the most fabulous thing we own. Haha!
xo
s
Amy W says
Ha. That is SUCH an amazing transformation I actually laughed out loud. I love that final shot of the before and after from your bedroom. Looks just amazing.
Renee says
I love the way the geometric rug and stenciled floor look near each other. Also, AWESOME vanity. and, AWESOME paint color in your bedroom. +3 points for you guys! :)
YoungHouseLove says
Thanks so much Renee!
xo
s
Nicole says
This looks awesome! Cheap, fast, high impact – love it.