It has been nearly a month since we talked about stenciling the floor in our sink nook (we’re all over the place lately – Clara’s room, outdoor tiling, installing our stair runner, landscaping adventures, starting in on the kitchen, etc) but that doesn’t mean we were done in there. We had a few more bullets to check off:
- sealing those stenciled floors
- loading in the closet after the floors dried (hopefully with more function/storage instead of the stuff we thoughtlessly shoved in there when we moved)
- updating the vanity with more function as well as a fresh finish (up close it was in pretty rough shape, and we thought we could gain more function from that empty cubby on the right side if we added some inexpensive shelves)
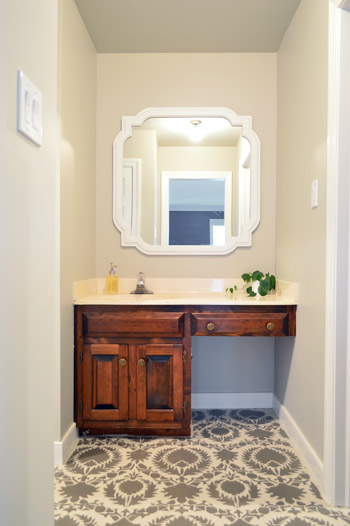
So to knock that first bullet off the list, Sherry used a small foam roller to apply two thin and even coats of SafeCoat Acrylaq to the floor (that’s our favorite non-toxic eco poly). She rolled those on about 24 hours apart, and wore a respirator just because it wasn’t fully odorless. It went on pretty fast, and she started in the furthest corner of the closet and just rolled her way out of the room. Then we blocked it off while it dried so we didn’t end up with puppy paw prints in it.
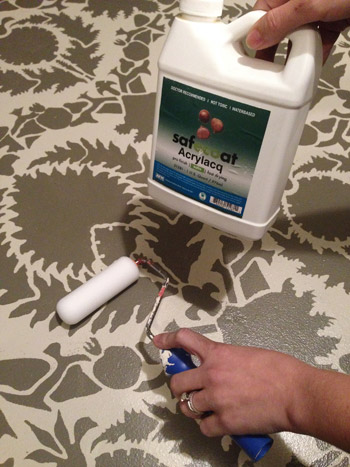
It has been a nice protective final step that has made us less worried about any chips or drips (heck, I was even able to scrape off a dried staining splatter later without damaging the stencil).
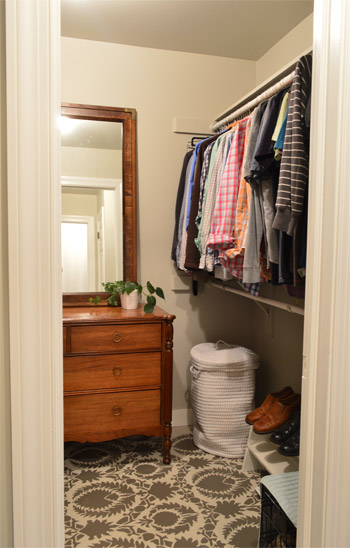
Once the floor sealer was fully cured (we waited around 72 hours) we could load in the closet, and this time we tried to be more thoughtful about what went where, and what would be the most functional. Bringing in a dresser and a mirror as well as a laundry room basket to use as a hamper really helped to make it a lot more storage-friendly than a bunch of random bins and piles. Although this dresser will probably end up in the nursery and our new West Elm dresser will most likely make its way in here after we add that wall of built-ins around our bed down the line.
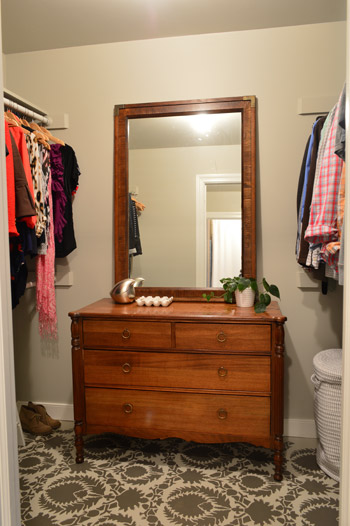
Here’s a shot of Sherry’s side:
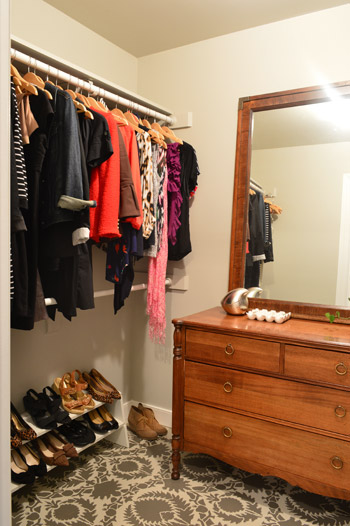
And my side (note the difference in shoe quantities):
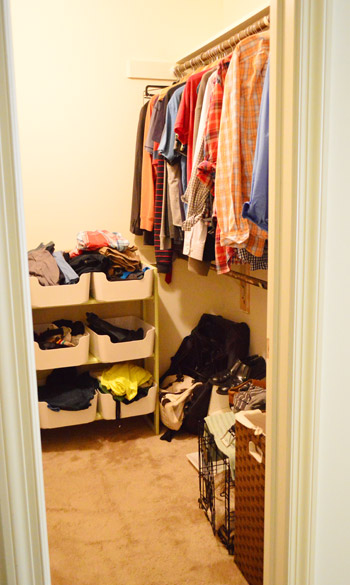
Just as a refresher, here’s what the closet looked like when we moved in and threw everything down. It’s amazing what some fresh paint on the walls, trim, floor, and ceiling along with some much needed organization and some old furniture (the dresser’s a hand-me-down and the mirror was a $5 yard sale find) can do.
So with those first two bullets checked off, it was shelf o’ clock. They were actually a pretty easy build. We just had to keep two things in mind as we planned them out on paper:
- how to build supports for two shelves (function!)
- where to create places to attach the front-facing boards to make it look pretty (form!)
So here’s what we came up with (we like to map things out on paper together, and then we usually divide and conquer, so in this case Sherry did the polying and most of the closet organization, and I was happy to do the shelf building and staining, especially since the stain isn’t without VOCs). Then Sherry swooped back in and tackled the hinges and reattached the doors while I switched out the drawer and door hardware.
As for the building step, I started from the floor and worked my way up.
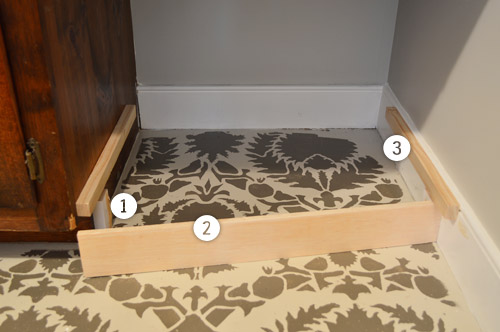
Step 1: I nailed a small piece of scrap wood into the side of the vanity (and another just like it into the baseboard on the opposite side) with one side resting on the floor and the other set back 3/4″ from the front of the vanity’s toe kick.
Step 2: This created a spot for me to attach a strip of plywood that would effectively extended the toe kick all the way across.
Step 3: Right above this, I nailed in matching strips of 1 x 2″ board (that I ripped in half on my table saw) that the bottom shelf could rest on. You’ll see in Step #10 why I didn’t line it up with the bottom of the vanity.
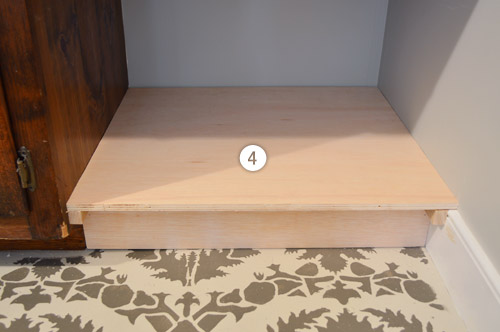
Step 4: I placed my first shelf, which I cut out of a piece of plywood I had leftover from the sunroom ceiling. It was such a tight fit I didn’t bother nailing it into place.
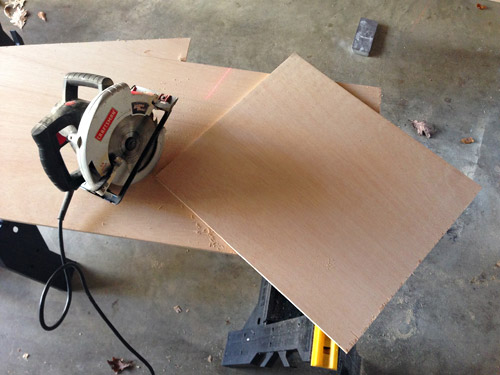
Step 5: After carefully measuring for the middle of the space, I nail-gunned another set of small strips on all 3 sides. I hadn’t done a back strip on the last shelf because it (coincidentally) rested perfectly on the top of the baseboard. Note: in this photo you can see how the vanity is a little dinged up in a few places, hence our desire to refinish it, which would also help us match the new wood with the old wood.
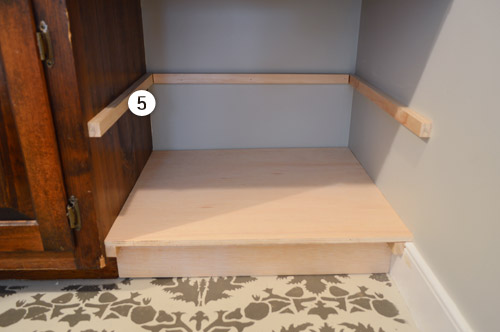
Step 6: I added my second shelf, cut from the same piece of plywood scrap.
Step 7: We wanted to add a face board at the top of the opening too, since we were trying to mimic the spacing and the look of the existing vanity. So by putting a face board here, it’d continue the strip of wood between the drawer face and cabinet doors that’s already on the left side. So, just like I did for the toe kick, I nailed small pieces of scrap wood here, set slightly back from the front of the cabinet.
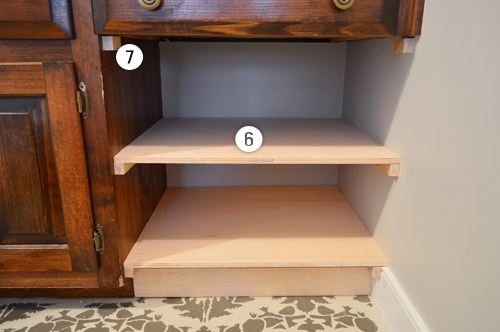
Step 8: Time to start adding face boards. I started with a vertical one against the wall, which was a 1 x 3″ board (which really measured 1 x 2.5″) that I ripped on the table saw to be 1 x 2″ to match the width of the existing face boards. I glued and nailed it into place against the supports and shelves.
Step 9: Since that vertical face board got nailed into the small piece of scrap that I had placed at the top, I no longer had a place for the horizontal face board to attach. So I screwed another piece of scrap into the back of the vertical board to create one again.
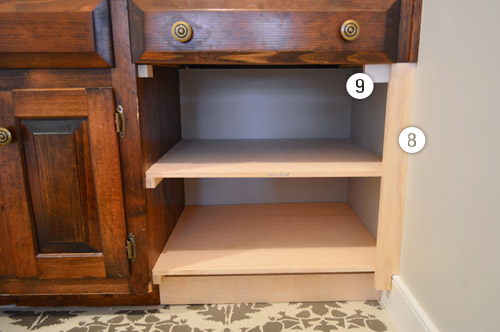
Step 10: Now to put in all of the horizontal face boards, which were from the same 1 x 3″ board that I ripped to be 2″ wide. I was able to glue and nail these into the supports and the front edge of the shelves too. I wanted the bottom edge to match up with the existing vanity, which is why in Step 3 I had to account for the 2″ face board when placing my shelf support strips.
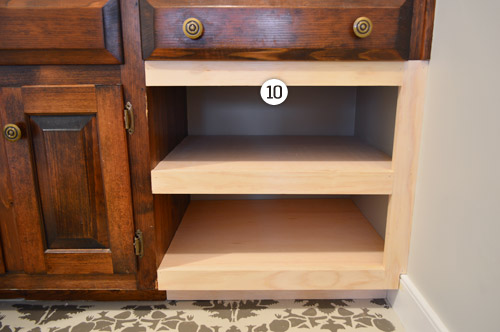
Here’s a pulled back shot of the whole thing once it was constructed. Putting it together was pretty fast (maybe an hour?). It was triple-checking all of my measurements and cutting my pieces that took the longest. I was certain I was going to mess something up along the way – like forgetting to account for the thickness of the plywood shelf when placing my support strips – so I tried to do the whole measure twice (and think twice) before cutting once thing.
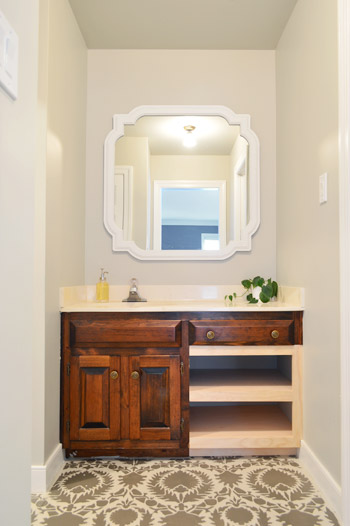
Obviously the next challenge was getting the new shelves and the old vanity to be the same color. We wanted to maintain some semblance of wood grain texture, but also had some darker toned wood items in our bedroom (like a big leaning wall mirror near the doorway to this sink nook) that inspired us to go a little richer/darker with our new stain choice. We also learned from painting the vanity in our half bathroom that a deeper, less-orange shade can tone down the yellow in the sink top. So after having such a good experience with PolyShades on our stair railing (and having half a can leftover) we decided to go that route with the vanity.
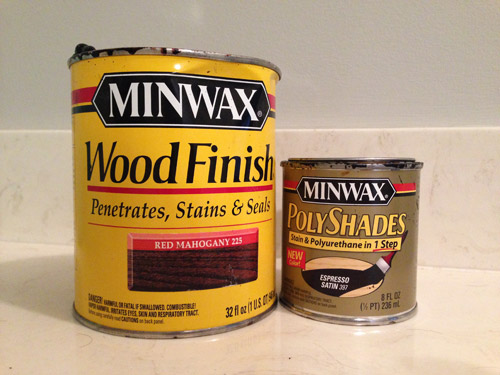
The other can pictured above is some stain that we had leftover from Clara’s dresser makeover, which we first brushed onto the new shelves (to get them closer to the existing color on the left side of the vanity before PolyShading the whole thing to be uniform). I stupidly forgot to take a picture of that step, so unfortunately we’ll just have to skip ahead, but the color wasn’t a perfect match at all – just sort of within a tone or two instead of one side being bleach blonde. Apparently it was enough of a similarity that one coat of Espresso PolyShades (applied with a brush) did the trick in fully bridging the gap. Oh and before I brushed on the PolyShades, Sherry lightly sanded the existing vanity side so it was stain-ready just like the fresh wood was.
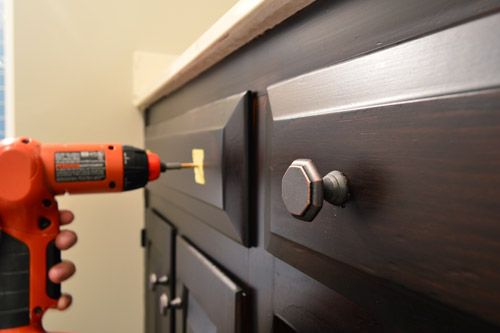
Before Sherry reattached the doors and put the drawer back in (all of which I had removed to make staining easier) we updated the knobs with some cheap ones (under $2 each!) that we found at Target. We thought that the octagon shape was a nice step-up from completely basic but the color would blend in nicely with our dark stain, so the knobs won’t compete with the patterned floor. In addition to using four of them to replace the existing knobs, I also drilled holes to add two more in the dummy drawer face that sits under the sink for a more balanced look.
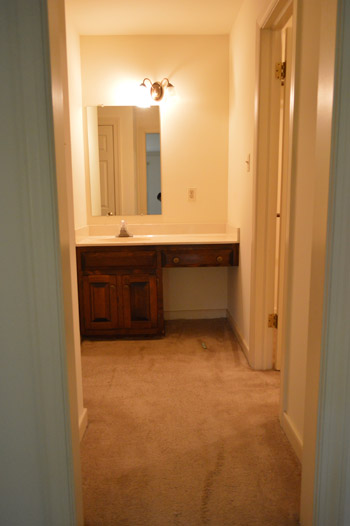
And with that folks, we have a completed vanity. Wait, but let’s reminisce about what we started with:
And where we ended up:
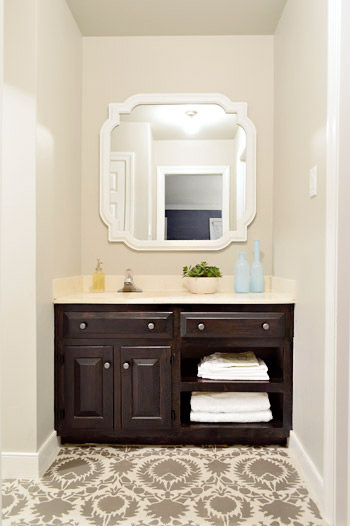
I realize the dark stain color makes it a bit hard to see some of the detail in photos (in person it’s more wood-grain-ish without looking quite as goth-dark), but I’m happy to report that the new shelves look like they’ve always been there. We only did one coat of the PolyShades because we didn’t want it getting any darker, so there’s a little variation in the wood tone throughout the vanity. A second coat might’ve evened that out, but we both decided we like how the variation maintains the wood grain (although if you’re going for consistent overall coverage, we’d probably recommend two coats).
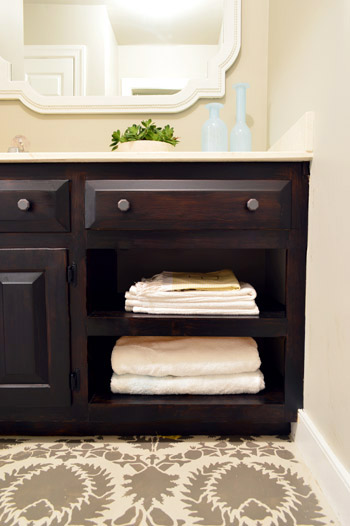
The best part is that the project was super cheap for us. Thanks to having the plywood and both types of stain on hand, our only costs were a 1 x 2″ board and a 1 x 3″ board ($12 total), along with the knobs ($12) and two pairs of new ORB hinges for the cabinet doors ($6). So this entire vanity update came to a grand total of $30. Note: if you don’t have plywood and stain on hand, you might want to add $30 to the budget.
Between this, our half bathroom, and our stair makeover, we’re starting to notice that we’re really gravitating towards high-contrast, almost monochromatic color schemes in the smaller nooks and crannies of this house. I don’t think it’s an indication that we’re ditching color (our adjoining bedroom has blue walls, a green rug, bright yellow pillows, and a patterned headboard – and we can’t forget Clara’s recent wall & door makeover) but I do think we’re appreciating the impact of some dark accents in the mix.
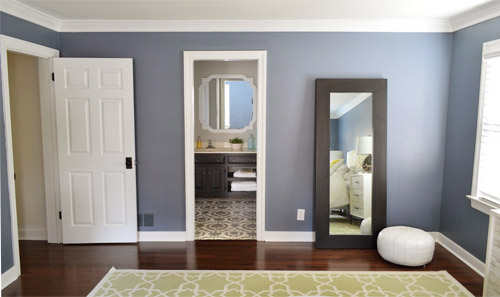
And just for fun, here’s a before shot from that angle from before we moved in:
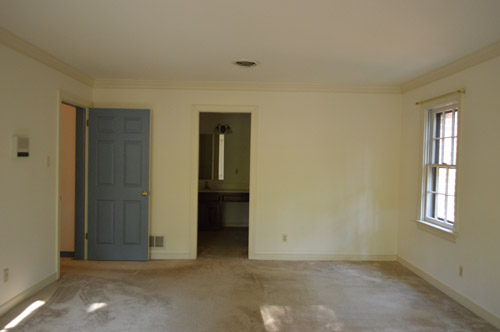
So I’d say we’re getting pretty darn close to calling Phase 1 of the sink nook complete. Which is probably a good thing since we’re halfway through stripping wallpaper in the dining room and ready to start rolling on some kitchen updates before the chaos of the holidays (along with the showhouse kicking into high gear). What did you guys do this weekend? Any building? Sealing? Staining? New hardware? Closet organization? As boring as the closet organization part sounds, it’s pretty nice to finally have a real spot for all of our stuff after feeling like we were living out of bins and sorting through random piles since June.

Flagless says
What difference in shoe quantity? There are only like 10 pairs there, and that is almost the same as two pairs! :P I’ve got about 40 pairs, and I still don’t see myself as someone with lots of shoes. (Then again, the only other blog I follow every day, apart from yours, is the one called shoeperwoman, and that might have changed my perspective on what ‘lots of shoes’ is) :)
YoungHouseLove says
Haha!
xo
s
Donna says
John and Sherri, I have to laugh because your Phase I projects are so neat and polished that I would be happy to call them done at my house. Of course, I am a lot older and tireder than you guys!
Sherri, will you be hanging your capiz framed pictures in the sink alcove like you did at your previous house?
YoungHouseLove says
Aw thanks Donna! I’d love to rehang those framed anniversary pics, either in the sink nook or nearby in the bedroom somewhere. I can’t wait for a decade or two when they take up a whole wall…
xo
s
Mariann Warren says
You’ve got me sold on trying the Minwax Polyshades stainon my kitchen chairs. I was going to paint them this last summer but just couldn’t decide on a color…..because I really wanted wood (just not ugly orange toned wood) I’m totally going to try this. The vanity looks awesome by the way! Love the floor!
YoungHouseLove says
Good luck Mariann!
xo
s
Cindy says
Wow! It looks fantastic. The vanity looks like it was like that from the beginning instead of something that was added on. You amaze me with what you accomplish – often with little money invested.
YoungHouseLove says
Thanks Cindy!
-John
Timothy says
I love it!! It looks AMAZING! especially for just a phase one makeover. And i was wondering are you guys gonna change the faucet?add a light fixture above the mirror?
YoungHouseLove says
If we see something awesome or budget friendly in the way of a faucet or light we’ll grab one, or we’ll just wait for phase two if we don’t (don’t want to buy something as a placeholder that we don’t love, so sometimes we end up holding out and sometimes we find a good deal and grab it).
xo
s
Andrea says
Looks great! Question for Sherry – how do you manage to keep so few clothes in the closet? Do you store clothes from different seasons? Seriously I would love to have a closet like yours that isn’t overcrowded and where I can actually move the clothes on the hangars because they aren’t stuffed/jammed on the closet bar. What’s your secret to not owning so many clothes?
YoungHouseLove says
I think from being a NYC gal with a tiny closet/studio/storage situation I just learned to be sort of a minimalist with that stuff. Those are all my clothes including my maternity ones (although I do have pjs, socks, underwear, and jeans in a dresser drawer). I learned in NY when I had a miniscule closet that around 9 tops and 9 bottoms could be mixed and matched to make almost 100 different outfit combos, so I try to get staples and mix them with fun jewelry or a blousy top or a blazer and big earrings – the more you mix things up, the more outfits you can have from fewer pieces.
xo
s
Gillian Milton says
Seriously. Amazing. You guys make anything look gorgeous. One question though – do you ever do anything with laminate? Most of the kitchen/bathroom cabinetry here in Australia is not timber but laminate. I simply wouldn’t know what to do with it.
YoungHouseLove says
That’s rough! We have laminate counters in our kitchen and we’ve seen bloggers cover them in concrete or even use a painting kit that Home Depot sells for that surface, so those are two ideas for ya!
xo
s
Sara says
This is so fantastic – and so close to your original Photoshop rendering! Way to go :)
Kerrie says
Looks beautiful, congrats. Much be such a relief to get it done, as well as a joy to use the space now. Can I ask about lighting? Is it dark now at the sink without the wall light?
YoungHouseLove says
Thankfully we have that overhead light (you can see it in the mirror) so it’s not too dark for us. Down the line we’d love to add a light over the mirror again (we’ll just raise the junction box we capped).
xo
s
Stephanie says
LOVE, LOVE, LOOOOOOOOVVVVVEEEE!!! Great Job!!!
June says
You two did an amazing job with this! You have given me so many ideas for our new house! Quick question: Did Sherry help with polyshades staining or are the fumes too strong for someone who is pregnant to be around? We need to stain our kitchen cabinets and bathroom vanities before we move in and I am debating on whether I should do it myself or just hire someone. Thank you so much! Can’t wait to see what you do in the kitchen! :)
YoungHouseLove says
The warning said it was pretty fumey so I stayed away, although I think with a respirator you would be ok (open windows and run fans too!). I’m just a nervous nellie. It didn’t have nearly as bad of an odor as the larger liquid stain though so I’d say it’s a lot friendlier than that!
xo
s
Karen says
C’mon, really. Where do you guys store the rest of your shoes? Nooo, that’s not it. Cuz I’d need a warehouse.
YoungHouseLove says
Haha, we have a shoe basket down by the door so our everyday shoes are in there (hence John just having two dress pairs up in the closet and me having a few more lesser worn pairs for special occasions, other seasons, etc in the closet).
xo
s
angel says
Oooh-la-la, so beautiful!
Love the title of this post too :)
Debby says
Love,love,love the update. That is seriously amazing. We started removing an annoying half wall between our kitchen and family room that we have tolerated for 25 years until we had an ah ha moment and decided why are we wasting 4 feet of space that could make our eat in area that much bigger. You two always inspire me.
Emily says
You both make magic happen with DIY! It looks amazing!
Anna says
The transformation is incredible! We are about to Polyshades (can I use that as a verb?) the heck out of our orangey-brown wood bathroom vanity in a beiged-out master bath, I can’t wait to see how it goes!
Marta says
Kudos my friends,
you are making a home out of a house in the most beautiful, amazing way, and so fast!! It might not seem like it to you, but my husband and I bought a house almost 3 years ago and I can tell you we are WAAAAY behind you two.
What I love the most is that you repurpose as much as you can, and what’s even better is that while doing so, you inspire tons of people to reuse instead of the -unfortunately- too common out with the old in with the new.
Chapeau monsieurs et madames ;)
Keep up the good work! (probably heard that one before)
YoungHouseLove says
Thanks so much Marta!
xo
s
Gabriella says
This looks fantastic. I am especially fond of your (unintentional) theme with the dark and light contrasts. I am slowly building motivation to stain all of our mahogany trim. I want to be thoughtful in allotting enough time that I can complete it all (my husband does not like half way projects! Who can blame him). I can’t wait to see the finished de-wall-papering and paint colors you choose.
Jennifer says
Hooray! This is the YHL I first fell in love with! Love the monochromatic color scheme, the use of pattern, the high contrast dark wood stain, the working with whatcha got and creating something that looks so awesomely put together and upscale. Great job guys! I think this house is the perfect balance between the styles of your first house and your second.
Sarah D says
That looks fantastic! You’d never know those shelves aren’t original.
Clover says
Sherry do you ever want to send your site to the previous owners of your houses to show them what you’ve done? Have you ever had them look on the site do you know? The before and after shots are so amazing, I always wonder what they’d think.
YoungHouseLove says
Aw thanks Clover! We have heard from the old owners of our first and second house just since they found our blog through press or a friend or something, so we hope that happens with the previous owners of this house as well! It was amazing to hear from the first family who lived in our first house in the 50s/60s! They had these awesome old photos they sent us!
xo
s
Julianne says
Wow, guys! Looks amazing! Total night & day transformation. Nice job :0)
amanda says
Weird question but where are your toothbrushes? Are they not in the picture for styling purposes or do you keep them in the drawer (that seems kind of yuck…)? Sorry for the strange question but I’m just wondering how come my bathroom counter never looks that uncluttered and pristine!
YoungHouseLove says
They’re electric so sometimes they’re in the drawer and sometimes they’re charging in the sink in the bathroom (this is an extra sink off of our bedroom, but there’s one in front of the toilet in the actual bathroom as well, which is the one with the outlet now, so they charge in there).
xo
s
Clover says
Haha Amanda I always think that too!
Michelle @ A Healthy Mrs says
Love it! You did a great job — you’d never know that the shelves weren’t always part of the vanity!
Kate says
Looks amazing! Love it!
Lisa Barton-Collins says
Wow, what an incredible difference. It looks fantastic, and I’m impressed that it was so budget friendly. You guys have been so busy, you must be exhausted!
xx
YoungHouseLove says
Thanks Lisa! We do kinda feel our heads spinning a little bit, but it’s nice to check things off before this baby comes!
xo
s
Sydnie F. says
We have this exact vanity situation in our master bath, and this will be PERFECT. You guys rocked this one! Thanks!
[email protected] says
I can’t say it often enough: You guys rule! This is mind blowing ;)
lori says
So this is a perfect example of what you guys have been talking about…Making a space more livable until you are ready to gut. It looks fantastic. I could live with that for a few years until i decided what i really wanted to do. It looks super cute!!
YoungHouseLove says
Thanks Lori!
xo
s
Shelley @ Green Eggs and Hamlet says
Wow, as always, it looks fantastic!
Have you all ever converted your false drawer fronts into a hinged drawer (apparently the correct term is “sink front tray”)? They don’t hold much but are handy for a few small items (toothpaste, chap stick, etc.). Not sure if it’s worth it for this transition period on your sink nook but maybe good to keep in mind for future? http://www.homedepot.com/b/Kitchen-Cabinets-Cabinet-Hardware-Cabinet-Organizers-Sink-Front-Trays/N-5yc1vZc3v8
YoungHouseLove says
That’s a good idea! I’ve seen that in a kitchen, but never thought about it for a bathroom. Makes sense though!
xo
s
Bren says
100+ years from now, someone will be “restoring” your “old” house. They will rip up whatever floor you eventually put down over this beautiful stenciled floor and decide to keep this “original” detail (which will survive because of some poly seal business you put down). Then they will post it on a flog (future blog, of course) and a whole bunch of people 100+ years older than you will copy them. You will be changing the future! ;)
xoxo, Bren
YoungHouseLove says
Hahaha!
xo
s
Peg says
Of course Sherry has more shoes…it just wouldn’t be natural if it was the other way ’round! Am amazed at the amount-or lack thereof-of clothes you two have. Obviously you only buy what you love! P.S. Maybe that should be your next “how-to” column.
Also, the vanity looks amazing!
Victoria says
Another stylish, beautifully executed, well thought out make over. I love it! It looks so high end. I’m crazy about the stenciled floor and how all the colors and textures mesh together. It is now a place you want to be in rather than ignore. You guys are astonishing.
YoungHouseLove says
Thanks so much Victoria!
-John
Becca says
Love the updates! Random question for Sherry, your suede “desert booties” in the corner…so cute! Mind sharing where you found them? :)
YoungHouseLove says
Those were from the J Crew Outlet a while back. They’re really comfy and great for the colder weather!
xo
s
Debbie says
Love the vanity. J&S, you are so talented. I would love to see some bright color in there. Paint the mirror orange, or green? To go with the bedroom? Anyway, I am sure you’ll find a way to get some more color in there.
Daisy says
Looks frikin’ awesome! I mean what a simple cost effective way to make an old, outdated vanity look stylish! Kudos!
Kate says
Looks great! Also, I actually used y’all as a verb today in a conversation with a realtor. In discussing a house that had clearly been remodeled and painted prior to going on the market I told her, “this place has totally been young house loved.” It made her spit out her coffee. :)
YoungHouseLove says
Haha! You’re so sweet Kate!
xo
s
Sam Rodier says
Is that “Morning Fog” (Sherwin Williams) is see on the bedroom walls? Me likey!
YoungHouseLove says
It’s Black Pepper by BM. So moody and cozy at night!
xo
s
Amanda L says
This may have been super cheap, but this is one the most amazing transformations you guys have done to date!! Inspired to try and do something with my own super crappy bathroom. :)
YoungHouseLove says
Thanks so much Amanda!
xo
s
Megan says
That looks awesome. I’m normally not a commenter, but I’ve been reading your blog for almost 3 years. I couldn’t resist telling you how great it looks. What a major difference.
YoungHouseLove says
Thanks so much Megan!
xo
s
Samantha says
John, those shelves look stunning! They look like they came with the vanity, such nice work! I love what you guys have done so far! It’s inspiring to know you do not need to break the bank to make some awesome adjustments in the meantime.
Samantha
Laurie says
John – you must have been a carpenter in a past life. From creations to transformations you always end up with a professional result. I’ve bought many tools after reading your posts. Keep them coming.
YoungHouseLove says
Thank you so much Laurie.
-John
audra says
oh me, oh my. I’m loving the vanity makeover. the shelves are fantastic and the stain is perfect. then again, I always love your choices. nice work!
Kim says
In Sherry’s defense… I have that many tennis shoes alone!! Go shopping Girl!!!
YoungHouseLove says
Haha!
xo
s
Sarah says
I’m wondering what kind of overhead lighting you have in your bedroom and closet.
YoungHouseLove says
There’s an overhead light in the closet, the sink nook (you can see it in the mirror of some of these shots) and the main bathroom but only table lamps in the bedroom (we’d love to add an overhead fixture in there).
xo
s
Jessica says
Looks so good! Did you paint the back and side wall where you built the shelves or put wood on sides to enclose it? It looks dark in there where the towels are. Wonderful transformation!
YoungHouseLove says
Both sides are wood so they’re stained, but the back wall is the same color as the walls in there (Revere Pewter), it’s just in shadow so it looks darker.
xo
s
Autumn Beach says
Love that Petersik magic!
Jenna C says
Hi Sherry, What kind of respirator do you wear while painting? Does it make painting completely safe? I am pregnant too and have a lot of projects I want to do.
YoungHouseLove says
I have one of those heavy duty gas mask looking ones from Home Depot, and I use it when things might have an odor or some VOCs but I still avoid products that warn they’re not safe for pregnant women or developing fetuses and I don’t like to wear the respirator too long (when I’m pregnant I tend to get out if breath faster than usual). Your best bet is to stick with no-VOC paints and primers and sealers if you can. Good luck!
xo
s
lesismore says
it’s all about the word play up in here.
vast improvement, for sure. i never used to be a “phase” girl, but you’ve inspired me to be one in the past six months or so. now i’m all over the place in our house too.
i’m doing things i never thought i’d do, all for the sake of loving what i’m living with NOW, though i know it’s not forever.
living with nasty carpet was one thing we did for a bit, and it was in our basement and on the stairs, but i HATED it. we just recently re-did our entire basement and got rid of the last of the nasty carpet from 1980 something with it’s ground-in dirt and dog stains and that was the BEST feeling.
just say no to old carpet.
YoungHouseLove says
That sounds like such a freeing feeling! Congrats on getting it gone!
xo
s
Mrs. A says
Wowzers! It’s amazing how the white trim makes the door opening look so much wider and the room look bigger. It must feel wonderful having the new view on that side of the room. :)